rear view mirror lexus LC500 2020 / LEXUS 2020 LC500,LC500H (OM11537U) User Guide
[x] Cancel search | Manufacturer: LEXUS, Model Year: 2020, Model line: LC500, Model: Lexus LC500 2020Pages: 436, PDF Size: 13.86 MB
Page 124 of 436
1243-3. Adjusting the seats
1Turn the engine switch
2 Check that the shift position is in P.
3 Adjust the driver’s seat, steering
wheel, outside rear view mirrors
and head-up display to the desired
positions.
4 While pressing the “SET” button, or
within 3 seconds after the “SET”
button is pressed, press button “1”,
“2” or “3” until the buzzer sounds.
If the selected button has already been
preset, the previously recorded position
WARNING
■Lever-operated “Front, Fold &
Return” seat
●Before operating the lever-operated
“Front, Fold & Return” seat, ensure that
any surrounding passengers or objects
will not contact the seat.
●Make sure the seat back is locked
securely before driving.
●Never operate the lever-operated
“Front, Fold & Retu rn” seat while the
vehicle is moving.
■Jam protection function
Do not use a hand, foot, or any other part
of your body to intentionally activate the
jam protection function.
Driving position memory
This feature automatically adjusts
the positions of the driver’s seat,
steering wheel, outside rear view
mirrors and head-up display (if
equipped) to suit your preferences.
Up to 3 different driving positions
can be recorded.
Each electronic key (including a
card key) can be registered to
recall your preferred driving posi-
tion.
Recording a driving position into
memory
Page 126 of 436
1263-3. Adjusting the seats
and then close the driver’s door.
If 2 or more keys are in the vehicle, the
driving position cannot be recorded
properly.
1Turn the engine switch
2 Check that the shift position is in P.
3 Recall the driving position that you
want to record.
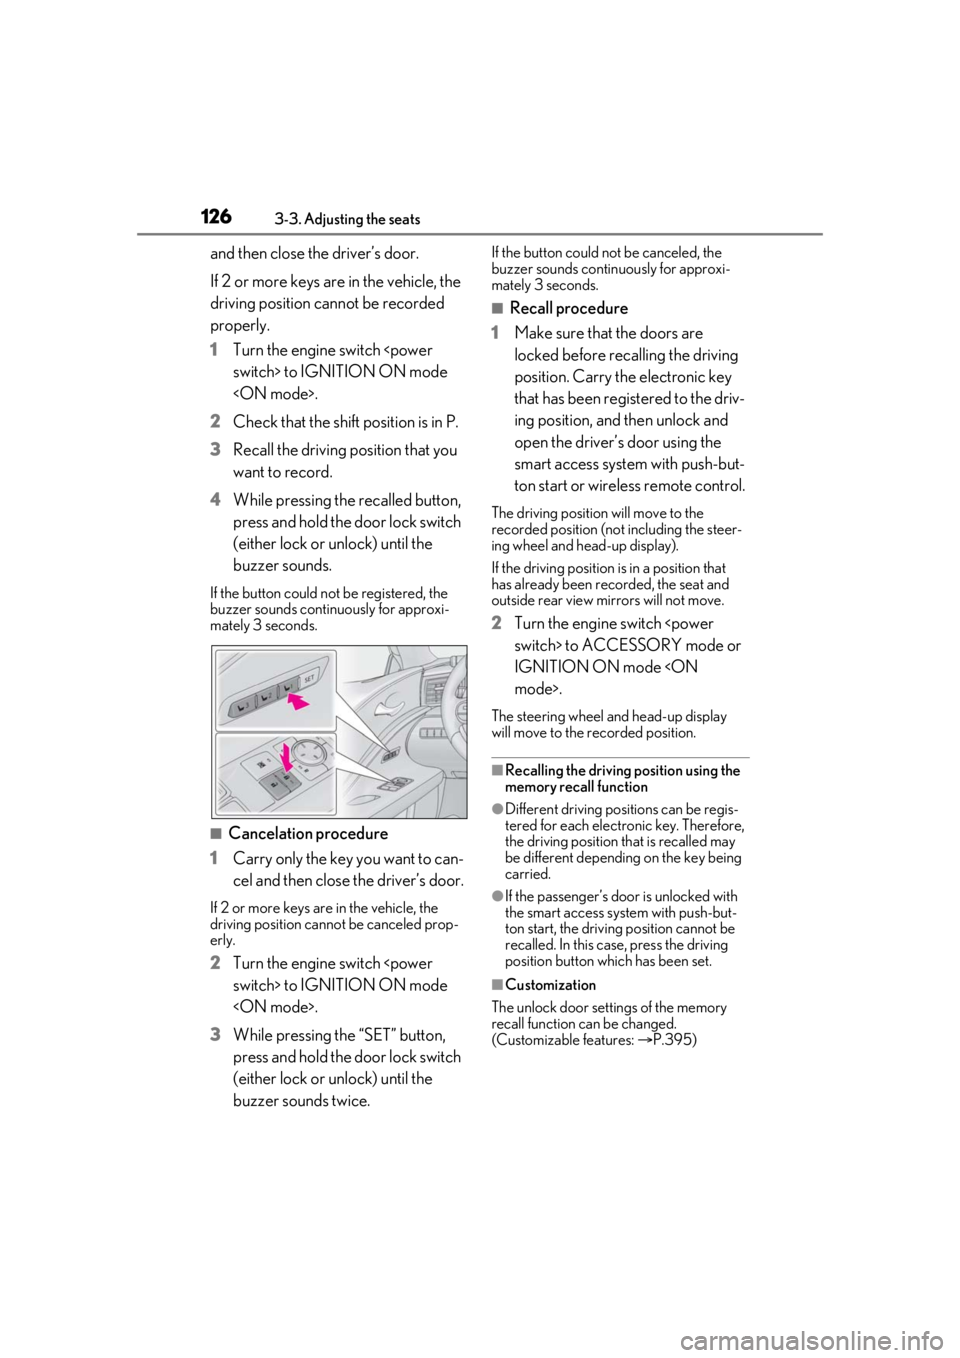
4 While pressing the recalled button,
press and hold the door lock switch
(either lock or unlock) until the
buzzer sounds.
If the button could not be registered, the
buzzer sounds continuously for approxi-
mately 3 seconds.
■Cancelation procedure
1 Carry only the key you want to can-
cel and then close the driver’s door.
If 2 or more keys are in the vehicle, the
driving position cannot be canceled prop-
erly.
2Turn the engine switch
3 While pressing the “SET” button,
press and hold the door lock switch
(either lock or unlock) until the
buzzer sounds twice.
If the button could not be canceled, the
buzzer sounds continuously for approxi-
mately 3 seconds.
■Recall procedure
1 Make sure that the doors are
locked before recalling the driving
position. Carry the electronic key
that has been registered to the driv-
ing position, and then unlock and
open the driver’s door using the
smart access system with push-but-
ton start or wireless remote control.
The driving position will move to the
recorded position (not including the steer-
ing wheel and head-up display).
If the driving position is in a position that
has already been recorded, the seat and
outside rear view mirrors will not move.
2Turn the engine switch
IGNITION ON mode
The steering wheel and head-up display
will move to the recorded position.
■Recalling the driving position using the
memory recall function
●Different driving positions can be regis-
tered for each electronic key. Therefore,
the driving position that is recalled may
be different depending on the key being
carried.
●If the passenger’s door is unlocked with
the smart access system with push-but-
ton start, the driving position cannot be
recalled. In this case, press the driving
position button which has been set.
■Customization
The unlock door sett ings of the memory
recall function can be changed.
(Customizable features: P.395)
Page 130 of 436
1303-4. Adjusting the steering wheel and mirrors
The height of the rear view mirror can
be adjusted to suit your driving pos-
ture.
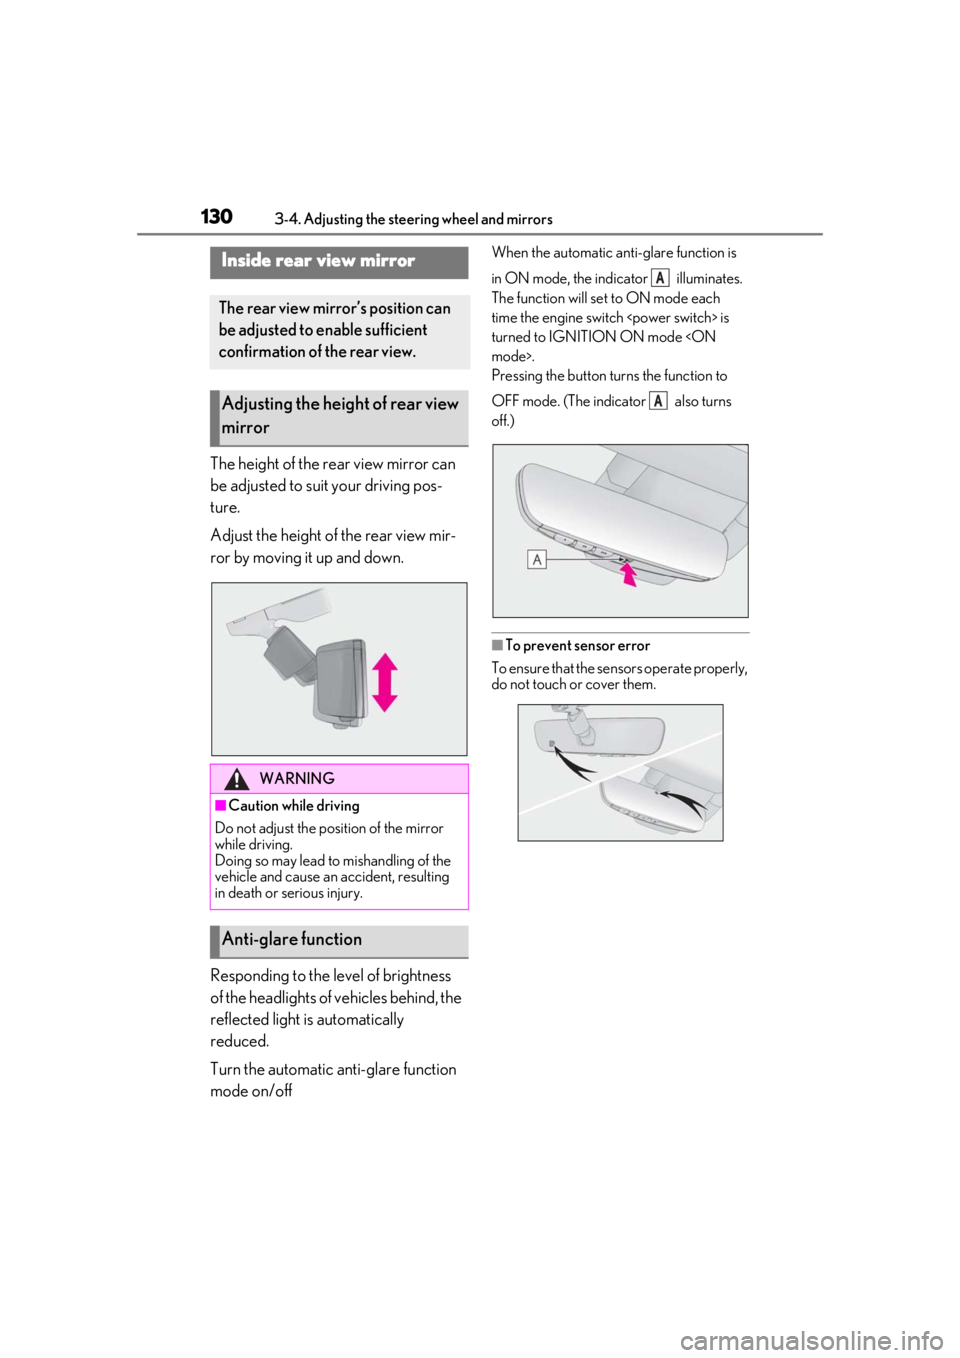
Adjust the height of the rear view mir-
ror by moving it up and down.
Responding to the level of brightness
of the headlights of vehicles behind, the
reflected light is automatically
reduced.
Turn the automatic anti-glare function
mode on/off
When the automatic anti-glare function is
in ON mode, the indicator illuminates.
The function will set to ON mode each
time the engine switch
turned to IGNITION ON mode
Pressing the button turns the function to
OFF mode. (The indicator also turns
off.)
■To prevent sensor error
To ensure that the sensors operate properly,
do not touch or cover them.
Inside rear view mirror
The rear view mirror’s position can
be adjusted to enable sufficient
confirmation of the rear view.
Adjusting the height of rear view
mirror
WARNING
■Caution while driving
Do not adjust the position of the mirror
while driving.
Doing so may lead to mishandling of the
vehicle and cause an accident, resulting
in death or serious injury.
Anti-glare function
A
A
Page 131 of 436
1313-4. Adjusting the steering wheel and mirrors
3
Before driving
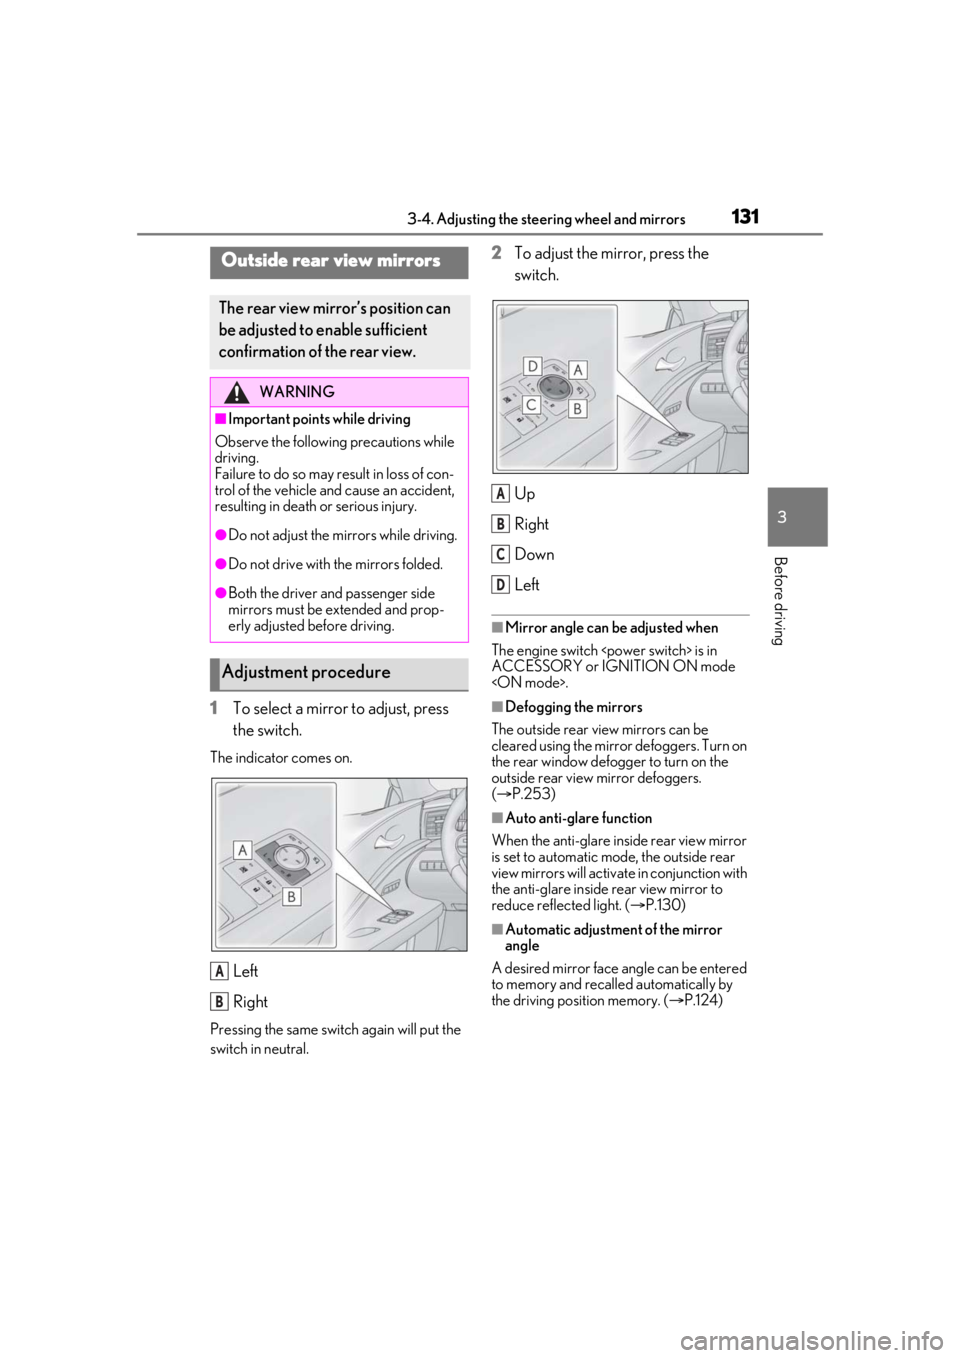
1To select a mirror to adjust, press
the switch.
The indicator comes on.
Left
Right
Pressing the same switch again will put the
switch in neutral.
2To adjust the mirror, press the
switch.
Up
Right
Down
Left
■Mirror angle can be adjusted when
The engine switch
ACCESSORY or IGNITION ON mode
■Defogging the mirrors
The outside rear view mirrors can be
cleared using the mirror defoggers. Turn on
the rear window defogger to turn on the
outside rear view mirror defoggers.
( P.253)
■Auto anti-glare function
When the anti-glare inside rear view mirror
is set to automatic mode, the outside rear
view mirrors will activate in conjunction with
the anti-glare inside rear view mirror to
reduce reflec ted light. (P.130)
■Automatic adjustment of the mirror
angle
A desired mirror face angle can be entered
to memory and recalled automatically by
the driving position memory. ( P.124)
Outside rear view mirrors
The rear view mirror’s position can
be adjusted to enable sufficient
confirmation of the rear view.
WARNING
■Important points while driving
Observe the following precautions while
driving.
Failure to do so may result in loss of con-
trol of the vehicle and cause an accident,
resulting in death or serious injury.
●Do not adjust the mirrors while driving.
●Do not drive with the mirrors folded.
●Both the driver and passenger side
mirrors must be extended and prop-
erly adjusted before driving.
Adjustment procedure
A
B
A
B
C
D
Page 132 of 436
1323-4. Adjusting the steering wheel and mirrors
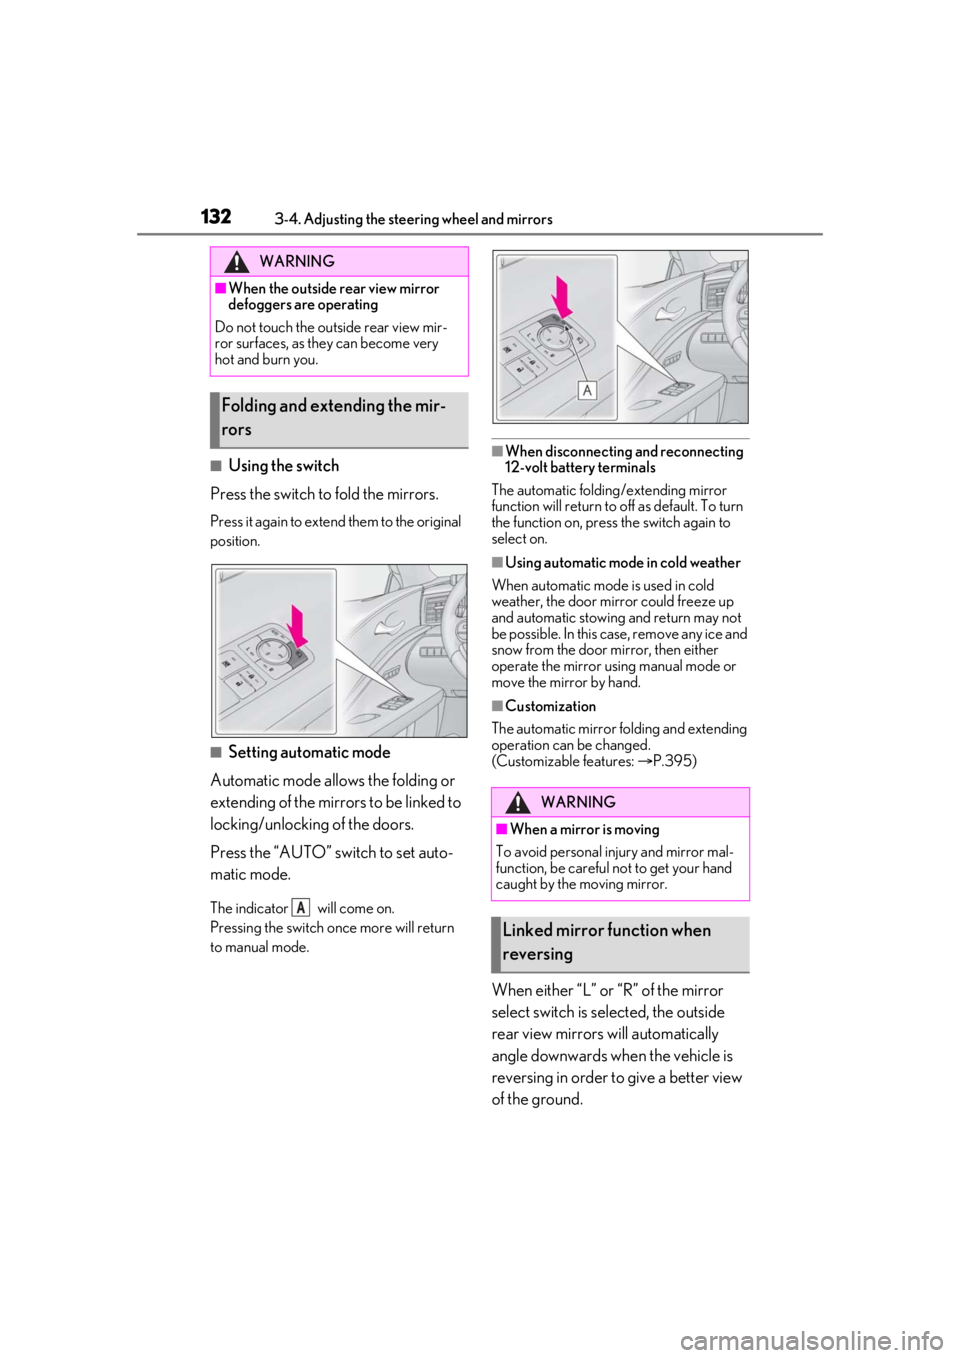
■Using the switch
Press the switch to fold the mirrors.
Press it again to extend them to the original
position.
■Setting automatic mode
Automatic mode allows the folding or
extending of the mirrors to be linked to
locking/unlockin g of the doors.
Press the “AUTO” switch to set auto-
matic mode.
The indicator will come on.
Pressing the switch on ce more will return
to manual mode.
■When disconnecting and reconnecting
12-volt battery terminals
The automatic folding/extending mirror
function will return to off as default. To turn
the function on, press the switch again to
select on.
■Using automatic mode in cold weather
When automatic mode is used in cold
weather, the door mirror could freeze up
and automatic stowing and return may not
be possible. In this case, remove any ice and
snow from the door mirror, then either
operate the mirror using manual mode or
move the mirror by hand.
■Customization
The automatic mirror folding and extending
operation can be changed.
(Customizable features: P.395)
When either “L” or “R” of the mirror
select switch is selected, the outside
rear view mirrors will automatically
angle downwards when the vehicle is
reversing in order to give a better view
of the ground.
WARNING
■When the outside rear view mirror
defoggers are operating
Do not touch the outside rear view mir-
ror surfaces, as they can become very
hot and burn you.
Folding and extending the mir-
rors
A
WARNING
■When a mirror is moving
To avoid personal injury and mirror mal-
function, be careful not to get your hand
caught by the moving mirror.
Linked mirror function when
reversing
Page 140 of 436
1404-1. Before driving
WARNING
■When driving the vehicle
●Do not drive if you are unfamiliar with
the location of the brake and accelera-
tor pedals to avoid depressing the
wrong pedal.
• Accidentally depressing the accelera- tor pedal instead of the brake pedal
will result in sudden acceleration that
may lead to an accident.
• When backing up, you may twist your body around, leading to a difficulty in
operating the pedals. Make sure to
operate the pedals properly.
• Make sure to keep a correct driving posture even when moving the vehicle
only slightly. This allows you to depress
the brake and accelerator pedals
properly.
• Depress the brake pedal using your right foot. Depressing the brake pedal
using your left foot may delay
response in an emergency, resulting in
an accident.
●LC500h: The driver should pay extra
attention to pedestrians when the vehi-
cle is powered only by the electric
motor (traction motor). As there is no
engine noise, the pedestrians may mis-
judge the vehicle’s movement. Even
though the vehicle is equipped with the
vehicle proximity notification system,
drive with care as pedestrians in the
vicinity may still not notice the vehicle if
the surrounding area is noisy.
●Do not drive the vehicle over or stop
the vehicle near flammable materials.
The exhaust system and exhaust gases
can be extremely hot. These hot parts
may cause a fire if there is any flamma-
ble material nearby.
●During normal driving, do not turn off
the engine
the engine
driving will not cause loss of steering
or braking control, however, power
assist to the steering will be lost. This
will make it more difficult to steer
smoothly, so you should pull over and
stop the vehicle as soon as it is safe to
do so.
In the event of an emergency, such as if
it becomes impossible to stop the vehi-
cle in the normal way: P.330
●Use engine braking (downshift) to
maintain a safe speed when driving
down a steep hill.
Using the brakes continuously may
cause the brakes to overheat and lose
effectiveness. ( P.157, 163)
●Do not adjust the positions of the
steering wheel, the seat, or the inside
or outside rear view mirrors while driv-
ing.
Doing so may result in a loss of vehicle
control.
●Always check that all passengers’
arms, heads or other parts of their
body are not outside the vehicle.
●Do not drive in excess of the speed
limit. Even if the legal speed limit per-
mits it, do not drive over 85 mph (140
km/h) unless your vehicle has high-
speed capability tires. Driving over 85
mph (140 km/h) may re sult in tire fail-
ure, loss of control and possible injury.
Be sure to consult a tire dealer to
determine whether the tires on your
vehicle are high-speed capability tires
or not before driving at such speeds.
■When driving on slippery road sur-
faces
●Sudden braking, acceleration and
steering may cause tire slippage and
reduce your ability to control the vehi-
cle.
Page 191 of 436
1914-5. Using the driving support systems
4
Driving
WARNING
●If the part of the windshield in front of
the camera sensor is fogged up or
covered with condensation or ice, use
the windshield defogger to remove the
fog, condensation or ice. (P.253)
●If water droplets cannot be properly
removed from the area of the wind-
shield in front of the camera sensor by
the windshield wipers, replace the
wiper insert or wiper blade.
If the wiper inserts or wiper blades
need to be replaced, contact your
Lexus dealer.
●Do not attach window tinting to the
windshield.
●Replace the windshield if it is damaged
or cracked.
If the windshield needs to be replaced,
contact your Lexus dealer.
●Do not get the camera sensor wet.
●Do not allow bright lights to shine into
the camera sensor.
●Do not dirty or damage the camera
sensor.
When cleaning the inside of the wind-
shield, do not allow glass cleaner to
contact the lens. Also, do not touch the
lens.
If the lens is dirty or damaged, contact
your Lexus dealer.
●Do not subject the camera sensor to a
strong impact.
●Do not change the installation position
or direction of the camera sensor or
remove it.
●Do not disassemble the camera sen-
sor.
●Do not modify any components of the
vehicle around the camera sensor
(inside rear view mirror, etc.) or ceiling.
●Do not attach any accessories that
may obstruct the camera sensor to the
hood, front grille or front bumper.
Contact your Lexus dealer for details.
●If a surfboard or other long object is to
be mounted on the roof, make sure
that it will not obstruct the camera sen-
sor.
●Do not modify the headlights or other
lights.
Page 198 of 436

1984-5. Using the driving support systems
• The vehicle is wobbling.
• The vehicle is being driven at extremely high speeds.
• When driving on a hill
• If the radar sensor or camera sensor is misaligned
●In some situations such as the following,
sufficient braking force may not be
obtained, preventing the system from
performing properly:
• If the braking functions cannot operate to
their full extent, such as when the brake
parts are extremely cold, extremely hot,
or wet
• If the vehicle is not properly maintained (brakes or tires are excessively worn,
improper tire inflation pressure, etc.)
• When the vehicle is being driven on a gravel road or other slippery surface
●Some pedestrians such as the following
may not be detected by the radar sensor
and camera sensor, preventing the sys-
tem from operating properly:
• Pedestrians shorter than approximately 3.2 ft. (1 m) or tall er than approximately
6.5 ft. (2 m)
• Pedestrians wearing oversized clothing (a rain coat, long skirt, etc.), making their
silhouette obscure
• Pedestrians who are carrying large bag- gage, holding an umbrella, etc., hiding
part of their body
• Pedestrians who are bending forward or squatting
• Pedestrians who are pushing a stroller, wheelchair, bicycle or other vehicle
• Groups of pedestrians which are close
together
• Pedestrians who are wearing white and look extremely bright
• Pedestrians in the dark, such as at night or while in a tunnel
• Pedestrians whose clothing appears to
be nearly the same co lor or brightness as
their surroundings
• Pedestrians near walls , fences, guardrails,
or large objects
• Pedestrians who are on a metal object (manhole cover, steel plate, etc.) on the
road
• Pedestrians who are walking fast
• Pedestrians who are changing speed abruptly • Pedestrians running out from behind a
vehicle or a large object
• Pedestrians who are extremely close to
the side of the vehicle (outside rear view
mirror, etc.)
■If the PCS warning light flashes or illumi-
nates and a warning message is dis-
played on the multi-information display
The pre-collision system may be temporar-
ily unavailable or there may be a malfunc-
tion in the system.
●In the following situations, the warning
light will turn off, the message will disap-
pear and the system will become opera-
tional when normal operating conditions
return:
• When the radar sensor or camera sensor
or the area around either sensor is hot,
such as in the sun
• When the radar sensor or camera sensor
or the area around either sensor is cold,
such as in an extremely cold environment
• When a front sensor is dirty or covered
with snow, etc.
• When the part of the windshield in front of the camera sensor is fogged up or cov-
ered with condensation or ice (Defog-
ging the windshield: P.253)
• If the camera sensor is obstructed, such
as when the hood is open or a sticker is
attached to the windshield near the cam-
era sensor
●If the PCS warning light continues to flash
or remains illuminated or the warning
message does not disappear even
though the vehicle has returned to nor-
mal, the system may be malfunctioning.
Have the vehicle inspected by your Lexus
dealer immediately.
■If VSC is disabled
●If VSC is disabled ( P.236), the pre-col-
lision brake assist and pre-collision brak-
ing functions are also disabled.
●The PCS warning light will turn on and
“VSC Turned Off Pre-Collision Brake
System Unavailable” will be displayed on
the multi-information display.
Page 223 of 436
2234-5. Using the driving support systems
4
Driving
*:If equipped
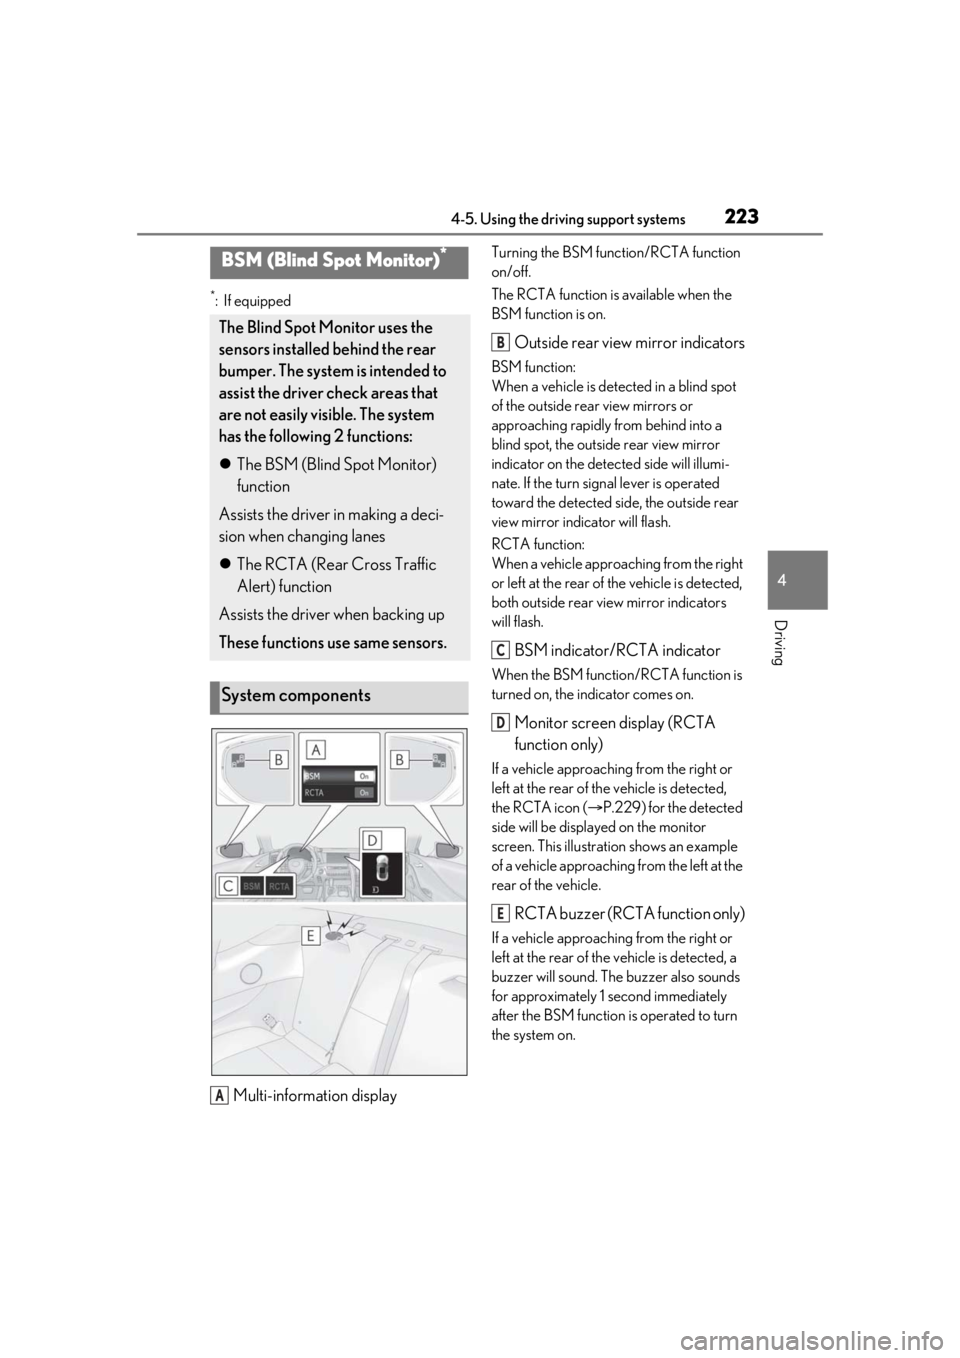
Multi-information display
Turning the BSM function/RCTA function
on/off.
The RCTA function is available when the
BSM function is on.
Outside rear view mirror indicators
BSM function:
When a vehicle is detected in a blind spot
of the outside rear view mirrors or
approaching rapidly from behind into a
blind spot, the outside rear view mirror
indicator on the detected side will illumi-
nate. If the turn signal lever is operated
toward the detected side, the outside rear
view mirror indicator will flash.
RCTA function:
When a vehicle approaching from the right
or left at the rear of the vehicle is detected,
both outside rear view mirror indicators
will flash.
BSM indicator/RCTA indicator
When the BSM function/RCTA function is
turned on, the indicator comes on.
Monitor screen display (RCTA
function only)
If a vehicle approaching from the right or
left at the rear of th e vehicle is detected,
the RCTA icon ( P.229) for the detected
side will be displayed on the monitor
screen. This illustration shows an example
of a vehicle approaching from the left at the
rear of the vehicle.
RCTA buzzer (RCTA function only)
If a vehicle approaching from the right or
left at the rear of th e vehicle is detected, a
buzzer will sound. The buzzer also sounds
for approximately 1 second immediately
after the BSM function is operated to turn
the system on.
BSM (Blind Spot Monitor)*
The Blind Spot Monitor uses the
sensors installed behind the rear
bumper. The system is intended to
assist the driver check areas that
are not easily vi sible. The system
has the following 2 functions:
The BSM (Blind Spot Monitor)
function
Assists the driver in making a deci-
sion when changing lanes
The RCTA (Rear Cross Traffic
Alert) function
Assists the driver when backing up
These functions use same sensors.
System components
A
B
C
D
E
Page 224 of 436
2244-5. Using the driving support systems
1Press or of the meter con-
trol switches, select .
2 Press or of the meter con-
trol switches, select “BSM”, and
then press “OK”.
3 Press or of the meter con-
trol switches, select “BSM” or
“RCTA”, and press “OK”.
■Outside rear view mirror indicator visi-
bility
In strong sunlight, the outside rear view mir-
ror indicator may be difficult to see.
■Hearing the RCTA buzzer
The RCTA buzzer may be difficult to hear over loud noises, such as if the audio system
volume is high.
■When “Blind Spot Monitor Unavailable”
is shown on the multi-information dis-
play
Water, snow, mud, etc., may be built up in
the vicinity of the sensor area of bumper.
( P.225) Removing the water, snow, mud,
etc., from the vicinity of the sensor area
bumper should return it to normal.
Also, the sensor may not function normally
when used in extremely hot or cold weather.
■When “Blind Spot Monitor System Mal-
function” is shown on the multi-informa-
tion display
There may be a sensor malfunction or volt-
age abnormality. Have the vehicle
inspected at your Lexus dealer.
■Customization
Some functions can be customized. (Cus-
tomizable features: P.395)
■Certification for the Blind Spot Monitor
For vehicles sold in the U.S.A., Hawaii, Guam and Puerto Rico
Turning the BSM function/RCTA
function on/off