ECU lexus LC500 2020 / LEXUS 2020 LC500,LC500H (OM11537U) Owner's Guide
[x] Cancel search | Manufacturer: LEXUS, Model Year: 2020, Model line: LC500, Model: Lexus LC500 2020Pages: 436, PDF Size: 13.86 MB
Page 48 of 436
481-2. Child safety
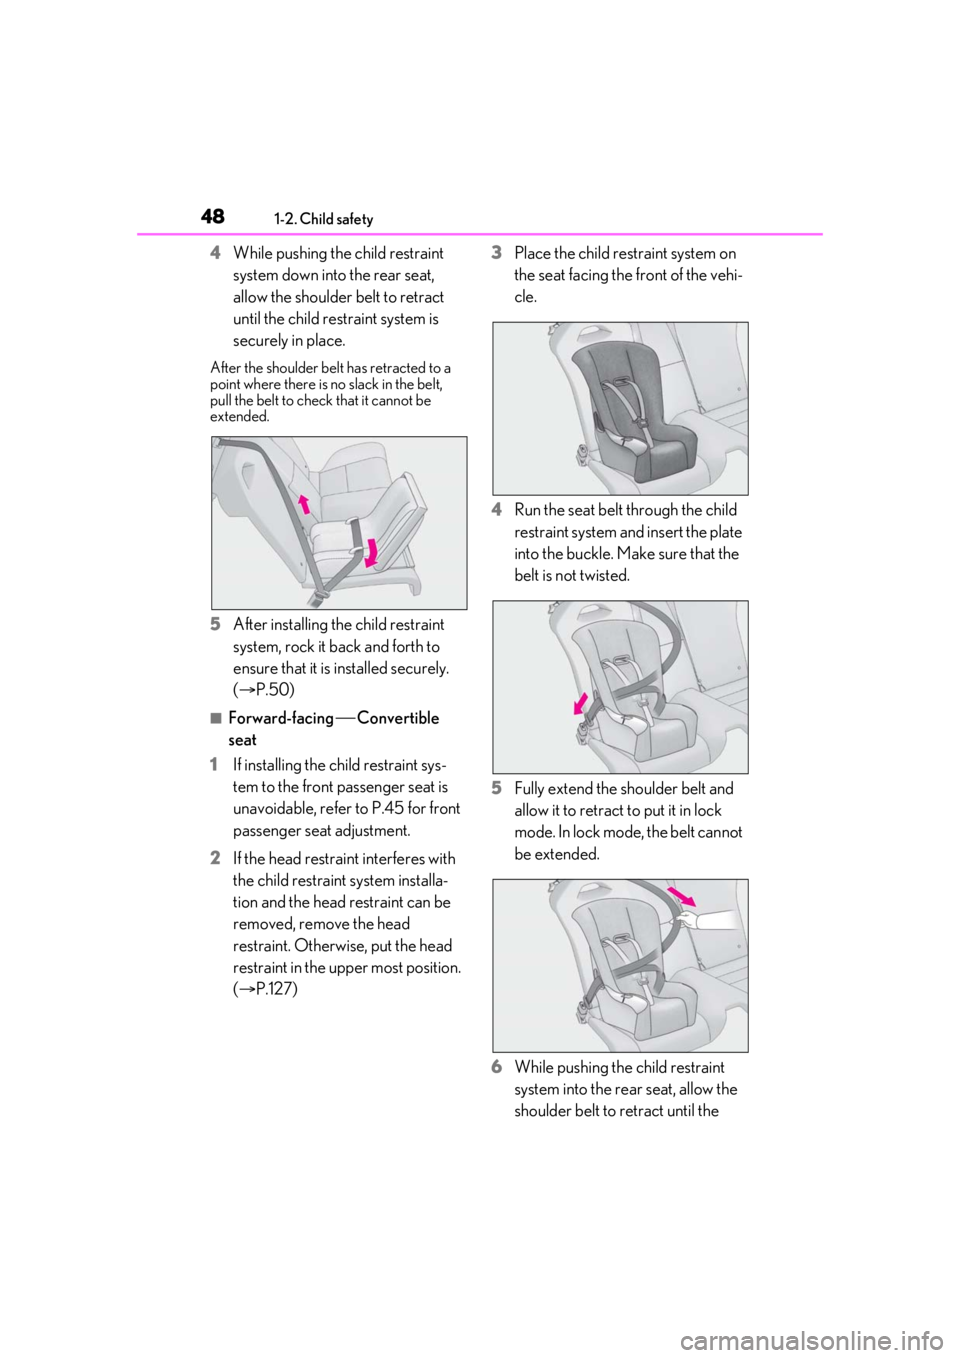
4While pushing the child restraint
system down into the rear seat,
allow the shoulder belt to retract
until the child restraint system is
securely in place.
After the shoulder belt has retracted to a
point where there is no slack in the belt,
pull the belt to check that it cannot be
extended.
5After installing the child restraint
system, rock it back and forth to
ensure that it is installed securely.
(P.50)
■Forward-facing Convertible
seat
1 If installing the child restraint sys-
tem to the front passenger seat is
unavoidable, refer to P.45 for front
passenger seat adjustment.
2 If the head restraint interferes with
the child restraint system installa-
tion and the head restraint can be
removed, remove the head
restraint. Otherwise, put the head
restraint in the upper most position.
(P.127) 3
Place the child restraint system on
the seat facing the front of the vehi-
cle.
4 Run the seat belt through the child
restraint system and insert the plate
into the buckle. Make sure that the
belt is not twisted.
5 Fully extend the shoulder belt and
allow it to retract to put it in lock
mode. In lock mode, the belt cannot
be extended.
6 While pushing the child restraint
system into the rear seat, allow the
shoulder belt to retract until the
Page 49 of 436
491-2. Child safety
1
For safety and security
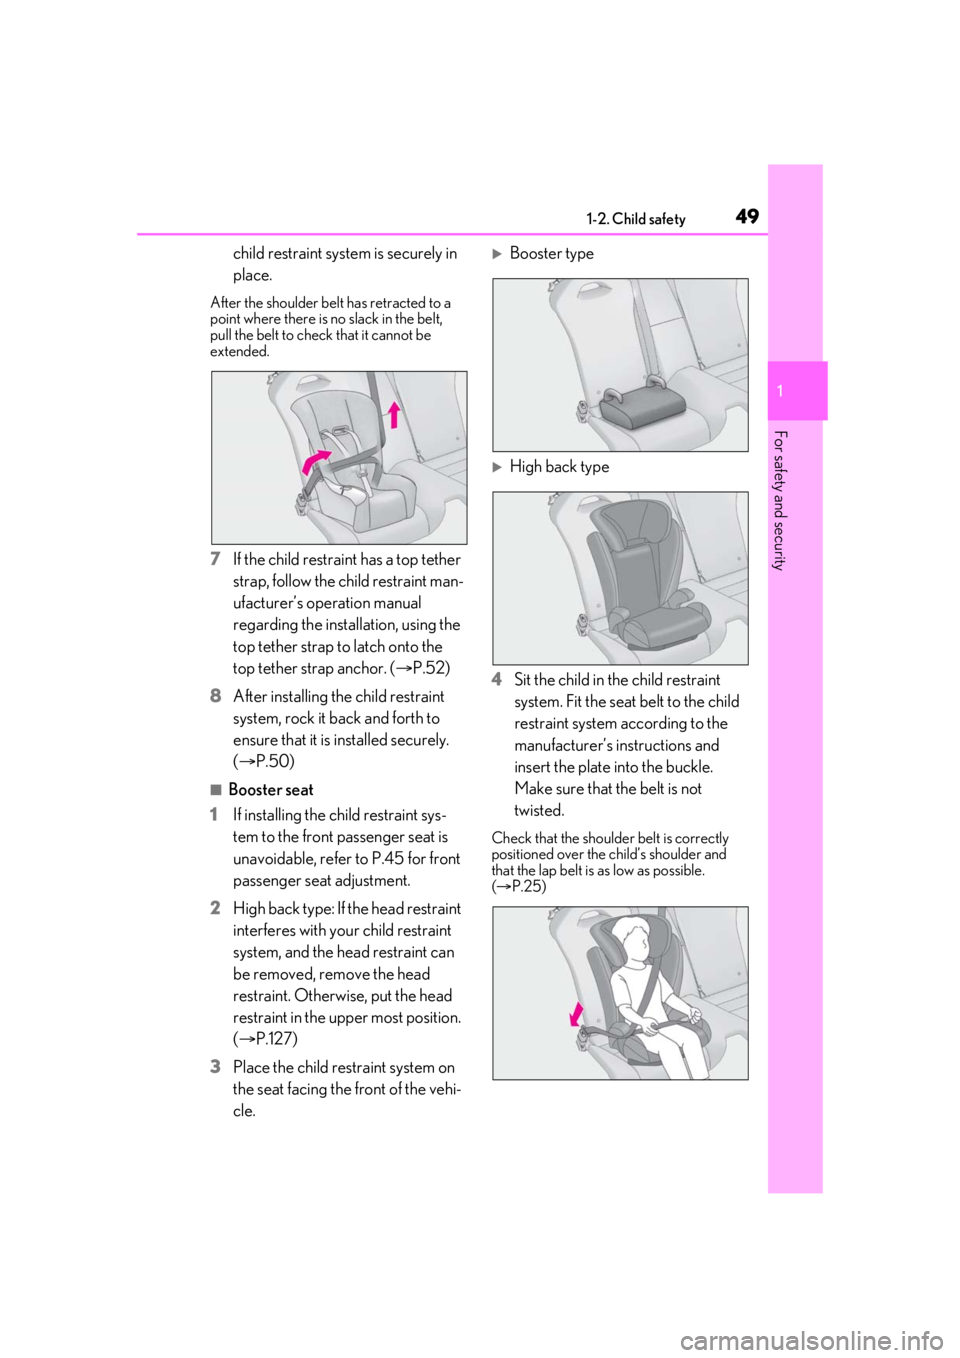
child restraint system is securely in
place.
After the shoulder belt has retracted to a
point where there is no slack in the belt,
pull the belt to check that it cannot be
extended.
7If the child restraint has a top tether
strap, follow the child restraint man-
ufacturer’s operation manual
regarding the installation, using the
top tether strap to latch onto the
top tether strap anchor. ( P.52)
8 After installing the child restraint
system, rock it back and forth to
ensure that it is installed securely.
(P.50)
■Booster seat
1 If installing the child restraint sys-
tem to the front passenger seat is
unavoidable, refer to P.45 for front
passenger seat adjustment.
2 High back type: If the head restraint
interferes with your child restraint
system, and the head restraint can
be removed, remove the head
restraint. Otherwise, put the head
restraint in the upper most position.
(P.127)
3 Place the child restraint system on
the seat facing the front of the vehi-
cle.
Booster type
High back type
4 Sit the child in the child restraint
system. Fit the seat belt to the child
restraint system according to the
manufacturer’s in structions and
insert the plate into the buckle.
Make sure that the belt is not
twisted.
Check that the shoulder belt is correctly
positioned over the child’s shoulder and
that the lap belt is as low as possible.
( P.25)
Page 50 of 436
501-2. Child safety
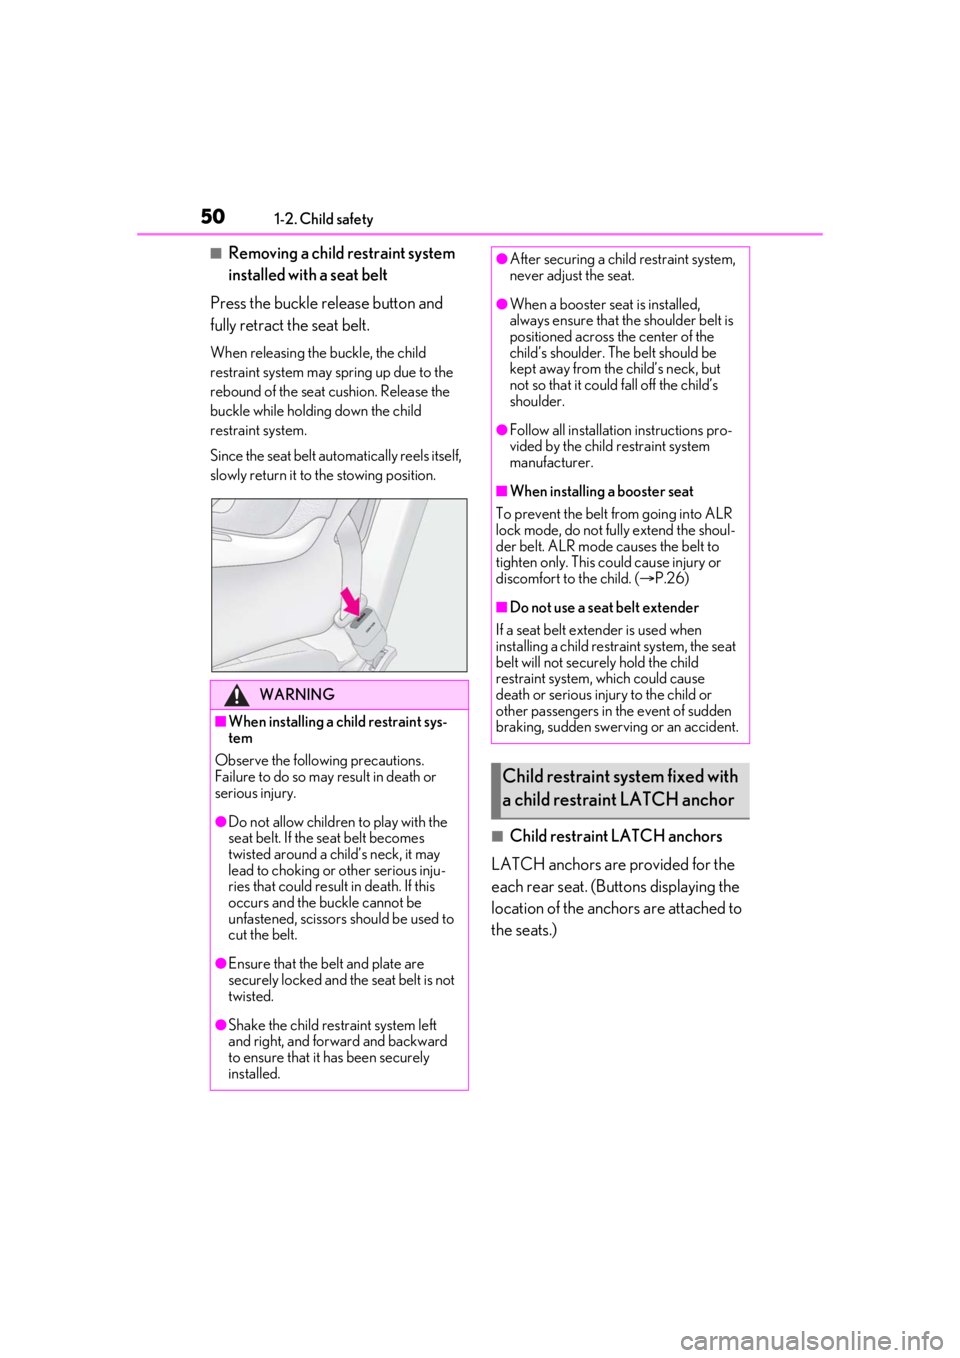
■Removing a child restraint system
installed with a seat belt
Press the buckle release button and
fully retract the seat belt.
When releasing the buckle, the child
restraint system may spring up due to the
rebound of the seat cushion. Release the
buckle while holding down the child
restraint system.
Since the seat belt automatically reels itself,
slowly return it to the stowing position.
■Child restraint LATCH anchors
LATCH anchors are provided for the
each rear seat. (Buttons displaying the
location of the anchors are attached to
the seats.)
WARNING
■When installing a child restraint sys-
tem
Observe the following precautions.
Failure to do so may result in death or
serious injury.
●Do not allow children to play with the
seat belt. If the seat belt becomes
twisted around a child’s neck, it may
lead to choking or other serious inju-
ries that could result in death. If this
occurs and the buckle cannot be
unfastened, scissors should be used to
cut the belt.
●Ensure that the belt and plate are
securely locked and the seat belt is not
twisted.
●Shake the child restraint system left
and right, and forward and backward
to ensure that it has been securely
installed.
●After securing a child restraint system,
never adjust the seat.
●When a booster seat is installed,
always ensure that th e shoulder belt is
positioned across the center of the
child’s shoulder. The belt should be
kept away from the child’s neck, but
not so that it could fall off the child’s
shoulder.
●Follow all installation instructions pro-
vided by the child restraint system
manufacturer.
■When installing a booster seat
To prevent the belt from going into ALR
lock mode, do not fully extend the shoul-
der belt. ALR mode causes the belt to
tighten only. This could cause injury or
discomfort to the child. ( P.26)
■Do not use a seat belt extender
If a seat belt extender is used when
installing a child restra int system, the seat
belt will not securely hold the child
restraint system, which could cause
death or serious injury to the child or
other passengers in the event of sudden
braking, sudden swerving or an accident.
Child restraint system fixed with
a child restraint LATCH anchor
Page 51 of 436
511-2. Child safety
1
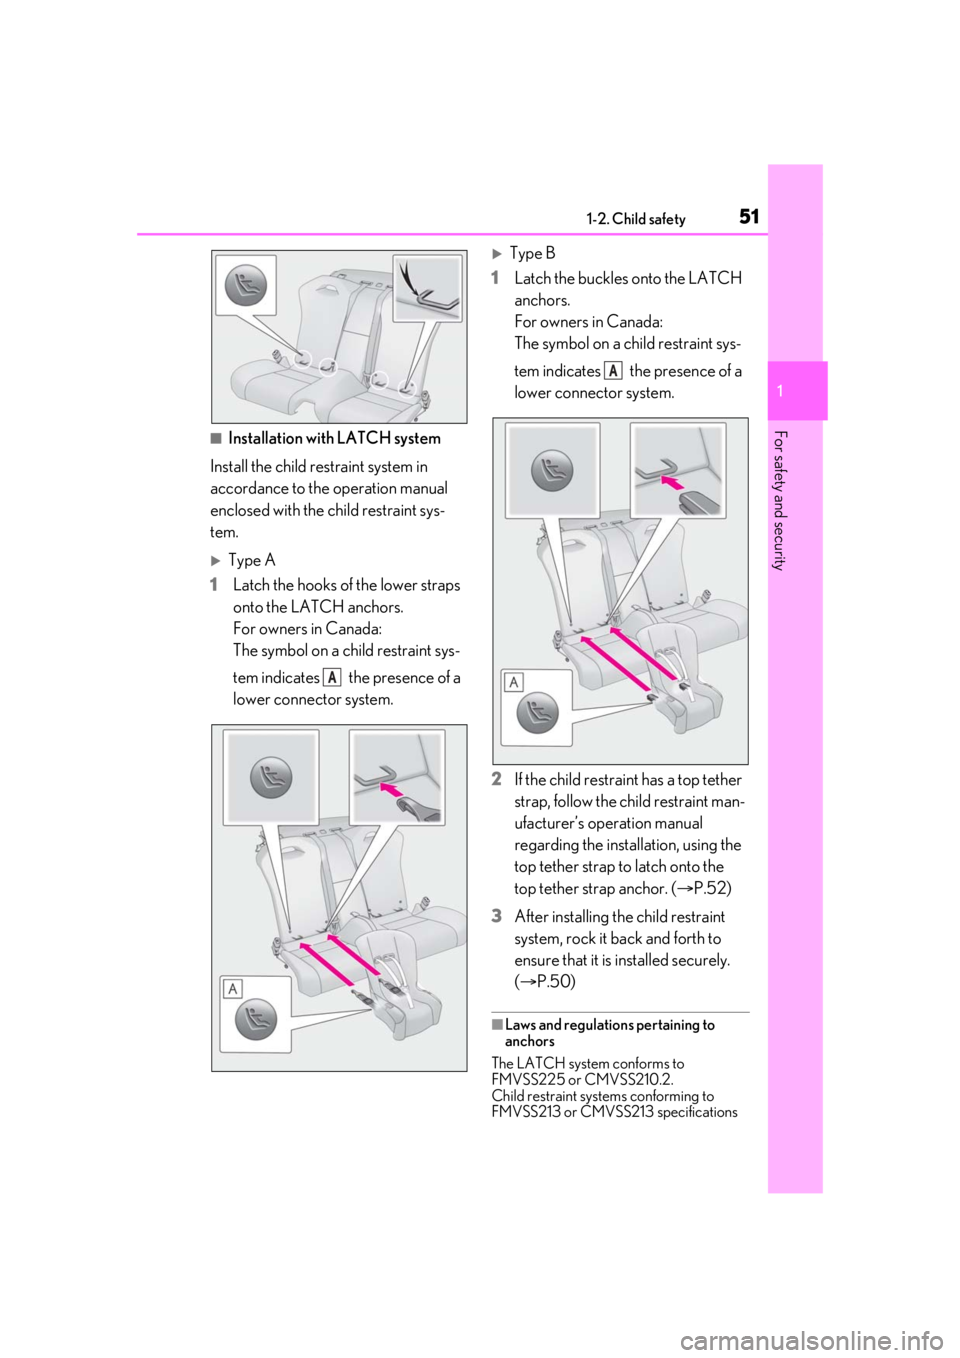
For safety and security■Installation with LATCH system
Install the child restraint system in
accordance to the operation manual
enclosed with the child restraint sys-
tem.
Type A
1 Latch the hooks of the lower straps
onto the LATCH anchors.
For owners in Canada:
The symbol on a child restraint sys-
tem indicates the presence of a
lower connector system.
Type B
1 Latch the buckles onto the LATCH
anchors.
For owners in Canada:
The symbol on a child restraint sys-
tem indicates the presence of a
lower connector system.
2 If the child restraint has a top tether
strap, follow the child restraint man-
ufacturer’s operation manual
regarding the installation, using the
top tether strap to latch onto the
top tether strap anchor. ( P.52)
3 After installing the child restraint
system, rock it back and forth to
ensure that it is installed securely.
(P.50)
■Laws and regulations pertaining to
anchors
The LATCH system conforms to
FMVSS225 or CMVSS210.2.
Child restraint systems conforming to
FMVSS213 or CMVSS213 specifications
A
A
Page 52 of 436
521-2. Child safety
can be used.
This vehicle is designed to conform to SAE
J1819.
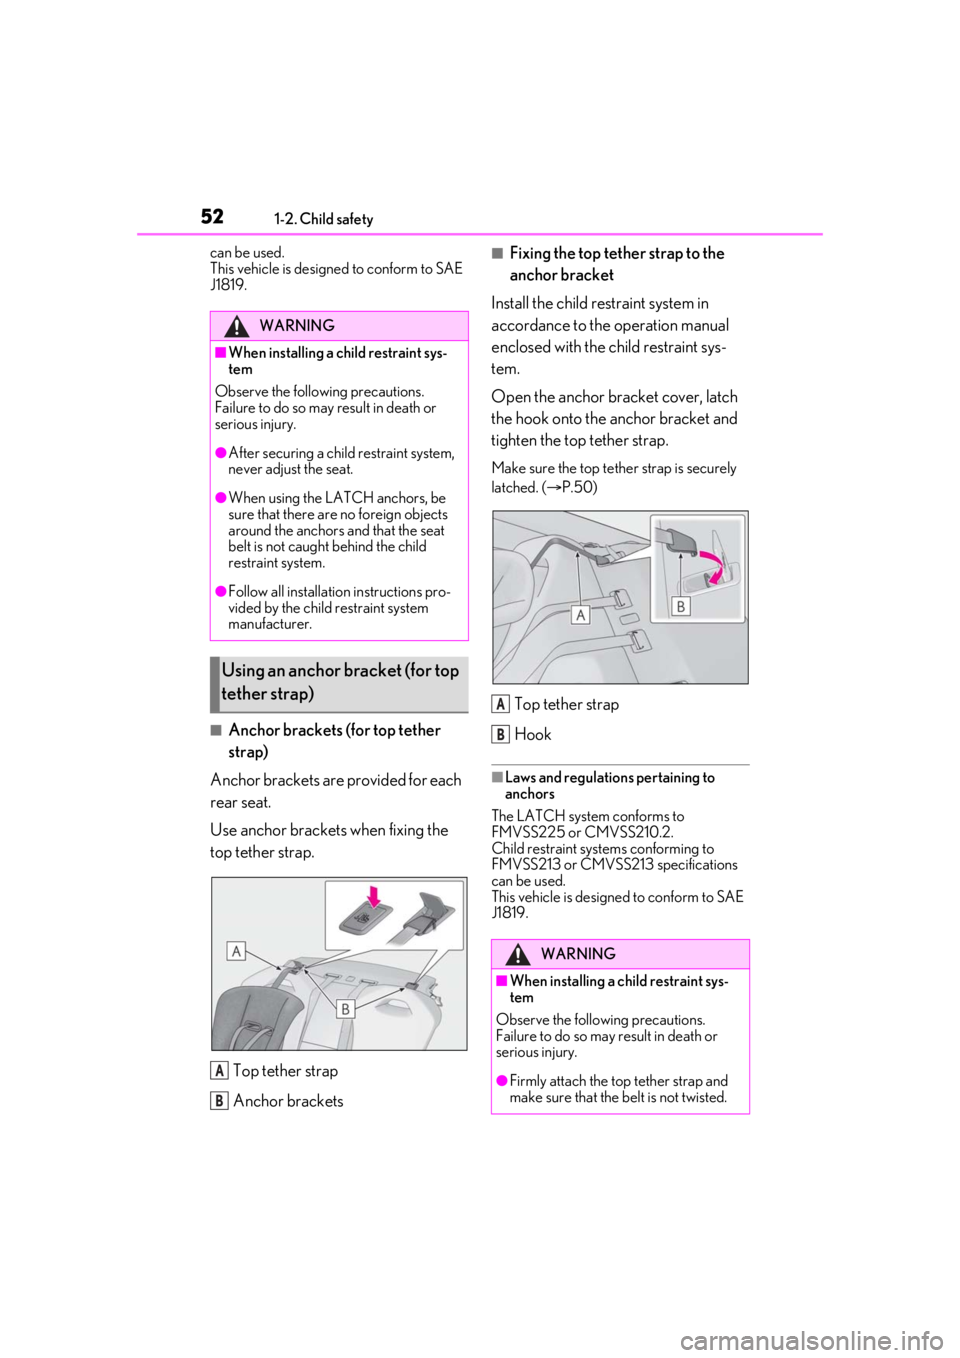
■Anchor brackets (for top tether
strap)
Anchor brackets are provided for each
rear seat.
Use anchor brackets when fixing the
top tether strap.
Top tether strap
Anchor brackets
■Fixing the top tether strap to the
anchor bracket
Install the child restraint system in
accordance to the operation manual
enclosed with the child restraint sys-
tem.
Open the anchor bracket cover, latch
the hook onto the anchor bracket and
tighten the top tether strap.
Make sure the top tether strap is securely
latched. ( P.50)
Top tether strap
Hook
■Laws and regulations pertaining to
anchors
The LATCH system conforms to
FMVSS225 or CMVSS210.2.
Child restraint systems conforming to
FMVSS213 or CMVSS213 specifications
can be used.
This vehicle is designed to conform to SAE
J1819.
WARNING
■When installing a child restraint sys-
tem
Observe the following precautions.
Failure to do so may result in death or
serious injury.
●After securing a child restraint system,
never adjust the seat.
●When using the LATCH anchors, be
sure that there are no foreign objects
around the anchors and that the seat
belt is not caught behind the child
restraint system.
●Follow all installation instructions pro-
vided by the child restraint system
manufacturer.
Using an anchor bracket (for top
tether strap)
A
B
WARNING
■When installing a child restraint sys-
tem
Observe the following precautions.
Failure to do so may result in death or
serious injury.
●Firmly attach the top tether strap and
make sure that the belt is not twisted.
A
B
Page 53 of 436
531-2. Child safety
1
For safety and security
WARNING
●Do not attach the top tether strap to
anything other than the anchor
bracket.
●After securing a child restraint system,
never adjust the seat.
●Follow all installation instructions pro-
vided by the child restraint system
manufacturer.
NOTICE
■Anchor brackets (for top tether
strap)
When not in use, make certain to close
the lid. If it remains open, the lid may be
damaged.
Page 54 of 436
541-3. Lexus Enform
1-3.Lexus Enform
*:If equipped
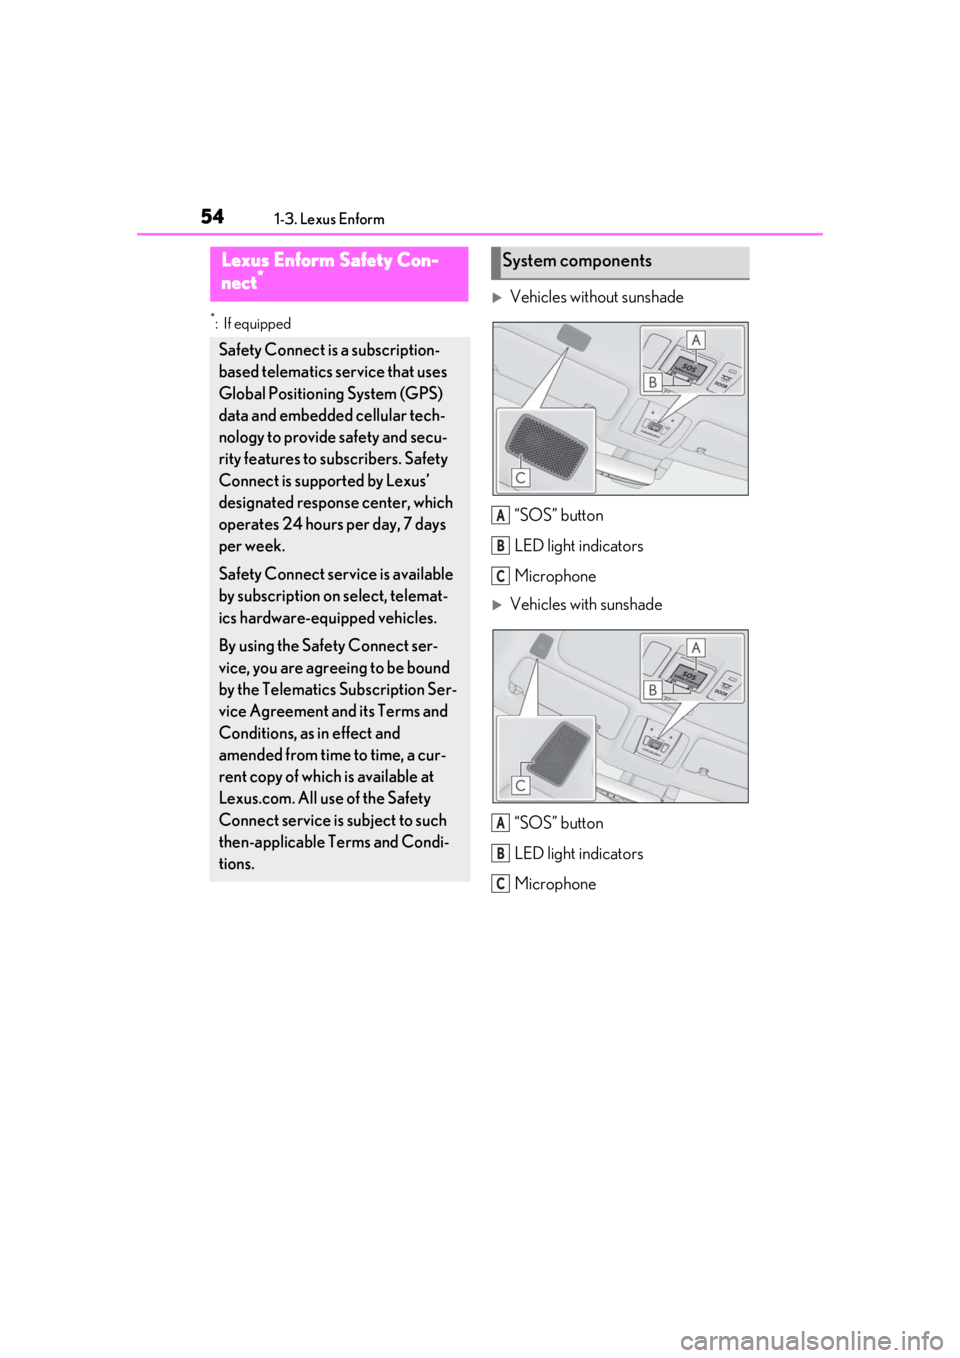
Vehicles without sunshade“SOS” button
LED light indicators
Microphone
Vehicles with sunshade“SOS” button
LED light indicators
Microphone
Lexus Enform Safety Con-
nect*
Safety Connect is a subscription-
based telematics service that uses
Global Positioning System (GPS)
data and embedded cellular tech-
nology to provide safety and secu-
rity features to subscribers. Safety
Connect is supported by Lexus’
designated response center, which
operates 24 hours per day, 7 days
per week.
Safety Connect service is available
by subscription on select, telemat-
ics hardware-equipped vehicles.
By using the Safety Connect ser-
vice, you are agreeing to be bound
by the Telematics Subscription Ser-
vice Agreement and its Terms and
Conditions, as in effect and
amended from time to time, a cur-
rent copy of which is available at
Lexus.com. All use of the Safety
Connect service is subject to such
then-applicable Terms and Condi-
tions.
System components
A
B
C
A
B
C
Page 55 of 436
551-3. Lexus Enform
1
For safety and security
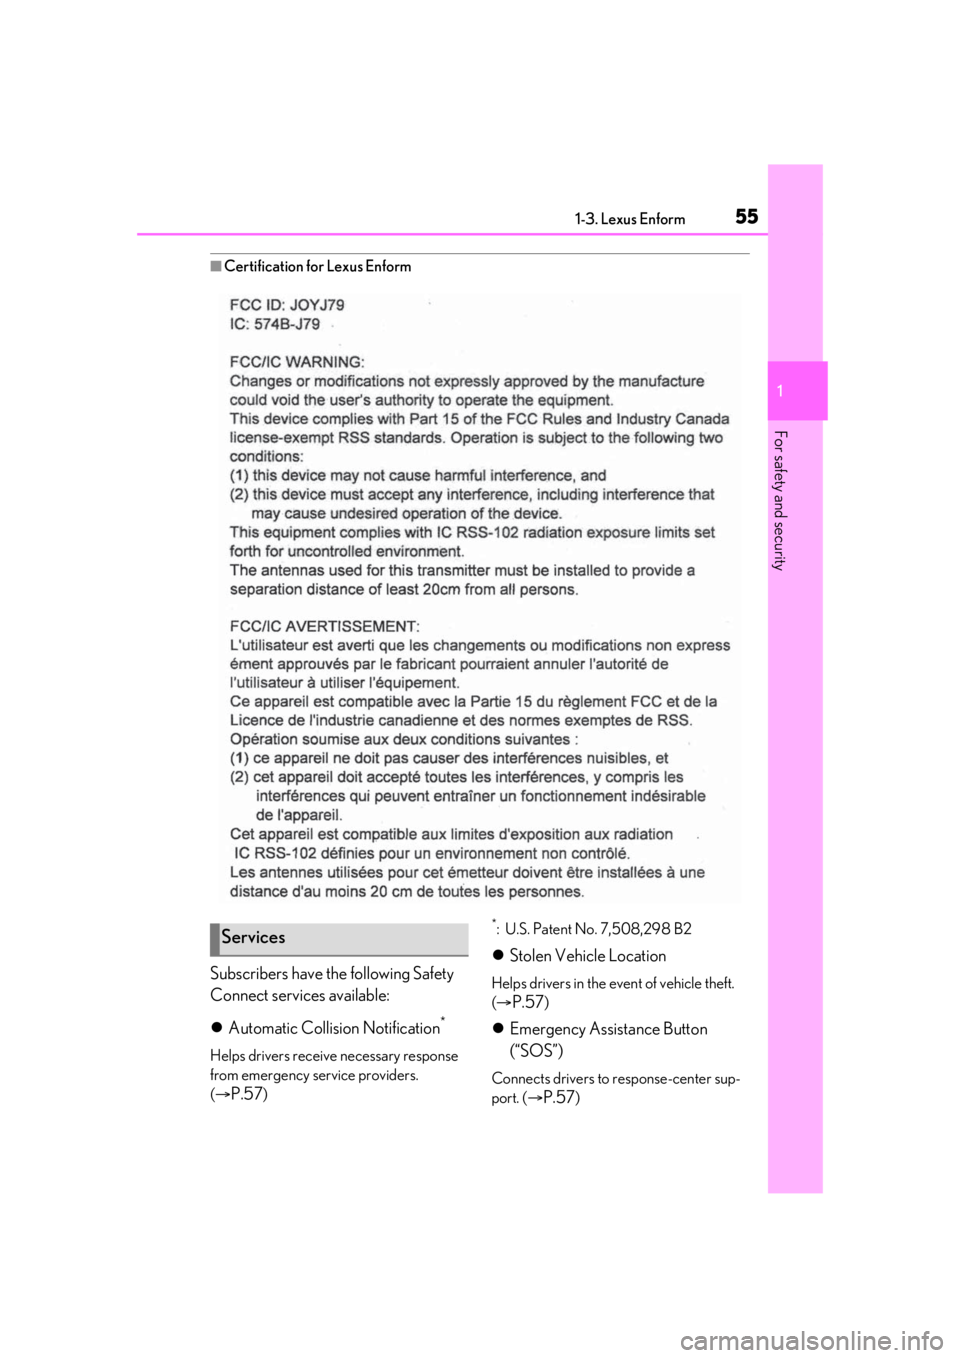
■Certification for Lexus Enform
Subscribers have the following Safety
Connect services available:
Automatic Collision Notification
*
Helps drivers receive necessary response
from emergency service providers.
(
P.57)
*: U.S. Patent No. 7,508,298 B2
Stolen Vehicle Location
Helps drivers in the event of vehicle theft.
(
P.57)
Emergency Assistance Button
(“SOS”)
Connects drivers to response-center sup-
port. (
P.57)
Services
Page 57 of 436
571-3. Lexus Enform
1
For safety and security
Safety Connect call in process
Red indicator light (except at vehi-
cle start-up) = System malfunction
(contact your Lexus dealer)
No indicator light (off) = Safety
Connect service not active
■Automatic Collision Notification
In case of either airbag deployment or
severe rear-end collision, the system is
designed to automatically call the
response center. The responding agent
receives the vehicle’s location and
attempts to speak with the vehicle
occupants to assess the level of emer-
gency. If the occupants are unable to
communicate, the ag ent automatically
treats the call as an emergency, con-
tacts the nearest emergency services
provider to describe the situation, and
requests that assistance be sent to the
location.
■Stolen Vehicle Location
If your vehicle is stolen, Safety Connect
can work with local authorities to assist
them in locating and recovering the
vehicle. After filing a police report, call
the Safety Connect response center at
1-800-25-LEXUS (1-800-255-
3987) in the United States, 1-877-
539-8777 in Puerto Rico or 1-800-
265-3987 in Canada, and follow the
prompts for Safety Connect to initiate
this service.
In addition to assisting law enforce-
ment with recovery of a stolen vehicle, Safety-Connect-equipped vehicle
location data may, under certain cir-
cumstances, be shared with third par-
ties to locate your vehicle. Further
information is available at Lexus.com.
■Emergency Assistance Button
(“SOS”)
In the event of an emergency on the
road, push the “SOS” button to reach
the Safety Connect response center.
The answering agent will determine
your vehicle’s location, assess the
emergency, and dispatch the neces-
sary assistance required.
If you accidentally press the “SOS” button,
tell the response-center agent that you are
not experiencing an emergency.
■Enhanced Roadside Assistance
Enhanced Roadside Assistance adds
GPS data to the already included war-
ranty-based Lexus roadside service.
Subscribers can press the “SOS” but-
ton to reach a Safety Connect
response-center agent, who can help
with a wide range of needs, such as:
towing, flat tire, fuel delivery, etc. For a
description of the Roadside Assistance
services and their limitations, please
see the Safety Connect Terms and
Conditions, which are available at
Lexus.com.
Important! Read this information about
exposure to radio frequency signals
before using Safety Connect;
Safety Connect services
Safety information for Safety
Connect
Page 59 of 436
591-3. Lexus Enform
1
For safety and security
when operating Lexus Enform Remote.
In some states, use of Lexus Enform
Remote may violate state or local laws.
Before using Lexus Enform Remote,
check your state and local laws.
●Any malfunction of the Lexus should be
repaired by your Lexus dealer.
●Lexus Enform Remote is designed to
work at temperatures above -22°F (-
30°C). This specification is related to the
Lexus Enform Remote operation, but is
dependent on the vehicle’s operating
temperature range which may be differ-
ent.
●Content is subject to change without
notice.
●Some features of the Lexus Enform
Remote may not be available on some
models.
●Additional information can be found at
www.lexus.com/enform/
.
●Availability of func tions of the Lexus
Enform service is de pendent on network
reception level.
■Safety information for Lexus Enform
Remote
Refer to the safety information for Safety
Connect: P.57
*: If equipped
■Availability of service
Lexus Enform Service Connect is not avail-
able in some countries or areas.
■Lexus Enform Serv ice Connect Infor-
mation
Availability of functions of the Lexus Enform
Service Connect is dependent on network
reception level.
■Safety information for Lexus Enform
Service Connect
Refer to the safety information for Safety
Connect: P.57
Lexus Enform Service Con-
nect
*
Lexus Enform Service Connect
uses DCM (Data Communication
Module) to collect and transmit
vehicle data that allows Lexus to
provide:
Vehicle Health Report (VHR)
(Safety Recalls, Service Cam-
paigns, Current Vehicle Alerts,
Required Maintenance, and Vehi-
cle Condition Status)
Maintenance Notifications
Vehicle Alert Notifications
For details about this service and
how to register, refer to
http://www.lexus.com/enform/
.
The Lexus Enform Service Con-
nect is achieved by using a DCM
built in the vehicle.