mirror Lexus LC500 2021 / LEXUS 2021 LC500,LC500H (OM11559U) User Guide
[x] Cancel search | Manufacturer: LEXUS, Model Year: 2021, Model line: LC500, Model: Lexus LC500 2021Pages: 448, PDF Size: 14.11 MB
Page 127 of 448
1273-3. Adjusting the seats
3
Before driving
●If the front seat is close to the sun visor or
other surrounding parts, frontwards and
upwards movement may be restricted.
■Jam protection function
While the driving position is recalling or the
power easy access system is operating, if an
object is stuck behind the front seat, the
front seat will stop and then move slightly
forward.
While the lever-operated “Front, Fold &
Return” seat is operating, if an object is
stuck either in front of or behind the front
seat, the front seat will stop and then move
in the opposite direction slightly.
When the jam protection function operates,
the seat stops at a position other than the
set seat position. Chec k the seat position.
The seat and steering wheel are auto-
matically adjusted to allow the driver to
enter and exit the vehicle easily.
When all of the following have been
performed, the seat and steering
wheel are automatically adjusted to a
position that allows the driver to enter
and exit the vehicle easily.
The shift position has been shifted to
P.
The engine switch
has been turned off.
The driver’s seat belt has been
unfastened.
WARNING
■Lever-operated “Front, Fold &
Return” seat
●Before operating the lever-operated
“Front, Fold & Return” seat, ensure that
any surrounding passengers or objects
will not contact the seat.
●Make sure the seat back is locked
securely before driving.
●Never operate the lever-operated
“Front, Fold & Retu rn” seat while the
vehicle is moving.
■Jam protection function
Do not use a hand, foot, or any other part
of your body to intentionally activate the
jam protection function.
Driving position memory
This feature automatically adjusts
the positions of the driver’s seat,
steering wheel, outside rear view
mirrors and head-up display (if
equipped) to make entering and
exiting the vehicle easier or to suit
your preferences.
Up to 3 different driving positions
can be recorded.
Each electronic key (including a
card key) can be registered to
recall your preferred driving posi-
tion.
Power easy access system
Page 128 of 448
1283-3. Adjusting the seats
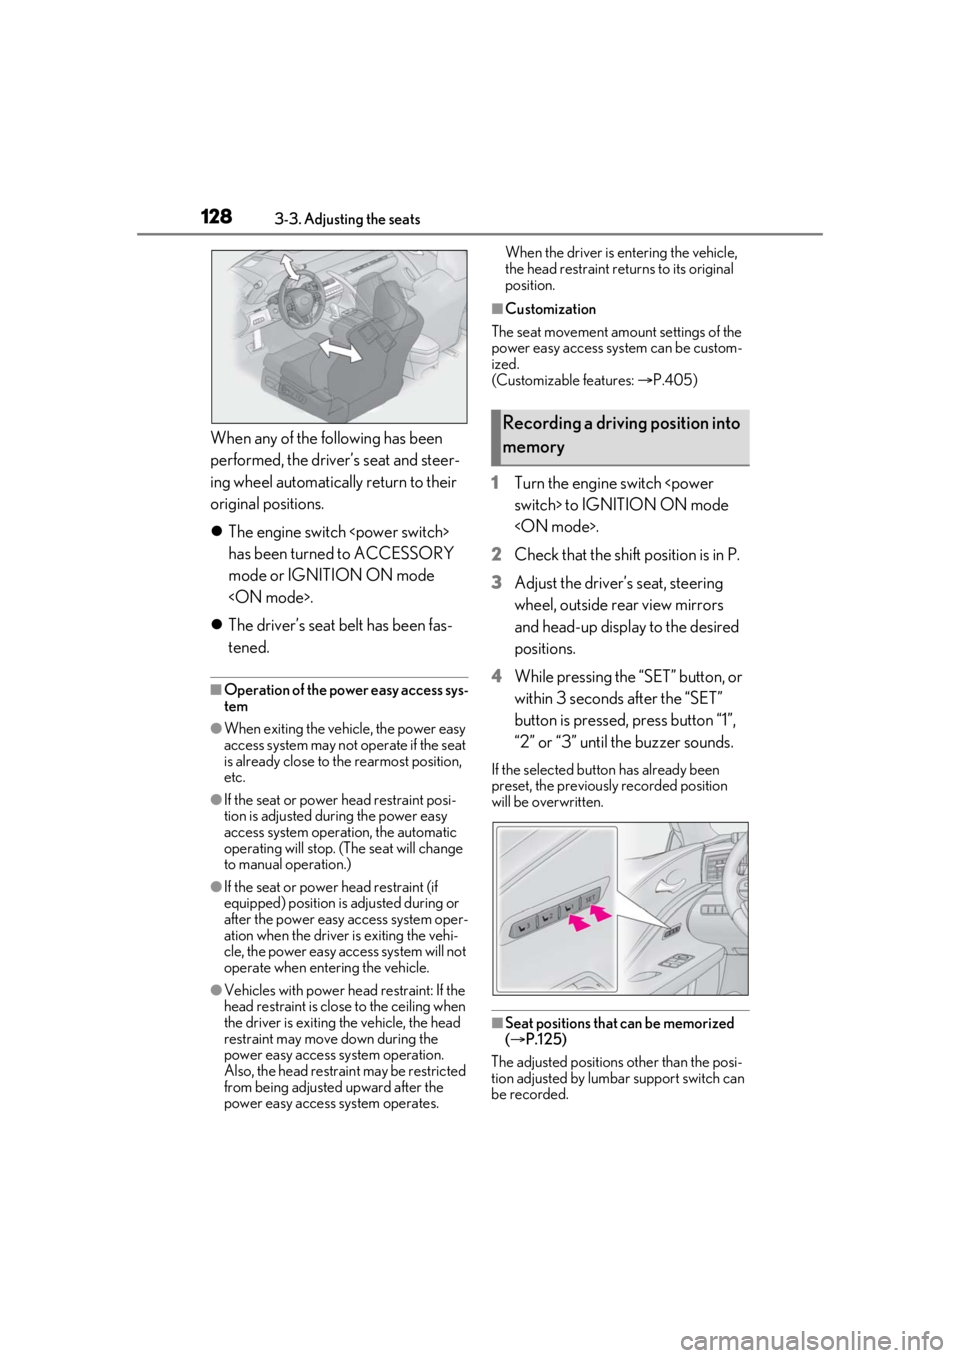
When any of the following has been
performed, the driver’s seat and steer-
ing wheel automatically return to their
original positions.
The engine switch
has been turned to ACCESSORY
mode or IGNITION ON mode
The driver’s seat belt has been fas-
tened.
■Operation of the power easy access sys-
tem
●When exiting the vehicle, the power easy
access system may not operate if the seat
is already close to the rearmost position,
etc.
●If the seat or power head restraint posi-
tion is adjusted during the power easy
access system operation, the automatic
operating will stop. (The seat will change
to manual operation.)
●If the seat or power head restraint (if
equipped) position is adjusted during or
after the power easy access system oper-
ation when the driver is exiting the vehi-
cle, the power easy access system will not
operate when entering the vehicle.
●Vehicles with power he ad restraint: If the
head restraint is close to the ceiling when
the driver is exiting the vehicle, the head
restraint may move down during the
power easy access sy stem operation.
Also, the head restrain t may be restricted
from being adjusted upward after the
power easy access system operates. When the driver is entering the vehicle,
the head restraint returns to its original
position.
■Customization
The seat movement amou nt settings of the
power easy access system can be custom-
ized.
(Customizable features: P.405)
1 Turn the engine switch
2 Check that the shift position is in P.
3 Adjust the driver’s seat, steering
wheel, outside rear view mirrors
and head-up display to the desired
positions.
4 While pressing the “SET” button, or
within 3 seconds after the “SET”
button is pressed, press button “1”,
“2” or “3” until the buzzer sounds.
If the selected button has already been
preset, the previously recorded position
will be overwritten.
■Seat positions that can be memorized
( P.125)
The adjusted positions other than the posi-
tion adjusted by lumb ar support switch can
be recorded.
Recording a driving position into
memory
Page 130 of 448
1303-3. Adjusting the seats
mately 3 seconds.
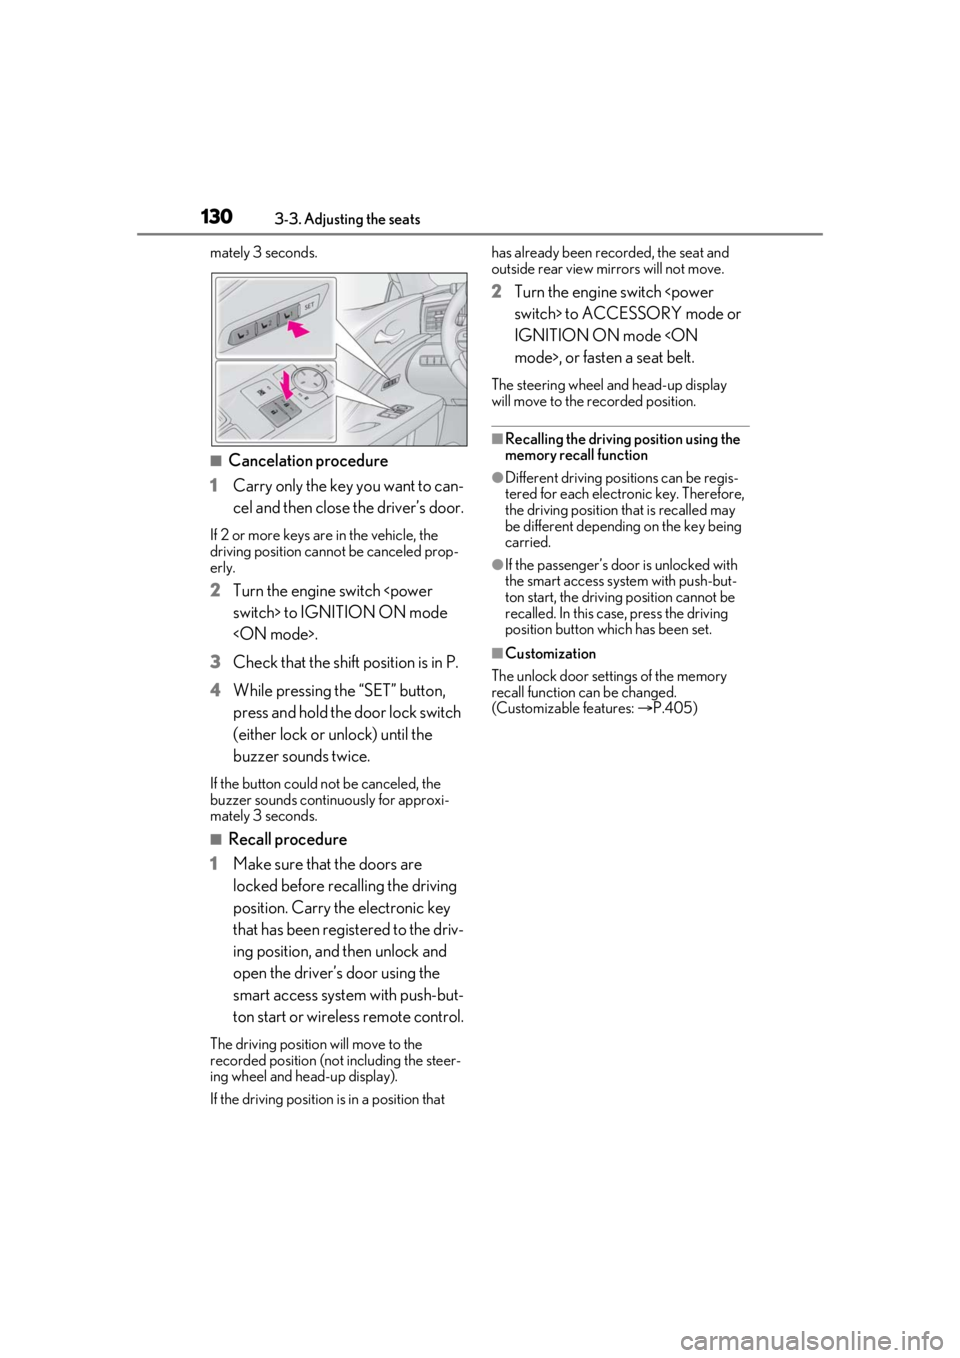
■Cancelation procedure
1 Carry only the key you want to can-
cel and then close the driver’s door.
If 2 or more keys are in the vehicle, the
driving position cannot be canceled prop-
erly.
2Turn the engine switch
3 Check that the shift position is in P.
4 While pressing the “SET” button,
press and hold the door lock switch
(either lock or unlock) until the
buzzer sounds twice.
If the button could not be canceled, the
buzzer sounds continuously for approxi-
mately 3 seconds.
■Recall procedure
1 Make sure that the doors are
locked before recalling the driving
position. Carry the electronic key
that has been registered to the driv-
ing position, and then unlock and
open the driver’s door using the
smart access system with push-but-
ton start or wireless remote control.
The driving position will move to the
recorded position (not including the steer-
ing wheel and head-up display).
If the driving position is in a position that has already been recorded, the seat and
outside rear view mirrors will not move.
2
Turn the engine switch
IGNITION ON mode
The steering wheel and head-up display
will move to the recorded position.
■Recalling the driving position using the
memory recall function
●Different driving positions can be regis-
tered for each electronic key. Therefore,
the driving position that is recalled may
be different depending on the key being
carried.
●If the passenger’s door is unlocked with
the smart access system with push-but-
ton start, the driving position cannot be
recalled. In this case, press the driving
position button which has been set.
■Customization
The unlock door sett ings of the memory
recall function can be changed.
(Customizable features: P.405)
Page 133 of 448
1333-4. Adjusting the steering wheel and mirrors
3
Before driving
3-4.Adjusting the steering wheel and mirrors
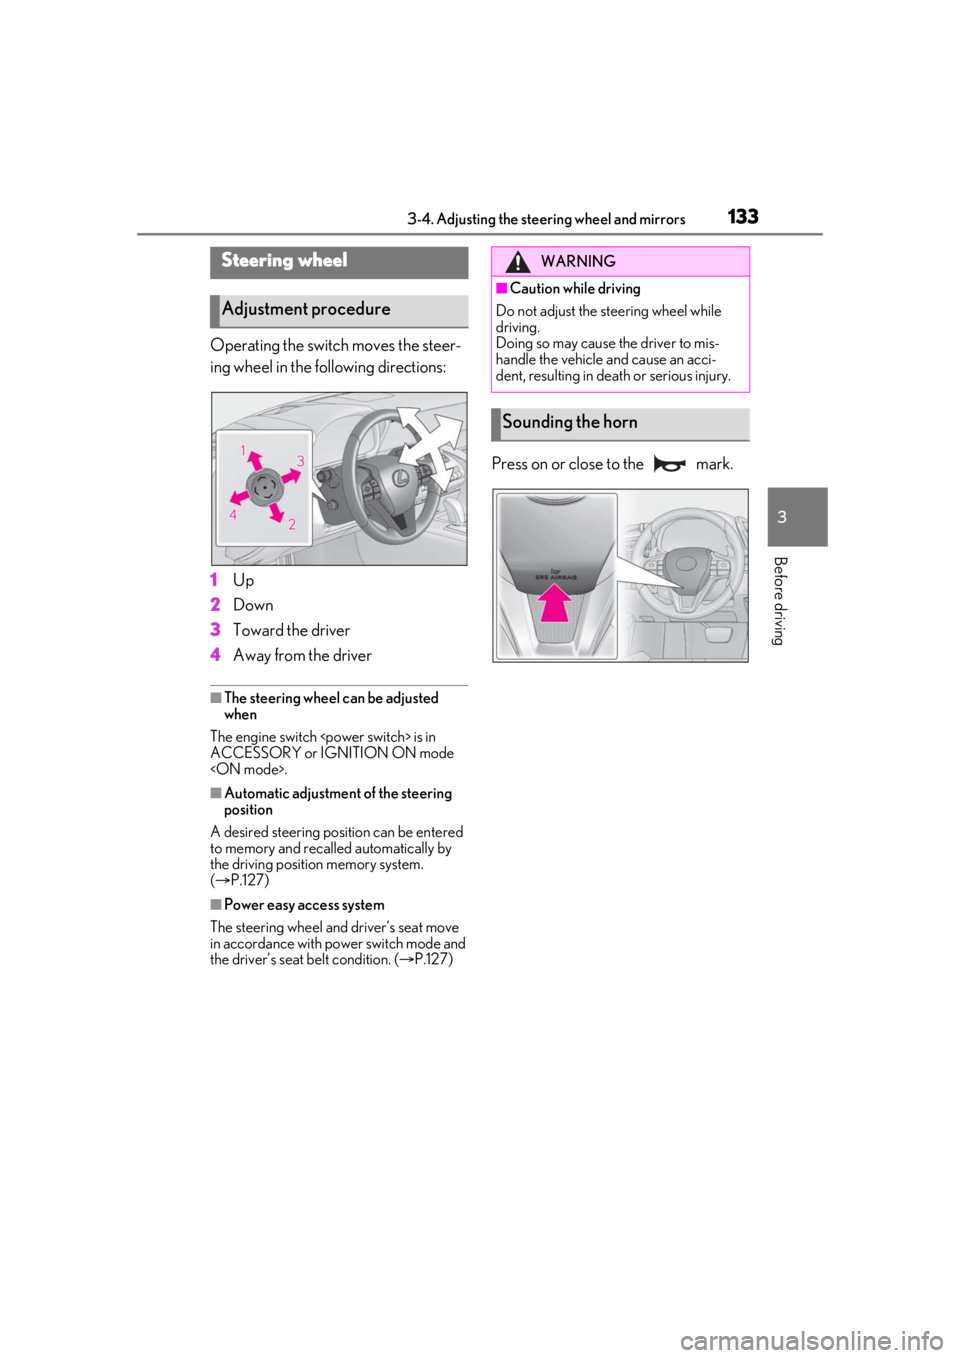
Operating the switch moves the steer-
ing wheel in the following directions:
1Up
2 Down
3 Toward the driver
4 Away from the driver
■The steering wheel can be adjusted
when
The engine switch
ACCESSORY or IGNITION ON mode
■Automatic adjustment of the steering
position
A desired steering position can be entered
to memory and recalled automatically by
the driving position memory system.
( P.127)
■Power easy access system
The steering wheel and driver’s seat move
in accordance with power switch mode and
the driver’s seat belt condition. ( P.127)
Press on or close to the mark.
Steering wheel
Adjustment procedure
WARNING
■Caution while driving
Do not adjust the steering wheel while
driving.
Doing so may cause the driver to mis-
handle the vehicle and cause an acci-
dent, resulting in death or serious injury.
Sounding the horn
Page 134 of 448
1343-4. Adjusting the steering wheel and mirrors
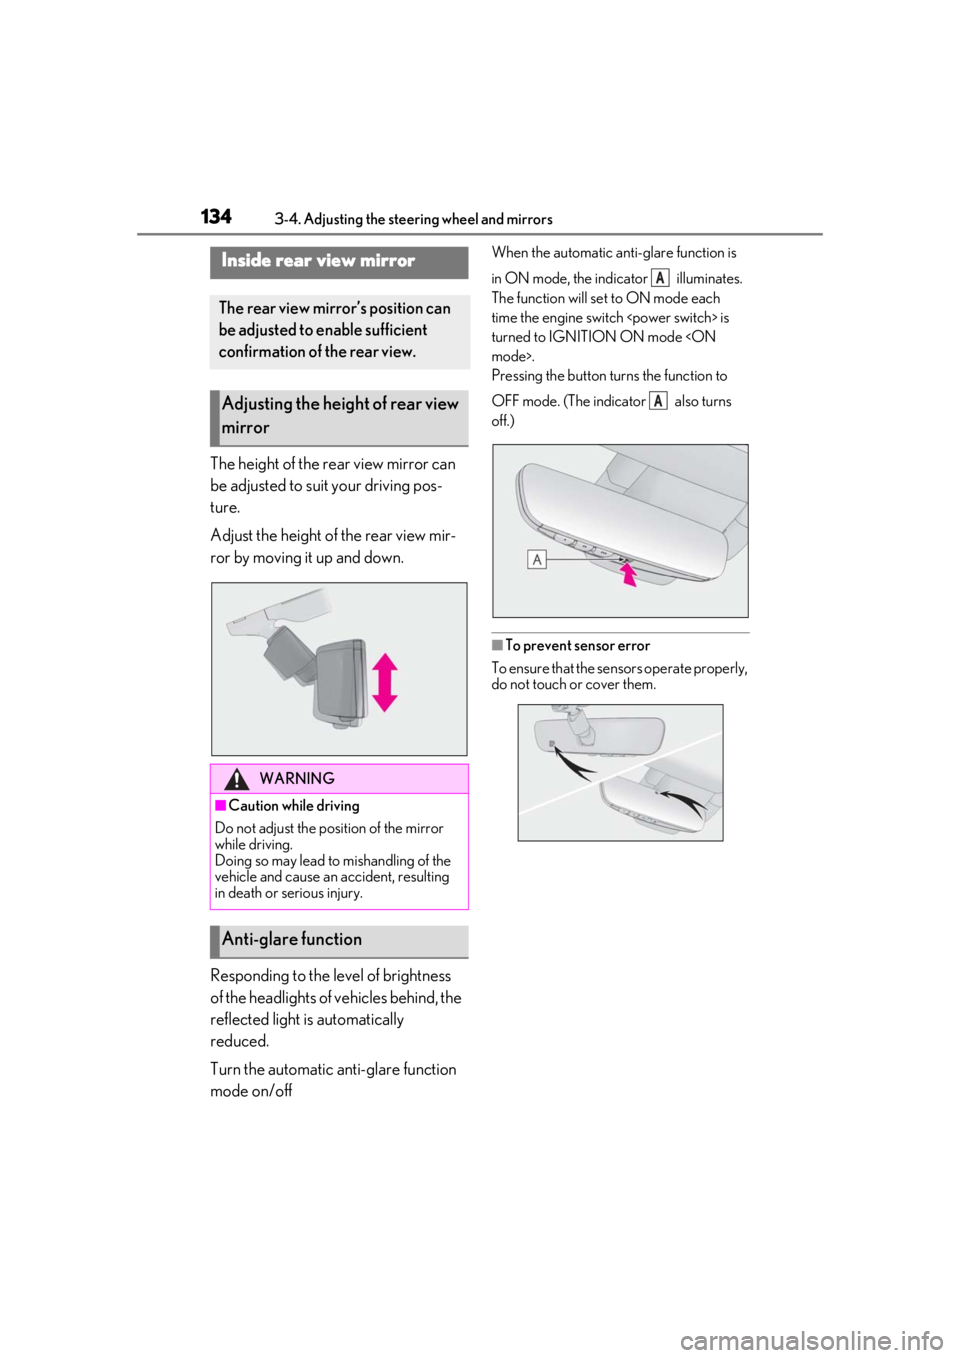
The height of the rear view mirror can
be adjusted to suit your driving pos-
ture.
Adjust the height of the rear view mir-
ror by moving it up and down.
Responding to the level of brightness
of the headlights of vehicles behind, the
reflected light is automatically
reduced.
Turn the automatic anti-glare function
mode on/off
When the automatic anti-glare function is
in ON mode, the indicator illuminates.
The function will set to ON mode each
time the engine switch
turned to IGNITION ON mode
Pressing the button turns the function to
OFF mode. (The indicator also turns
off.)
■To prevent sensor error
To ensure that the sensors operate properly,
do not touch or cover them.
Inside rear view mirror
The rear view mirror’s position can
be adjusted to enable sufficient
confirmation of the rear view.
Adjusting the height of rear view
mirror
WARNING
■Caution while driving
Do not adjust the position of the mirror
while driving.
Doing so may lead to mishandling of the
vehicle and cause an accident, resulting
in death or serious injury.
Anti-glare function
A
A
Page 135 of 448
1353-4. Adjusting the steering wheel and mirrors
3
Before driving
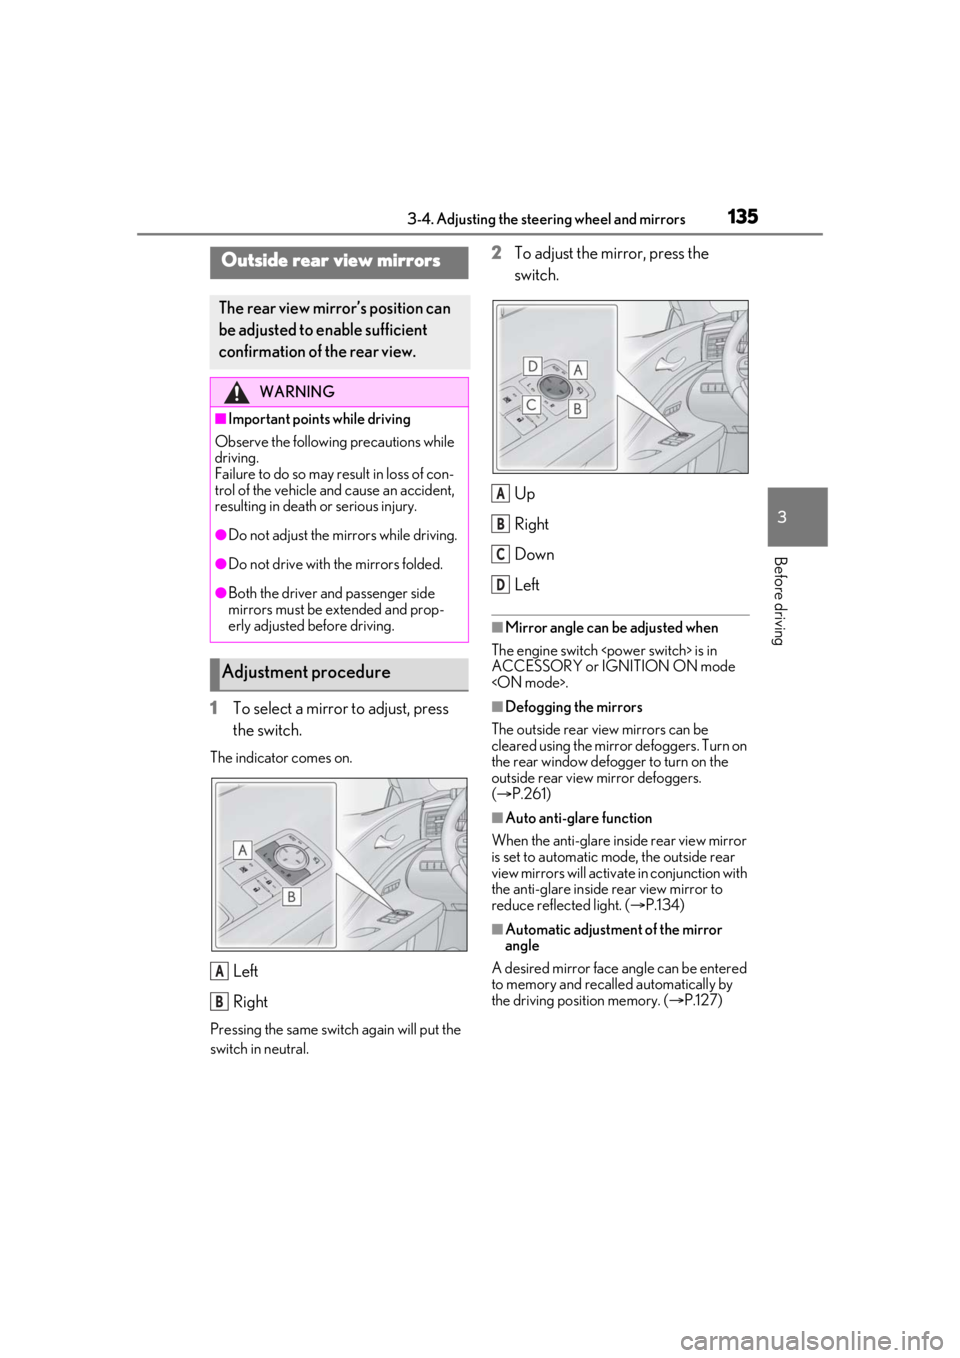
1To select a mirror to adjust, press
the switch.
The indicator comes on.
Left
Right
Pressing the same switch again will put the
switch in neutral.
2To adjust the mirror, press the
switch.
Up
Right
Down
Left
■Mirror angle can be adjusted when
The engine switch
ACCESSORY or IGNITION ON mode
■Defogging the mirrors
The outside rear view mirrors can be
cleared using the mirror defoggers. Turn on
the rear window defogger to turn on the
outside rear view mirror defoggers.
( P.261)
■Auto anti-glare function
When the anti-glare inside rear view mirror
is set to automatic mode, the outside rear
view mirrors will activate in conjunction with
the anti-glare inside rear view mirror to
reduce reflec ted light. (P.134)
■Automatic adjustment of the mirror
angle
A desired mirror face angle can be entered
to memory and recalled automatically by
the driving position memory. ( P.127)
Outside rear view mirrors
The rear view mirror’s position can
be adjusted to enable sufficient
confirmation of the rear view.
WARNING
■Important points while driving
Observe the following precautions while
driving.
Failure to do so may result in loss of con-
trol of the vehicle and cause an accident,
resulting in death or serious injury.
●Do not adjust the mirrors while driving.
●Do not drive with the mirrors folded.
●Both the driver and passenger side
mirrors must be extended and prop-
erly adjusted before driving.
Adjustment procedure
A
B
A
B
C
D
Page 136 of 448
1363-4. Adjusting the steering wheel and mirrors
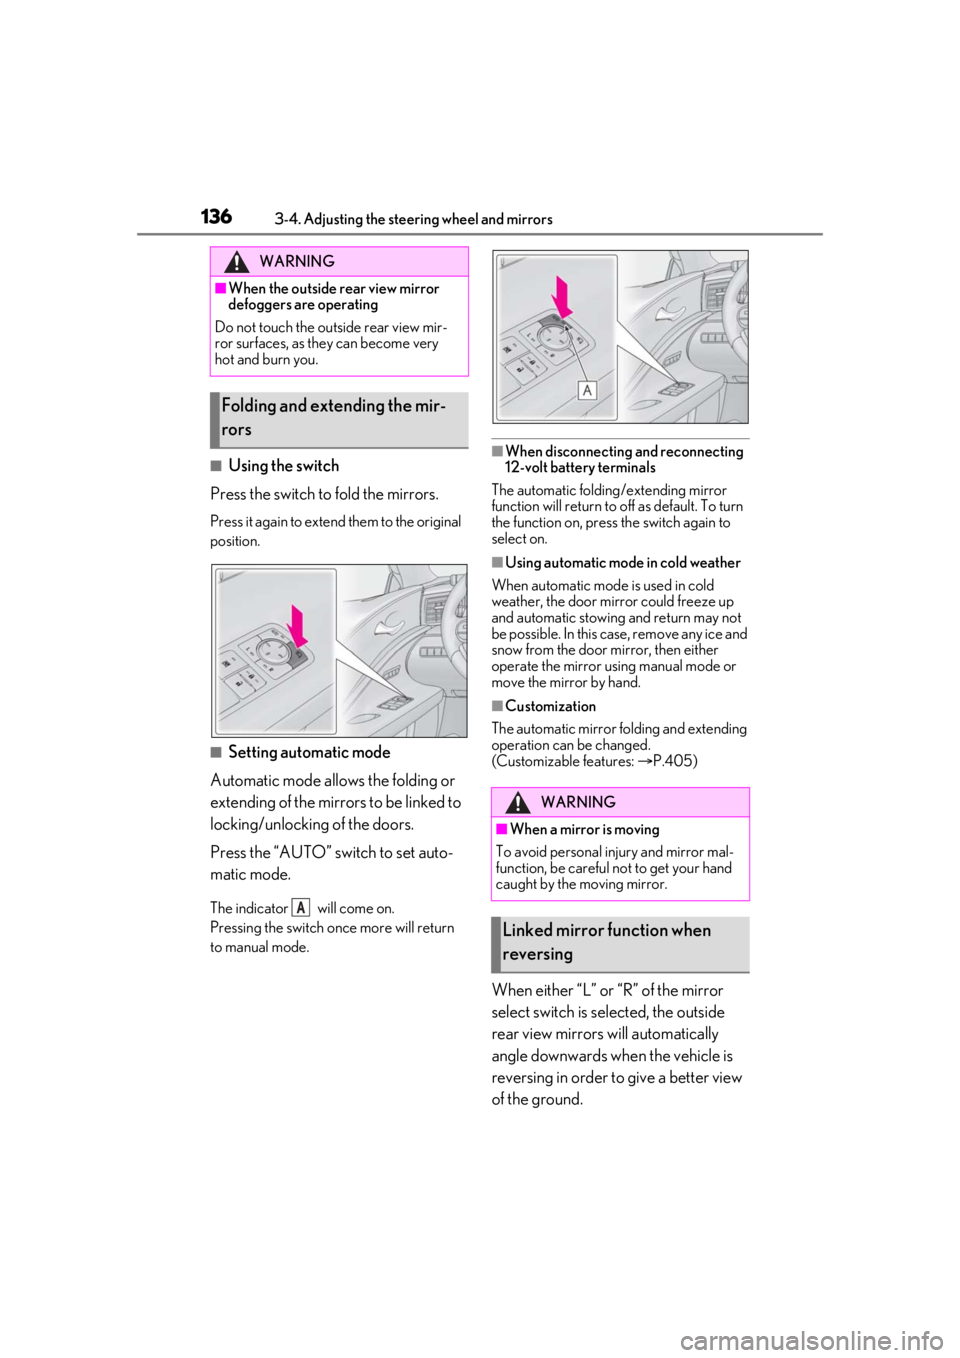
■Using the switch
Press the switch to fold the mirrors.
Press it again to extend them to the original
position.
■Setting automatic mode
Automatic mode allows the folding or
extending of the mirrors to be linked to
locking/unlockin g of the doors.
Press the “AUTO” switch to set auto-
matic mode.
The indicator will come on.
Pressing the switch on ce more will return
to manual mode.
■When disconnecting and reconnecting
12-volt battery terminals
The automatic folding/extending mirror
function will return to off as default. To turn
the function on, press the switch again to
select on.
■Using automatic mode in cold weather
When automatic mode is used in cold
weather, the door mirror could freeze up
and automatic stowing and return may not
be possible. In this case, remove any ice and
snow from the door mirror, then either
operate the mirror using manual mode or
move the mirror by hand.
■Customization
The automatic mirror folding and extending
operation can be changed.
(Customizable features: P.405)
When either “L” or “R” of the mirror
select switch is selected, the outside
rear view mirrors will automatically
angle downwards when the vehicle is
reversing in order to give a better view
of the ground.
WARNING
■When the outside rear view mirror
defoggers are operating
Do not touch the outside rear view mir-
ror surfaces, as they can become very
hot and burn you.
Folding and extending the mir-
rors
A
WARNING
■When a mirror is moving
To avoid personal injury and mirror mal-
function, be careful not to get your hand
caught by the moving mirror.
Linked mirror function when
reversing
Page 137 of 448

1373-4. Adjusting the steering wheel and mirrors
3
Before driving
To disable this function, select neither
“L” nor “R”.
■Adjusting the mirror angle when
the vehicle is reversing
With the shift position in R, adjust the
mirror angle at a desired position.
The adjusted angle will be memorized
and the mirror will automatically tilt to
the memorized angle whenever the
shift position is shifted to R from next
time.
The memorized downward tilt position of
the mirror is linked to the normal position
(angle adjusted with the shift position in
other than R). Therefore, if the normal posi-
tion is changed after adjustment, the tilt
position will also change.
When the normal position is changed,
readjust the angle in reversing.
Page 144 of 448
1444-1. Before driving
WARNING
■When driving the vehicle
●Do not drive if you are unfamiliar with
the location of the brake and accelera-
tor pedals to avoid depressing the
wrong pedal.
• Accidentally depressing the accelera- tor pedal instead of the brake pedal
will result in sudden acceleration that
may lead to an accident.
• When backing up, you may twist your body around, leading to a difficulty in
operating the pedals. Make sure to
operate the pedals properly.
• Make sure to keep a correct driving posture even when moving the vehicle
only slightly. This allows you to depress
the brake and accelerator pedals
properly.
• Depress the brake pedal using your right foot. Depressing the brake pedal
using your left foot may delay
response in an emergency, resulting in
an accident.
●LC500h: The driver should pay extra
attention to pedestrians when the vehi-
cle is powered only by the electric
motor (traction motor). As there is no
engine noise, the pedestrians may mis-
judge the vehicle’s movement. Even
though the vehicle is equipped with the
vehicle proximity notification system,
drive with care as pedestrians in the
vicinity may still not notice the vehicle if
the surrounding area is noisy.
●Do not drive the vehicle over or stop
the vehicle near flammable materials.
The exhaust system and exhaust gases
can be extremely hot. These hot parts
may cause a fire if there is any flamma-
ble material nearby.
●During normal driving, do not turn off
the engine
the engine
driving will not cause loss of steering
or braking control, however, power
assist to the steering will be lost. This
will make it more difficult to steer
smoothly, so you should pull over and
stop the vehicle as soon as it is safe to
do so.
In the event of an emergency, such as if
it becomes impossible to stop the vehi-
cle in the normal way: P.338
●Use engine braking (downshift) to
maintain a safe speed when driving
down a steep hill.
Using the brakes continuously may
cause the brakes to overheat and lose
effectiveness. ( P.162, 169)
●Do not adjust the positions of the
steering wheel, the seat, or the inside
or outside rear view mirrors while driv-
ing.
Doing so may result in a loss of vehicle
control.
●Always check that all passengers’
arms, heads or other parts of their
body are not outside the vehicle.
●Do not drive in excess of the speed
limit. Even if the legal speed limit per-
mits it, do not drive over 85 mph (140
km/h) unless your vehicle has high-
speed capability tires. Driving over 85
mph (140 km/h) may re sult in tire fail-
ure, loss of control and possible injury.
Be sure to consult a tire dealer to
determine whether the tires on your
vehicle are high-speed capability tires
or not before driving at such speeds.
■When driving on slippery road sur-
faces
●Sudden braking, acceleration and
steering may cause tire slippage and
reduce your ability to control the vehi-
cle.
Page 185 of 448
1854-3. Operating the lights and wipers
4
Driving
●House lights, street lights, traffic signals,
and illuminated billboards or signs may
cause the high beam to switch to the low
beams, or the low beams to remain on.
●The following factors may affect the
amount of time taken to turn the high
beam on or off:
• The brightness of headlights, fog lights,
and tail lights of vehicles ahead
• The movement and direction of vehicles ahead
• When a vehicle ahead only has opera- tional lights on one side
• When a vehicle ahead is a two-wheeled
vehicle
• The condition of the road (gradient, curve, condition of the road surface etc.)
• The number of passengers and amount of luggage
●The high beam may be turned on or off
when the driver does not expect it.
●Bicycles or similar objects may not be
detected.
●In the situations show n below, the system
may not be able to accurately detect sur-
rounding brightness levels. This may
cause the low beams to remain on or the
high beams to cause problems for pedes-
trians, vehicles ahead or other parties. In
these cases, manually switch between the
high and low beams.
• In bad weather (rain, snow, fog, sand-
storms etc.)
• The windshield is obscured by fog, mist, ice, dirt etc.
• The windshield is cracked or damaged.
• The front camera is deformed or dirty.
• Surrounding brightness levels are equal to those of headlights, tail lights or fog
lights.
• Vehicles ahead have headlights or tail
lights that are either switched off, dirty,
changing color, or have improperly
adjusted aim.
• When driving through an area of inter- mittently changing brightness and dark-
ness.
• When frequently and repeatedly driving
ascending/descending roads, or roads
with rough, bumpy or uneven surfaces
(such as stone-paved roads, gravel tracks
etc.). • When frequently and repeatedly taking
curves or driving on a winding road.
• There is a highly re flective object ahead
of the vehicle, such as a sign or a mirror.
• The vehicle’s headlights are damaged or dirty.
• The vehicle is listing or titling, due to a flat tire, a trailer being towed etc.
• The driver believes that the high beam
may be causing problems or distress to
other drivers or pedestrians nearby.
■Temporarily lowering sensor sensitivity
The sensitivity of the sensor can be tempo-
rarily lowered.
1 Turn the engine switch
off while the following conditions are
met.
• The headlight swit ch is in or .
• The headlight switch lever is in low beam
position.
• Automatic High Be am switch is on.
2 Turn the engine switch
to IGNITION ON mode
3 Within 60 seconds after 2, repeat pull-
ing the headlight switch lever to the
original position then pushing it to the
high beam position quickly 10 times,
then leave the lever in high beam posi-
tion.
4 If the sensitivity is changed, the Auto-
matic High Beam indicator turns on and
off 3 times.
Automatic High Beam (headlights) may
turn on even the vehicle is stopped.
■Switching to high beam
Push the lever away from you.
The Automatic High Beam indicator will
turn off and the high beam indicator will
turn on.
Pull the lever to its original position to acti-
vate the Automatic High Beam system
again.
Turning the high beam on/off
manually