remote control Lexus LC500 2021 / LEXUS 2021 LC500,LC500H (OM11559U) Owner's Guide
[x] Cancel search | Manufacturer: LEXUS, Model Year: 2021, Model line: LC500, Model: Lexus LC500 2021Pages: 448, PDF Size: 14.11 MB
Page 269 of 448
2695-3. Using the air conditioning system
5
Interior features
The seat ventilator can be adjusted in 3 lev-
els.
When the seat ventilator is operated, the
fan speed level is disp layed on the screen.
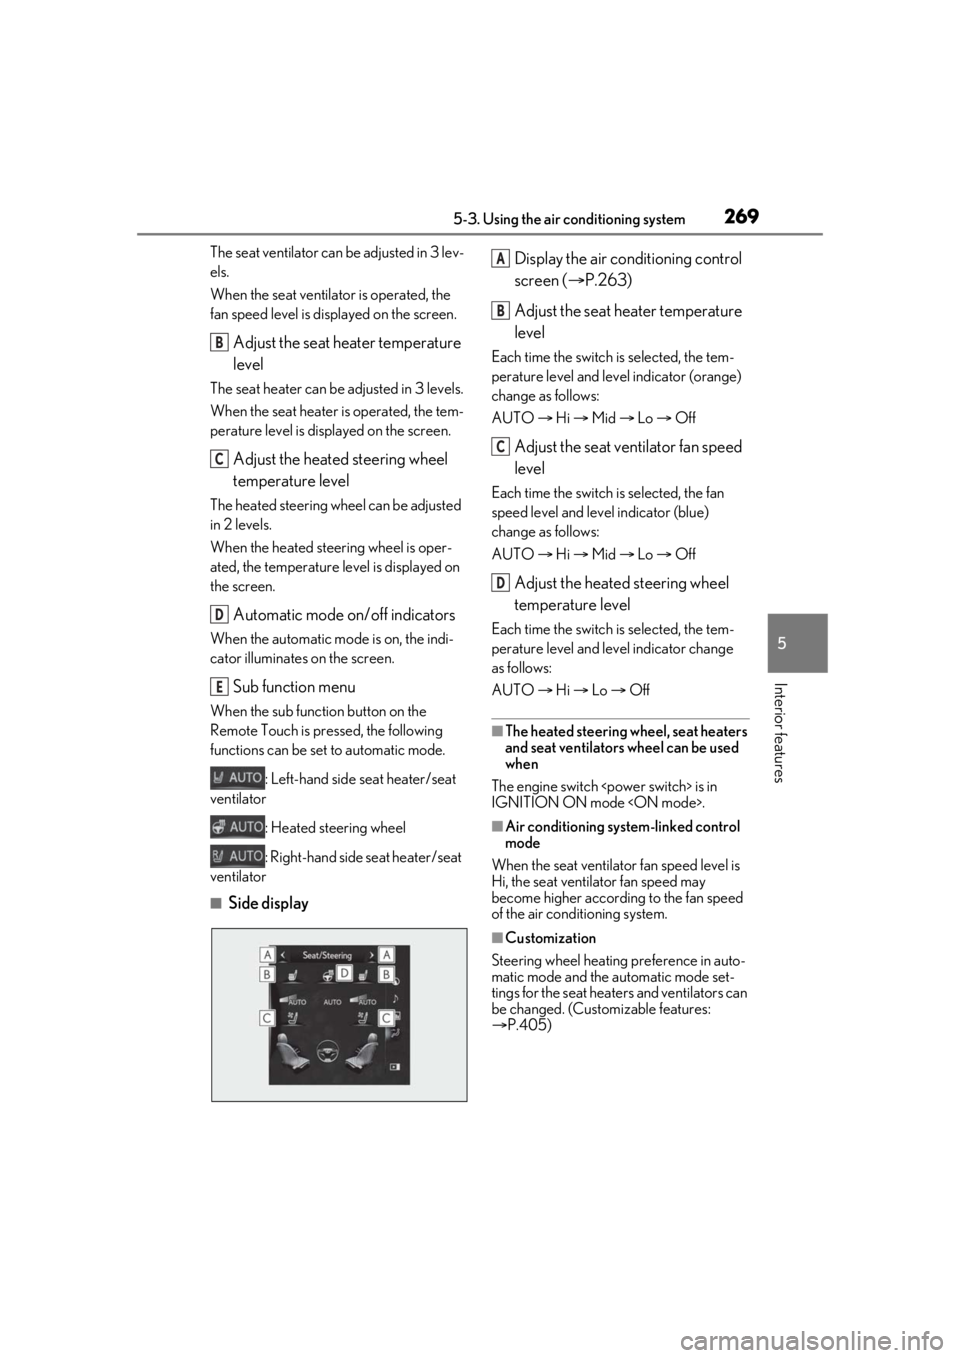
Adjust the seat heater temperature
level
The seat heater can be adjusted in 3 levels.
When the seat heater is operated, the tem-
perature level is displayed on the screen.
Adjust the heated steering wheel
temperature level
The heated steering wheel can be adjusted
in 2 levels.
When the heated steering wheel is oper-
ated, the temperature level is displayed on
the screen.
Automatic mode on/off indicators
When the automatic mode is on, the indi-
cator illuminates on the screen.
Sub function menu
When the sub function button on the
Remote Touch is pressed, the following
functions can be set to automatic mode.
: Left-hand side seat heater/seat
ventilator
: Heated steering wheel
: Right-hand side seat heater/seat
ventilator
■Side display Display the air conditioning control
screen (
P.263)
Adjust the seat heater temperature
level
Each time the switch is selected, the tem-
perature level and level indicator (orange)
change as follows:
AUTO Hi Mid Lo Off
Adjust the seat ventilator fan speed
level
Each time the switch is selected, the fan
speed level and level indicator (blue)
change as follows:
AUTO Hi Mid Lo Off
Adjust the heated steering wheel
temperature level
Each time the switch is selected, the tem-
perature level and le vel indicator change
as follows:
AUTO Hi Lo Off
■The heated steering wheel, seat heaters
and seat ventilators wheel can be used
when
The engine switch
IGNITION ON mode
■Air conditioning system-linked control
mode
When the seat ventilator fan speed level is
Hi, the seat ventilator fan speed may
become higher according to the fan speed
of the air conditioning system.
■Customization
Steering wheel heating preference in auto-
matic mode and the automatic mode set-
tings for the seat heaters and ventilators can
be changed. (Customizable features:
P.405)
B
C
D
E
A
B
C
D
Page 280 of 448
2805-6. Using the other interior features
For vehicles sold in Canada
■When support is necessary
Visit on the web at
www.homelink.com/lexus
or call 1-800-355-3515.
■Before programming HomeLink®
During programming, it is possible
that garage doors, gates, or other
devices may operate. For this rea-
son, make sure that people and
objects are clear of the garage door
or other devices to prevent injury or
other potential harm.
It is recommended that a new bat-
tery be placed in the remote control
transmitter for more accurate pro-
gramming.
Garage door opener motors manu-
factured after 1995 may be
equipped with rolling code protec-
WARNING
■When programming a garage door or
other remote control device
The garage door or other device may
operate, so ensure people and objects
are out of danger to prevent potential
harm.
■Conforming to federal safety stan-
dards
Do not use the HomeLink
® compatible
transceiver with any garage door opener
or device that lacks safety stop and
reverse features as required by federal
safety standards.
This includes any garage door that can-
not detect an interfering object. A door
or device without these features
increases the risk of death or serious
injury.
■When operating or programming
HomeLink®
Never allow a child to operate or play
with the HomeLink® buttons.
Programming the HomeLink®
Page 281 of 448
2815-6. Using the other interior features
5
Interior features
tion. If this is the case, you may need
a stepladder or other sturdy, safe
device to reach the “Learn” or
“Smart” button on the garage door
opener motor.
■Programming HomeLink®
Steps 1 through 3 must be performed
within 60 seconds, otherwise the indi-
cator light will stop flashing and pro-
gramming will not be able to be
completed.
1 Press and release the HomeLink
®
button you want to program and
check that the HomeLink
® indica-
tor light flashes (orange).
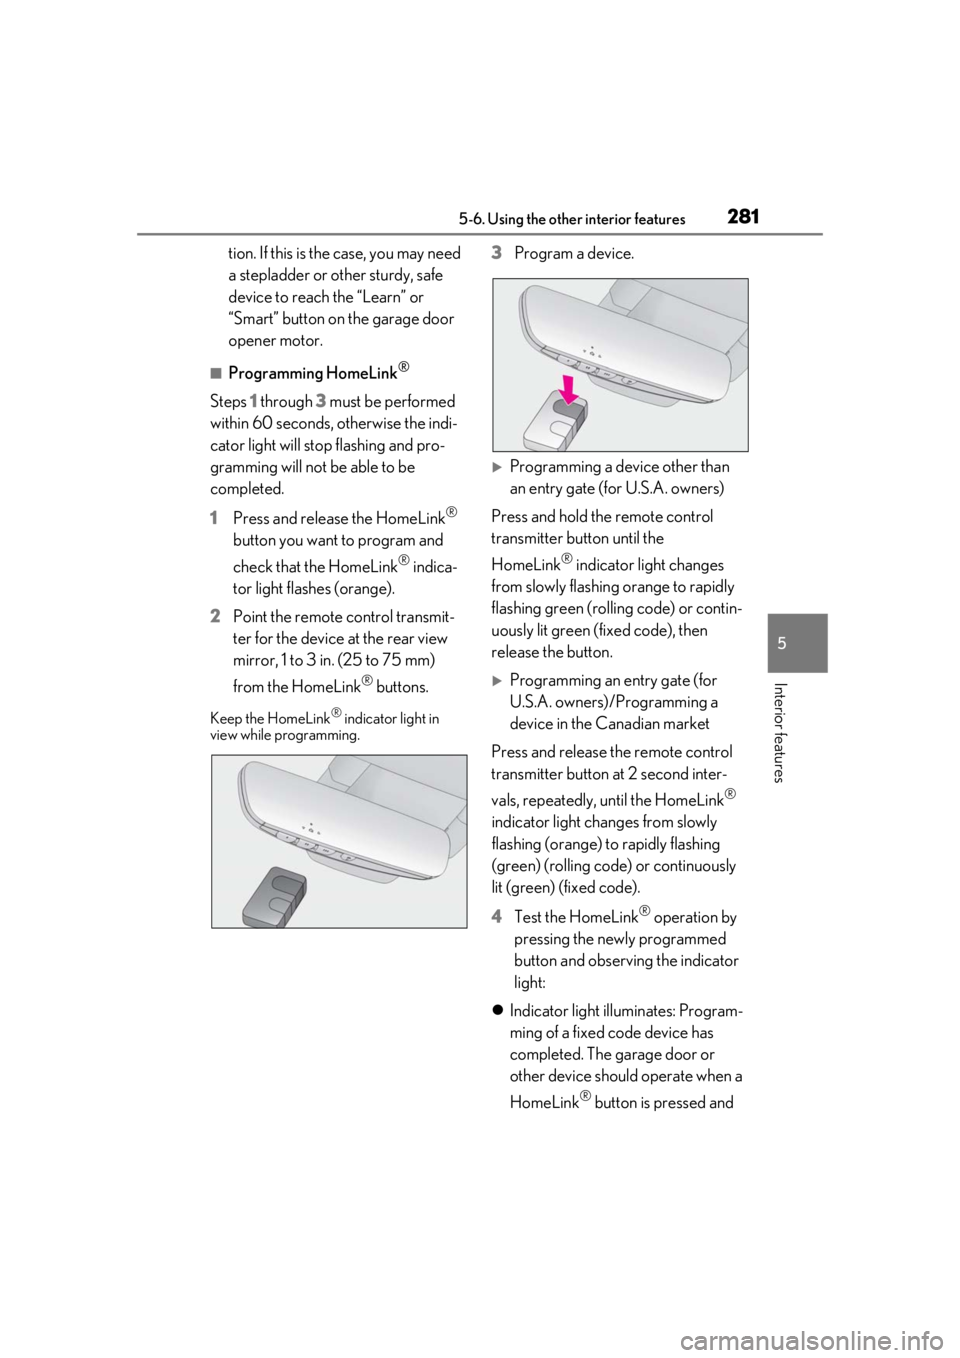
2 Point the remote control transmit-
ter for the device at the rear view
mirror, 1 to 3 in. (25 to 75 mm)
from the HomeLink
® buttons.
Keep the HomeLink® indicator light in
view while programming.
3 Program a device.
Programming a device other than
an entry gate (for U.S.A. owners)
Press and hold the remote control
transmitter button until the
HomeLink
® indicator light changes
from slowly flashing orange to rapidly
flashing green (rolling code) or contin-
uously lit green (fixed code), then
release the button.
Programming an entry gate (for
U.S.A. owners)/Programming a
device in the Canadian market
Press and release the remote control
transmitter button at 2 second inter-
vals, repeatedly, until the HomeLink
®
indicator light changes from slowly
flashing (orange) to rapidly flashing
(green) (rolling code) or continuously
lit (green) (fixed code).
4 Test the HomeLink
® operation by
pressing the newly programmed
button and observing the indicator
light:
Indicator light illuminates: Program-
ming of a fixed code device has
completed. The garage door or
other device should operate when a
HomeLink
® button is pressed and
Page 311 of 448
3116-3. Do-it-yourself maintenance
6
Maintenance and care
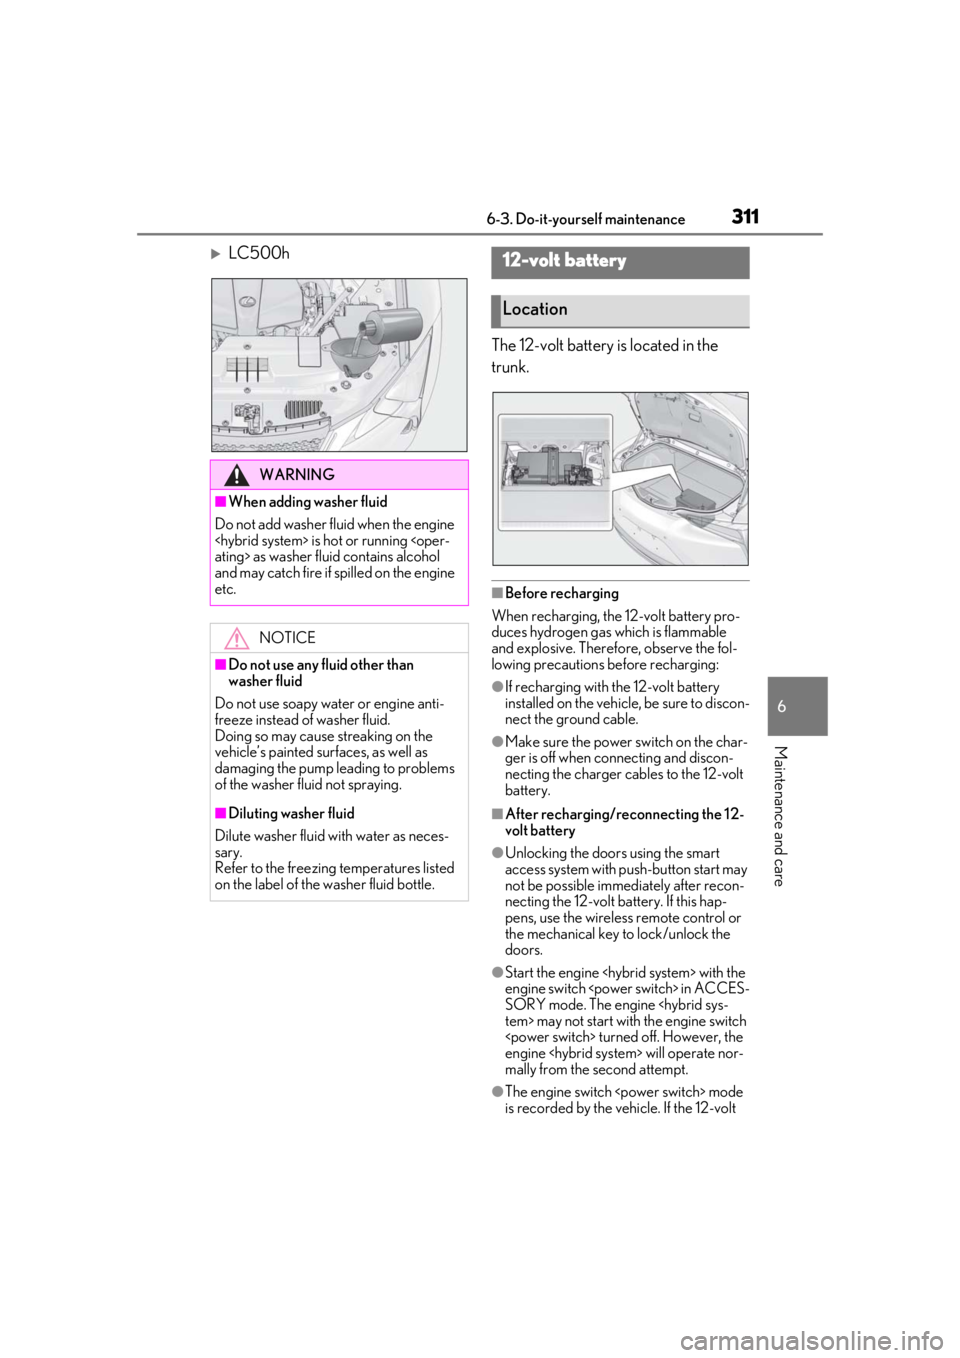
LC500hThe 12-volt battery is located in the
trunk.
■Before recharging
When recharging, the 12-volt battery pro-
duces hydrogen gas which is flammable
and explosive. Therefore, observe the fol-
lowing precautions before recharging:
●If recharging with the 12-volt battery
installed on the vehicle, be sure to discon-
nect the ground cable.
●Make sure the power switch on the char-
ger is off when connecting and discon-
necting the charger cables to the 12-volt
battery.
■After recharging/reconnecting the 12-
volt battery
●Unlocking the doors using the smart
access system with pu sh-button start may
not be possible immediately after recon-
necting the 12-volt battery. If this hap-
pens, use the wireless remote control or
the mechanical key to lock/unlock the
doors.
●Start the engine
engine switch
SORY mode. The engine
engine
mally from the second attempt.
●The engine switch
is recorded by the vehicle. If the 12-volt
WARNING
■When adding washer fluid
Do not add washer fluid when the engine
and may catch fire if spilled on the engine
etc.
NOTICE
■Do not use any fluid other than
washer fluid
Do not use soapy water or engine anti-
freeze instead of washer fluid.
Doing so may cause streaking on the
vehicle’s painted surfaces, as well as
damaging the pump leading to problems
of the washer fluid not spraying.
■Diluting washer fluid
Dilute washer fluid with water as neces-
sary.
Refer to the freezing temperatures listed
on the label of the washer fluid bottle.
12-volt battery
Location
Page 330 of 448
3306-3. Do-it-yourself maintenance
■If the electronic key battery is depleted
The following symptoms may occur:
●The smart access syst em with push-but-
ton start and wireless remote control will
not function properly.
●The operational rang e will be reduced.
■When the card key battery needs to be
replaced (if equipped)
The battery for th e card key is available only
at Lexus dealers. Your Lexus dealer can
replace the battery for you.
Prepare the following before replacing
the battery:
Flathead screwdriver
Small flathead screwdriver
Lithium battery CR2032
■Use a CR2032 lithium battery
●Batteries can be purchased at your Lexus
dealer, local electrical appliance shops or
camera stores.
●Replace only with the same or equivalent
type recommended by the manufacturer.
●Dispose of used batteries according to
the local laws.
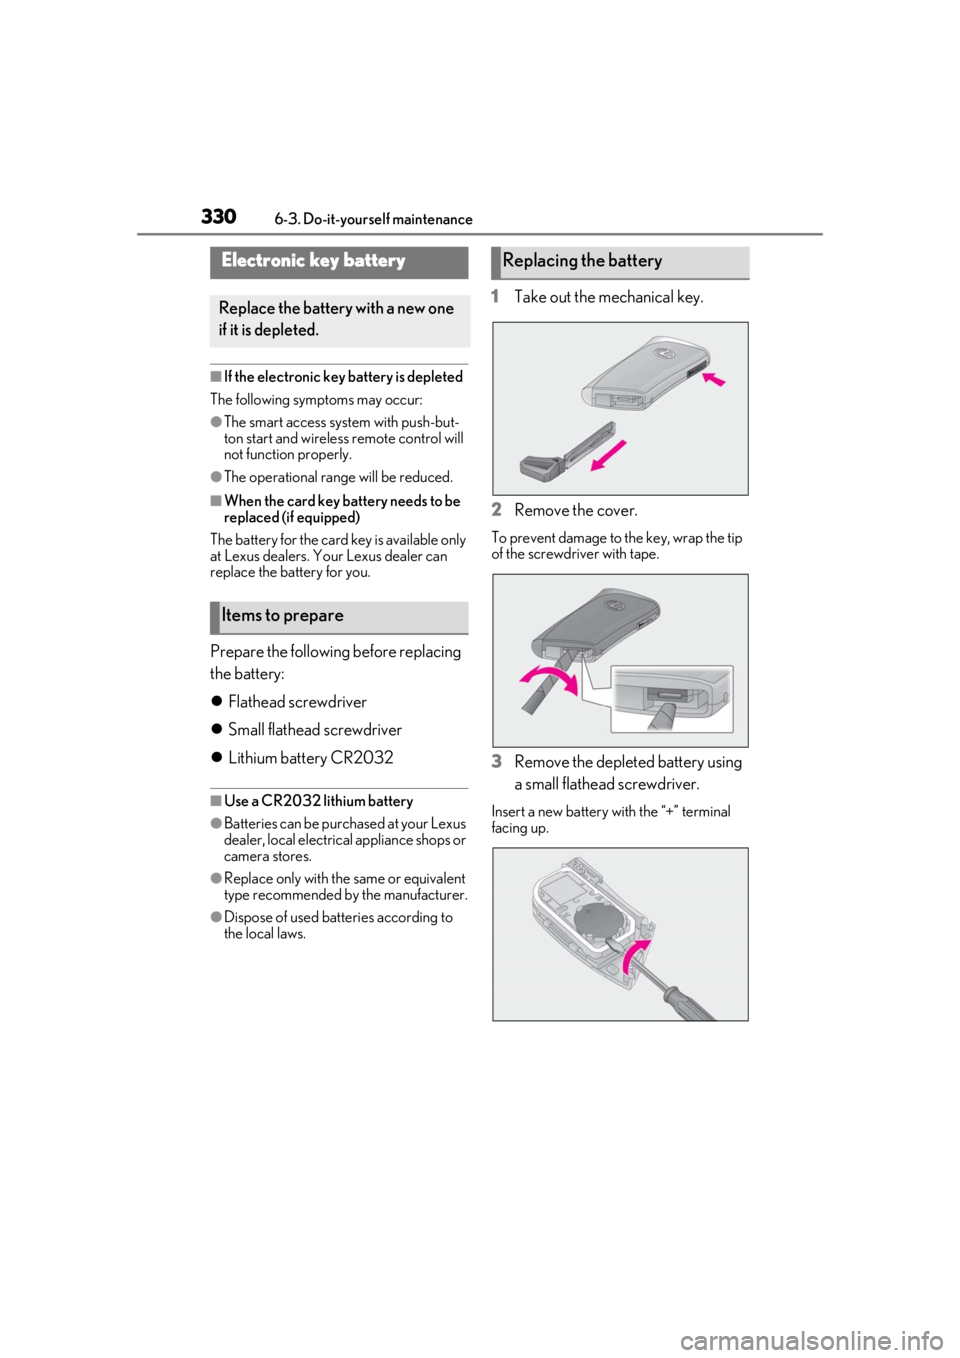
1 Take out the mechanical key.
2 Remove the cover.
To prevent damage to the key, wrap the tip
of the screwdri ver with tape.
3Remove the depleted battery using
a small flathead screwdriver.
Insert a new battery with the “+” terminal
facing up.
Electronic key battery
Replace the battery with a new one
if it is depleted.
Items to prepare
Replacing the battery
Page 331 of 448
3316-3. Do-it-yourself maintenance
6
Maintenance and care
1Turn the engine switch
2 Open the Fuse box cover.
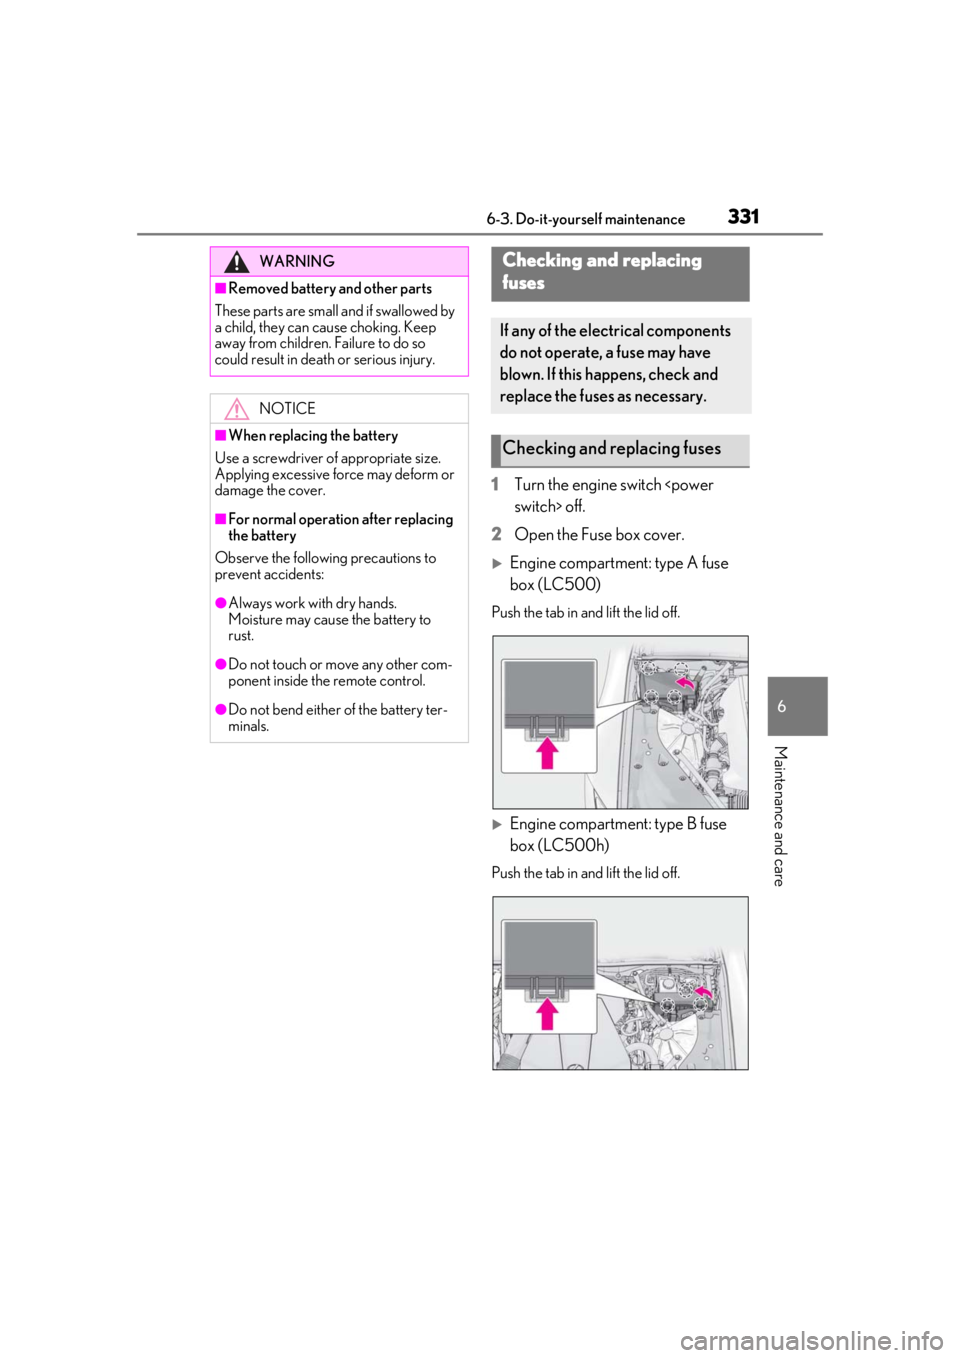
Engine compartment: type A fuse
box (LC500)
Push the tab in and lift the lid off.
Engine compartment: type B fuse
box (LC500h)
Push the tab in and lift the lid off.
WARNING
■Removed battery and other parts
These parts are small and if swallowed by
a child, they can cause choking. Keep
away from children. Failure to do so
could result in death or serious injury.
NOTICE
■When replacing the battery
Use a screwdriver of appropriate size.
Applying excessive force may deform or
damage the cover.
■For normal operation after replacing
the battery
Observe the following precautions to
prevent accidents:
●Always work with dry hands.
Moisture may cause the battery to
rust.
●Do not touch or move any other com-
ponent inside the remote control.
●Do not bend either of the battery ter-
minals.
Checking and replacing
fuses
If any of the electrical components
do not operate, a fuse may have
blown. If this happens, check and
replace the fuses as necessary.
Checking and replacing fuses
Page 367 of 448
3677-2. Steps to take in an emergency
7
When trouble arises
the filler opening due to air being dis-
charged from inside the fuel tank.
Therefore, fill the fuel tank carefully and
slowly.
■When the electronic key does not work
properly
●Make sure that the smart access system
with push-button start has not been deac-
tivated using the Remote Touch or at your
Lexus dealer. If it is off, turn the function
on.
●Check if battery-saving mode is set. If it is
set, cancel the function. ( P.119)
Use the mechanical key ( P.108) in
order to perform th e following opera-
tions:
WARNING
■After opening the fuel filler door
Make sure to put back the cover to the
center of the rear seat. Failure to do so
may cause an accident.
NOTICE
■After opening the fuel filler door
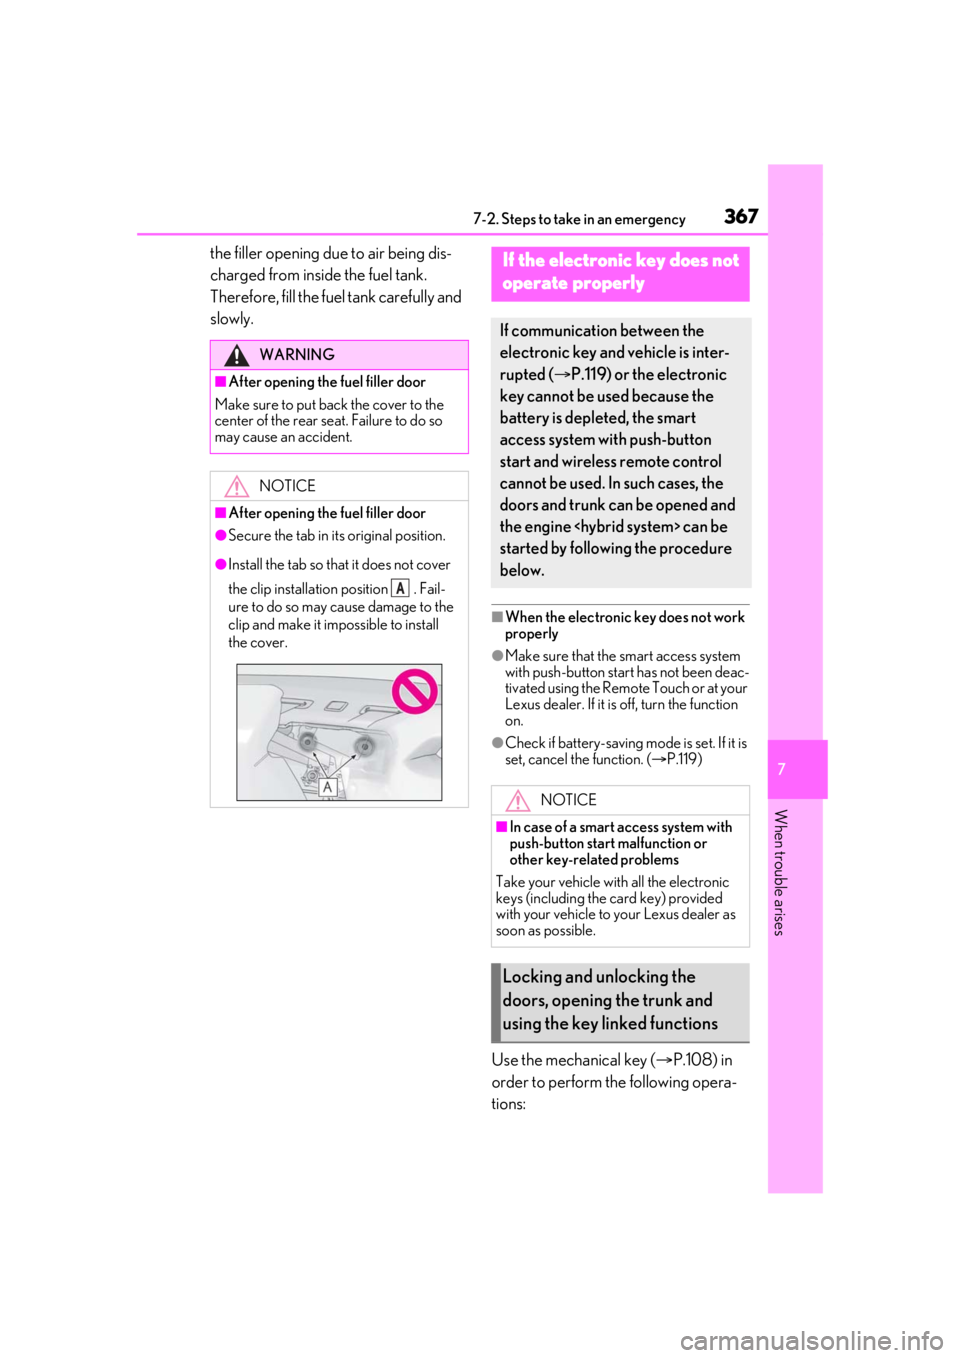
●Secure the tab in its original position.
●Install the tab so that it does not cover
the clip installation position . Fail-
ure to do so may cause damage to the
clip and make it impossible to install
the cover.
A
If the electronic key does not
operate properly
If communication between the
electronic key and vehicle is inter-
rupted ( P.119) or the electronic
key cannot be used because the
battery is depleted, the smart
access system with push-button
start and wireless remote control
cannot be used. In such cases, the
doors and trunk can be opened and
the engine
started by following the procedure
below.
NOTICE
■In case of a smart access system with
push-button start malfunction or
other key-rela ted problems
Take your vehicle with all the electronic
keys (including the card key) provided
with your vehicle to your Lexus dealer as
soon as possible.
Locking and unlocking the
doors, opening the trunk and
using the key linked functions
Page 374 of 448

3747-2. Steps to take in an emergency
■When the 12-volt battery is removed or
discharged
●Information stored in the ECU is cleared.
When the 12-volt battery is depleted,
have the vehicle inspected at your Lexus
dealer.
●Some systems may require initialization.
( P.417)
■When removing the 12-volt battery ter-
minals
When the 12-volt battery terminals are
removed, the information stored in the
ECU is cleared. Before removing the 12-
volt battery terminals, contact your Lexus
dealer.
■Charging the 12-volt battery
The electricity stored in the 12-volt battery
will discharge gradually even when the
vehicle is not in use, due to natural dis-
charge and the draining effects of certain
electrical appliances. If the vehicle is left for
a long time, the 12-volt battery may dis-
charge, and the engine
may be unable to start. (The 12-volt battery
recharges automatically during driving.)
■When recharging or replacing the 12-
volt battery
●In some cases, it may not be possible to
unlock the doors using the smart access
system with push-button start when the
12-volt battery is discharged. Use the
wireless remote control or the mechani-
cal key to lock or unlock the doors.
●The engine
on the first attempt after the 12-volt bat-
tery has recharged bu t will start normally
after the second attempt. This is not a
malfunction.
●The engine switch
is memorized by the vehicle. When the
12-volt battery is reconnected, the system
will return to the mode it was in before
the 12-volt battery was discharged.
Before disconnecting the 12-volt battery,
turn the engine switch
If you are unsure what mode the engine
switch
12-volt battery discharged, be especially
careful when reconnecting the 12-volt
battery.
●If the 12-volt battery discharges, it may
not be possible to shift the shift position to
other positions. In this case, the vehicle
cannot be towed without lifting both rear
wheels because the re ar wheels will be
locked. ( P.342)
■When replacing the 12-volt battery
●Use a Central Degassing type 12-volt
battery (European Regulations).
●Type A*1: Use a 12-volt battery that the
case size is same as the previous one
(LN4), 20 hour rate capacity (20HR) is
equivalent (80Ah) or greater, and per-
formance rating (CCA) is equivalent
(685A) or greater.
Type B
*2: Use a 12-volt battery that the
case size is same as the previous one
(LN3), 20 hour rate capacity (20HR) is
equivalent (70Ah) or greater, and perfor-
mance rating (CCA) is equivalent
(600A) or greater.
• If the sizes differ, the 12-volt battery can- not be properly secured.
• If the 20 hour rate capacity is low, even if the time period where the vehicle is not
used is a short time, the 12-volt battery
may discharge and engine
●Use a 12-volt battery with a handle. If a
12-volt battery without a handle is used,
removal is more difficult.
●After exchanging, firmly attach the fol-
lowing items to the exhaust hole of the 12-
volt battery.
• Use the exhaust hose that was attached to the 12-volt battery before exchanging.
• Use the exhaust hole plug included with the 12-volt battery exchanged or the one
installed on the battery prior to the
exchange. (Depending on the 12-volt
battery to be exchanged, the exhaust
hole may be plugged.)
Page 405 of 448
4058-2. Customization
8
Vehicle specifications
8-2.Customization
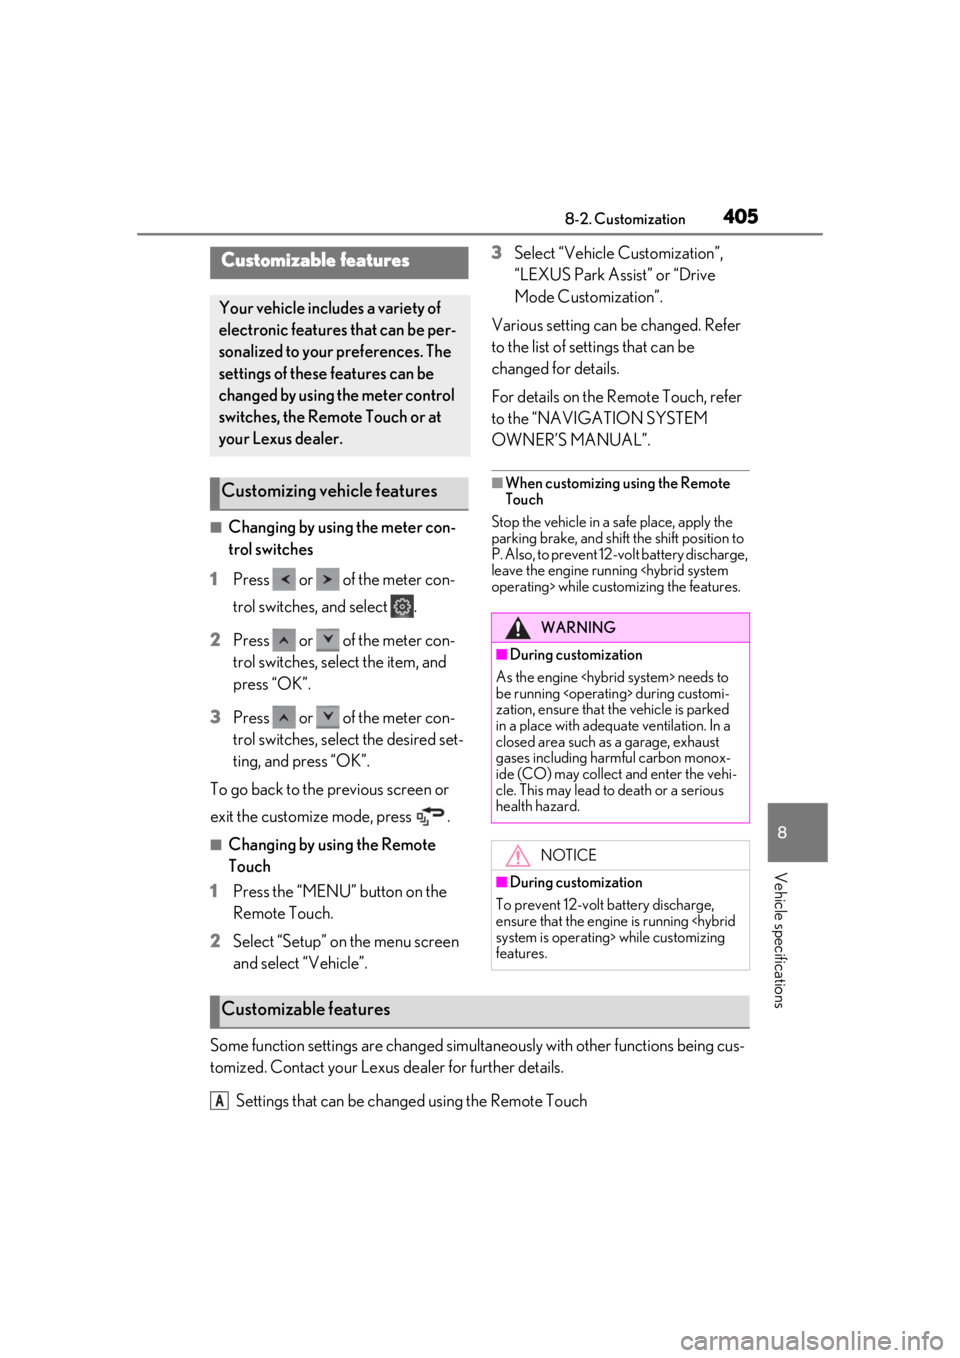
■Changing by using the meter con-
trol switches
1 Press or of the meter con-
trol switches, and select .
2 Press or of the meter con-
trol switches, select the item, and
press “OK”.
3 Press or of the meter con-
trol switches, select the desired set-
ting, and press “OK”.
To go back to the previous screen or
exit the customize mode, press .
■Changing by using the Remote
Touch
1 Press the “MENU” button on the
Remote Touch.
2 Select “Setup” on the menu screen
and select “Vehicle”. 3
Select “Vehicle Customization”,
“LEXUS Park Assist” or “Drive
Mode Customization”.
Various setting can be changed. Refer
to the list of settings that can be
changed for details.
For details on the Remote Touch, refer
to the “NAVIGATION SYSTEM
OWNER’S MANUAL”.
■When customizing using the Remote
Touch
Stop the vehicle in a safe place, apply the
parking brake, and shift the shift position to
P. Also, to prevent 12-volt battery discharge,
leave the engine running
Some function settings are changed simultaneously with other functions being cus-
tomized. Contact your Lexus dealer for further details.
Settings that can be changed using the Remote Touch
Customizable features
Your vehicle includes a variety of
electronic features that can be per-
sonalized to your preferences. The
settings of these features can be
changed by using the meter control
switches, the Remote Touch or at
your Lexus dealer.
Customizing vehicle features
WARNING
■During customization
As the engine
be running
zation, ensure that the vehicle is parked
in a place with adequate ventilation. In a
closed area such as a garage, exhaust
gases including harmful carbon monox-
ide (CO) may collect and enter the vehi-
cle. This may lead to death or a serious
health hazard.
NOTICE
■During customization
To prevent 12-volt battery discharge,
ensure that the engine is running
features.
Customizable features
A
Page 410 of 448
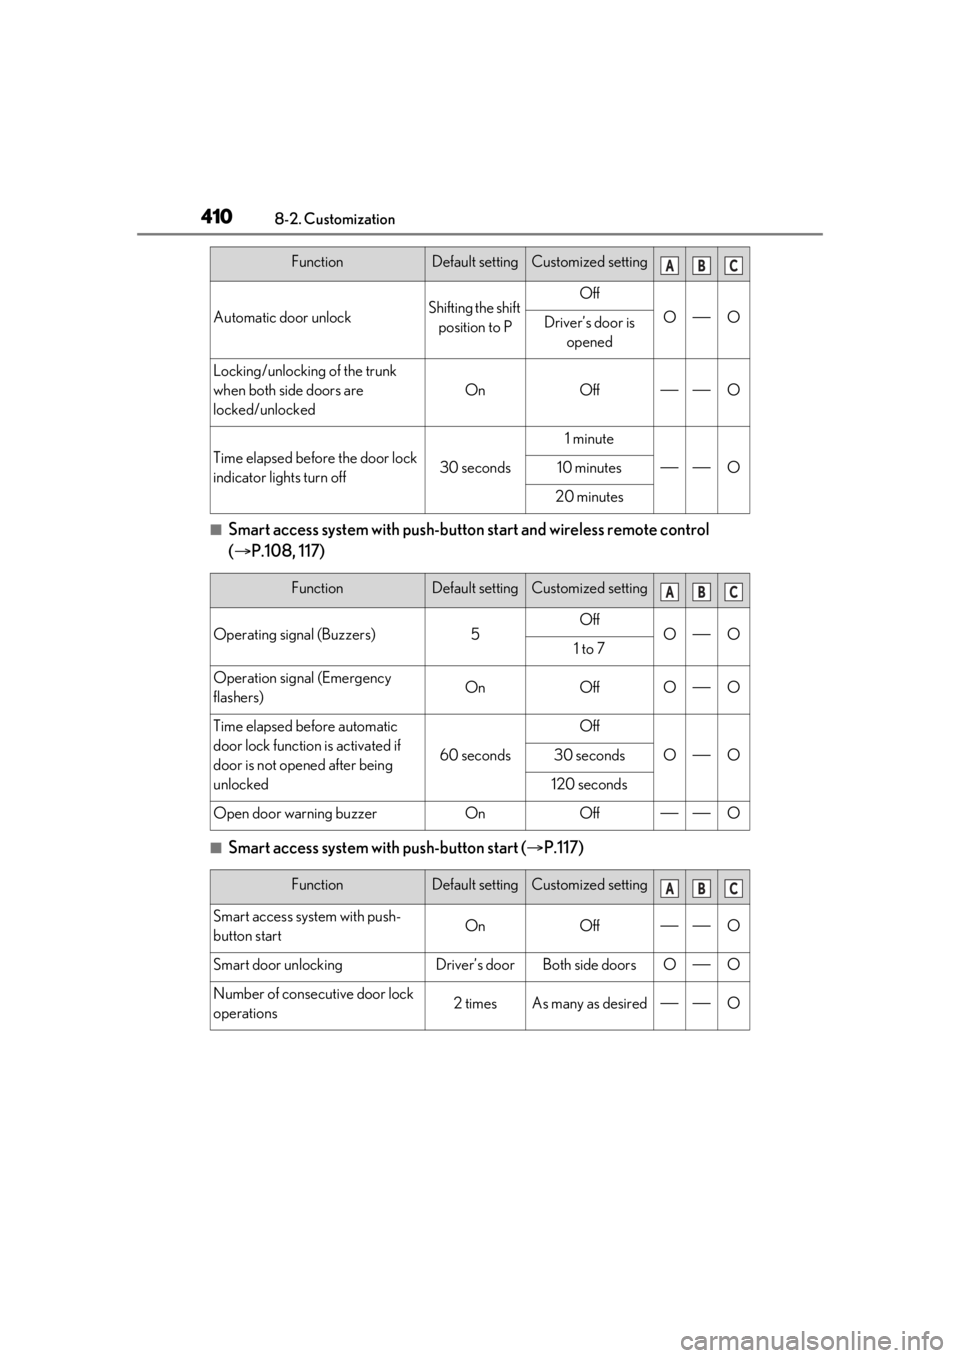
4108-2. Customization
■Smart access system with push-button start and wireless remote control
( P.108, 117)
■Smart access system with push-button start ( P.117)
Automatic door unlockShifting the shift
position to POff
OODriver’s door is opened
Locking/unlocking of the trunk
when both side doors are
locked/unlocked
OnOffO
Time elapsed before the door lock
indicator lights turn off30 seconds
1 minute
O10 minutes
20 minutes
FunctionDefault settingCustomized setting
Operating signal (Buzzers)5OffOO1 to 7
Operation signal (Emergency
flashers)OnOffOO
Time elapsed before automatic
door lock function is activated if
door is not open ed after being
unlocked
60 seconds
Off
OO30 seconds
120 seconds
Open door warning buzzerOnOffO
FunctionDefault settingCustomized setting
Smart access system with push-
button startOnOffO
Smart door unlockingDriver’s doorBoth side doorsOO
Number of consecutive door lock
operations2 timesAs many as desiredO
FunctionDefault settingCustomized settingABC
ABC
ABC