steering wheel Lexus LC500 2021 / LEXUS 2021 LC500,LC500H (OM11559U) Service Manual
[x] Cancel search | Manufacturer: LEXUS, Model Year: 2021, Model line: LC500, Model: Lexus LC500 2021Pages: 448, PDF Size: 14.11 MB
Page 258 of 448
2585-2. Lexus Climate Concierge
5-2.Lexus Climate Concierge
Select
The indicator on the Lexus Climate Con-
cierge control screen illuminates, and the
automatic air conditioning system, seat
heaters and ventilators, and heated steer-
ing wheel operate in automatic mode.
If any of the system is operated manually,
the indicator turns off. However, all other
functions continue to operate in automatic
mode.
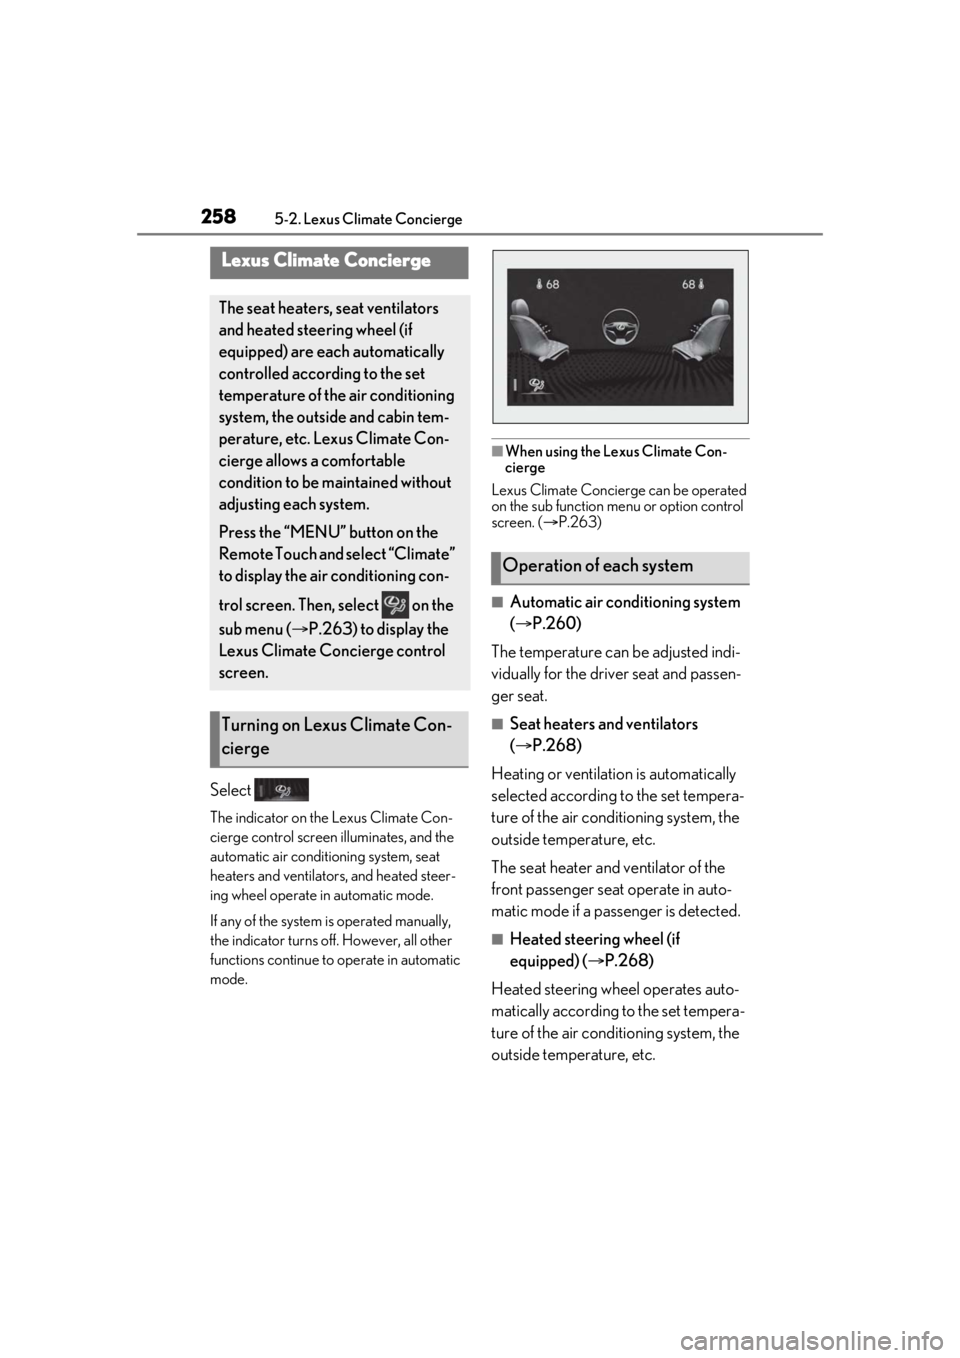
■When using the Lexus Climate Con-
cierge
Lexus Climate Concierge can be operated
on the sub function menu or option control
screen. ( P.263)
■Automatic air conditioning system
( P.260)
The temperature can be adjusted indi-
vidually for the driver seat and passen-
ger seat.
■Seat heaters and ventilators
( P.268)
Heating or ventilation is automatically
selected according to the set tempera-
ture of the air conditioning system, the
outside temperature, etc.
The seat heater and ventilator of the
front passenger seat operate in auto-
matic mode if a passenger is detected.
■Heated steering wheel (if
equipped) ( P.268)
Heated steering wheel operates auto-
matically according to the set tempera-
ture of the air conditioning system, the
outside temperature, etc.
Lexus Climate Concierge
The seat heaters, seat ventilators
and heated steering wheel (if
equipped) are each automatically
controlled according to the set
temperature of the air conditioning
system, the outside and cabin tem-
perature, etc. Lexus Climate Con-
cierge allows a comfortable
condition to be maintained without
adjusting each system.
Press the “MENU” button on the
Remote Touch and select “Climate”
to display the air conditioning con-
trol screen. Then, select on the
sub menu ( P.263) to display the
Lexus Climate Concierge control
screen.
Turning on Lexus Climate Con-
cierge
Operation of each system
Page 264 of 448
2645-3. Using the air conditioning system
Sub menu
Selecting the sub menu item to switch the
main screen.
: Display the air conditioning control
screen
: Display the heated steering wheel (if
equipped)/seat heater/seat ventilator con-
trol screen
: Display the Lexus Climate Con-
cierge control screen
: Display the option control screen
Adjust the left-hand side tempera-
ture setting
Adjust the fan speed setting
Select the air flow mode
: Air flows to the upper body
: Air flows to the upper body and feet
: Air flows to the feet
: Air flows to the feet and the wind-
shield defogger operates
Adjust the right-hand side tem-
perature setting
Function on/off indicators
When the function is on, the indicator illu-
minates on the control screen.
Sub function menu
When the sub function button on the
Remote Touch is pressed, the following
functions can be switched on and off.
: Set Lexus Climate Concierge
( P.258)
“AUTO”: Set automatic mode on/off (
P.265)
“Off”: Turn the fan off
“A/C”: Set cooling and dehumidification
function
“DUAL”: Adjust the temperature for driver
and passenger seats separately (“DUAL”
mode) ( P.266)
: Set eco air conditioning mode
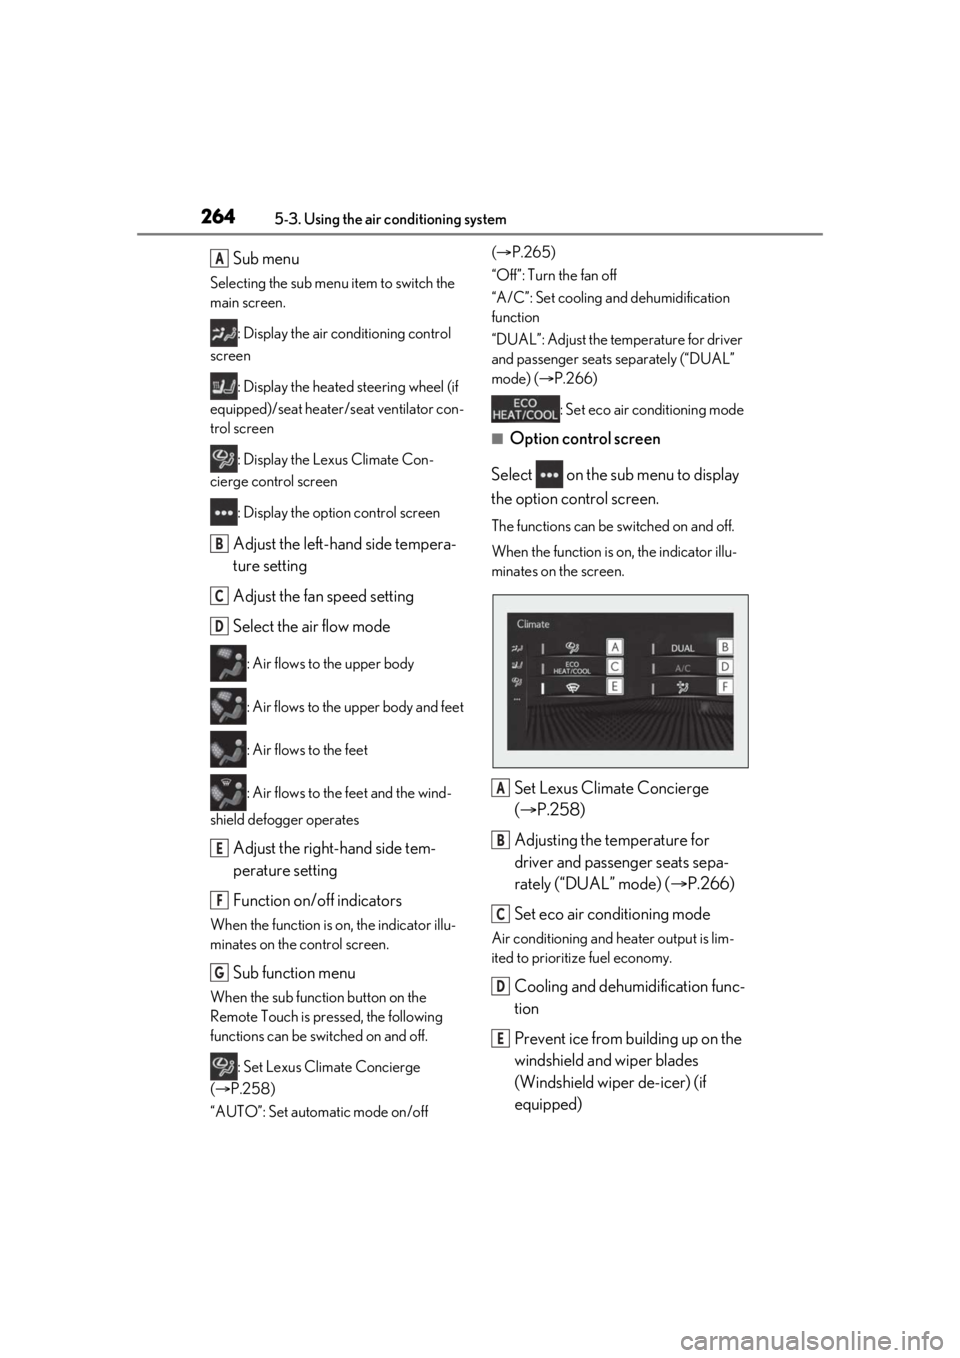
■Option control screen
Select on the sub menu to display
the option control screen.
The functions can be switched on and off.
When the function is on, the indicator illu-
minates on the screen.
Set Lexus Climate Concierge
( P.258)
Adjusting the temperature for
driver and passenger seats sepa-
rately (“DUAL” mode) ( P.266)
Set eco air conditioning mode
Air conditioning and heater output is lim-
ited to prioritize fuel economy.
Cooling and dehumidification func-
tion
Prevent ice from building up on the
windshield and wiper blades
(Windshield wiper de-icer) (if
equipped)
A
B
C
D
E
F
G
A
B
C
D
E
Page 265 of 448
2655-3. Using the air conditioning system
5
Interior features
Removing pollen from the air
(Micro dust and pollen filter)
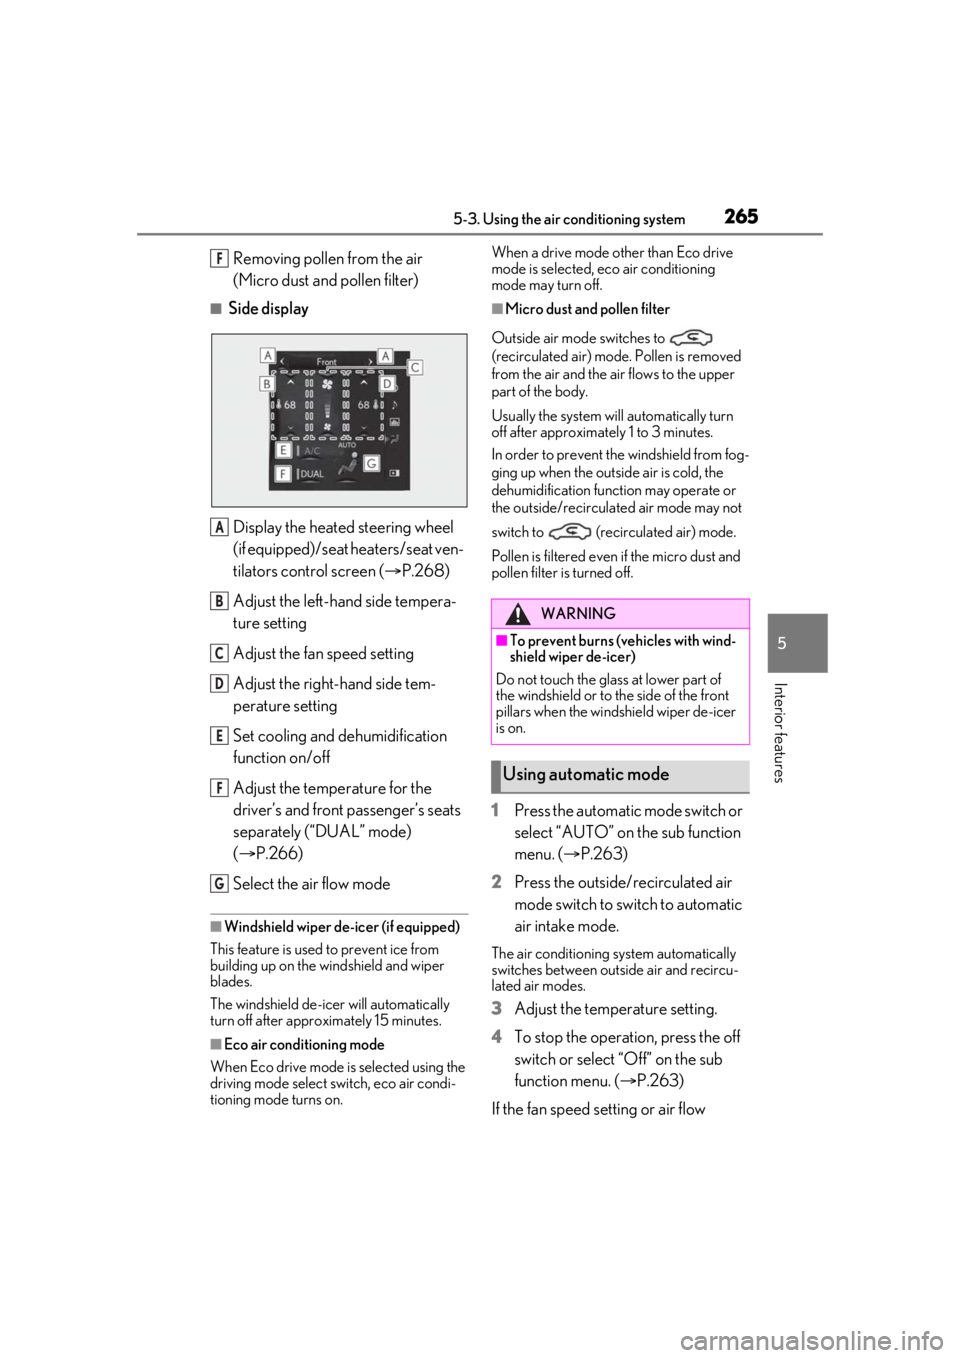
■Side displayDisplay the heated steering wheel
(if equipped)/seat heaters/seat ven-
tilators control screen ( P.268)
Adjust the left-hand side tempera-
ture setting
Adjust the fan speed setting
Adjust the right-hand side tem-
perature setting
Set cooling and dehumidification
function on/off
Adjust the temperature for the
driver’s and front passenger’s seats
separately (“DUAL” mode)
( P.266)
Select the air flow mode
■Windshield wiper de-icer (if equipped)
This feature is used to prevent ice from
building up on the wi ndshield and wiper
blades.
The windshield de-icer will automatically
turn off after approximately 15 minutes.
■Eco air conditioning mode
When Eco drive mode is selected using the
driving mode select switch, eco air condi-
tioning mode turns on. When a drive mode other than Eco drive
mode is selected, eco air conditioning
mode may turn off.
■Micro dust and pollen filter
Outside air mode switches to
(recirculated air) mode. Pollen is removed
from the air and the air flows to the upper
part of the body.
Usually the system will automatically turn
off after approximately 1 to 3 minutes.
In order to prevent the windshield from fog-
ging up when the outside air is cold, the
dehumidification function may operate or
the outside/recirculated air mode may not
switch to (recirculated air) mode.
Pollen is filtered even if the micro dust and
pollen filter is turned off.
1 Press the automatic mode switch or
select “AUTO” on the sub function
menu. ( P.263)
2 Press the outside/recirculated air
mode switch to switch to automatic
air intake mode.
The air conditioning system automatically
switches between outside air and recircu-
lated air modes.
3Adjust the temperature setting.
4 To stop the operation, press the off
switch or select “Off” on the sub
function menu. ( P.263)
If the fan speed setting or air flow
F
A
B
C
D
E
F
G
WARNING
■To prevent burns (vehicles with wind-
shield wiper de-icer)
Do not touch the glass at lower part of
the windshield or to the side of the front
pillars when the windshield wiper de-icer
is on.
Using automatic mode
Page 268 of 448
2685-3. Using the air conditioning system
*:If equipped
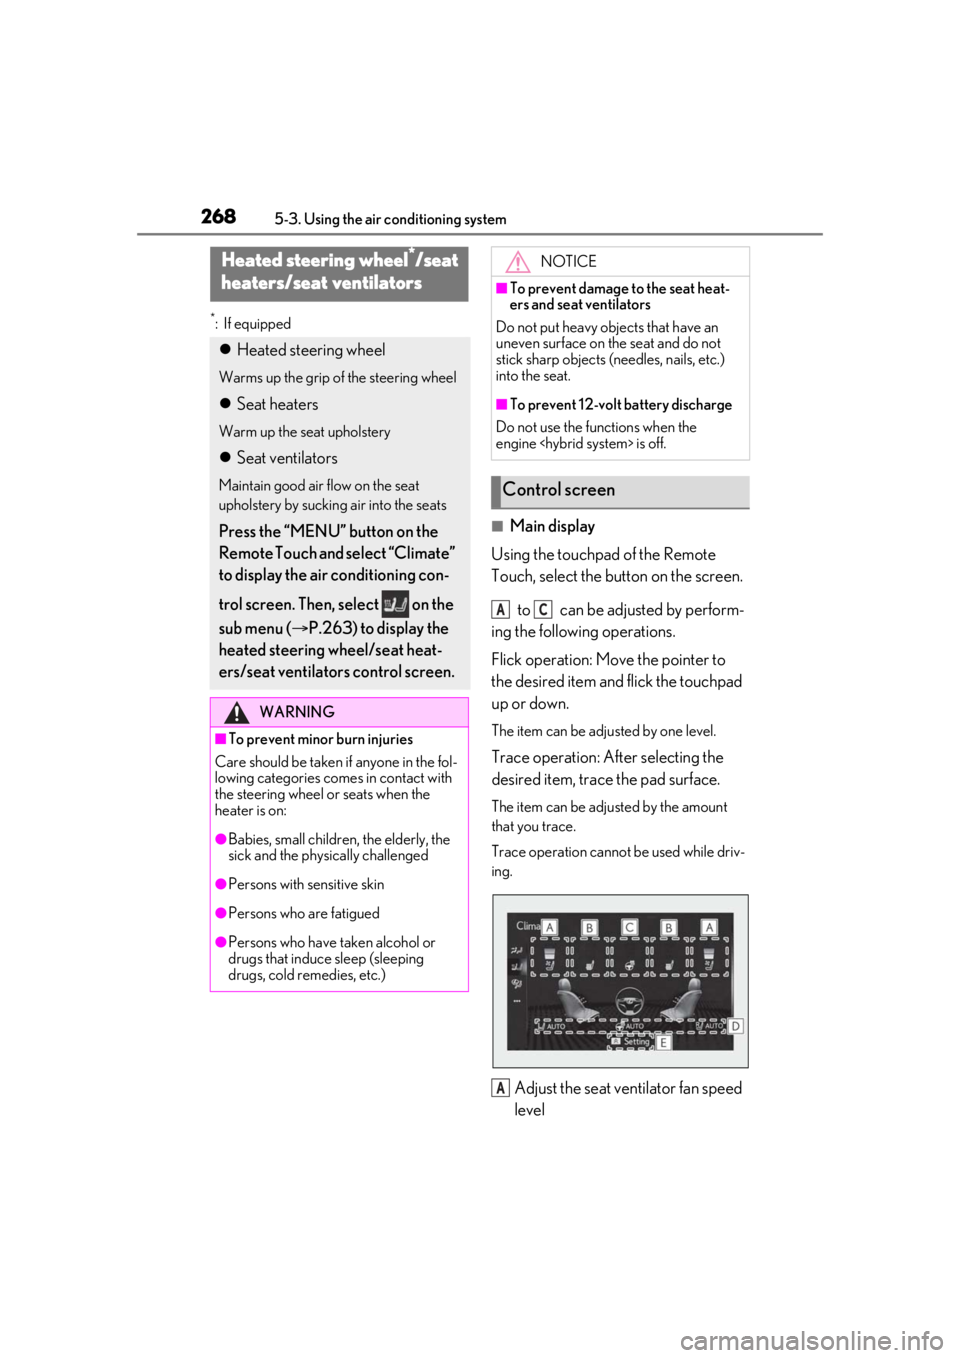
■Main display
Using the touchpad of the Remote
Touch, select the button on the screen.
to can be adjusted by perform-
ing the following operations.
Flick operation: Move the pointer to
the desired item and flick the touchpad
up or down.
The item can be adjusted by one level.
Trace operation: After selecting the
desired item, trace the pad surface.
The item can be adjusted by the amount
that you trace.
Trace operation cannot be used while driv-
ing.
Adjust the seat ventilator fan speed
level
Heated steering wheel*/seat
heaters/seat ventilators
Heated steering wheel
Warms up the grip of the steering wheel
Seat heaters
Warm up the seat upholstery
Seat ventilators
Maintain good air flow on the seat
upholstery by sucking air into the seats
Press the “MENU” button on the
Remote Touch and select “Climate”
to display the air conditioning con-
trol screen. Then, select on the
sub menu ( P.263) to display the
heated steering wheel/seat heat-
ers/seat ventilators control screen.
WARNING
■To prevent minor burn injuries
Care should be taken if anyone in the fol-
lowing categories comes in contact with
the steering wheel or seats when the
heater is on:
●Babies, small children, the elderly, the
sick and the phys ically challenged
●Persons with sensitive skin
●Persons who are fatigued
●Persons who have taken alcohol or
drugs that induce sleep (sleeping
drugs, cold remedies, etc.)
NOTICE
■To prevent damage to the seat heat-
ers and seat ventilators
Do not put heavy objects that have an
uneven surface on the seat and do not
stick sharp objects (n eedles, nails, etc.)
into the seat.
■To prevent 12-volt battery discharge
Do not use the functions when the
engine
Control screen
AC
A
Page 269 of 448
2695-3. Using the air conditioning system
5
Interior features
The seat ventilator can be adjusted in 3 lev-
els.
When the seat ventilator is operated, the
fan speed level is disp layed on the screen.
Adjust the seat heater temperature
level
The seat heater can be adjusted in 3 levels.
When the seat heater is operated, the tem-
perature level is displayed on the screen.
Adjust the heated steering wheel
temperature level
The heated steering wheel can be adjusted
in 2 levels.
When the heated steering wheel is oper-
ated, the temperature level is displayed on
the screen.
Automatic mode on/off indicators
When the automatic mode is on, the indi-
cator illuminates on the screen.
Sub function menu
When the sub function button on the
Remote Touch is pressed, the following
functions can be set to automatic mode.
: Left-hand side seat heater/seat
ventilator
: Heated steering wheel
: Right-hand side seat heater/seat
ventilator
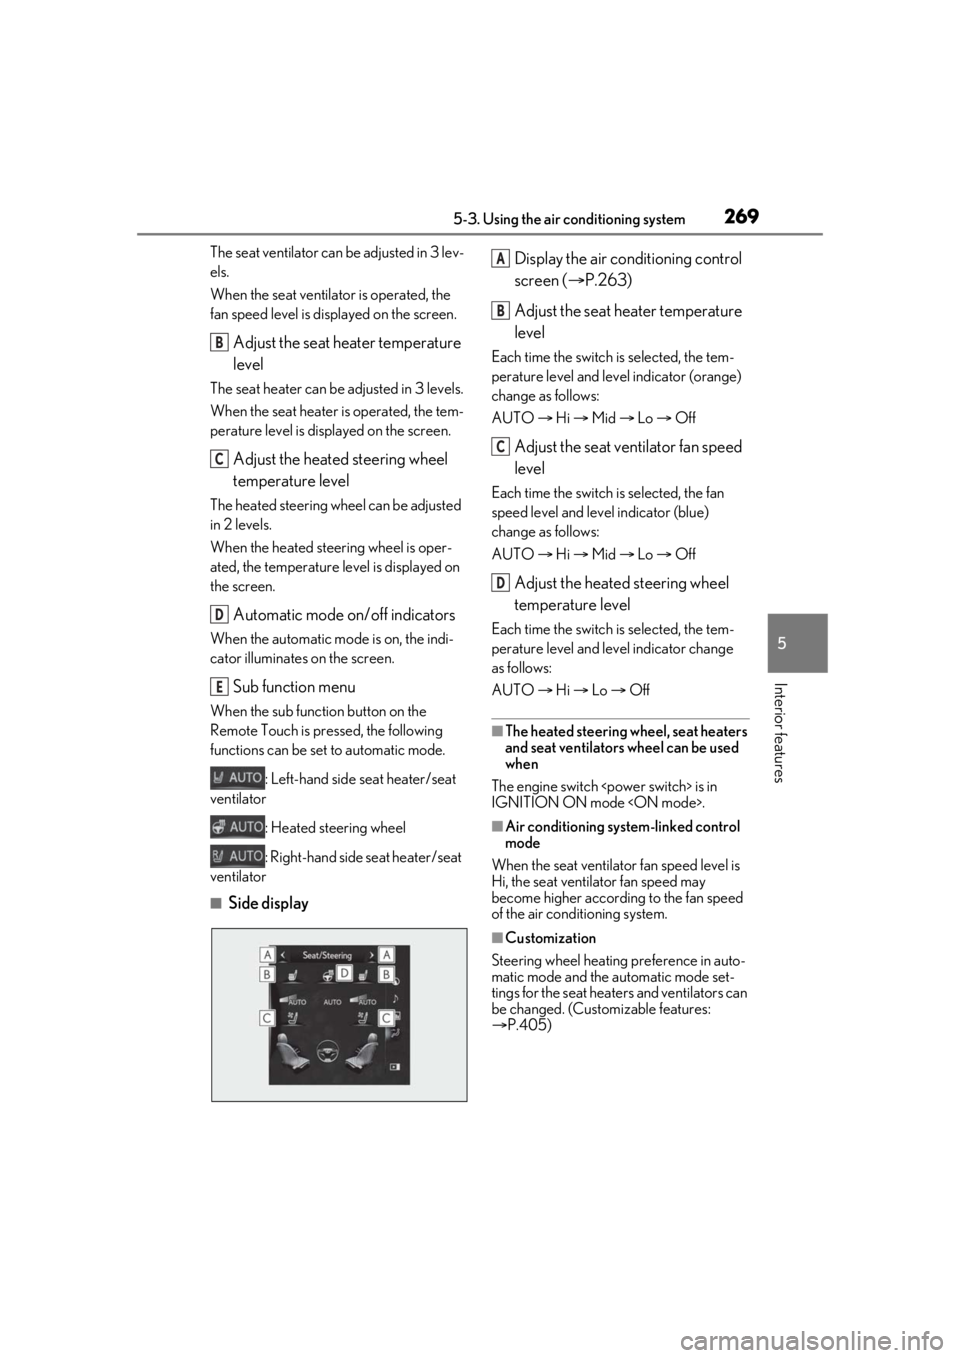
■Side display Display the air conditioning control
screen (
P.263)
Adjust the seat heater temperature
level
Each time the switch is selected, the tem-
perature level and level indicator (orange)
change as follows:
AUTO Hi Mid Lo Off
Adjust the seat ventilator fan speed
level
Each time the switch is selected, the fan
speed level and level indicator (blue)
change as follows:
AUTO Hi Mid Lo Off
Adjust the heated steering wheel
temperature level
Each time the switch is selected, the tem-
perature level and le vel indicator change
as follows:
AUTO Hi Lo Off
■The heated steering wheel, seat heaters
and seat ventilators wheel can be used
when
The engine switch
IGNITION ON mode
■Air conditioning system-linked control
mode
When the seat ventilator fan speed level is
Hi, the seat ventilator fan speed may
become higher according to the fan speed
of the air conditioning system.
■Customization
Steering wheel heating preference in auto-
matic mode and the automatic mode set-
tings for the seat heaters and ventilators can
be changed. (Customizable features:
P.405)
B
C
D
E
A
B
C
D
Page 298 of 448
2986-2. Maintenance
Parking brake
• Move smoothly?
•When parked on a slope and the park-
ing brake is on, is the
vehicle securely
stopped?
Seat belts
• Do the seat belts operate smoothly?
• The seat belts should not be damaged.
Seats• Do the seat controls operate properly?
Steering wheel
• Does the steering wheel rotate
smoothly?
• Does the steering wheel have the cor-
rect amount of free
play?
•There should not be any strange sounds
coming from the
steering wheel.
Vehicle exterior
ItemsCheck points
Doors/trunk• Do the doors/trunk operate smoothly?
Engine hood
•Does the engine hood lock system
work properly?
Fluid leaks
•There should not be any signs of fluid
leakage after the
vehicle has been
parked.
ItemsCheck points
Tires
• Is the tire inflation pressure correct?
• The tires should not be damaged or
excessively worn.
• Have the tires been rotated according to
the maintenance
schedule?
• The wheel nuts should not be loose.
Windshield wip-
ers
• The wiper blades should not show any
signs of cracking,
splitting, wear, con-
tamination or defor-
mation.
• The wiper blades should clear the
windshield without
streaking or skip-
ping.
ItemsCheck points
Page 339 of 448
3397-1. Essential information
7
When trouble arises
seconds or more, or press it briefly
3 times or more in succession.
5 Stop the vehicle in a safe place by
the road.
Remove the seat belt first.
If the door can be opened, open the
door and exit the vehicle.
If the door can not be opened, open
the window using the power window
switch and exit the vehicle through
the window.
If the window can not be opened
using the power window switch,
remain calm, wait until the water
level inside the vehicle rises to the
point that the water pressure inside
of the vehicle equals the water pres-
sure outside of the vehicle, and then
open the door and exit the vehicle.
WARNING
■If the engine
be turned off while driving
Power assist for the steering wheel will
be lost, making th e steering wheel
heavier to turn. Decelerate as much as
possible before turning off the engine
If the vehicle is trapped in
rising water
In the event the vehicle is sub-
merged in water, remain calm and
perform the following.
WARNING
■Using an emergency hammer* for
emergency escape
The front side wind ows and rear side
windows, as well as the rear window can
be shattered by an emergency hammer
*
used for emergency escape.
However, an emergency hammer can
not shatter the windshie ld as it is lami-
nated glass.
*: Contact your Lexus dealer or after-
market accessory manufacturer for
further information about an emer-
gency hammer.
Page 341 of 448
3417-2. Steps to take in an emergency
7
When trouble arises
7-2.Steps to take in an emergency
If your vehicle needs to be
towed
If towing is necessary, we recom-
mend having your vehicle towed by
your Lexus dealer or commercial
towing service, using a wheel-lift
type truck or flatbed truck.
Use a safety chain system for all
towing, and abide by all state/pro-
vincial and local laws.
WARNING
Observe the following precautions.
Failure to do so may result in death or
serious injury.
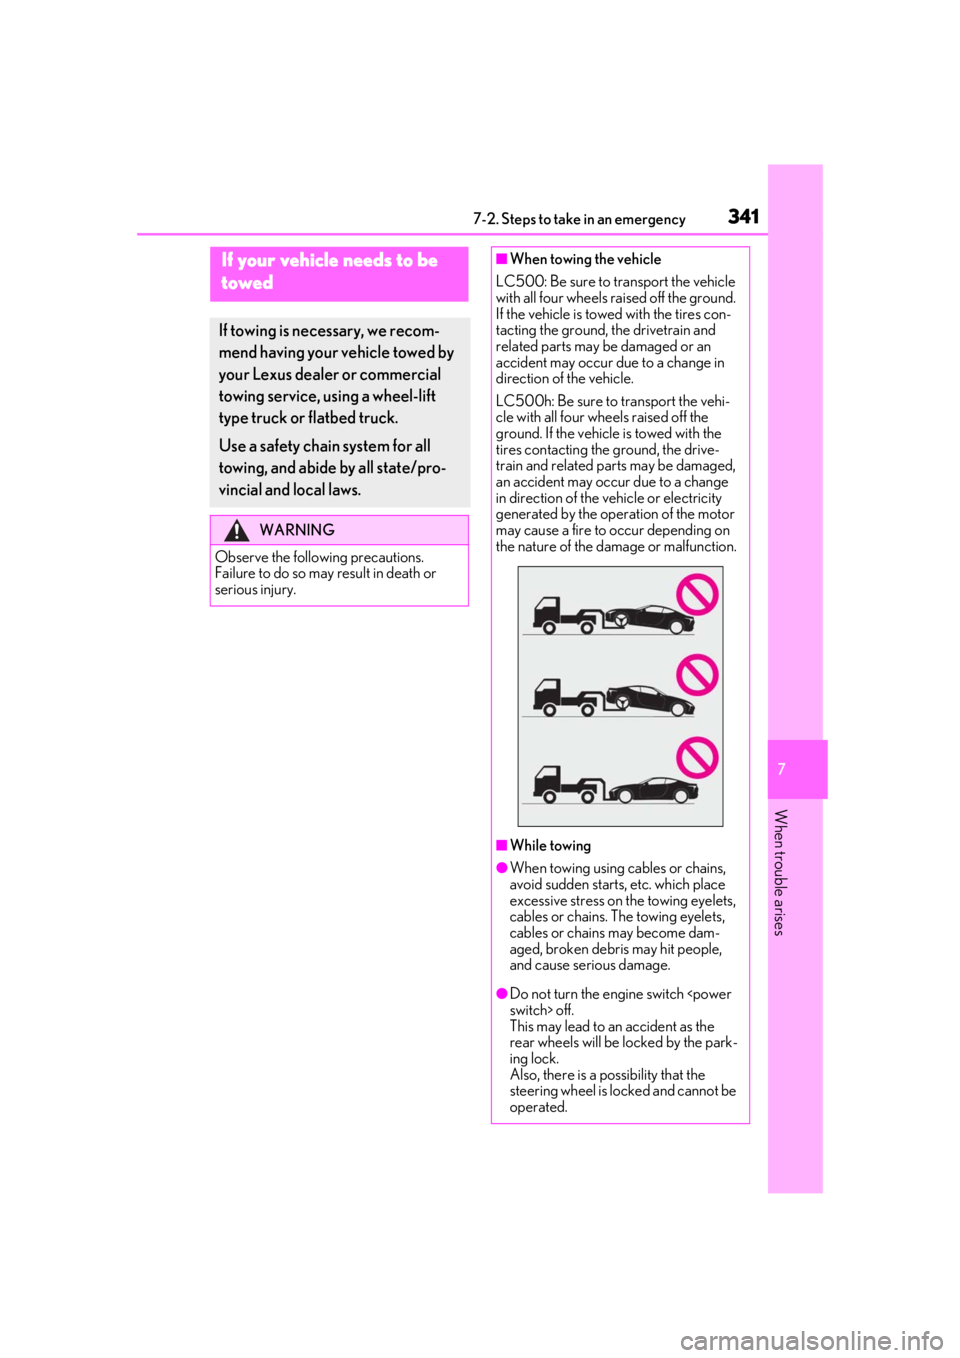
■When towing the vehicle
LC500: Be sure to transport the vehicle
with all four wheels raised off the ground.
If the vehicle is towed with the tires con-
tacting the ground, the drivetrain and
related parts may be damaged or an
accident may occur due to a change in
direction of the vehicle.
LC500h: Be sure to transport the vehi-
cle with all four wheels raised off the
ground. If the vehicle is towed with the
tires contacting the ground, the drive-
train and related parts may be damaged,
an accident may occur due to a change
in direction of the vehicle or electricity
generated by the operation of the motor
may cause a fire to occur depending on
the nature of the damage or malfunction.
■While towing
●When towing using cables or chains,
avoid sudden starts, etc. which place
excessive stress on the towing eyelets,
cables or chains. The towing eyelets,
cables or chains may become dam-
aged, broken debris may hit people,
and cause serious damage.
●Do not turn the engine switch
This may lead to an accident as the
rear wheels will be locked by the park-
ing lock.
Also, there is a possibility that the
steering wheel is locked and cannot be
operated.
Page 342 of 448
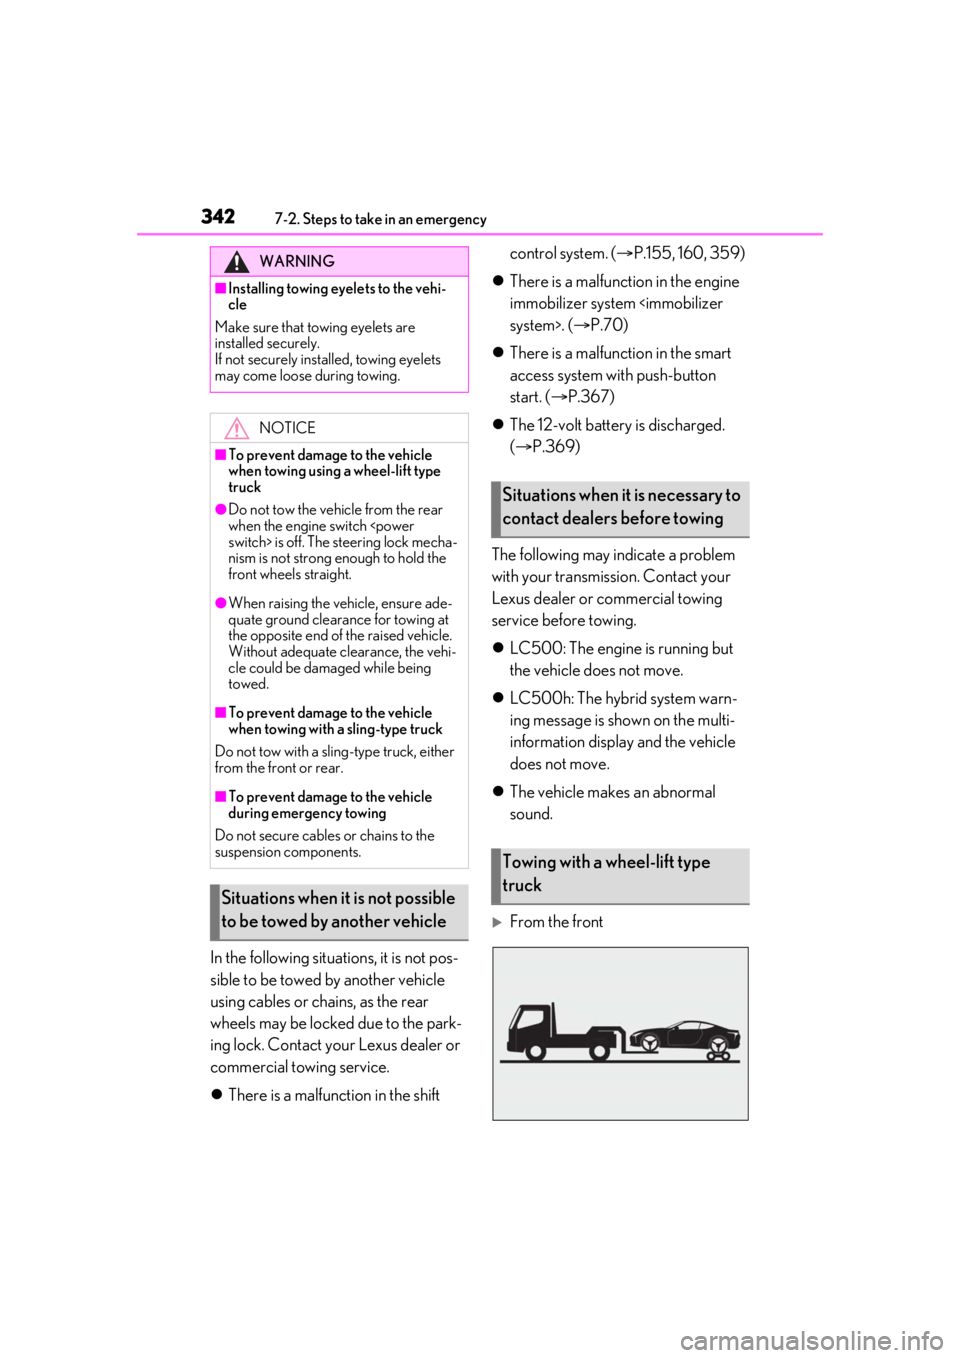
3427-2. Steps to take in an emergency
In the following situations, it is not pos-
sible to be towed by another vehicle
using cables or chains, as the rear
wheels may be locked due to the park-
ing lock. Contact your Lexus dealer or
commercial towing service.
There is a malfunction in the shift control system. (
P.155, 160, 359)
There is a malfunction in the engine
immobilizer system
There is a malfunction in the smart
access system with push-button
start. ( P.367)
The 12-volt battery is discharged.
( P.369)
The following may indicate a problem
with your transmission. Contact your
Lexus dealer or commercial towing
service before towing.
LC500: The engine is running but
the vehicle does not move.
LC500h: The hybrid system warn-
ing message is shown on the multi-
information display and the vehicle
does not move.
The vehicle makes an abnormal
sound.
From the front
WARNING
■Installing towing eyelets to the vehi-
cle
Make sure that towing eyelets are
installed securely.
If not securely installed, towing eyelets
may come loose during towing.
NOTICE
■To prevent damage to the vehicle
when towing using a wheel-lift type
truck
●Do not tow the vehicle from the rear
when the engine switch
nism is not strong enough to hold the
front wheels straight.
●When raising the vehicle, ensure ade-
quate ground clearance for towing at
the opposite end of the raised vehicle.
Without adequate clearance, the vehi-
cle could be damaged while being
towed.
■To prevent damage to the vehicle
when towing with a sling-type truck
Do not tow with a sling-type truck, either
from the front or rear.
■To prevent damage to the vehicle
during emergency towing
Do not secure cables or chains to the
suspension components.
Situations when it is not possible
to be towed by another vehicle
Situations when it is necessary to
contact dealers before towing
Towing with a wheel-lift type
truck
Page 343 of 448
3437-2. Steps to take in an emergency
7
When trouble arises
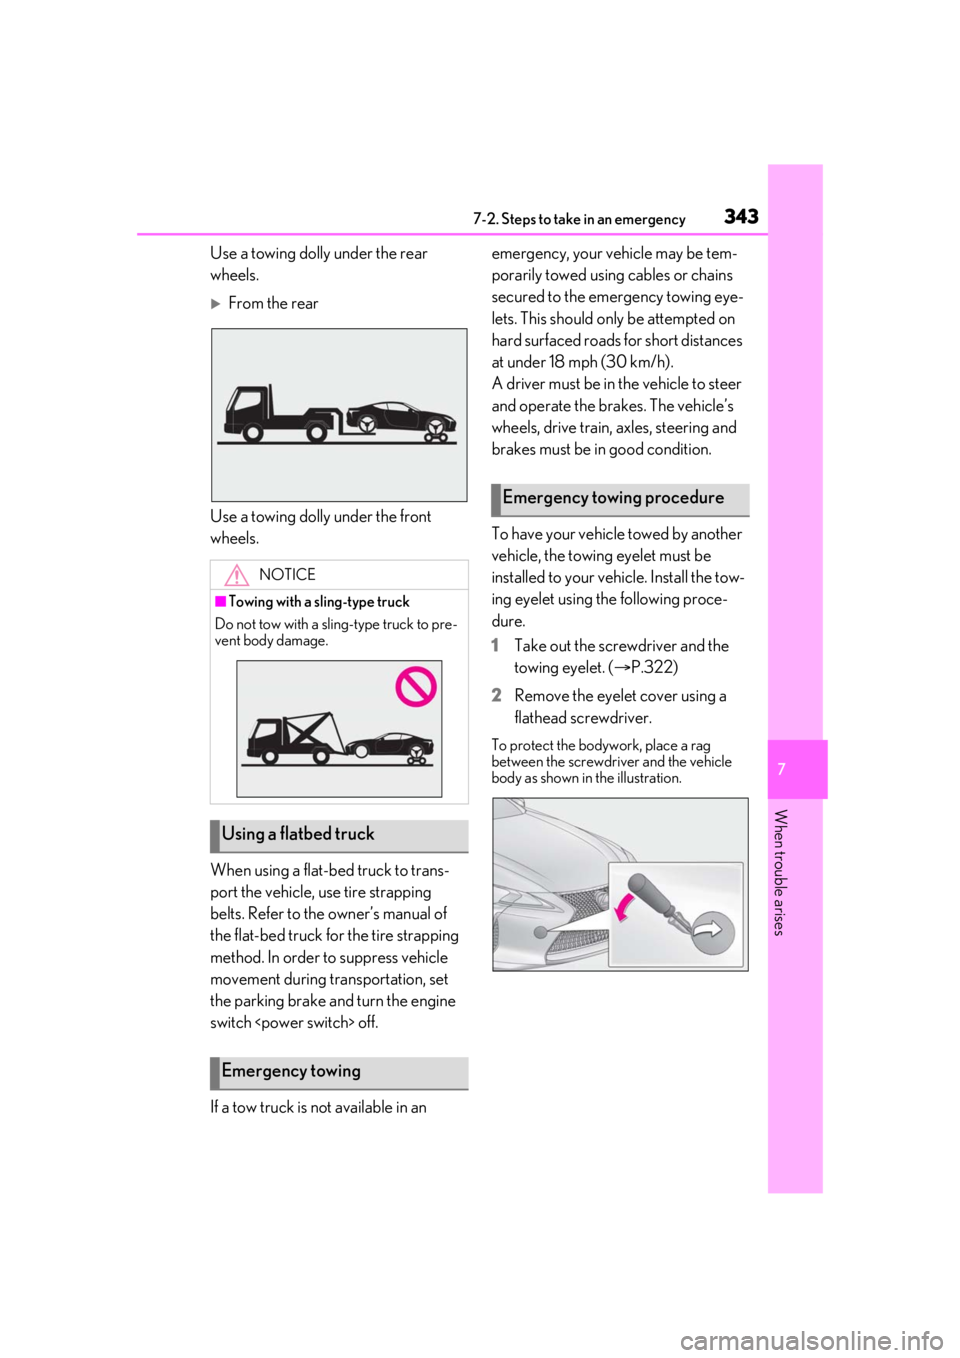
Use a towing dolly under the rear
wheels.
From the rear
Use a towing dolly under the front
wheels.
When using a flat-bed truck to trans-
port the vehicle, use tire strapping
belts. Refer to the owner’s manual of
the flat-bed truck for the tire strapping
method. In order to suppress vehicle
movement during tr ansportation, set
the parking brake and turn the engine
switch
If a tow truck is not available in an emergency, your vehicle may be tem-
porarily towed using cables or chains
secured to the emergency towing eye-
lets. This should only be attempted on
hard surfaced roads for short distances
at under 18 mph (30 km/h).
A driver must be in the vehicle to steer
and operate the brakes. The vehicle’s
wheels, drive train, axles, steering and
brakes must be in good condition.
To have your vehicle towed by another
vehicle, the towing eyelet must be
installed to your vehicle. Install the tow-
ing eyelet using the following proce-
dure.
1
Take out the screwdriver and the
towing eyelet. ( P.322)
2 Remove the eyelet cover using a
flathead screwdriver.
To protect the bodywork, place a rag
between the screwdriver and the vehicle
body as shown in the illustration.
NOTICE
■Towing with a sling-type truck
Do not tow with a sling-type truck to pre-
vent body damage.
Using a flatbed truck
Emergency towing
Emergency towing procedure