check engine lexus LC500C 2021 / LEXUS 2021 LC500 CONVERTIBLE (OM11498U) Owner's Guide
[x] Cancel search | Manufacturer: LEXUS, Model Year: 2021, Model line: LC500C, Model: Lexus LC500C 2021Pages: 410, PDF Size: 8.71 MB
Page 267 of 410
2656-2. Maintenance
6
Maintenance and care
6-2.Maintenance
■Repair and replacement
It is recommended that genuine Lexus parts
be used for repairs to ensure performance
of each system. If non-Lexus parts are used
in replacement or if a repair shop other than
a Lexus dealer perfor ms repairs, confirm
the warranty coverage.
■Allow inspection and repairs to be per-
formed by a Lexus dealer
●Lexus technicians are well-trained spe-
cialists and are kept up to date with the
latest service information. They are well
informed about the operations of all sys-
tems on your vehicle.
●Keep a copy of the repa ir order. It proves
that the maintenance that has been per-
formed is under warranty coverage. If
any problem should arise while your vehi-
cle is under warranty, your Lexus dealer
will promptly take care of it.
General maintenance should be per-
formed on a daily basis. This can be
done by yourself or by a Lexus dealer.
Scheduled maintenance should be
performed at specified intervals
according to the maintenance sched-
ule.
For details about ma intenance items and
schedules, refer to the “Warranty and Ser-
vice Guide”, “Owner’s Manual Supple-
ment” or “Scheduled Maintenance”.
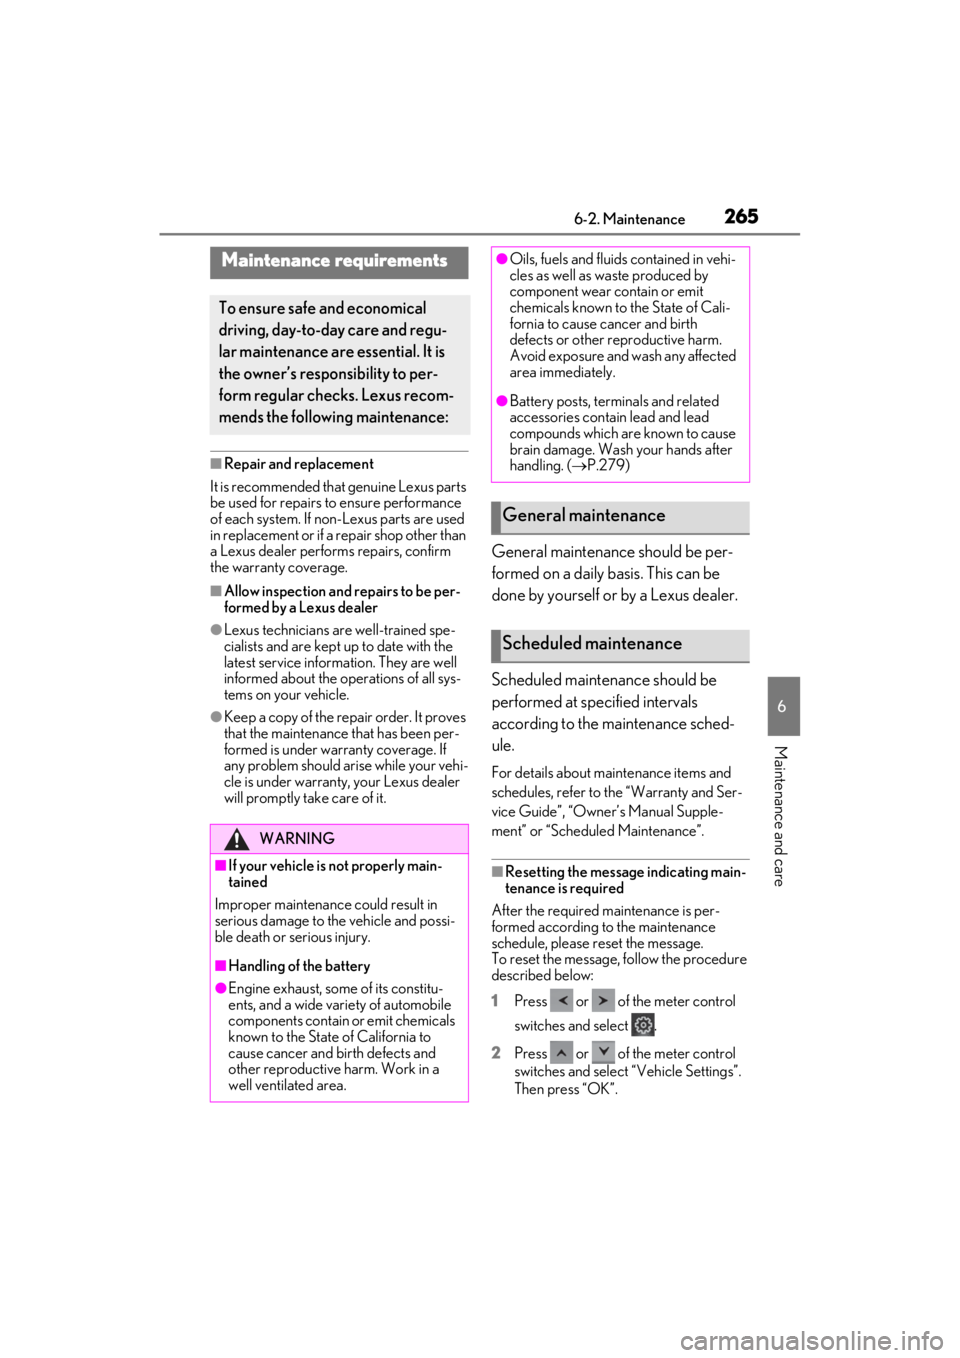
■Resetting the message indicating main-
tenance is required
After the required maintenance is per-
formed according to the maintenance
schedule, please reset the message.
To reset the message, follow the procedure
described below:
1
Press or of the meter control
switches and select .
2
Press or of the meter control
switches and select “Vehicle Settings”.
Then press “OK”.
Maintenance requirements
To ensure safe and economical
driving, day-to-day care and regu-
lar maintenance are essential. It is
the owner’s responsibility to per-
form regular checks. Lexus recom-
mends the following maintenance:
WARNING
■If your vehicle is not properly main-
tained
Improper maintenanc e could result in
serious damage to the vehicle and possi-
ble death or serious injury.
■Handling of the battery
●Engine exhaust, some of its constitu-
ents, and a wide variety of automobile
components contain or emit chemicals
known to the State of California to
cause cancer and birth defects and
other reproductive harm. Work in a
well ventilated area.
●Oils, fuels and fluids contained in vehi-
cles as well as waste produced by
component wear contain or emit
chemicals known to the State of Cali-
fornia to cause cancer and birth
defects or other reproductive harm.
Avoid exposure and wash any affected
area immediately.
●Battery posts, terminals and related
accessories contain lead and lead
compounds which are known to cause
brain damage. Wash your hands after
handling. ( P.279)
General maintenance
Scheduled maintenance
Page 268 of 410
2666-2. Maintenance
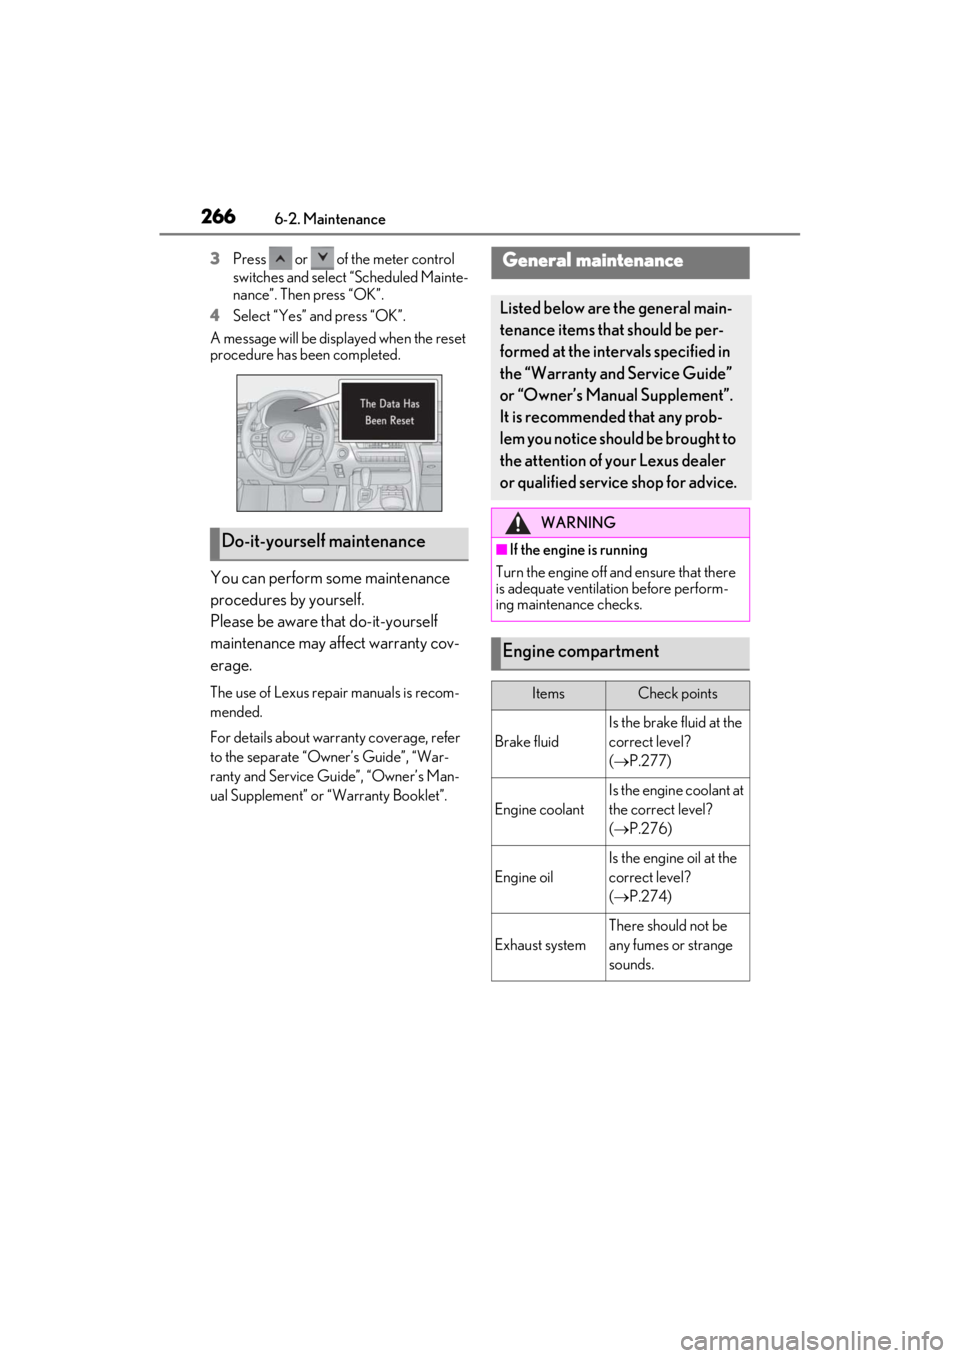
3Press or of the meter control
switches and select “Scheduled Mainte-
nance”. Then press “OK”.
4
Select “Yes” and press “OK”.
A message will be disp layed when the reset
procedure has been completed.
You can perform some maintenance
procedures by yourself.
Please be aware that do-it-yourself
maintenance may affect warranty cov-
erage.
The use of Lexus repair manuals is recom-
mended.
For details about warranty coverage, refer
to the separate “Owner’s Guide”, “War-
ranty and Service Guide”, “Owner’s Man-
ual Supplement” or “Warranty Booklet”.
Do-it-yourself maintenance
General maintenance
Listed below are the general main-
tenance items that should be per-
formed at the intervals specified in
the “Warranty and Service Guide”
or “Owner’s Manual Supplement”.
It is recommended that any prob-
lem you notice should be brought to
the attention of your Lexus dealer
or qualified service shop for advice.
WARNING
■If the engine is running
Turn the engine off and ensure that there
is adequate ventilati on before perform-
ing maintenance checks.
Engine compartment
ItemsCheck points
Brake fluid
Is the brake fluid at the
correct level?
( P.277)
Engine coolant
Is the engine coolant at
the correct level?
( P.276)
Engine oil
Is the engine oil at the
correct level?
( P.274)
Exhaust system
There should not be
any fumes or strange
sounds.
Page 270 of 410
2686-2. Maintenance
Seats• Do the seat controls operate properly?
Steering wheel
• Does the steering wheel rotate
smoothly?
• Does the steering wheel have the cor-
rect amount of free
play?
•There should not be any strange sounds
coming from the
steering wheel.
Vehicle exterior
ItemsCheck points
Doors/trunk• Do the doors/trunk operate smoothly?
Engine hood
•Does the engine hood lock system
work properly?
Fluid leaks
•There should not be any signs of fluid
leakage after the
vehicle has been
parked.
ItemsCheck points
Tires
• Is the tire inflation pressure correct?
• The tires should not be damaged or
excessively worn.
• Have the tires been rotated according to
the maintenance
schedule?
• The wheel nuts should not be loose.
Windshield wip-
ers
• The wiper blades should not show any
signs of cracking,
splitting, wear, con-
tamination or defor-
mation.
• The wiper blades should clear the
windshield without
streaking or skip-
ping.
ItemsCheck points
Page 276 of 410
2746-3. Do-it-yourself maintenance
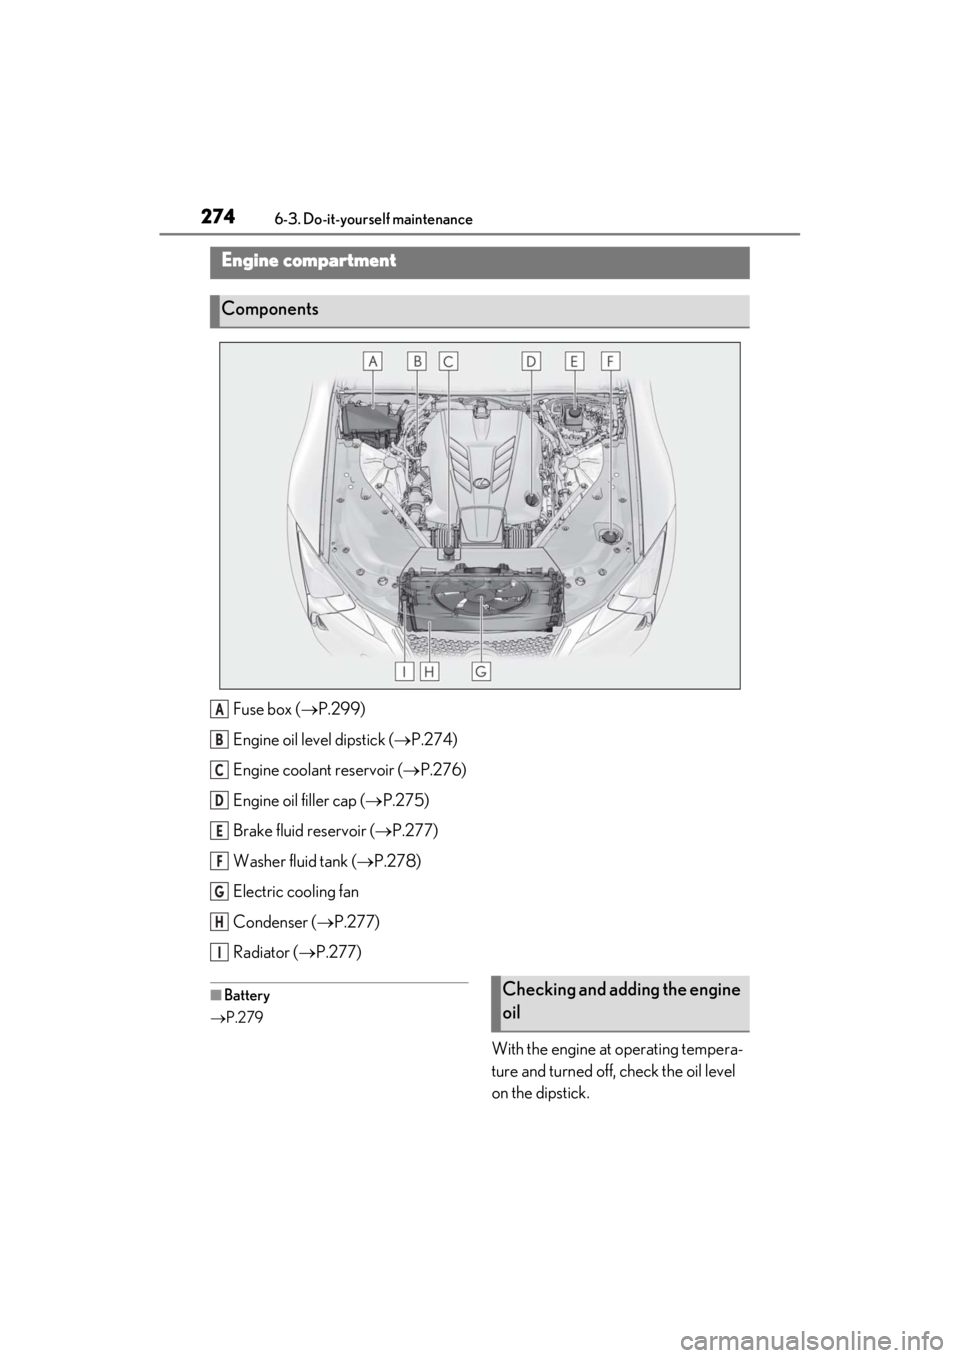
Fuse box (P.299)
Engine oil level dipstick ( P.274)
Engine coolant reservoir ( P.276)
Engine oil filler cap ( P.275)
Brake fluid reservoir ( P.277)
Washer fluid tank ( P.278)
Electric cooling fan
Condenser ( P.277)
Radiator ( P.277)
■Battery
P.279
With the engine at operating tempera-
ture and turned off, check the oil level
on the dipstick.
Engine compartment
Components
A
B
C
D
E
F
G
H
I
Checking and adding the engine
oil
Page 277 of 410
2756-3. Do-it-yourself maintenance
6
Maintenance and care
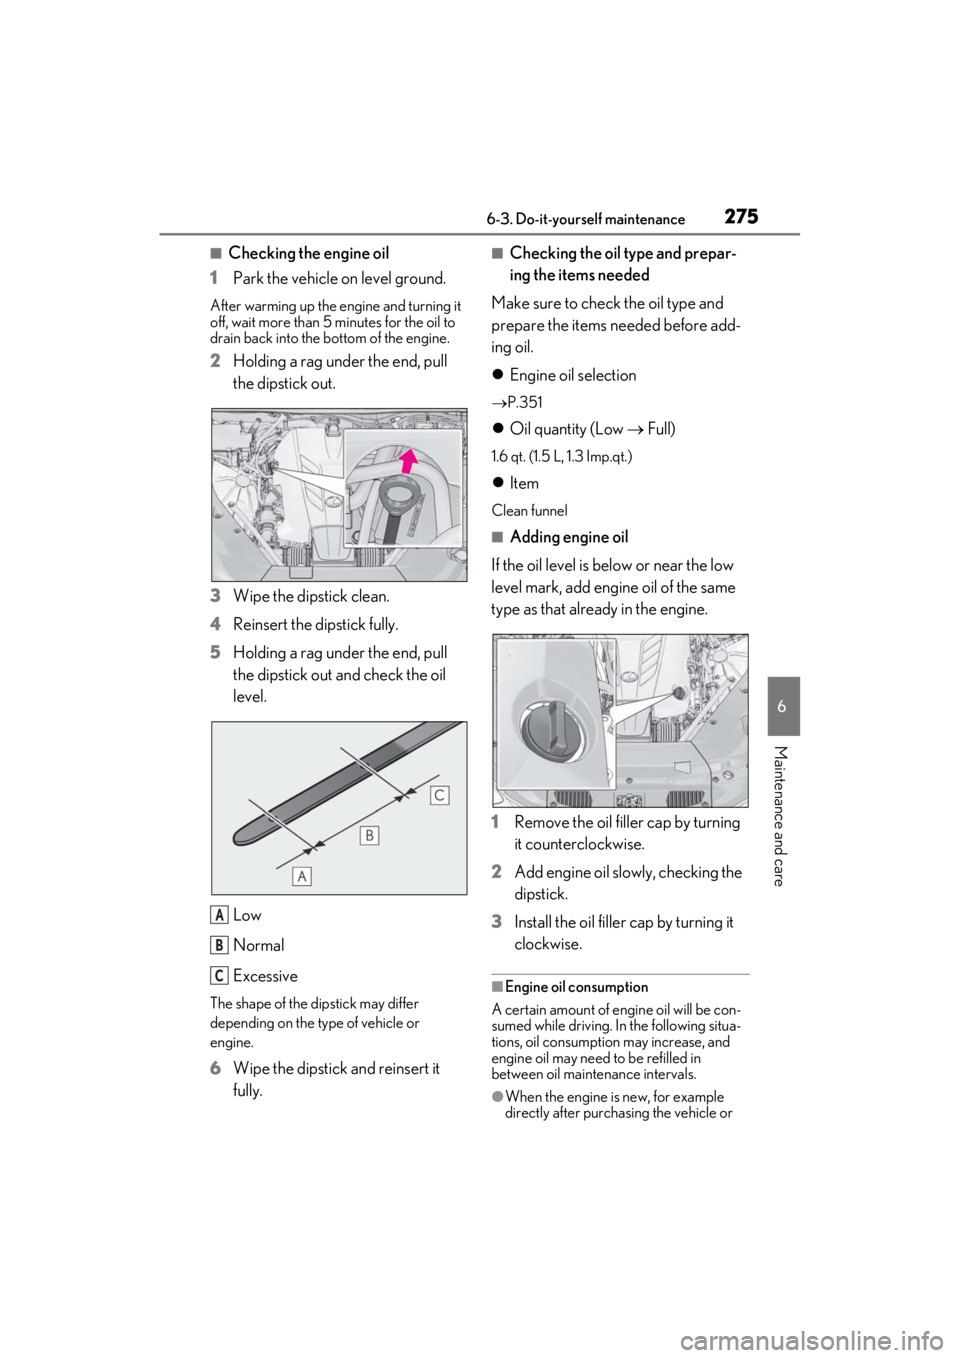
■Checking the engine oil
1 Park the vehicle on level ground.
After warming up the en gine and turning it
off, wait more than 5 minutes for the oil to
drain back into the bottom of the engine.
2 Holding a rag under the end, pull
the dipstick out.
3 Wipe the dipstick clean.
4 Reinsert the dipstick fully.
5 Holding a rag under the end, pull
the dipstick out and check the oil
level.
Low
Normal
Excessive
The shape of the dipstick may differ
depending on the type of vehicle or
engine.
6Wipe the dipstick and reinsert it
fully.
■Checking the oil type and prepar-
ing the items needed
Make sure to check the oil type and
prepare the items needed before add-
ing oil.
Engine oil selection
P.351
Oil quantity (Low Full)
1.6 qt. (1.5 L, 1.3 Imp.qt.)
Item
Clean funnel
■Adding engine oil
If the oil level is below or near the low
level mark, add engine oil of the same
type as that already in the engine.
1 Remove the oil filler cap by turning
it counterclockwise.
2 Add engine oil slowly, checking the
dipstick.
3 Install the oil filler cap by turning it
clockwise.
■Engine oil consumption
A certain amount of engine oil will be con-
sumed while driving. In the following situa-
tions, oil consumption may increase, and
engine oil may need to be refilled in
between oil maintenance intervals.
●When the engine is new, for example
directly after purchasing the vehicle or
A
B
C
Page 278 of 410
2766-3. Do-it-yourself maintenance
after replacing the engine
●If low quality oil or oil of an inappropriate
viscosity is used
●When driving at high engine speeds or
with a heavy load, or when driving while
accelerating or decelerating frequently
●When leaving the engine idling for a long
time, or when driving frequently through
heavy traffic
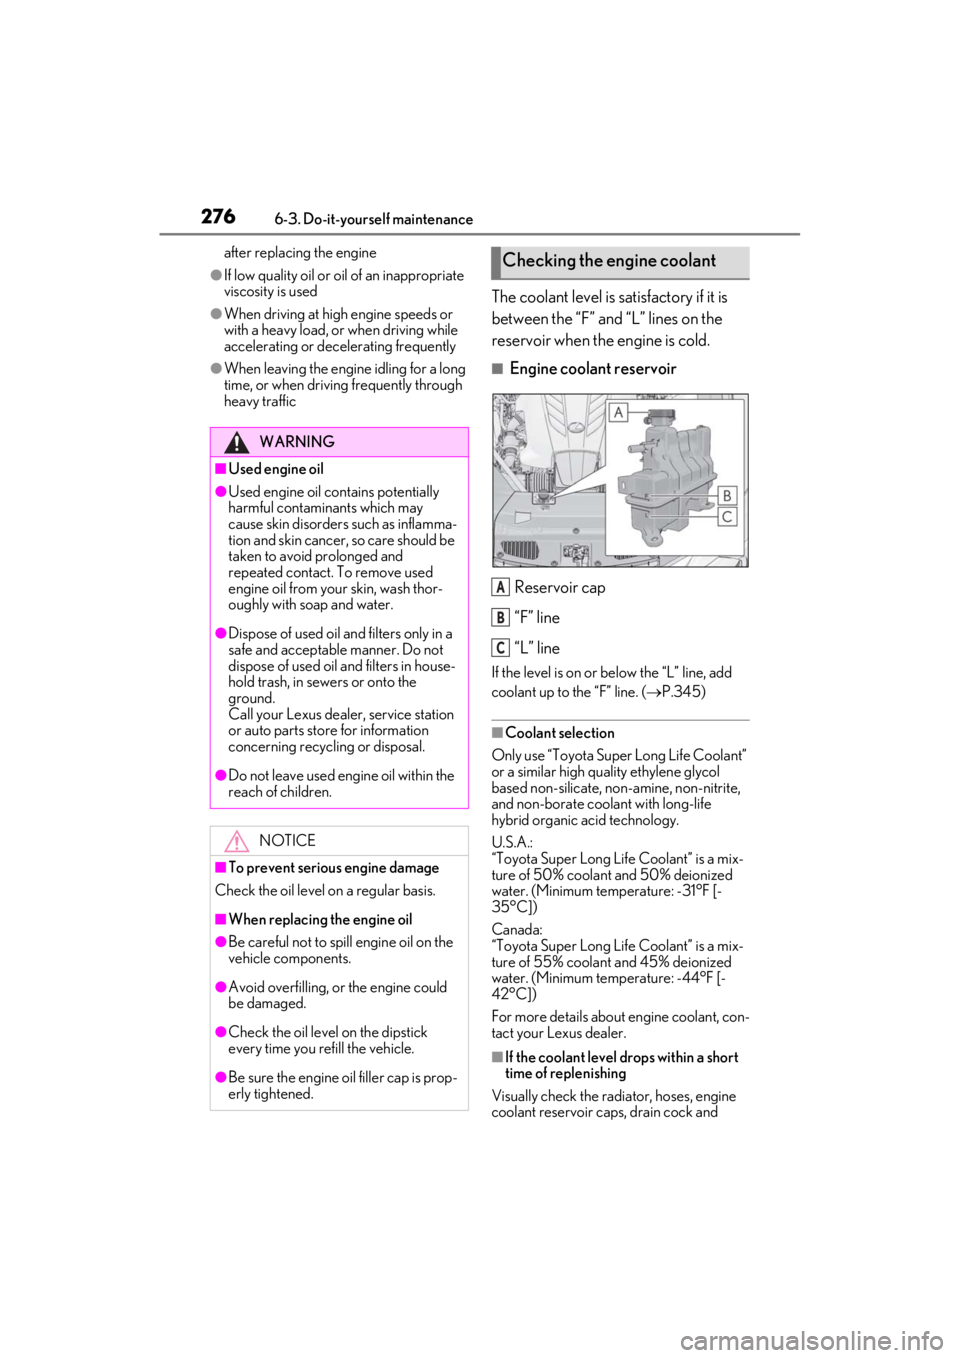
The coolant level is satisfactory if it is
between the “F” and “L” lines on the
reservoir when the engine is cold.
■Engine coolant reservoirReservoir cap
“F” line
“L” line
If the level is on or below the “L” line, add
coolant up to the “F” line. ( P.345)
■Coolant selection
Only use “Toyota Super Long Life Coolant”
or a similar high quality ethylene glycol
based non-silicate, non-amine, non-nitrite,
and non-borate coolant with long-life
hybrid organic acid technology.
U.S.A.:
“Toyota Super Long Life Coolant” is a mix-
ture of 50% coolant and 50% deionized
water. (Minimum temperature: -31°F [-
35°C])
Canada:
“Toyota Super Long Life Coolant” is a mix-
ture of 55% coolant and 45% deionized
water. (Minimum temperature: -44°F [-
42°C])
For more details about engine coolant, con-
tact your Lexus dealer.
■If the coolant level drops within a short
time of replenishing
Visually check the radi ator, hoses, engine
coolant reservoir caps, drain cock and
WARNING
■Used engine oil
●Used engine oil contains potentially
harmful contaminants which may
cause skin disorders such as inflamma-
tion and skin cancer, so care should be
taken to avoid prolonged and
repeated contact. To remove used
engine oil from your skin, wash thor-
oughly with soap and water.
●Dispose of used oil and filters only in a
safe and acceptable manner. Do not
dispose of used oil and filters in house-
hold trash, in sewers or onto the
ground.
Call your Lexus dealer, service station
or auto parts store for information
concerning recycling or disposal.
●Do not leave used engine oil within the
reach of children.
NOTICE
■To prevent serious engine damage
Check the oil level on a regular basis.
■When replacing the engine oil
●Be careful not to spill engine oil on the
vehicle components.
●Avoid overfilling, or the engine could
be damaged.
●Check the oil level on the dipstick
every time you refill the vehicle.
●Be sure the engine oi l filler cap is prop-
erly tightened.
Checking the engine coolant
A
B
C
Page 279 of 410
2776-3. Do-it-yourself maintenance
6
Maintenance and care
water pump.
If you cannot find a leak, have your Lexus
dealer test the cap and check for leaks in
the cooling system.
Check the radiator and condenser and
clear away any foreign objects.
If either of the above parts is extremely
dirty or you are not sure of their condi-
tion, have your vehicle inspected by
your Lexus dealer.
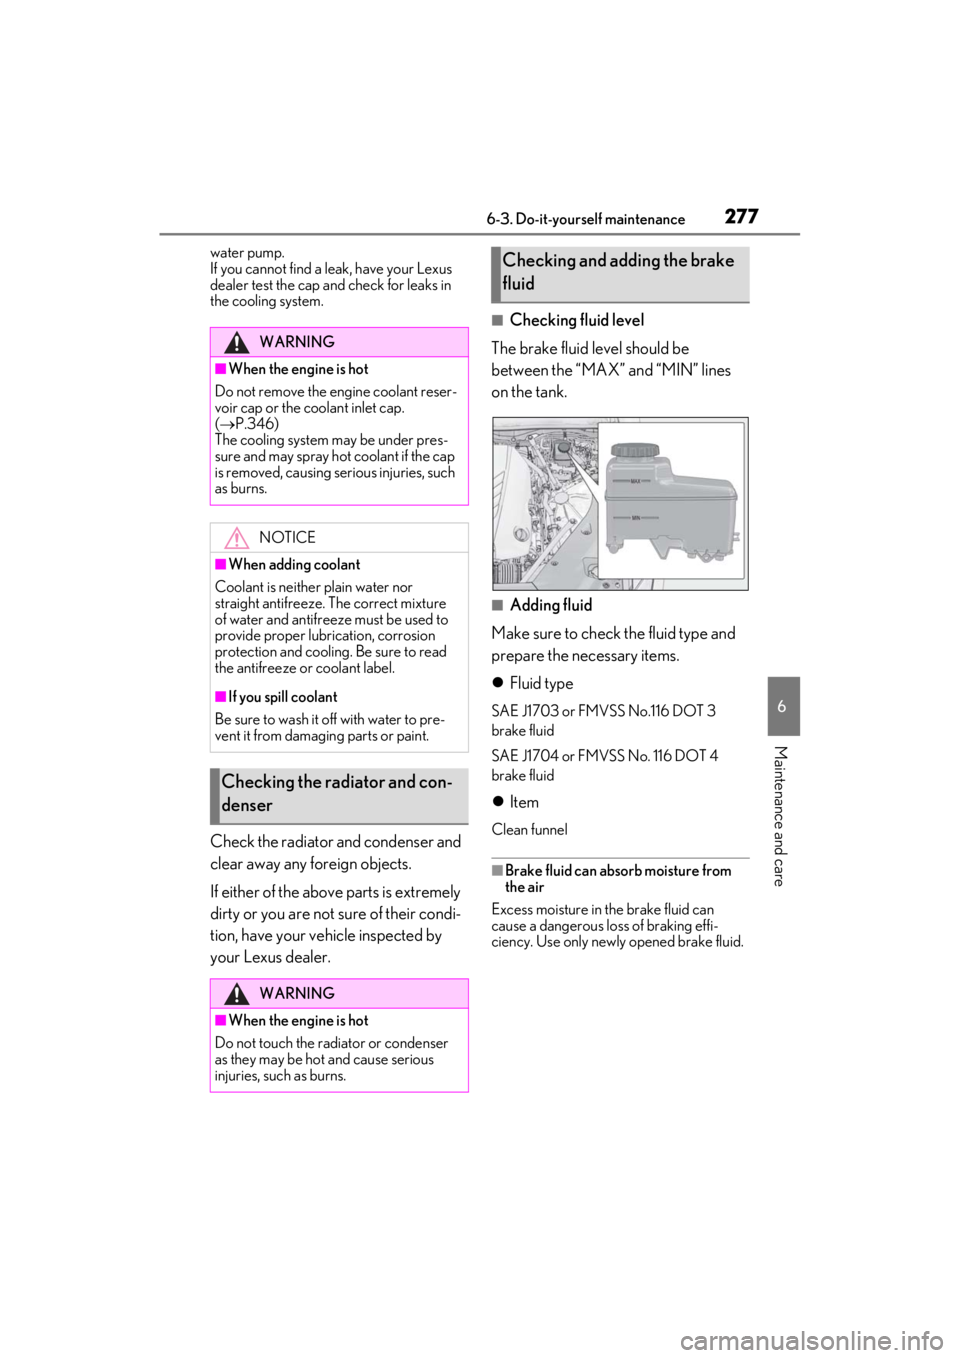
■Checking fluid level
The brake fluid level should be
between the “MAX” and “MIN” lines
on the tank.
■Adding fluid
Make sure to check the fluid type and
prepare the necessary items.
Fluid type
SAE J1703 or FMVSS No.116 DOT 3
brake fluid
SAE J1704 or FMVSS No. 116 DOT 4
brake fluid
Item
Clean funnel
■Brake fluid can absorb moisture from
the air
Excess moisture in the brake fluid can
cause a dangerous loss of braking effi-
ciency. Use only newly opened brake fluid.
WARNING
■When the engine is hot
Do not remove the engine coolant reser-
voir cap or the coolant inlet cap.
( P.346)
The cooling system may be under pres-
sure and may spray hot coolant if the cap
is removed, causing serious injuries, such
as burns.
NOTICE
■When adding coolant
Coolant is neither plain water nor
straight antifreeze. The correct mixture
of water and antifreeze must be used to
provide proper lubrication, corrosion
protection and cooling. Be sure to read
the antifreeze or coolant label.
■If you spill coolant
Be sure to wash it off with water to pre-
vent it from damagi ng parts or paint.
Checking the radiator and con-
denser
WARNING
■When the engine is hot
Do not touch the radiator or condenser
as they may be hot and cause serious
injuries, such as burns.
Checking and adding the brake
fluid
Page 280 of 410
2786-3. Do-it-yourself maintenance
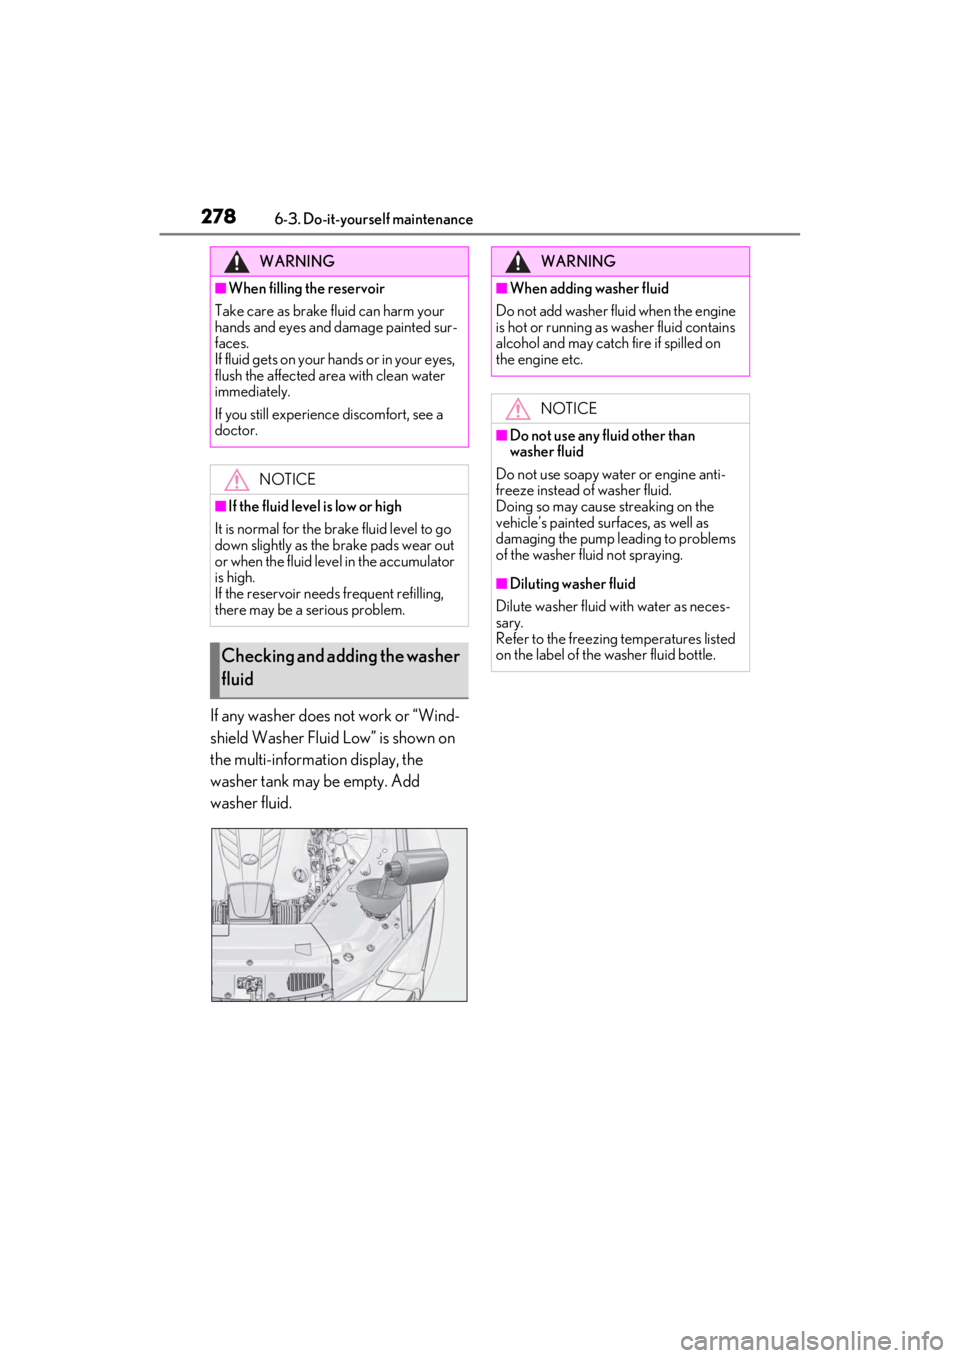
If any washer does not work or “Wind-
shield Washer Fluid Low” is shown on
the multi-information display, the
washer tank may be empty. Add
washer fluid.
WARNING
■When filling the reservoir
Take care as brake fluid can harm your
hands and eyes and damage painted sur-
faces.
If fluid gets on your hands or in your eyes,
flush the affected area with clean water
immediately.
If you still experience discomfort, see a
doctor.
NOTICE
■If the fluid level is low or high
It is normal for the brake fluid level to go
down slightly as the brake pads wear out
or when the fluid level in the accumulator
is high.
If the reservoir need s frequent refilling,
there may be a serious problem.
Checking and adding the washer
fluid
WARNING
■When adding washer fluid
Do not add washer fluid when the engine
is hot or running as washer fluid contains
alcohol and may catch fire if spilled on
the engine etc.
NOTICE
■Do not use any fluid other than
washer fluid
Do not use soapy water or engine anti-
freeze instead of washer fluid.
Doing so may cause streaking on the
vehicle’s painted surfaces, as well as
damaging the pump leading to problems
of the washer fluid not spraying.
■Diluting washer fluid
Dilute washer fluid with water as neces-
sary.
Refer to the freezing temperatures listed
on the label of the washer fluid bottle.
Page 282 of 410
2806-3. Do-it-yourself maintenance
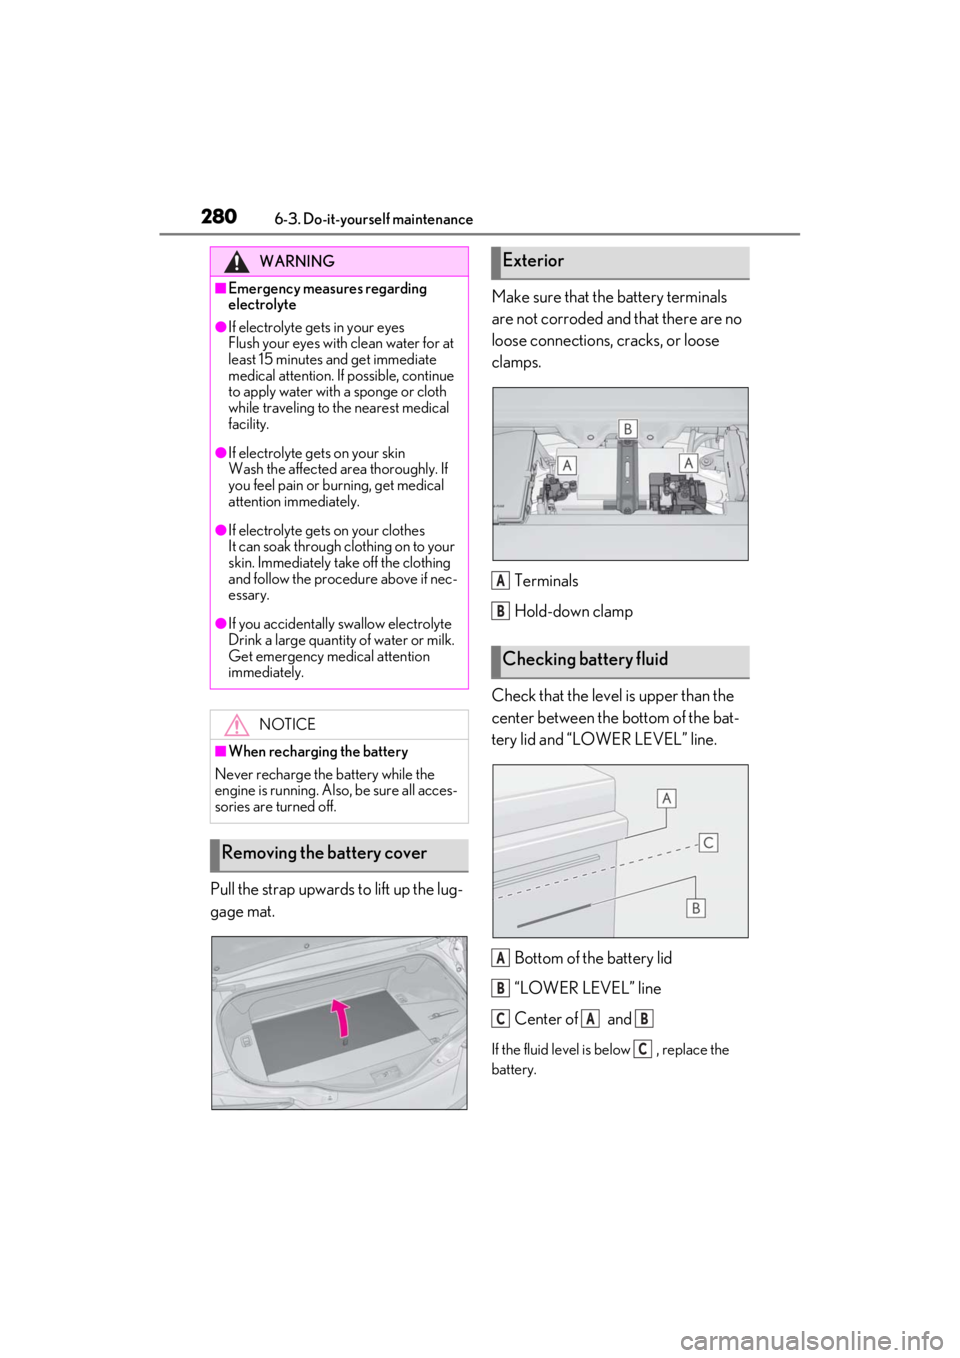
Pull the strap upwards to lift up the lug-
gage mat.Make sure that the battery terminals
are not corroded and
that there are no
loose connections, cracks, or loose
clamps.
Terminals
Hold-down clamp
Check that the level is upper than the
center between the bottom of the bat-
tery lid and “LOWER LEVEL” line.
Bottom of the battery lid
“LOWER LEVEL” line
Center of and
If the fluid level is below , replace the
battery.
WARNING
■Emergency measures regarding
electrolyte
●If electrolyte gets in your eyes
Flush your eyes with clean water for at
least 15 minutes and get immediate
medical attention. If possible, continue
to apply water with a sponge or cloth
while traveling to the nearest medical
facility.
●If electrolyte gets on your skin
Wash the affected area thoroughly. If
you feel pain or burning, get medical
attention immediately.
●If electrolyte gets on your clothes
It can soak through clothing on to your
skin. Immediately take off the clothing
and follow the procedure above if nec-
essary.
●If you accidentally swallow electrolyte
Drink a large quantity of water or milk.
Get emergency medical attention
immediately. NOTICE
■When recharging the battery
Never recharge the battery while the
engine is running. Also, be sure all acces-
sories are turned off.
Removing the battery cover
Exterior
Checking battery fluid
A
B
A
B
CAB
C
Page 298 of 410
2966-3. Do-it-yourself maintenance
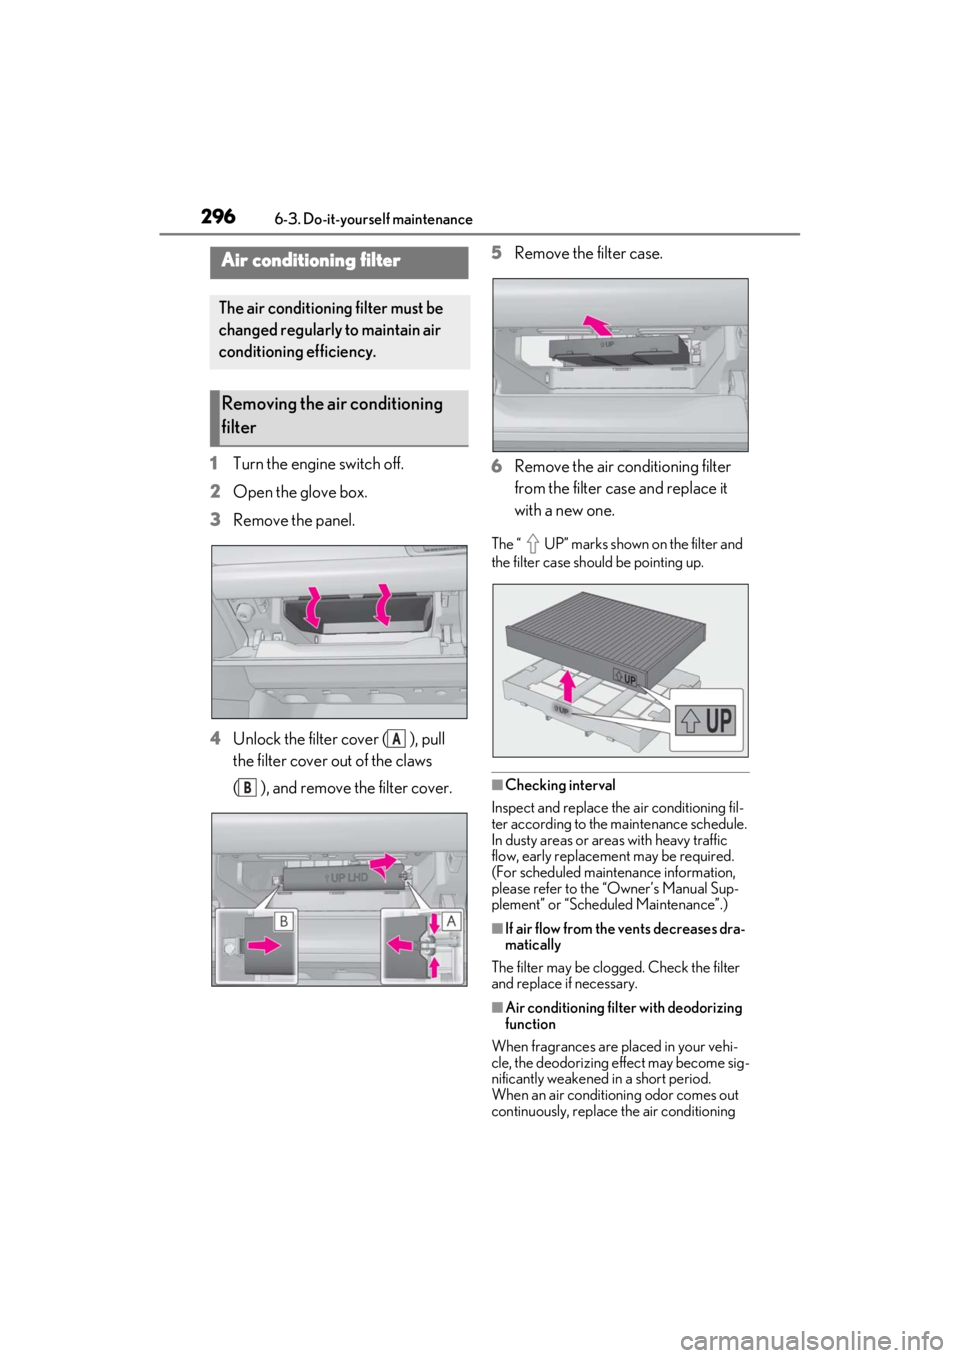
1Turn the engine switch off.
2 Open the glove box.
3 Remove the panel.
4 Unlock the filter cover ( ), pull
the filter cover out of the claws
( ), and remove the filter cover. 5
Remove the filter case.
6 Remove the air conditioning filter
from the filter case and replace it
with a new one.
The “ UP” marks shown on the filter and
the filter case should be pointing up.
■Checking interval
Inspect and replace the air conditioning fil-
ter according to the maintenance schedule.
In dusty areas or areas with heavy traffic
flow, early replacement may be required.
(For scheduled maintenance information,
please refer to the “Owner’s Manual Sup-
plement” or “Scheduled Maintenance”.)
■If air flow from the vents decreases dra-
matically
The filter may be clogged. Check the filter
and replace if necessary.
■Air conditioning filt er with deodorizing
function
When fragrances are placed in your vehi-
cle, the deodorizing effect may become sig-
nificantly weakened in a short period.
When an air conditioning odor comes out
continuously, replace the air conditioning
Air conditioning filter
The air conditioning filter must be
changed regularly to maintain air
conditioning efficiency.
Removing the air conditioning
filter
A
B