fuel lexus LC500h 2020 / LEXUS 2020 LC500,LC500H (OM11537U) Owner's Guide
[x] Cancel search | Manufacturer: LEXUS, Model Year: 2020, Model line: LC500h, Model: Lexus LC500h 2020Pages: 436, PDF Size: 13.86 MB
Page 139 of 436
1394-1. Before driving
4
Driving
is due to automatic up-shifting control or
down-shifting implementation to meet driv-
ing conditions. It does not indicate sudden
acceleration.
●The vehicle is judged to be driving uphill
or downhill
●When the accelerator pedal is released
●When the brake pedal is firmly or quickly
depressed
■Restraining the engine
output (Brake Override System)
●When the accelerator and brake pedals
are depressed at the same time, the
engine
restrained.
●A warning message is displayed on the
multi-information display while the sys-
tem is operating. If a warning message is
shown on the multi-information display,
read the message and follow the instruc-
tions.
■Restraining sudden start (Drive-Start
Control)
●When the following unusual operation is
performed, the engine
output may be restrained.
• When the shift position is shifted from R
to D, D or M to R, N to R, P to D
*, P to R*
with the accelerator pedal depressed, a
warning message appears on the multi-
information display. If a warning message
is shown on the multi-information display,
read the message and follow the instruc-
tions.
• When the accelerator pedal is depressed
too much while the vehicle is in reverse.
*: Depending on the situation, the shift posi-
tion may not be changed.
●While Drive-Start Control is being acti-
vated, your vehicle may have trouble
escaping from the mud or fresh snow. In
such case, deactivate TRAC ( P.236)
to cancel Drive-Start Control so that the
vehicle may become able to escape from
the mud or fresh snow.
■Breaking in your new Lexus
To extend the life of the vehicle, observing
the following precautions is recommended:
●For the first 186 miles (300 km):
Avoid sudden stops.
●For the first 621 miles (1000 km):
• Do not drive at extremely high speeds.
• Avoid sudden acceleration.
• Do not drive continuously in low gears.
• Do not drive at a constant speed for extended periods.
■Drum-in-disc type parking brake system
Your vehicle has a drum-in-disc type park-
ing brake system. This type of brake system
needs bedding-down of the brake shoes
periodically or whenever the parking brake
shoes and/or drum are replaced. Have your
Lexus dealer perform the bedding down
operation.
■Operating your vehicle in a foreign
country
Comply with the relevant vehicle registra-
tion laws and confirm the availability of the
correct fuel. ( P.377)
■Brake pads and discs
The brake pads and discs are designed for
use under high load conditions. Therefore,
brake noise may be generated depending
on the vehicle speed, braking force and
vehicle environment (temperature, humid-
ity, etc.).
WARNING
Observe the following precautions.
Failure to do so may result in death or
serious injury.
■When starting the vehicle
LC500: Always keep your foot on the
brake pedal while stopped with the
engine running. This prevents the vehicle
from creeping.
LC500h: Always keep your foot on the
brake pedal while stopped with the
“READY” indicator is illuminated. This
prevents the vehicle from creeping.
Page 156 of 436
1564-2. Driving procedures
mation display.
●The temperature of the hybrid system is
high.
The vehicle has been left in the sun,
driven on a hill, driven at high speeds, etc.
●The temperature of the hybrid system is
low.
The vehicle has been left in temperatures
lower than about 32°F (0°C) for a long
period of time etc.
●The gasoline engine is warming up.
●The hybrid battery (traction battery) is
low.
The remaining battery level indicated in
the “Energy monitor” display is low.
( P.96)
●Vehicle speed is high.
●The accelerator pedal is depressed firmly
or the vehicle is on a hill etc.
●The windshield defogger is in use.
●When the shift position is in M.
■Switching to EV drive mode when the
gasoline engine is cold
If the hybrid system is started while the gas-
oline engine is cold, the gasoline engine will
start automatically in order to warm up. In
this case, you will become unable to switch
to EV drive mode.
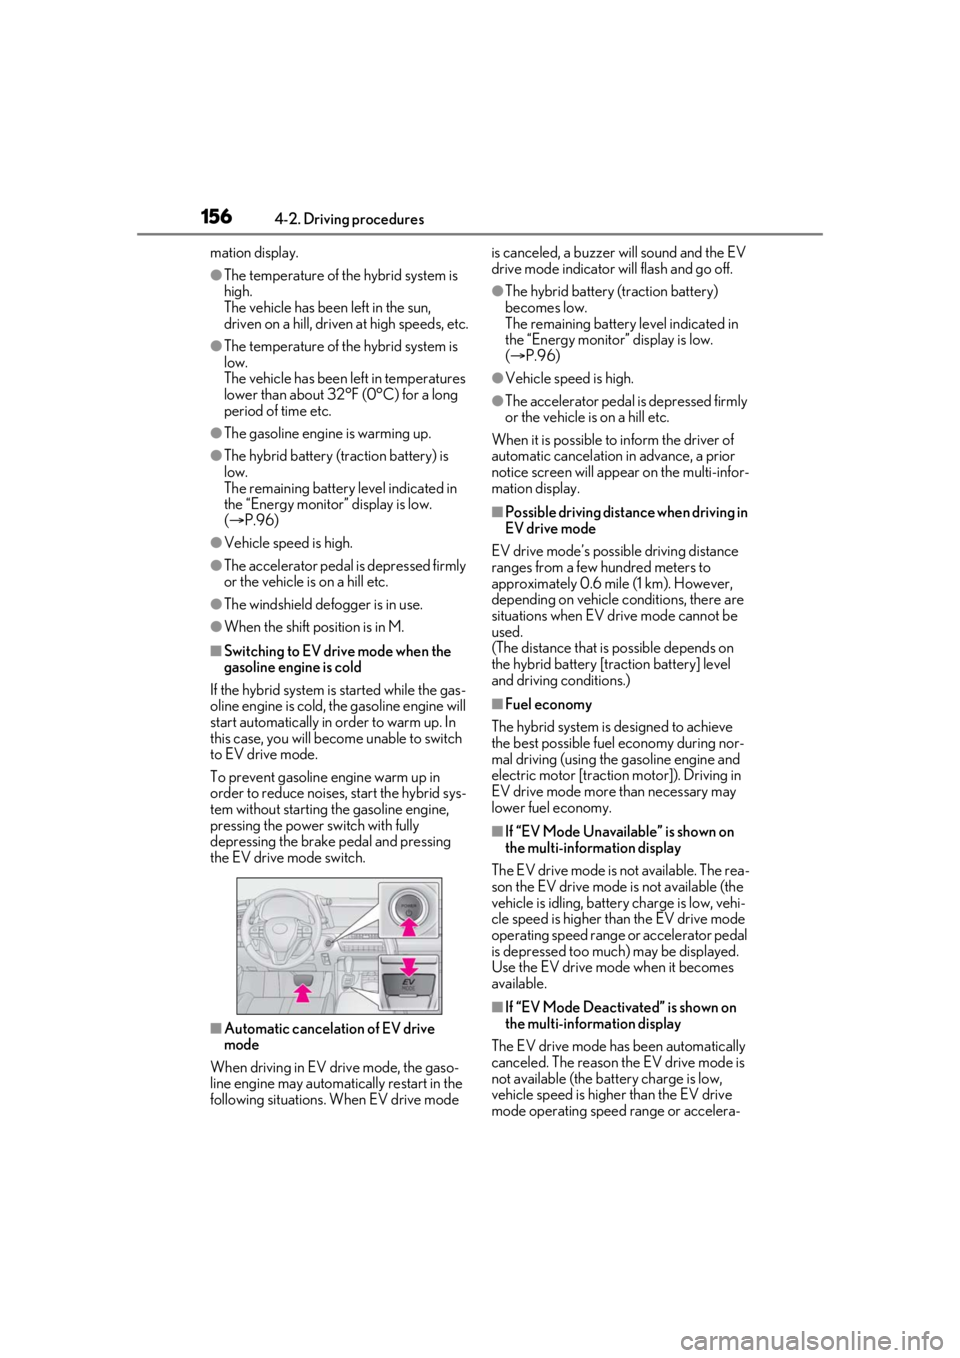
To prevent gasoline engine warm up in
order to reduce noises, start the hybrid sys-
tem without starting the gasoline engine,
pressing the power switch with fully
depressing the brake pedal and pressing
the EV drive mode switch.
■Automatic cancelation of EV drive
mode
When driving in EV drive mode, the gaso-
line engine may automatically restart in the
following situations. When EV drive mode is canceled, a buzzer will sound and the EV
drive mode indicator will flash and go off.
●The hybrid battery (traction battery)
becomes low.
The remaining battery level indicated in
the “Energy monitor” display is low.
(
P.96)
●Vehicle speed is high.
●The accelerator pedal is depressed firmly
or the vehicle is on a hill etc.
When it is possible to inform the driver of
automatic cancelation in advance, a prior
notice screen will appear on the multi-infor-
mation display.
■Possible driving distan ce when driving in
EV drive mode
EV drive mode’s possible driving distance
ranges from a few hundred meters to
approximately 0.6 mile (1 km). However,
depending on vehicle conditions, there are
situations when EV drive mode cannot be
used.
(The distance that is possible depends on
the hybrid battery [traction battery] level
and driving conditions.)
■Fuel economy
The hybrid system is designed to achieve
the best possible fuel economy during nor-
mal driving (using the gasoline engine and
electric motor [tractio n motor]). Driving in
EV drive mode more than necessary may
lower fuel economy.
■If “EV Mode Unavailable” is shown on
the multi-information display
The EV drive mode is not available. The rea-
son the EV drive mode is not available (the
vehicle is idling, batter y charge is low, vehi-
cle speed is higher than the EV drive mode
operating speed range or accelerator pedal
is depressed too much) may be displayed.
Use the EV drive mode when it becomes
available.
■If “EV Mode Deactivated” is shown on
the multi-information display
The EV drive mode has been automatically
canceled. The reason the EV drive mode is
not available (the batt ery charge is low,
vehicle speed is higher than the EV drive
mode operating speed range or accelera-
Page 157 of 436
1574-2. Driving procedures
4
Driving
tor pedal is depressed too much) may be
displayed. Drive the vehicle for a while
before attempting to turn on the EV drive
mode again.
*1: To improve fuel efficiency and reduce noise, set the shift position in D for nor-
mal driving. You can choose gear range
suitable for your driving situation by
operating the paddle shift switches.
*2: Any gear range can be fixed when driv-ing in M mode.
■For the shift positions
●When the engine switch is off or in
ACCESSORY mode, the shift position
cannot be changed.
●When the engine swit ch is in IGNITION
ON mode, the shift position can only be
changed to N.
●When the engine is running, the shift
position can be changed from P to D, N
or R.
●The shift position can only be changed to
M directly from D.
WARNING
■Caution while driving
When driving in EV drive mode, pay spe-
cial attention to the area around the vehi-
cle. Because there is no engine noise,
pedestrians, people riding bicycles or
other people and vehicles in the area
may not be aware of the vehicle starting
off or approaching th em, so take extra
care while driving. Th erefore, take extra
care while driving even if the vehicle
proximity notification system is active.
Automatic transmission
(LC500)
Select the shift position depending
on your purpose and situation.
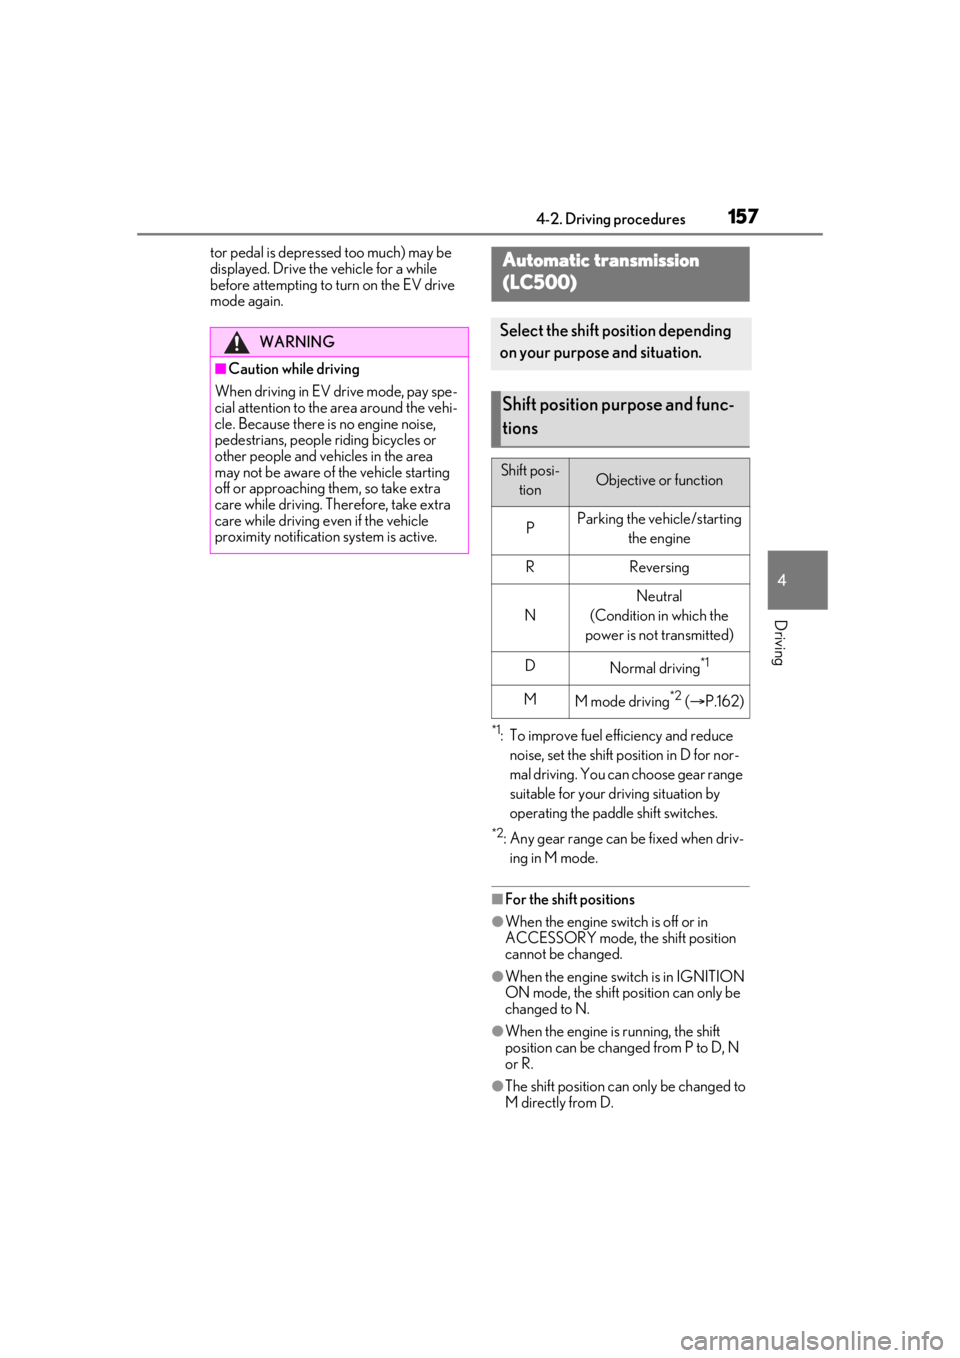
Shift position purpose and func-
tions
Shift posi-
tionObjective or function
PParking the vehicle/starting the engine
RReversing
N
Neutral
(Condition in which the
power is not transmitted)
DNormal driving*1
MM mode driving*2 ( P.162)
Page 163 of 436
1634-2. Driving procedures
4
Driving
sion fluid temperature is high or low,
or other reasons.
Also, the gear will not shift when the
vehicle speed is low, even if an upshift
operation is performed.
■Downshifting restriction warning
buzzer
To help ensure safety and driving perfor-
mance, downshifting operation may some-
times be restricted. In some circumstances,
downshifting may not be possible even
when the paddle shift switch is operated. (A
buzzer will sound twice.)
*1: To improve fuel efficiency and reduce
noise, set the shift position in D for nor-
mal driving. You can choose gear range
suitable for your driving situation by
operating the paddle shift switches.
*2: Any gear range can be fixed when driv-ing in M mode.
■For the shift positions
●When the power switch is off, the shift
position cannot be changed.
●When the power switch is in ON mode
(the hybrid system is not operating), the
shift position can only be changed to N.
●When the “READY” indicator is on, the
shift position can be changed from P to D,
N or R.
●When the “READY” indicator is flashing,
the shift position cannot be changed from
P to another position even if the shift lever
is operated. Wait until the “READY” indi-
Hybrid transmission
(LC500h)
Select the shift position depending
on your purpose and situation.
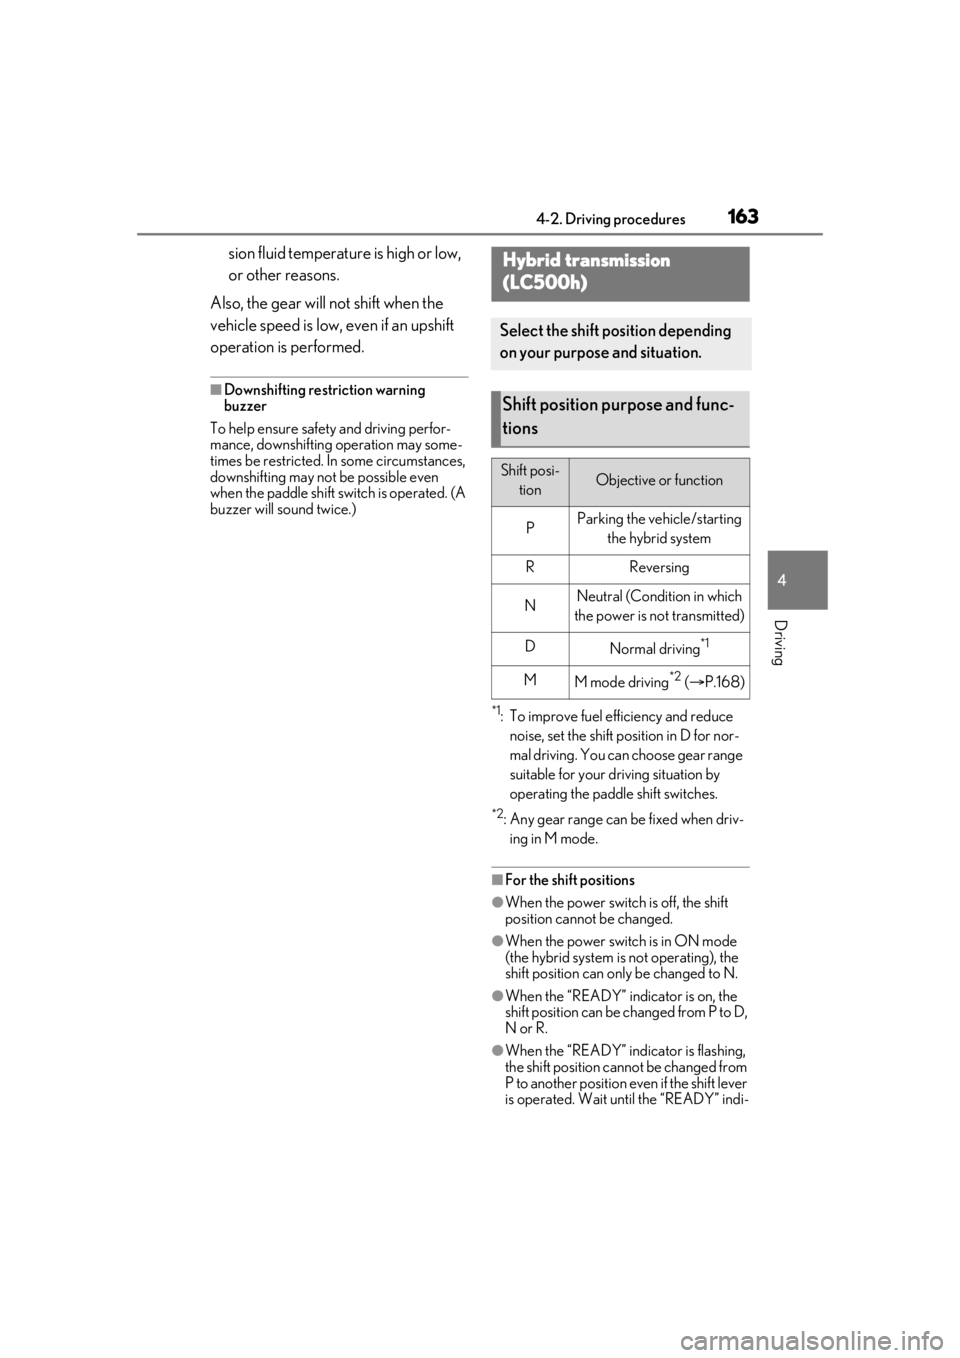
Shift position purpose and func-
tions
Shift posi-
tionObjective or function
PParking the vehicle/starting the hybrid system
RReversing
NNeutral (Condition in which
the power is not transmitted)
DNormal driving*1
MM mode driving*2 ( P.168)
Page 175 of 436
1754-3. Operating the lights and wipers
4
Driving
4-3.Operating the lights and wipers
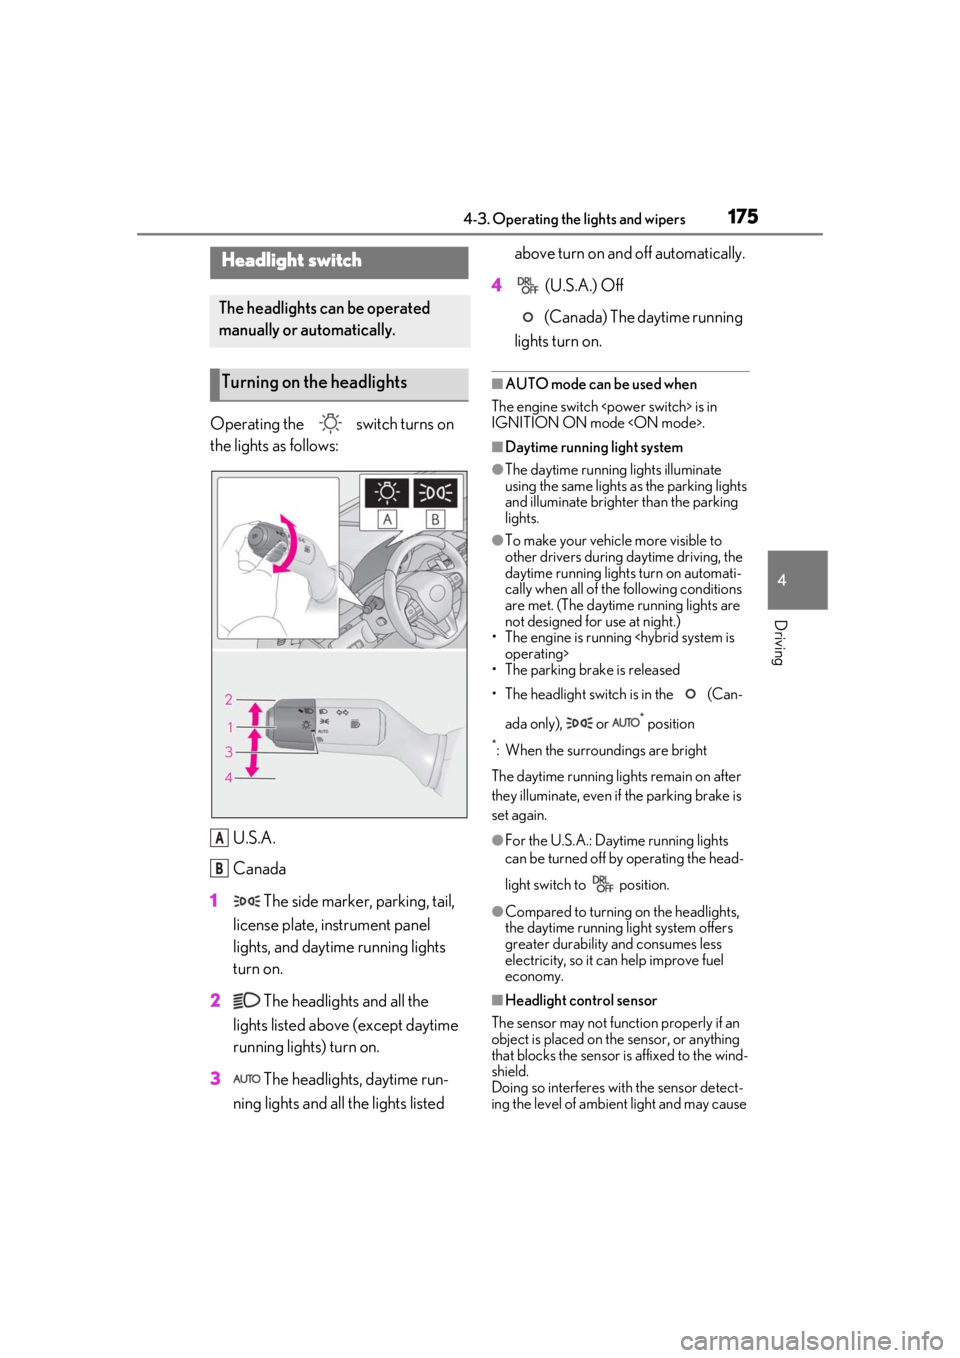
Operating the switch turns on
the lights as follows:U.S.A.
Canada
1 The side marker, parking, tail,
license plate, instrument panel
lights, and daytime running lights
turn on.
2 The headlights and all the
lights listed above (except daytime
running lights) turn on.
3 The headlights, daytime run-
ning lights and all the lights listed above turn on and off automatically.
4 (U.S.A.) Off
(Canada) The daytime running
lights turn on.
■AUTO mode can be used when
The engine switch
IGNITION ON mode
■Daytime running light system
●The daytime running lights illuminate
using the same lights as the parking lights
and illuminate brighter than the parking
lights.
●To make your vehicle more visible to
other drivers during daytime driving, the
daytime running lights turn on automati-
cally when all of the following conditions
are met. (The daytime running lights are
not designed for use at night.)
• The engine is running
• The parking brake is released
• The headlight switch is in the (Can-
ada only), or
* position
*: When the surroundings are bright
The daytime running lights remain on after
they illuminate, even if the parking brake is
set again.
●For the U.S.A.: Daytime running lights
can be turned off by operating the head-
light switch to position.
●Compared to turning on the headlights,
the daytime running light system offers
greater durability and consumes less
electricity, so it can help improve fuel
economy.
■Headlight control sensor
The sensor may not function properly if an
object is placed on the sensor, or anything
that blocks the sensor is affixed to the wind-
shield.
Doing so interferes with the sensor detect-
ing the level of ambien t light and may cause
Headlight switch
The headlights can be operated
manually or automatically.
Turning on the headlights
A
B
Page 184 of 436
1844-4. Refueling
4-4.Refueling
Turn the engine switch
doors and windows are closed.
Confirm the type of fuel.
■Fuel types
P.385
■Fuel tank opening for unleaded gasoline
To help prevent incorrect fueling, your vehi-
cle has a fuel tank opening that only accom-
modates the special nozzle on unleaded
fuel pumps.
■LC500: If the malf unction indicator
lamp illuminates
The malfunction indicator lamp may illumi-
nate erroneously if refueling is performed
repeatedly when the fuel tank is nearly full.
Opening the fuel tank cap
LC500h: The fuel ta nk of your vehi-
cle has a special structure, which
requires a reduction in fuel tank
pressure before refueling. After the
opener switch has been pressed, it
will take several seconds until the
vehicle is ready for refueling.
Before refueling the vehicle
WARNING
■When refueling the vehicle
Observe the following precautions while
refueling the vehicle. Failure to do so may
result in death or serious injury.
●After exiting the vehicle and before
opening the fuel door, touch an
unpainted metal surf ace to discharge
any static electricity. It is important to
discharge static elec tricity before refu-
eling because sparks resulting from
static electricity can cause fuel vapors
to ignite while refueling.
●Always hold the grips on the fuel tank
cap and turn it slowly to remove it.
A whooshing sound may be heard
when the fuel tank cap is loosened.
Wait until the sound cannot be heard
before fully removing the cap. In hot
weather, pressurized fuel may spray
out the filler neck and cause injury.
●Do not allow anyone that has not dis-
charged static electricity from their
body to come close to an open fuel
tank.
●Do not inhale vaporized fuel.
Fuel contains substances that are
harmful if inhaled.
●Do not smoke while refueling the vehi-
cle.
Doing so may cause the fuel to ignite
and cause a fire.
●Do not return to the vehicle or touch
any person or object that is statically
charged.
This may cause static electricity to
build up, resulting in a possible ignition
hazard.
■When refueling
Observe the following precautions to
prevent fuel overflowing from the fuel
tank:
●Securely insert the fuel nozzle into the
fuel filler neck.
●Stop filling the tank after the fuel noz-
zle automatically clicks off.
●Do not top off the fuel tank.
Page 185 of 436
1854-4. Refueling
4
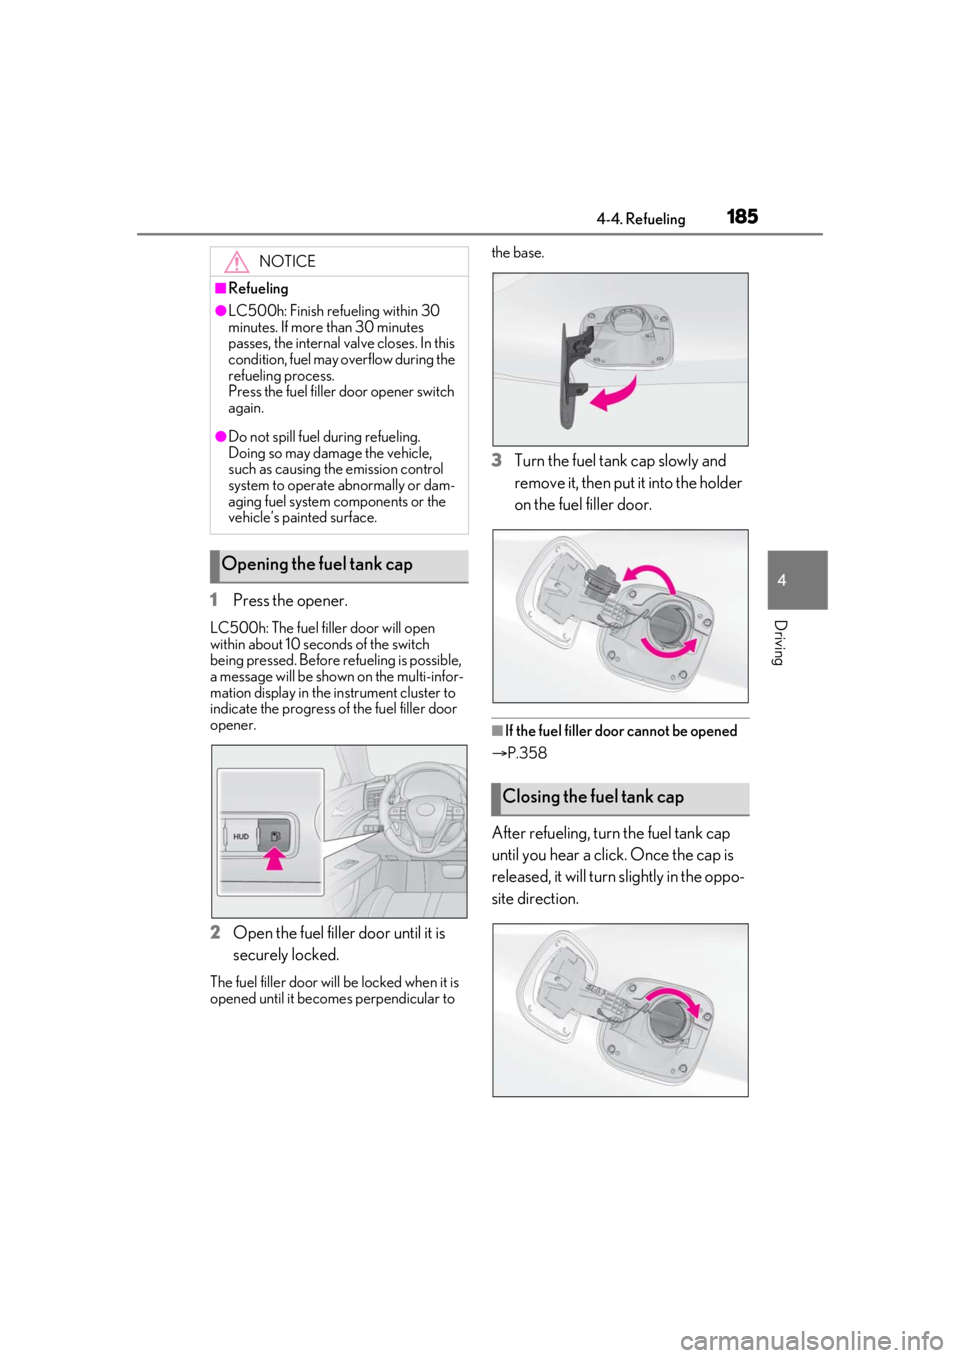
Driving1Press the opener.
LC500h: The fuel filler door will open
within about 10 seco nds of the switch
being pressed. Before refueling is possible,
a message will be shown on the multi-infor-
mation display in the instrument cluster to
indicate the progress of the fuel filler door
opener.
2 Open the fuel filler door until it is
securely locked.
The fuel filler door will be locked when it is
opened until it becomes perpendicular to the base.
3
Turn the fuel tank cap slowly and
remove it, then put it into the holder
on the fuel filler door.
■If the fuel filler door cannot be opened
P.358
After refueling, turn the fuel tank cap
until you hear a click. Once the cap is
released, it will turn slightly in the oppo-
site direction.
NOTICE
■Refueling
●LC500h: Finish refueling within 30
minutes. If more than 30 minutes
passes, the internal va lve closes. In this
condition, fuel may overflow during the
refueling process.
Press the fuel filler door opener switch
again.
●Do not spill fuel during refueling.
Doing so may damage the vehicle,
such as causing the emission control
system to operate abnormally or dam-
aging fuel system components or the
vehicle’s painted surface.
Opening the fuel tank cap
Closing the fuel tank cap
Page 186 of 436

1864-4. Refueling
WARNING
■When replacing the fuel tank cap
Do not use anything but a genuine Lexus
fuel tank cap designed for your vehicle.
Doing so may cause a fire or other inci-
dent which may result in death or serious
injury.
Page 216 of 436
2164-5. Using the driving support systems
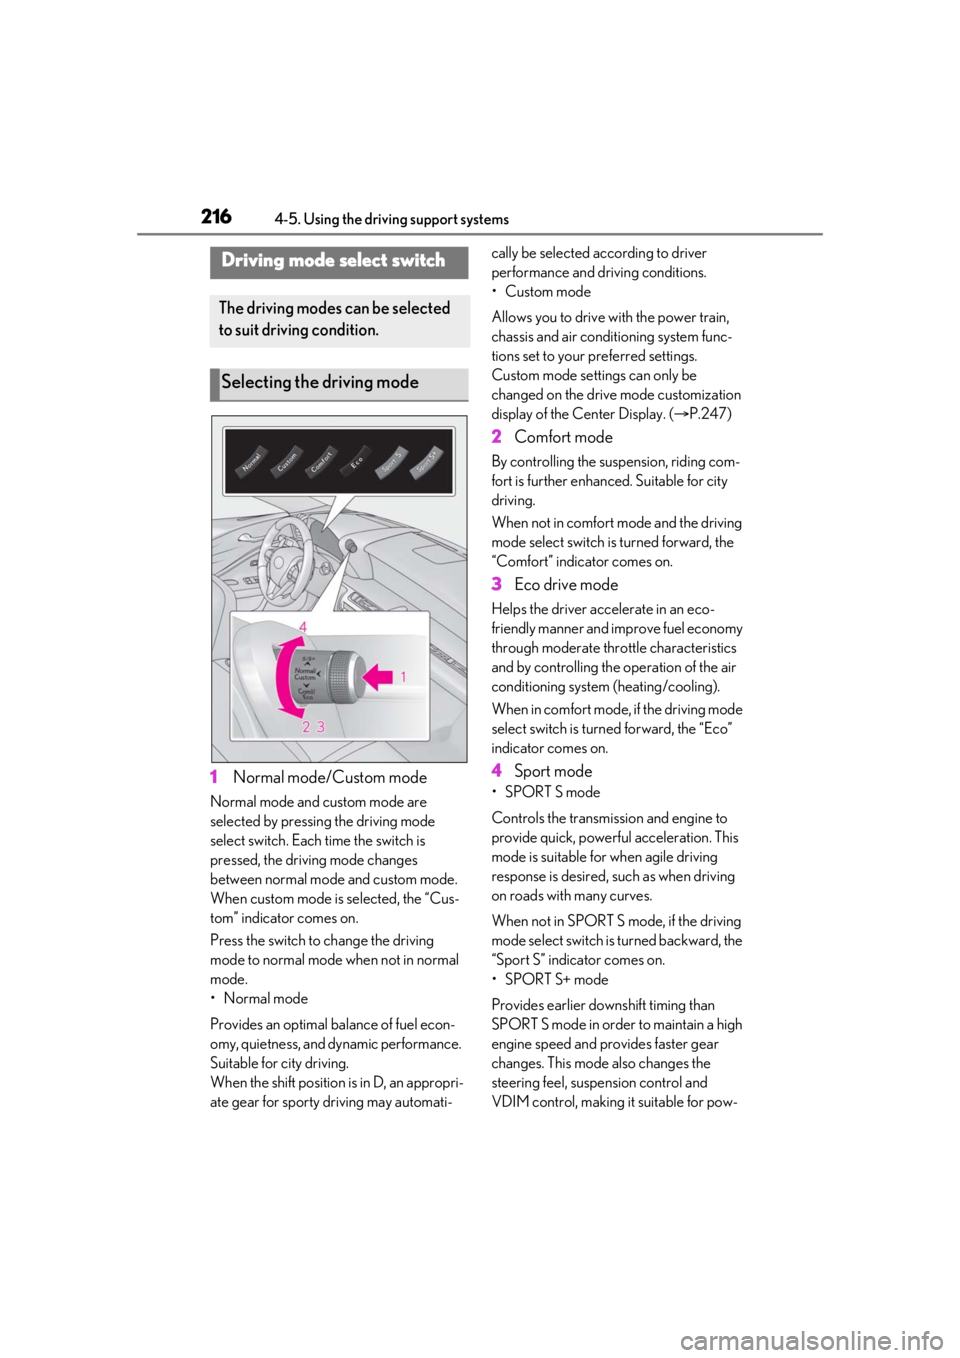
1Normal mode/Custom mode
Normal mode and custom mode are
selected by pressing the driving mode
select switch. Each time the switch is
pressed, the driving mode changes
between normal mode and custom mode.
When custom mode is selected, the “Cus-
tom” indicator comes on.
Press the switch to change the driving
mode to normal mode when not in normal
mode.
•Normal mode
Provides an optimal ba lance of fuel econ-
omy, quietness, and dynamic performance.
Suitable for city driving.
When the shift position is in D, an appropri-
ate gear for sporty driving may automati- cally be selected according to driver
performance and driving conditions.
• Custom mode
Allows you to drive with the power train,
chassis and air conditioning system func-
tions set to your preferred settings.
Custom mode settings can only be
changed on the drive mode customization
display of the Center Display. (
P.247)
2 Comfort mode
By controlling the suspension, riding com-
fort is further enhanced. Suitable for city
driving.
When not in comfort mode and the driving
mode select switch is turned forward, the
“Comfort” indicator comes on.
3Eco drive mode
Helps the driver acce lerate in an eco-
friendly manner and improve fuel economy
through moderate thro ttle characteristics
and by controlling the operation of the air
conditioning system (heating/cooling).
When in comfort mode, if the driving mode
select switch is turned forward, the “Eco”
indicator comes on.
4 Sport mode
•SPORT S mode
Controls the transmission and engine to
provide quick, powerful acceleration. This
mode is suitable for when agile driving
response is desired, such as when driving
on roads with many curves.
When not in SPORT S mode, if the driving
mode select switch is turned backward, the
“Sport S” indicator comes on.
•SPORT S+ mode
Provides earlier downshift timing than
SPORT S mode in order to maintain a high
engine speed and provides faster gear
changes. This mode also changes the
steering feel, susp ension control and
VDIM control, making it suitable for pow-
Driving mode select switch
The driving modes can be selected
to suit driving condition.
Selecting the driving mode
Page 217 of 436
2174-5. Using the driving support systems
4
Driving
erful sporty driving.
When in SPORT S mode, if the driving
mode select switch is turned backward, the
“Sport S+” indicator comes on.
■Operation of the air conditioning sys-
tem in Eco drive mode
Eco drive mode controls the heating/cool-
ing operations and fan speed of the air con-
ditioning system to enhance fuel efficiency.
To improve air condit ioning performance,
perform the following operations:
●Turn off eco air conditioning mode
( P.257)
●Adjust the fan speed ( P.255)
●Turn off Eco drive mode ( P.216)
■Automatic deactivation of sport mode
and custom mode
If the engine switch
turned off after drivin g in sport mode or
custom mode, the drive mode will be
changed to normal mode.
■Driving mode pop-up display
When the driving mode is changed, the
selected driving mode will be temporarily
displayed on the side display. ( P.248)
For custom mode, select “Setting” on the
display to customize the driving mode.
*: If equipped
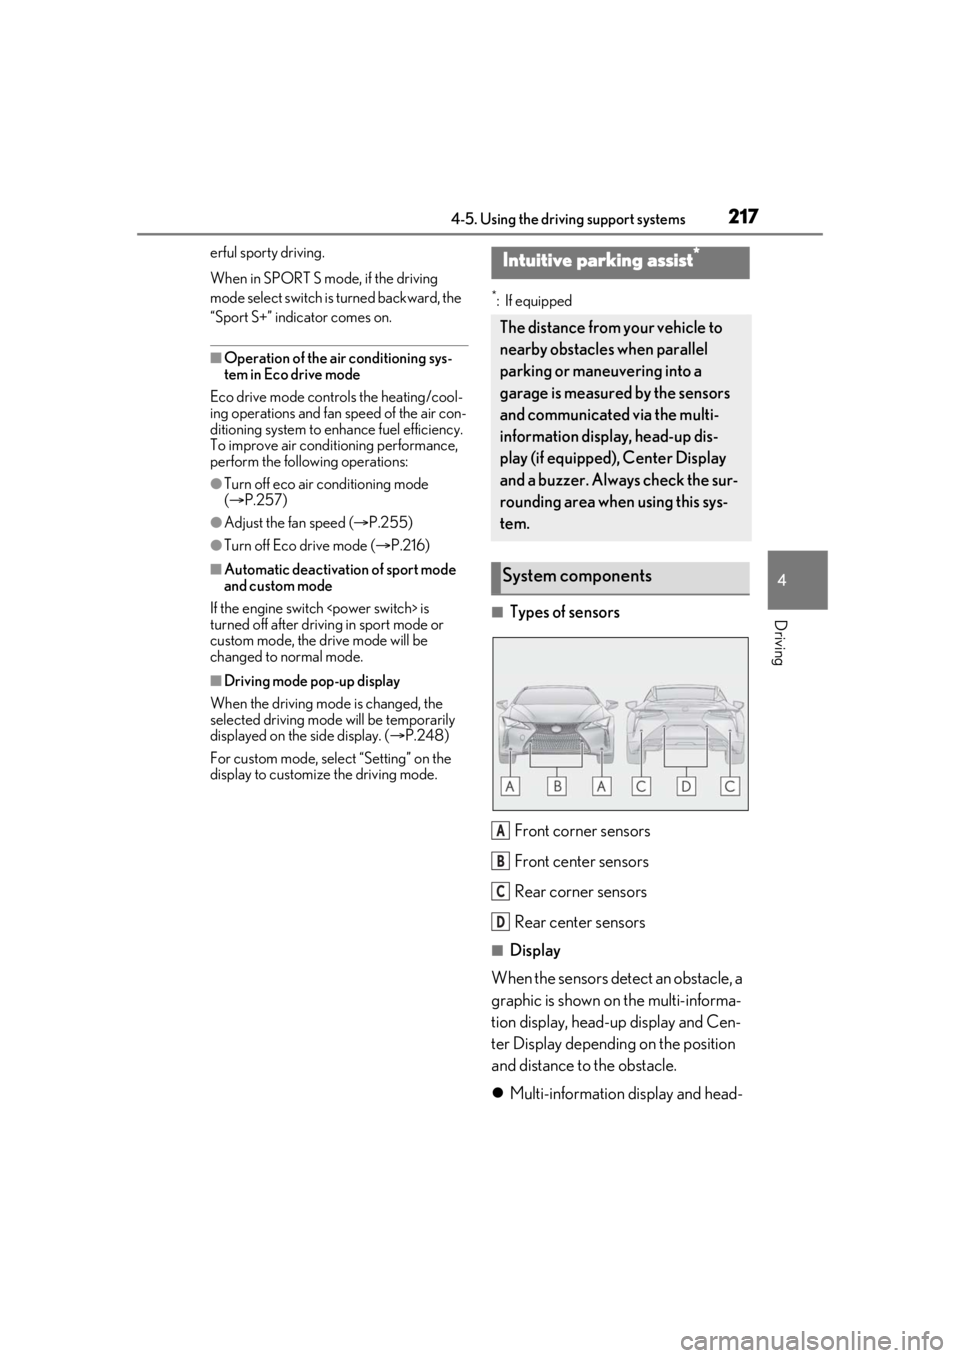
■Types of sensors
Front corner sensors
Front center sensors
Rear corner sensors
Rear center sensors
■Display
When the sensors detect an obstacle, a
graphic is shown on the multi-informa-
tion display, head-up display and Cen-
ter Display depending on the position
and distance to the obstacle.
Multi-information display and head-
Intuitive parking assist*
The distance from your vehicle to
nearby obstacles when parallel
parking or maneuvering into a
garage is measured by the sensors
and communicated via the multi-
information display, head-up dis-
play (if equipped), Center Display
and a buzzer. Always check the sur-
rounding area when using this sys-
tem.
System components
A
B
C
D