ESP lexus LC500h 2020 / LEXUS 2020 LC500,LC500H (OM11537U) Service Manual
[x] Cancel search | Manufacturer: LEXUS, Model Year: 2020, Model line: LC500h, Model: Lexus LC500h 2020Pages: 436, PDF Size: 13.86 MB
Page 248 of 436
2485-1. Remote Touch
*1: Refer to the “NAVIGATION SYSTEM OWNER’S MANUAL”.
*2: This function is not made available on some models.
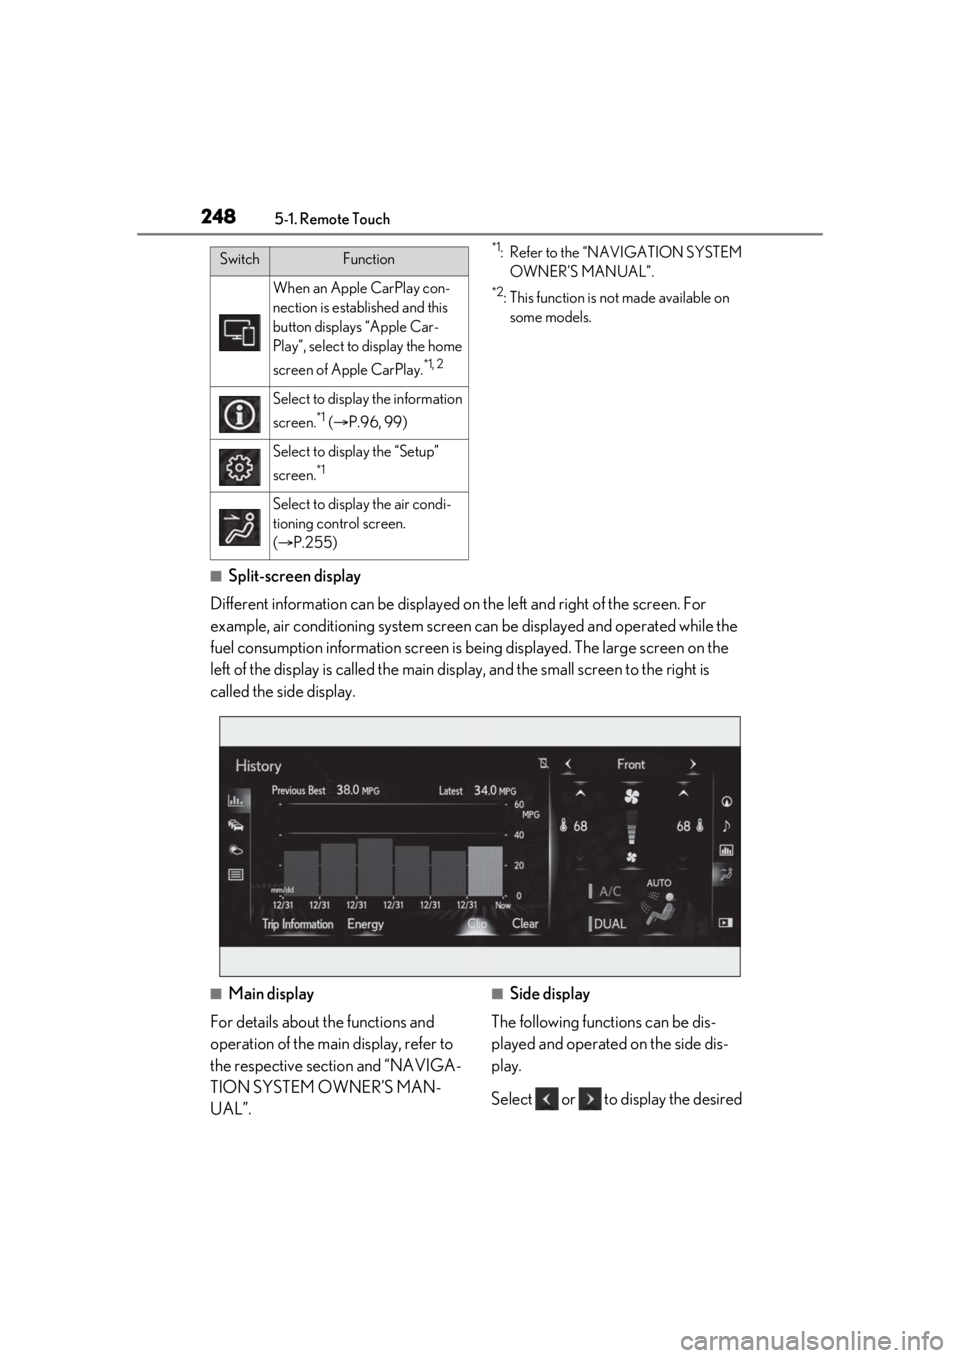
■Split-screen display
Different information can be displayed on the left and right of the screen. For
example, air conditioning system screen can be displayed and operated while the
fuel consumption information screen is be ing displayed. The large screen on the
left of the display is called the main display, and the small screen to the right is
called the side display.
■Main display
For details about the functions and
operation of the main display, refer to
the respective section and “NAVIGA-
TION SYSTEM OWNER’S MAN-
UAL”.■Side display
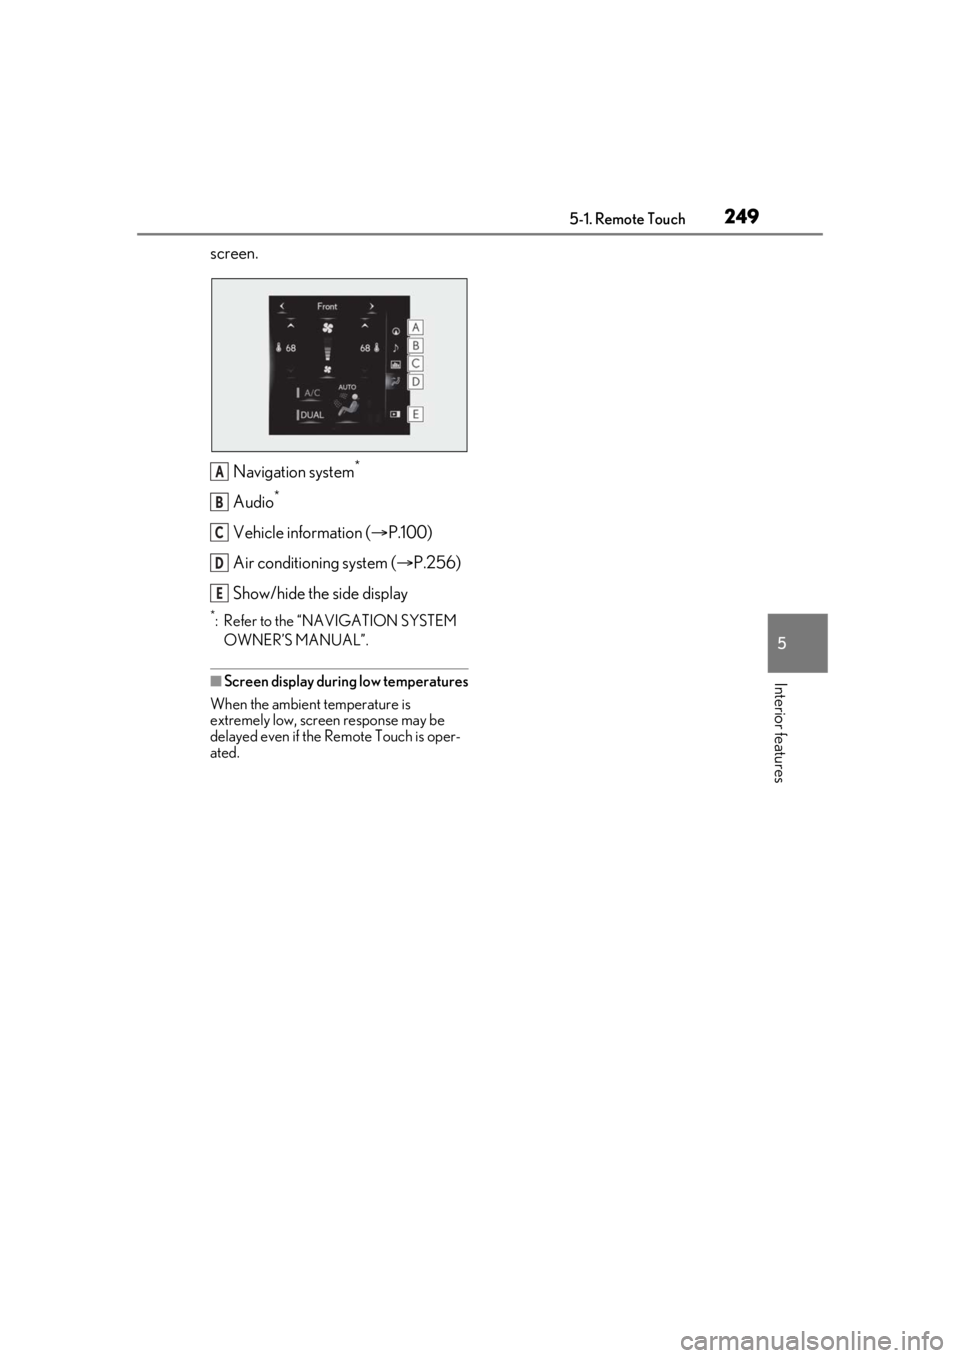
The following functions can be dis-
played and operated on the side dis-
play.
Select or to display the desired
When an Apple CarPlay con-
nection is established and this
button displays “Apple Car-
Play”, select to display the home
screen of Apple CarPlay.
*1, 2
Select to display the information
screen.
*1 ( P.96, 99)
Select to disp lay the “Setup”
screen.
*1
Select to display the air condi-
tioning control screen.
( P.255)
SwitchFunction
Page 249 of 436
2495-1. Remote Touch
5
Interior features
screen.Navigation system
*
Audio*
Vehicle information ( P.100)
Air conditioning system ( P.256)
Show/hide the side display
*: Refer to the “NAVIGATION SYSTEM OWNER’S MANUAL”.
■Screen display during low temperatures
When the ambient temperature is
extremely low, screen response may be
delayed even if the Re mote Touch is oper-
ated.
A
B
C
D
E
Page 262 of 436
2625-4. Using the interior lights
5-4.Using the interior lights
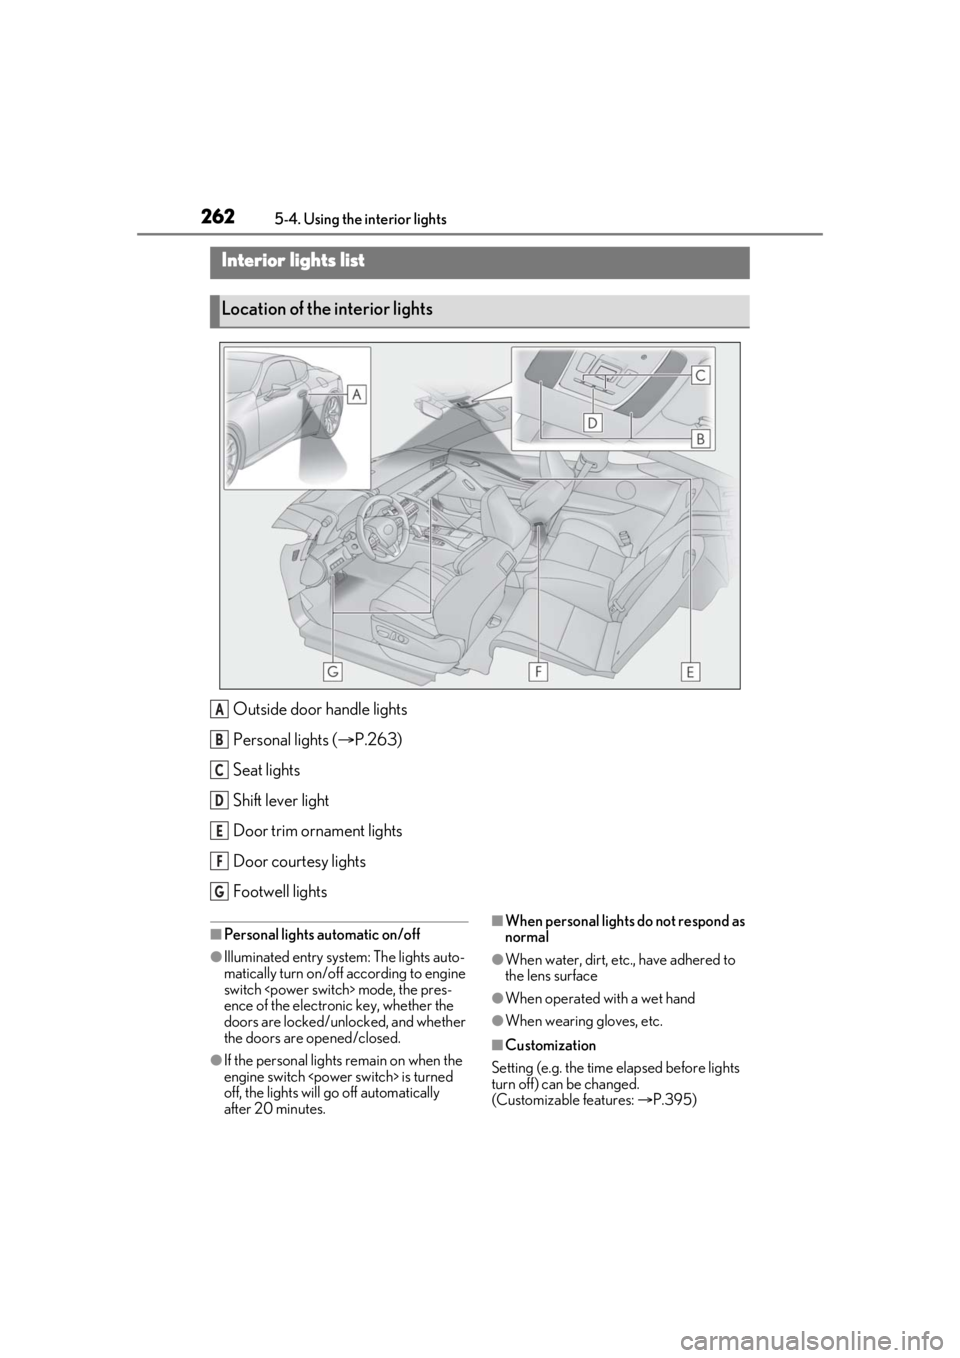
Outside door handle lights
Personal lights ( P.263)
Seat lights
Shift lever light
Door trim ornament lights
Door courtesy lights
Footwell lights
■Personal lights automatic on/off
●Illuminated entry system: The lights auto-
matically turn on/off according to engine
switch
ence of the electronic key, whether the
doors are locked/unlocked, and whether
the doors are opened/closed.
●If the personal lights remain on when the
engine switch
off, the lights will go off automatically
after 20 minutes.
■When personal lights do not respond as
normal
●When water, dirt, etc., have adhered to
the lens surface
●When operated with a wet hand
●When wearing gloves, etc.
■Customization
Setting (e.g. the time elapsed before lights
turn off) can be changed.
(Customizable features: P.395)
Interior lights list
Location of the interior lights
A
B
C
D
E
F
G
Page 282 of 436
2826-1. Maintenance and care
■CFRP (Carbon Fiber Reinforced Plas-
tic) parts (if equipped)
CFRP is used for the scuff plates. When
cleaning the scuff plates, remove dirt using
a water-dampened soft cloth or synthetic
chamois, and then wipe the surface with a
dry soft cloth to remove any remaining
moisture.
WARNING
■Water in the vehicle
●LC500: Do not splash or spill liquid in
the vehicle.
Doing so may cause electrical compo-
nents etc. to malfunction or catch fire.
LC500h: Do not splash or spill liquid
in the vehicle, such as on the floor, on
the rear seats, in the hybrid battery
(traction battery) air vents, and in the
trunk. ( P.66)
Doing so may cause the hybrid battery,
electrical components, etc. to mal-
function or catch fire.
●Do not get any of the SRS components
or wiring in the vehicle interior wet.
( P.28)
An electrical malfunction may cause
the airbags to deploy or not function
properly, resulting in death or serious
injury.
■Cleaning the interior (especially
instrument panel)
Do not use polish wax or polish cleaner.
The instrument panel may reflect off the
windshield, obstructing the driver’s view
and leading to an accident, resulting in
death or serious injury.
NOTICE
■Cleaning detergents
●Do not use the following types of
detergent, as they may discolor the
vehicle interior or cause streaks or
damage to painted surfaces:
• Non-seat portions: Organic sub- stances such as benzene or gasoline,
alkaline or acidic solutions, dye, and
bleach
• Seats: Alkaline or acidic solutions, such as thinner, benzene, and alcohol
●Do not use polish wax or polish
cleaner. The instrument panel’s or
other interior part’s painted surface
may be damaged.
■Preventing damage to leather sur-
faces
Observe the following precautions to
avoid damage to and deterioration of
leather surfaces:
●Remove any dust or dirt from leather
surfaces immediately.
●Do not expose the vehicle to direct
sunlight for extended periods of time.
Park the vehicle in the shade, espe-
cially during summer.
●Do not place items made of vinyl, plas-
tic, or containing wax on the uphol-
stery, as they may stick to the leather
surface if the vehicle interior heats up
significantly.
■Water on the floor
Do not wash the vehicle floor with water.
Vehicle systems such as the audio system
may be damaged if water comes into
contact with electrical components such
as the audio system above or under the
floor of the vehicle. Water may also
cause the body to rust.
Page 287 of 436
2876-2. Maintenance
6
Maintenance and care
6-2.Maintenance
■Repair and replacement
It is recommended that genuine Lexus parts
be used for repairs to ensure performance
of each system. If non-Lexus parts are used
in replacement or if a repair shop other than
a Lexus dealer perfor ms repairs, confirm
the warranty coverage.
■Allow inspection and repairs to be per-
formed by a Lexus dealer
●Lexus technicians are well-trained spe-
cialists and are kept up to date with the
latest service information. They are well
informed about the operations of all sys-
tems on your vehicle.
●Keep a copy of the repa ir order. It proves
that the maintenance that has been per-
formed is under warra nty coverage. If any
problem should arise while your vehicle is
under warranty, your Lexus dealer will
promptly take care of it.
General maintenance should be per-
formed on a daily basis. This can be
done by yourself or by a Lexus dealer.
Scheduled maintenance should be
performed at specified intervals
according to the maintenance sched-
ule.
For details about ma intenance items and
schedules, refer to the “Warranty and Ser-
vice Guide”, “Owner’s Manual Supple-
ment” or “Scheduled Maintenance”.
■Resetting the message indicating main-
tenance is required
After the required maintenance is per-
formed according to the maintenance
schedule, please reset the message.
To reset the message, follow the procedure
described below:
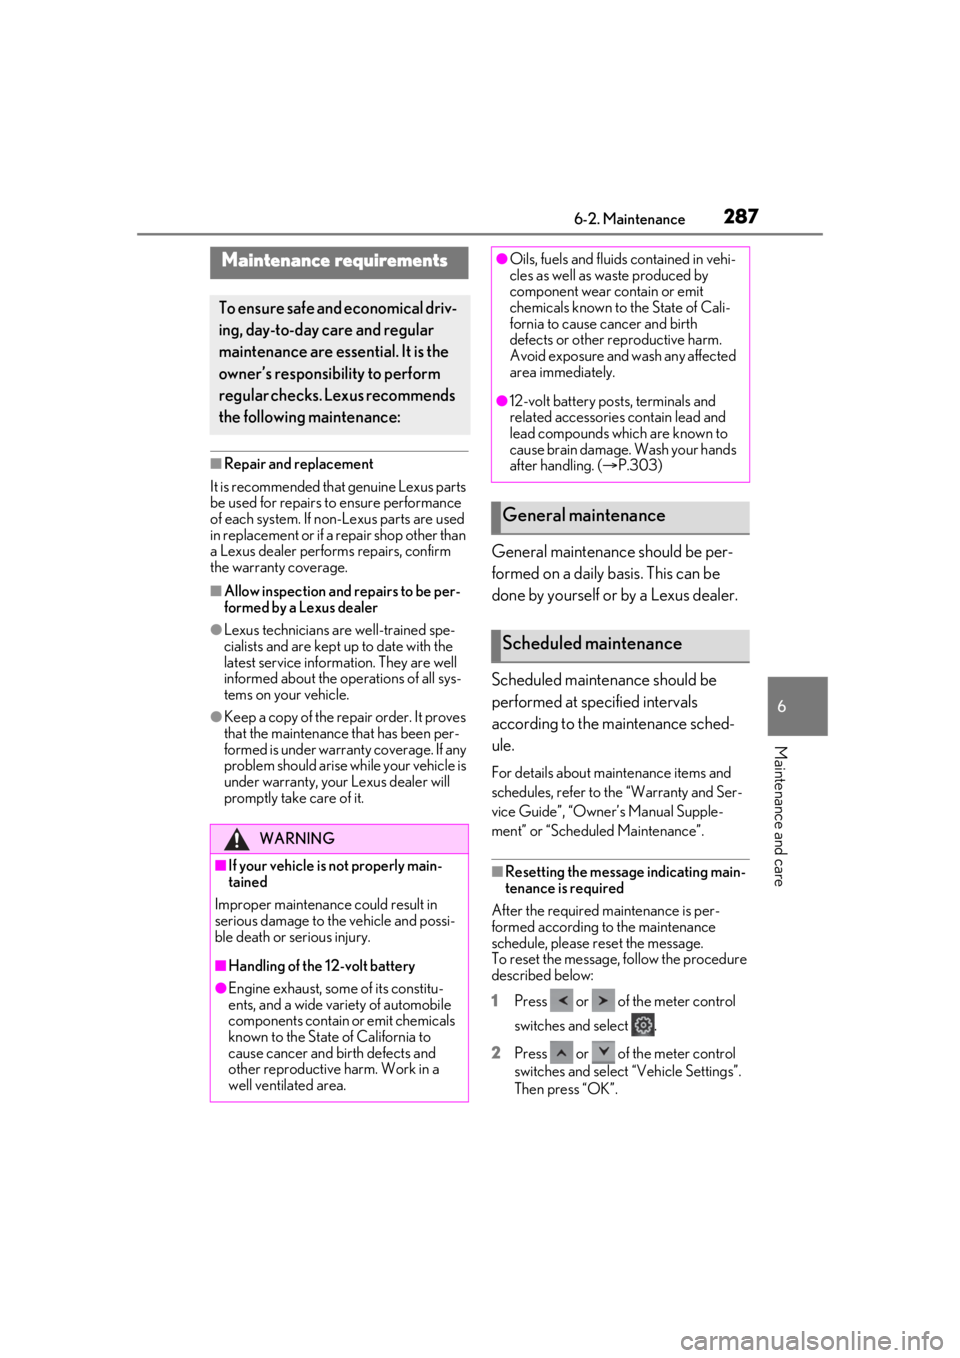
1 Press or of the meter control
switches and select .
2 Press or of the meter control
switches and select “Vehicle Settings”.
Then press “OK”.
Maintenance requirements
To ensure safe and economical driv-
ing, day-to-day care and regular
maintenance are essential. It is the
owner’s responsibility to perform
regular checks. Lexus recommends
the following maintenance:
WARNING
■If your vehicle is not properly main-
tained
Improper maintenanc e could result in
serious damage to the vehicle and possi-
ble death or serious injury.
■Handling of the 12-volt battery
●Engine exhaust, some of its constitu-
ents, and a wide variety of automobile
components contain or emit chemicals
known to the State of California to
cause cancer and birth defects and
other reproductive harm. Work in a
well ventilated area.
●Oils, fuels and fluids contained in vehi-
cles as well as waste produced by
component wear contain or emit
chemicals known to the State of Cali-
fornia to cause cancer and birth
defects or other re productive harm.
Avoid exposure and wash any affected
area immediately.
●12-volt battery post s, terminals and
related accessories contain lead and
lead compounds which are known to
cause brain damage. Wash your hands
after handling. ( P.303)
General maintenance
Scheduled maintenance
Page 347 of 436
3477-2. Steps to take in an emergency
7
When trouble arises
WARNING
■Maintenance of the tires
Each tire, including the spare (if provided), should be checked monthly when cold and
inflated to the inflation pressure recommended by the vehicle manufacturer on the vehi-
cle placard or tire inflation pr essure label (tire and load info rmation label). (If your vehicle
has tires of a different size th an the size indicated on the vehicle placard or tire inflation
pressure label [tire and load information label], you should determine the proper tire
inflation pressure for those tires.)
As an added safety feature, your vehicle has been equipped with a tire pressure monitor-
ing system (TPMS-tire pressure warning system) that illuminates a low tire pressure tell-
tale (tire pressure warning light) when one or more of your tires is significantly under-
inflated. Accordingly, when the low tire pressu re telltale (tire pressure warning light) illu-
minates, you should stop and check your tires as soon as possible, and inflate them to the
proper pressure. Driving on a si gnificantly under-inflated tire causes the tire to overheat
and can lead to tire failure. Under-inflation al so reduces fuel efficiency and tire tread life,
and may affect the vehicle’s handling and stopping ability.
Please note that the TPMS (tire pressure warning system) is not a substitute for proper
tire maintenance, and it is the driver’s respon sibility to maintain correct tire pressure, even
if under-inflation has not reac hed the level to trigger illumina tion of the TPMS low tire
pressure telltale (tire pressure warning light).
Your vehicle has also been equipped with a TPMS (tire pressure warning system) mal-
function indicator to indicate when the system is not operating properly. The TPMS (tire
pressure warning system) malfunction indicator is combined with the low tire pressure
telltale (tire pressure warning light). When the system detect s a malfunction, the telltale
will flash for approximately one minute and th en remain continuously illuminated. This
sequence will continue upon subsequent vehi cle start-ups as long as the malfunction
exists. When the malfunction in dicator is illuminated, the system may not be able to
detect or signal low tire pressure as intended.
TPMS (tire pressure warning system) malfunctions may occur for a variety of reasons,
including the installation of re placement or alternate tires or wheels on the vehicle that
prevent the TPMS (tire pressure warning sy stem) from functioning properly. Always
check the TPMS (tire pressure warning system ) malfunction telltale after replacing one or
more tires or wheels on your vehicle to ensu re that the replacement or alternate tires and
wheels allow the TPMS (tire pr essure warning system) to cont inue to function properly.
NOTICE
■To ensure the tire pressure warning system operates properly
Do not install tires with differ ent specifications or makers, as the tire pressure warning
system may not operate properly.
Page 365 of 436
3657-2. Steps to take in an emergency
7
When trouble arises
turning the engine switch
8 Once the vehicle’s engine
jumper cables in the exact reverse
order from which they were con-
nected.
9 Close the exclusive jump starting
terminal cover, and reinstall the fuse
box cover to its original position.
Once the engine
have the vehicle inspected at your Lexus
dealer as soon as possible.
■Starting the engine
when the 12-volt battery is discharged
The engine
started by push-starting.
■To prevent 12-volt battery discharge
●Turn off the headlights and the audio sys-
tem while the engine
stopped.
●Turn off any unnecessary electrical com-
ponents when the vehicle is running at a
low speed for an extended period, such
as in heavy traffic.
■When the 12-volt battery is removed or
discharged
●Information stored in the ECU is cleared.
When the 12-volt battery is depleted,
have the vehicle inspected at your Lexus
dealer.
●Some systems may require initialization.
( P.407)
■When removing the 12-volt battery ter-
minals
When the 12-volt battery terminals are
removed, the information stored in the
ECU is cleared. Before removing the 12-
volt battery terminals, contact your Lexus
dealer.
■Charging the 12-volt battery
The electricity stored in the 12-volt battery
will discharge gradually even when the
vehicle is not in use, due to natural dis-
charge and the draining effects of certain
electrical appliances. If the vehicle is left for
a long time, the 12-volt battery may dis-
charge, and the engine
may be unable to start. (The 12-volt battery
recharges automatically during driving.)
■When recharging or replacing the 12-
volt battery
●In some cases, it may not be possible to
unlock the doors using the smart access
system with push-button start when the
12-volt battery is discharged. Use the
wireless remote control or the mechani-
cal key to lock or unlock the doors.
●The engine
on the first attempt after the 12-volt bat-
tery has recharged but will start normally
after the second attempt. This is not a
malfunction.
●The engine switch
is memorized by the vehicle. When the
12-volt battery is reconnected, the system
will return to the mode it was in before
the 12-volt battery was discharged.
Before disconnecting the 12-volt battery,
turn the engine switch
If you are unsure wh at mode the engine
switch
12-volt battery discharged, be especially
careful when reconnecting the 12-volt
battery.
●If the 12-volt battery discharges, it may
not be possible to shift the shift position to
other positions. In this case, the vehicle
cannot be towed without lifting both rear
wheels because the re ar wheels will be
locked. ( P.334)
■When replacing the 12-volt battery
●Use a Central Degassing type 12-volt
battery (European Regulations).
●Type A*1: Use a 12-volt battery that the
case size is same as the previous one
(LN4), 20 hour rate capacity (20HR) is
equivalent (80Ah) or greater, and per-
formance rating (CCA) is equivalent
(685A) or greater.
Page 370 of 436
3707-2. Steps to take in an emergency
If the engine coolant temperature
gauge enters the red zone or
“Engine Coolant Temp High Stop in
a Safe Place See Owner’s Manual”
is shown on the multi-information
display
1 Stop the vehicle in a safe place and
turn off the air conditioning system,
and then stop the hybrid system.
2 If you see steam:
Carefully lift the hood after the
steam subsides.
If you do not see steam:
Carefully lift the hood.
WARNING
●Keep hands and clothing (especially a
tie, a scarf or a muffler) away from the
fan and belts. Failure to do so may
cause the hands or clothing to be
caught, resulting in serious injury.
●While the engine and radiator are hot,
do not loosen or remove the coolant
inlet cap or coolant reservoir cap.
High temperature steam or coolant
could spray out.
NOTICE
■When adding engine coolant
Add coolant slowly after the engine has
cooled down sufficiently. Adding cool
coolant to a hot engine too quickly can
cause damage to the engine.
■To prevent damage to the cooling sys-
tem
Observe the following precautions:
●Avoid contaminating the coolant with
foreign matter (such as sand or dust
etc.).
●Do not use any coolant additive.
If your vehicle overheats
(LC500h)
The following may indicate that
your vehicle is overheating.
The engine coolant temperature
gauge ( P.80) is in the red zone
or a loss of hybrid system power is
experienced. (For example, the
vehicle speed does not increase.)
“Engine Coolant Temp High Stop
in a Safe Place See Owner’s
Manual” or “Hybrid System
Overheated Reduced Output
Power” is shown on the multi-
information display.
Steam comes out from under the
hood.
Correction procedures
Page 373 of 436
3737-2. Steps to take in an emergency
7
When trouble arises
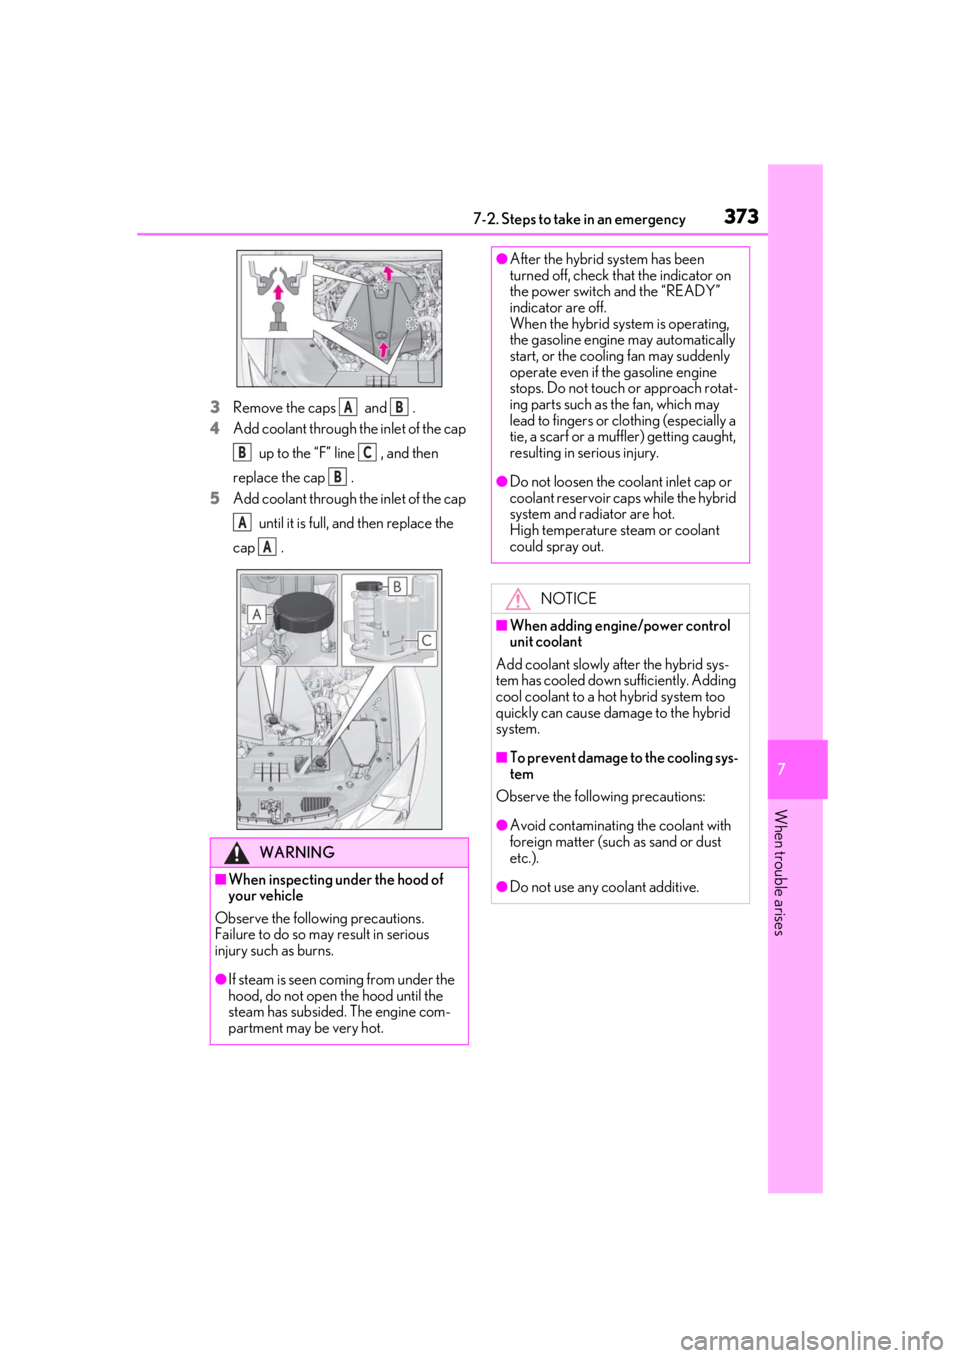
3Remove the caps and .
4 Add coolant through the inlet of the cap
up to the “F” line , and then
replace the cap .
5 Add coolant through the inlet of the cap
until it is full, and then replace the
cap .
WARNING
■When inspecting under the hood of
your vehicle
Observe the following precautions.
Failure to do so may result in serious
injury such as burns.
●If steam is seen coming from under the
hood, do not open the hood until the
steam has subsided. The engine com-
partment may be very hot.
AB
BC
B
A
A
●After the hybrid system has been
turned off, check that the indicator on
the power switch and the “READY”
indicator are off.
When the hybrid system is operating,
the gasoline engine may automatically
start, or the cooling fan may suddenly
operate even if the gasoline engine
stops. Do not touch or approach rotat-
ing parts such as the fan, which may
lead to fingers or clothing (especially a
tie, a scarf or a muffler) getting caught,
resulting in serious injury.
●Do not loosen the coolant inlet cap or
coolant reservoir caps while the hybrid
system and radiator are hot.
High temperature steam or coolant
could spray out.
NOTICE
■When adding engine/power control
unit coolant
Add coolant slowly after the hybrid sys-
tem has cooled down sufficiently. Adding
cool coolant to a hot hybrid system too
quickly can cause dama ge to the hybrid
system.
■To prevent damage to the cooling sys-
tem
Observe the following precautions:
●Avoid contaminating the coolant with
foreign matter (such as sand or dust
etc.).
●Do not use any coolant additive.
Page 390 of 436
3908-1. Specifications
■Treadwear
The treadwear grade is a comparative
rating based on the wear rate of the tire
when tested under controlled condi-
tions on a specified government test
course.
For example, a tire graded 150 would wear
one and a half (1 - 1/2) times as well on the
government course as a tire graded 100.
The relative performa nce of tires depends
upon the actual conditions of their use.
Performance may differ significantly from
the norm due to variatio ns in driving habits,
service practices and differences in road
characteristics and climate.
■Traction AA, A, B, C
The traction grades, from highest to
lowest, are AA, A, B and C, and they
represent the tire’s ability to stop on
wet pavement as measured under con-
trolled conditions on specified govern-
ment test surfaces of asphalt and
concrete.
A tire marked C may have poor traction
performance.
Warning: The traction grade assigned to
this tire is based on braking (straight
ahead) traction tests and does not include cornering (turning) traction.
■Temperature A, B, C
The temperature grades are A (the
highest), B, and C, representing the
tire’s resistance to the generation of
heat and its ability to dissipate heat
when tested under controlled condi-
tions on a specified indoor laboratory
test wheel.
Sustained high temperature can cause the
material of the tire to degenerate and
reduce tire life, and excessive temperature
can lead to sudd en tire failure.
Grade C corresponds to a level of perfor-
mance which all passenger car tires must
meet under the Fede ral Motor Vehicle
Safety Standard No. 109.
Grades B and A represent higher levels of
performance on the laboratory test wheel
than the minimum required by law.
Warning: The temperature grades of a tire
assume that it is properly inflated and not
overloaded.
Excessive speed, unde rinflation, or exces-
sive loading, either separately or in combi-
nation, can cause heat buildup and
possible tire failure.
Glossary of tire terminology
Tire related termMeaning
Cold tire inflation
pressureTire pressure when the vehicle has been parked for three hours or
more, or has not been driven more than 1 mile or 1.5 km under that
condition
Maximum inflation
pressureThe maximum cold inflated pressure to which a tire may be inflated,
shown on the sidewall of the tire
Recommended
inflation pressureCold tire inflation pressure recommended by a manufacturer