check engine lexus LFA 2012 Technical Information / LEXUS 2012 LFA: INSIDE THE LFA
[x] Cancel search | Manufacturer: LEXUS, Model Year: 2012, Model line: LFA, Model: Lexus LFA 2012Pages: 128, PDF Size: 5.91 MB
Page 71 of 128

69
Using the meter
Checking and topping up the oil level
The LFA uses a dry-sump oil system to circulate the engine oil between the
engine and the oil tank. Therefore, depending on the conditions, the level of oil
in the oil tank can vary greatly.
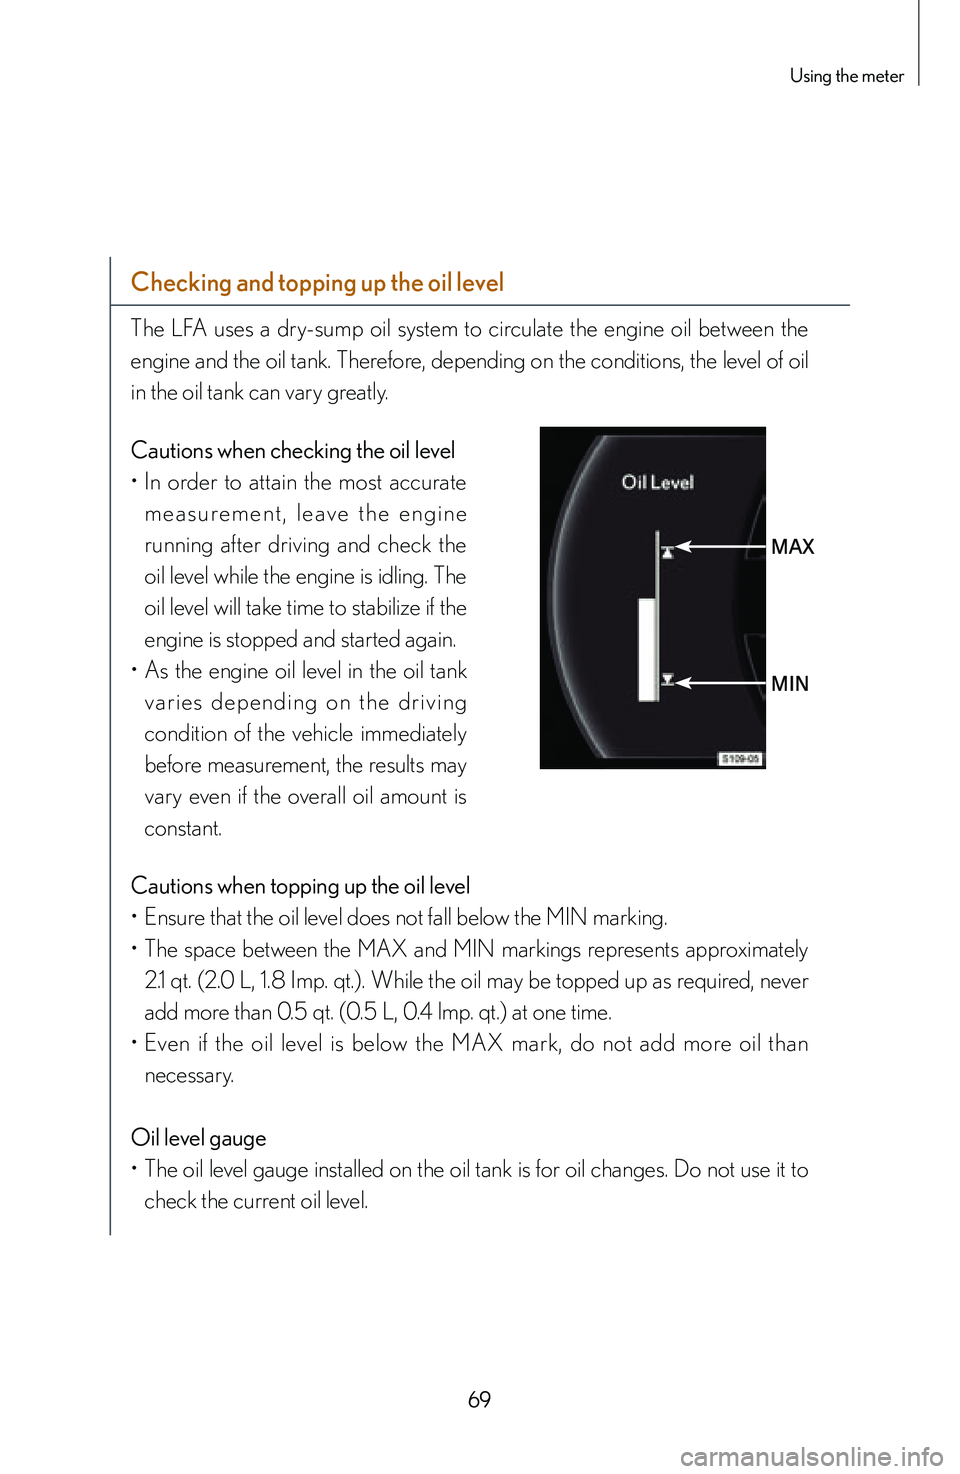
Cautions when checking the oil level
• In order to attain the most accurate
m e a s u r e m e n t , l e a v e t h e e n g i n e
running after driving and check the
oil level while the engine is idling. The
oil level will take time to stabilize if the
engine is stopped and started again.
• As the engine oil level in the oil tank
va r i e s d e p e n d i n g o n t h e d r i v i n g
condition of the vehicle immediately
before measurement, the results may
vary even if the overall oil amount is
constant.
MAX
MIN
Cautions when topping up the oil level
• Ensure that the oil level does not fall below the MIN marking.
• The space between the MAX and MIN markings represents approximately
2.1 qt. (2.0 L, 1.8 Imp. qt.). While the oil may be topped up as required, never
add more than 0.5 qt. (0.5 L, 0.4 lmp. qt.) at one time.
• Even if the oil level is below the MAX mark, do not add more oil than
necessary.
Oil level gauge
• The oil level gauge installed on the oil tank is for oil changes. Do not use it to
check the current oil level.
Page 73 of 128

71
Using the meter
■
■Rev Peak
An afterimage of the tachometer needle at the highest engine speed attained prior
to an upshift or deceleration will be retained for approximately 0.5 seconds. This
function simulates the “telltale needle” used in traditional analog racing tachometers to
help the driver time their upshifts and check over-revs on downshifting etc.
The Rev Peak function can be turned on or off from “Settings” on the menu display.
The color of the tachometer needle afterimage will change in accordance with that of
the actual tachometer needle.
Tachometer needle colorTachometer afterimage needle color
Blue Red
Red Blue
White Blue
Page 100 of 128

98
■
■Starting the engine by connecting an external
battery
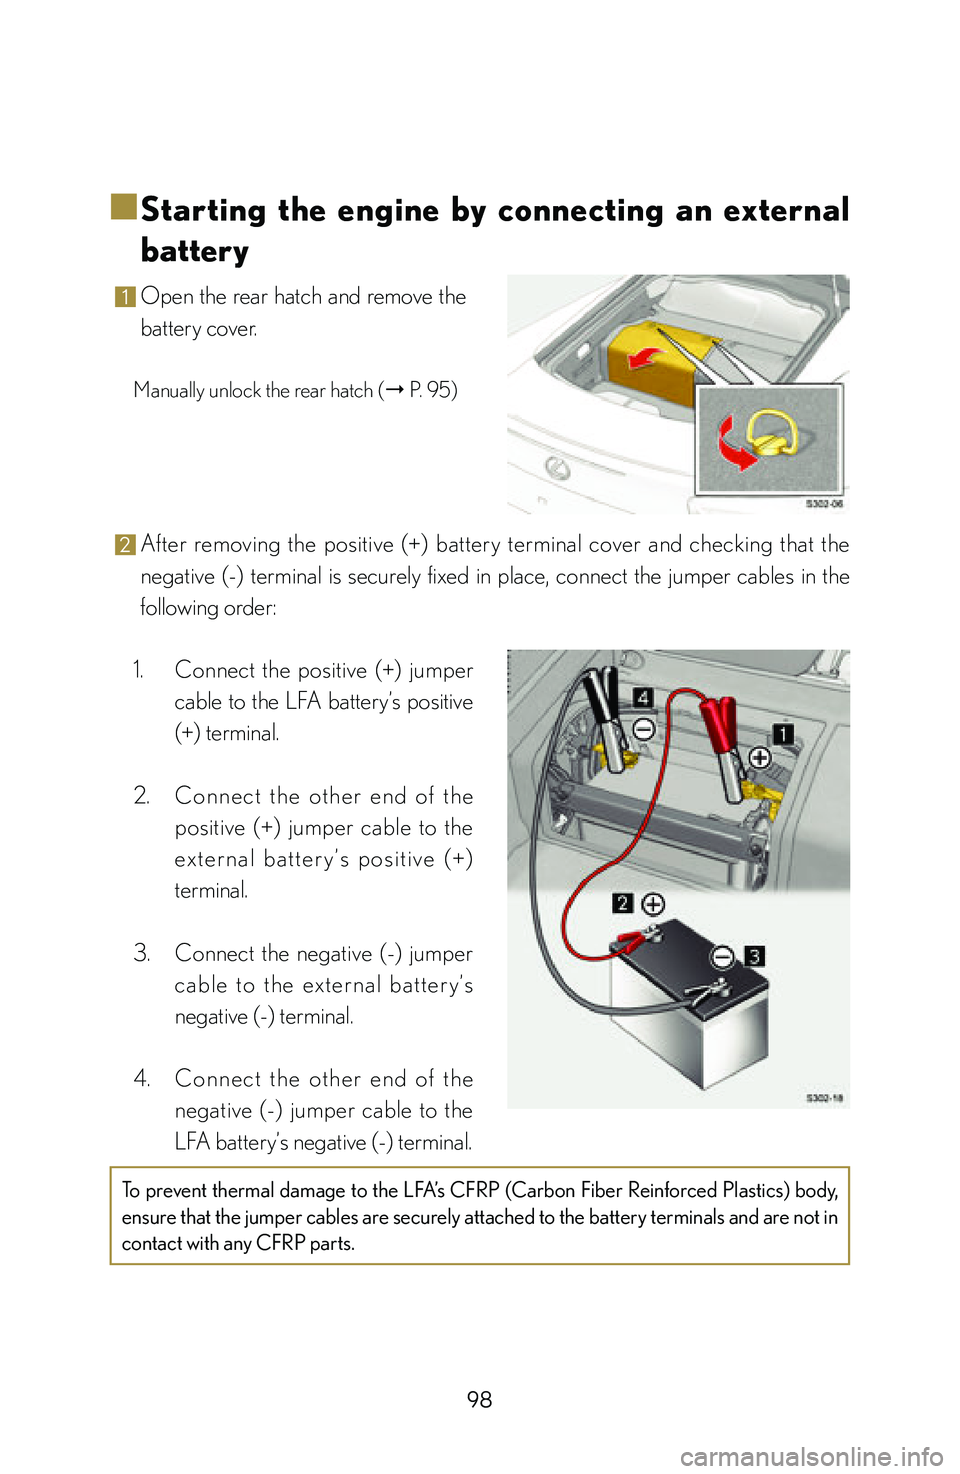
1 Open the rear hatch and remove the
battery cover.
Manually unlock the rear hatch (" P. 95)
2 After removing the positive (+) battery terminal cover and checking that the
negative (-) terminal is securely fixed in place, connect the jumper cables in the
following order:
1. Connect the positive (+) jumper
cable to the LFA battery’s positive
(+) terminal.
2. C o n n e c t t h e o t h e r e n d o f t h e
positive (+) jumper cable to the
e x t e r n a l b a t t e r y ’s p o s i t i ve ( + )
terminal.
3. Connect the negative (-) jumper
c a b l e t o t h e ext e r n a l b a t t e r y ’s
negative (-) terminal.
4. C o n n e c t t h e o t h e r e n d o f t h e
negative (-) jumper cable to the
LFA battery’s negative (-) terminal.
To prevent thermal damage to the LFA’s CFRP (Carbon Fiber Reinforced Plastics) body,
ensure that the jumper cables are securely attached to the battery terminals and are not in
contact with any CFRP parts.
Page 117 of 128

115
Index
Checking the oil level 69
Clock 67
Clutch 37
Clutch disc 37
Cold starting restrictions 17
Combination meter 57
Connecting an external battery
to start the engine 98
Control characteristics
depending on driving mode 23
Control pad 66
Coolant temperature 60
Coolant temperature gauge 60
Crankshaft 38
Creep phenomenon 37
DDark current (parasitic current) 93
Dead battery 94
Default shift speed setting 41
Departure angle 100
Diaphragm spring 37
Differential 39
Differential oil cooler 39
Digital display 56
Disabling the theft deterrent
system 102
Disabling the tilt sensor 102
Discharged battery 94
Disconnecting the negative (-)
battery terminal 99
Door mirror switches 9
Double wishbone front
suspension 47
Downshift 40
Driving mode 58
Driving mode selection 27
Driving mode selector switch 41
Driving mode selector switch
operation 23
Driving mode-linked variable
throttle response 33
Driving position 20
Driving position adjustment 10
Dry single-plate clutch 37
Dual shaft transmission 39
EECB (Electronically
Controlled Brake) 50
Emergency brake 9
Engine 56
Engine code 16
Engine coolant 60
Engine coolant temperature
gauge 60
Engine coolant temperature
sensor 60
Engine limiters 16
Engine oil pressure 62
Engine oil pressure gauge 62
Engine oil temperature gauge 61
Engine overspeed 70
Engine protection mechanisms 16