stop start lexus LFA 2012 Technical Information / LEXUS 2012 LFA (OM77006U) Owner's Manual
[x] Cancel search | Manufacturer: LEXUS, Model Year: 2012, Model line: LFA, Model: Lexus LFA 2012Pages: 420, PDF Size: 5.02 MB
Page 303 of 420

When trouble arises5
301
5-1. Essential informationEmergency flashers.............. 302
If your vehicle needs to be towed................................ 303
If you think something is wrong ..................................... 308
Fuel pump shut off system .................................... 309
Event data recorder ............... 310 5-2. Steps to take in an
emergency
If a warning light turns on or a warning buzzer
sounds... .................................. 312
If a warning message is displayed................................ 322
If you have a flat tire............... 332
If the engine will not start .... 343
If you lose your keys/ wireless remote
control transmitter ............. 344
If the parking brake cannot be released ............. 345
If the vehicle battery is discharged ............................ 348
If your vehicle overheats ...... 351
If the vehicle becomes stuck........................................ 354
If your vehicle has to be stopped in an
emergency ............................ 355
Page 311 of 420

5
When trouble arises
309
5-1. Essential information
Fuel pump shut off system
To minimize the risk of fuel leakage when the engine stalls or when an airbag
inflates upon collision, the fuel pump shut off system stops the supply of fuel to
the engine.
Follow the procedure below to restart the engine after the system is acti-
vated.
Turn the ignition switch to the “ACC” or “LOCK” position.
Restart the engine.
NOTICE
■Before starting the engine
Inspect the ground under the vehicle.
If you find that fuel has leaked onto the ground, the fuel system has been damaged
and is in need of repair. Do not restart the engine.
STEP1
STEP2
Page 322 of 420

320
5-2. Steps to take in an emergency
CAUTION
■Maintenance of the tires
Each tire, including the spare (if provided), should be checked monthly when cold
and inflated to the inflation pressure re commended by the vehicle manufacturer on
the vehicle placard or tire inflation pressu re label (tire and load information label).
(If your vehicle has tires of a different size than the size indicated on the vehicle
placard or tire inflation pressure label [tire and load information label], you should
determine the proper tire inflation pressure for those tires.)
As an added safety feature, your vehicl e has been equipped with a tire pressure
monitoring system (TPMS-tire pressure warning system) that illuminates a low tire
pressure telltale (tire pressure warning light) when one or more of your tires is sig-
nificantly under-inflated. Accordingly, when the low tire pressure telltale (tire pres-
sure warning light) illuminates, you should stop and check your tires as soon as
possible, and inflate them to the proper pressure. Driving on a significantly under-
inflated tire causes the tire to overheat and can lead to tire failure. Under-inflation
also reduces fuel efficiency and tire tread life, and may affect the vehicle's handling
and stopping ability.
Please note that the TPMS (tire pressure warning system) is not a substitute for
proper tire maintenance, and it is the driv er's responsibility to maintain correct tire
pressure, even if under-inflation has not reached the level to trigger illumination of
the TPMS low tire pressure telltale (tire pressure warning light).
Your vehicle has also been equipped with a TPMS (tire pressure warning system)
malfunction indicator to indicate when th e system is not operating properly. The
TPMS (tire pressure warning system) malfunction indicator is combined with the
low tire pressure telltale (tire pressure warning light). When the system detects a
malfunction, the telltale will flash for approximately one minute and then remain
continuously illuminated. This sequence will continue upon subsequent vehicle
start-ups as long as the malfunction exists . When the malfunction indicator is illumi-
nated, the system may not be able to detect or signal low tire pressure as intended.
TPMS (tire pressure warning system) malfunctions may occur for a variety of rea-
sons, including the installation of replacem ent or alternate tires or wheels on the
vehicle that prevent the TPMS (tire pres sure warning system) from functioning
properly. Always check the TPMS (tire pressure warning system) malfunction tell-
tale after replacing one or more tires or wheels on your vehicle to ensure that the
replacement or alternate tires and wheels allow the TPMS (tire pressure warning
system) to continue to function properly.
Page 340 of 420

338
5-2. Steps to take in an emergency
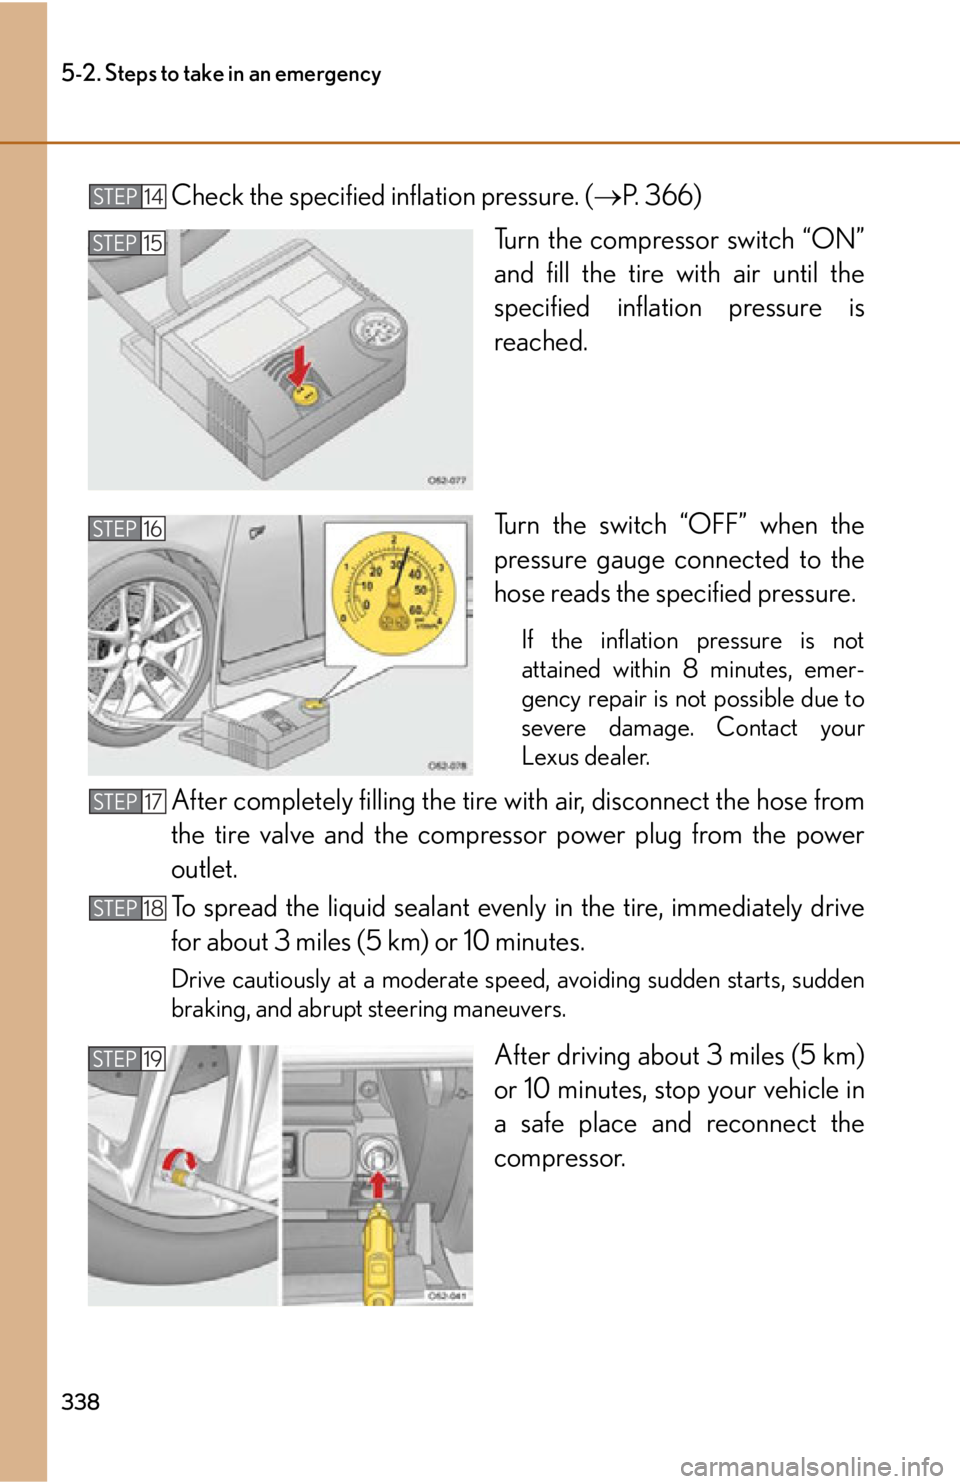
Check the specified inflation pressure. (P. 366)
Turn the compressor switch “ON”
and fill the tire with air until the
specified inflation pressure is
reached.
Turn the switch “OFF” when the
pressure gauge connected to the
hose reads the specified pressure.
If the inflation pressure is not
attained within 8 minutes, emer-
gency repair is not possible due to
severe damage. Contact your
Lexus dealer.
After completely filling the tire with air, disconnect the hose from
the tire valve and the compress or power plug from the power
outlet.
To spread the liquid sealant ev enly in the tire, immediately drive
for about 3 miles (5 km) or 10 minutes.
Drive cautiously at a moderate speed, avoiding sudden starts, sudden
braking, and abrupt steering maneuvers.
After driving about 3 miles (5 km)
or 10 minutes, stop your vehicle in
a safe place and reconnect the
compressor.
STEP 14
STEP 15
STEP 16
STEP 17
STEP 18
STEP 19
Page 343 of 420

5
When trouble arises
341
5-2. Steps to take in an emergency
CAUTION
■Precaution for children
Keep the emergency tire puncture repair kit out of the reach of children and store it
properly.
■Sealant precautions
●The sealant in the emergency tire puncture repair kit is not for human consump-
tion.
If the sealant is consumed, drink a large quantity of water and get medical atten-
tion immediately.
●If sealant gets in your eyes or on your skin, thoroughly wash with a large quantity
of water. If necessary, get medical attention.
■When fixing the flat tire
●Stop your vehicle in a safe and flat area.
●If force is used to turn the valve core tool while air remains in the tire, special care
should be taken because the valve core could fly out.
●Be careful, as sealant may fly out if you shake the bottle with the hose installed.
●If the hose is not securely installed, sealant may leak out when filling.
●Connect the valve and hose securely with the tire installed on the vehicle.
●Be careful handling the compressor, as parts of the compressor get hot during
operation. Some parts of the compressor may remain hot after use.
●Do not attach the vehicle speed warning sticker to an area other than the one
indicated. If the sticker is attached to an area where an SRS airbag is located,
such as the pad of the steering wheel, it may prevent the SRS airbag from operat-
ing properly.
■Driving to spread the liquid sealant evenly
Drive cautiously at a moderate speed, avoi ding sudden starts, sudden braking, and
abrupt steering maneuvers.
Page 353 of 420

5
When trouble arises
351
5-2. Steps to take in an emergency
If your vehicle overheats
If your engine overheats:
Stop the vehicle in a safe place and turn off the air conditioning
system.
Check to see if steam is coming out from under the hood.
If you see steam:
Stop the engine. Care fully lift the hood after the steam subsides
and then restart the engine.
If you do not see steam:
Leave the engine running and carefully lift the hood.
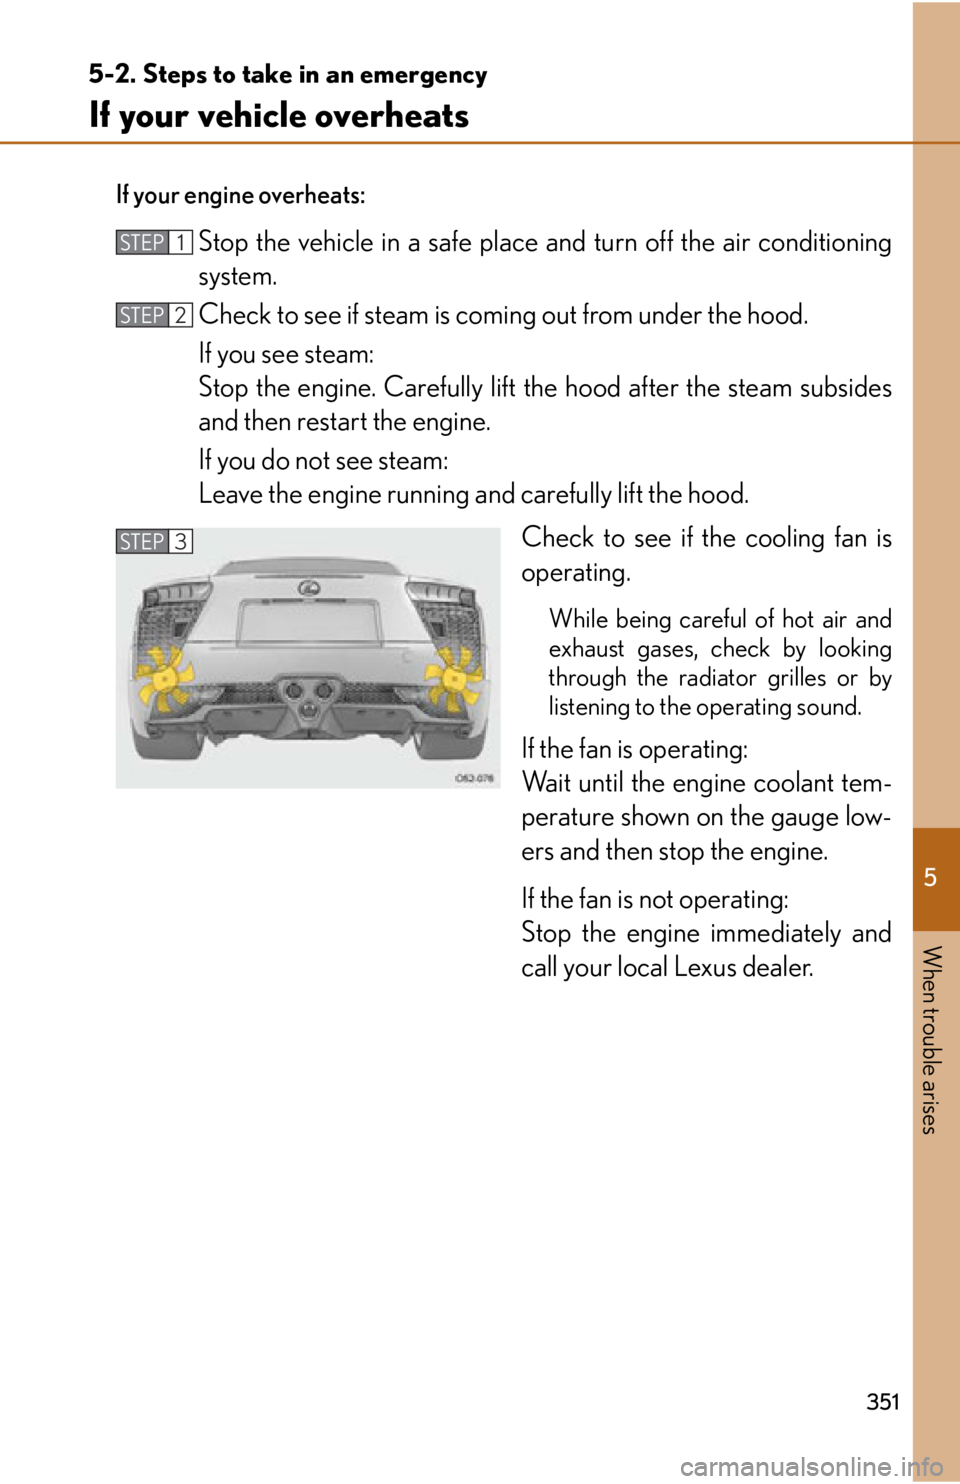
Check to see if the cooling fan is
operating.
While being careful of hot air and
exhaust gases, check by looking
through the radiator grilles or by
listening to the operating sound.
If the fan is operating:
Wait until the engine coolant tem-
perature shown on the gauge low-
ers and then stop the engine.
If the fan is not operating:
Stop the engine immediately and
call your local Lexus dealer.
STEP1
STEP2
STEP3
Page 356 of 420

354
5-2. Steps to take in an emergency
If the vehicle becomes stuck
Carry out the following procedures if the tires spin or the vehicle becomes
stuck in mud, dirt, or snow.
Set the parking brake, select Neutral and stop the engine.
Remove the mud, snow, or sand from around the stuck tire.
Place wood, stones or some other material to help provide trac-
tion under the tires.
Restart the engine.
Select 1st gear or Reverse, release the parking brake and care-
fully apply the accelerator to free the vehicle.
Turn off VSC and TRAC if these functions are hampering your attempts
to free the vehicle. ( P. 1 6 7 )
CAUTION
■When attempting to free a stuck vehicle
If you choose to rock the vehicle back and forth to free it, make sure the surround-
ing area is clear, to avoid striking other vehicles, objects or persons. The vehicle
may also lunge forward or lunge back suddenly as it becomes free. Use extreme
caution.
■When operating the paddle shift switches/reverse selector switch
Be careful not to operate the paddle shift switches/reverse selector switch with the
accelerator pedal depressed.
This may lead to unexpected rapid acceleration of the vehicle that may cause an
accident and result in death or serious injury.
NOTICE
■To avoid damaging the transm ission and other components
●Avoid spinning the wheels and do not rev the engine.
●If the vehicle remains stuck after trying these procedures, the vehicle may require
towing to be freed.
STEP1
STEP2
STEP3
STEP4
STEP5
Page 357 of 420

5
When trouble arises
355
5-2. Steps to take in an emergency
If your vehicle has to be stopped in an emergency
Only in an emergency, such as if it becomes impossible to stop the vehicle in
the normal way, stop the vehicle using the following procedure:
Steadily step on the brake pedal with both feet and firmly depress
it.
Do not pump the brake pedal repeatedly as this will increase the dis-
tance required to slow the vehicle.
Select Neutral. ( P. 103)
If Neutral is selected After slowing down, stop the vehicle in a safe place by the road.
Stop the engine.
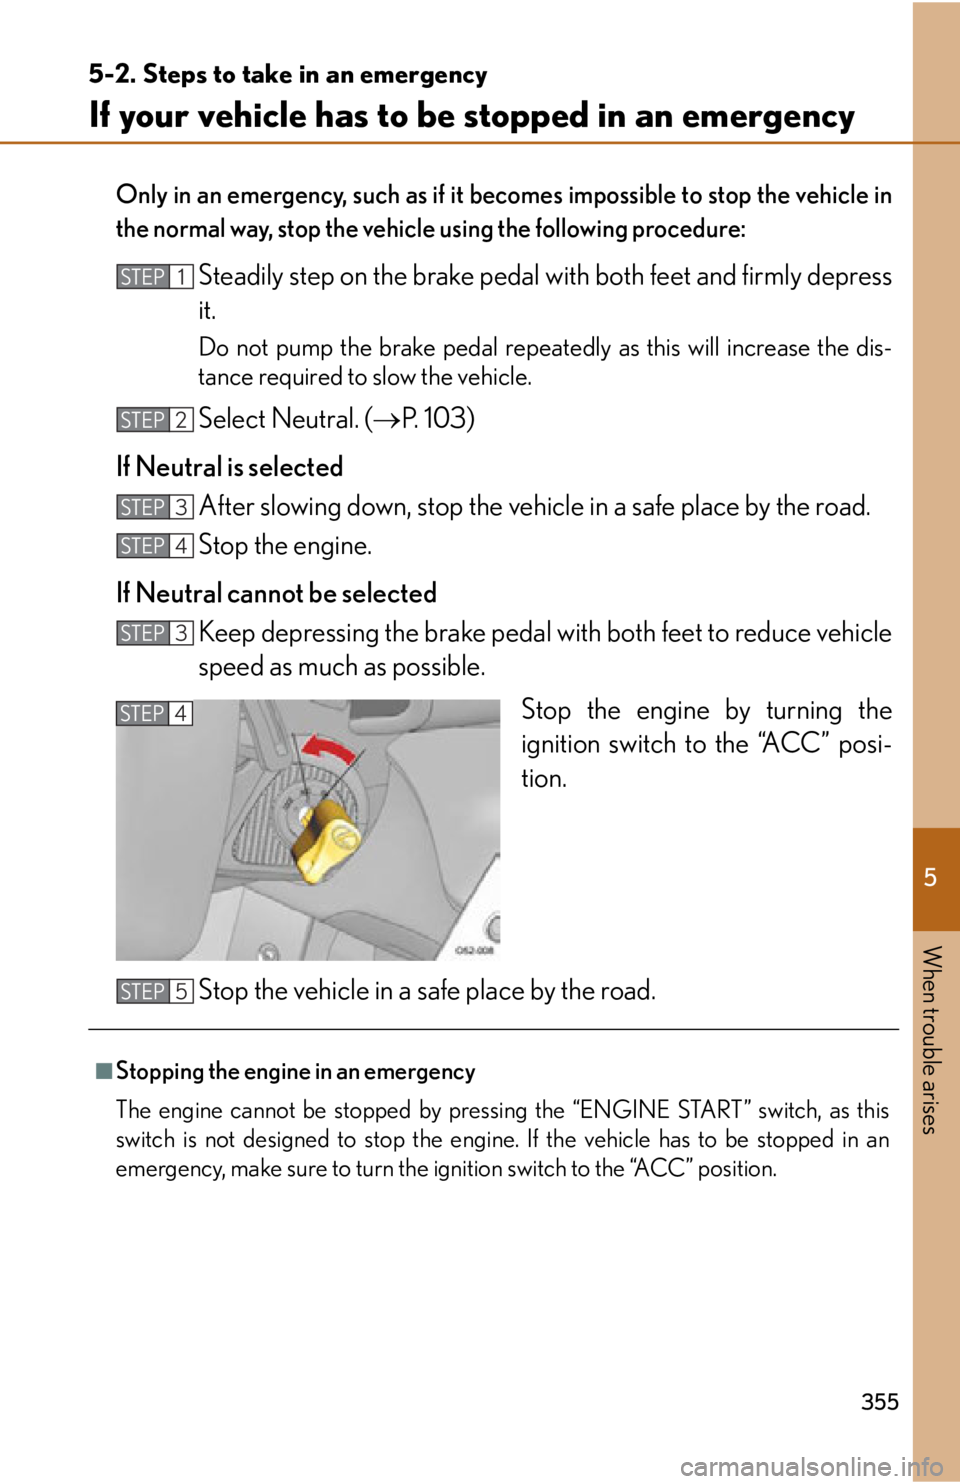
If Neutral cannot be selected Keep depressing the brake pedal with both feet to reduce vehicle
speed as much as possible.
Stop the engine by turning the
ignition switch to the “ACC” posi-
tion.
Stop the vehicle in a safe place by the road.
STEP1
STEP2
STEP3
STEP4
STEP3
STEP4
■Stopping the engine in an emergency
The engine cannot be stopped by pressi ng the “ENGINE START” switch, as this
switch is not designed to stop the engine. If the vehicle has to be stopped in an
emergency, make sure to turn the ignition switch to the “ACC” position.
STEP5
Page 407 of 420

405
Alphabetical index
Electric power steering ....................... 166
Emergency, in case ofIf the active rear wing will not operate ....................................... 325
If the engine will not start ............... 343
If the fuel filler door cannot be opened ............................................ 50
If the parking brake cannot be released ....................................... 345
If the rear hatch cannot be opened ....................................................29
If the vehicle has a discharged battery.................................................. 348
If the warning buzzer sounds........ 312
If the warning light turns on ............ 312
If the warning message is displayed .............................................322
If you have a flat tire ........................ 332
If you lose your keys ........................ 344
If you lose your wireless remote control ................................ 344
If you think something is wrong...................................................308
If your vehicle becomes stuck .... 354
If your vehicle has to be stopped in an emergency ......... 355
If your vehicle needs to be towed ................................................... 303
If your vehicle overheats.................. 351 Emergency flashers
Switch.......................................................302
Engine “ENGINE START” switch ...............98
Compartment......................................256
Engine coolant ................................... 260
Engine coolant temperature gauge....................................................... 116
Engine oil pressure gauge ............... 116
Engine oil temperature gauge ....... 116
Engine speed restrictions .................90
Engine starting restrictions............... 181
Hood ....................................................... 250
How to start the engine .....................98
Identification number ...................... 358
Idling with five cylinders.....................90
If the engine will not start................343
Ignition switch .........................................98
Overheating .......................................... 351
Tachometer ......................................... 260
Variable red zone................................. 119
Warning light ........................................ 314
Warning message ................. 324, 327
Engine coolant Capacity .................................................362
Checking .............................................. 260
Coolant type ........................................362
Engine coolant temperature gauge....................................................... 116
Preparing and checking before winter .....................................180E
*2: Refer to “Inside the LFA”.
Page 409 of 420

407
Alphabetical index
Hazard lights .......................................... 302
Headlight cleaner ..................................160
Headlight low/high beams.................158
HeadlightsDischarge headlight precautions .......................................300
Replacing light bulbs ....................... 299
Switch ....................................................... 158
Wattage ................................................. 367
Heaters Seat heaters..............................................32
Side mirror .............................................. 201
High beams ..............................................158
High mounted stoplight Replacing light bulbs ....................... 299
Hill-start assist control ......................... 166
Hood ......................................................... 250
Hooks Tonneau cover ..................................... 218
Horn.............................................................. 115
Hub socket................................................ 281 I/M test...................................................... 246
Identification
Engine..................................................... 358
Vehicle ................................................... 358
Ignition switch............................................98
Ignition switch light............................... 207
Illuminated entry system .................... 207
Illumination .............................................. 207
Indicator lights........................................... 121
Initialization Items to initialize ................................ 386
Inside rear view mirror .......................... 42
Interior lights Down light .............................................207
Ignition switch light............................207
Interior lights .........................................207
Switch...................................................... 208
Wattage .................................................. 367
Intermittent adjuster ............................. 160HI