rear lexus LS400 1994 Electrical Components / 1994 LS400: SWITCHES
[x] Cancel search | Manufacturer: LEXUS, Model Year: 1994, Model line: LS400, Model: Lexus LS400 1994Pages: 9, PDF Size: 3.32 MB
Page 1 of 9

SECTION 1 – 2
15
INSTRUMENTS AND CONTROLS
Switches
Headlight switch16 . . . . . . . . . . . . . . . . . . . . . . . . . . . . . . . . . . . . . . . . . .
Headlight dimmer and turn signal switch17 . . . . . . . . . . . . . . . . . . . . .
Fog light switch18 . . . . . . . . . . . . . . . . . . . . . . . . . . . . . . . . . . . . . . . . . . .
Windshield wiper and washer switch19 . . . . . . . . . . . . . . . . . . . . . . . . .
Headlight cleaner switch19 . . . . . . . . . . . . . . . . . . . . . . . . . . . . . . . . . . .
Rear window and outside rear view mirror defogger switch20 . . . . .
Power window switches21 . . . . . . . . . . . . . . . . . . . . . . . . . . . . . . . . . . . .
Emergency flasher switch22 . . . . . . . . . . . . . . . . . . . . . . . . . . . . . . . . . .
Seat heater switches23 . . . . . . . . . . . . . . . . . . . . . . . . . . . . . . . . . . . . . .
Page 4 of 9

SWITCHES
18
For signaling turns, move the lever up or down in the
conventional manner.
The ignition key must be in the “ON” position.
The turn signal is self-cancelling after a turn, but after a lane
change, you may have to cancel it by hand. You can also signal
a lane change by moving the turn signal lever partway and
holding it there. If the green light in the instrument cluster
flashes faster than normal, it indicates that the front or rear turn
signal bulb has burned out. If this indicator light does not come
on, the fuse or the indicator light itself has probably failed. You
may change headlight beam even while the turn signal lights
are flashing.
FOG LIGHT SWITCH
Fog light switch
To turn on the fog lights, turn the switch to the “ON”
position. The fog lights come on only when the headlights
are on low beam.
The headlights must be on.
Page 6 of 9
SWITCHES
20The low washer fluid reminder light in the instrument cluster
comes on when the fluid level in the tank becomes nearly
empty. For information on adding washer fluid, see “Adding
washer fluid” on page 230.
NOTICE:
Do not turn the headlight cleaner on with the tank empty.
It may cause the cleaner motor to overheat.
REAR WINDOW AND
OUTSIDE REAR VIEW MIRROR
DEFOGGER SWITCH
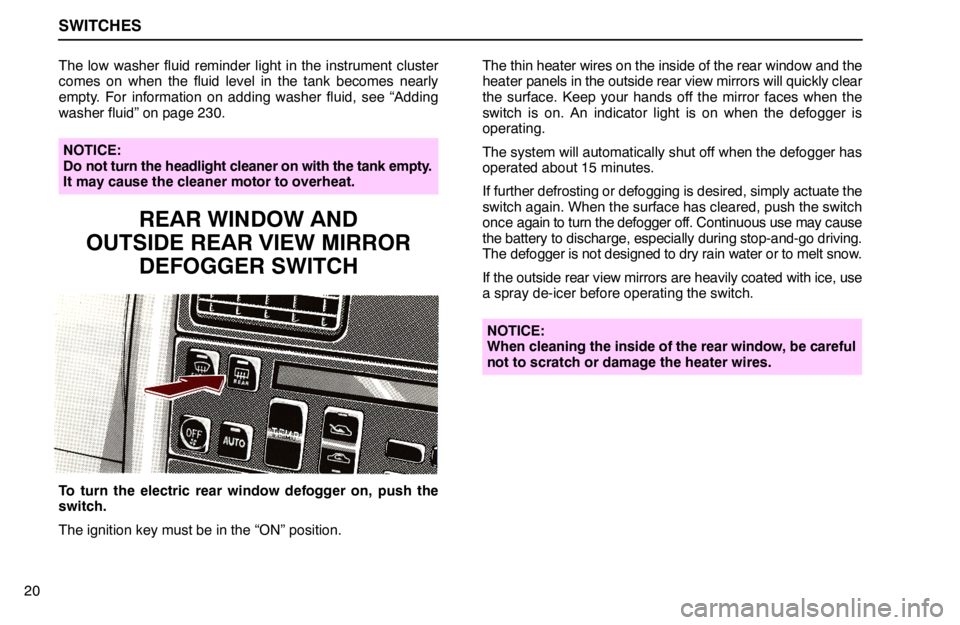
To turn the electric rear window defogger on, push the
switch.
The ignition key must be in the “ON” position.The thin heater wires on the inside of the rear window and the
heater panels in the outside rear view mirrors will quickly clear
the surface. Keep your hands off the mirror faces when the
switch is on. An indicator light is on when the defogger is
operating.
The system will automatically shut off when the defogger has
operated about 15 minutes.
If further defrosting or defogging is desired, simply actuate the
switch again. When the surface has cleared, push the switch
once again to turn the defogger off. Continuous use may cause
the battery to discharge, especially during stop-and-go driving.
The defogger is not designed to dry rain water or to melt snow.
If the outside rear view mirrors are heavily coated with ice, use
a spray de-icer before operating the switch.
NOTICE:
When cleaning the inside of the rear window, be careful
not to scratch or damage the heater wires.
Page 7 of 9

SWITCHES
21
POWER WINDOW SWITCHES
For left rear window
For right rear window
For driver’s window
For front passenger’s window
To raise or lower the windows, use the switch on each
door. The passengers’ windows can also be controlled by
the switches on the driver’s door.
The ignition key must be in the “ON” position. However, even
if the ignition key is turned to “OFF” position, the window can
be operated until a front door is opened (or for about sixty
seconds).
Operating the driver’s switch
To lower the window, push the switch halfway down. Pull
it up to raise the window. The window glass moves as long
as the switch is operated.
To fully lower the driver’s window automatically, push the
switch fully down.
In automatic operation, the window will fully open even if you
let go of the switch. To stop the window partway, lightly pull the
switch up and then release it.
Operating the passengers’ switches
To lower the window, push the switch down. Pull it up to
raise the window. The window moves as long as the
switch is operated.