lexus LS400 1999 Comfort Adjustment / LEXUS 1999 LS400 (OM50514U) Service Manual
Manufacturer: LEXUS, Model Year: 1999,
Model line: LS400,
Model: Lexus LS400 1999
Pages: 495, PDF Size: 2.56 MB
lexus LS400 1999 Comfort Adjustment / LEXUS 1999 LS400 (OM50514U) Service Manual
LS400 1999
Lexus
Lexus
https://www.carmanualsonline.info/img/36/30122/w960_30122-0.png
lexus LS400 1999 Comfort Adjustment / LEXUS 1999 LS400 (OM50514U) Service Manual
Trending: spark plugs, ground clearance, spare tire location, automatic transmission fluid, spare wheel, headlights, airbag disable
Page 41 of 495
 Service Manual KEYS AND DOORS
25
Push
the ºUNLOCKº button until the windows and moon
roof start to move. When you release the button, the
windows and moon roof stop operating.
For vehicles sold in U.S.A.
This de")
KEYS AND DOORS
25
Push
the ºUNLOCKº button until the windows and moon
roof start to move. When you release the button, the
windows and moon roof stop operating.
For vehicles sold in U.S.A.
This device complies with Part 15 of the FCC
Rules.
Operation is subject to the following two
conditions: (1) This device may not cause
harmful interference, and (2) this device must
accept any interference received, including
interference that may cause undesired
operation. This equipment has been tested and found to
comply with the limits for a Class B digital
device, pursuant to Part 15 of the FCC Rules.
These limits are designed to provide reasonable
protection against harmful interference in a
residential installation. This equipment
generates, uses and can radiate radio frequency
energy and, if not installed and used in
accordance with the instructions, may cause
harmful interference to radio communications.
However, there is no guarantee that interference
will not occur in a particular installation. If this
equipment does cause harmful interference to
radio or television reception, which can be
determined by turning the equipment off and on,
the user is encouraged to try to correct the
interference by one or more of the following
measures:
± Reorient or relocate the receiving antenna.
± Increase the separation between the
equipment and receiver.
± Connect the equipment into an outlet on a
circuit different from that to which the receiver is
connected.
± Consult the dealer or an experienced radio /
TV technician for help.
Page 42 of 495
KEYS AND DOORS
26
CAUTION
Changes or modifications not expressly approved by
the party responsible for compliance could void the
user's authority to operate the equipment.
For vehicles sold in CanadaThis device complies with RSS±210 of Industry
Canada.
Operation is subject to the following two
conditions: (1) this device may not cause
interference, and (2) this device must accept any
interference, including interference that may
cause undesired operation of the device.Replacing the battery
When you replace the battery, prepare a lithium battery
CR1616 and a special screwdriver.
Page 43 of 495
KEYS AND DOORS
27
CAUTION
Special care should be taken that small children do not
swallow the removed battery or components.
NOTICE
When replacing the battery, be careful not to lose thecomponents, screws and O±ring.
11L028±1
1. Remove the screw, and then the cover while pushing
it in the arrow direction.
Page 44 of 495
KEYS AND DOORS
28
11L029±1
2. Remove the module from the key frame.
11L030±1
3. Remove the 2 screws to take out the lid of the module.
4. Take out the discharged battery and put a new battery
with the positive side up.
Page 45 of 495
KEYS AND DOORS
29
NOTICE
�Make sure the positive side and negative sideof the battery should be faced correctly.
�Be careful not to bend the electrode of thebattery insertion and that dust or oils do notadhere to the inside of the module.
�Take care not to lose the screws and O±ring.
5. Install the lid with the O±ring and 2 screws.
NOTICE
Take care not to damage or bend the O±ring wheninstalling.
6. Install the module into the key frame and secure the
cover with the screw.
7. When pushing any switch on the wireless key, make
sure the indicator light comes on.
DOORS
Locking with key
Page 46 of 495
KEYS AND DOORS
30
11L026±1
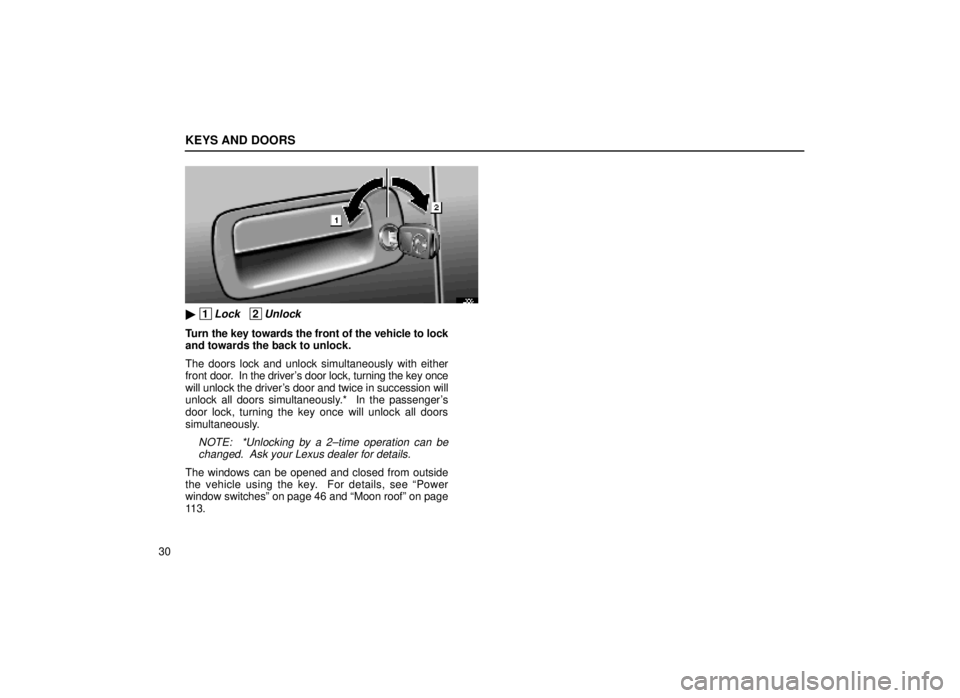
� 1Lock 2Unlock
Turn the key towards the front of the vehicle to lock
and towards the back to unlock.
The doors lock and unlock simultaneously with either
front door. In the driver's door lock, turning the key once
will unlock the driver's door and twice in succession will
unlock all doors simultaneously.* In the passenger's
door lock, turning the key once will unlock all doors
simultaneously.
NOTE: *Unlocking by a 2±time operation can be changed. Ask your Lexus dealer for details.
The windows can be opened and closed from outside
the vehicle using the key. For details, see ªPower
window switchesº on page 46 and ªMoon roofº on page
11 3 .
Page 47 of 495
KEYS AND DOORS
31
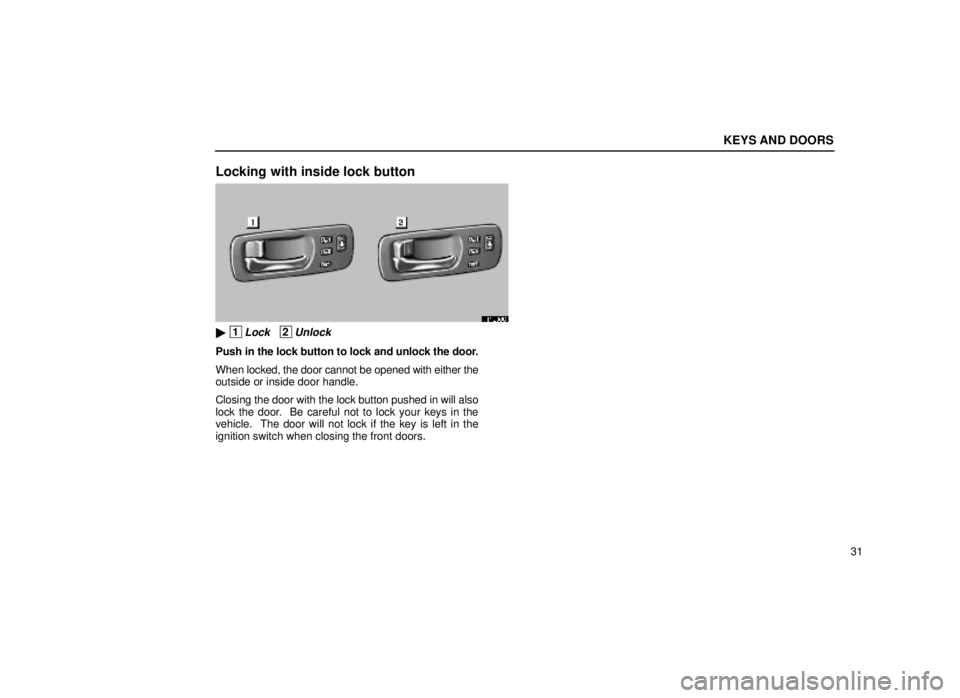
Locking with inside lock button
11L006
� 1Lock 2Unlock
Push in the lock button to lock and unlock the door.
When locked, the door cannot be opened with either the
outside or inside door handle.
Closing the door with the lock button pushed in will also
lock the door. Be careful not to lock your keys in the
vehicle. The door will not lock if the key is left in the
ignition switch when closing the front doors.
Page 48 of 495
KEYS AND DOORS
32
CAUTION
Before driving, make sure the doors are closed and
locked, especially when small children are in the
vehicle. Along with the proper use of seat belts, locking
the doors helps prevent the driver and passengers from
being thrown out from the vehicle during an accident.
It also helps prevent the doors from being opened
unintentionally.
Locking with power door lock switch
11L007-2
� 1Lock 2Unlock
To lock all the doors simultaneously, push the power
door lock switch on the front side. Pushing on the
rear side will unlock them.
The same switch is also equipped on the front
passenger's side.
Page 49 of 495
KEYS AND DOORS
33
Locking with rear door child±protector
11L009-2
Whenever small children are in the vehicle, lock the
rear door so that it does not open from the inside.
To do this, turn the knob to the ºLOCKº position as
shown and then close the door.
Page 50 of 495
SECTION 1 ± 2
34
INSTRUMENTS AND CONTROLS
Switches
Headlight switch35
. . . . . . . . . . . . . . . . . . . . . . . . . . . . . . .
Headlight dimmer and turn signal switch 38
. . . . . . . . . .
Fog light switch 41
. . . . . . . . . . . . . . . . . . . . . . . . . . . . . . . .
Windshield wiper and washer switch 41
. . . . . . . . . . . . . .
Headlight cleaner switch 44
. . . . . . . . . . . . . . . . . . . . . . . .
Rear window and outside rear view mirror
defogger switch 45
. . . . . . . . . . . . . . . . . . . . . . . . . . . . . . . .
Power window switches 46
. . . . . . . . . . . . . . . . . . . . . . . . .
Emergency flasher switch 52
. . . . . . . . . . . . . . . . . . . . . . .
Seat heater switches 53
. . . . . . . . . . . . . . . . . . . . . . . . . . .
Trending: transmission, run flat, turn signal bulb, oil reset, set clock, key battery, warning light
 Service Manual KEYS AND DOORS
26
CAUTION
Changes or modifications not expressly approved by
the party responsible for compliance could void the
users authority to operate the equipment.
For vehicles sold in CanadaT")
 Service Manual KEYS AND DOORS
27
CAUTION
Special care should be taken that small children do not
swallow the removed battery or components.
NOTICE
When replacing the battery, be careful not to lose thecomponents, sc")
 Service Manual KEYS AND DOORS
28
11L029±1
2. Remove the module from the key frame.
11L030±1
3. Remove the 2 screws to take out the lid of the module.
4. Take out the discharged battery and put a new battery
with t")

 Service Manual KEYS AND DOORS
32
CAUTION
Before driving, make sure the doors are closed and
locked, especially when small children are in the
vehicle. Along with the proper use of seat belts, locking
the doors help")
 Service Manual KEYS AND DOORS
33
Locking with rear door child±protector
11L009-2
Whenever small children are in the vehicle, lock the
rear door so that it does not open from the inside.
To do this, turn the knob to")
 Service Manual SECTION 1 ± 2
34
INSTRUMENTS AND CONTROLS
Switches
Headlight switch35
. . . . . . . . . . . . . . . . . . . . . . . . . . . . . . .
Headlight dimmer and turn signal switch 38
. . . . . . . . . .")