remote control LEXUS LS500 2020 Owner's Manual
[x] Cancel search | Manufacturer: LEXUS, Model Year: 2020, Model line: LS500, Model: LEXUS LS500 2020Pages: 516, PDF Size: 10.38 MB
Page 146 of 516

1463-5. Opening, closing the windows and moon roof
*:If equipped
■Opening and closing
1 Opens the moon roof
*
The moon roof tilts up and then fully opens.
2Closes the moon roof*
*: Lightly press either side of the moon roof
switch to stop the moon roof partway.
■Tilting up and down
1 Tilts the moon roof up
*
2Tilts the moon roof down*
*: Lightly press either side of the moon roof
switch to stop the moon roof partway.
■The moon roof can be operated when
The engine switch is in IGNITION ON
mode.
■Operating the moon roof after turning
the engine off
The moon roof can be operated for approx-
imately 45 seconds after the engine switch
is turned to ACCESSORY mode or turned
off. It cannot, howeve r, be operated once
either front door is opened.
■Jam protection function
If an object is dete cted between the moon
roof and the frame while the moon roof is
closing or tilting down, travel is stopped and
the moon roof opens slightly.
■Sunshade
The sunshade can be opened and closed
manually. However, the sunshade will open
automatically when the moon roof is
opened.
■Door lock linked moon roof operation
●The moon roof can be opened and
closed using the mechanical key.*
( P.438)
●The moon roof can be opened using the
wireless remote control.* ( P.100)*: These settings must be customized at
your Lexus dealer.
■When the moon roof does not close nor-
mally
Perform the following procedure:
1 Stop the vehicle.
2 Press and hold th e “CLOSE” switch.
*
The moon roof will close, reopen and pause
for approximately 10 seconds. Then it will
close again and stop at the completely
closed position.
3Check to make sure that the moon roof
is completely closed and then release
the switch.
*: If the switch is released at the incorrect
time, the procedure will have to be per-
formed again from the beginning.
If the moon roof does not fully close even
Moon roof*
Use the overhead switches to open
and close the moon roof and tilt it
up and down.
Operating the moon roof
Page 147 of 516

1473-5. Opening, closing the windows and moon roof
3
Before driving
after performing the above procedure cor-
rectly, have the vehicle inspected by your
Lexus dealer.
■If the moon roof does not move normally
If the moon roof does not open or close
normally or the automatic opening function
does not operate, perform the following ini-
tialization procedure.
1
Stop the vehicle.
2
Press and hold the “DOWN” switch.*
The moon roof will stop at the tilt-up posi-
tion. After that, it will op en, close, tilt up, tilt
down, and stop at the fully closed position.
3
Confirm that the moon roof has com-
pletely stopped and release the switch.
*: If you release the switch while the moon
roof is moving, perform the procedure
again from the beginning.
If, after performing the above procedures
correctly, the moon roof still does not open
or close normally or the automatic opening
function does not operate, have the vehicle
inspected by your Lexus dealer.
■Moon roof open warning buzzer
A buzzer sounds and a message is shown
on the multi-information display in the
instrument cluster when the engine switch
is turned off and the driver’s door is opened
with the moon roof open.
■Customization
Some functions can be customized.
( P.470)
WARNING
Observe the following precautions.
Failure to do so may cause death or seri-
ous injury.
■Opening the moon roof
●Do not allow any passengers to put
their hands or heads outside the vehi-
cle while it is moving.
●Do not sit on top of the moon roof.
■Opening and closing the moon roof
●The driver is responsible for moon roof
opening and closing operations.
In order to prevent accidental opera-
tion, especially by a child, do not let a
child operate the moon roof. It is possi-
ble for children and other passengers
to have body parts caught in the moon
roof.
●Check to make sure that all passen-
gers do not have any part of their body
in a position where it could be caught
when the moon roof is being operated.
●When using the wireless remote con-
trol or mechanical key and operating
the moon roof, operate the moon roof
after checking to make sure that there
is no possibility of any passenger hav-
ing any of their body parts caught in
the moon roof. Also, do not let a child
operate moon roof by the wireless
remote control or mech anical key. It is
possible for children and other passen-
gers to get caught in the moon roof.
●When exiting the vehicle, turn the
engine switch off, carry the key and
exit the vehicle along with the child.
There may be accidental operation,
due to mischief, etc., that may possibly
lead to an accident.
Page 152 of 516

1523-5. Opening, closing the windows and moon roof
WARNING
●Do not sit on top of the panoramic
moon roof.
■Opening and closing the panoramic
moon roof
●The driver is responsible for pan-
oramic moon roof opening and closing
operations. In order to prevent acci-
dental operation, especially by a child,
do not let a child operate the pan-
oramic moon roof. It is possible for
children and other passengers to have
body parts caught in the panoramic
moon roof.
●Check to make sure that all passen-
gers do not have any part of their body
in a position where it could be caught
when the panoramic moon roof is
being operated.
●When using the wireless remote con-
trol or mechanical key and operating
the panoramic moon roof, operate the
panoramic moon roof after checking
to make sure that there is no possibility
of any passenger having any of their
body parts caught in the panoramic
moon roof. Also, do not let a child
operate panoramic moon roof by the
wireless remote control or mechanical
key. It is possible for children and other
passengers to get caught in the pan-
oramic moon roof.
●When exiting the vehicle, turn the
engine switch off, carry the key and
exit the vehicle along with the child.
There may be accidental operation,
due to mischief, etc., that may possibly
lead to an accident.
■Jam protection function
●Never use any part of your body to
intentionally activate the jam protec-
tion function.
●The jam protection function may not
work if something gets caught just
before the panoramic moon roof or
electronic roof sunshade is fully
closed. Also, the jam protection func-
tion is not designed to operate while
the switch is being pressed. Take care
so that your fingers, etc. do not get
caught.
■To prevent burns or injuries
Do not touch the area between the
underside of the panoramic moon roof
and the electronic sunshade. Your hand
may get caught and you could injure
yourself. Also, if the vehicle is left in direct
sunlight for a long time, the underside of
the panoramic moon roof could become
very hot and could cause burns.
NOTICE
■To prevent damage to the panoramic
moon roof
●Before opening the panoramic moon
roof, make sure that there are no for-
eign objects, such as stones or ice,
around the opening.
●Do not hit the surface or edge of the
panoramic moon roof with hard
objects.
■After the vehicle has been washed or
rained on
Before opening the panoramic moon
roof, wipe any water off the panoramic
moon roof. Otherwise, water may enter
the cabin when the panoramic moon roof
is opened.
Page 181 of 516
1814-3. Operating the lights and wipers
4
Driving
The sensor may not function properly if an
object is placed on the sensor, or anything
that blocks the sensor is affixed to the wind-
shield.
Doing so interferes with the sensor detect-
ing the level of ambient light and may cause
the automatic headlight system to malfunc-
tion.
■Automatic light off system
●When the headlights are on: The head-
lights and tail lights turn off 30 seconds
after the driver’s door is opened and
closed if the engine switch is turned to
ACCESSORY mode or turned off. (The
lights turn off immediately if on the
key is pressed after all the doors are
closed.)
●When only the tail lights are on: The tail
lights turn off automatically if the engine
switch is turned to ACCESSORY mode
or turned off and the driver’s door is
opened.
To turn the lights on again, turn the engine
switch to IGNITION ON mode, or turn the
light switch off once and then back to
or .
■Light reminder buzzer
A buzzer sounds when the engine switch is
turned off or turned to ACCESSORY
mode and the driver’s door is opened while
the lights are turned on.
■Automatic headlight leveling system
The level of the headlights is automatically
adjusted according to the number of pas-
sengers and the loading condition of the
vehicle to ensure that the headlights do not
interfere with other road users.
■Windshield wiper linked headlight illu-
mination
When driving during daytime with the
headlight switch turned to , if the wind-
shield wipers are used, the headlights will
turn on automatically after several seconds
to help enhance the visibility of your vehicle.
■Battery-saving function
In order to prevent the battery of the vehicle from discharging, if the headlights and/or
tail lights are on when
the engine switch is
turned off the battery saving function will
operate and automatically turn off all the
lights after approximately 20 minutes.
When the engine switch is turned to IGNI-
TION ON mode, the battery-saving func-
tion will be disabled.
When any of the following are performed,
the battery-saving function is canceled
once and then reactivated. All the lights will
turn off automatically 20 minutes after the
Battery- saving function has been reacti-
vated:
●When the headlight switch is operated
●When a door or the trunk is opened or
closed
■Welcome light illumination control
The parking lights and tail lights automati-
cally turn on at night when the doors are
unlocked using the entry function or wire-
less remote control if the light switch is in
the position.
■Customization
Some functions can be customized.
( P.470)
NOTICE
■To prevent battery discharge
Do not leave the lights on longer than
necessary when the engine is not run-
ning.
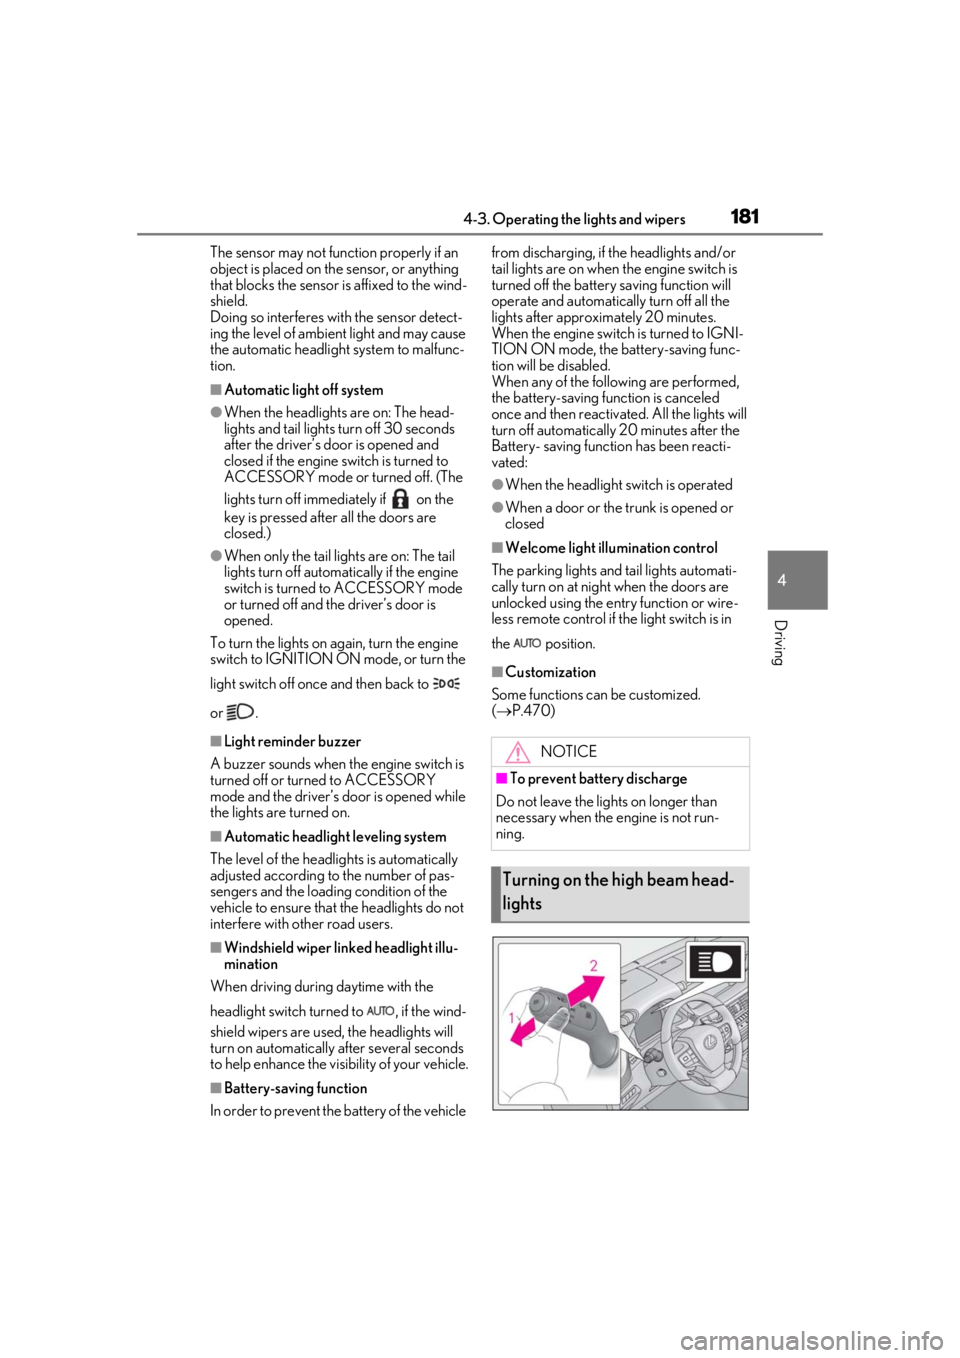
Turning on the high beam head-
lights
Page 296 of 516
2964-5. Using the driving support systems
When the doors are unlocked using
the smart access system with
push-button start
When the doors are unlocked using
the wireless remote control and
then a door is opened.
The vehicle height will increase by approxi-
mately 0.8 in. (20 mm) from its normal
position.
Depending on the current vehicle height,
the vehicle height may not increase.
If the vehicle height increased, when
any of the following conditions are met,
the vehicle will return to its previous
height:
A certain amount of time has
elapsed since the engine was
started and the doors were closed
The vehicle speed reaches approxi-
mately 3 mph (5 km/h)
The doors are locked using the
smart access system with push-but-
ton start or wireless remote control
Exit control
When “Select Parking Height” is set to
“High”, the vehicle height will automati-
cally increase when the P shift position
is selected and a door is opened.
1 Press or to select .
2 Press or to select “Vehicle
Settings” and then press .
3 Press or to select
and then press . 4
Press or to select “Select
Parking Height” and then press
.
The vehicle height will increase by approxi-
mately 0.4 in. (10 mm) from its normal
position.
Depending on the current vehicle height,
the vehicle height may not increase.
If the vehicle height increased, when
any of the following conditions are met,
the vehicle will return to its previous
height:
The vehicle speed reaches approxi-
mately 3 mph (5 km/h)
The doors are locked using the
smart access system with push-but-
ton start or wireless remote control
■Enabling/Disabling access mode
1 Press the or meter control
switch to select .
2 Press the or meter control
switch to select “Vehicle Settings”
and then press .
3 Press the or meter control
switch to select and then
press .
4 Press the or meter control
switch to select “Access Mode” and
then press .
The setting will change between
enabled/disabled each time the
meter control switch is pressed.
Page 310 of 516

3105-1. Remote Touch/Display
■Menu screen
Press the “MENU” button on the
Remote Touch to display the menu
screen.
The displays shown in the illustrations
are used for example only and may dif-
fer from the actual vehicle.
*1: Refer to the “NAVIGATION AND MULTIMEDIA SYSTEM OWNER’S
MANUAL”.
*2: This function is not available on some models.
■Split-screen display
Different information can be displayed on the left and right sides of the screen. For
example, air conditioning system screen can be displayed and operated while the
fuel consumption information screen is be ing displayed. The large screen on the
Center Display
Center Display overview
SwitchFunction
Select to display the
“Destination”
screen.
*1
Select to display the
media control
screen or the audio
control screen.
*1
Select to display the
hands-free control
screen.
*1
Select to display the
“Apps” screen.
*1, 2
When an Apple
CarPlay connection
is established and
button displays
“Apple CarPlay”,
select to display the
home screen of
Apple CarPlay.
*1, 2
Select to display the
information screen.
*1
( P.91)
Select to display the
setup screen.
*1
Select to display the
air conditioning con-
trol screen.
( P.320)
SwitchFunction
Page 312 of 516

3125-1. Remote Touch/Display
*:If equipped
■Home screenTouch to display the audio control
screen.
Refer to “NAVIGATION AND
MULTIMEDIA SYSTEM
OWNER’S MANUAL”.
Touch to display the rear air condi-
tioning control screen. ( P.328,
331)
Touch to display the rear seat
adjustment screen. ( P.126, 134,
136)
Touch to display the relaxation seat
(if equipped) control screen. (
P.128)
Touch to display the rear sunshade
(if equipped)/rear interior light con-
trol screen. ( P.335, 350)
Touch to display the Rear Multi
Operation Panel settings screen.
( P.312)
Touch to display/hide the shortcut
screen.
Shortcut screen
The following can be adjusted or operated:
• Rear air conditioning system tempera- ture setting ( P.328)
• Rear seat heaters/rear seat ventilators ( P.331)
• Audio system
Refer to “NAVIGATION AND MULTI-
MEDIA SYSTEM OWNER’S MANUAL”.
• Rear door sunshades/rear quarter sun- shades/rear sunshade ( P.351)
button
Press to display the home screen.
When the screen is on, press and
hold to turn the screen off.
■Rear Multi Operation Panel set-
tings screen
Screen operation settings and the
brightness of the screen can be
changed.
Rear Multi Operation Panel*
The Rear Multi Operation Panel
built-into the rear armrest can be
used to operate the rear audio sys-
tem, air conditioning system, seat,
relaxation seat, shades or lights.
Rear Multi Operation Panel
overview
A
B
C
D
E
F
G
H
I
Page 315 of 516
3155-2. Lexus Climate Concierge
5
Interior features
5-2.Lexus Climate Concierge
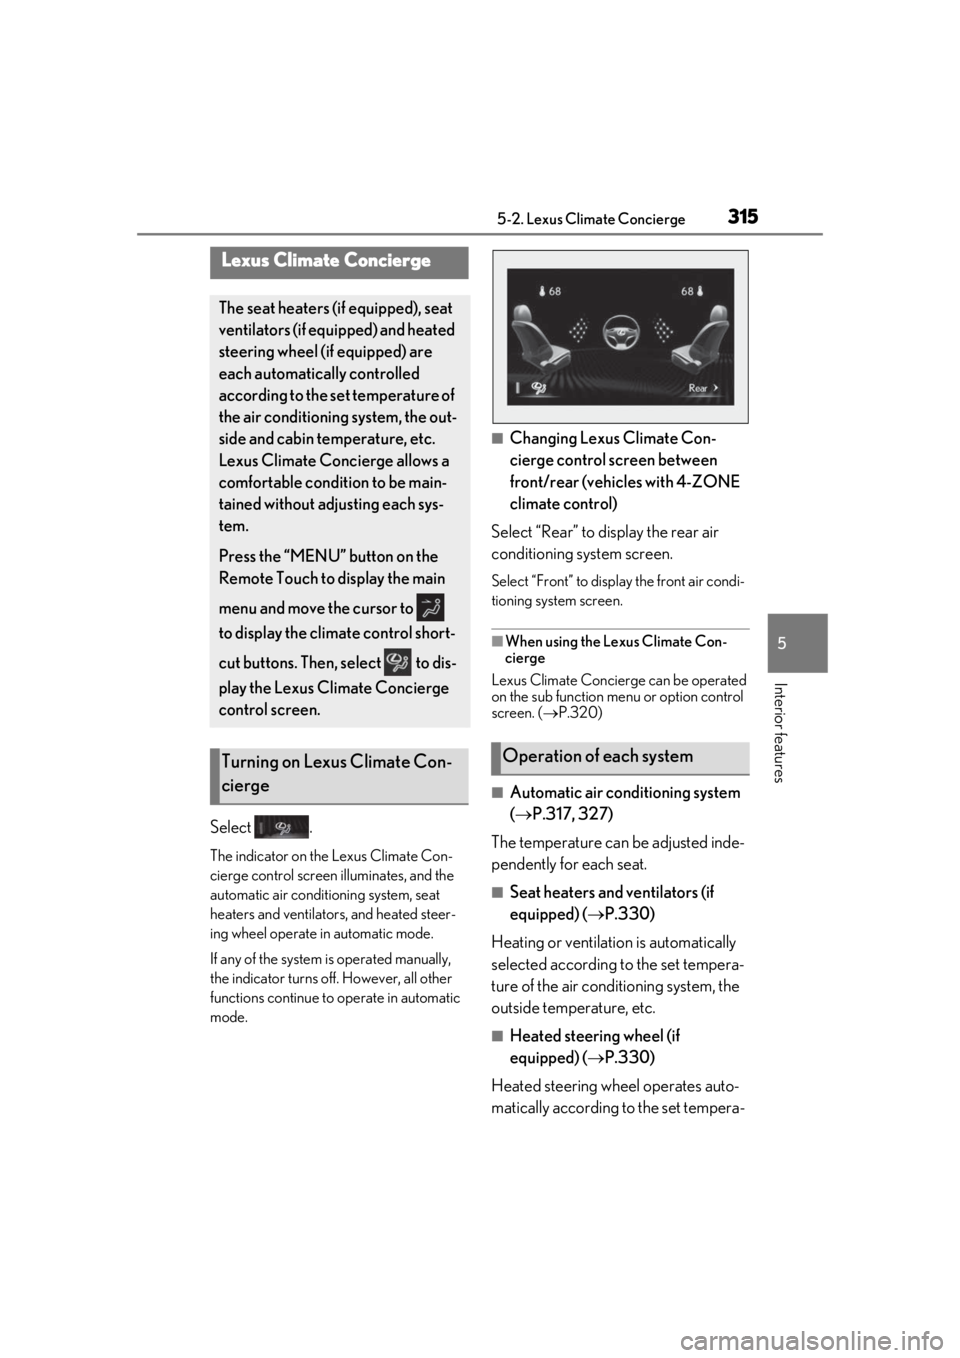
Select .
The indicator on the Lexus Climate Con-
cierge control screen illuminates, and the
automatic air conditioning system, seat
heaters and ventilators, and heated steer-
ing wheel operate in automatic mode.
If any of the system is operated manually,
the indicator turns off. However, all other
functions continue to operate in automatic
mode.
■Changing Lexus Climate Con-
cierge control screen between
front/rear (vehicles with 4-ZONE
climate control)
Select “Rear” to display the rear air
conditioning system screen.
Select “Front” to display the front air condi-
tioning system screen.
■When using the Lexus Climate Con-
cierge
Lexus Climate Concierge can be operated
on the sub function menu or option control
screen. ( P.320)
■Automatic air conditioning system
( P.317, 327)
The temperature can be adjusted inde-
pendently for each seat.
■Seat heaters and ventilators (if
equipped) ( P.330)
Heating or ventilation is automatically
selected according to the set tempera-
ture of the air conditioning system, the
outside temperature, etc.
■Heated steering wheel (if
equipped) ( P.330)
Heated steering wheel operates auto-
matically according to the set tempera-
Lexus Climate Concierge
The seat heaters (if equipped), seat
ventilators (if equipped) and heated
steering wheel (if equipped) are
each automatically controlled
according to the set temperature of
the air conditioning system, the out-
side and cabin temperature, etc.
Lexus Climate Concierge allows a
comfortable condition to be main-
tained without adjusting each sys-
tem.
Press the “MENU” button on the
Remote Touch to display the main
menu and move the cursor to
to display the climate control short-
cut buttons. Then, select to dis-
play the Lexus Climate Concierge
control screen.
Turning on Lexus Climate Con-
ciergeOperation of each system
Page 317 of 516
3175-3. Using the air conditioning system and defogger
5
Interior features
5-3.Using the air conditioning system and defogger
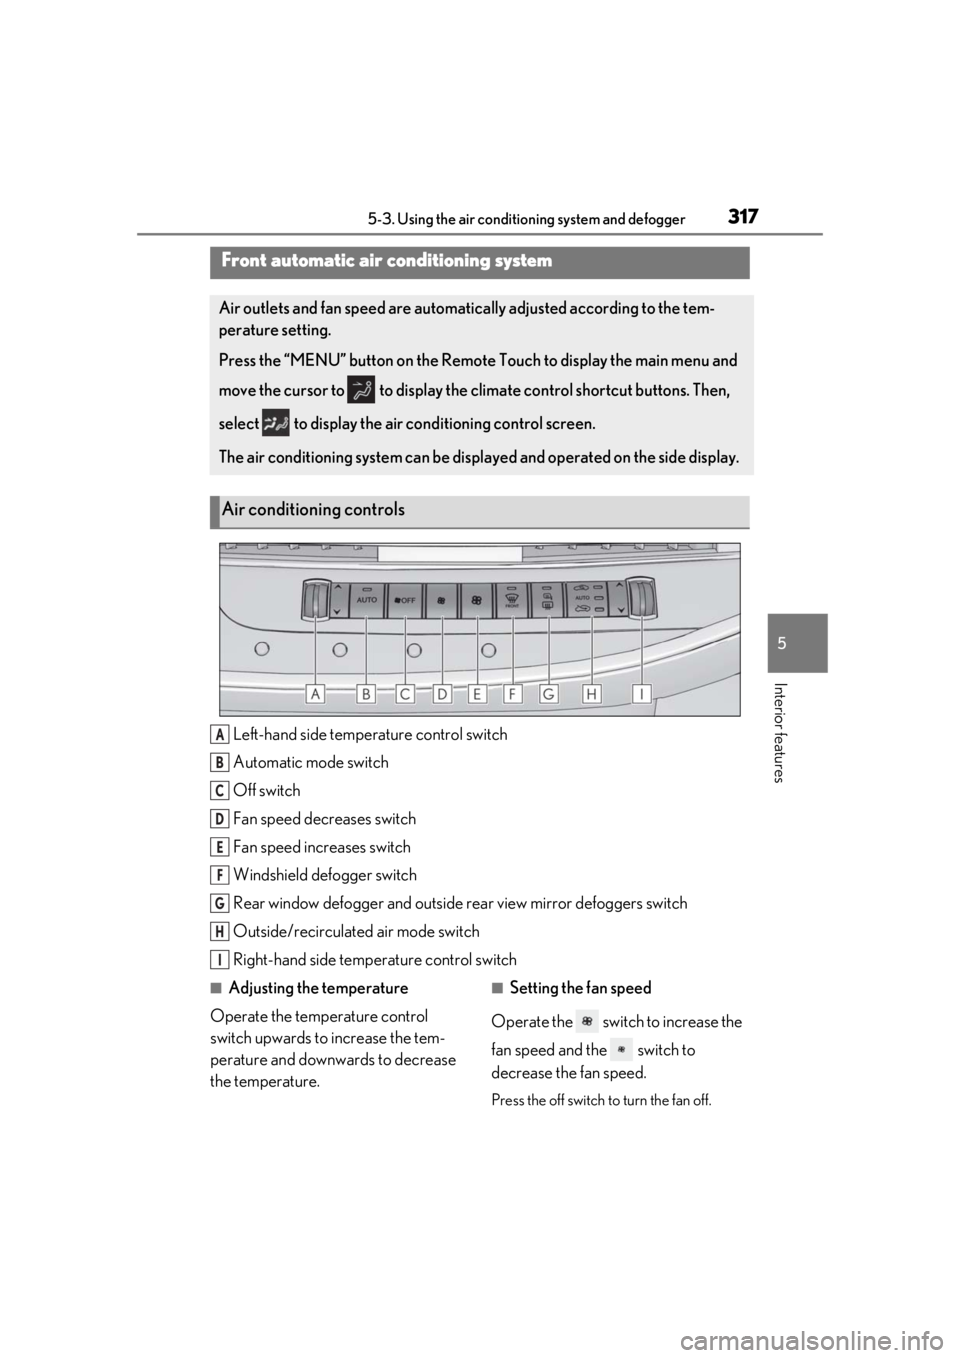
Left-hand side temperature control switch
Automatic mode switch
Off switch
Fan speed decreases switch
Fan speed increases switch
Windshield defogger switch
Rear window defogger and outside rear view mirror defoggers switch
Outside/recirculated air mode switch
Right-hand side temp erature control switch
■Adjusting the temperature
Operate the temperature control
switch upwards to increase the tem-
perature and downwards to decrease
the temperature.■Setting the fan speed
Operate the switch to increase the
fan speed and the switch to
decrease the fan speed.
Press the off switch to turn the fan off.
Front automatic air conditioning system
Air outlets and fan speed are automati cally adjusted according to the tem-
perature setting.
Press the “MENU” button on the Remote Touch to display the main menu and
move the cursor to to display the climate control shortcut buttons. Then,
select to display the air conditioning control screen.
The air conditioning system can be displa yed and operated on the side display.
Air conditioning controls
A
B
C
D
E
F
G
H
I
Page 320 of 516
3205-3. Using the air conditioning system and defogger
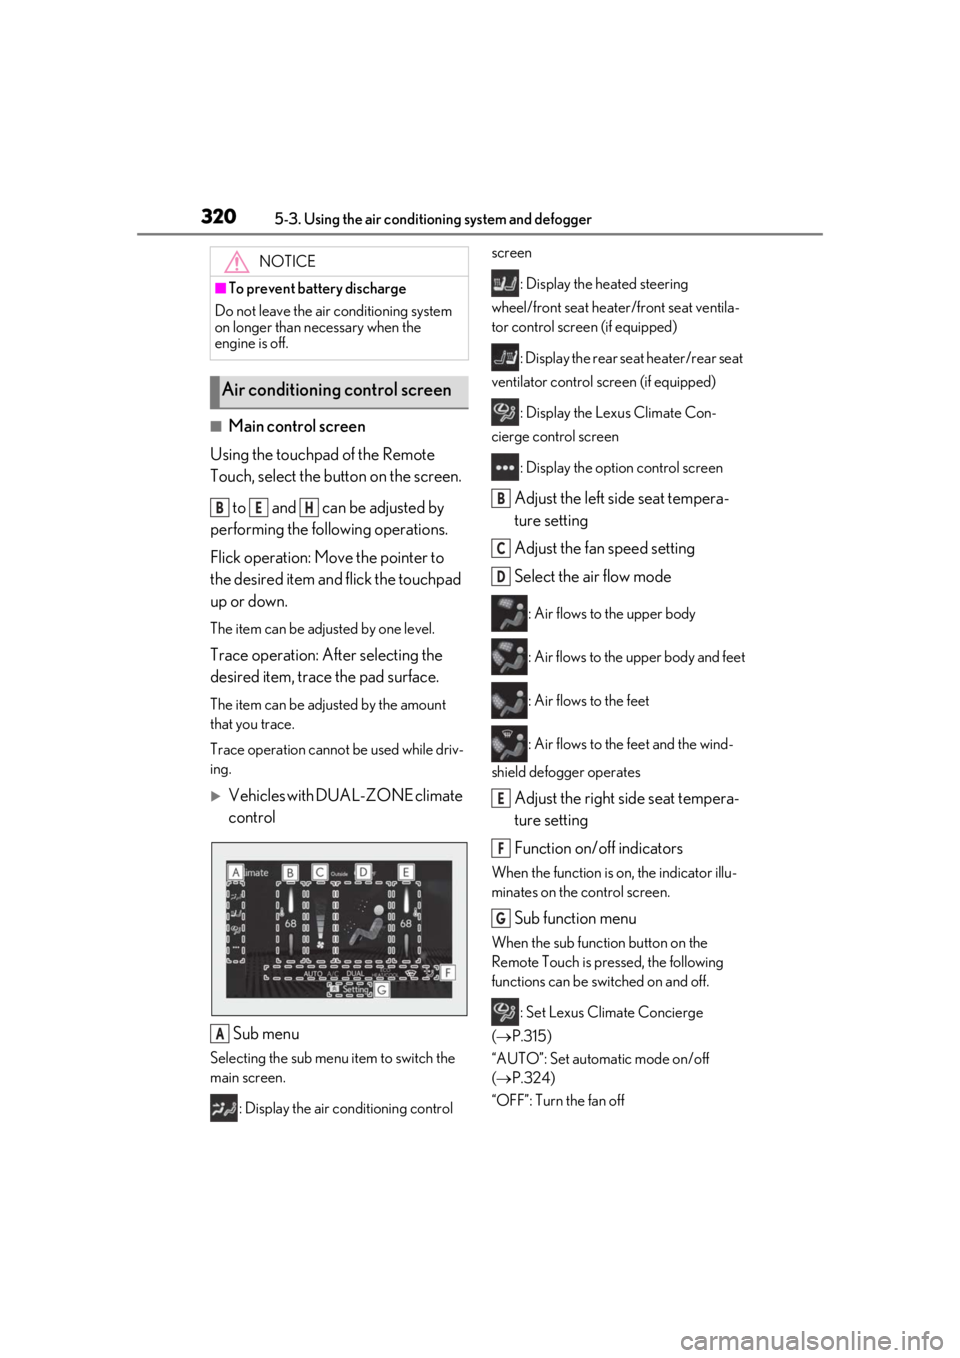
■Main control screen
Using the touchpad of the Remote
Touch, select the button on the screen.
to and can be adjusted by
performing the following operations.
Flick operation: Move the pointer to
the desired item and flick the touchpad
up or down.
The item can be adjusted by one level.
Trace operation: After selecting the
desired item, trace the pad surface.
The item can be adjusted by the amount
that you trace.
Trace operation cannot be used while driv-
ing.
Vehicles with DUAL-ZONE climate
control
Sub menu
Selecting the sub menu item to switch the
main screen. : Display the air conditioning control screen
: Display the heated steering
wheel/front seat heater /front seat ventila-
tor control screen (if equipped)
: Display the rear seat heater/rear seat
ventilator control screen (if equipped)
: Display the Lexus Climate Con-
cierge control screen
: Display the option control screen
Adjust the left side seat tempera-
ture setting
Adjust the fan speed setting
Select the air flow mode
: Air flows to the upper body
: Air flows to the upper body and feet
: Air flows to the feet
: Air flows to the feet and the wind-
shield defogger operates
Adjust the right side seat tempera-
ture setting
Function on/off indicators
When the function is on, the indicator illu-
minates on the control screen.
Sub function menu
When the sub function button on the
Remote Touch is pressed, the following
functions can be switched on and off.
: Set Lexus Climate Concierge
( P.315)
“AUTO”: Set automatic mode on/off
( P.324)
“OFF”: Turn the fan off
NOTICE
■To prevent battery discharge
Do not leave the air conditioning system
on longer than necessary when the
engine is off.
Air conditioning control screen
BEH
A
B
C
D
E
F
G