check engine light LEXUS LS500 2021 Owners Manual
[x] Cancel search | Manufacturer: LEXUS, Model Year: 2021, Model line: LS500, Model: LEXUS LS500 2021Pages: 520, PDF Size: 9.81 MB
Page 4 of 520
4TABLE OF CONTENTS
Trunk features................................349
5-6. Using the other interior features Other interior features .............. 352
Garage door opener.................. 360
6-1. Maintenance and care Cleaning and protecting the vehi-cle exterior ................................... 368
Cleaning and protecting the vehi- cle interior ..................................... 371
6-2. Maintenance Maintenance requirements ..... 374
General maintenance ................ 375
Emission inspection and mainte- nance (I/M) programs ............ 378
6-3. Do-it-yourself maintenance Do-it-yourself service precautions........................................................... 379
Hood................................................... 381
Positioning a floor jack................ 381
Engine compartment.................. 383
Battery ............................................... 391
Tires ................................................... 393
Replacing the tire ......................... 402
Tire inflation pressure ................. 406
Wheels.............................................. 407
Air conditioning filter..................409
Electronic key battery ................. 410
Checking and replacing fuses ............................................................ 412
Headlight aim.................................. 415
Light bulbs ........................................ 4167-1. Essential information
Emergency flashers ..................... 418
If your vehicle has to be stopped in an emergency ............................. 418
If the vehicle is trapped in rising water ............................................... 419
7-2. Steps to take in an emergency If your vehicle needs to be towed............................................................ 421
If you think something is wrong .......................................................... 425
Fuel pump shut off system ........ 426
If a warning light turns on or a warn- ing buzzer sounds...................... 427
If a warning messa ge is displayed
.......................................................... 436
If you have a flat tire .................... 438
If the engine will not start .......... 439
If you lose your keys...................... 441
If the fuel filler door cannot be opened ............................................ 441
If the electronic key does not oper- ate properly .................................. 442
If the vehicle battery is discharged .......................................................... 444
If your vehicle overheats ........... 449
If the vehicle becomes stuck ... 452
8-1. Specifications Maintenance data (fuel, oil level, etc.) ................................................. 456
Fuel information .
........................... 465
6Maintenance and care
7When trouble arises
8Vehicle specifications
Page 13 of 520
13Pictorial index
Precautions for winter season .....................................................................................P.309
To prevent freezing (windshield wiper de-icer)
*.................................................P.328
Precautions for car wash ............................................................................................... P.369
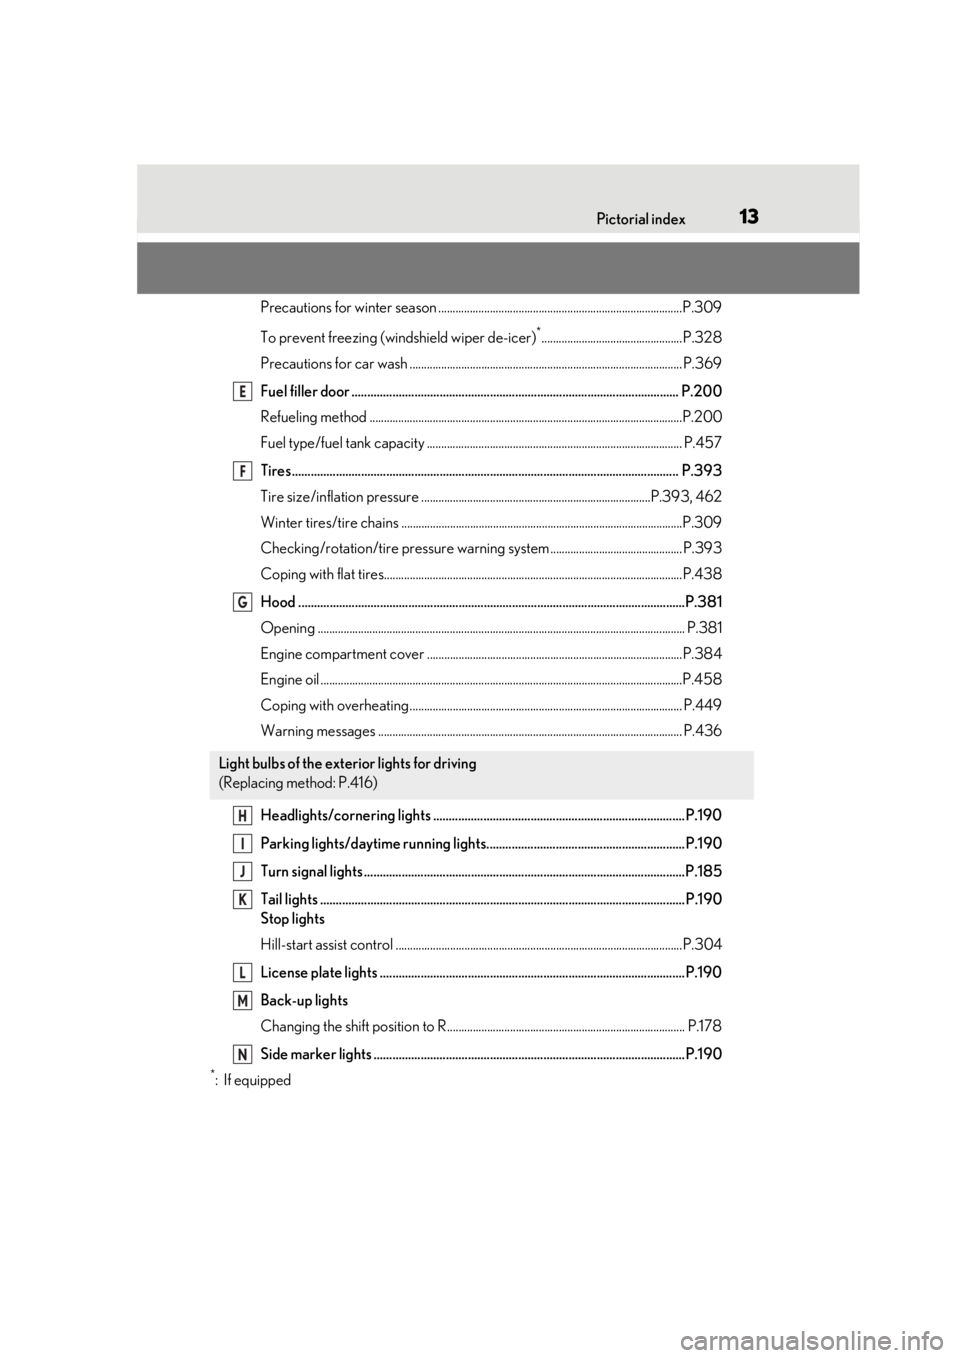
Fuel filler door ........................................................................................................ P.200
Refueling method .............................................................................................................P. 200
Fuel type/fuel tank capacity ...... ................................................................................... P.457
Tires.......................................................................................................................... .P.393
Tire size/inflation pressure ......................... .......................................................P.393, 462
Winter tires/tire chains ..................................................................................................P.309
Checking/rotation/tire pressure warning system.............................................. P.393
Coping with flat tires........................................................................................................P .438
Hood ........................................................................................................................... P.381
Opening ........................................................................................................................ ........ P.381
Engine compartment cover .........................................................................................P.384
Engine oil ..................................................................................................................... .........P.458
Coping with overheating ............................................................................................... P.449
Warning messages .......................................................................................................... P.436
Headlights/cornering lights ................................................................................P.190
Parking lights/daytime running lights...............................................................P.190
Turn signal lights ......................................................................................................P.185
Tail lights .................................................................................................................... P.190
Stop lights
Hill-start assist control ....................................................................................................P. 304
License plate lights .................................................................................................P.190
Back-up lights
Changing the shift position to R................................................................................... P.178
Side marker lights ...................................................................................................P.190
*:If equipped
Light bulbs of the exterior lights for driving
(Replacing method: P.416)
E
F
G
H
I
J
K
L
M
N
Page 44 of 520

441-1. For safe use
Exhaust gas precautions
Harmful substance to the human
body is included in exhaust gases if
inhaled.
WARNING
Exhaust gases include harmful carbon
monoxide (CO), which is colorless and
odorless. Observe the following precau-
tions.
Failure to do so may cause exhaust gases
enter the vehicle and may lead to an
accident caused by light-headedness, or
may lead to death or a serious health
hazard.
■Important points while driving
●Keep the trunk lid closed.
●If you smell exhaust gases in the vehi-
cle even when the trunk lid is closed,
open the windows and have the vehi-
cle inspected at your Lexus dealer as
soon as possible.
■When parking
●If the vehicle is in a poorly ventilated
area or a closed area, such as a
garage, stop the engine.
●Do not leave the vehicle with the
engine on for a long time.
If such a situation cannot be avoided,
park the vehicle in an open space and
ensure that exhaust fumes do not enter
the vehicle interior.
●Do not leave the engine running in an
area with snow build-up, or where it is
snowing. If snowbanks build up around
the vehicle while the engine is running,
exhaust gases may collect and enter
the vehicle.
■Exhaust pipe
The exhaust system needs to be checked
periodically. If there is a hole or crack
caused by corrosion, damage to a joint
or abnormal exhaust noise, be sure to
have the vehicle inspected and repaired
by your Lexus dealer.
Page 66 of 520

661-4. Theft deterrent system
■Items to check before locking the
vehicle
To prevent unexpected triggering of
the alarm and vehicle theft, make sure
of the following:
Nobody is in the vehicle.
The windows, moon roof (if
equipped) and panoramic moon
roof (if equipped) are closed before
the alarm is set.
No valuables or other personal
items are left in the vehicle.
■Setting
Close the doors, trunk and hood, and
lock all the doors. The system will be
set automatically after 30 seconds.
The indicator light changes from being on
to flashing when the system is set.
■Deactivating or stopping
Do one of the following to deactivate
or stop the alarms:
Except for Canada: Unlock the
doors.
Except for Canada: Open the trunk.
For Canada: Unlock the doors or
open the trunk using the entry func-
tion or wireless remote control.
Turn the engine switch to ACCES-
SORY or IGNITION ON mode, or
start the engine. (The alarm will be
deactivated or stopped after a few
seconds.)
■System maintenance
The vehicle has a maintenance-free type
alarm system.
■Triggering of the alarm
The alarm may be triggered in the following
situations:
(Stopping the alarm deactivates the alarm
system.)
●For Canada: The doors are unlocked
using the mechanical key.
Alarm
The alarm uses light and sound to
give an alert when an intrusion is
detected.
The alarm is triggered in the follow-
ing situations when the alarm is set:
Except for Canada: A locked
door or trunk is unlocked or
opened in any way other than
using the entry function, wireless
remote control or mechanical
key. (The doors will lock again
automatically.)
For Canada: A locked door or
trunk is unlocked or opened in
any way other than using the
entry function or wireless remote
control. (The door s will lock again
automatically.)
The hood is opened.
Setting/deactivating/stopping
the alarm system
Page 71 of 520

712-1. Instrument cluster
2
Vehicle status information and indicators
Warning lights inform the driver of mal-
functions in the indicated vehicle’s sys-
tems.
*1: These lights come on when the engine switch is turned to IGNITION ON
mode to indicate that a system check is
Warning lights
(U.S.A.)
Brake system warning light*1
( P.427)
(red)
(Canada)
Brake system warning light*1
( P.427)
(yellow)
Brake system warning light*1
( P.427)
High coolant temperature
warning light
*2 ( P.427)
Charging system warning
light
*2 ( P.428)
Low engine oil pressure warn-
ing light
*2 ( P.428)
(U.S.A.)
Malfunction indicator lamp*1
( P.428)
(Canada)
Malfunction indicator lamp*1
( P.428)
SRS warning light
*1 ( P.428)
Pop Up Hood warning light
*1
( P.429)
(U.S.A.)
ABS warning light*1 ( P.429)
(Canada)
ABS warning light*1 ( P.429)
Inappropriate pedal operation
warning light
*2 ( P.429)
(red)
Electric power steering system
warning light
*1 ( P.430)
(yellow)
Electric power st eering system
warning light
*1 ( P.430)
Low fuel level warning light
( P.430)
Driver’s and front passenger’s
seat belt re minder light
( P.430)
Rear passengers’ seat
belt reminder lights
(except F SPORT mod-
els) ( P.431)
Rear passengers’ seat belt
reminder lights (F SPORT mod-
els) ( P.431)
Tire pressure warning light
*1
( P.431)
(orange)
LTA indicator ( P.431)
(flashes)
RCD OFF indicator (if
equipped) ( P.432)
(flashes or
illuminates)PCS warning light*1 ( P.432)
Slip indicator
*1 ( P.432)
(flashes)
(U.S.A.)
Parking brake indicator
( P.433)
(flashes)
(Canada)
Parking brake indicator
( P.433)
(flashes)
Brake hold operated indicator*1
( P.433)
Page 73 of 520

732-1. Instrument cluster
2
Vehicle status information and indicators
Drive mode indicators
Except F SPORT models
F SPORT models
*1: These lights come on when the engine
switch is turned to IGNITION ON
mode to indicate that a system check is
being performed. They will turn off after
the engine is started, or after a few sec-
onds. There may be a malfunction in a
system if the lights do not come on, or
turn off. Have the vehicle inspected by
your Lexus dealer.
*2: This light comes on when the system is turned off.
*3: This light illuminates on the outside rear view mirrors.
*4: This light illuminates on the multi-infor- mation display.
*5: When the outside temperature is approximately 37°F (3°C) or lower, this
indicator will flash for approximately 10
seconds, then stay on.
(Canada)
Parking brake indicator
( P.186)
Brake hold standby indicator
*1
( P.188)
Brake hold operated indicator
*1
( P.188)
Eco Driving Indicator Light
*1
( P.85)
Low outside temperature indi-
cator
*5 ( P.75, 78)
Security indicator
*6 ( P.64,
66)
“AIR BAG ON/OFF”
indicator
*1, 6 ( P.40)
Snow mode indicator ( P.182)
Normal mode indicator
( P.299)
Custom mode indicator (if
equipped) ( P.299)
Comfort mode indicator (if
equipped) ( P.299)
Eco drive mode indicator
( P.299)
Sport mode indicator (if
equipped) ( P.299)
Sport S mode indicator (if
equipped) ( P.299)
Sport S+ mode indicator (if
equipped) ( P.299)
Snow mode indicator ( P.182)
Normal mode indicator
( P.299)
Custom mode indicator
( P.299)
Comfort mode indicator
( P.299)
Eco drive mode indicator
( P.299)
Sport S mode indicator
( P.299)
Sport S+ mode indicator
( P.299)
Page 81 of 520
812-1. Instrument cluster
2
Vehicle status information and indicators
■Display items
Odometer
Displays the total distance the vehicle has
been driven.
Trip meter A/trip meter B
Displays the distance the vehicle has been
driven since the meter was last reset. Trip
meters A and B can be used to record and
display different distances independently.
Distance until next engine oil
change
Displays the distance the vehicle can be
driven until an oil change is necessary.
■Changing the display
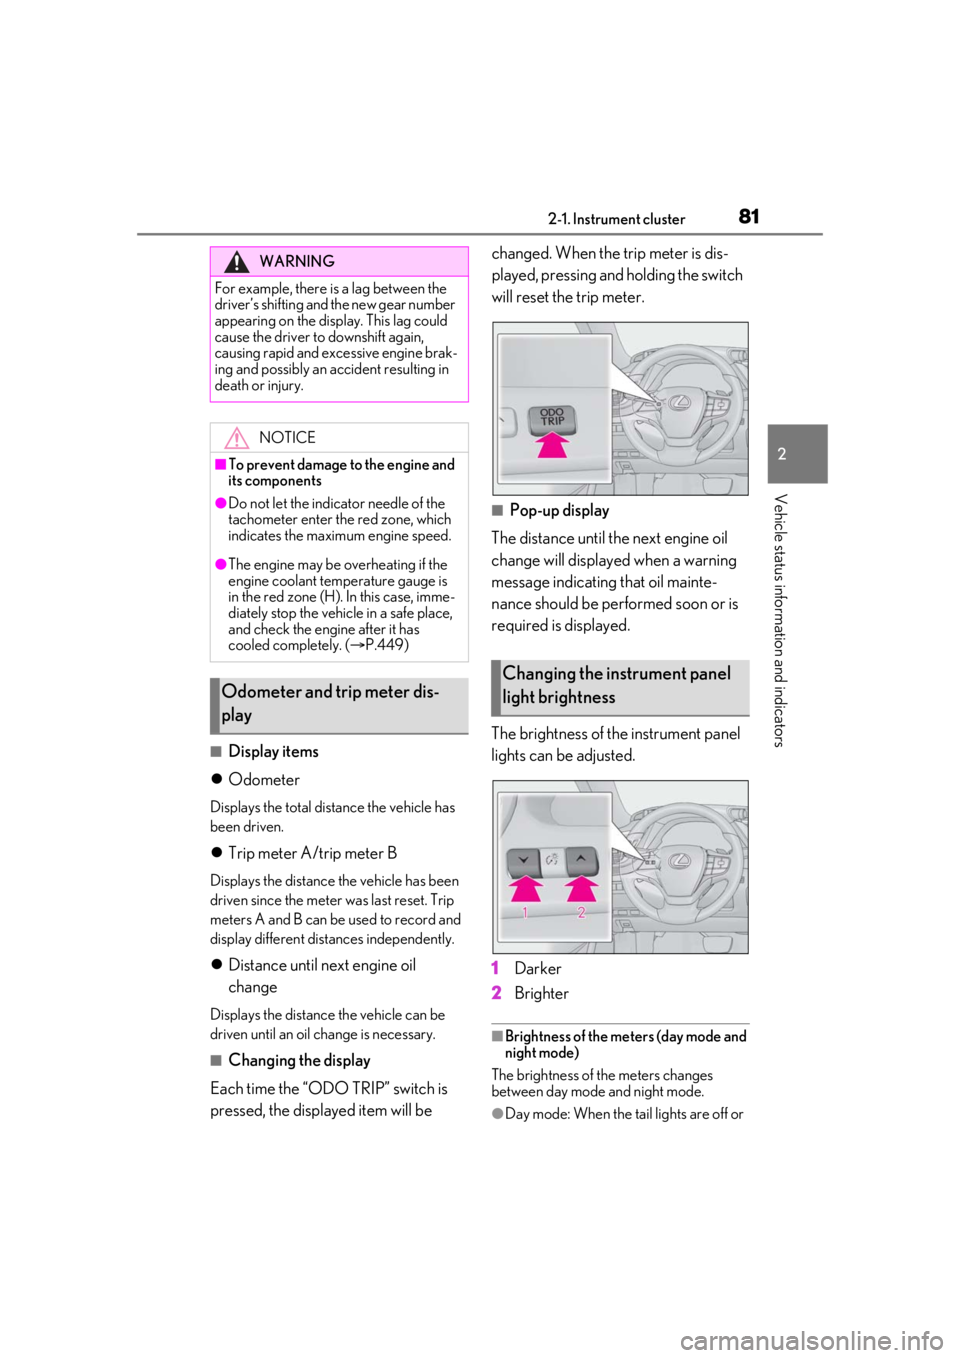
Each time the “ODO TRIP” switch is
pressed, the displayed item will be changed. When the trip meter is dis-
played, pressing and holding the switch
will reset the trip meter.
■Pop-up display
The distance until the next engine oil
change will displayed when a warning
message indicating that oil mainte-
nance should be performed soon or is
required is displayed.
The brightness of the instrument panel
lights can be adjusted.
1 Darker
2 Brighter
■Brightness of the meters (day mode and
night mode)
The brightness of the meters changes
between day mode and night mode.
●Day mode: When the tail lights are off or
WARNING
For example, there is a lag between the
driver’s shifting and the new gear number
appearing on the display. This lag could
cause the driver to downshift again,
causing rapid and excessive engine brak-
ing and possibly an accident resulting in
death or injury.
NOTICE
■To prevent damage to the engine and
its components
●Do not let the indicator needle of the
tachometer enter the red zone, which
indicates the maximum engine speed.
●The engine may be overheating if the
engine coolant temperature gauge is
in the red zone (H). In this case, imme-
diately stop the vehicle in a safe place,
and check the engine after it has
cooled completely. ( P.449)
Odometer and trip meter dis-
play
Changing the instrument panel
light brightness
Page 102 of 520
1023-2. Opening, closing and locking the doors and trunk
3-2.Opening, closing and locking the doors and trunk
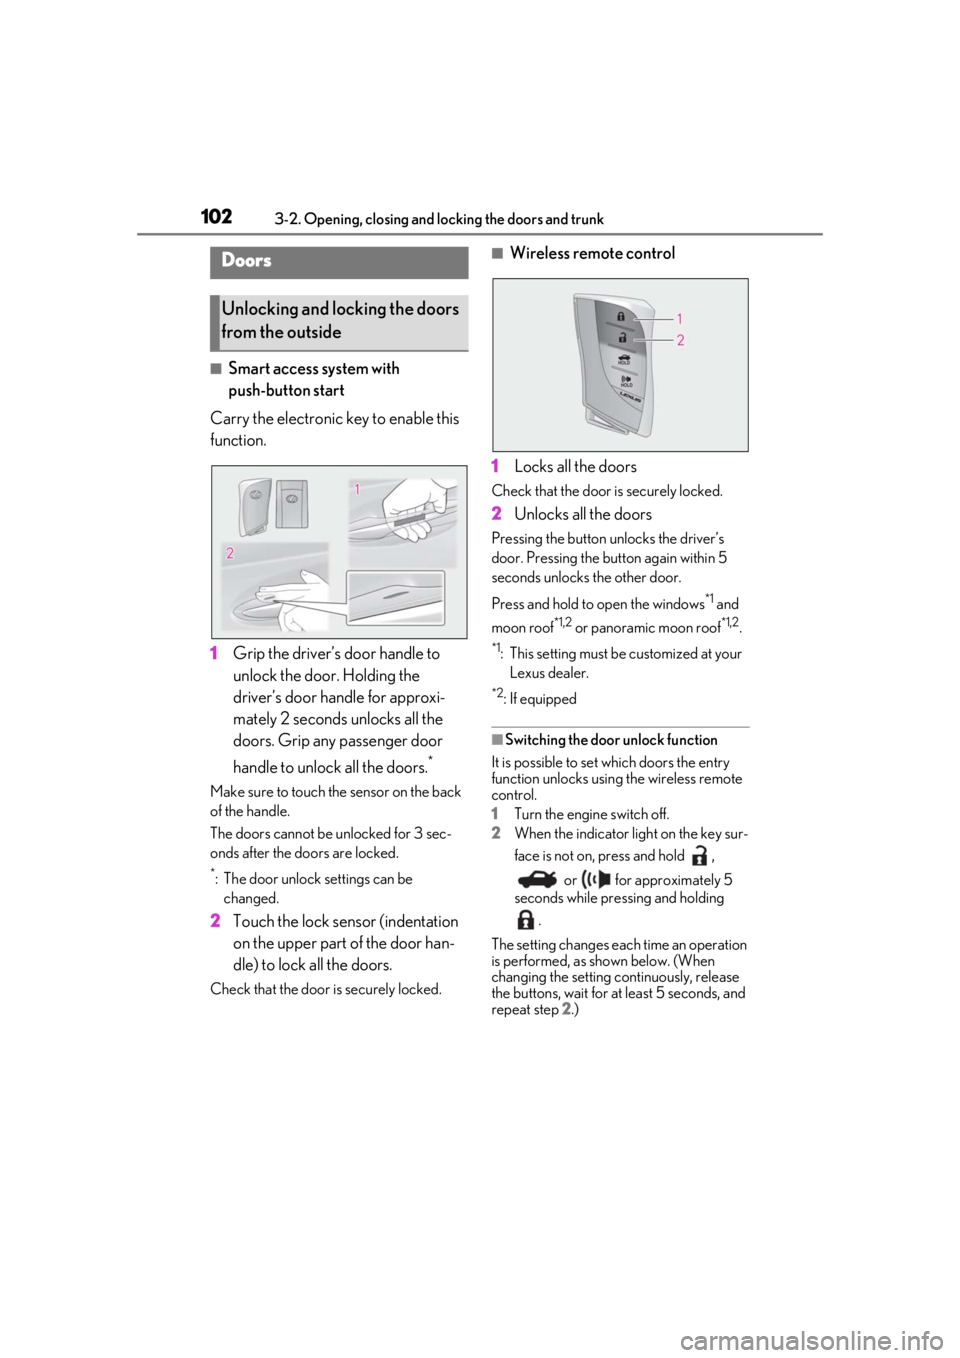
■Smart access system with
push-button start
Carry the electronic key to enable this
function.
1 Grip the driver’s door handle to
unlock the door. Holding the
driver’s door ha ndle for approxi-
mately 2 seconds unlocks all the
doors. Grip any passenger door
handle to unlock all the doors.
*
Make sure to touch the sensor on the back
of the handle.
The doors cannot be unlocked for 3 sec-
onds after the doors are locked.
*: The door unlock settings can be changed.
2 Touch the lock sensor (indentation
on the upper part of the door han-
dle) to lock all the doors.
Check that the door is securely locked.
■Wireless remote control
1 Locks all the doors
Check that the door is securely locked.
2Unlocks all the doors
Pressing the button unlocks the driver’s
door. Pressing the button again within 5
seconds unlocks the other door.
Press and hold to open the windows
*1 and
moon roof
*1,2 or panoramic moon roof*1,2.
*1: This setting must be customized at your
Lexus dealer.
*2: If equipped
■Switching the door unlock function
It is possible to set which doors the entry
function unlocks using the wireless remote
control.
1 Turn the engine switch off.
2 When the indicator light on the key sur-
face is not on, press and hold ,
or for approximately 5
seconds while pre ssing and holding
.
The setting changes each time an operation
is performed, as shown below. (When
changing the setting continuously, release
the buttons, wait for at least 5 seconds, and
repeat step 2 .)
Doors
Unlocking and locking the doors
from the outside
Page 111 of 520
1113-2. Opening, closing and locking the doors and trunk
3
Before driving
minutes.
■Trunk easy closer
In the event that the trun k lid is left slightly
open, the trunk easy closer will automati-
cally close it to the fully closed position.
●The trunk easy closer will operate
regardless of the en gine switch mode.
●If the trunk easy closer does not operate,
open the trunk to the half open position
or more and then close it.
■Function to prevent the trunk being
locked with the electronic key inside
●When all doors are locked, closing the
trunk lid with the electr onic key left inside
the trunk will sound an alarm.
In this case, the trunk lid can be opened
pressing the trunk release button on the
trunk lid.
●If the spare electronic key is put in the
trunk with all the doors locked, the key
confinement prevention function is acti-
vated so the trunk can be opened. In
order to prevent theft, take all electronic
keys with you when leaving the vehicle.
●If the electronic key is put in the trunk with
all the doors locked, the key may not be
detected depending on the location of
the key and the surrounding radio wave
conditions. In this case, the key confine-
ment prevention function cannot be acti-
vated, causing the doors to lock when the
trunk is closed. Make sure to check
where the key is before closing the trunk.
●The key confinement prevention function
cannot be activated if any one of the
doors is unlocked. In this case, open the
trunk using the trunk opener.
■Overload protection function (vehicles
with power trunk opener and closer)
The trunk lid will not operate when exces-
sive load is present on the top of the trunk
lid.
■Fall-down protection function (vehicles
with power trunk opener and closer)
While the trunk lid is opening automatically,
applying excessive force to it will stop the
opening operation to prevent the trunk lid
from rapidly falling down.
■Jam protection function (vehicles with
power trunk opener and closer)
While the trunk lid is closing automatically,
the trunk lid will stop closing and open if
something gets caught.
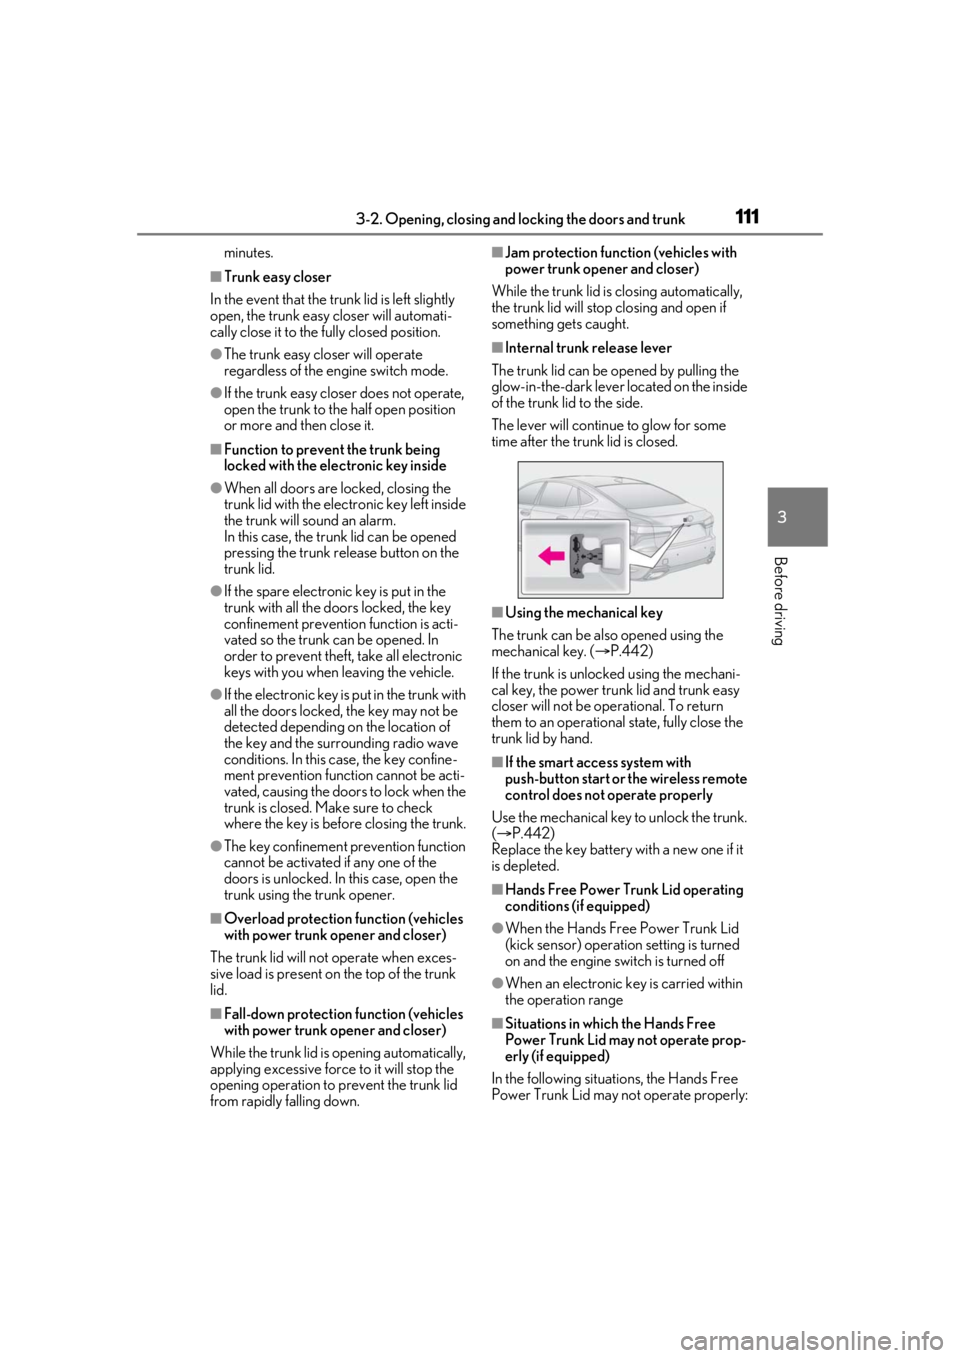
■Internal trunk release lever
The trunk lid can be opened by pulling the
glow-in-the-dark lever located on the inside
of the trunk lid to the side.
The lever will continue to glow for some
time after the trunk lid is closed.
■Using the mechanical key
The trunk can be also opened using the
mechanical key. ( P.442)
If the trunk is unlocked using the mechani-
cal key, the power trunk lid and trunk easy
closer will not be operational. To return
them to an operational state, fully close the
trunk lid by hand.
■If the smart access system with
push-button start or the wireless remote
control does not operate properly
Use the mechanical key to unlock the trunk.
( P.442)
Replace the key battery with a new one if it
is depleted.
■Hands Free Power Trunk Lid operating
conditions (if equipped)
●When the Hands Free Power Trunk Lid
(kick sensor) operatio n setting is turned
on and the engine switch is turned off
●When an electronic key is carried within
the operation range
■Situations in which the Hands Free
Power Trunk Lid may not operate prop-
erly (if equipped)
In the following situations, the Hands Free
Power Trunk Lid may not operate properly:
Page 116 of 520

1163-2. Opening, closing and locking the doors and trunk
engine is started or engine switch modes
are changed.
●Do not leave the electronic key on top of
the instrument panel or near the door
pockets when exiting the vehicle.
Depending on the radio wave reception
conditions, it may be detected by the
antenna outside the cabin and the doors
will become lockable from the outside,
possibly trapping the electronic key
inside the vehicle.
●As long as the electron ic key is within the
effective range, the doors may be locked
or unlocked by anyone. However, only
the doors detecting the electronic key
can be used to unlock the vehicle.
●Even if the electronic key is not inside the
vehicle, it may be possible to start the
engine if the electronic key is near the
window.
●The doors may unlock or lock if a large
amount of water spla shes on the door
handle, such as in the rain or in a car
wash, when the electronic key is within
the effective range. (The doors will auto-
matically be locked after approximately
60 seconds if the d oors are not opened
and closed.)
●If the wireless remote control is used to
lock the doors when the electronic key is
near the vehicle, there is a possibility that
the door may not be unlocked by the
entry function. (Use the wireless remote
control to unlock the doors.)
●Touching the door lock sensor while
wearing gloves may delay or prevent lock
operation.
●When the lock operation is performed
using the lock sensor, recognition signals
will be shown up to two consecutive
times. After this, no recognition signals
will be given.
●If the door handle becomes wet while the
electronic key is within the effective
range, the door may lock and unlock
repeatedly. In this case, follow the follow-
ing correction procedures to wash the
vehicle:
• Place the electronic key in a location 6 ft. (2 m) or more away from the vehicle.
(Take care to ensure that the key is not stolen.)
• Set the electronic key to battery-saving mode to disable the smart access system
with push-button start. ( P.115)
●If the electronic key is inside the vehicle
and a door handle becomes wet during a
car wash, a message may be shown on
the multi-information display and a
buzzer will sound outside the vehicle. To
turn off the alarm, lock all the doors.
●The lock sensor may not work properly if
it comes into contact with ice, snow, mud,
etc. Clean the lock sensor and attempt to
operate it again.
●A sudden approach to the effective
range or door handle may prevent the
doors from being unlocked. In this case,
return the door handle to the original
position and check that the doors unlock
before pulling the door handle again.
●If there is another electronic key in the
detection area, it may take slightly longer
to unlock the doors after the door handle
is gripped.
■When the vehicle is not driven for
extended periods
●To prevent theft of the vehicle, do not
leave the electronic key within 6 ft. (2 m)
of the vehicle.
●The smart access system with push-but-
ton start can be deactivated in advance.
●Setting the electronic key to battery-sav-
ing mode helps to reduce key battery
depletion. ( P.115)
■To operate the system properly
●Make sure to carry the electronic key
when operating the system. Do not get
the electronic key too close to the vehicle
when operating the system from the out-
side of the vehicle.
Depending on the position and holding
condition of the electr onic key, the key may
not be detected correctly and the system
may not operate properly. (The alarm may
go off accidentally, or the door lock pre-
vention function may not operate.)
●Do not leave the electr onic key inside the
trunk.