ECO mode LEXUS LS500H 2020 User Guide
[x] Cancel search | Manufacturer: LEXUS, Model Year: 2020, Model line: LS500H, Model: LEXUS LS500H 2020Pages: 516, PDF Size: 10.38 MB
Page 85 of 516
852-1. Instrument cluster
2
Vehicle status information and indicators
tion system-linked information.
Route guidance to destination
Compass display (heading-up dis-
play)
■Route guidance to destination display
When the route guidance to destination
display is enabled on the head-up display, it
will not be displayed on the multi-informa-
tion display. ( P.89)
Select to enable selection of an audio
source or track on the meter using the
meter control switches.
Select to display the operational status
of the following systems:
LTA (Lane Tracing Assist) ( P.226)
Dynamic radar cruise control with
full-speed range ( P.241)
RSA (Road Sign Assist) (if
equipped) ( P.238)
■Meter display settings that can be
changed
Language
Select to change th e language displayed.
Units
Select to change the units of measure dis-
played.
Speedometer display (except F
SPORT models)
Select to set the display of the speedome-
ter to digital/analog/both digital and ana-
log.
Drive information 1/Drive informa-
tion 2
Select to select up to 2 items ( P.82) that
will be displayed on each Drive information
screen (Drive information 1 screen and
Drive information 2 sc reen) respectively.
Clock
Select to switch between 12-hour display
and 24-hour display.
Pop-up display
Select to enable/disable pop-up displays
for each relevant system.
Accent color
Select to change the accent color on the
screen, such as the cursor color.
Rev indicator (F SPORT models)
• Select to enable/disable the rev indica-
tor.
• Select to set the engine speed at which the rev indicator (amber) will begin to be
displayed.
Rev peak (F SPORT models)
Select to enable/disable the rev peak.
Eco Driving Indicator Light
Select to enable/disable the Eco Driving
Indicator Light.
Default setting
Select to reset the meter display settings to
the default setting.
■Vehicle functions and settings that
can be changed
P.470
Audio system-linked display
Driving support system informa-
tion display
Settings display
Page 88 of 516
882-1. Instrument cluster
Displays the following items:
• Speedometer
• Shift position/shift range/gear position (P.169)
Tachometer/Eco Driving Indicator display area ( P.90)
HUD (Head-up display) switch
■Head-up display will operate when
The engine switch is in IGNITION ON
mode.
■When using the head-up display
The head-up display may seem dark or hard
to see when viewed through sunglasses,
especially polarized su nglasses. Adjust the
brightness of the head-up display or
remove your sunglasses.
■Street name display
Only street names whic h are included in the
map data will be displayed.
■Outside temperature display
●When the ambient temperature is
approximately 37°F (3°C) or lower, the
low outside temperature indicator will
flash for approximately 10 seconds and
the outside temperature display will turn
off. In this case, the display will be dis-
played again when the outside tempera-
ture becomes approximately 41°F (5°C)
or higher.
●In the following situations, the correct
outside temperature may not be dis-
played, or the display may take longer
than normal to change:
• When stopped, or driving at low speeds (less than 12 mph [20 km/h])
• When the outside temperature has
changed suddenly (at the entrance/exit of
a garage, tunnel, etc.)
●When “--” or “E” is displayed, the system
may be malfunctioning. Take your vehicle
to your Lexus dealer.
F
G
WARNING
■When using the head-up display
●Check that the position and brightness
of the head-up display image does not
interfere with safe driving. Incorrect
adjustment of the image’s position or
brightness may obstruct the driver’s
view and lead to an accident, resulting
in death or serious injury.
●Do not continuously look at the
head-up display while driving as you
may fail to see pedestrians, objects on
the road, etc. ahead of the vehicle.
NOTICE
■Head-up display projector
●Do not place any drinks near the
head-up display projector. If the pro-
jector gets wet, electrical malfunctions
may result.
●Do not place anything on or put stick-
ers onto the head-up display projector.
Doing so could interrupt head-up dis-
play indications.
●Do not touch the inside of the head-up
display projector or thrust sharp edges
or the like into the projector.
Doing so could cause mechanical mal-
functions.
Page 89 of 516
892-1. Instrument cluster
2
Vehicle status information and indicators
■Enabling/disabling the head-up dis-
play
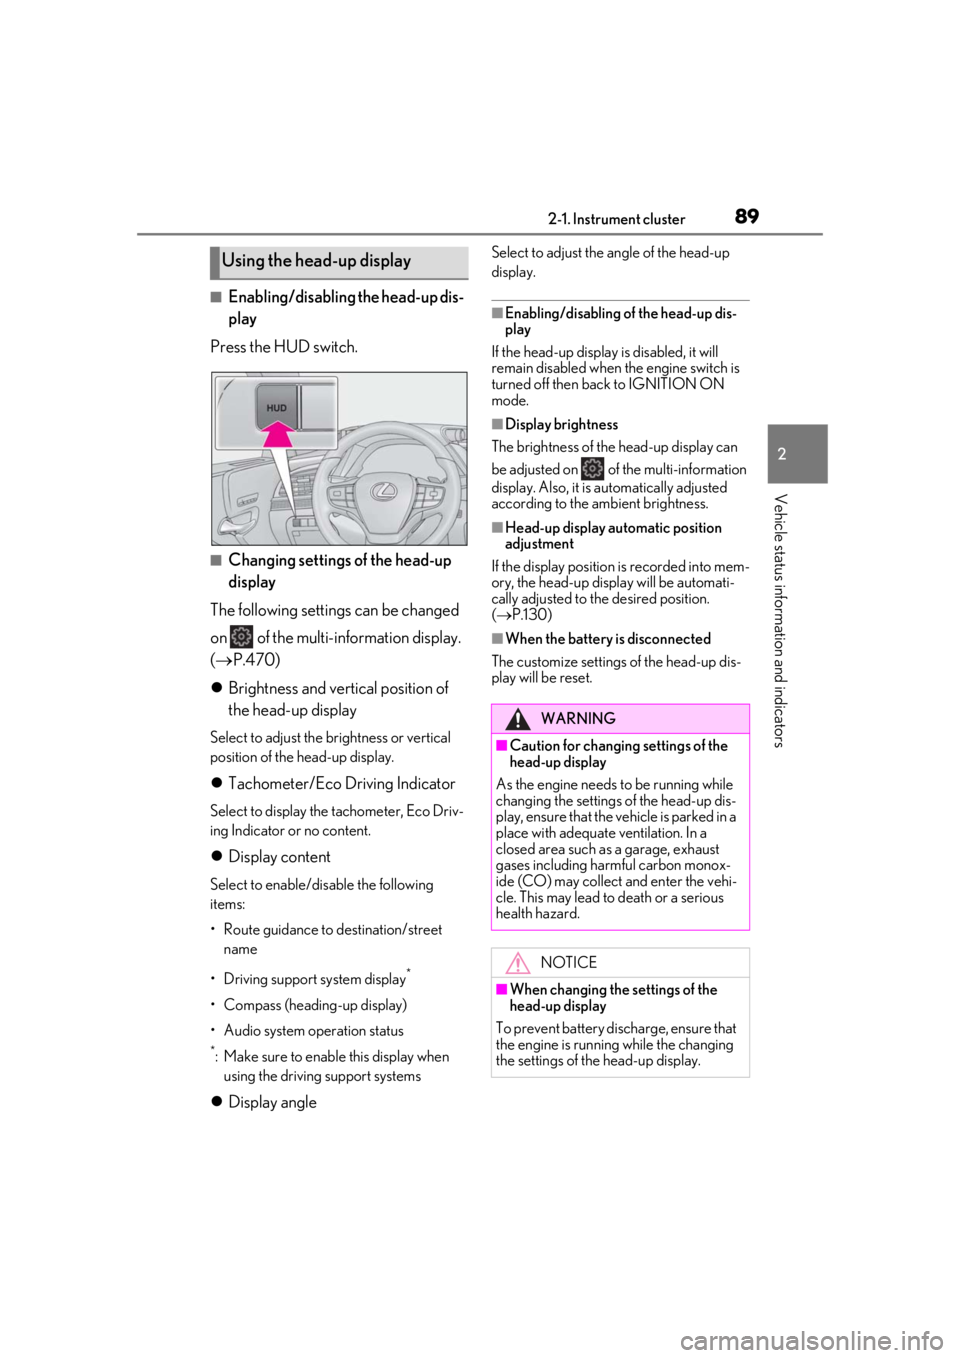
Press the HUD switch.
■Changing settings of the head-up
display
The following settings can be changed
on of the multi-information display.
( P.470)
Brightness and vertical position of
the head-up display
Select to adjust the brightness or vertical
position of the head-up display.
Tachometer/Eco Driving Indicator
Select to display the tachometer, Eco Driv-
ing Indicator or no content.
Display content
Select to enable/dis able the following
items:
• Route guidance to destination/street
name
• Driving support system display
*
• Compass (heading-up display)
• Audio system operation status
*: Make sure to enable this display when using the driving support systems
Display angle
Select to adjust the angle of the head-up
display.
■Enabling/disabling of the head-up dis-
play
If the head-up display is disabled, it will
remain disabled when the engine switch is
turned off then back to IGNITION ON
mode.
■Display brightness
The brightness of the head-up display can
be adjusted on of the multi-information
display. Also, it is automatically adjusted
according to the ambient brightness.
■Head-up display automatic position
adjustment
If the display position is recorded into mem-
ory, the head-up display will be automati-
cally adjusted to th e desired position.
( P.130)
■When the battery is disconnected
The customize settings of the head-up dis-
play will be reset.
Using the head-up display
WARNING
■Caution for changing settings of the
head-up display
As the engine needs to be running while
changing the settings of the head-up dis-
play, ensure that the vehicle is parked in a
place with adequate ventilation. In a
closed area such as a garage, exhaust
gases including harmful carbon monox-
ide (CO) may collect and enter the vehi-
cle. This may lead to death or a serious
health hazard.
NOTICE
■When changing the settings of the
head-up display
To prevent battery discharge, ensure that
the engine is running while the changing
the settings of the head-up display.
Page 92 of 516
922-1. Instrument cluster
menu screen.
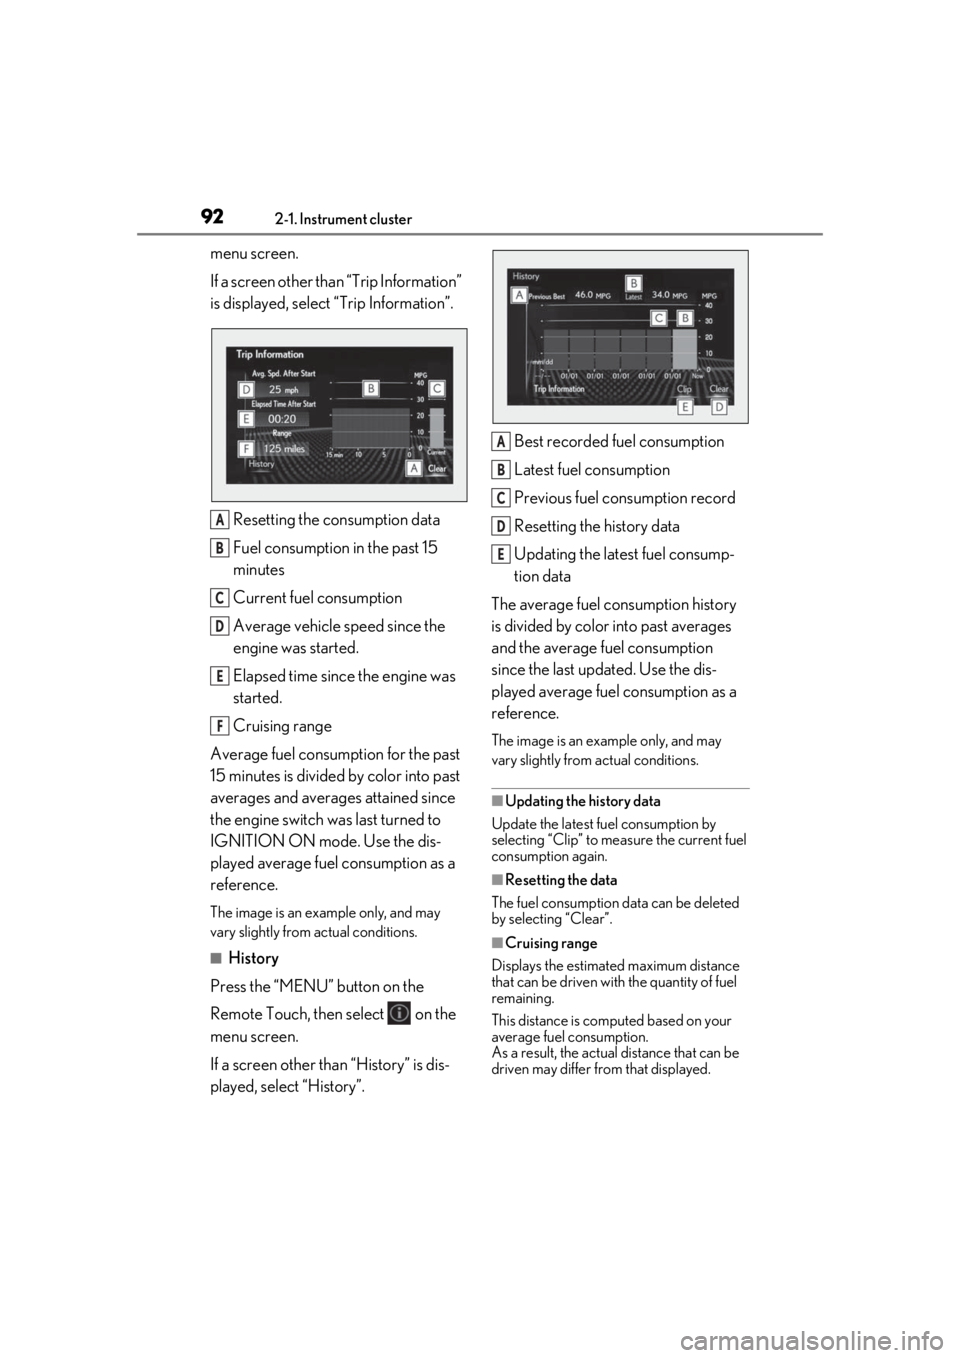
If a screen other than “Trip Information”
is displayed, select “Trip Information”.
Resetting the consumption data
Fuel consumption in the past 15
minutes
Current fuel consumption
Average vehicle speed since the
engine was started.
Elapsed time since the engine was
started.
Cruising range
Average fuel consumption for the past
15 minutes is divided by color into past
averages and averages attained since
the engine switch was last turned to
IGNITION ON mode. Use the dis-
played average fuel consumption as a
reference.
The image is an example only, and may
vary slightly from actual conditions.
■History
Press the “MENU” button on the
Remote Touch, then select on the
menu screen.
If a screen other than “History” is dis-
played, select “History”. Best recorded fuel consumption
Latest fuel consumption
Previous fuel consumption record
Resetting the history data
Updating the latest fuel consump-
tion data
The average fuel consumption history
is divided by color into past averages
and the average fuel consumption
since the last updated. Use the dis-
played average fuel consumption as a
reference.
The image is an example only, and may
vary slightly from actual conditions.
■Updating the history data
Update the latest fuel consumption by
selecting “Clip” to meas ure the current fuel
consumption again.
■Resetting the data
The fuel consumption data can be deleted
by selecting “Clear”.
■Cruising range
Displays the estimated maximum distance
that can be driven with the quantity of fuel
remaining.
This distance is computed based on your
average fuel consumption.
As a result, the actual distance that can be
driven may differ from that displayed.
A
B
C
D
E
F
A
B
C
D
E
Page 97 of 516
973-1. Key information
3
Before driving
●To reduce key battery depletion when the
electronic key is to not be used for long
periods of time, set the electronic key to
the battery-saving mode. (P.113)
●As the electronic ke y always receives
radio waves, the battery will become
depleted even if the electronic key is not
used. The following symptoms indicate
that the electronic key battery may be
depleted. Replace the battery when nec-
essary.
• The smart access system with push-but- ton start or the wireless remote control
does not operate.
• The detection area becomes smaller.
• The LED indicator on the key surface does not turn on.
●To avoid serious deterioration, do not
leave the electronic key within 3 ft. (1 m)
of the following electr ical appliances that
produce a magnetic field:
• TVs
• Personal computers
• Cellular phones, cordless phones and battery chargers
• Recharging cellular phones or cordless phones
• Table lamps
• Induction cookers
■Replacing the battery
P.403
■Confirmation of the number of regis-
tered keys
The number of keys already registered to
the vehicle can be confirmed. Ask your
Lexus dealer for details.
■If “A New Key has been Registered
Contact Your Dealer for Details” is
shown on the multi-information display
This message will be displayed each time
the driver’s door is opened when the doors
are unlocked from the outside for approxi-
mately 10 days after a new electronic key
has been registered.
If this message is disp layed but you have not
had a new electronic key registered, ask
your Lexus dealer to check if an unknown
electronic key (other than those in your
possession) has been registered. NOTICE
■To prevent key damage
●Do not drop the keys, subject them to
strong shocks or bend them.
●Do not expose the keys to high tem-
peratures for a long period of time.
●Do not get the keys wet or wash them
in an ultrasonic washer etc.
●Do not attach metallic or magnetic
materials to the keys or place the keys
close to such materials.
●Do not disassemble the keys.
●Do not attach a sticker or anything else
to the surface of the electronic key.
●Do not place the keys near objects that
produce magnetic fields, such as TVs,
audio systems and induction cookers,
or medical electrical equipment, such
as low-frequency therapy equipment.
■Carrying the electronic key on your
person
Carry the electronic key 3.9 in. (10 cm)
or more away from electric appliances
that are turned on. Radio waves emitted
from electric applianc es within 3.9 in. (10
cm) of the electronic key may interfere
with the key, causing the key to not func-
tion properly.
■In case of a smart access system with
push-button start malfunction or
other key-related problems
P.437
■When an electronic key is lost
P.436
■Handling the card key (if equipped)
●Do not apply excess force when insert-
ing the mechanical key into the card
key. Doing so may damage the card
key.
Page 98 of 516
983-1. Key information
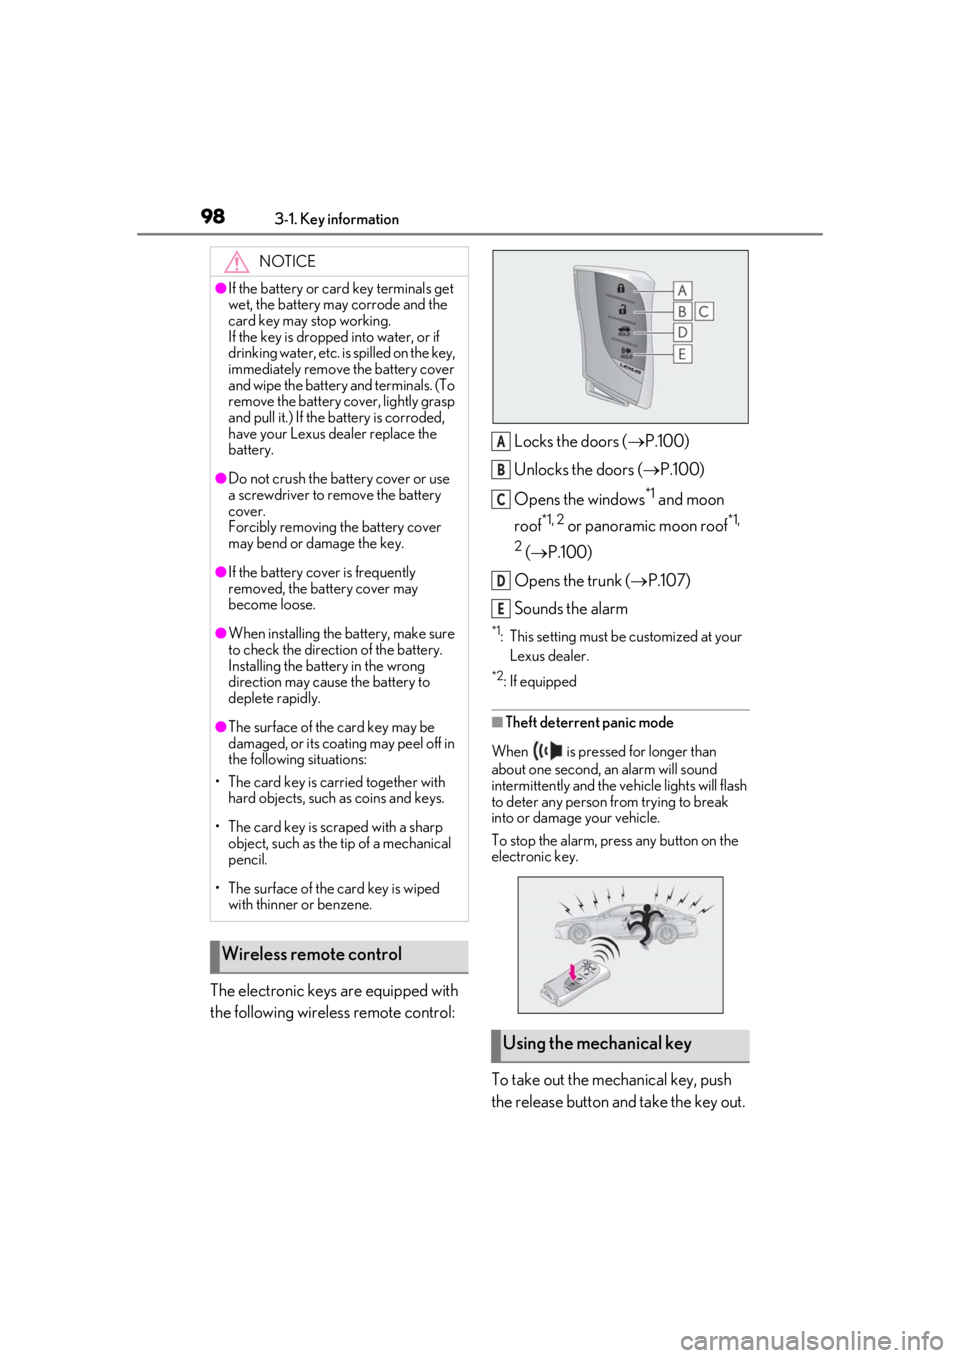
The electronic keys are equipped with
the following wireless remote control:Locks the doors (
P.100)
Unlocks the doors ( P.100)
Opens the windows
*1 and moon
roof
*1, 2 or panoramic moon roof*1,
2
( P.100)
Opens the trunk ( P.107)
Sounds the alarm
*1: This setting must be customized at your
Lexus dealer.
*2: If equipped
■Theft deterrent panic mode
When is pressed for longer than
about one second, an alarm will sound
intermittently and the vehicle lights will flash
to deter any person from trying to break
into or damage your vehicle.
To stop the alarm, press any button on the
electronic key.
To take out the mechanical key, push
the release button and take the key out.
NOTICE
●If the battery or card key terminals get
wet, the battery may corrode and the
card key may stop working.
If the key is dropped into water, or if
drinking water, etc. is spilled on the key,
immediately remove the battery cover
and wipe the battery and terminals. (To
remove the battery co ver, lightly grasp
and pull it.) If the battery is corroded,
have your Lexus dealer replace the
battery.
●Do not crush the battery cover or use
a screwdriver to remove the battery
cover.
Forcibly removing the battery cover
may bend or damage the key.
●If the battery cover is frequently
removed, the battery cover may
become loose.
●When installing the ba ttery, make sure
to check the direction of the battery.
Installing the battery in the wrong
direction may cause the battery to
deplete rapidly.
●The surface of the card key may be
damaged, or its coating may peel off in
the following situations:
• The card key is carried together with hard objects, such as coins and keys.
• The card key is scraped with a sharp object, such as the tip of a mechanical
pencil.
• The surface of the card key is wiped with thinner or benzene.
Wireless remote control
Using the mechanical key
A
B
C
D
E
Page 103 of 516
1033-2. Opening, closing and locking the doors and trunk
3
Before driving
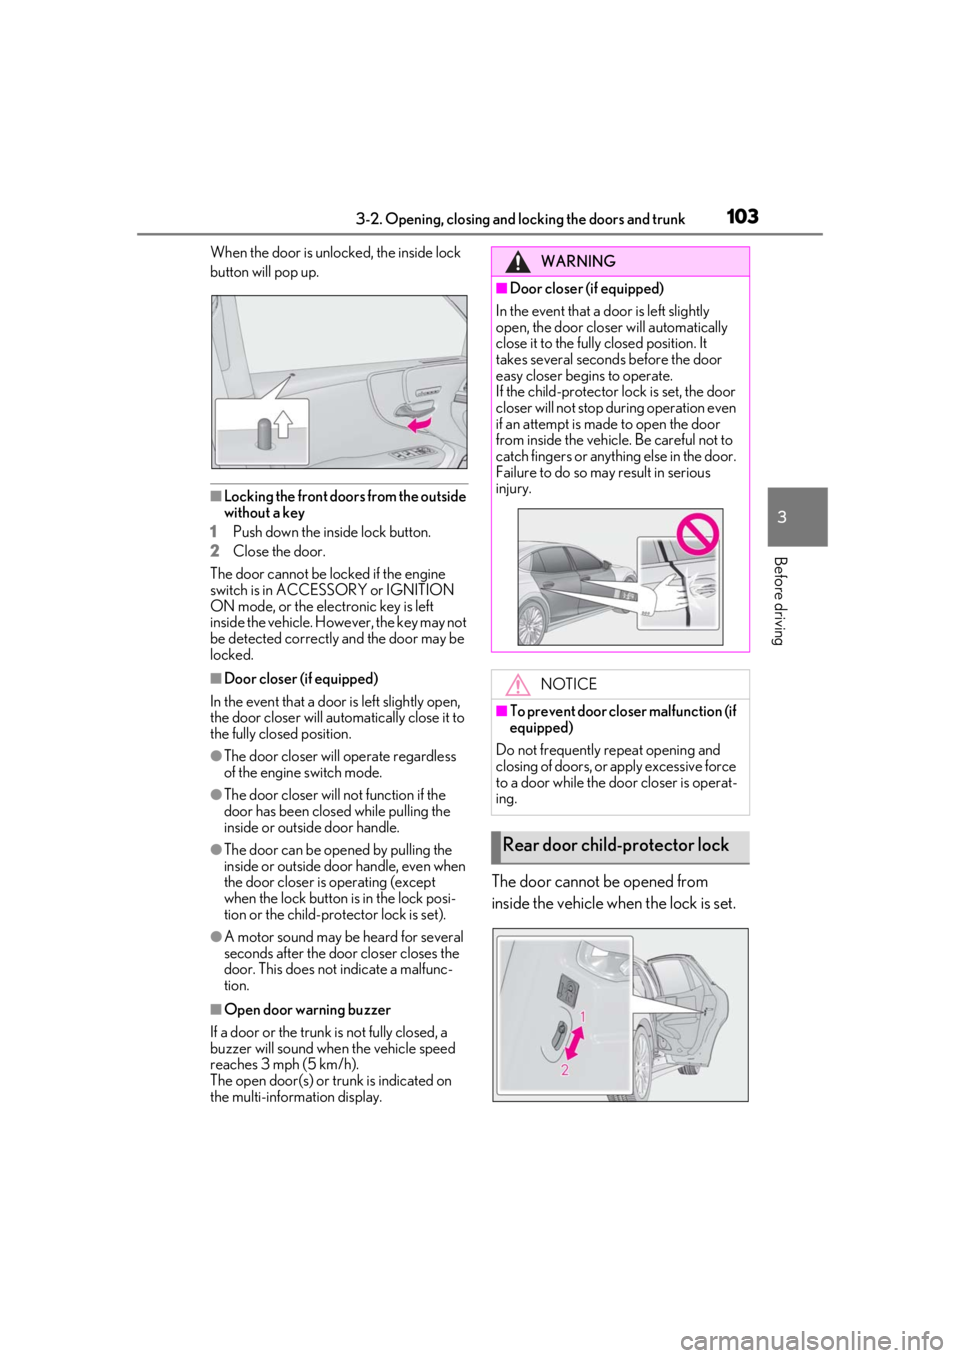
When the door is unlocked, the inside lock
button will pop up.
■Locking the front doors from the outside
without a key
1
Push down the inside lock button.
2
Close the door.
The door cannot be locked if the engine
switch is in ACCESSORY or IGNITION
ON mode, or the electronic key is left
inside the vehicle. However, the key may not
be detected correctly and the door may be
locked.
■Door closer (if equipped)
In the event that a door is left slightly open,
the door closer will automatically close it to
the fully closed position.
●The door closer will operate regardless
of the engine switch mode.
●The door closer will not function if the
door has been clos ed while pulling the
inside or outside door handle.
●The door can be opened by pulling the
inside or outside door handle, even when
the door closer is operating (except
when the lock button is in the lock posi-
tion or the child-protector lock is set).
●A motor sound may be heard for several
seconds after the door closer closes the
door. This does not indicate a malfunc-
tion.
■Open door warning buzzer
If a door or the trunk is not fully closed, a
buzzer will sound when the vehicle speed
reaches 3 mph (5 km/h).
The open door(s) or trunk is indicated on
the multi-information display.
The door cannot be opened from
inside the vehicle when the lock is set.
WARNING
■Door closer (if equipped)
In the event that a d oor is left slightly
open, the door closer will automatically
close it to the fully closed position. It
takes several seconds before the door
easy closer begins to operate.
If the child-protector lock is set, the door
closer will not stop during operation even
if an attempt is made to open the door
from inside the vehicle. Be careful not to
catch fingers or anything else in the door.
Failure to do so may result in serious
injury.
NOTICE
■To prevent door closer malfunction (if
equipped)
Do not frequently repeat opening and
closing of doors, or apply excessive force
to a door while the door closer is operat-
ing.
Rear door child-protector lock
Page 106 of 516
1063-2. Opening, closing and locking the doors and trunk
■Trunk opener switch
Press the trunk opener switch.
If the vehicle is equipped with a power
trunk opener and closer, the trunk lid will
fully open.
WARNING
●On an incline, the trunk lid may sud-
denly shut after it opens automatically.
Make sure the trunk lid is fully open
and secure before using the trunk.
●In the following situations, the power
trunk opener and closer may detect an
abnormality and automatic operation
may be stopped. In this case, the trunk
lid has to be operated manually. Take
extra care in this situation, as the
stopped trunk lid ma y suddenly shut,
causing an accident.
• When the trunk lid contacts an obsta- cle
• When the battery voltage suddenly drops, such as when the engine switch
is turned to IGNITION ON mode or
the engine is started during automatic
operation
●Do not attach any accessories other
than genuine Lexus parts to the trunk
lid. The power trunk opener and closer
may not operate, caus ing itself to mal-
function, or the trun k lid may suddenly
shut again after it is opened.
■Hands Free Power Trunk Lid (if
equipped)
Observe the following precautions.
Failure to do so may cause serious injury.
●Exhaust gasses cause the exhaust
pipes to become quite hot. When
operating the Hands Free Power Trunk
Lid, be careful not to touch the exhaust
pipe.
●Do not operate the Hands Free Power
Trunk Lid if there is little space under
the rear bumper.
■Jam protection function
Observe the following precautions.
Failure to do so may cause serious injury.
●Never use any part of your body to
intentionally activate the jam protec-
tion function.
●The jam protection function may not
work if something gets caught just
before the trunk lid fully closes. Be
careful not to catch fingers or anything
else in the trunk lid.
●The jam protection function may not
work depending on the shape of the
object that is caught. Be careful not to
catch fingers or anything else.
NOTICE
■To prevent trunk easy closer malfunc-
tions
Do not apply force to the trunk lid while
the trunk easy closer is operating.
■To prevent damage to the power
trunk opener and closer (vehicles
with power trunk opener and closer)
●Make sure that there is no luggage or
snow on the trunk lid before operating
the power trunk opener and closer. In
addition, make sure that there is no ice
between the trunk lid and frame that
prevents movement of the trunk lid.
Operating the power trunk opener
and closer when excessive load is
present on the trunk lid may cause a
malfunction.
●Do not apply excessive force to the
trunk lid while the power trunk opener
and closer is operating.
Opening/closing the trunk
Page 112 of 516
1123-2. Opening, closing and locking the doors and trunk
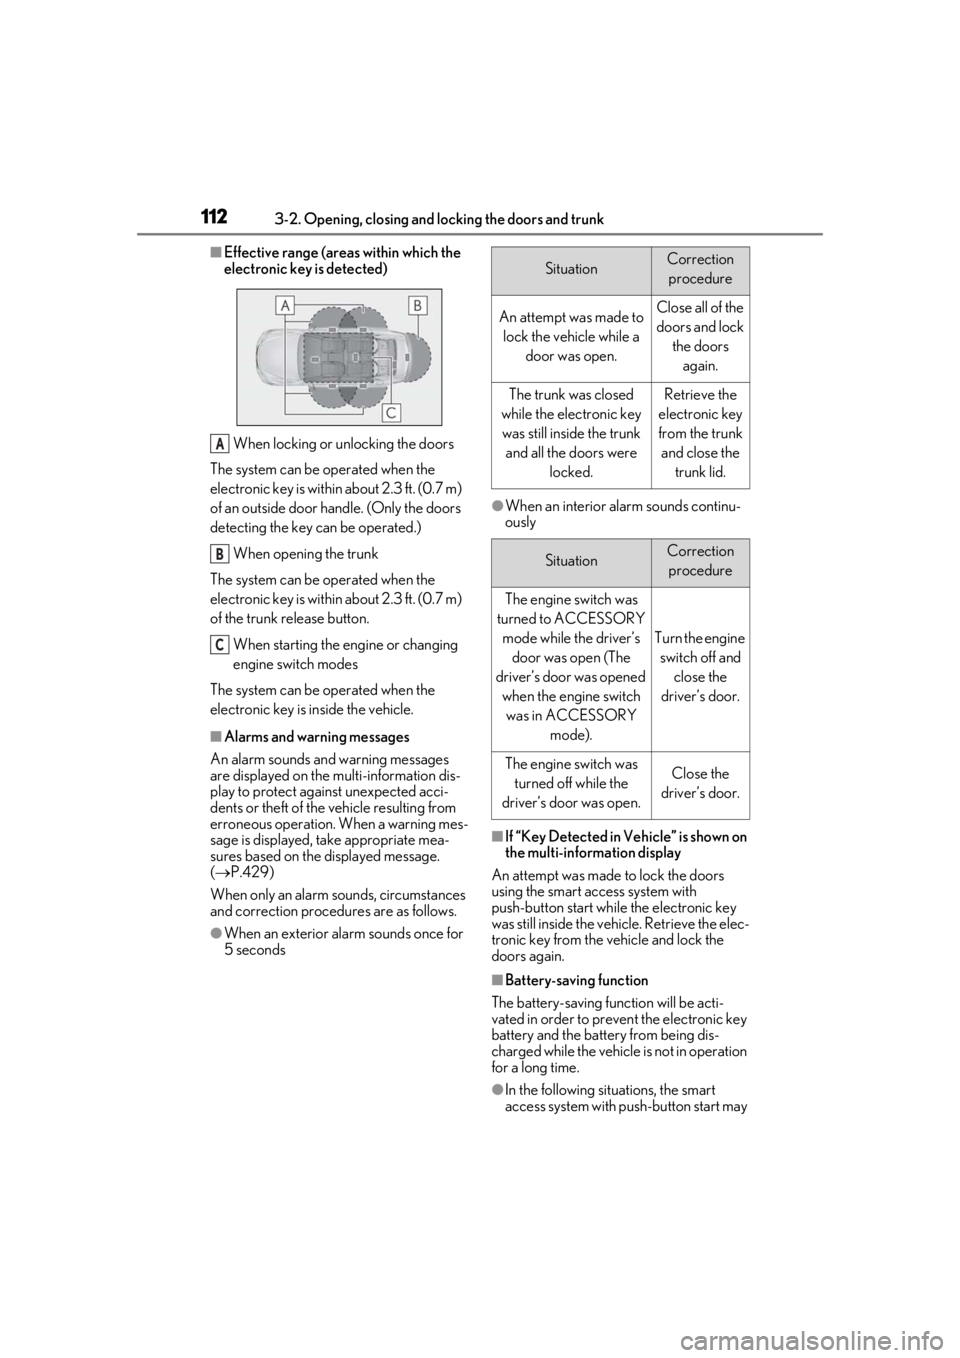
■Effective range (areas within which the
electronic key is detected)
When locking or unlocking the doors
The system can be operated when the
electronic key is within about 2.3 ft. (0.7 m)
of an outside door handle. (Only the doors
detecting the key can be operated.)
When opening the trunk
The system can be operated when the
electronic key is within about 2.3 ft. (0.7 m)
of the trunk release button.
When starting the engine or changing
engine switch modes
The system can be operated when the
electronic key is inside the vehicle.
■Alarms and warning messages
An alarm sounds and warning messages
are displayed on the multi-information dis-
play to protect against unexpected acci-
dents or theft of the vehicle resulting from
erroneous operation. When a warning mes-
sage is displayed, take appropriate mea-
sures based on the displayed message.
( P.429)
When only an alarm sounds, circumstances
and correction procedures are as follows.
●When an exterior alarm sounds once for
5 seconds
●When an interior alarm sounds continu-
ously
■If “Key Detected in Vehicle” is shown on
the multi-information display
An attempt was made to lock the doors
using the smart access system with
push-button start while the electronic key
was still inside the vehicle. Retrieve the elec-
tronic key from the vehicle and lock the
doors again.
■Battery-saving function
The battery-saving function will be acti-
vated in order to prevent the electronic key
battery and the battery from being dis-
charged while the vehicle is not in operation
for a long time.
●In the following situations, the smart
access system with pu sh-button start may
A
B
C
SituationCorrection
procedure
An attempt was made to lock the vehicle while a door was open.Close all of the doors and lock the doors again.
The trunk was closed
while the electronic key was still inside the trunk and all the doors were locked.Retrieve the
electronic key
from the trunk and close the trunk lid.
SituationCorrection procedure
The engine switch was
turned to ACCESSORY mode while the driver’s door was open (The
driver’s door was opened when the engine switch was in ACCESSORY mode).
Turn the engine switch off and close the
driver’s door.
The engine switch was turned off while the
driver’s door was open.Close the
driver’s door.
Page 114 of 516

1143-2. Opening, closing and locking the doors and trunk
engine is started or engine switch modes
are changed.
●Do not leave the electronic key on top of
the instrument panel or near the door
pockets when exiting the vehicle.
Depending on the radio wave reception
conditions, it may be detected by the
antenna outside the cabin and the doors
will become lockable from the outside,
possibly trapping the electronic key
inside the vehicle.
●As long as the electron ic key is within the
effective range, the doors may be locked
or unlocked by anyone. However, only
the doors detecting the electronic key
can be used to unlock the vehicle.
●Even if the electronic key is not inside the
vehicle, it may be possible to start the
engine if the electronic key is near the
window.
●The doors may unlock or lock if a large
amount of water spla shes on the door
handle, such as in the rain or in a car
wash, when the electronic key is within
the effective range. (The doors will auto-
matically be locked after approximately
60 seconds if the d oors are not opened
and closed.)
●If the wireless remote control is used to
lock the doors when the electronic key is
near the vehicle, there is a possibility that
the door may not be unlocked by the
entry function. (Use the wireless remote
control to unlock the doors.)
●Touching the door lock sensor while
wearing gloves may delay or prevent lock
operation.
●When the lock operation is performed
using the lock sensor, recognition signals
will be shown up to two consecutive
times. After this, no recognition signals
will be given.
●If the door handle becomes wet while the
electronic key is within the effective
range, the door may lock and unlock
repeatedly. In this case, follow the follow-
ing correction procedures to wash the
vehicle:
• Place the electronic key in a location 6 ft. (2 m) or more away from the vehicle.
(Take care to ensure that the key is not stolen.)
• Set the electronic key to battery-saving mode to disable the smart access system
with push-button start. ( P.113)
●If the electronic key is inside the vehicle
and a door handle becomes wet during a
car wash, a message may be shown on
the multi-information display and a
buzzer will sound outside the vehicle. To
turn off the alarm, lock all the doors.
●The lock sensor may not work properly if
it comes into contact with ice, snow, mud,
etc. Clean the lock sensor and attempt to
operate it again.
●A sudden approach to the effective
range or door handle may prevent the
doors from being unlocked. In this case,
return the door handle to the original
position and check that the doors unlock
before pulling the door handle again.
●If there is another electronic key in the
detection area, it may take slightly longer
to unlock the doors after the door handle
is gripped.
■When the vehicle is not driven for
extended periods
●To prevent theft of the vehicle, do not
leave the electronic key within 6 ft. (2 m)
of the vehicle.
●The smart access system with push-but-
ton start can be deactivated in advance.
●Setting the electronic key to battery-sav-
ing mode helps to reduce key battery
depletion. ( P.113)
■To operate the system properly
●Make sure to carry the electronic key
when operating the system. Do not get
the electronic key too close to the vehicle
when operating the system from the out-
side of the vehicle.
Depending on the position and holding
condition of the electr onic key, the key may
not be detected correctly and the system
may not operate properly. (The alarm may
go off accidentally, or the door lock pre-
vention function may not operate.)
●Do not leave the electr onic key inside the
trunk.