buttons LEXUS LS500H 2020 User Guide
[x] Cancel search | Manufacturer: LEXUS, Model Year: 2020, Model line: LS500H, Model: LEXUS LS500H 2020Pages: 516, PDF Size: 10.38 MB
Page 126 of 516

1263-3. Adjusting the seats
■Automatic operation
The seat can be moved to preset posi-
tions.
1
Display the home screen on the
Rear Multi Operation Panel
( P.312) and then touch “Seat”.
2
Touch “Left” or “Right”.
3
Touch the desired preset button.
When the operating conditions are not
met, the preset buttons will be grayed out.
/ : Moves the rear seat
to the upright position (Business
Mode)
/ : Moves the rear seat
with an ottoman to a slightly reclined
position (Entertainment Mode) (if
equipped)
Vehicles without a rear seat entertainment
system: Moves the fron t passenger’s seat
forward.
Vehicles with a rear seat entertainment
system: Moves the fron t passenger’s seat
and rear display to allow the rear display to
be comfortably viewed.
: Moves the rear seat with an
ottoman to a deeply reclined position
(Relaxation Mode) (if equipped)
Moves the front passenger’s seat forward
and folds the seatback and head restraint
forward.
To stop the front passenger seat while it is
moving, touch “STOP”.
■Manual operation
1
Display the home screen on the
Rear Multi Operation Panel
( P.312) and then touch “Seat”.
WARNING
●When getting in or out of the vehicle,
retract the ottoman. If the ottoman is
not retracted, it may cause a fall, result-
ing in injury.
●Do not operate the ottoman when the
vehicle is moving.
●Do not allow anyone to put their hands
or feet under the rear seat when stow-
ing the ottoman.
NOTICE
■To prevent an ottoman malfunction (if
equipped)
●Do not place any objects in the rear
seat footwell that could prevent the
operation of the ottoman.
●Do not place heavy luggage on the
ottoman.
●Do not place any objects under the
ottoman while it is raised for use. These
objects may interfere with the ottoman
being folded, causing damage to the
ottoman or the objects themselves.
■To prevent a rear display malfunction
(if equipped)
Do not attempt to move the rear display
by hand, as doing so may damage the
rear display.
Adjustment procedure
Page 132 of 516

1323-3. Adjusting the seats
button is pressed, press button “1”,
“2” or “3” until the buzzer sounds.
If the selected button has already been
preset, the previously recorded position
will be overwritten.
When the driver’s seat adjustment
switches are in front passenger mode
( P.121), the position of the driver’s seat
cannot be registered.
To record the position of the front pas-
senger’s seat, adjust the front passen-
ger’s seat to the desired position and
perform step 4
using the buttons on
the front passenger’s side.
■In order to correctly use the driving
position memory function
If a seat position is already in the furthest
possible position and the seat is operated in
the same direction, the recorded position
may be slightly differen t when it is recalled.
1Turn the engine switch to IGNI-
TION ON mode.
2
Check that the shift position is in P. 3
Press one of the buttons for the
driving position you want to recall
until the buzzer sounds.
When the driver’s seat adjustment
switches are in front passenger mode
(
P.121), a driving position cannot be
recalled.
■To stop the position recall operation
part-way through
Perform any of the following operations:
●Press the “SET” button.
●Press button “1”, “2” or “3”.
●Press the mode change button.
●Operate any of the seat adjustment
switches (only cancels seat position
recall).
●Operate the tilt and telescopic steering
control switch (onl y cancels steering
wheel position recall).
■Recalling a driving position
If a driving position is recalled, the move-
ment of the front seat may be stopped part-
way if the seat moves close to the rear seat.
If a rear passenger is determined to be in
the vehicle, the rearward movement of the
front seat may be stopped partway to
ensure sufficient space for the rear passen-
ger.
■Recalling the front passenger’s seat
position (vehicles with a rear seat with
an ottoman)
If the ottoman of the rear seat is extended,
the front passenger’s se at position cannot
be recalled.
WARNING
■Seat adjustment caution
Take care during seat adjustment so that
the seat does not strike the rear passen-
ger or squeeze your body against the
steering wheel.
Recalling a driving position
Page 135 of 516
1353-3. Adjusting the seats
3
Before driving
2Display the home screen on the
Rear Multi Operation Panel
(P.312) and then touch “Seat”.
3
Touch “Left” or “Right”.
4
Touch “1” or “2”.
When the operating conditions are not
met, the buttons will be grayed out.
To stop the operation touch “STOP”.
If the seat is adjust ed while a memorized
position is being recalled, the automatic
operation will stop. (The seat will change to
manual operation.)
■Operating condition
The weight of an occupant is detected on
the rear seat or the rear seat belt is fas-
tened.
Once weight is detect ed on the seat, the
seat will be judged as occupied until the
rear door is opened then closed or the
engine switch is turned off.
■Recalling a rear seat position
If a memorized rear seat position is recalled,
the seat may stop part-way to ensure suffi-
cient space for the rear passenger.
■Recalling the ottoman position (if
equipped)
When a seat position is recalled, the otto-
man will not raise or extend. The ottoman
position can only be recalled if the memo-
rized position is lower and shorter than the
current position.
Head restraints
Head restraints are provided for all
seats.
Vehicles with power rear seat: The
head restraint for the rear center
seat is integrated into the seatback
and cannot be adjusted.
WARNING
■Head restraint precautions
Observe the following precautions
regarding the head re straints. Failure to
do so may result in death or serious
injury.
●Use the head restraints designed for
each respective seat.
●Adjust the head restraints to the cor-
rect position at all times.
●Manual type: After adjusting the head
restraints, push down on them and
make sure they are locked in position.
●Do not drive with the head restraints
removed.
Page 308 of 516
3085-1. Remote Touch/Display
5-1.Remote Touch/Display
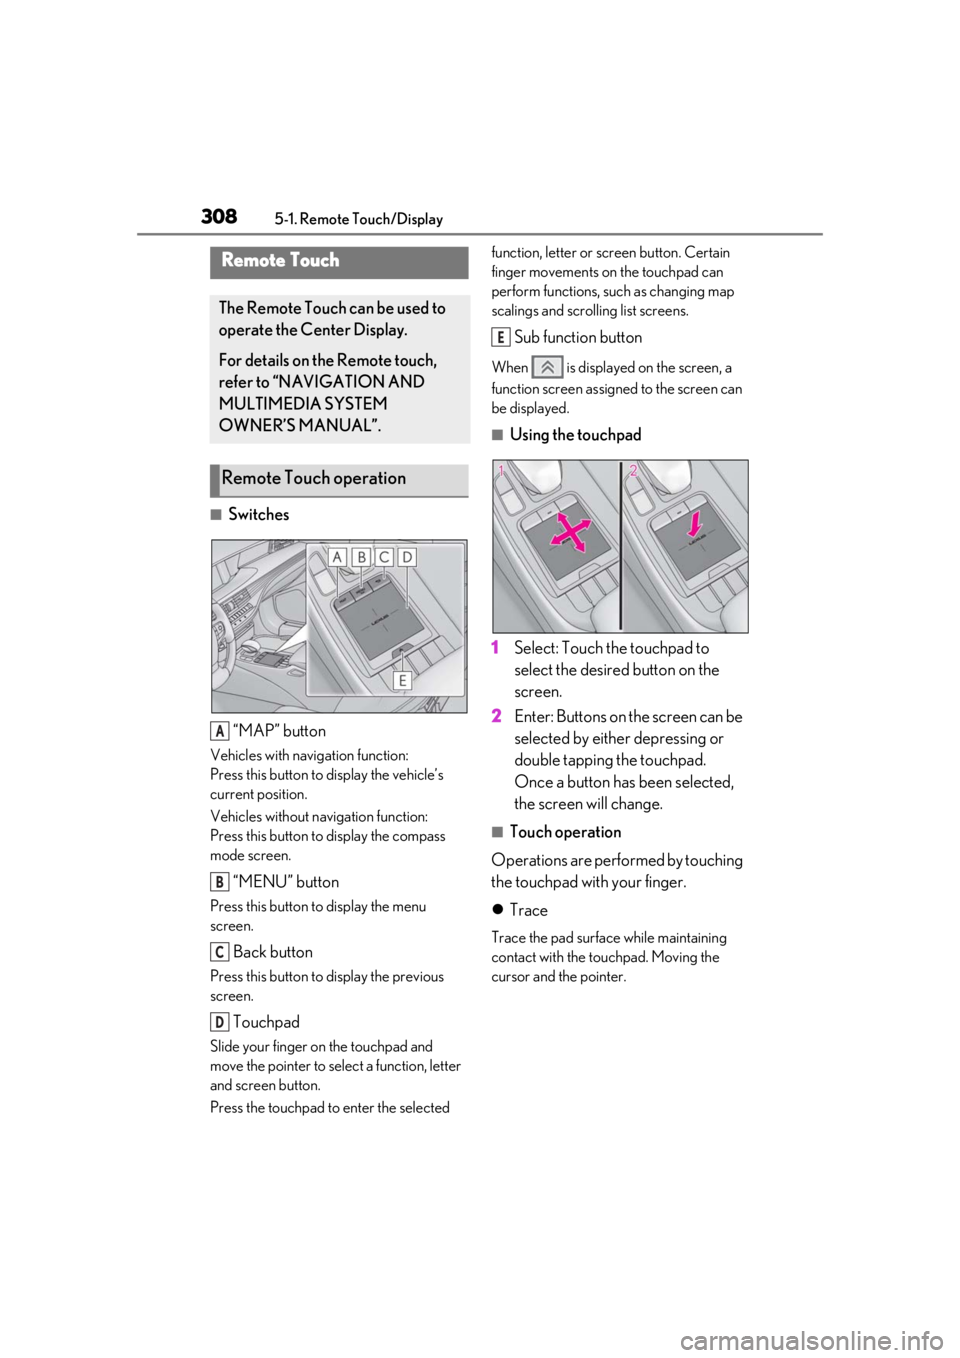
■Switches“MAP” button
Vehicles with navigation function:
Press this button to display the vehicle’s
current position.
Vehicles without navigation function:
Press this button to display the compass
mode screen.
“MENU” button
Press this button to display the menu
screen.
Back button
Press this button to display the previous
screen.
Touchpad
Slide your finger on the touchpad and
move the pointer to select a function, letter
and screen button.
Press the touchpad to enter the selected function, letter or screen button. Certain
finger movements on the touchpad can
perform functions, su
ch as changing map
scalings and scrolling list screens.
Sub function button
When is displayed on the screen, a
function screen assigned to the screen can
be displayed.
■Using the touchpad
1 Select: Touch the touchpad to
select the desired button on the
screen.
2 Enter: Buttons on the screen can be
selected by either depressing or
double tapping the touchpad.
Once a button has been selected,
the screen will change.
■Touch operation
Operations are performed by touching
the touchpad with your finger.
Trace
Trace the pad surface while maintaining
contact with the touchpad. Moving the
cursor and the pointer.
Remote Touch
The Remote Touch can be used to
operate the Center Display.
For details on the Remote touch,
refer to “NAVIGATION AND
MULTIMEDIA SYSTEM
OWNER’S MANUAL”.
Remote Touch operation
A
B
C
D
E
Page 315 of 516
3155-2. Lexus Climate Concierge
5
Interior features
5-2.Lexus Climate Concierge
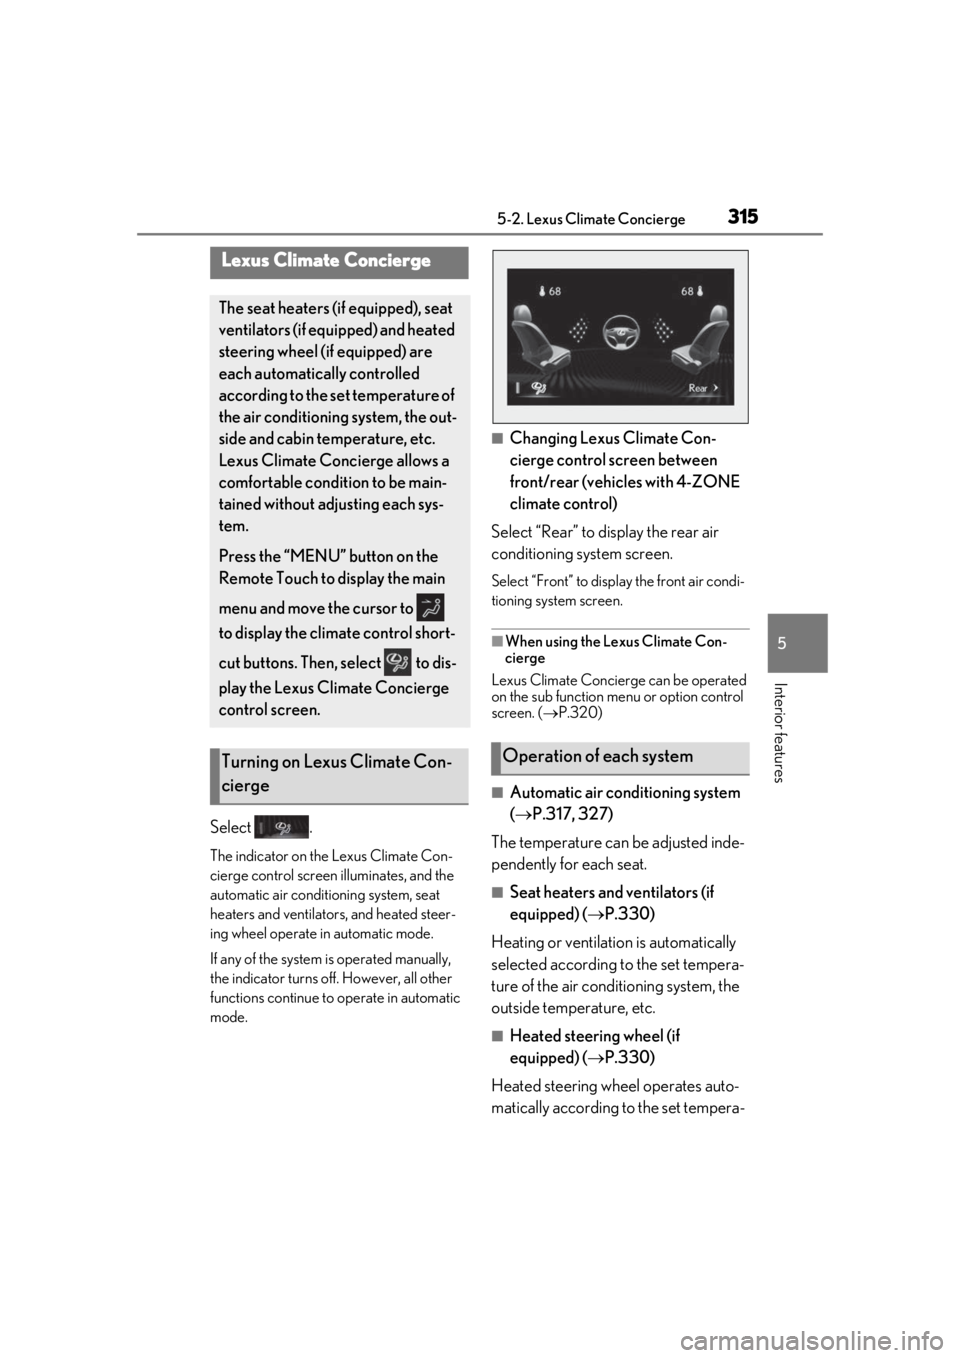
Select .
The indicator on the Lexus Climate Con-
cierge control screen illuminates, and the
automatic air conditioning system, seat
heaters and ventilators, and heated steer-
ing wheel operate in automatic mode.
If any of the system is operated manually,
the indicator turns off. However, all other
functions continue to operate in automatic
mode.
■Changing Lexus Climate Con-
cierge control screen between
front/rear (vehicles with 4-ZONE
climate control)
Select “Rear” to display the rear air
conditioning system screen.
Select “Front” to display the front air condi-
tioning system screen.
■When using the Lexus Climate Con-
cierge
Lexus Climate Concierge can be operated
on the sub function menu or option control
screen. ( P.320)
■Automatic air conditioning system
( P.317, 327)
The temperature can be adjusted inde-
pendently for each seat.
■Seat heaters and ventilators (if
equipped) ( P.330)
Heating or ventilation is automatically
selected according to the set tempera-
ture of the air conditioning system, the
outside temperature, etc.
■Heated steering wheel (if
equipped) ( P.330)
Heated steering wheel operates auto-
matically according to the set tempera-
Lexus Climate Concierge
The seat heaters (if equipped), seat
ventilators (if equipped) and heated
steering wheel (if equipped) are
each automatically controlled
according to the set temperature of
the air conditioning system, the out-
side and cabin temperature, etc.
Lexus Climate Concierge allows a
comfortable condition to be main-
tained without adjusting each sys-
tem.
Press the “MENU” button on the
Remote Touch to display the main
menu and move the cursor to
to display the climate control short-
cut buttons. Then, select to dis-
play the Lexus Climate Concierge
control screen.
Turning on Lexus Climate Con-
ciergeOperation of each system
Page 317 of 516
3175-3. Using the air conditioning system and defogger
5
Interior features
5-3.Using the air conditioning system and defogger
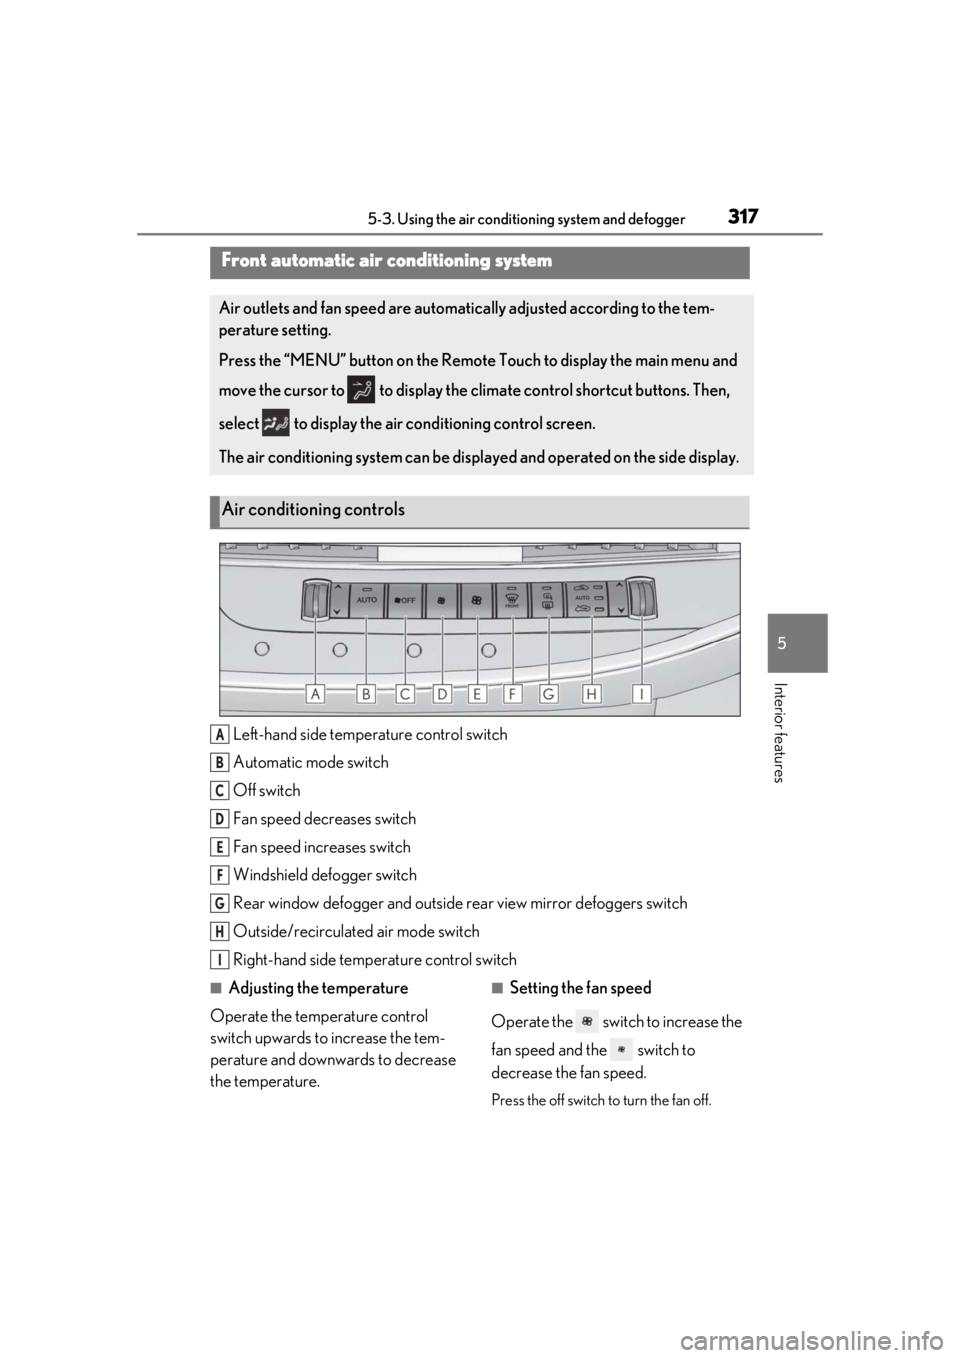
Left-hand side temperature control switch
Automatic mode switch
Off switch
Fan speed decreases switch
Fan speed increases switch
Windshield defogger switch
Rear window defogger and outside rear view mirror defoggers switch
Outside/recirculated air mode switch
Right-hand side temp erature control switch
■Adjusting the temperature
Operate the temperature control
switch upwards to increase the tem-
perature and downwards to decrease
the temperature.■Setting the fan speed
Operate the switch to increase the
fan speed and the switch to
decrease the fan speed.
Press the off switch to turn the fan off.
Front automatic air conditioning system
Air outlets and fan speed are automati cally adjusted according to the tem-
perature setting.
Press the “MENU” button on the Remote Touch to display the main menu and
move the cursor to to display the climate control shortcut buttons. Then,
select to display the air conditioning control screen.
The air conditioning system can be displa yed and operated on the side display.
Air conditioning controls
A
B
C
D
E
F
G
H
I
Page 327 of 516
3275-3. Using the air conditioning system and defogger
5
Interior features
*:If equipped
■Center Display
Press the “MENU” button on the
Remote Touch to display the main
menu and move the cursor to to
display the climate control shortcut
buttons. Then, select to display the
rear air conditioning control screen.
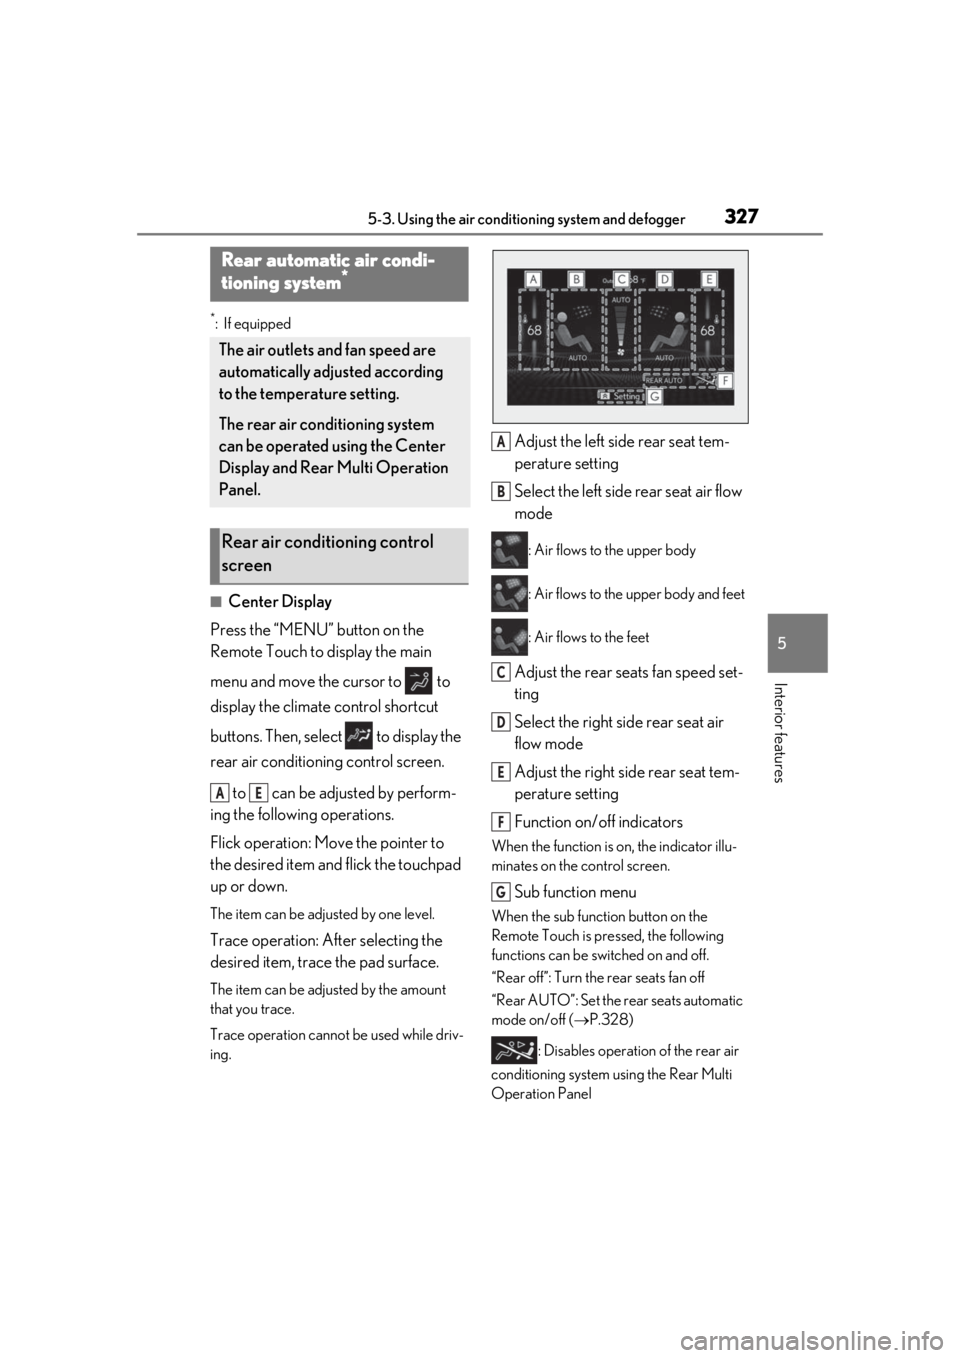
to can be adjusted by perform-
ing the following operations.
Flick operation: Move the pointer to
the desired item and flick the touchpad
up or down.
The item can be adjusted by one level.
Trace operation: After selecting the
desired item, trace the pad surface.
The item can be adjusted by the amount
that you trace.
Trace operation cannot be used while driv-
ing.
Adjust the left side rear seat tem-
perature setting
Select the left side rear seat air flow
mode
: Air flows to the upper body
: Air flows to the upper body and feet
: Air flows to the feet
Adjust the rear seats fan speed set-
ting
Select the right side rear seat air
flow mode
Adjust the right side rear seat tem-
perature setting
Function on/off indicators
When the function is on, the indicator illu-
minates on the control screen.
Sub function menu
When the sub function button on the
Remote Touch is pressed, the following
functions can be switched on and off.
“Rear off”: Turn the rear seats fan off
“Rear AUTO”: Set the rear seats automatic
mode on/off ( P.328)
: Disables operation of the rear air
conditioning system using the Rear Multi
Operation Panel
Rear automatic air condi-
tioning system*
The air outlets and fan speed are
automatically adjusted according
to the temperature setting.
The rear air conditioning system
can be operated using the Center
Display and Rear Multi Operation
Panel.
Rear air conditioning control
screen
AE
A
B
C
D
E
F
G
Page 330 of 516
3305-3. Using the air conditioning system and defogger
*: If equipped
■Center Display
Press the “MENU” button on the
Remote Touch to display the main
menu and move the cursor to to
display the shortcut buttons. Then,
select to display the heated steer-
ing wheel/front seat heater/front seat
ventilator control screen.
To display the rear seat heater/rear seat
ventilator control screen, select . (if
equipped)
Main screen
Using the touchpad of the Remote
Touch, select the button on the screen.
to can be adjusted by perform-
ing the following operations.
Flick operation: Move the pointer to
the desired item and flick the touchpad
up or down.
The item can be adjusted by one level.
Trace operation: After selecting the
desired item, trace the touchpad sur-
face.
The item can be adjusted by the amount
Heated steering wheel*/seat
h
eaters*/seat ventilators*
Heated steering wheel
Warms up the grip of the steering
wheel
Front seat heaters/Rear seat
heaters
Warm up the seat upholstery
Front seat ventilators/Rear seat
ventilators
Maintain good ventilation by pulling
air through the seat upholstery
The Center Display and Rear Multi
Operation Panel/rear control
panel can be used to operate the
heated steering wheel, seat heaters
and seat ventilators.
WARNING
■To prevent minor burn injuries
Care should be taken if anyone in the fol-
lowing categories comes in contact with
the steering wheel or seats when the
heater is on:
●Babies, small children, the elderly, the
sick and the phys ically challenged
●Persons with sensitive skin
●Persons who are fatigued
●Persons who have taken alcohol or
drugs that induce sleep (sleeping
drugs, cold remedies, etc.)
NOTICE
■To prevent damage to the seat heat-
ers and seat ventilators
Do not put heavy objects that have an
uneven surface on the seat and do not
stick sharp objects (n eedles, nails, etc.)
into the seat.
■To prevent battery discharge
Do not use the functions when the
engine is off.
Control screen
AC
Page 354 of 516
3545-6. Using the other interior features
The HomeLink® wireless control sys-
tem in your vehicle has 3 buttons which
can be programmed to operate 3 dif-
ferent devices. Refer to the program-
ming methods on the following pages
to determine the method which is
appropriate for the device. HomeLink
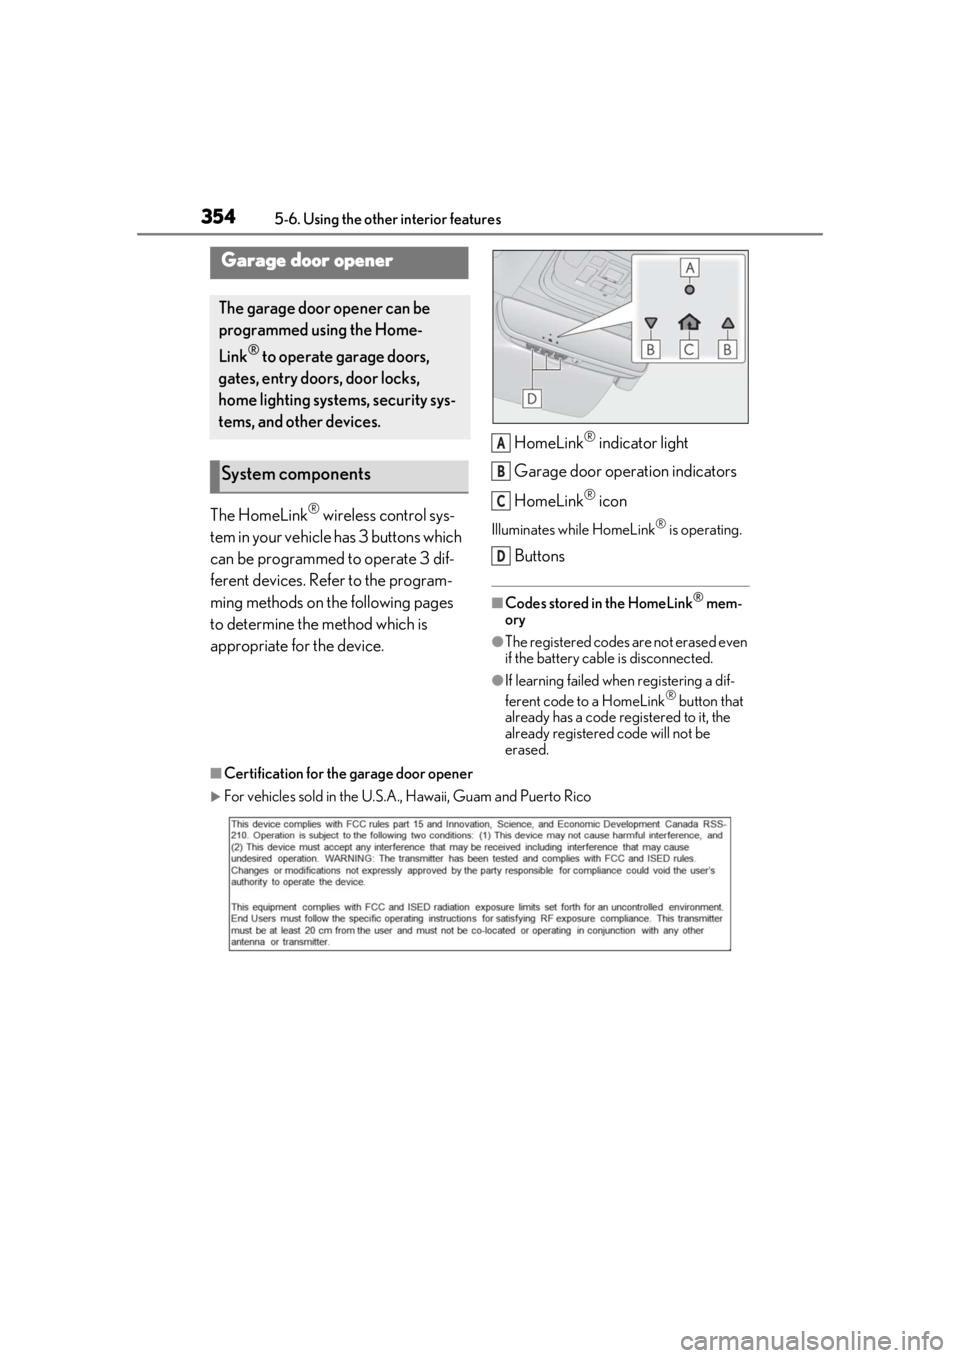
® indicator light
Garage door operation indicators
HomeLink
® icon
Illuminates while HomeLink® is operating.
Buttons
■Codes stored in the HomeLink® mem-
ory
●The registered codes are not erased even
if the battery cable is disconnected.
●If learning failed when registering a dif-
ferent code to a HomeLink® button that
already has a code registered to it, the
already registered code will not be
erased.
■Certification for the garage door opener
For vehicles sold in the U.S.A. , Hawaii, Guam and Puerto Rico
Garage door opener
The garage door opener can be
programmed using the Home-
Link
® to operate garage doors,
gates, entry doors, door locks,
home lighting systems, security sys-
tems, and other devices.
System components
A
B
C
D
Page 355 of 516
3555-6. Using the other interior features
5
Interior features
For vehicles sold in Canada
■When support is necessary
Visit on the web at
www.homelink.com/lexus
or call
1-800-355-3515.
■Before programming HomeLink®
During programming, it is possible
that garage doors, gates, or other
devices may operate. For this rea-
son, make sure that people and
objects are clear of the garage door
or other devices to prevent injury or
other potential harm.
It is recommended that a new bat-
tery be placed in the remote control
transmitter for more accurate pro-
gramming.
Garage door opener motors manu-
factured after 1995 may be
equipped with rolling code protec-
tion. If this is the case, you may need
WARNING
■When programming a garage door or
other remote control device
The garage door or other device may
operate, so ensure people and objects
are out of danger to prevent potential
harm.
■Conforming to federal safety stan-
dards
Do not use the HomeLink
® compatible
transceiver with any garage door opener
or device that lacks safety stop and
reverse features as required by federal
safety standards.
This includes any garage door that can-
not detect an interfering object. A door
or device without these features
increases the risk of death or serious
injury.
■When operating or programming
HomeLink®
Never allow a child to operate or play
with the HomeLink® buttons.
Programming the HomeLink®