audio LEXUS LS500H 2020 Owners Manual
[x] Cancel search | Manufacturer: LEXUS, Model Year: 2020, Model line: LS500H, Model: LEXUS LS500H 2020Pages: 516, PDF Size: 10.38 MB
Page 15 of 516

15Pictorial index
Applying/releasing the parking brake.......................................................................P.176
Precautions for winter season .....................................................................................P.304
Warning buzzer/messages.......................................................................................... P.429
Turn signal lever ...................................................................................................... P.175
Headlight switch..................................................................................................... P.180
Headlights/parking lights/tail lights/license plate lig hts/daytime running lights
............................................................................................................................... .................... P.180
AHB (Automatic High Beam)...................................................................................... P.183
Windshield wiper and washer switch ................................................................P.185
Usage.......................................................................................................................... ............ P.185
Adding washer fluid .........................................................................................................P.3 84
Warning messages .......................................................................................................... P.429
Emergency flasher switch ....................................................................................P.410
Hood lock release lever ....................................................................................... P.375
Tilt and telescopic steering contro l switch................................ .................... .. P.139
Adjustment ..................................................................................................................... ...... P.139
Driving position memory ................................................................................................ P.130
Air conditioning system ........................................................................................ P.317
Usage.......................................................................................................................... .............P.317
Rear window defogger.....................................................................................................P.317
Audio system
*
Brake hold switch .................................................................................................... P.178
Trunk opener main switch ..................................................................................... P.110
*: Refer to “NAVIGATION AND MULTIMEDIA SYSTEM OWNER’S MANUAL”.
F
G
H
I
J
K
L
M
N
Page 18 of 516

18Pictorial index
Phone switch*
LTA (Lane Tracing Assist) switch ......................................................................P.226
Vehicle-to-vehicle distance switch ..................................................................P.244
Cruise control switches ........................................................................................ P.241
Audio remote control switches
*
Talk switch*
*
: Refer to “NAVIGATION AND MULTIMEDIA SYSTEM OWNER’S MANUAL”.
Remote Touch
*1..................................................................................................... P.308
Seat switch ................................................................................................................P.12 0
Rear sunshade switch
*2...................................................................................... P.352
Vehicle height adjustment switch
*2.................................................................P.294
P position switch ....................................................................................................... P.171
*1: Refer to “NAVIGATION AND MULTIMEDIA SYSTEM OWNER’S MANUAL”.
*2: If equipped
C
D
E
F
G
H
A
B
C
D
E
Page 81 of 516

812-1. Instrument cluster
2
Vehicle status information and indicators
Main meter moved to the right
By selecting menu icons on the
multi-information display, a variety of
driving-related information can be dis-
played. The multi-information display
can also be used to change display set-
tings and other vehicle settings.
Warning or suggestion/advice pop-up
displays are also displayed in certain
situations.
■Menu icons
The menu icons will be displayed by
pressing or of the meter con-
trol switch.
F SPORT models: The menu icons can be
displayed when the main meter is moved to
the right.
■Liquid crystal display
Small spots or light spots may appear on the
display. This phenomen on is characteristic
of liquid crystal disp lays, and there is no
problem continuing to use the display.
The multi-information display is oper-
ated using the meter control switches.
Driving information display
( P.82)
Navigation syst em-linked dis-
play (if equipped) ( P.84)
Audio system-linked display
( P.85)
Driving support system infor-
mation display ( P.85)
Warning message display
( P.429)
Settings display ( P.85)
WARNING
■Caution for use while driving
●When operating the multi-information
display while driving, pay extra atten-
tion to the safety of the area around the
vehicle.
●Do not look continuously at the
multi-information display while driving
as you may fail to see pedestrians,
objects on the road, etc. ahead of the
vehicle.
■The information display at low tem-
peratures
P.74, 78
Changing the meter display
Page 85 of 516
852-1. Instrument cluster
2
Vehicle status information and indicators
tion system-linked information.
Route guidance to destination
Compass display (heading-up dis-
play)
■Route guidance to destination display
When the route guidance to destination
display is enabled on the head-up display, it
will not be displayed on the multi-informa-
tion display. ( P.89)
Select to enable selection of an audio
source or track on the meter using the
meter control switches.
Select to display the operational status
of the following systems:
LTA (Lane Tracing Assist) ( P.226)
Dynamic radar cruise control with
full-speed range ( P.241)
RSA (Road Sign Assist) (if
equipped) ( P.238)
■Meter display settings that can be
changed
Language
Select to change th e language displayed.
Units
Select to change the units of measure dis-
played.
Speedometer display (except F
SPORT models)
Select to set the display of the speedome-
ter to digital/analog/both digital and ana-
log.
Drive information 1/Drive informa-
tion 2
Select to select up to 2 items ( P.82) that
will be displayed on each Drive information
screen (Drive information 1 screen and
Drive information 2 sc reen) respectively.
Clock
Select to switch between 12-hour display
and 24-hour display.
Pop-up display
Select to enable/disable pop-up displays
for each relevant system.
Accent color
Select to change the accent color on the
screen, such as the cursor color.
Rev indicator (F SPORT models)
• Select to enable/disable the rev indica-
tor.
• Select to set the engine speed at which the rev indicator (amber) will begin to be
displayed.
Rev peak (F SPORT models)
Select to enable/disable the rev peak.
Eco Driving Indicator Light
Select to enable/disable the Eco Driving
Indicator Light.
Default setting
Select to reset the meter display settings to
the default setting.
■Vehicle functions and settings that
can be changed
P.470
Audio system-linked display
Driving support system informa-
tion display
Settings display
Page 89 of 516
892-1. Instrument cluster
2
Vehicle status information and indicators
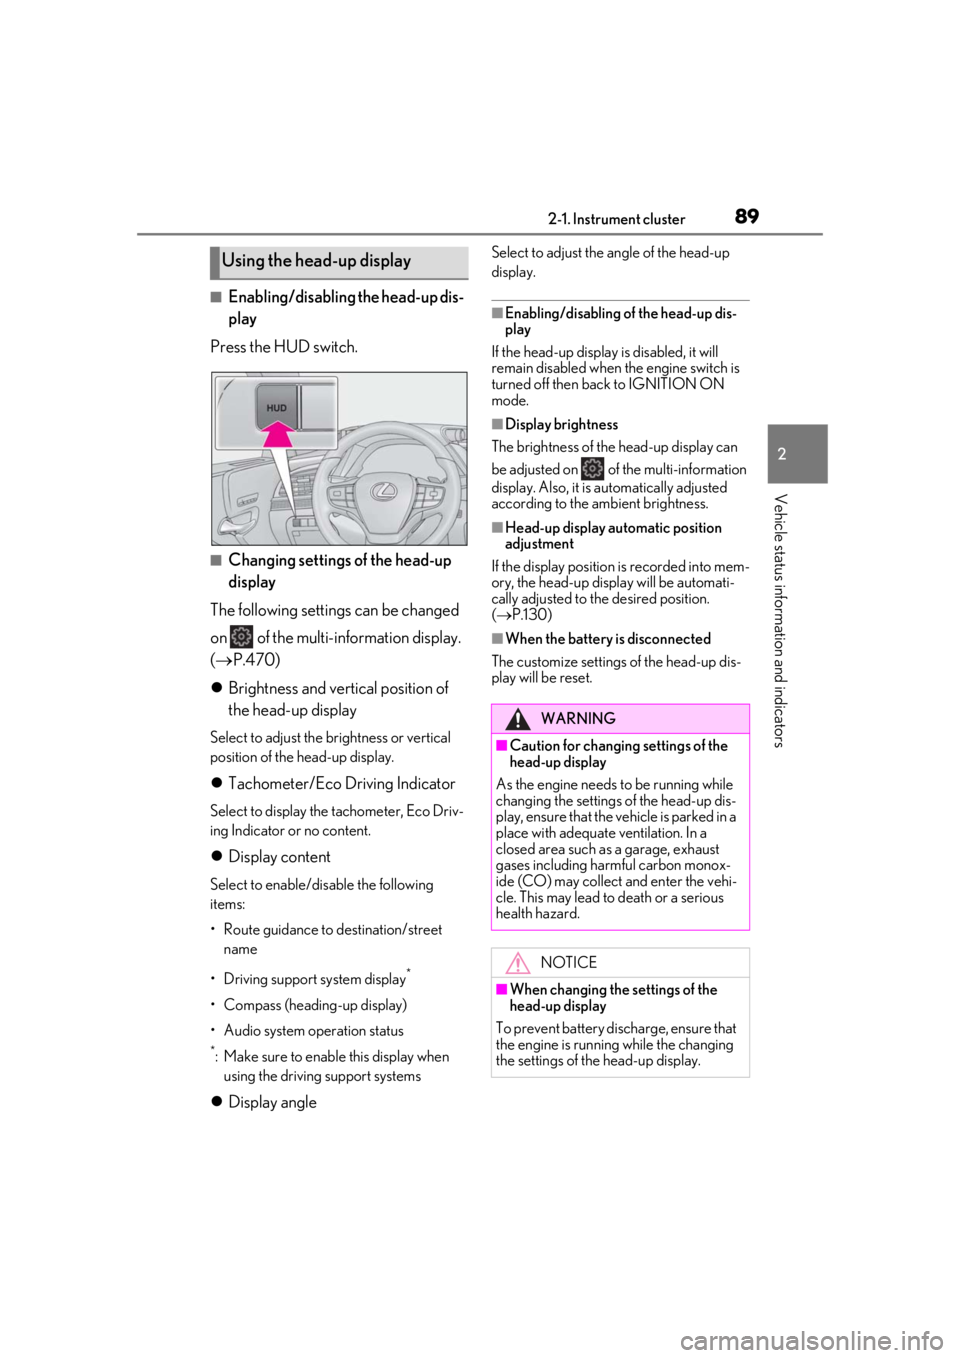
■Enabling/disabling the head-up dis-
play
Press the HUD switch.
■Changing settings of the head-up
display
The following settings can be changed
on of the multi-information display.
( P.470)
Brightness and vertical position of
the head-up display
Select to adjust the brightness or vertical
position of the head-up display.
Tachometer/Eco Driving Indicator
Select to display the tachometer, Eco Driv-
ing Indicator or no content.
Display content
Select to enable/dis able the following
items:
• Route guidance to destination/street
name
• Driving support system display
*
• Compass (heading-up display)
• Audio system operation status
*: Make sure to enable this display when using the driving support systems
Display angle
Select to adjust the angle of the head-up
display.
■Enabling/disabling of the head-up dis-
play
If the head-up display is disabled, it will
remain disabled when the engine switch is
turned off then back to IGNITION ON
mode.
■Display brightness
The brightness of the head-up display can
be adjusted on of the multi-information
display. Also, it is automatically adjusted
according to the ambient brightness.
■Head-up display automatic position
adjustment
If the display position is recorded into mem-
ory, the head-up display will be automati-
cally adjusted to th e desired position.
( P.130)
■When the battery is disconnected
The customize settings of the head-up dis-
play will be reset.
Using the head-up display
WARNING
■Caution for changing settings of the
head-up display
As the engine needs to be running while
changing the settings of the head-up dis-
play, ensure that the vehicle is parked in a
place with adequate ventilation. In a
closed area such as a garage, exhaust
gases including harmful carbon monox-
ide (CO) may collect and enter the vehi-
cle. This may lead to death or a serious
health hazard.
NOTICE
■When changing the settings of the
head-up display
To prevent battery discharge, ensure that
the engine is running while the changing
the settings of the head-up display.
Page 90 of 516
902-1. Instrument cluster
Displays the operational status of the
following systems:
LTA (Lane Tracing Assist) ( P.226)
Dynamic radar cruise control with
full-speed range ( P.241)
Details of content displayed on the
head-up display may differ from that dis-
played on the multi-information display. For
details, refer to the explanation of each sys-
tem.
Pop-up displays for the following sys-
tems will be displayed when necessary.
■Driving support systems
Displays a warning/suggestion/advice
message or the operating state of a rel-
evant system.
PCS (Pre-Collision System)
( P.205, 216)
FCTA (Front Cross Traffic Alert) (if
equipped) ( P.223)
Intuitive parking assist (if equipped)
( P.259)
Parking Support Brake function (for
static objects) (if equipped)
( P.279)
Brake Override System ( P.155)
Drive-Start Control ( P.155)
Details of content displayed on the
head-up display may differ from that dis-
played on the multi-information display. For
details, refer to the explanation of each sys-
tem.
■/ icons
These icons are linked to the
multi-information display
: Master warning icon
Displayed when a warn ing message is dis-
played on the multi-information display.
( P.429)
: Information icon
Displayed when a suggestion pop-up dis-
play ( P.86) or advice pop-up display is
displayed on the multi-information display.
■Warning message
Some warning messages are displayed
when necessary, according to certain
conditions.
Details of content displayed on the
head-up display may differ from that dis-
played on the multi-information display.
■Audio system operation status
Displayed when an audio remote con-
trol switch on the steering wheel is
operated.
■Hands-free system status
Displayed when the hands-free system
is operated.
■When a pop-up display is displayed
When a pop-up display is displayed, a cur-
rent display may no long er be displayed. In
this case, the display will return after the
pop-up display disappears.
■Tachometer
Displays the engine speed in revolu-
Driving support system display
area
Pop-up display
Tachometer/Eco Driving Indica-
tor
Page 97 of 516
973-1. Key information
3
Before driving
●To reduce key battery depletion when the
electronic key is to not be used for long
periods of time, set the electronic key to
the battery-saving mode. (P.113)
●As the electronic ke y always receives
radio waves, the battery will become
depleted even if the electronic key is not
used. The following symptoms indicate
that the electronic key battery may be
depleted. Replace the battery when nec-
essary.
• The smart access system with push-but- ton start or the wireless remote control
does not operate.
• The detection area becomes smaller.
• The LED indicator on the key surface does not turn on.
●To avoid serious deterioration, do not
leave the electronic key within 3 ft. (1 m)
of the following electr ical appliances that
produce a magnetic field:
• TVs
• Personal computers
• Cellular phones, cordless phones and battery chargers
• Recharging cellular phones or cordless phones
• Table lamps
• Induction cookers
■Replacing the battery
P.403
■Confirmation of the number of regis-
tered keys
The number of keys already registered to
the vehicle can be confirmed. Ask your
Lexus dealer for details.
■If “A New Key has been Registered
Contact Your Dealer for Details” is
shown on the multi-information display
This message will be displayed each time
the driver’s door is opened when the doors
are unlocked from the outside for approxi-
mately 10 days after a new electronic key
has been registered.
If this message is disp layed but you have not
had a new electronic key registered, ask
your Lexus dealer to check if an unknown
electronic key (other than those in your
possession) has been registered. NOTICE
■To prevent key damage
●Do not drop the keys, subject them to
strong shocks or bend them.
●Do not expose the keys to high tem-
peratures for a long period of time.
●Do not get the keys wet or wash them
in an ultrasonic washer etc.
●Do not attach metallic or magnetic
materials to the keys or place the keys
close to such materials.
●Do not disassemble the keys.
●Do not attach a sticker or anything else
to the surface of the electronic key.
●Do not place the keys near objects that
produce magnetic fields, such as TVs,
audio systems and induction cookers,
or medical electrical equipment, such
as low-frequency therapy equipment.
■Carrying the electronic key on your
person
Carry the electronic key 3.9 in. (10 cm)
or more away from electric appliances
that are turned on. Radio waves emitted
from electric applianc es within 3.9 in. (10
cm) of the electronic key may interfere
with the key, causing the key to not func-
tion properly.
■In case of a smart access system with
push-button start malfunction or
other key-related problems
P.437
■When an electronic key is lost
P.436
■Handling the card key (if equipped)
●Do not apply excess force when insert-
ing the mechanical key into the card
key. Doing so may damage the card
key.
Page 113 of 516
1133-2. Opening, closing and locking the doors and trunk
3
Before driving
take some time to unlock the doors.
• The electronic key has been left in an area of approximately 6 ft. (2 m) of the
outside of the vehicle for 10 minutes or
longer.
• The smart access system with push-but-
ton start has not been used for 5 days or
longer.
●If the smart access system with push-but-
ton start has not been used for 14 days or
longer, the doors cannot be unlocked at
any doors except the driver’s door. In this
case, take hold of the driver’s door han-
dle, or use the wireless remote control or
the mechanical key, to unlock the doors.
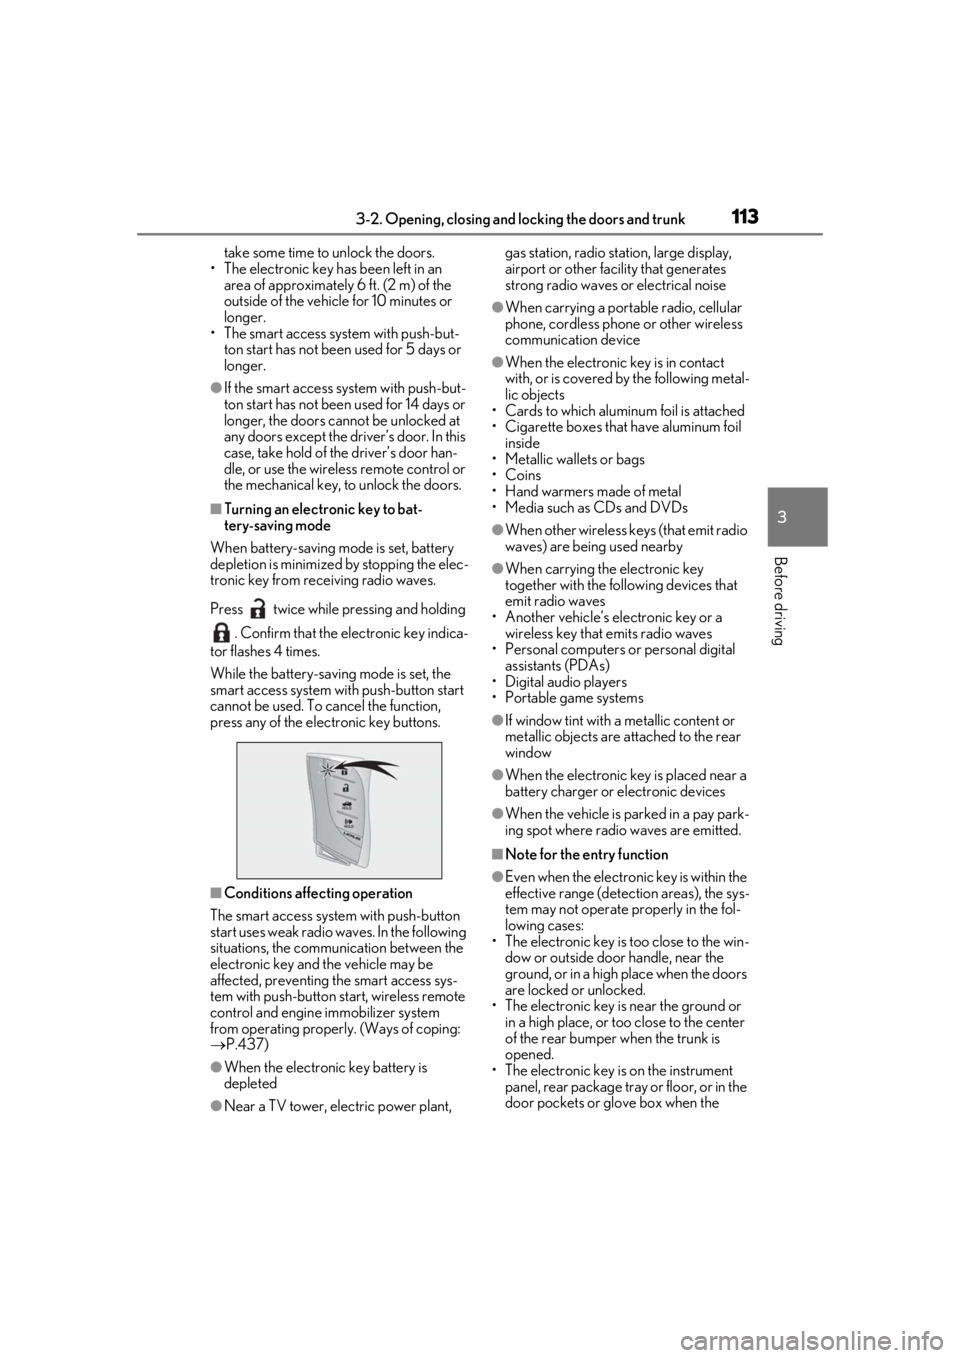
■Turning an electronic key to bat-
tery-saving mode
When battery-saving mode is set, battery
depletion is minimized by stopping the elec-
tronic key from re ceiving radio waves.
Press twice while pressing and holding . Confirm that the electronic key indica-
tor flashes 4 times.
While the battery-saving mode is set, the
smart access system with push-button start
cannot be used. To cancel the function,
press any of the electronic key buttons.
■Conditions affe cting operation
The smart access system with push-button
start uses weak radio waves. In the following
situations, the communication between the
electronic key and the vehicle may be
affected, preventing the smart access sys-
tem with push-button start, wireless remote
control and engine immobilizer system
from operating properly. (Ways of coping:
P.437)
●When the electronic key battery is
depleted
●Near a TV tower, electric power plant, gas station, radio stat
ion, large display,
airport or other fac ility that generates
strong radio waves or electrical noise
●When carrying a portable radio, cellular
phone, cordless phone or other wireless
communication device
●When the electronic key is in contact
with, or is covered by the following metal-
lic objects
• Cards to which aluminum foil is attached
• Cigarette boxes that have aluminum foil
inside
• Metallic wallets or bags
•Coins
• Hand warmers made of metal
• Media such as CDs and DVDs
●When other wireless keys (that emit radio
waves) are being used nearby
●When carrying the electronic key
together with the following devices that
emit radio waves
• Another vehicle’s electronic key or a wireless key that emits radio waves
• Personal computers or personal digital assistants (PDAs)
• Digital audio players
• Portable game systems
●If window tint with a metallic content or
metallic objects are attached to the rear
window
●When the electronic key is placed near a
battery charger or electronic devices
●When the vehicle is parked in a pay park-
ing spot where radio waves are emitted.
■Note for the entry function
●Even when the electronic key is within the
effective range (detection areas), the sys-
tem may not operate properly in the fol-
lowing cases:
• The electronic key is too close to the win- dow or outside door handle, near the
ground, or in a high place when the doors
are locked or unlocked.
• The electronic key is near the ground or in a high place, or too close to the center
of the rear bumper when the trunk is
opened.
• The electronic key is on the instrument
panel, rear package tray or floor, or in the
door pockets or glove box when the
Page 168 of 516
1684-2. Driving procedures
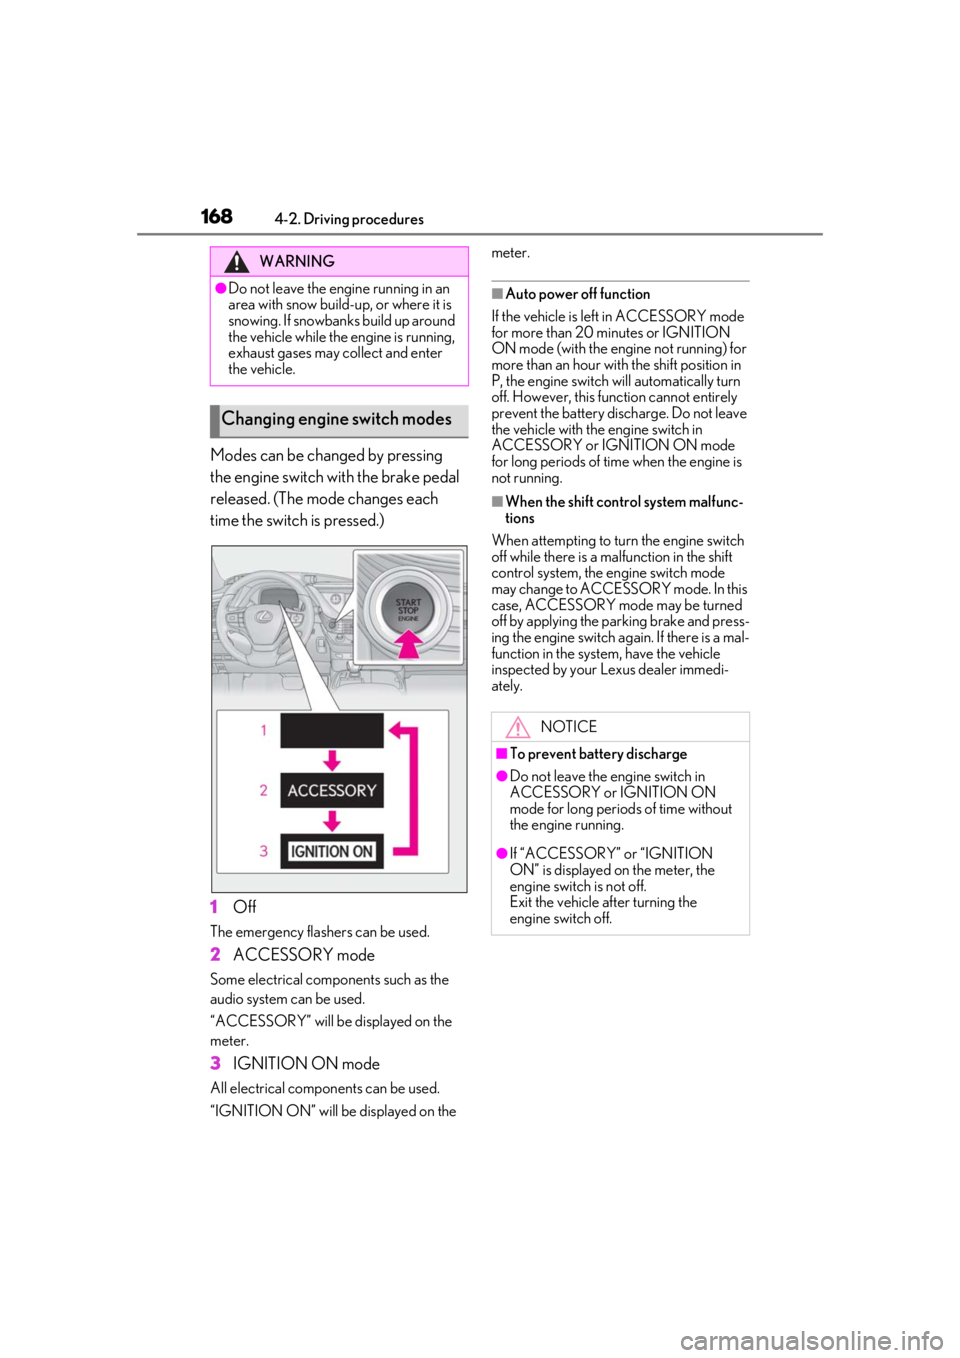
Modes can be changed by pressing
the engine switch with the brake pedal
released. (The mode changes each
time the switch is pressed.)
1
Off
The emergency flashers can be used.
2ACCESSORY mode
Some electrical components such as the
audio system can be used.
“ACCESSORY” will be displayed on the
meter.
3IGNITION ON mode
All electrical components can be used.
“IGNITION ON” will be displayed on the meter.
■Auto power off function
If the vehicle is left in ACCESSORY mode
for more than 20 minutes or IGNITION
ON mode (with the engine not running) for
more than an hour with the shift position in
P, the engine switch will automatically turn
off. However, this function cannot entirely
prevent the battery discharge. Do not leave
the vehicle with the engine switch in
ACCESSORY or IGNITION ON mode
for long periods of time when the engine is
not running.
■When the shift control system malfunc-
tions
When attempting to turn the engine switch
off while there is a ma lfunction in the shift
control system, the engine switch mode
may change to ACCESSO RY mode. In this
case, ACCESSORY mode may be turned
off by applying the parking brake and press-
ing the engine switch again. If there is a mal-
function in the system, have the vehicle
inspected by your Lexus dealer immedi-
ately.
WARNING
●Do not leave the engine running in an
area with snow build-up, or where it is
snowing. If snowbanks build up around
the vehicle while the engine is running,
exhaust gases may collect and enter
the vehicle.
Changing engine switch modes
NOTICE
■To prevent battery discharge
●Do not leave the engine switch in
ACCESSORY or IGNITION ON
mode for long periods of time without
the engine running.
●If “ACCESSORY” or “IGNITION
ON” is displayed on the meter, the
engine switch is not off.
Exit the vehicle after turning the
engine switch off.
Page 236 of 516
2364-5. Using the driving support systems
• ABS, VSC, TRAC and PCS are not oper-ating.
• TRAC or VSC is not turned off.
• Hands off steering wheel warning is not
displayed. ( P.237)
• The dynamic radar cruise control with
full-speed range approach warning is not
operating.
• The lane departure alert function is not
operating.
• The curve speed reduction function ( P.247) is not operating.
■Temporary cancelation of functions
●When operation conditions are no longer
met, a function may be temporarily can-
celed. However, when the operation con-
ditions are met again, operation of the
function is automa tically restored.
( P.234)
●If the operation conditions ( P.234) are
no longer met while the lane centering
function is operating, the steering wheel
may vibrate and the buzzer may sound to
indicate that the function has been tem-
porarily canceled. However, if the “Alert”
customization setting is set to ,
the system will notify the driver by vibrat-
ing the steering wheel instead of sound-
ing the buzzer.
●If the operating conditions ( P.234) are
no longer met, the lane change assist
function will be canceled. (vehicles with
Lexus Safety System + A)
If a message urging operation of the steer-
ing wheel is displayed, operate the steering
wheel.
■Steering assist function/lane centering
function
●Depending on the vehicle speed, lane
departure situation, road conditions, etc.,
the driver may not feel the function is
operating or the function may not oper-
ate at all.
●Even if the curve speed reduction func-
tion ( P.247) operates, the lane center-
ing function may not be able to drive the
vehicle around a curve successfully.
(vehicles with Lexus Safety System + A)
●The steering control of the function is
overridden by the driver’s steering wheel operation.
●When the vehicle speed is approximately
31 mph (50 km/h) or less, the warning
display of the lane ce
ntering function will
not operate.
●Do not attempt to test the operation of
the steering assist function.
●The steering assist function may operate
when attempting to cut closely in front of
another vehicle while changing lanes.
■Lane departure alert function
●The warning buzzer may be difficult to
hear due to external noise, audio play-
back, etc. Also, it may be difficult to feel
steering wheel vibrations due to the road
conditions, etc.
●If the edge of the course* is not clear or
straight, the lane departure alert function
may not operate.
●Vehicle with BSM: It may not be possible
for the system to determine if there is a
danger of a collision with a vehicle in an
adjacent lane.
●Do not attempt to test the operation of
the lane departure alert function.
●This function may operate if, when chang-
ing lanes, your vehicle cuts closely in front
of another vehicle.
*: Boundary between asphalt and the side
of the road, such as grass, soil, or a curb
■Lane change assist function (vehicles
with Lexus Safety System + A)
Depending on the vehicle speed, vehicle
condition, road conditions, or conditions of
the area around the vehicle, the lane
change assist function may not operate or it
may be difficult to recognize that it has
operated.
If steering control oper ation is excessive or
insufficient, it can be corrected by the
driver’s operation of the steering wheel.
In situations such as the following, the lane
change assist function may be canceled:
●When the system no longer detects white
(yellow) lane lines
●When the turn signal lever is operated
fully (right/left turn position)