LEXUS LX570 2015 Repair Manual
LX570 2015
LEXUS
LEXUS
https://www.carmanualsonline.info/img/36/58938/w960_58938-0.png
LEXUS LX570 2015 Repair Manual
Page 786 of 960
7844-3. Do-it-yourself maintenance
LX570_OM_OM60L96U_(U) Electronic key battery Replace the battery with a ne w one if it is discharged.
■ You will need the following items:
● Flathead screwdriver (T o prevent damage to the key, cover the
tip of the screwdriver with rag.)
● Small Phillips-head screwdriver
● Lithium battery (CR1632)
■ Replacing the battery
Take out the mechanical key
( P. 31).
Remove the cover.
Remove the depleted battery. Insert a new battery with the “+”
terminal facing up.STEP 1
STEP 2
STEP 3
Page 787 of 960

7854-3. Do-it-yourself maintenance
4
Maintenance and care
LX570_OM_OM60L96U_(U) ■
If the electronic key battery is discharged
The following symptoms may occur. ●
The smart access system with push-butto n start and wireless remote control will
not function properly. ●
The operational range is reduced.■
Use a CR1632 lithium battery ●
Batteries can be purchased at your Lexus dealer, jewelers, or camera stores. ●
Replace only with the same or equiva lent type recommend ed by your Lexus
dealer. ●
Dispose of used batteries according to the local laws.■
When the card key battery needs to be replaced
The battery for the card key is available on ly at Lexus dealer. Your Lexus dealer can
replace the battery for you.
CAUTION■
Removed battery and other parts
These parts are small and if swallowed by a child, they can cause choking. Keep
away from children. Failure to do so co uld result in death or serious injury.
NOTICE■
For normal operation after replacing the battery
Observe the following precautions to prevent accidents. ●
Always work with dry hands.
Moisture may cause the battery to rust. ●
Do not touch or move any other comp onents inside the electronic key.●
Do not bend the battery terminals.
Page 788 of 960
7864-3. Do-it-yourself maintenance
LX570_OM_OM60L96U_(U) Checking and replacing fuses If any of the electrical components do not operate, a fuse may have blown.
If this happens, check and re place the fuses as necessary.
Turn the “ENGINE START STOP” switch OFF.
Remove the engine compartment cover
P. 752
The fuses are located in the fo llowing places. To check the
fuses, follow the instructions below.
Engine compartm ent (fuse box on the left side)
Push the tab in and lift the lid off.
Engine compartm ent (fuse box on the right side)
Push the tabs in and lift the lid
off.STEP 1
STEP 2
STEP 3
Page 789 of 960
7874-3. Do-it-yourself maintenance
4
Maintenance and care
LX570_OM_OM60L96U_(U) Driver’s side instrument panel
Remove the bolts and the cover.
Remove the lid.
Page 790 of 960
7884-3. Do-it-yourself maintenance
LX570_OM_OM60L96U_(U) Passenger’s side instrument panel
Remove the cover.
Remove the lid.
After a system failure, see “Fuse layout and amperage ratings”
( P. 791) for details about which fuse to check.
Remove the fuse with the pull-
out tool.STEP 4
STEP 5
Page 791 of 960
7894-3. Do-it-yourself maintenance
4
Maintenance and care
LX570_OM_OM60L96U_(U) Check if the fuse has blown.
Type A and B
Normal fuse
Blown fuse Replace it with one of an appro-
priate amperage rating. The
amperage rating can be found
on the fuse box lid.STEP 6
Type A
Type B
Page 792 of 960
7904-3. Do-it-yourself maintenance
LX570_OM_OM60L96U_(U) Type C and D
Normal fuse
Blown fuse Contact your Lexus dealer.Type C
Type D
Page 793 of 960
7914-3. Do-it-yourself maintenance
4
Maintenance and care
LX570_OM_OM60L96U_(U) Fuse layout and amperage ratings
■ Engine compartment (fuse box on the left side)
Fuse Ampere Circuit
1 A/F 15 A A/F heater
2 HORN 10 A Horn
3 EFI MAIN 25 A Multiport fuel injection system/
sequential multiport fuel injection sys-
tem, A/F heater, fuel pump
4 IG2 MAIN 30 A INJ, IGN, MET
5 RR A/C 50 A Blower controller
6 CDS FAN 25 A Condenser fan
7 RR S/HTR 20 A Rear seat heater
8 FR FOG 15 A Front fog lights
9 STOP 15 A Stoplights, high mounted stoplight,
brake controller, ABS, VSC, main
body ECU, Multiport fuel injection
system/sequential multiport fuel injec-
tion system, trailer
Page 794 of 960
7924-3. Do-it-yourself maintenance
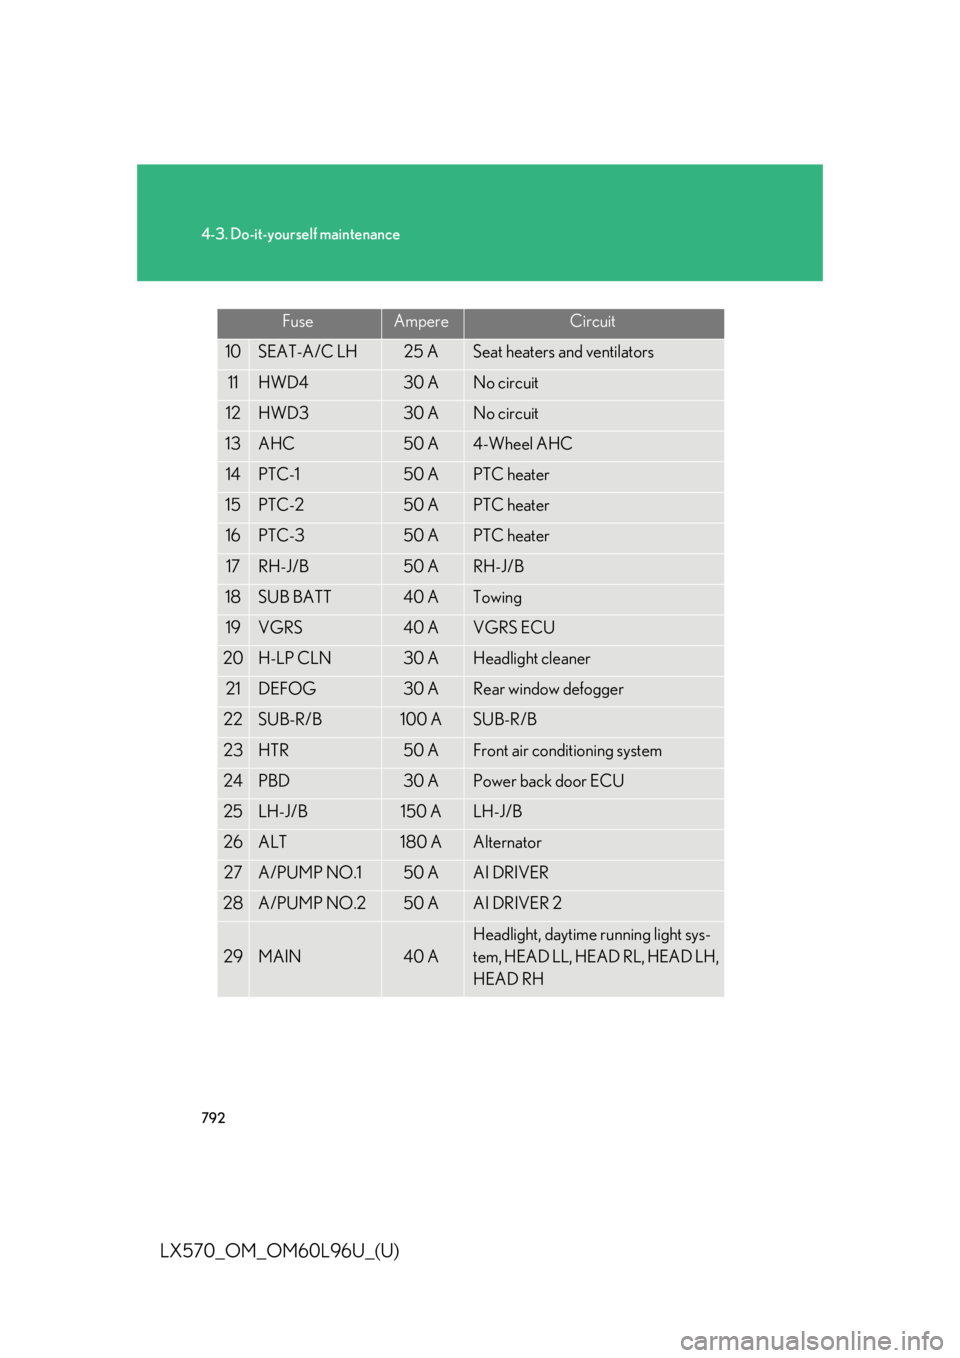
LX570_OM_OM60L96U_(U) 10 SEAT-A/C LH 25 A Seat heaters and ventilators
11 HWD4 30 A No circuit
12 HWD3 30 A No circuit
13 AHC 50 A 4-Wheel AHC
14 PTC-1 50 A PTC heater
15 PTC-2 50 A PTC heater
16 PTC-3 50 A PTC heater
17 RH-J/B 50 A RH-J/B
18 SUB BATT 40 A Towing
19 VGRS 40 A VGRS ECU
20 H-LP CLN 30 A Headlight cleaner
21 DEFOG 30 A Rear window defogger
22 SUB-R/B 100 A SUB-R/B
23 HTR 50 A Front air conditioning system
24 PBD 30 A Power back door ECU
25 LH-J/B 150 A LH-J/B
26 ALT 180 A Alternator
27 A/PUMP NO.1 50 A AI DRIVER
28 A/PUMP NO.2 50 A AI DRIVER 2
29 MAIN 40 A Headlight, daytime running light sys-
tem, HEAD LL, HEAD RL, HEAD LH,
HEAD RHFuse Ampere Circuit
Page 795 of 960
7934-3. Do-it-yourself maintenance
4
Maintenance and care
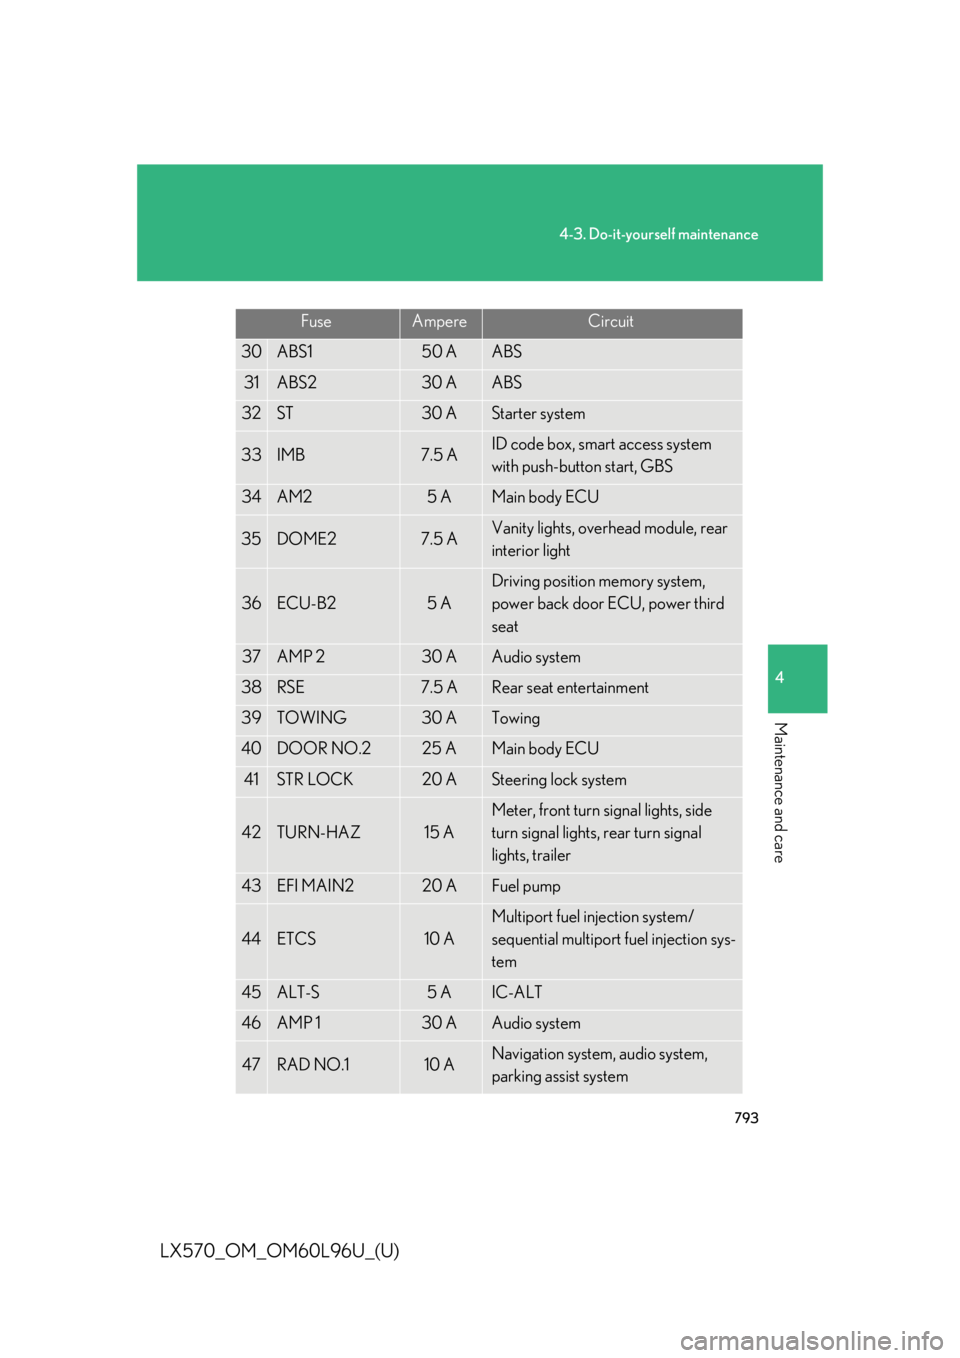
LX570_OM_OM60L96U_(U) 30 ABS1 50 A ABS
31 ABS2 30 A ABS
32 ST 30 A Starter system
33 IMB 7.5 A ID code box, smart access system
with push-button start, GBS
34 AM2 5 A Main body ECU
35 DOME2 7.5 A Vanity lights, overhead module, rear
interior light
36 ECU-B2 5 A Driving position memory system,
power back door ECU, power third
seat
37 AMP 2 30 A Audio system
38 RSE 7.5 A Rear seat entertainment
39 TOWING 30 A Towing
40 DOOR NO.2 25 A Main body ECU
41 STR LOCK 20 A Steering lock system
42 TURN-HAZ 15 A Meter, front turn signal lights, side
turn signal lights, rear turn signal
lights, trailer
43 EFI MAIN2 20 A Fuel pump
44 ETCS 10 A Multiport fuel injection system/
sequential multiport fuel injection sys-
tem
45 ALT-S 5 A IC-ALT
46 AMP 1 30 A Audio system
47 RAD NO.1 10 A Navigation system, audio system,
parking assist systemFuse Ampere Circuit