set LEXUS NX200T 2016 Owner's Guide
[x] Cancel search | Manufacturer: LEXUS, Model Year: 2016, Model line: NX200T, Model: LEXUS NX200T 2016Pages: 660, PDF Size: 9.96 MB
Page 135 of 660

1353-2. Opening, closing and locking the doors
3
Operation of each component
NX200t_OM_USA_OM78081U
●A sudden approach to the effective range or door handle may prevent the doors from
being unlocked. In this case, return the door handle to the original position and check
that the doors unlock before pulling the door handle again.
●If there is another electronic key in the detection area, it may take slightly longer to
unlock the doors after the door handle is gripped.
■When the vehicle is not driven for extended periods
●To prevent theft of the vehicle, do not leave the electronic key within 6 ft. (2 m) of the
vehicle.
●The smart access system with push-button start can be deactivated in advance.
( P. 6 1 6 )
■To operate the system properly
Make sure to carry the electronic key when operating the system. Do not get the elec-
tronic key too close to the vehicle when op erating the system from the outside of the
vehicle.
Depending on the position and holding condition of the electronic key, the key may not
be detected correctly and the system may not operate properly. (The alarm may go off
accidentally, or the door lock prevention may not operate.)
■If the smart access system with push-button start does not operate properly
●Locking and unlocking the doors: Use the mechanical key. (P. 5 76 )
●Starting the engine: P. 5 7 8
■Customization
Settings (e.g. smart access system with push-button start) can be changed.
(Customizable features: P. 6 1 4 )
■If the smart access system with push-butto n start has been deactivated in a customized
setting
●Locking and unlocking the doors:
Use the wireless remote control or mechanical key. ( P. 114, 576)
●Starting the engine and changing engine switch modes: P. 5 7 8
●Stopping the engine: P. 1 9 3
Page 143 of 660

1433-3. Adjusting the seats
3
Operation of each component
NX200t_OM_USA_OM78081U
■Reclining adjustment (power seat)
■Power seat operations (if equipped)
If the seat has a cover or seat cushion, it may not operate properly. Also, when folding
down the seat, check that there is nothing on the rear seat that would interfere with the
operation.
■Seatback jam protection function (power seat)
When folding down the seatback, if a foreig n object is perceived between the seatback
and seat cushion, the seatback will revers e operations and then stops operations.
The buzzer sounds intermitte ntly during reverse operations and sounds continuously
when operations are stopped. Stop the seatback partwa y. To set the seatback
to the rearmost position, press the button again.
WA R N I N G
■When folding the rear seatbacks down and after folded
Observe the following precautions.
Failure to do so may result in death or serious injury.
●Do not fold the seatbacks down while driving.
●Stop the vehicle on level ground, set the parking brake and shift the shift lever to P.
●Do not allow anyone to sit on a folded se atback or in the luggage compartment while
driving.
●Do not allow children to enter the luggage compartment.
■When operating the seatback
Observe the following precautions.
Failure to do so may cause death or serious injury.
●Keep other passengers from being hit with the seatback.
●Do not bring your hands close to the moving parts or between the seats, as well as do
not let any part of your body get caught.
●Vehicles with a power seat: Do not let children operate the seatback as other passen-
gers may get caught in seat.
●Vehicles with a power seat: Check that there are no passengers sitting in the seat
before folding that seat forward. Also, do le t other passengers sit in the seat while the
seat is forward folding.
Page 145 of 660

1453-3. Adjusting the seats
3
Operation of each component
NX200t_OM_USA_OM78081U
Driving position memory
The seat and steering wheel are automatically adjusted to allow the driver to
enter and exit the vehicle easily.
When all of the following have been
performed, the driver’s seat and steer-
ing wheel are automatically adjusted to
a position that allows driver to enter
and exit the
vehicle easily.
• The shift lever has been shifted to P.
• The engine switch has been turnedoff.
• The driver’s seat belt has been unfastened.
When any of the following has been perf ormed, the driver’s seat and steering
wheel automatically return to their original positions. • The engine switch has been turn ed to ACCESSORY mode or IGNITION
ON mode.
• The driver’s seat belt has been fastened.
■Operation of the power easy access system
When exiting the vehicle, the power easy acc ess system may not operate if the seat is
already close to the rearmost position, etc.
■Customization
The seat movement amount settings of the power easy access system can be custom-
ized. (Customizable features: P. 6 1 4 )
: If equipped
This feature automatically adjusts the fr ont seats, steering wheel and outside
rear view mirrors to make entering and ex iting the vehicle easier or to suit your
preferences.
Power easy access system
Page 146 of 660

1463-3. Adjusting the seats
NX200t_OM_USA_OM78081U
Your preferred driving position (the posi tion of the driver’s seat, steering wheel
and outside rear view mirrors) can be recorded and recalled by pressing a but-
ton.
Three different driving positions can be recorded into memory.
■Recording procedure
Check that the shift lever is in P.
Turn the engine switch to IGNITION ON mode.
Adjust the driver’s seat, steering wheel and outside rear view mirrors to the
desired positions.
While pressing the “SET” button,
or within 3 seconds after the
“SET” button is pressed, press
button “1”, “2” or “3” until the
buzzer sounds.
If the selected button has already
been preset, the previously recorded
position will be overwritten.
■Recall procedureCheck that the shift lever is in P.
Turn the engine switch to IGNITION ON mode.
Press one of the buttons for the
driving position you want to recall
until the buzzer sounds.
Driving position memory
1
2
3
4
1
2
3
Page 147 of 660

1473-3. Adjusting the seats
3
Operation of each component
NX200t_OM_USA_OM78081U
■To stop the position recall operation part-way through
Perform any of the following:
●Press the “SET” button.
●Press button “1”, “2” or “3”.
●Operate any of the seat adjustment switches (only cancels seat position recall).
●Operate the tilt and telescopic steering co ntrol switch (only cancels steering wheel
position recall).
■Seat positions that can be memorized ( P. 1 3 7 )
The adjusted positions other than the position adjusted by lumbar support switch can be
recorded.
■Operating the driving position memory after turning the engine switch off
Recorded seat positions can be activated up to 180 seconds after the driver’s door is
opened and another 60 seconds after it is closed again.
■In order to correctly use the dr iving position memory function
If a seat position is already in the furthest po ssible position and the seat is operated in the
same direction, the recorded position may be slightly different when it is recalled.
Each electronic key (including a card key) can be registered to recall your pre-
ferred driving position.
■Registering procedure
Record your driving position to button “1”, “2” or “3” before performing the
following:
Carry only the key you want to regist er, and then close the driver’s door.
If 2 or more keys are in the vehicle, the driving position cannot be recorded
properly.
Check that the shift lever is in P.
Turn the engine switch to IGNITION ON mode.
Recall the driving position that you want to record.
While pressing the recalled but-
ton, press and hold the door lock
switch (either lock or unlock) until
the buzzer sounds.
If the button could not be registered,
the buzzer sounds continuously for
approximately 3 seconds.
Memory recall function
1
2
3
4
Page 148 of 660

1483-3. Adjusting the seats
NX200t_OM_USA_OM78081U
■Recall procedure Carry the electronic key that has been registered to the driving position,
and then unlock and open the driver’s door using the smart access system
with push-button start or wireless remote control.
The driving position will move to the reco rded position (not including the steering
wheel). However, the seat will move to a po sition slightly behind the recorded posi-
tion in order to make entering the vehicle easier.
If the driving position is in a position th at has already been recorded, the seat and
outside rear view mirrors will not move.
Turn the engine switch to ACCESSORY mode or IGNITION ON mode,
or fasten a seat belt.
The seat and steering wheel will move to the recorded position.
■Cancelation procedure
Carry only the key you want to cancel and then close the driver’s door.
If 2 or more keys are in the vehicle, the driving position cannot be canceled
properly.
Turn the engine switch to IGNITION ON mode.
While pressing the “SET” button, press and hold the door lock switch
(either lock or unlock) unt il the buzzer sounds twice.
If it could not be canceled, the buzzer sounds continuously for approximately 3
seconds.
■Recalling the driving position using the memory recall function
●Different driving positions can be registered for each electronic key. Therefore, the
driving position that is recalled may be different depending on the key being carried.
●If a door other than the driver’s door is unlocked with the smart access system with
push-button start, the driving position cannot be recalled. In this case, press the driving
position button which has been set.
■Customization
The unlock door settings of the memory re call function can be customized. (Customiz-
able features: P. 6 1 4 )
WA R N I N G
■Seat adjustment caution
Take care during seat adjustment so that th e seat does not strike the rear passenger or
squeeze your body against the steering wheel.
1
2
1
2
Page 153 of 660
1533-4. Adjusting the steering wheel and mirrors
3
Operation of each component
NX200t_OM_USA_OM78081U
Inside rear view mirror
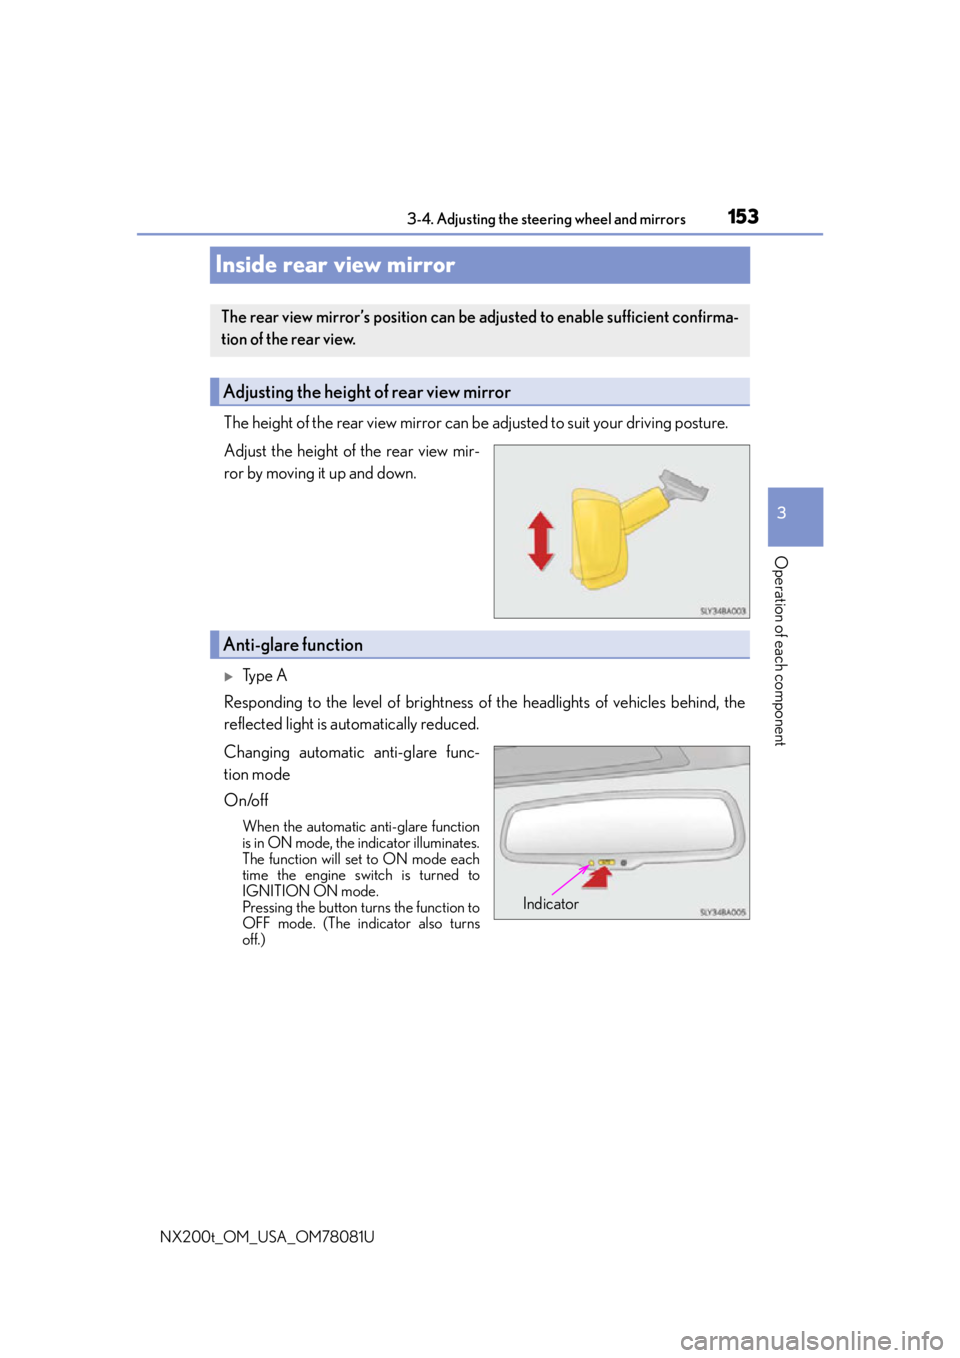
The height of the rear view mirror can be adjusted to suit your driving posture.
Adjust the height of the rear view mir-
ror by moving it up and down.
Ty p e A
Responding to the level of brightness of the headlights of vehicles behind, the
reflected light is automatically reduced.
Changing automatic anti-glare func-
tion mode
On/off
When the automatic anti-glare function
is in ON mode, the indicator illuminates.
The function will set to ON mode each
time the engine switch is turned to
IGNITION ON mode.
Pressing the button turns the function to
OFF mode. (The indicator also turns
off.)
The rear view mirror’s position can be adjusted to enable sufficient confirma-
tion of the rear view.
Adjusting the height of rear view mirror
Anti-glare function
Indicator
Page 154 of 660

1543-4. Adjusting the steering wheel and mirrors
NX200t_OM_USA_OM78081U
Ty p e B
Responding to the level of brightness of the headlights of vehicles behind, the
reflected light is automatically reduced.
Changing automatic anti-glare func-
tion mode
On/off
When the automatic anti-glare function
is in ON mode, the indicator illuminates.
The function will set to ON mode each
time the engine switch is turned to
IGNITION ON mode.
Pressing the button turns the function to
OFF mode. (The indicator also turns
off.)
■To prevent sensor error
Indicator
To ensure that the sens ors operate properly, do
not touch or cover them.Ty p e A
Ty p e B
WA R N I N G
Do not adjust the position of the mirror while driving.
Doing so may lead to mishandling of the vehicle and cause an accident, resulting in
death or serious injury.
Page 156 of 660

1563-4. Adjusting the steering wheel and mirrors
NX200t_OM_USA_OM78081U
When the mirror select switch is in the “L” or “R” position, the outside rear view
mirrors will automatically angle downwards when the vehicle is reversing in
order to give a better view of the ground.
To disable this function, move the mirror select switch to the neutral position
(between “L” or “R”)
■Adjusting the mirror angle when the vehicle is reversing
With the shift lever in R, adjust the mirror angle at a desired position.
The adjusted angle will be memorized and the mirror will automatically tilt to
the memorized angle whenever the shift lever is shifted to R from next time.
The memorized downward tilt position of the mirror is linked to the normal position
(angle adjusted with the shif t lever in other than R). Therefore, if the normal posi-
tion is changed after adjustment, th e tilt position will also change.
When the normal position is chang ed, readjust the angle in reversing.
■Mirror angle can be adjusted when
The engine switch is in ACCESSORY or IGNITION ON mode.
■When the mirrors are fogged up
The outside rear view mirrors can be cleare d using the mirror defoggers. Turn on the
rear window defogger to turn on the outside rear view mirror defoggers. ( P. 4 2 5 )
■Automatic adjustment of the mirror angle (vehicles with driving position memory)
A desired mirror face angle can be entered to memory and recalled automatically by the
driving position memory. ( P. 1 4 5 )
■Auto anti-glare function (if equipped)
When the anti-glare inside rear view mirror is set to automatic mode, the outside rear
view mirrors will activate in conjunction with the anti-glare inside rear view mirror to
reduce reflected light. ( P. 1 5 3 )
■ Linked mirror function when reversing (vehicles with driving position memory)
When used in cold weather du ring reverse driving, the door mirror could be frozen and
may not automatically point the mirror surface downward. In this event, remove any ice
and snow from the mirror surface.
Linked mirror function when reversi ng (vehicles with driving position
memory)
Page 159 of 660

1593-5. Opening, closing the windows and moon roof
3
Operation of each component
NX200t_OM_USA_OM78081U
■The power windows can be operated when
The engine switch is in IGNITION ON mode.
■Operating the power windows after turning the engine off
The power windows can be operated for approximately 45 seconds even after the
engine switch is turned to ACCESSORY mode or turned off. They cannot, however, be
operated once either front door is opened.
■Up jam protection function
If an object becomes caught between the window and the window frame, window travel
is stopped and the window is opened slightly.
■Down jam protection function
When the window is opening, if a foreign obje ct malfunction within the door causes it to
be clamped, the operation stops.
■When opening and closing the window cannot be done
When the up or down jam protection function operates unusually or the door window
cannot be fully opened and cl osed, perform the following op erations with the power win-
dow switch of that door.
●Stop the vehicle, with the engine switch in IGNITION ON mode, continually operate
the power window switch in the one-touch cl osing position within 4 seconds after the
up jam or down jam protection function was activated. Otherwise, by continually oper-
ating the power window switch in the one- touch opening position, the door window can
be opened and closed.
●If the door window cannot be opened and closed even when performing the above
operations, implement the following pr ocedure for function initialization.
Turn the engine switch to IGNITION ON mode.
Pull and hold the power window switch in the one-touch closing position and com-
pletely close the door window.
Release the power window switch for a moment and then resume pulling and hold-
ing the switch in the one-touch closin g position for approximately 4 seconds.
Press and hold the power window switch in the one-touch opening position and
after the door window is co mpletely opened, continue ho lding the switch for a fur-
ther 1 second or more.
Pull and hold the power window switch in the one-touch closing position, once
more, and after the door window is comple tely closed, continue holding the switch
for a further 1 second or more.
If you release the switch while the window is moving, start again from the beginning.
If the window reverses and cannot be closed or completely open, have the vehicle
inspected by your Lexus dealer.
■Door lock linked window operation
●The power windows can be opened an d closed using the mechanical key.* ( P. 577)
●The power windows can be opened us ing the wireless remote control.* (P. 114)
*: These settings must be customized at your Lexus dealer.
1
2
3
4
5