order LEXUS NX300 2020 Owners Manual
[x] Cancel search | Manufacturer: LEXUS, Model Year: 2020, Model line: NX300, Model: LEXUS NX300 2020Pages: 468, PDF Size: 10.24 MB
Page 7 of 468

7
LEXUS NX300 Owners Manual_USA_M78389_en
The recorded data varies according to
the vehicle grade level and options
with which it is equipped. These com-
puters do not record conversations or
sounds, and only record images out-
side of the vehicle in certain situations.
• Engine speed/Electric motor speed
(traction motor speed)
• Accelerator status
•Brake status
• Vehicle speed
• Operation status of the driving assist systems, such as the ABS and
pre-collision system
• Images from the front camera (avail- able only when certain safety sys-
tems are activated, which varies
depending on the vehicle specifica-
tions).
Data Transmission
Your vehicle may transmit the data
recorded in these computers to Lexus
without notification to you.
Data usage
Lexus may use the data recorded in this
computer to diagnose malfunctions, con-
duct research and development, and
improve quality.
Lexus will not disclose the recorded data to
a third party except:
• With the consent of the vehicle owner or with the consent of the lessee if the vehi-
cle is leased
• In response to an of ficial request by the
police, a court of law or a government
agency
• For use by Lexus in a lawsuit
• For research purposes where the data is not tied to a specific vehicle or vehicle owner
Recorded image information can be
erased by your Lexus dealer.
The image recording function can be dis-
abled. However, if the function is disabled,
data from when the pre-collision system
operates will not be available.
To learn more abou t the vehicle data
collected, used and shared by
Lexus, please visit
www.lexus.com/privacyvts/
.
If your Lexus has Lexus Enform and if
you have subscribed to those services,
please refer to the Lexus Enform
Telematics Subscription Service
Agreement for information on data
collected and its usage.
To learn more abou t the vehicle data
collected, used and shared by
Lexus, please visit
www.lexus.com/privacyvts/
.
This vehicle is equipped with an event
data recorder (EDR). The main pur-
pose of an EDR is to record, in certain
crash or near crash-like situations, such
as an air bag deployment or hitting a
road obstacle, data that will assist in
understanding how a vehicle’s systems
performed. The EDR is designed to
record data related to vehicle dynam-
ics and safety systems for a short
Usage of data collected through
Lexus Enform (U.S. mainland on-
ly)
Event data recorder
Page 10 of 468

10
LEXUS NX300 Owners Manual_USA_M78389_en
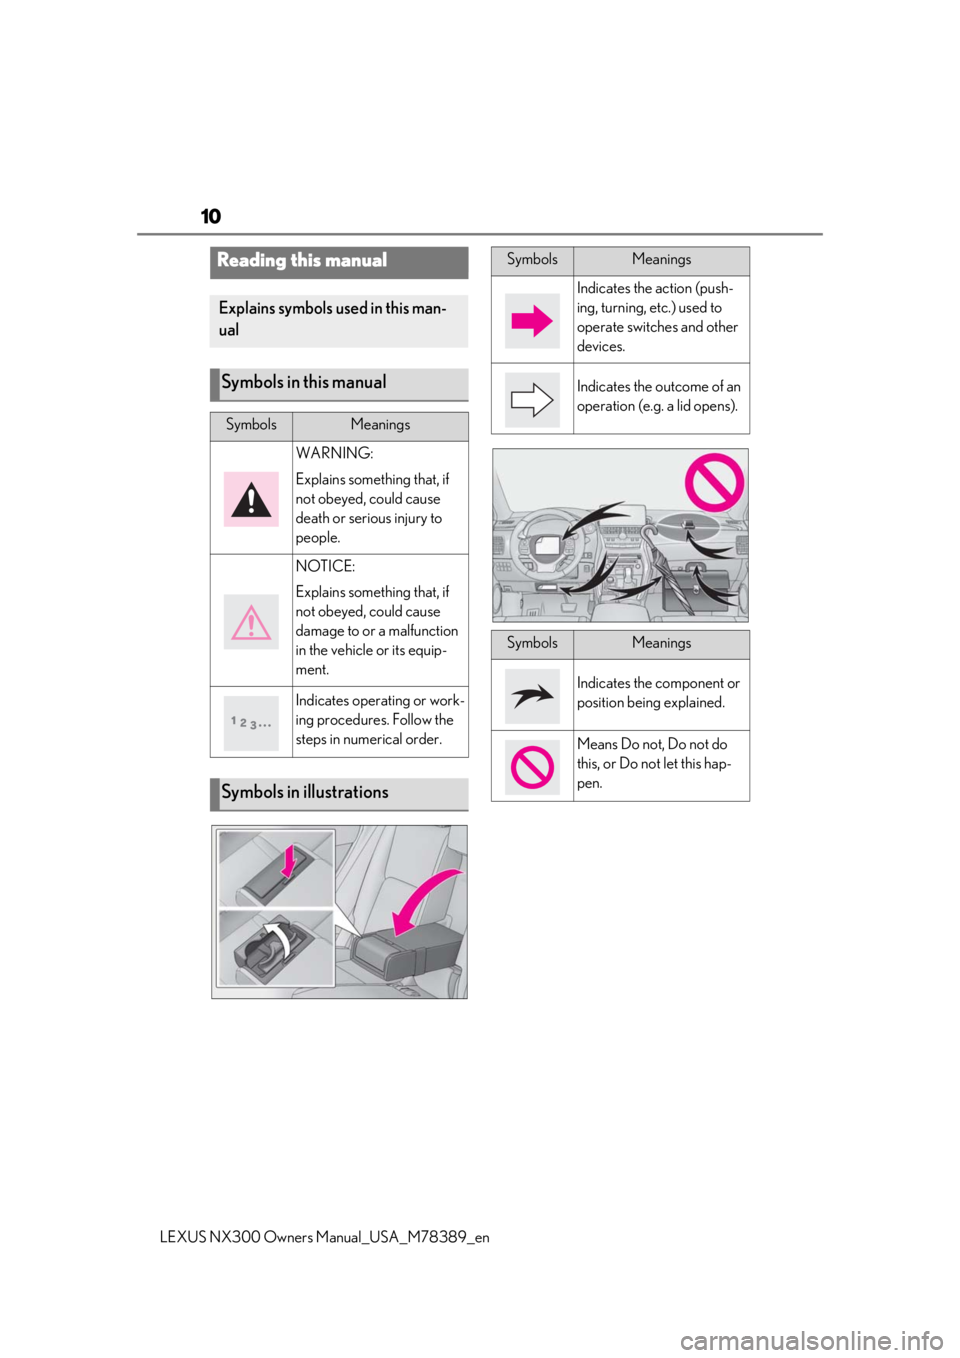
Reading this manual
Explains symbols used in this man-
ual
Symbols in this manual
SymbolsMeanings
WARNING:
Explains something that, if
not obeyed, could cause
death or serious injury to
people.
NOTICE:
Explains something that, if
not obeyed, could cause
damage to or a malfunction
in the vehicle or its equip-
ment.
Indicates operating or work-
ing procedures. Follow the
steps in numerical order.
Symbols in illustrations
SymbolsMeanings
Indicates the action (push-
ing, turning, etc.) used to
operate switches and other
devices.
Indicates the outcome of an
operation (e.g. a lid opens).
SymbolsMeanings
Indicates the component or
position being explained.
Means Do not, Do not do
this, or Do not let this hap-
pen.
Page 28 of 468

281-1. For safe use
LEXUS NX300 Owners Manual_USA_M78389_en
1To fasten the seat belt, push the
plate into the buckle until a click
sound is heard.
2
To release the seat belt, press the
release button .
■Emergency locking retractor (ELR)
The retractor will lock the belt during a sud-
den stop or on impact. It may also lock if you
lean forward too quickly. A slow, easy
motion will allow the belt to extend so that
you can move around fully.
■Automatic locking retractor (ALR)
When a passenger’s shoulder belt is com-
pletely extended and then retracted even
slightly, the belt is lock ed in that position and
cannot be extended. This feature is used to
hold the child restraint system (CRS) firmly.
To free the belt again, fully retract the belt
and then pull the belt out once more.
1Take out the plate.
Plate A
Plate B
2
When fixing the belt, in the order of
plate A and then plate B, insert the
WARNING
●The personalized extender may not be
safe on another vehicle, when used by
another person, or at a different seat-
ing position other than the one origi-
nally intended.
NOTICE
■When releasing a seat belt extender
Press on the buckle release button on the
extender, not on the seat belt, then,
release the extender from the seat belt
buckle.
This helps prevent damage to the vehicle
interior and the extender itself.
Fastening and releasing the seat
belt (except for the rear center
seat)
A
Fastening the seat belt (for the
rear center seat)
A
B
Page 29 of 468

291-1. For safe use
LEXUS NX300 Owners Manual_USA_M78389_en
1
For safety and security
plate into the buckle until a clicking
sound is heard.
Plate A
Plate B
Buckle 1
To release the hooked buckle, push
the buckle release button .
2
Insert the mechanical key ( P.96)
or plate B into the notch of buckle
and remove the belt.
Retract the belt slowly when releasing and
stowing the seat belt.
Mechanical key
Plate B
Buckle
3
Stow in the cover in the order of
plate B and then plate A.
In order to securely fix it, firmly insert it to
WARNING
■When using the rear center seat belt
Do not use the rear center seat belt with
either buckle released. Fastening only
one of the buckles may result in death or
serious injury in case of sudden braking
or a collision.
A
B
C
Releasing and stowing the seat
belt (for the rear center seat)
A
A
B
C
Page 45 of 468

451-1. For safe use
LEXUS NX300 Owners Manual_USA_M78389_en
1
For safety and security
WARNING
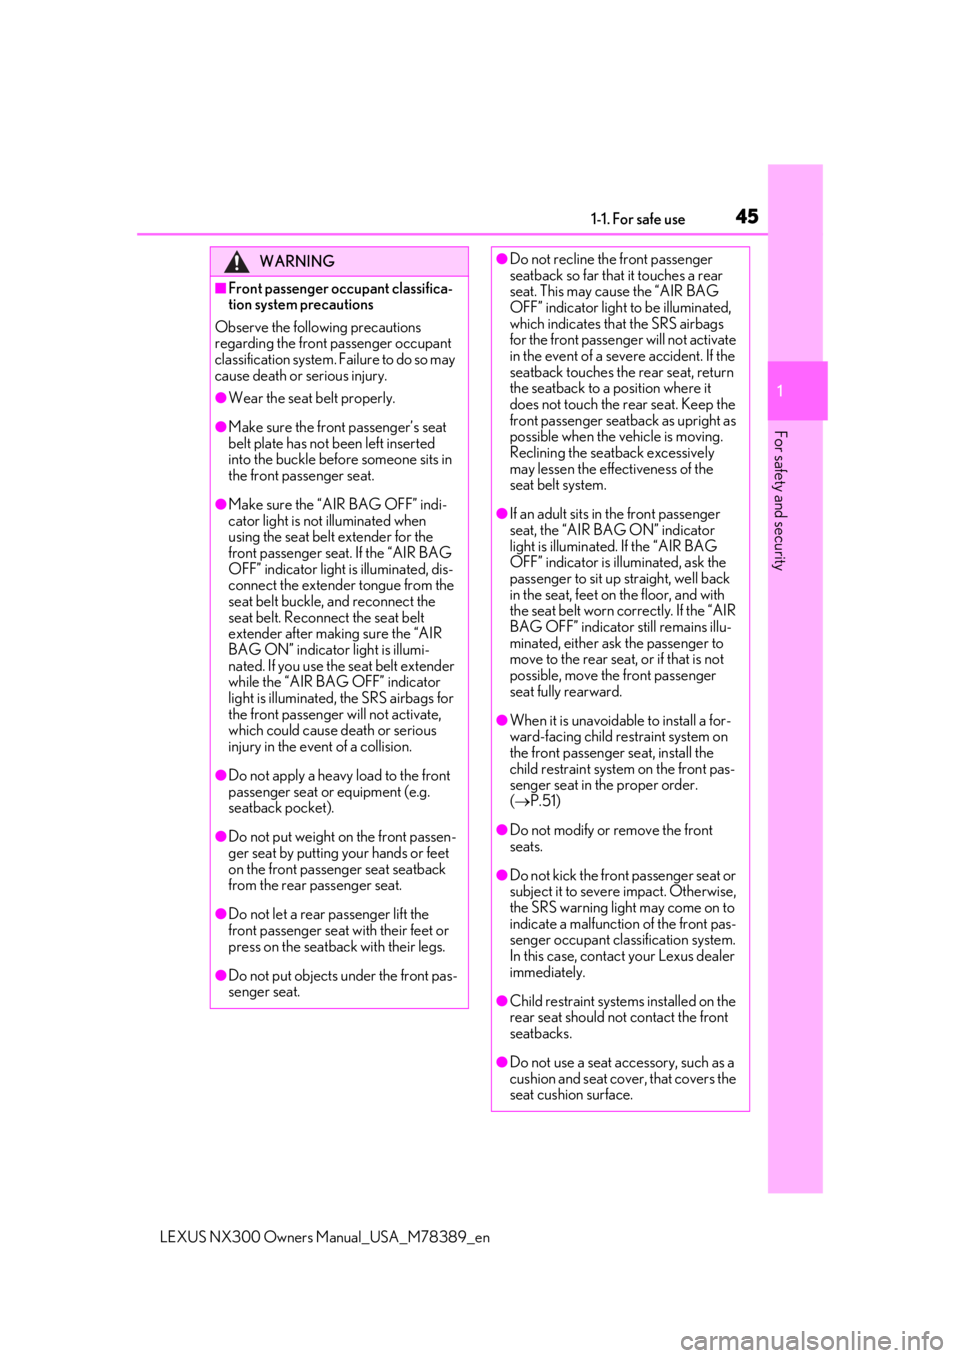
■Front passenger occupant classifica-
tion system precautions
Observe the following precautions
regarding the front passenger occupant
classification system. Failure to do so may
cause death or serious injury.
●Wear the seat belt properly.
●Make sure the fron t passenger’s seat
belt plate has not been left inserted
into the buckle before someone sits in
the front passenger seat.
●Make sure the “AIR BAG OFF” indi-
cator light is not illuminated when
using the seat belt extender for the
front passenger seat. If the “AIR BAG
OFF” indicator light is illuminated, dis-
connect the extender tongue from the
seat belt buckle, and reconnect the
seat belt. Reconnect the seat belt
extender after making sure the “AIR
BAG ON” indicator light is illumi-
nated. If you use the seat belt extender
while the “AIR BAG OFF” indicator
light is illuminated, the SRS airbags for
the front passenger will not activate,
which could cause death or serious
injury in the event of a collision.
●Do not apply a heavy load to the front
passenger seat or equipment (e.g.
seatback pocket).
●Do not put weight on the front passen-
ger seat by putting your hands or feet
on the front passenger seat seatback
from the rear passenger seat.
●Do not let a rear passenger lift the
front passenger seat with their feet or
press on the seatback with their legs.
●Do not put objects under the front pas-
senger seat.
●Do not recline the front passenger
seatback so far that it touches a rear
seat. This may cause the “AIR BAG
OFF” indicator light to be illuminated,
which indicates that the SRS airbags
for the front passenger will not activate
in the event of a severe accident. If the
seatback touches the rear seat, return
the seatback to a position where it
does not touch the rear seat. Keep the
front passenger seatback as upright as
possible when the vehicle is moving.
Reclining the seatback excessively
may lessen the effectiveness of the
seat belt system.
●If an adult sits in the front passenger
seat, the “AIR BAG ON” indicator
light is illuminated. If the “AIR BAG
OFF” indicator is illuminated, ask the
passenger to sit up straight, well back
in the seat, feet on the floor, and with
the seat belt worn co rrectly. If the “AIR
BAG OFF” indicator still remains illu-
minated, either ask the passenger to
move to the rear seat, or if that is not
possible, move the front passenger
seat fully rearward.
●When it is unavoidable to install a for-
ward-facing child restraint system on
the front passenger seat, install the
child restraint system on the front pas-
senger seat in the proper order.
( P.51)
●Do not modify or remove the front
seats.
●Do not kick the front passenger seat or
subject it to severe impact. Otherwise,
the SRS warning light may come on to
indicate a malfunction of the front pas-
senger occupant clas sification system.
In this case, contact your Lexus dealer
immediately.
●Child restraint systems installed on the
rear seat should not contact the front
seatbacks.
●Do not use a seat accessory, such as a
cushion and seat cover, that covers the
seat cushion surface.
Page 77 of 468

772-1. Instrument cluster
LEXUS NX300 Owners Manual_USA_M78389_en
2
Vehicle status information and indicators*1: These lights turn on when the engine
switch is turned to the IGNITION ON
mode to indicate that a system check is
being performed. They will turn off after
the engine is started, or after a few sec-
onds. There may be a malfunction in a
system if the lights do not turn on, or
turn off. Have the vehicle inspected by
your Lexus dealer.
*2: This light illuminates on the multi-infor-mation display.
*3: The light flashes to indicate that the sys-tem is operating.
*4: The light comes on when the system is turned off.
*5: When the outside temperature is approximately 37°F (3°C) or lower, the
indicator will flash for approximately 10
seconds, then stay on.
*6: In order to confirm operation, the BSM outside rear view mirror indicators illu-
minate in the following situations:
When the engine switch is turned to
IGNITION ON mode while the BSM
main switch is set to ON.
When the BSM main switch is set to
ON while the engine switch is in IGNI-
TION ON mode.
If the system is func tioning correctly, the
BSM outside rear view mirror indica-
tors will turn off after a few seconds.
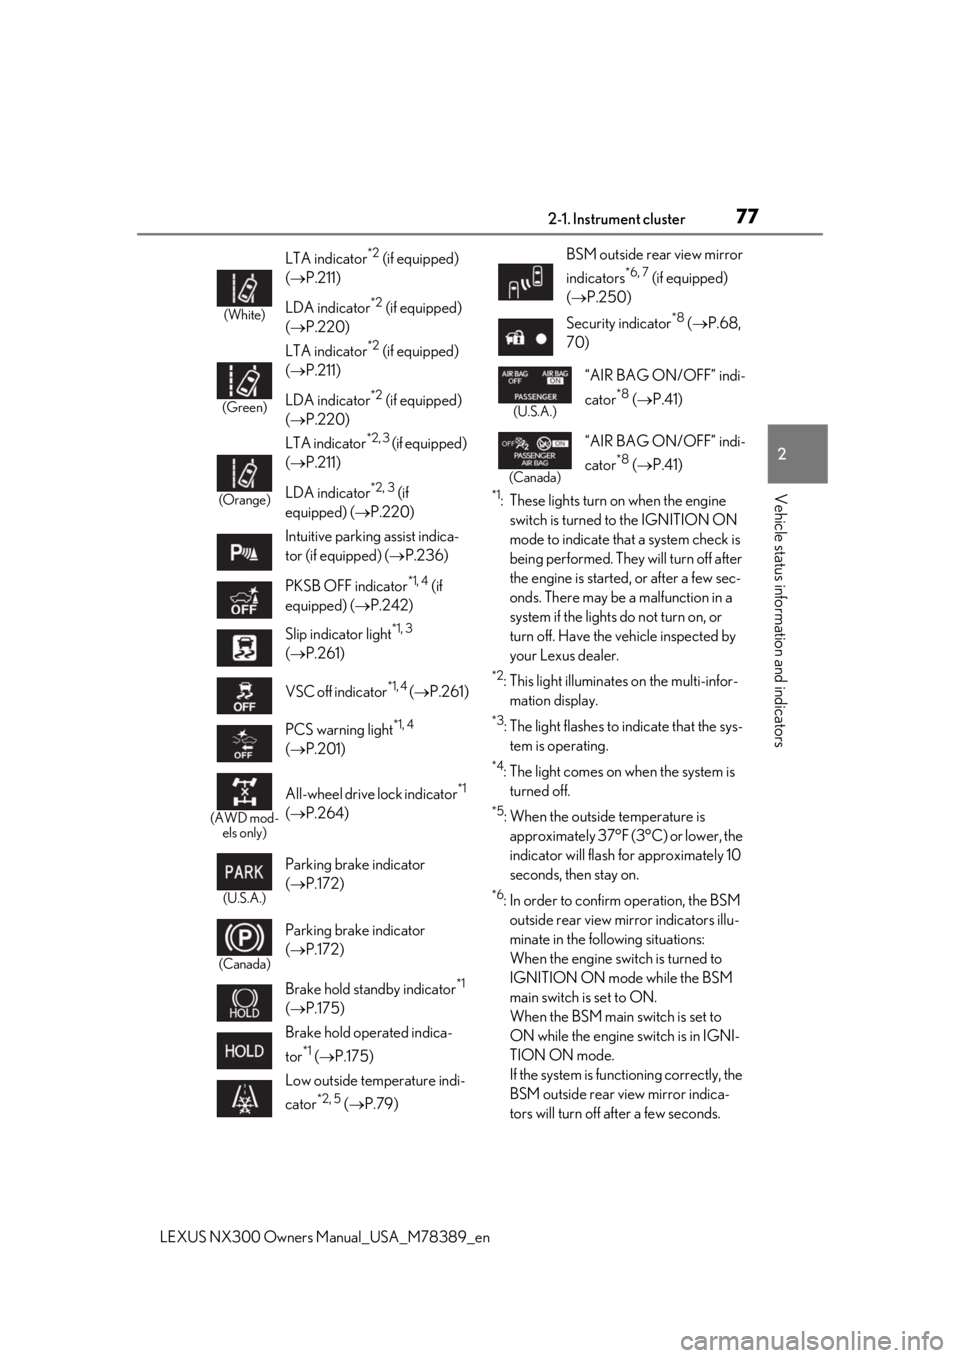
(White)
LTA indicator*2 (if equipped)
( P.211)
LDA indicator
*2 (if equipped)
( P.220)
(Green)
LTA indicator*2 (if equipped)
( P.211)
LDA indicator
*2 (if equipped)
( P.220)
(Orange)
LTA indicator*2, 3 (if equipped)
( P.211)
LDA indicator
*2, 3 (if
equipped) ( P.220)
Intuitive parking assist indica-
tor (if equipped) ( P.236)
PKSB OFF indicator
*1, 4 (if
equipped) ( P.242)
Slip indicator light
*1, 3
( P.261)
VSC off indicator
*1, 4 ( P.261)
PCS warning light
*1, 4
( P.201)
(AWD mod-
els only)
All-wheel drive lock indicator*1
( P.264)
(U.S.A.)
Parking brake indicator
( P.172)
(Canada)
Parking brake indicator
( P.172)
Brake hold standby indicator
*1
( P.175)
Brake hold operated indica-
tor
*1 ( P.175)
Low outside temperature indi-
cator
*2, 5 ( P.79)
BSM outside rear view mirror
indicators
*6, 7 (if equipped)
( P.250)
Security indicator
*8 ( P.68,
70)
(U.S.A.)
“AIR BAG ON/OFF” indi-
cator
*8 ( P.41)
(Canada)
“AIR BAG ON/OFF” indi-
cator
*8 ( P.41)
Page 117 of 468

1173-2. Opening, closing and locking the doors
LEXUS NX300 Owners Manual_USA_M78389_en
3
Before driving
■Effective range (areas within which the
electronic key is detected)
When locking or unlocking the doors
The system can be operated when the
electronic key is within about 2.3 ft. (0.7
m) of an outside door handle. (Only the
doors detecting the key can be oper-
ated.)
When starting the engine or changing
engine switch modes
The system can be operated when the
electronic key is inside the vehicle.
■If an alarm sounds or a warning message
is displayed
A combination of exterior and interior
alarms as well as warning messages shown
on the multi-information display are used to
prevent theft of the vehicle and accidents
resulting from erroneous operation. Take
appropriate measures in response to any
warning message on the multi-information
display. ( P.384)
When only an alarm sounds, circumstances
and correction procedures are as follows.
●When an exterior alarm sounds once for
5 seconds
●When an Interior alarm pings repeatedly
■When “Smart Access System Malfunc-
tion See Owner’s Manual” will be dis-
played on the multi-information display
The system may be ma lfunctioning. Have
the vehicle inspected by your Lexus dealer
immediately.
■Battery-saving function
The battery-saving function will be acti-
vated in order to prevent the electronic key
battery and the battery from being dis-
charged while the vehicle is not in operation
for a long time.
●In the following situations, the smart
access system with pu sh-button start may
take some time to unlock the doors.
• The electronic key has been left in an area of approximately 6 ft. (2 m) of the
outside of the vehicle for 10 minutes or
longer.
• The smart access system with push-but- ton start has not been used for 5 days or
longer.
●If the smart access system with push-but-
ton start has not been used for 14 days or
longer, the doors cann ot be unlocked at
any doors except the dr iver’s door. In this
case, take hold of the driver’s door han-
dle, or use the wireless remote control or
the mechanical key, to unlock the doors.
■Turning an electronic key to battery-
saving mode
When battery-saving mode is set, battery
depletion is minimized by stopping the elec-
SituationCorrection proce- dure
An attempt was
made to lock the
vehicle while a door was open.Close all of the
doors and lock the doors again.
A
B
SituationCorrection proce- dure
The engine switch was turned to
ACCESSORY mode while the
driver’s door was
open (The driver’s door was opened when the engine switch was in
ACCESSORY mode).
Turn the engine
switch off and close the driver’s door.
Page 129 of 468

1293-3. Adjusting the seats
LEXUS NX300 Owners Manual_USA_M78389_en
3
Before driving
will be overwritten.
■Seat positions that can be memorized
( P.122)
The adjusted positions other than the posi-
tion adjusted by lumbar support switch can
be recorded.
■In order to correctly use the driving
position memory function
If a seat position is already in the furthest
possible position and the seat is operated in
the same direction, the recorded position
may be slightly differen t when it is recalled.
1Check that the shift lever is in P.
2
Turn the engine switch to IGNI-
TION ON mode. 3
Press one of the buttons for the
driving position you want to recall
until the buzzer sounds.
■To stop the position recall operation
part-way through
Perform any of the following:
●Press the “SET” button.
●Press button “1”, “2” or “3”.
●Operate any of the seat adjustment
switches (only cancels seat position
recall).
●Operate the tilt and telescopic steering
control switch (onl y cancels steering
wheel position recall).
■Operating the driving position memory
after turning the engine switch off
Recorded seat positions can be activated
up to 180 seconds after the driver’s door is
opened and another 60 seconds after it is
closed again.
■Registering procedure
Record your driving position to button
“1”, “2” or “3” before performing the
following:
Carry only the key yo u want to register,
and then close the driver’s door.
If 2 or more keys are in the vehicle, the
WARNING
■Seat adjustment caution
Take care during seat adjustment so that
the seat does not strike the rear passen-
ger or squeeze your body against the
steering wheel.
Recalling a driving position
Registering/canceling/recall a
driving position to an electronic
key (memory recall function)
Page 130 of 468

1303-3. Adjusting the seats
LEXUS NX300 Owners Manual_USA_M78389_en
driving position cannot be recorded
properly.
1Check that the shift lever is in P.
2 Turn the engine switch to IGNI-
TION ON mode.
3 Recall the driving position that you
want to record.
4 While pressing the recalled button,
press and hold the door lock switch
(either lock or unlock) until the
buzzer sounds.
If the driving position could not be regis-
tered, the buzzer sounds continuously for
approximately 3 seconds.
■Cancelation procedure
1 Carry only the key you want to can-
cel and then close the driver’s door.
If 2 or more keys are in the vehicle, the
driving position cannot be canceled prop-
erly.
2Turn the engine switch to IGNI-
TIONON mode.
3 While pressing the “SET” button,
press and hold the door lock switch
(either lock or unlock) until the
buzzer sounds twice.
If it could not be canceled, the buzzer
sounds continuously for approximately 3
seconds.
■Recall procedure
1 Make sure that the doors are
locked before recalling the driving
position.Carry the electronic key
that has been registered to the driv-
ing position, and then unlock and
open the driver’s door using the
smart access system with push-but-
ton start or wireless remote control.
The driving position will move to the
recorded position (not including the steer-
ing wheel). However, th e seat will move to
a position slightly behind the recorded
position in order to make entering the vehi-
cle easier.
If the driving position is in a position that
has already been recorded, the seat and
outside rear view mirrors will not move.
2 Turn the engine switch to ACCES-
SORY mode or IGNITION ON
mode, or fasten a seat belt.
The seat and steering wheel will move to
the recorded position.
■Recalling the driving position using the
memory recall function
●Different driving positions can be regis-
tered for each electronic key. Therefore,
the driving position that is recalled may
be different depending on the key being
carried.
●If a door other than the driver’s door is
unlocked with the smart access system
with push-button start, the driving posi-
tion cannot be recalled. In this case, press
the driving position button which has
been set.
■Customization
The unlock door sett ings of the memory
recall function can be customized. (Cus-
tomizable features: P.427)
Page 137 of 468

1373-4. Adjusting the steering wheel and mirrors
LEXUS NX300 Owners Manual_USA_M78389_en
3
Before driving
the driving position memory. ( P.128)
■Linked mirror function when reversing
(vehicles with driving position memory)
When the mirror select switch is in the “L”
or “R” position, the outside rear view mir-
rors will automatically angle downwards
when the vehicle is reversing in order to
give a better view of the ground.
To disable this function, move the mirror
select switch to the neutral position
(between “L” or “R”)
With the shift lever in R, adjust the mirror
angle to a desired position to set the mirror
angle used when the vehicle is reversing.
The adjusted angle will be memorized and
the mirror will automatically tilt to the mem-
orized angle whenever the shift lever is
shifted to R from next time.
The memorized downward tilt position of
the mirror is linked to the normal position
(angle adjusted with th e shift lever in other
than R). Therefore, if the normal position is
changed after adjustment, the tilt position
will also change.
When the normal position is changed, read-
just the angle in reversing.
When used in cold weather, the door mirror
could be frozen and may not automatically
point the mirror surface downward. In this
event, remove any ice and snow from the
mirror surface.
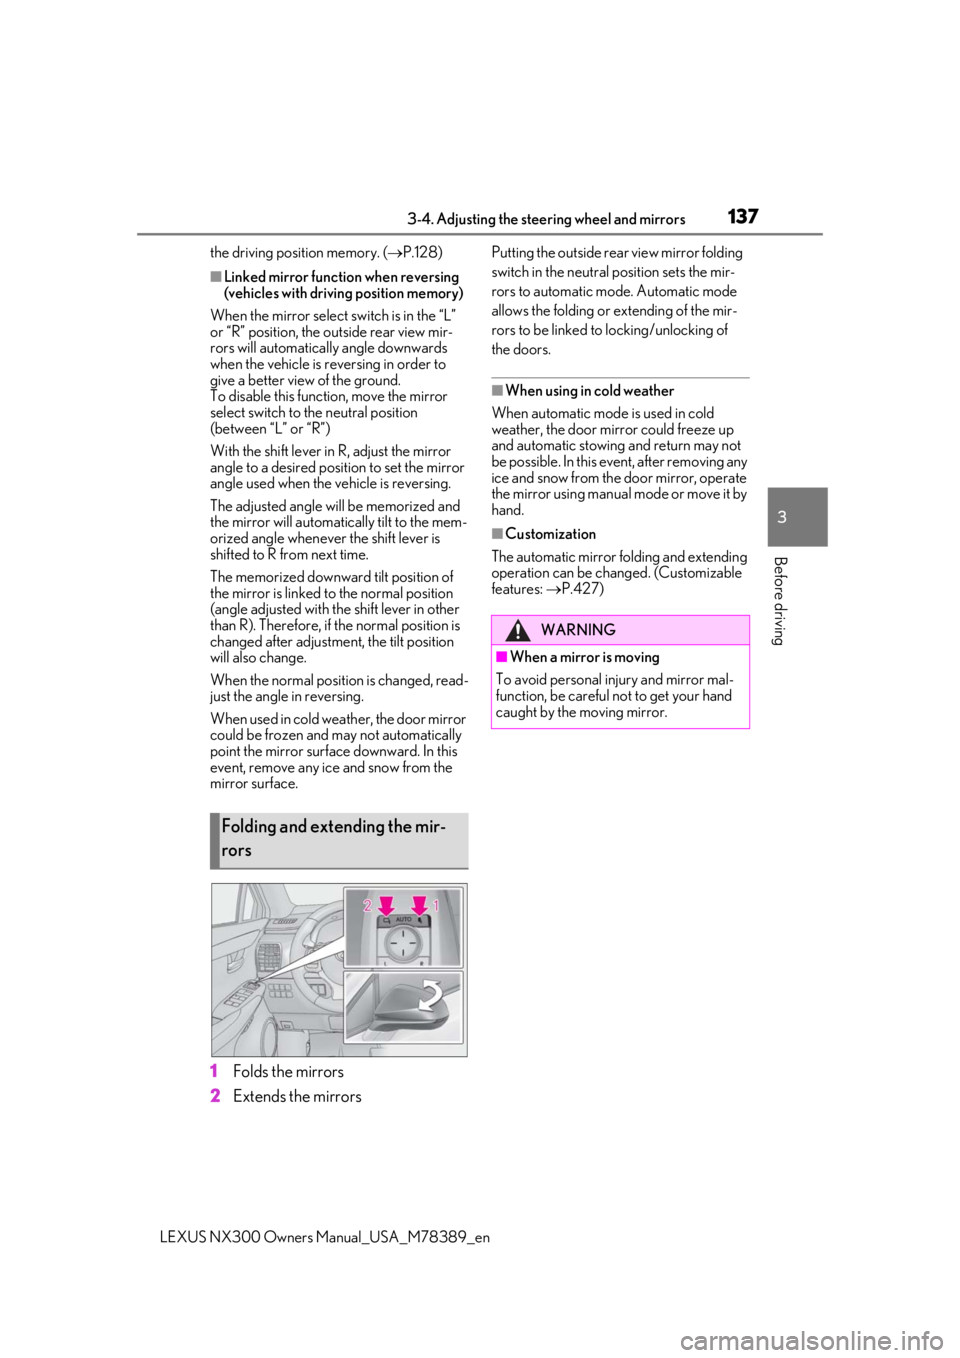
1Folds the mirrors
2
Extends the mirrors
Putting the outside rear view mirror folding
switch in the neutral position sets the mir-
rors to automatic mode. Automatic mode
allows the folding or extending of the mir-
rors to be linked to locking/unlocking of
the doors.
■When using in cold weather
When automatic mode is used in cold
weather, the door mirror could freeze up
and automatic stowing and return may not
be possible. In this event, after removing any
ice and snow from the door mirror, operate
the mirror using manual mode or move it by
hand.
■Customization
The automatic mirror folding and extending
operation can be changed. (Customizable
features: P.427)
Folding and extending the mir-
rors
WARNING
■When a mirror is moving
To avoid personal injury and mirror mal-
function, be careful not to get your hand
caught by the moving mirror.