reset LEXUS RC F 2017 Owner's Manual
[x] Cancel search | Manufacturer: LEXUS, Model Year: 2017, Model line: RC F, Model: LEXUS RC F 2017Pages: 724, PDF Size: 15.76 MB
Page 131 of 724
1312. Instrument cluster
2
Instrument cluster
Navigation system screen
Press the “MENU” button on the Remote Touch, then select “Info” on the
“Menu” screen, and then select “Fuel Consumption”.
If the “Past Record” screen is disp layed, select “Trip Information”.
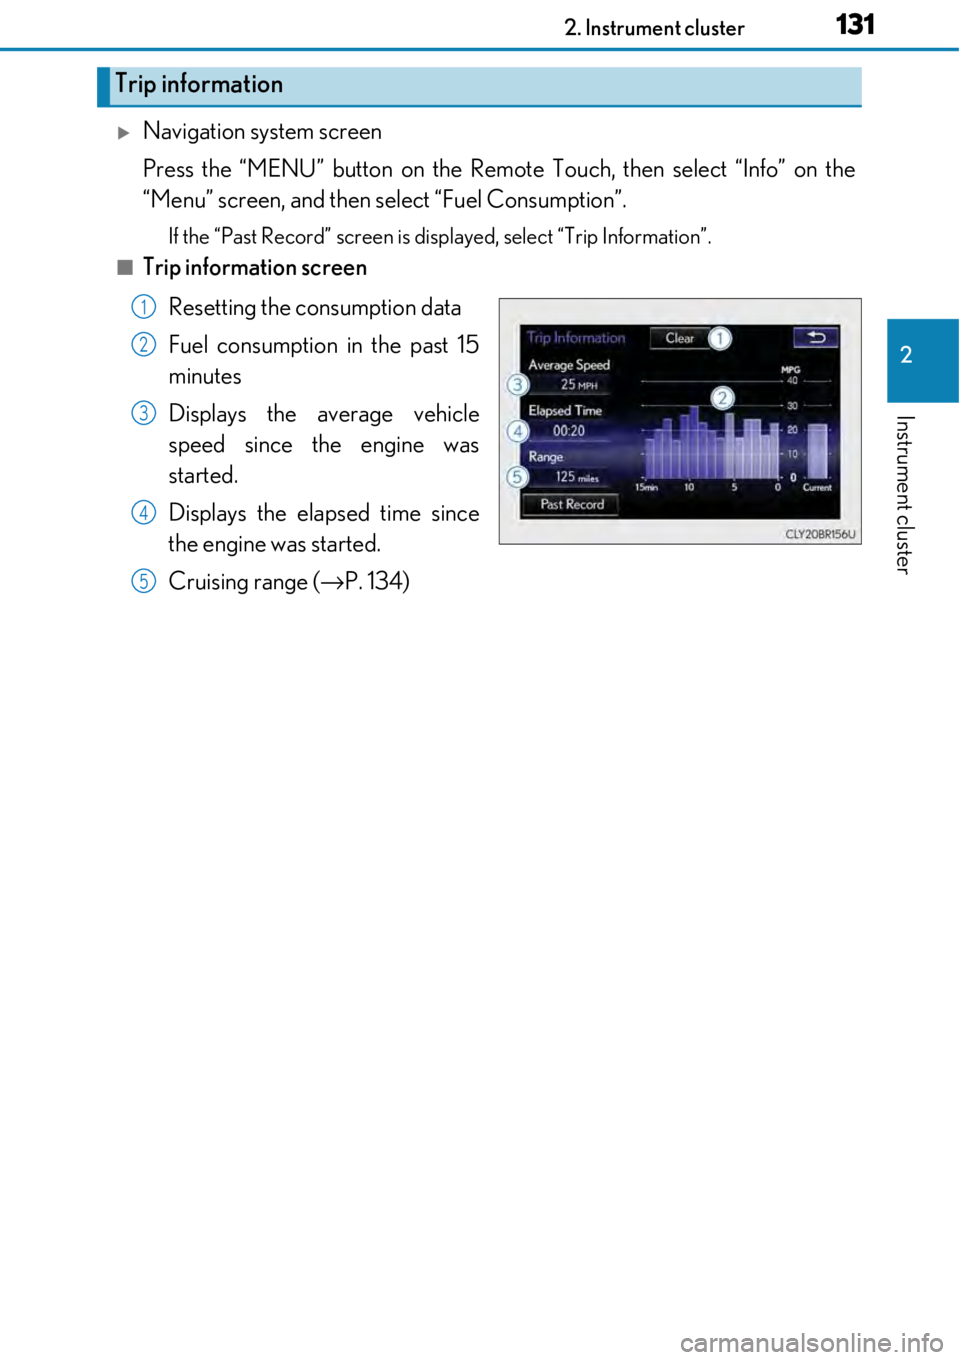
■Trip information screen
Resetting the consumption data
Fuel consumption in the past 15
minutes
Displays the average vehicle
speed since the engine was
started.
Displays the elapsed time since
the engine was started.
Cruising range ( →P. 134)
Trip information
1
2
3
4
5
Page 133 of 724
1332. Instrument cluster
2
Instrument cluster
Navigation system screen
Press the “MENU” button on the Remote Touch, then select “Info” on the
“Menu” screen, and then select “Fuel Consumption”.
If the “Trip Information” screen is displayed, select “Past Record”.
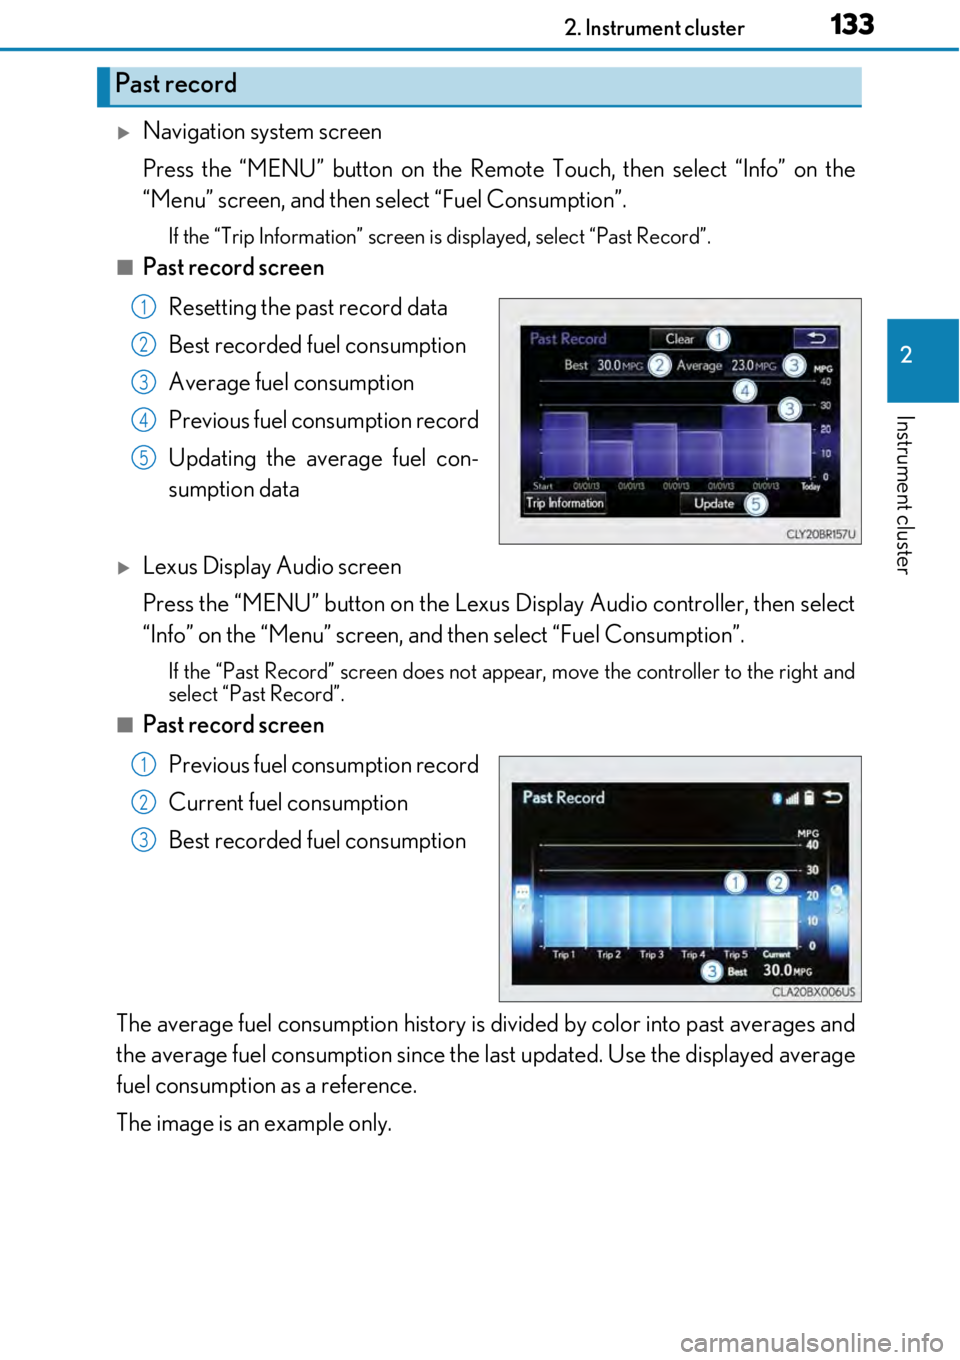
■Past record screen
Resetting the past record data
Best recorded fuel consumption
Average fuel consumption
Previous fuel consumption record
Updating the average fuel con-
sumption data
Lexus Display Audio screen
Press the “MENU” button on the Lexus Display Audio controller, then select
“Info” on the “Menu” screen, and then select “Fuel Consumption”.
If the “Past Record” screen does not appear, move the controller to the right and
select “Past Record”.
■Past record screen
Previous fuel consumption record
Current fuel consumption
Best recorded fuel consumption
The average fuel consumption history is di vided by color into past averages and
the average fuel consumption since the last updated. Use the displayed average
fuel consumption as a reference.
The image is an example only.
Past record
1
2
3
4
5
1
2
3
Page 134 of 724

1342. Instrument cluster
■Updating the past record data
Navigation system
Update the average fuel cons umption by selecting “Update” to measure the current fuel
consumption again.
Lexus Display Audio system
Update the average fuel consumption by mo ving the controller to the left and select
“Update” to measure the curre nt fuel consumption again.
■Resetting the data
Navigation system
The fuel consumption data can be deleted by selecting “Clear”.
Lexus Display Audio system
The fuel consumption data can be deleted by moving the controller to the left and select
“Clear”.
■Cruising range
Displays the estimated maximum distance that can be driven with the quantity of fuel
remaining.
This distance is computed based on your average fuel consumption.
As a result, the actual distance that can be driven may differ from that displayed.
Page 169 of 724
1693-3. Adjusting the seats
3
Operation of each component
Your preferred driving position (the position of the driver's seat, steering wheel
and outside rear view mirrors) can be recorded and recalled by pressing a but-
ton.
Three different driving positions can be recorded into memory.
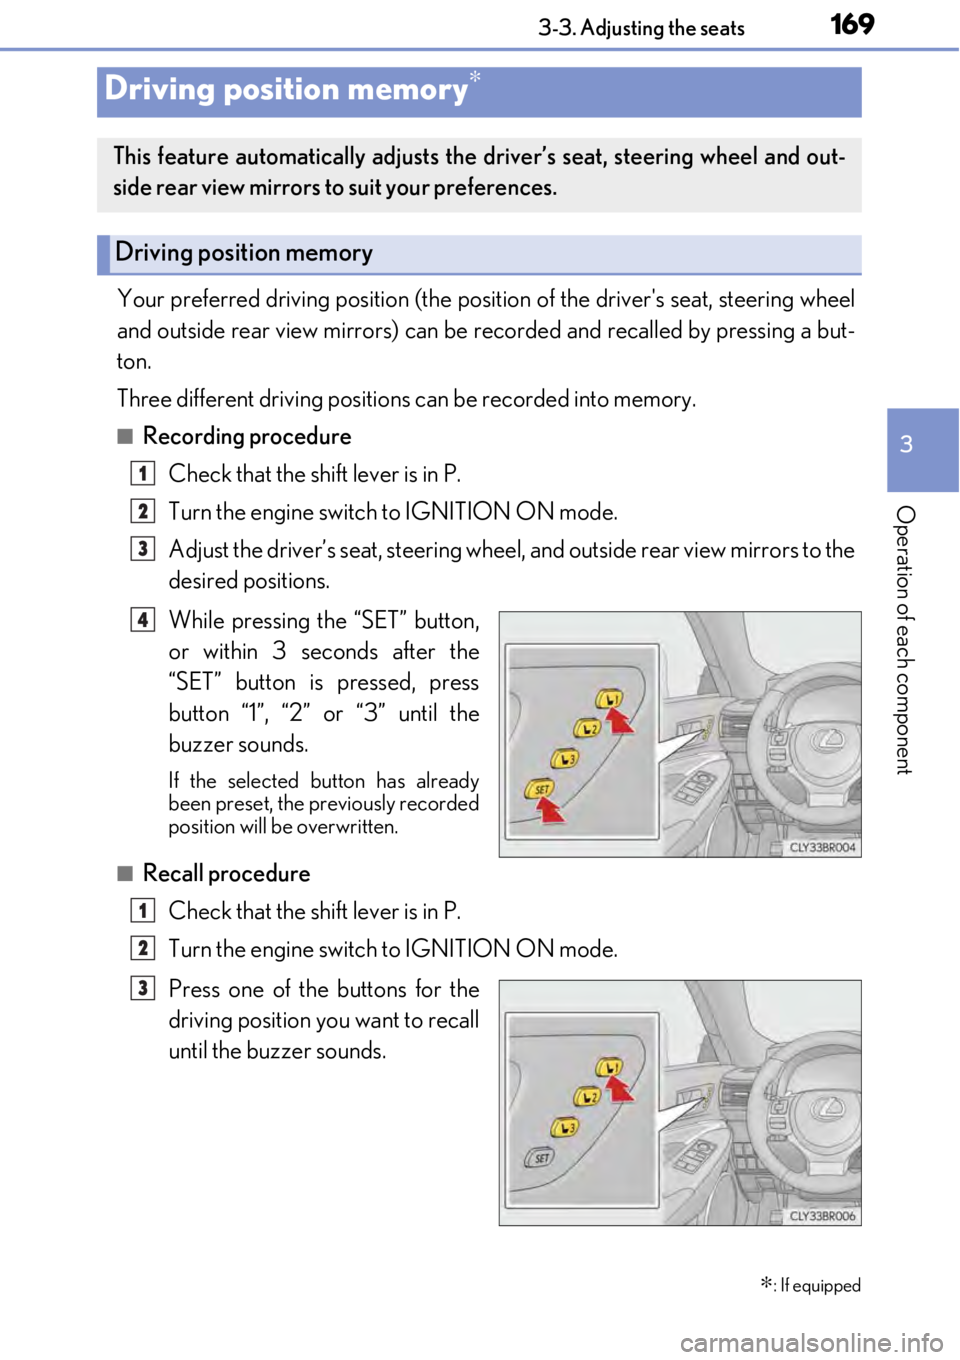
■Recording procedure
Check that the shift lever is in P.
Turn the engine switch to IGNITION ON mode.
Adjust the driver’s seat, steering wheel, and outside rear view mirrors to the
desired positions.
While pressing the “SET” button,
or within 3 seconds after the
“SET” button is pressed, press
button “1”, “2” or “3” until the
buzzer sounds.
If the selected button has already
been preset, the previously recorded
position will be overwritten.
■Recall procedureCheck that the shift lever is in P.
Turn the engine switch to IGNITION ON mode.
Press one of the buttons for the
driving position you want to recall
until the buzzer sounds.
Driving position memory∗
∗
: If equipped
This feature automatically adjusts the driver’s seat, steering wheel and out-
side rear view mirrors to suit your preferences.
Driving position memory
1
2
3
4
1
2
3
Page 338 of 724

3385-1. Basic Operations
Eject a disc.
Select preset radio stations, or access a desired track or file.
Except radio and A/V mode: Pause or resume playing a track or file.
Radio and A/V mode: Turn mute on/off.
“TUNE•SCROLL” knob
Select a radio station band, track or file.
Disc slot
Display the media top screen.
Display the radio top screen.
“PWR•VOL” knob
Press to turn the audio system on/o ff, and turn to adjust the volume.
Lexus Display Audio system∗
∗
: If equipped
Use the following buttons to star t listening to the audio system.
Lexus Display Audio operation buttons
1
2
3
4
5
6
7
8
Page 357 of 724
3575-3. Using the audio system
5
Lexus Display Audio system
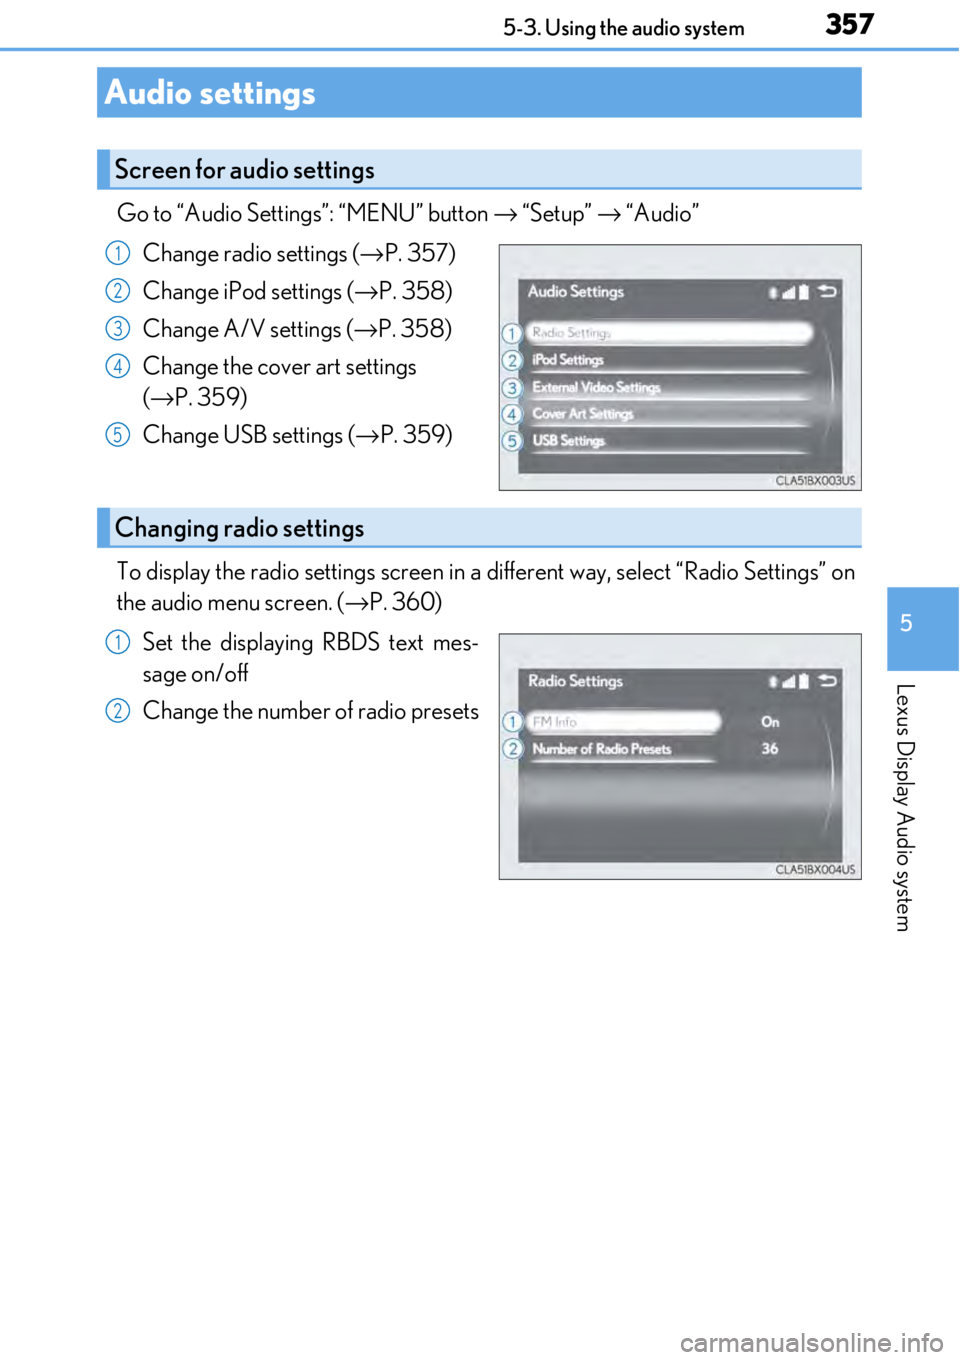
Go to “Audio Settings”: “MENU” button → “Setup” → “Audio”
Change radio settings (→ P. 357)
Change iPod settings ( →P. 358)
Change A/V settings ( →P. 358)
Change the cover art settings
(→ P. 359)
Change USB settings ( →P. 359)
To display the radio settings screen in a different way, select “Radio Settings” on
the audio menu screen. ( →P. 360)
Set the displaying RBDS text mes-
sage on/off
Change the number of radio presets
Audio settings
Screen for audio settings
1
2
3
4
5
Changing radio settings
1
2
Page 363 of 724

363
5
Lexus Display Audio system
5-4. Using the radio
Pressing the “RADIO” button displays the radio top screen from any screen of
the selected source.
■Menu screen
→P. 360
Tune in to the desired station using one of the following methods.
■Seek tuning
Press and hold then release the “ < PRST” or “TRACK >” button.
Seek tuning can also be operated on the menu screen. ( →P. 360)
The radio will begin seeking up or down for a station of the nearest frequency
and will stop when a station is found.
■Manual tuning
Turn the “TUNE•SCROLL” knob.
■Preset stations
Select the desired preset station by pressing the “ < PRST” or “TRACK >” but-
ton, or turning and pressing the controller.
■Station list
Move the controller to the right and selecting “Station List”.
AM radio: Selectin g a desired station.
FM radio: Selecting a desired type of station and selecting a desired st\
a-
tion.
To refreshing the station list, select “Refresh”. Select “Source” on the refresh
screen, can be change to the othe r audio source while refreshing.
Radio operation
Select “AM”, “FM” or “SAT” on the audi o source selection screen to begin lis-
tening to the radio.
Radio top screen
Selecting a station (AM or FM radio)
1
2
Page 364 of 724

3645-4. Using the radio
When “HD Radio” is set to “On”, available stations with HD Radio channels are
marked with “HD)”.In AM or FM mode, select a station marked with “HD)”.
Turn the “TUNE•SCROLL” knob to select an HD Radio channel.
HD Radio channels can also be selected by selecting “Multicast” on the menu screen.
( → P. 360)
Select in to the desired channel using one of the following methods.
■Turning up/down the channel
Press and hold the “< PRST” or “TRACK >” button or turn the
“TUNE•SCROLL” knob.
■Preset channels
Select the desired preset channel by pressing the “ < PRST” or “TRACK >”
button or controller.
■Channel list
Move the controller to the right and selecting “Select a SAT Category”.
Selecting a desired category of cha nnel and selecting a desired channel.
Search for desired stations or channel.
Select and hold one of the pr eset until you hear a beep.
■Display the song information
Move the controller to the right and selecting “Text”.
■Display the Additional information (HD radio)
Move the controller to the right and selecting “Additional Information”.
Selecting an HD Radio channel
Selecting a channel (XM Satellite Radio)
Setting presets
Display the text message
1
2
1
2
1
2
Page 366 of 724
3665-4. Using the radio
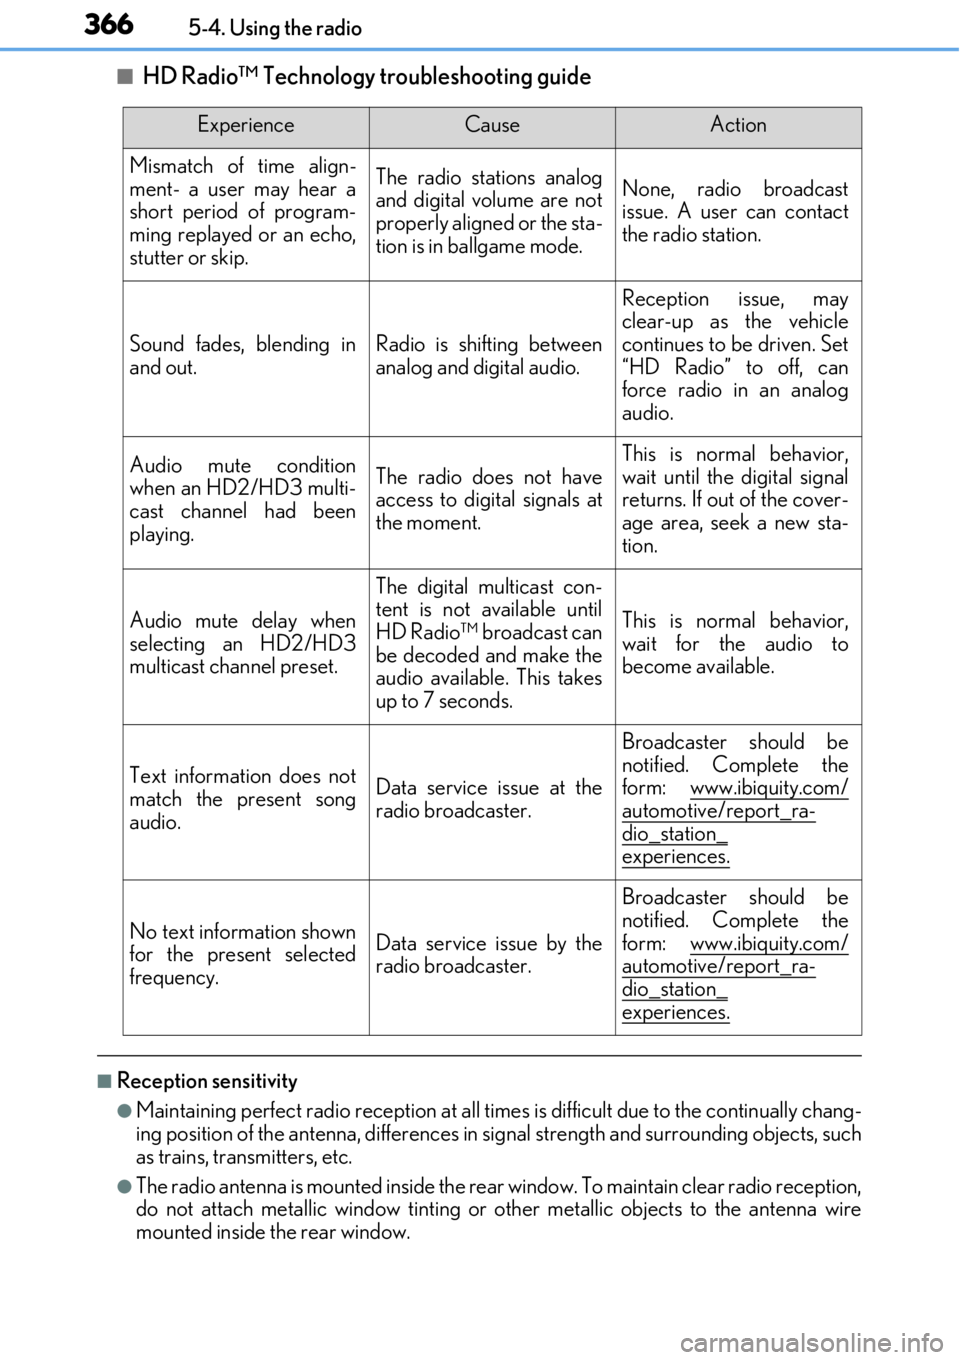
■HD Radio™ Technology troubleshooting guide
■Reception sensitivity
●Maintaining perfect radio reception at all times is difficult due to the continually chang-
ing position of the antenna, differences in si gnal strength and surrounding objects, such
as trains, transmitters, etc.
●The radio antenna is mounted inside the rear window. To maintain clear radio reception,
do not attach metallic window tinting or other metallic objects to the antenna wire
mounted inside the rear window.
ExperienceCauseAction
Mismatch of time align-
ment- a user may hear a
short period of program-
ming replayed or an echo,
stutter or skip.The radio stations analog
and digital volume are not
properly aligned or the sta-
tion is in ballgame mode.None, radio broadcast
issue. A user can contact
the radio station.
Sound fades, blending in
and out.Radio is shifting between
analog and digital audio.
Reception issue, may
clear-up as the vehicle
continues to be driven. Set
“HD Radio” to off, can
force radio in an analog
audio.
Audio mute condition
when an HD2/HD3 multi-
cast channel had been
playing.The radio does not have
access to digital signals at
the moment.
This is normal behavior,
wait until the digital signal
returns. If out of the cover-
age area, seek a new sta-
tion.
Audio mute delay when
selecting an HD2/HD3
multicast channel preset.
The digital multicast con-
tent is not available until
HD Radio™ broadcast can
be decoded and make the
audio available. This takes
up to 7 seconds.
This is normal behavior,
wait for the audio to
become available.
Text information does not
match the present song
audio.Data service issue at the
radio broadcaster.
Broadcaster should be
notified. Complete the
form: www.ibiquity.com/
automotive/report_ra-
dio_station_
experiences.
No text information shown
for the present selected
frequency.Data service issue by the
radio broadcaster.
Broadcaster should be
notified. Complete the
form: www.ibiquity.com/
automotive/report_ra-dio_station_
experiences.
Page 377 of 724

3775-6. Using an external device
5
Lexus Display Audio system
●“Made for iPod” and “Made for iPhone” mean that an electronic accessory has been
designed to connect specifically to an iPod, or iPhone, respectively, and has been certi-
fied by the developer to meet Apple performance standards.
●Apple is not responsible for the operation of this device or its compliance with safety
and regulatory standards. Please note that the use of this accessory with iPod or iPhone
may affect wireless performance.
●iPhone, iPod, iPod classic, iPod nano and iP od touch are trademarks of Apple Inc., reg-
istered in the U.S. and other countries.
■iPod cover art
●Depending on the iPod and songs in the iPod, iPod cover art may be displayed.
●This function can be changed to on/off. (→P. 359)
●It may take time to display iPod cover art, and the iPod may not be operated while the
cover art display is in process.
■iPod functions
●When an iPod is connected and the audio sour ce is changed to iPod mode, the iPod will
resume play from the same poin t in which it was last used.
●Depending on the iPod that is connected to the system, certain functions may not be
available. If a function is unavailable due to a malfunction (as opposed to a system spec-
ification), disconnecting th e device and reconnecting it may resolve the problem.
●Depending on the iPod, while connected to the system, the iPod cannot be operated
with its own controls. It is necessary to us e the controls of the vehicle’s audio system
instead.
●When the battery level of an iP od is very low, the iPod may not operate. If so, charge the
iPod before use.
●Compatible models ( →P. 379)
■iPod problems
To resolve most problems encountered when using your iPod, disconnect your iPod from
the vehicle iPod connection and reset it. For instructions on how to reset your iPod, refer
to your iPod Owner’s Manual.