lights LEXUS RC300 2016 Owner's Manual
[x] Cancel search | Manufacturer: LEXUS, Model Year: 2016, Model line: RC300, Model: LEXUS RC300 2016Pages: 700, PDF Size: 14.12 MB
Page 103 of 700
1032. Instrument cluster
2
Instrument cluster
RC350_RC300_RC200t_RC F_U (OM24671U)
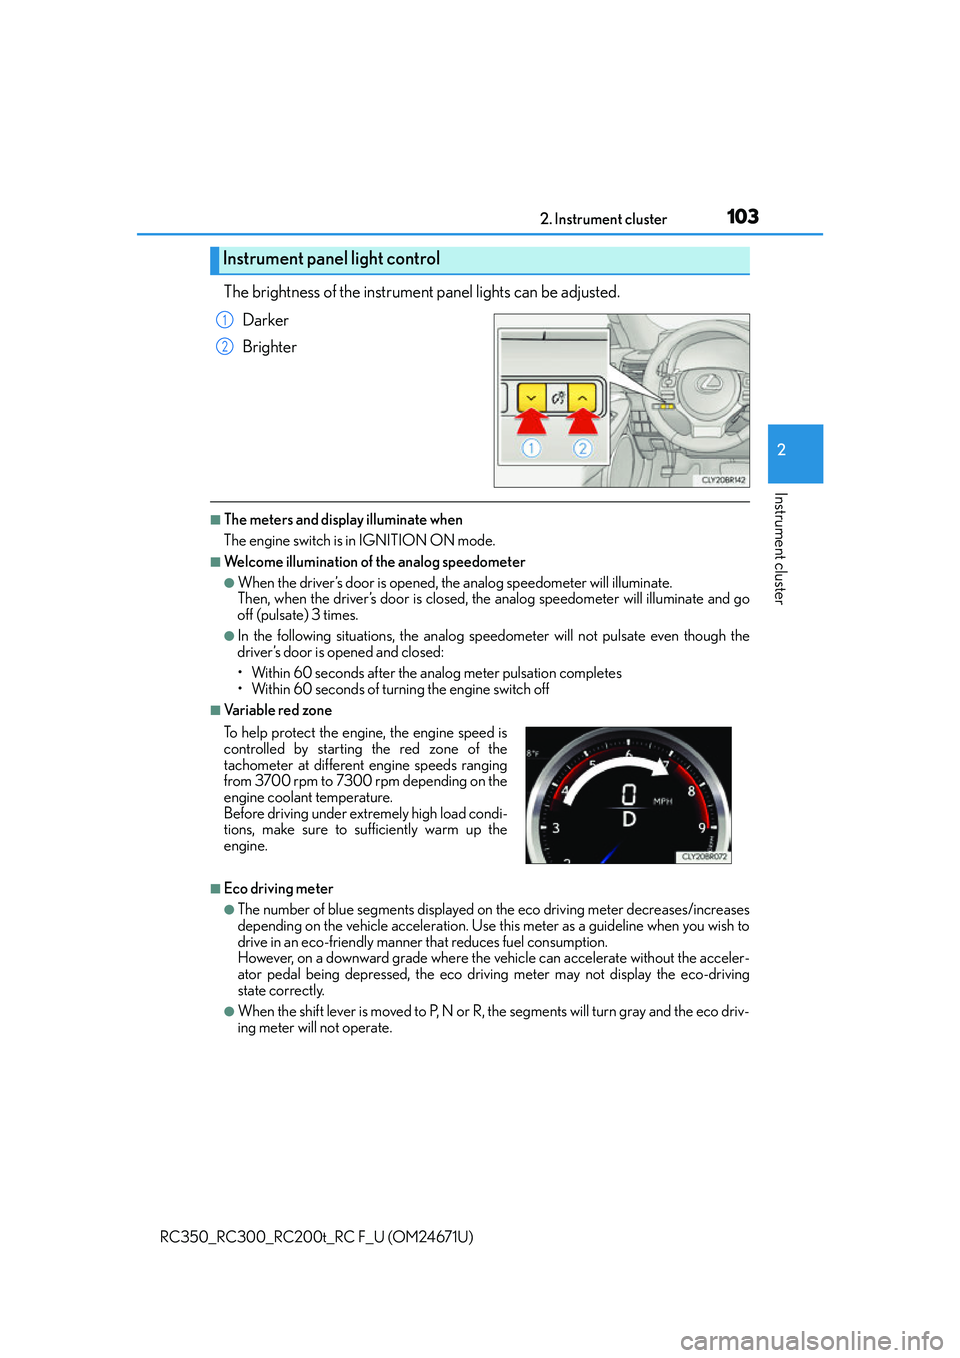
The brightness of the instrument panel lights can be adjusted.
Darker
Brighter
■The meters and display illuminate when
The engine switch is in IGNITION ON mode.
■Welcome illumination of the analog speedometer
●When the driver’s door is opened, th e analog speedometer will illuminate.
Then, when the driver’s door is closed, the analog speedometer will illuminate and go
off (pulsate) 3 times.
●In the following situations, the analog speedometer will no t pulsate even though the
driver’s door is opened and closed:
• Within 60 seconds after the analog meter pulsation completes
• Within 60 seconds of turn ing the engine switch off
■Va r i a b l e r e d z o n e
■Eco driving meter
●The number of blue segments displayed on the eco driving meter decreases/increases
depending on the vehicle acceleration. Use this meter as a guideline when you wish to
drive in an eco-friendly manner that reduces fuel consumption.
However, on a downward grade where the vehicle can accelerate without the acceler-
ator pedal being depressed, the eco driv ing meter may not display the eco-driving
state correctly.
●When the shift lever is moved to P, N or R, the segments will turn gray and the eco driv-
ing meter will not operate.
Instrument panel light control
1
2
To help protect the engine, the engine speed is
controlled by starting the red zone of the
tachometer at different engine speeds ranging
from 3700 rpm to 7300 rpm depending on the
engine coolant temperature.
Before driving under extremely high load condi-
tions, make sure to sufficiently warm up the
engine.
Page 104 of 700
1042. Instrument cluster
RC350_RC300_RC200t_RC F_U (OM24671U)
■Instrument panel brightness adjustment
The instrument panel brig htness levels when the tail ligh ts are on and off can be adjusted
individually. However, when the surroundings ar e bright (daytime, etc.), turning on the tail
lights will not change the instru ment panel brightness. At this time, any adjustments made
to the instrument panel bright ness levels will be applied to both settings at once.
■Dimming the analog speedometer lighting
The analog speedometer lighting will be dimm ed when the ambient light is bright, such
as during the daytime, and SPORT S or SPORT S+ mode is selected.
■Outside temperature display
●In the following situations, the correct outside temperature may not be displayed, or the
display may take longer than normal to change.
• When stopped, or driving at low speeds (less than 12 mph [20 km/h])
• When the outside temperature has changed suddenly (at the entrance/exit of a
garage, tunnel, etc.)
●When “ ” or “E” is displayed, the sy stem may be malfunctioning.
Take your vehicle to your Lexus dealer.
■Pop-up display
●In some situations, such as when a switch operation is pe rformed, a pop-up display will
be temporarily displayed on the multi-information display.
●Some pop-up displays can be set on/off. ( P. 122)
■Liquid crystal display
Small spots or light spots may appear on the display. This phenomenon is characteristic
of liquid crystal displays, and there is no problem continuing to use the display.
■Customization
The meter display can be customized on the multi-information display. (P. 1 1 3 )
NOTICE
■To prevent damage to the engine and its components
●Do not let the indicator of the tachometer enter the red zone, as it represents the
engine speed range which exceeds the maximum safe engine speed.
●In the following situations, the engine may be overheating. In this case, immediately
stop the vehicle in a safe place, and check the engine after it has cooled completely.
( P. 6 0 8 )
• The engine coolant temperature gauge indi cator ( ) is in the red zone and flash-
ing.
• The engine oil temperature gauge indicato r ( ) is in the red zone and flashing.
Page 133 of 700
1333-1. Key information
3
Operation of each component
RC350_RC300_RC200t_RC F_U (OM24671U)
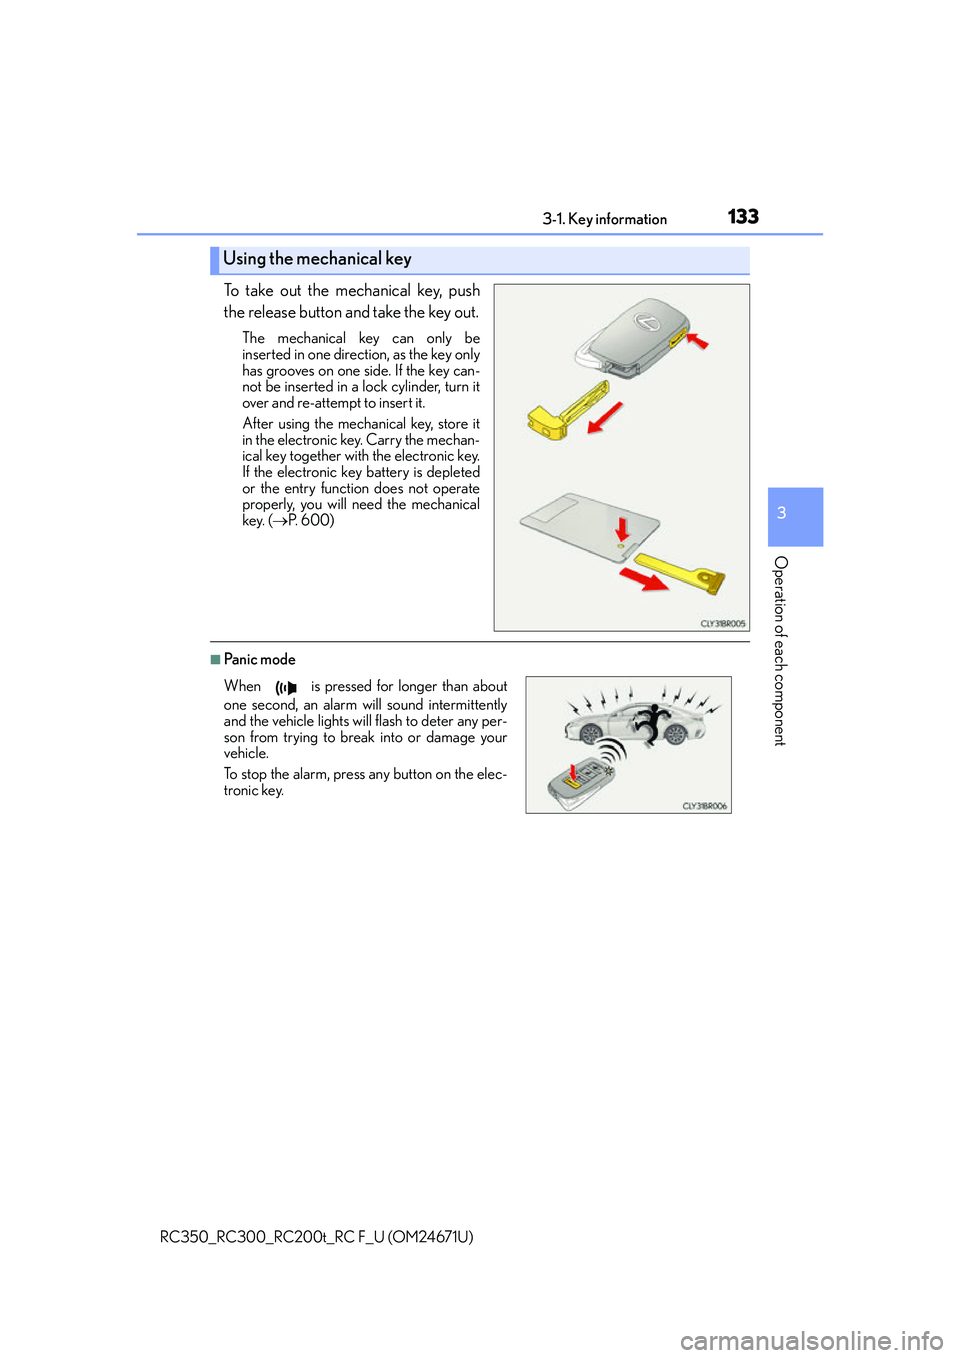
To take out the mechanical key, push
the release button and take the key out.
The mechanical key can only be
inserted in one direction, as the key only
has grooves on one side. If the key can-
not be inserted in a lock cylinder, turn it
over and re-attempt to insert it.
After using the mechanical key, store it
in the electronic key. Carry the mechan-
ical key together with the electronic key.
If the electronic key battery is depleted
or the entry function does not operate
properly, you will need the mechanical
key. (P. 600)
■Panic mode
Using the mechanical key
When is pressed for longer than about
one second, an alarm will sound intermittently
and the vehicle lights will flash to deter any per-
son from trying to break into or damage your
vehicle.
To stop the alarm, press any button on the elec-
tronic key.
Page 138 of 700
1383-2. Opening, closing and locking the doors and trunk
RC350_RC300_RC200t_RC F_U (OM24671U)
■Operation signals
A buzzer sounds and the emergency flashers flash to indicate that the doors have been
locked/unlocked. (Locked: once; Unlocked: twice)
A buzzer sounds to indicate that the windows and moon roof are operating.
■Security feature
If a door is not opened within approximately 60 seconds after the vehicle is unlocked, the
security feature automatically locks the vehicle again.
■Welcome light illumination control
The side marker, parking, tail and license plat e lights automatically turn on at night when
the doors are unlocked using the entry functi on or wireless remote control if the light
switch is in the “AUTO” position.
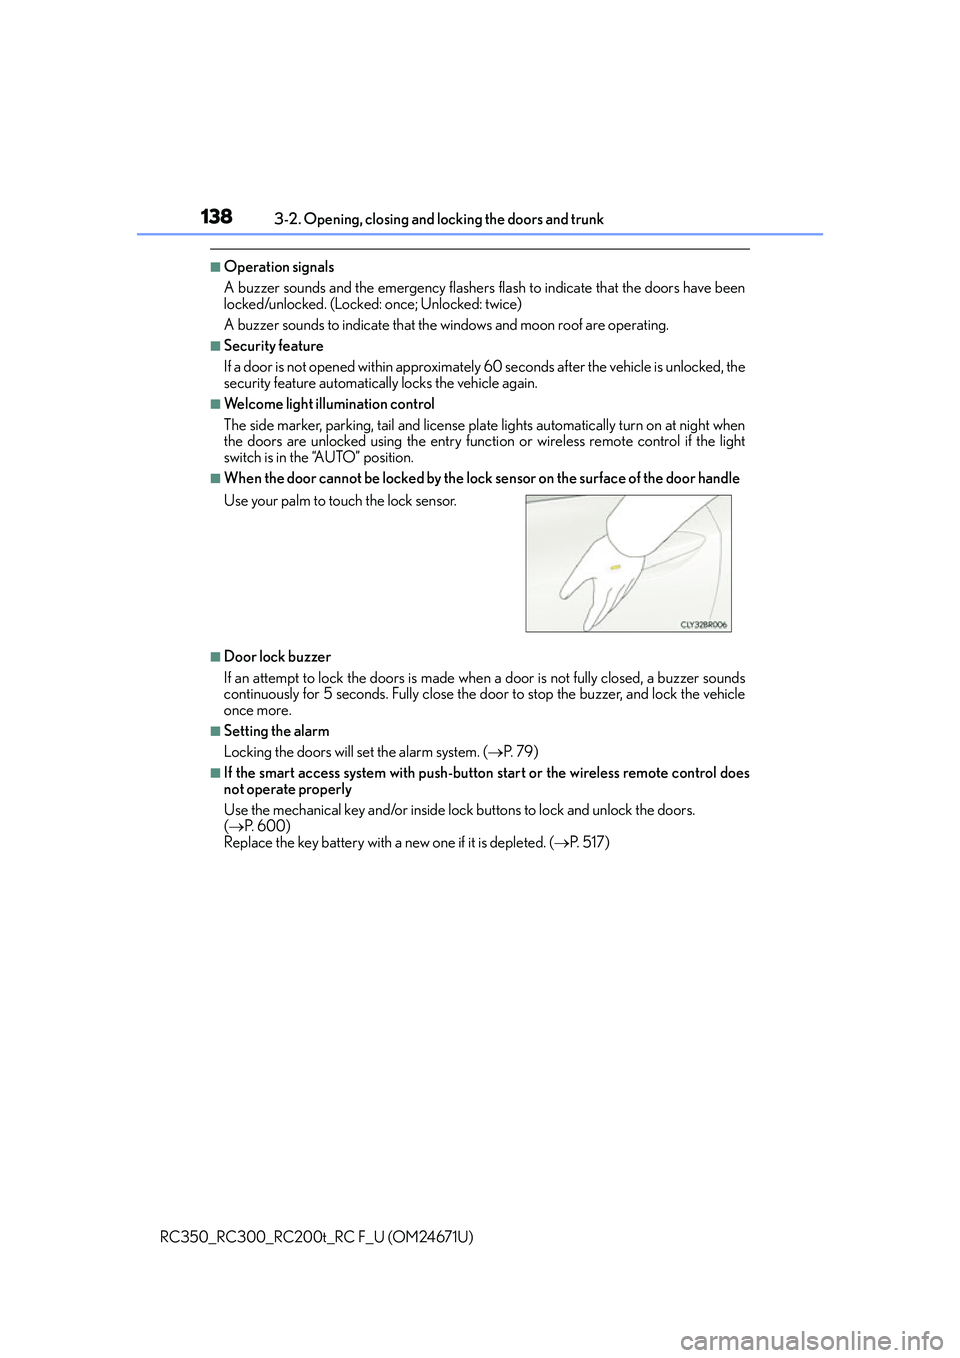
■When the door cannot be locked by the lock sensor on the surface of the door handle
■Door lock buzzer
If an attempt to lock the doors is made when a door is not fully closed, a buzzer sounds
continuously for 5 seconds. Fully close the door to stop the buzzer, and lock the vehicle
once more.
■Setting the alarm
Locking the doors will set the alarm system. ( P. 7 9 )
■If the smart access system with push-butto n start or the wireless remote control does
not operate properly
Use the mechanical key and/or inside lock buttons to lock and unlock the doors.
( P. 600)
Replace the key battery with a new one if it is depleted. ( P. 5 1 7 )
Use your palm to touch the lock sensor.
Page 169 of 700
1693-4. Adjusting the steering wheel and mirrors
3
Operation of each component
RC350_RC300_RC200t_RC F_U (OM24671U)
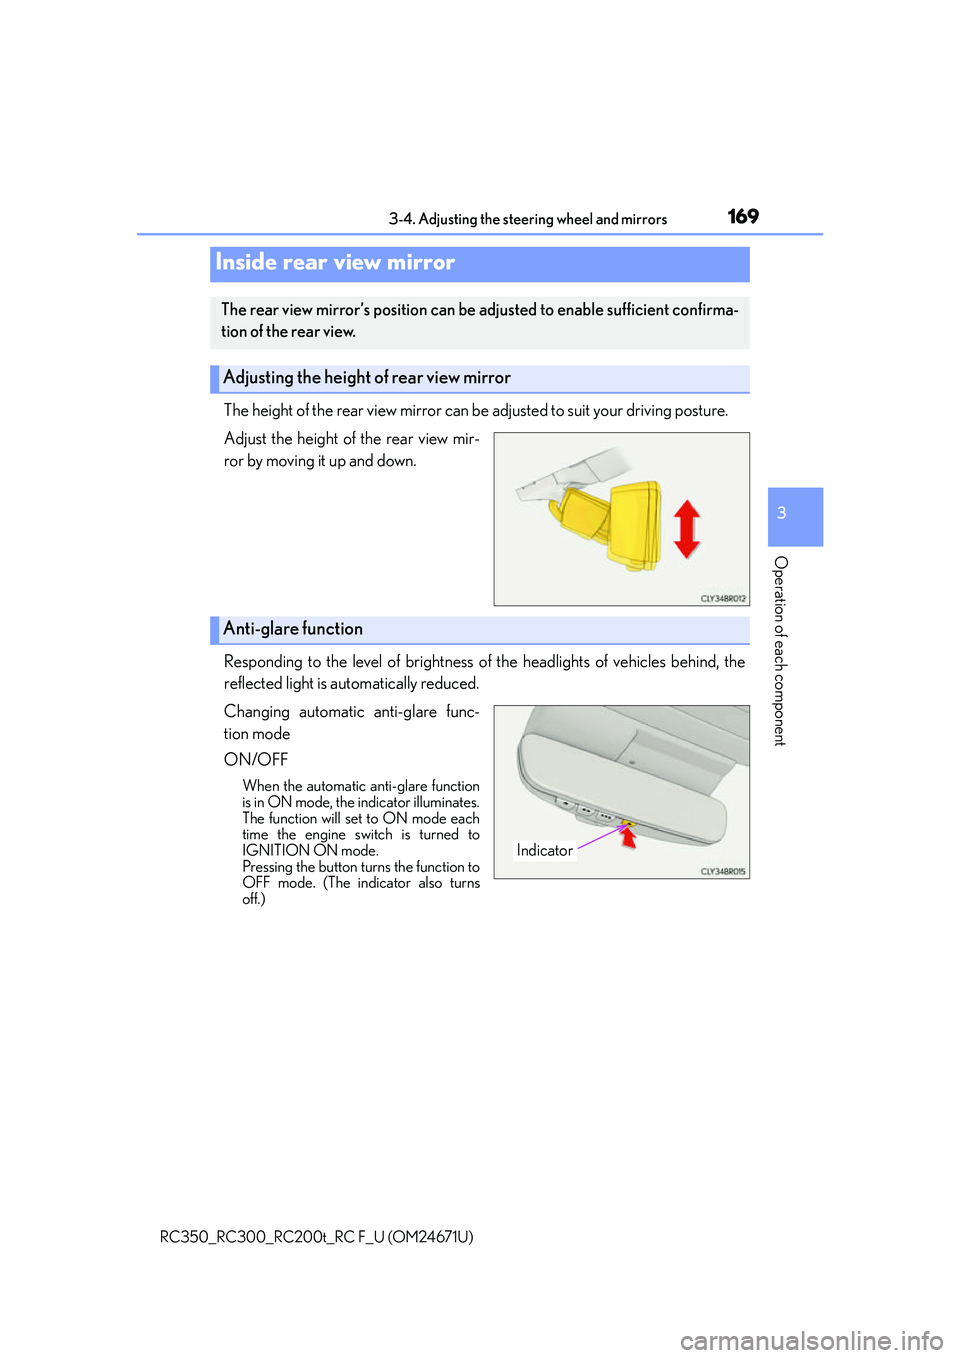
The height of the rear view mirror can be adjusted to suit your driving posture.
Adjust the height of the rear view mir-
ror by moving it up and down.
Responding to the level of brightness of the headlights of vehicles behind, the
reflected light is automatically reduced.
Changing automatic anti-glare func-
tion mode
ON/OFF
When the automatic anti-glare function
is in ON mode, the indicator illuminates.
The function will set to ON mode each
time the engine switch is turned to
IGNITION ON mode.
Pressing the button turns the function to
OFF mode. (The indicator also turns
off.)
Inside rear view mirror
The rear view mirror’s position can be adjusted to enable sufficient confirma-
tion of the rear view.
Adjusting the height of rear view mirror
Anti-glare function
Indicator
Page 183 of 700
183
Driving4
RC350_RC300_RC200t_RC F_U (OM24671U)
4-1. Before drivingDriving the vehicle ...................... 184
Cargo and luggage .................... 193
Vehicle load limits ....................... 196
Trailer towing ..................................197
Dinghy towing...............................198
4-2. Driving procedures Engine (ignition) switch ............ 199
Automatic transmission .......... 205
Turn signal lever ........................... 210
Parking brake ..................................211
ASC (Active Sound Control)
(RC350/RC300/
RC200t)...................................... 212
ASC (Active Sound Control) (RC F)............................................ 213
4-3. Operating the lights and wipers
Headlight switch .......................... 214
Automatic High Beam .............. 217
Fog light switch............................ 222
Windshield wipers and washer..........................................223
4-4. Refueling Opening the fuel tank cap....... 231 4-5. Using the driving support
systems
Cruise control ............................. 235
Dynamic radar cruise control ......................................... 239
LDA (Lane Departure Alert) ........ 253
Intuitive parking assist .............. 259
Lexus parking assist monitor ........................................ 268
Driving mode select switch ........................................... 283
Driving assist systems............... 287
PCS (Pre-Collision System).......... 295
BSM (Blind Spot Moni tor)..............302
• BSM function .........................306
• RCTA function ....................... 310
Active rear wing .......................... 315
TVD (Torque Vectoring Differential)................................. 318
4-6. Driving tips Winter driving tips .....................320
Page 210 of 700
2104-2. Driving procedures
RC350_RC300_RC200t_RC F_U (OM24671U)
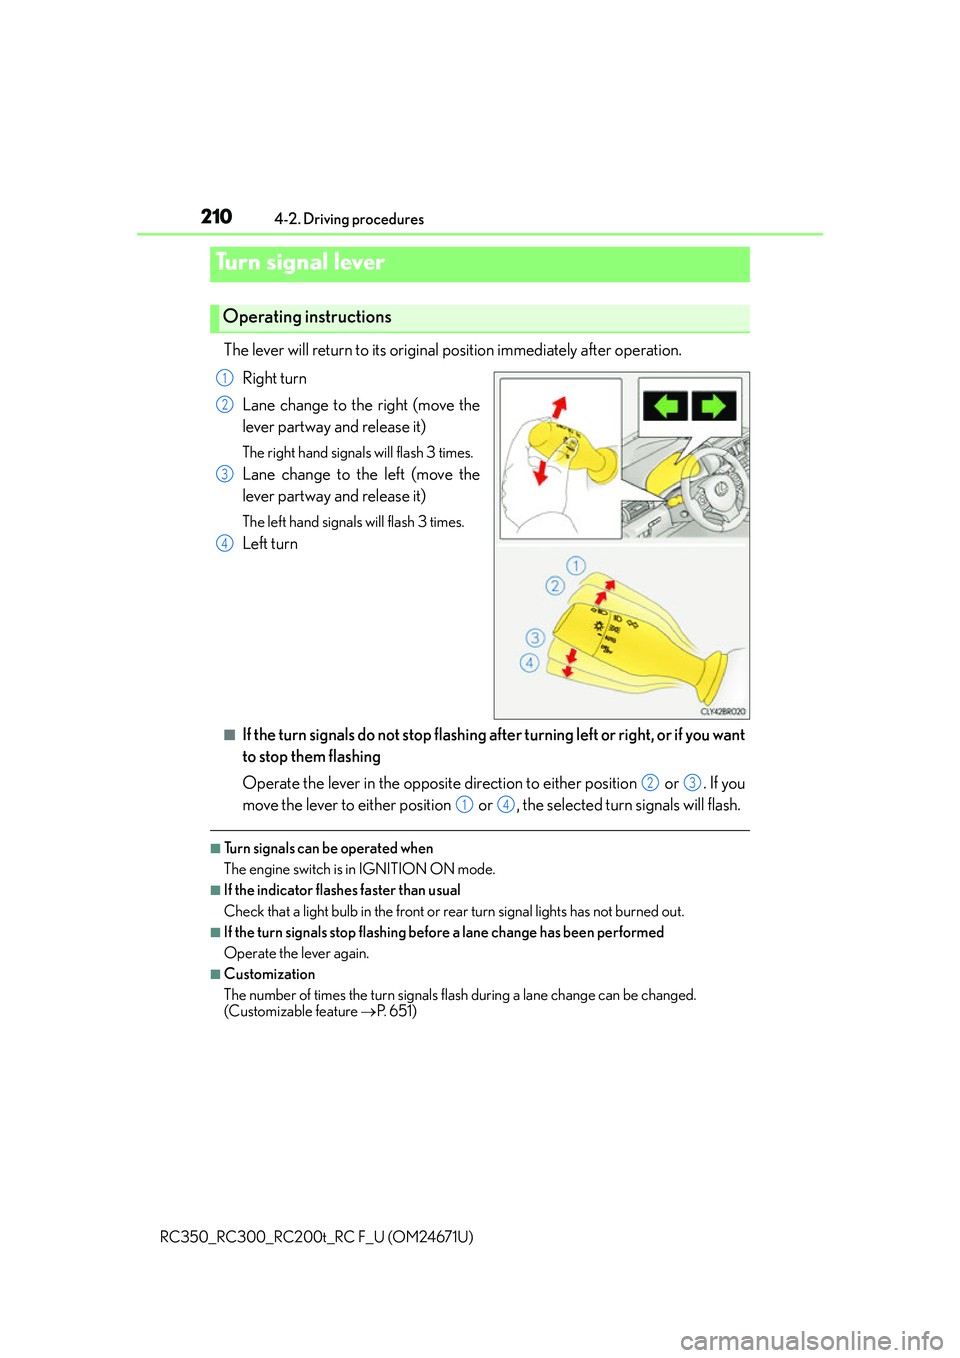
The lever will return to its original position immediately after operation.
Right turn
Lane change to the right (move the
lever partway and release it)
The right hand signals will flash 3 times.
Lane change to the left (move the
lever partway and release it)
The left hand signals will flash 3 times.
Left turn
■If the turn signals do not stop flashing af ter turning left or right, or if you want
to stop them flashing
Operate the lever in the opposite direction to either position or . If you
move the lever to either position or , the selected turn signals will flash.
■Turn signals can be operated when
The engine switch is in IGNITION ON mode.
■If the indicator flashes faster than usual
Check that a light bulb in the front or rear turn signal lights has not burned out.
■If the turn signals stop flashing befo re a lane change has been performed
Operate the lever again.
■Customization
The number of times the turn signals flash during a lane change can be changed.
(Customizable feature P. 6 5 1 )
Turn signal lever
Operating instructions
1
2
3
4
23
14
Page 214 of 700
214
RC350_RC300_RC200t_RC F_U (OM24671U)4-3. Operating the lights and wipers
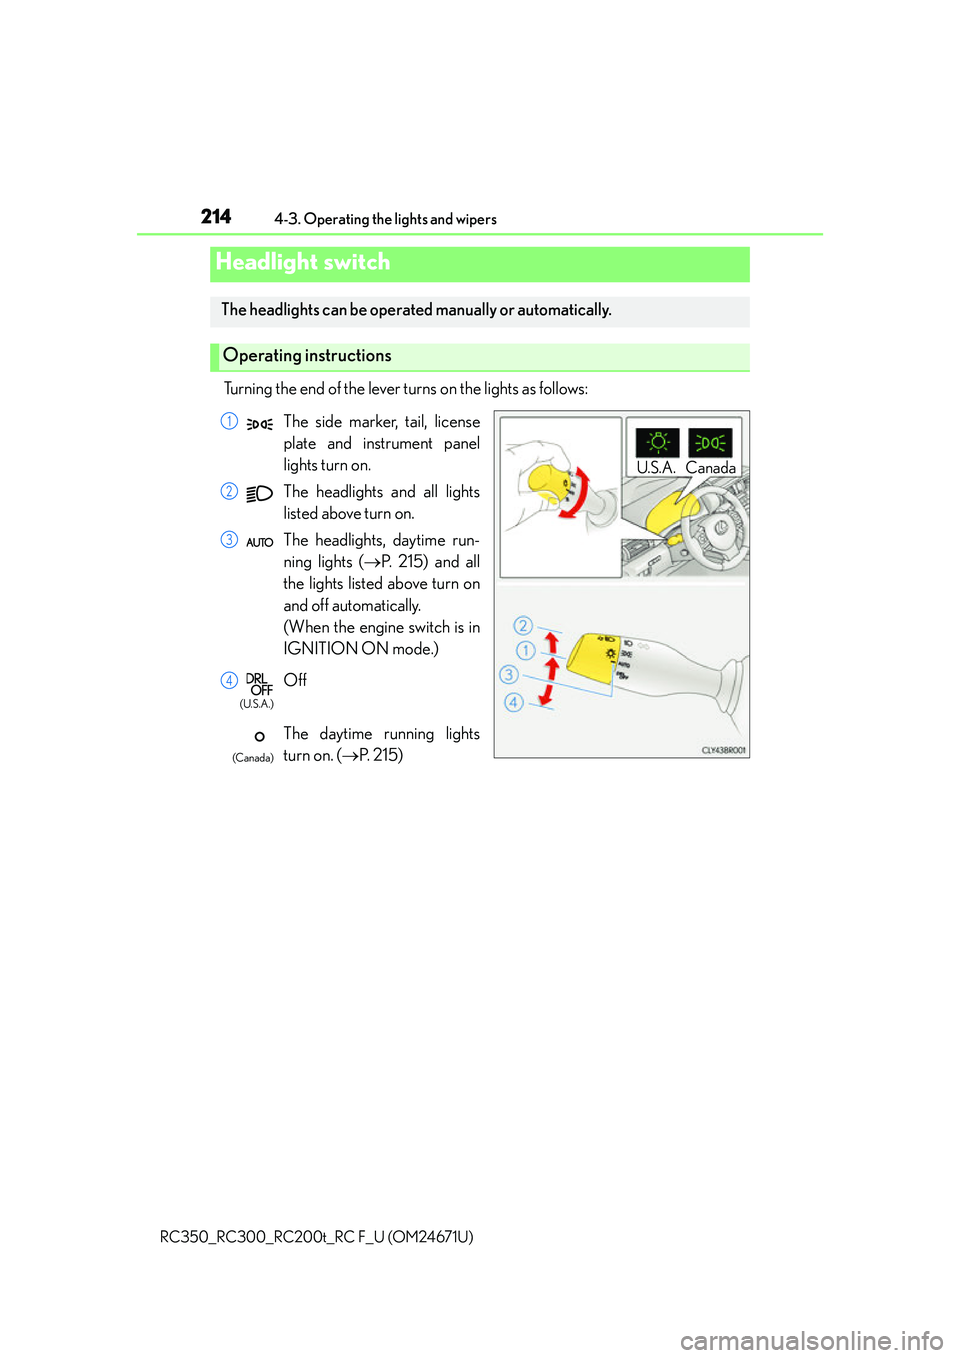
Turning the end of the lever turns on the lights as follows:
Headlight switch
The headlights can be operated manually or automatically.
Operating instructions
U.S.A. Canada
The side marker, tail, license
plate and instrument panel
lights turn on.
The headlights and all lights
listed above turn on.
The headlights, daytime run-
ning lights (
P. 215) and all
the lights listed above turn on
and off automatically.
(When the engine switch is in
IGNITION ON mode.)
Off
The daytime running lights
turn on. ( P. 2 1 5 )1
2
3
4
(U.S.A.)
(Canada)
Page 215 of 700
2154-3. Operating the lights and wipers
4
Driving
RC350_RC300_RC200t_RC F_U (OM24671U)
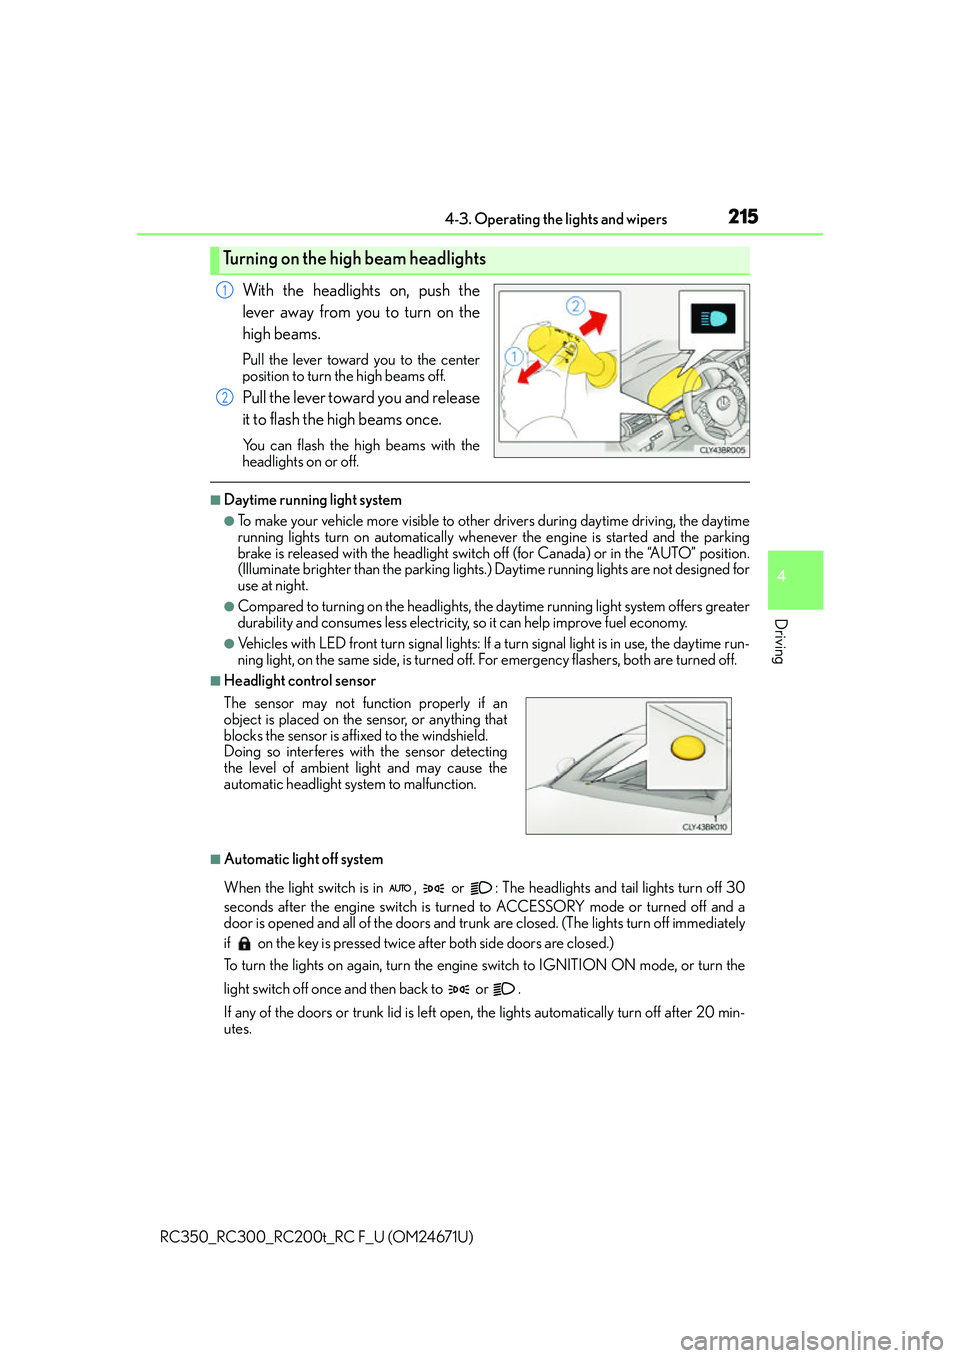
With the headlights on, push the
lever away from you to turn on the
high beams.
Pull the lever toward you to the center
position to turn the high beams off.
Pull the lever toward you and release
it to flash the high beams once.
You can flash the high beams with the
headlights on or off.
■Daytime running light system
●To make your vehicle more visible to other drivers during daytime driving, the daytime
running lights turn on automatically whenever the engine is started and the parking
brake is released with the headlight switch off (for Canada) or in the “AUTO” position.
(Illuminate brighter th an the parking lights.) Daytime running lights are not designed for
use at night.
●Compared to turning on the headlights, the daytime running light system offers greater
durability and consumes less electricity, so it can help improve fuel economy.
●Vehicles with LED front turn signal lights: If a turn signal light is in use, the daytime run-
ning light, on the same side, is turned off. For emergency flashers, both are turned off.
■Headlight control sensor
■Automatic light off system
When the light switch is in , or : The headlights and tail lights turn off 30
seconds after the engine switch is turned to ACCESSORY mode or turned off and a
door is opened and all of the doors and trunk are closed. (The lights turn off immediately
if on the key is pressed twice after both side doors are closed.)
To turn the lights on again, turn the engine switch to IGNITION ON mode, or turn the
light switch off once and then back to or .
If any of the doors or trunk lid is left open, the lights automatically turn off after 20 min-
utes.
Turning on the high beam headlights
1
2
The sensor may not function properly if an
object is placed on the sensor, or anything that
blocks the sensor is affixed to the windshield.
Doing so interferes with the sensor detecting
the level of ambient light and may cause the
automatic headlight system to malfunction.
Page 216 of 700
2164-3. Operating the lights and wipers
RC350_RC300_RC200t_RC F_U (OM24671U)
■Automatic headlight leveling system
The level of the headlights is automatically ad justed according to the number of passen-
gers and the loading condition of the vehicle to ensure that the headlights do not inter-
fere with other road users.
■Light reminder buzzer
A buzzer sounds when the engine switch is turned off or turned to ACCESSORY mode
and the driver’s door is opened while the lights are turned on.
■Operation guide display (vehicles with rain-sensing windshield wipers only)
When the headlight switch is operated to and from the “AUTO” position, the current sta-
tus is displayed on the meters for a few seconds to show that AUTO mode is activated/
deactivated. ( P. 110, 122)
■Customization
Settings (e.g. light sensor se nsitivity) can be changed.
(Customizable features: P. 6 5 1 )
NOTICE
■To prevent battery discharge
Do not leave the lights on longer than ne cessary when the engine is not running.