ECO mode LEXUS RC300 2020 User Guide
[x] Cancel search | Manufacturer: LEXUS, Model Year: 2020, Model line: RC300, Model: LEXUS RC300 2020Pages: 390, PDF Size: 8.65 MB
Page 71 of 390
712-1. Instrument cluster
2
Vehicle status information and indicators
changed to a registered screen of your
choice.
To register a screen as the top screen,
display the desired screen and press
and hold .
■Content displayed as drive infor-
mation
Select to display various drive data.
Up to 2 of the following items can be
selected for each drive information
screen:
Items displayed can be switched by
pressing or of the meter con-
trol switches to select and pressing or .
F SPORT models: When the main
meter is in the center position, only one
item will be displayed at a time.
F SPORT models: Some drive informa-
tion items can only be displayed when
the main meter is in the center position
or when it is moved to the right.
Current fuel consumption
Displays instantaneous current fuel con-
sumption
Average fuel economy
• After reset: Displays average fuel con-
sumption since display reset*1, 2
• After start: Displays average fuel con-sumption since engine start*2
• After refuel: Displays average fuel con-sumption since refuel*2, 3
Average vehicle speed
• After reset: Displays average vehicle
speed since display reset*1
• After start: Displays average vehicle speed since engine start
Elapsed time
• After reset: Displays elapsed time since
the display was reset*1
• After start: Displays elapsed time since engine start
Distance
• Driving range: Displays driving range
with remaining fuel*3, 4
• After start: Displays drive distance since vehicle start
Other
Blank: No item
*1: The function can be reset by pressing
the of the meter control switches
for longer than 1 second when the item
to reset is displayed.
If there is more than one item that can
be reset, the item selection screen will
appear.
*2: Use the displayed fuel consumption as a reference.
*3: When only a small amount of fuel is added to the tank, the display may not
be updated.
When refueling, turn the engine switch
off. If the vehicle is refueled without
turning the engine switch off, the display
may not be updated.
*4: This distance is computed based on your average fuel consumption. As a
result, the actual distance that can be
driven may differ from that displayed.
Drive information
Page 72 of 390
722-1. Instrument cluster
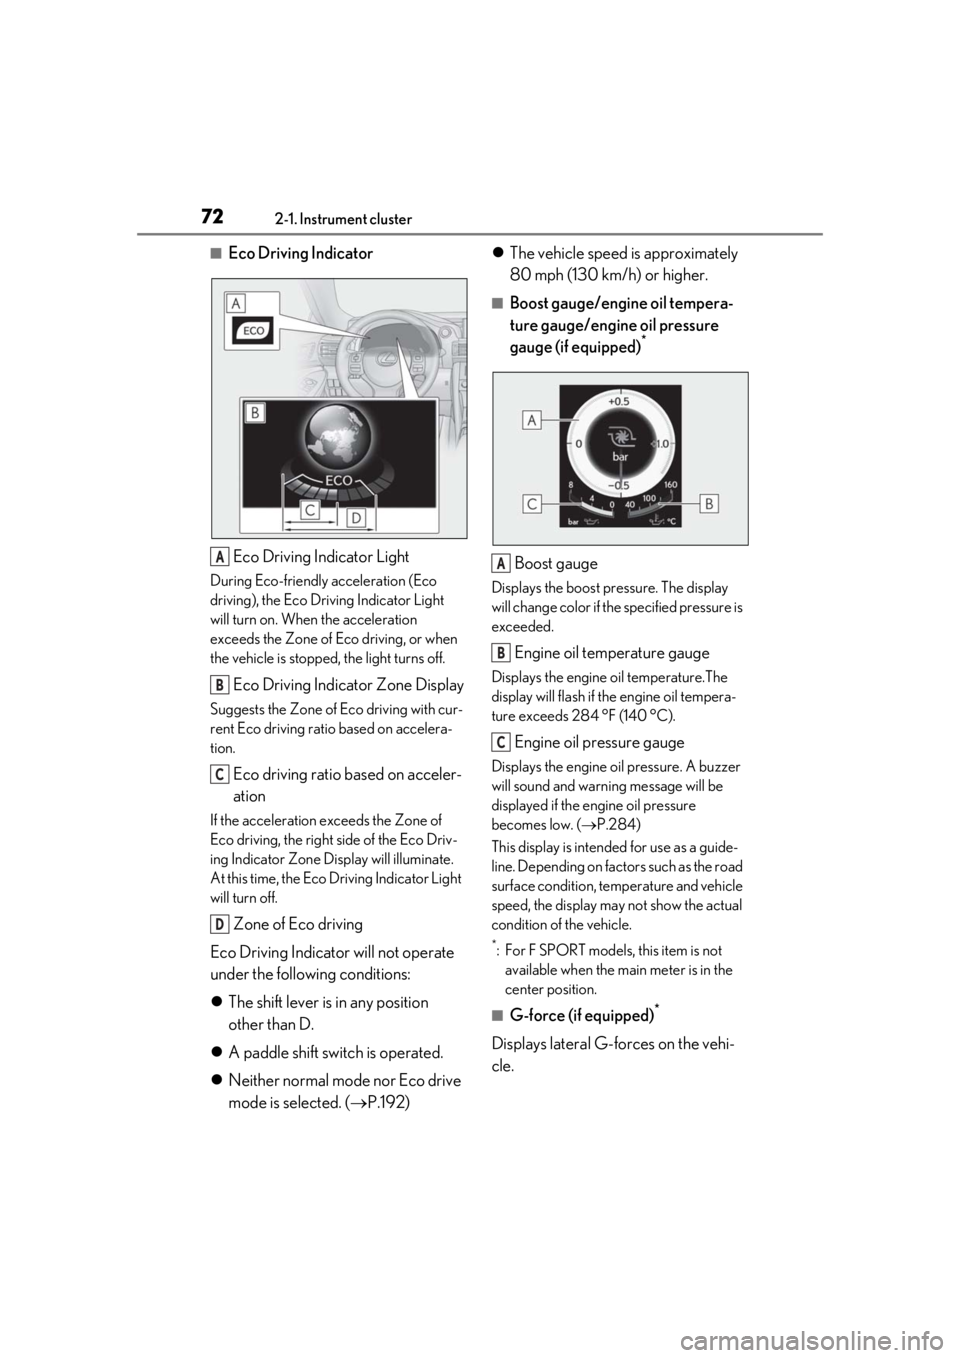
■Eco Driving IndicatorEco Driving Indicator Light
During Eco-friendly acceleration (Eco
driving), the Eco Driving Indicator Light
will turn on. When the acceleration
exceeds the Zone of Eco driving, or when
the vehicle is stopped, the light turns off.
Eco Driving Indicator Zone Display
Suggests the Zone of Eco driving with cur-
rent Eco driving ratio based on accelera-
tion.
Eco driving ratio based on acceler-
ation
If the acceleration exceeds the Zone of
Eco driving, the right side of the Eco Driv-
ing Indicator Zone Display will illuminate.
At this time, the Eco Driving Indicator Light
will turn off.
Zone of Eco driving
Eco Driving Indicator will not operate
under the following conditions:
The shift lever is in any position
other than D.
A paddle shift switch is operated.
Neither normal mode nor Eco drive
mode is selected. ( P.192)
The vehicle speed is approximately
80 mph (130 km/h) or higher.
■Boost gauge/engine oil tempera-
ture gauge/engine oil pressure
gauge (if equipped)
*
Boost gauge
Displays the boost pressure. The display
will change color if th e specified pressure is
exceeded.
Engine oil temperature gauge
Displays the engine oil temperature.The
display will flash if the engine oil tempera-
ture exceeds 284 °F (140 °C).
Engine oil pressure gauge
Displays the engine oil pressure. A buzzer
will sound and warning message will be
displayed if the engine oil pressure
becomes low. ( P.284)
This display is intended for use as a guide-
line. Depending on fact ors such as the road
surface condition, temperature and vehicle
speed, the display may not show the actual
condition of the vehicle.
*: For F SPORT models, this item is not available when the main meter is in the
center position.
■G-force (if equipped)*
Displays lateral G-forces on the vehi-
cle.
A
B
C
D
A
B
C
Page 73 of 390
732-1. Instrument cluster
2
Vehicle status information and indicators
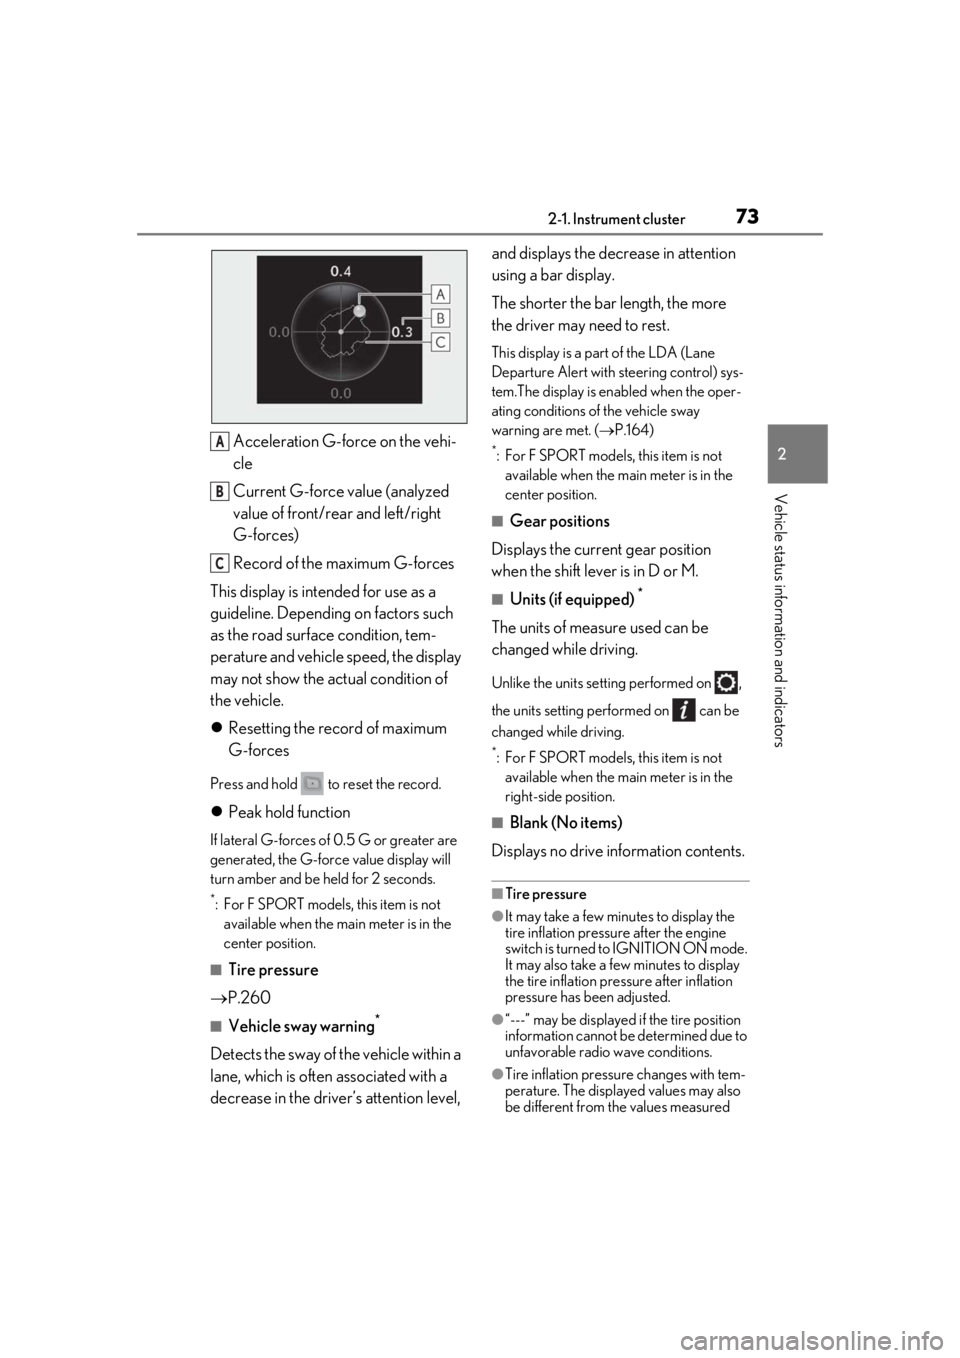
Acceleration G-force on the vehi-
cle
Current G-force value (analyzed
value of front/rear and left/right
G-forces)
Record of the maximum G-forces
This display is intended for use as a
guideline. Depending on factors such
as the road surface condition, tem-
perature and vehicle speed, the display
may not show the actual condition of
the vehicle.
Resetting the record of maximum
G-forces
Press and hold to reset the record.
Peak hold function
If lateral G-forces of 0.5 G or greater are
generated, the G-forc e value display will
turn amber and be held for 2 seconds.
*: For F SPORT models, this item is not available when the ma in meter is in the
center position.
■Tire pressure
P.260
■Vehicle sway warning*
Detects the sway of the vehicle within a
lane, which is often associated with a
decrease in the driver’s attention level, and displays the decrease in attention
using a bar display.
The shorter the bar length, the more
the driver may need to rest.
This display is a pa
rt of the LDA (Lane
Departure Alert with steering control) sys-
tem.The display is en abled when the oper-
ating conditions of the vehicle sway
warning are met. ( P.164)
*: For F SPORT models, this item is not
available when the main meter is in the
center position.
■Gear positions
Displays the current gear position
when the shift lever is in D or M.
■Units (if equipped) *
The units of measure used can be
changed while driving.
Unlike the units sett ing performed on ,
the units setting performed on can be
changed while driving.
*: For F SPORT models, this item is not available when the main meter is in the
right-side position.
■Blank (No items)
Displays no drive information contents.
■Tire pressure
●It may take a few minutes to display the
tire inflation pressu re after the engine
switch is turned to IGNITION ON mode.
It may also take a few minutes to display
the tire inflation pressure after inflation
pressure has b een adjusted.
●“---” may be displayed if the tire position
information cannot be determined due to
unfavorable radio wave conditions.
●Tire inflation pressure changes with tem-
perature. The displaye d values may also
be different from the values measured
A
B
C
Page 75 of 390

752-1. Instrument cluster
2
Vehicle status information and indicators
Speed Setting*
Select to set the desired vehicle speed at
which the speed indicato r will begin to be
displayed.
*: Always observe the legal speed limit when driving on public roads.
■Clock ( P.64)
Select to switch between 12-hour dis-
play and 24-hour display.
■Vehicle Settings
Scheduled Maintenance ( P.240)
Select to reset th e message indicating
maintenance is required , after the required
maintenance is performed.
Oil maintenance ( P.252)
Select to reset the en gine oil maintenance
information (message indicating mainte-
nance is required and distance until the
next oil change) after engine oil mainte-
nance is performed.
■Meter settings
Language
Select to change the language on the dis-
play.
Units
Select to change the units of measure dis-
played.
Eco Driving Indicator Light
( P.72)
Select to enable/disable the Eco Driving
Indicator Light.
Switch settings (except F
SPORT models)
Displays a procedure to register a desired
screen to
.
You can register 1 screen as a shortcut,
which can be displayed by pressing
.
Drive information screen ( P.71)
Select to choose between 2 items that will
be displayed on each drive information
screen (“Drive info 1”, “Drive Info 2” and
“Drive Info 3”) respectively.
Pop-up display ( P.68)
Select to enable/disable the pop-up dis-
play.
• Intersection guidance (if equipped)
• Incoming calls
• Audio Feedback (F SPORT)
• Volume Feedback (F SPORT)
• Brightness adjustment
Color (except F SPORT models)
Select to set the color of the cursor on the
multi-information display.
Needle (F SPORT models)
Select to set the tachometer needle color.
Rev indicator (F SPORT models)
( P.67)
• Select to enable/disable the Rev indica-
tor.
• Select to set the desired engine speed at which the Rev indicator will begin to be
displayed.
Rev peak (F SPORT models)
( P.67)
Select to enable/disable the Rev peak.
Default setting
Select to reset the meter display settings to
the default setting.
■Background color of the indicator/shift
position display area (except F SPORT
models)
The background color of the indicator/shift
Page 76 of 390
762-1. Instrument cluster
position display area is changed according
to the driving mode as follows (P.192):
●Eco drive mode: Blue
●Sport mode: Red
■G-force display (if equipped)
The G-force values may not be zero even
when the vehicle is parked, such as when it
is parked on an incline.
■Suspension of the settings display
●Some settings cannot be changed while
driving. When changing settings, park
the vehicle in a safe place.
●If a warning message is displayed, opera-
tion of the settings display will be sus-
pended.
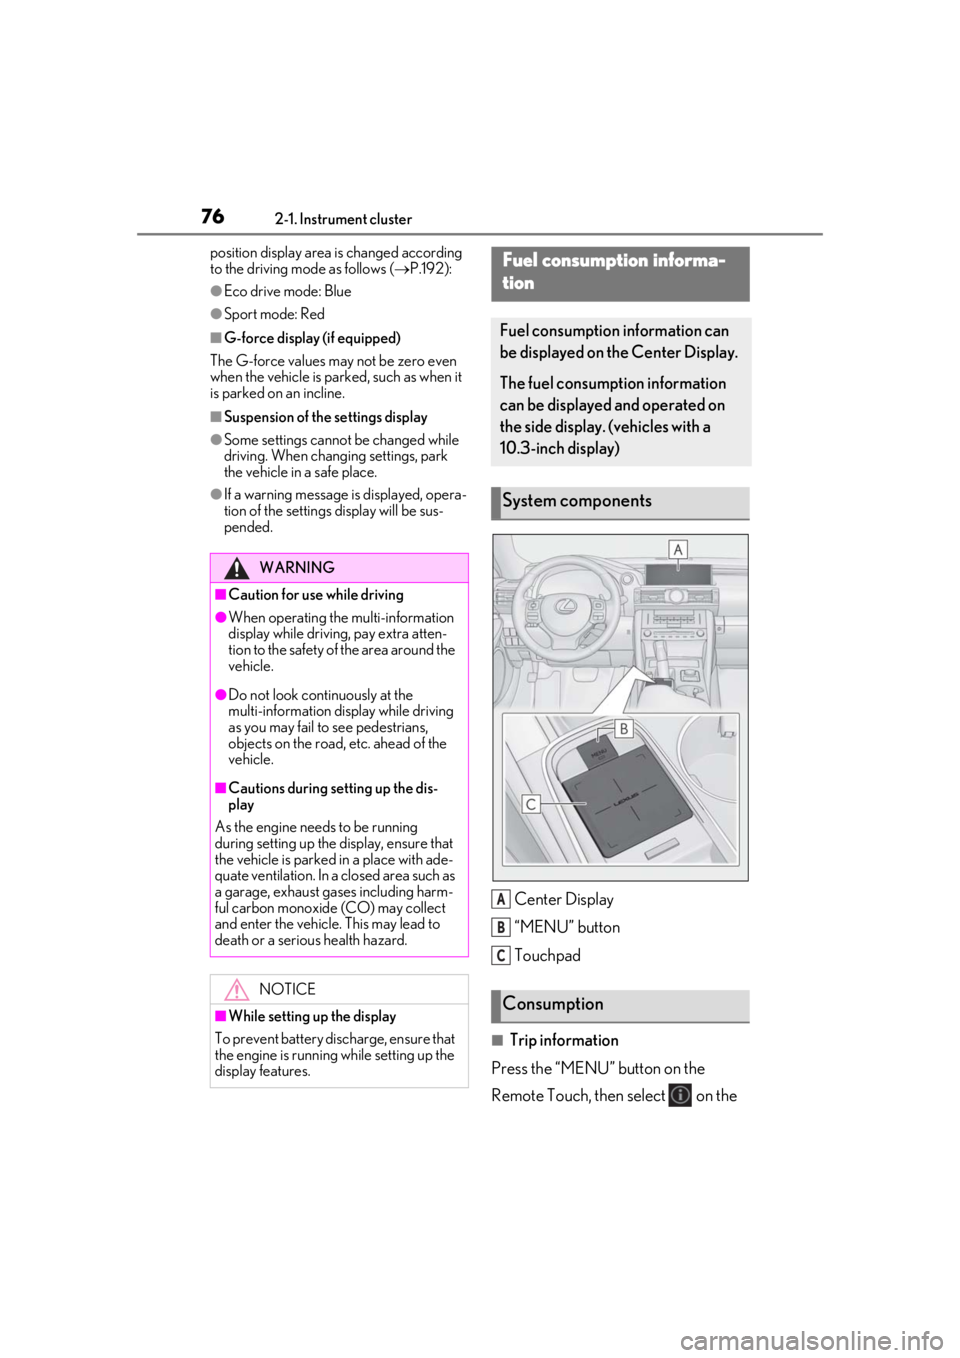
Center Display
“MENU” button
Touchpad
■Trip information
Press the “MENU” button on the
Remote Touch, then select on the
WARNING
■Caution for use while driving
●When operating the multi-information
display while driving, pay extra atten-
tion to the safety of the area around the
vehicle.
●Do not look continuously at the
multi-information di splay while driving
as you may fail to see pedestrians,
objects on the road, etc. ahead of the
vehicle.
■Cautions during setting up the dis-
play
As the engine needs to be running
during setting up the display, ensure that
the vehicle is parked in a place with ade-
quate ventilation. In a closed area such as
a garage, exhaust gases including harm-
ful carbon monoxide (CO) may collect
and enter the vehicle. This may lead to
death or a serious health hazard.
NOTICE
■While setting up the display
To prevent battery discharge, ensure that
the engine is running while setting up the
display features.
Fuel consumption informa-
tion
Fuel consumption information can
be displayed on the Center Display.
The fuel consumption information
can be displayed and operated on
the side display. (vehicles with a
10.3-inch display)
System components
Consumption
A
B
C
Page 77 of 390
772-1. Instrument cluster
2
Vehicle status information and indicators
menu screen, and then select “ECO”.
If a screen other than “Trip Information”
is displayed, select “Trip Information”.
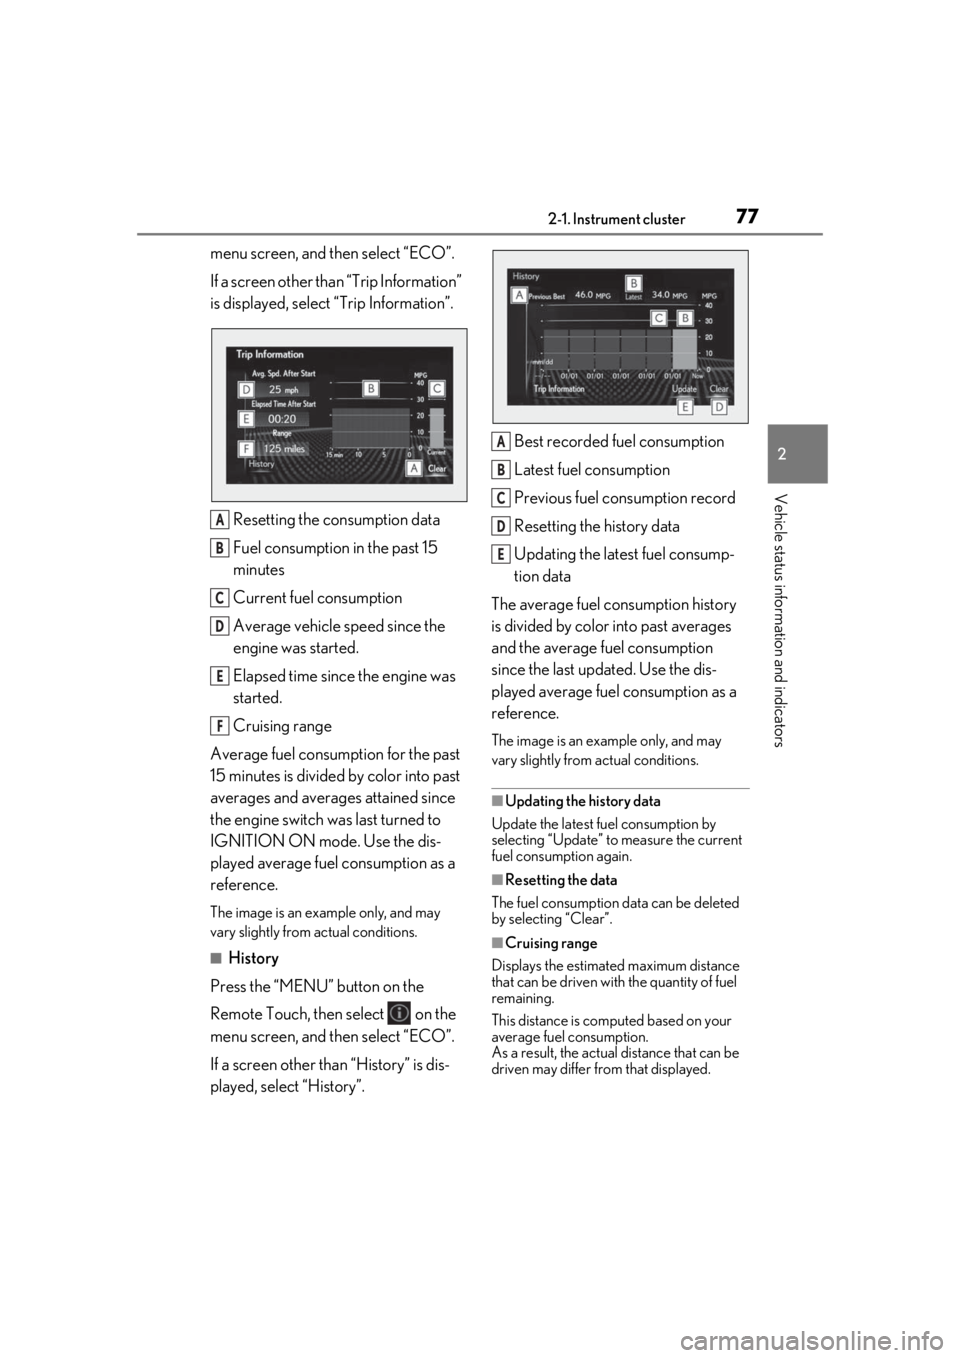
Resetting the consumption data
Fuel consumption in the past 15
minutes
Current fuel consumption
Average vehicle speed since the
engine was started.
Elapsed time since the engine was
started.
Cruising range
Average fuel consumption for the past
15 minutes is divided by color into past
averages and averages attained since
the engine switch was last turned to
IGNITION ON mode. Use the dis-
played average fuel consumption as a
reference.
The image is an example only, and may
vary slightly from actual conditions.
■History
Press the “MENU” button on the
Remote Touch, then select on the
menu screen, and then select “ECO”.
If a screen other than “History” is dis-
played, select “History”. Best recorded fuel consumption
Latest fuel consumption
Previous fuel consumption record
Resetting the history data
Updating the latest fuel consump-
tion data
The average fuel consumption history
is divided by color into past averages
and the average fuel consumption
since the last updated. Use the dis-
played average fuel consumption as a
reference.
The image is an example only, and may
vary slightly from actual conditions.
■Updating the history data
Update the latest fuel consumption by
selecting “Update” to measure the current
fuel consumption again.
■Resetting the data
The fuel consumption data can be deleted
by selecting “Clear”.
■Cruising range
Displays the estimated maximum distance
that can be driven with the quantity of fuel
remaining.
This distance is computed based on your
average fuel consumption.
As a result, the actual distance that can be
driven may differ from that displayed.
A
B
C
D
E
F
A
B
C
D
E
Page 84 of 390

843-1. Key information
The electronic keys are equipped with
the following wireless remote control:Locks the doors ( P.86)
Unlocks the doors ( P.86)
Opens the windows and moon
roof
* ( P.86)
Opens the trunk ( P.91)
Sounds the alarm
*: This setting must be customized at your
Lexus dealer.
■Panic mode
When is pressed for longer than
about one second, an alarm will sound
intermittently and the vehicle lights will flash
to deter any person from trying to break
into or damage your vehicle.
To stop the alarm, press any button on the
electronic key.
To take out the mechanical key, push
the release button and take the key out.
The mechanical key can only be inserted in
one direction, as the key only has grooves
on one side. If the key cannot be inserted in
a lock cylinder, turn it over and re-attempt
to insert it.
After using the mechanical key, store it in
the electronic key. Carry the mechanical
key together with the electronic key. If the
electronic key battery is depleted or the
entry function does not operate properly,
you will need the mechanical key.
( P.306)
NOTICE
●When installing the ba
ttery, make sure
to check the direction of the battery.
Installing the battery in the wrong
direction may cause the battery to
deplete rapidly.
●The surface of the card key may be
damaged, or its coating may peel off in
the following situations:
• The card key is carried together with hard objects, such as coins and keys.
• The card key is scraped with a sharp object, such as the tip of a mechanical
pencil.
• The surface of the card key is wiped with thinner or benzene.
Wireless remote control
A
B
C
D
E
Using the mechanical key
Page 94 of 390
943-2. Opening, closing and locking the doors and trunk
●When an exterior alarm sounds once for
5 seconds
●When an interior alarm sounds continu-
ously
■Battery-saving function
The battery-saving fu nction will be acti-
vated in order to prevent the electronic key
battery and the vehicle battery from being
discharged while the vehicle is not in opera-
tion for a long time.
●In the following situations, the smart
access system with pu sh-button start may
take some time to unlock the doors.
• The electronic key has been left within approximately 6 ft. (2 m) of the outside of
the vehicle for 10 minutes or longer.
• The smart access system with push-but- ton start has not been used for 5 days or
longer.
●If the smart access system with push-but-
ton start has not been used for 14 days or
longer, the doors cann ot be unlocked at
the passenger door. In this case, take hold
of the driver’s door handle, or use the
wireless remote control or mechanical
key, to unlock the doors.
■Electronic Key Battery-Saving Function
When battery-saving mode is set, battery
depletion is minimized by stopping the elec-
tronic key from receiving radio waves.
Press twice while pressing and holding
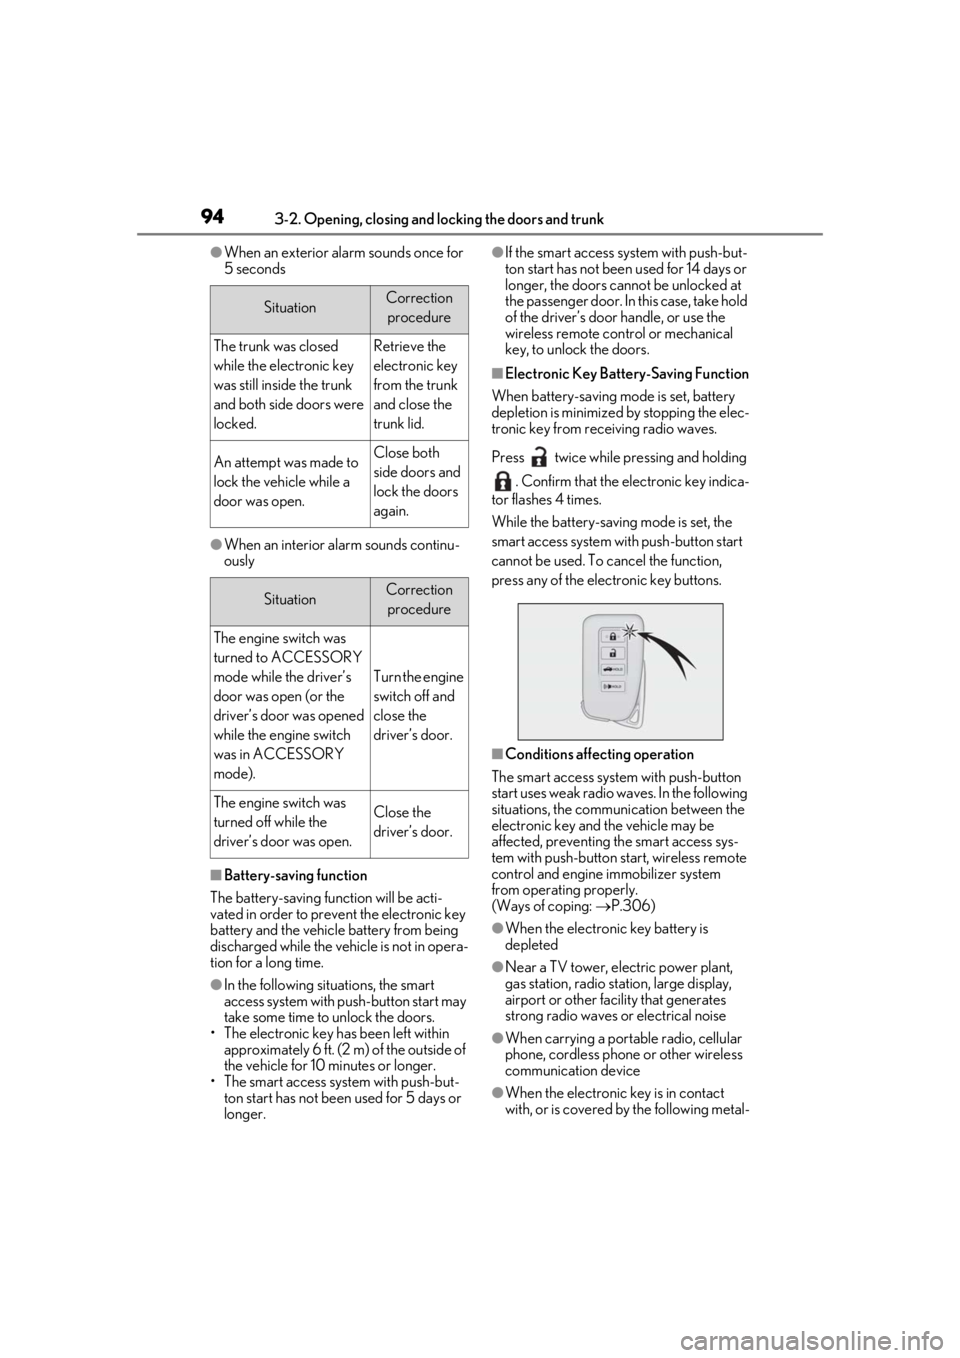
. Confirm that the electronic key indica-
tor flashes 4 times.
While the battery-saving mode is set, the
smart access system with push-button start
cannot be used. To cancel the function,
press any of the electronic key buttons.
■Conditions affecting operation
The smart access system with push-button
start uses weak radio waves. In the following
situations, the communication between the
electronic key and the vehicle may be
affected, preventing the smart access sys-
tem with push-button start, wireless remote
control and engine immobilizer system
from operating properly.
(Ways of coping: P.306)
●When the electronic key battery is
depleted
●Near a TV tower, electric power plant,
gas station, radio stat ion, large display,
airport or other fac ility that generates
strong radio waves or electrical noise
●When carrying a portable radio, cellular
phone, cordless phone or other wireless
communication device
●When the electronic key is in contact
with, or is covered by the following metal-
SituationCorrection
procedure
The trunk was closed
while the electronic key
was still inside the trunk
and both side doors were
locked.Retrieve the
electronic key
from the trunk
and close the
trunk lid.
An attempt was made to
lock the vehicle while a
door was open.Close both
side doors and
lock the doors
again.
SituationCorrection procedure
The engine switch was
turned to ACCESSORY
mode while the driver’s
door was open (or the
driver’s door was opened
while the engine switch
was in ACCESSORY
mode).
Turn the engine
switch off and
close the
driver’s door.
The engine switch was
turned off while the
driver’s door was open.Close the
driver’s door.
Page 95 of 390

953-2. Opening, closing and locking the doors and trunk
3
Before driving
lic objects
• Cards to which aluminum foil is attached
• Cigarette boxes that have aluminum foil
inside
• Metallic wallets or bags
•Coins
• Hand warmers made of metal
• Media such as CDs and DVDs
●When other wireless ke ys (that emit radio
waves) are being used nearby
●When carrying the electronic key
together with the following devices that
emit radio waves
• Another vehicle’s electronic key or a wireless key that emits radio waves
• Personal computers or personal digital
assistants (PDAs)
• Digital audio players
• Portable game systems
●If window tint with a metallic content or
metallic objects are attached to the rear
window
●When the electronic key is placed near a
battery charger or electronic devices
■Note for the entry function
●Even when the electronic key is within the
effective range (detection areas), the sys-
tem may not operate properly in the fol-
lowing cases:
• The electronic key is too close to the win- dow or outside door handle, near the
ground, or in a high place when the doors
are locked or unlocked.
• The electronic key is near the ground or in a high place, or too close to the rear
bumper center when the trunk is opened.
• The electronic key is on the instrument panel, rear package tray or floor, or in the
door pockets or glove box when the
engine is started or engine switch modes
are changed.
●Do not leave the electronic key on top of
the instrument panel or near the door
pockets when exiting the vehicle.
Depending on the radio wave reception
conditions, it may be detected by the
antenna outside the cabin and the doors
will become lockable from the outside,
possibly trapping the electronic key
inside the vehicle.
●As long as the electron ic key is within the effective range, the doors may be locked
or unlocked by anyone. However, only
the doors detecting the electronic key
can be used to unlock the vehicle.
●Even if the electronic
key is not inside the
vehicle, it may be po ssible to start the
engine if the electronic key is near the
window.
●The doors may unlock or lock if a large
amount of water splashes on the door
handle, such as in the rain or in a car
wash, when the electronic key is within
the effective range. (The doors will auto-
matically be locked after approximately
60 seconds if the doors are not opened
and closed.)
●If the wireless remote control is used to
lock the doors when the electronic key is
near the vehicle, there is a possibility that
the door may not be unlocked by the
entry function. (Use the wireless remote
control to unlock the doors.)
●Touching the door lock or unlock sensor
while wearing gloves may prevent lock or
unlock operation.
●When the lock operation is performed
using the lock sensor, recognition signals
will be shown up to two consecutive
times. After this, no recognition signals
will be given.
●If the door handle becomes wet while the
electronic key is within the effective
range, the door may lock and unlock
repeatedly. In this case, follow the follow-
ing correction procedures to wash the
vehicle:
• Place the electronic key in a location 6 ft. (2 m) or more away from the vehicle.
(Take care to ensure that the key is not
stolen.)
• Set the electronic key to battery-saving mode to disable the smart access system
with push-button start. ( P.94)
●If the electronic key is inside the vehicle
and a door handle becomes wet during a
car wash, a message may be shown on
the multi-information display and a
buzzer will sound outside the vehicle. To
turn off the alarm, lock both side doors.
●The lock sensor may not work properly if
it comes into contact with ice, snow, mud,
Page 97 of 390

973-3. Adjusting the seats
3
Before driving
3-3.Adjusting the seats
Seat position adjustment
Seatback angle adjustment
Seat cushion (front) angle adjust-
ment
Vertical height adjustment
Lumbar support adjustment (if
equipped)
■Power easy access system
The driver’s seat and steering wheel move
in accordance with engine switch mode and
the driver’s seat belt condition. ( P.100)
■When adjusting the seat
●Take care when adjusting the seat so that
the head restraint does not touch the ceil-
ing.
●When folding down a rear seatback, if it
interferes with a front seatback, adjust the
front seat position so that the seats no
longer interfere with each other. How-
ever, if adjusting the front seat position
causes the correct driving posture to not
be maintained, return the rear seatback
to its original position. ( P.99)
Front seats
WARNING
■When adjusting the seat position
●Take care when ad justing the seat
position to ensure that other passen-
gers are not injured by the moving
seat.
●Do not put your hands under the seat
or near the moving parts to avoid
injury.
Fingers or hands may become jammed in
the seat mechanism.
●Make sure to leave enough space
around the feet so they do not get
stuck.
■Seat adjustment
To reduce the risk of sliding under the lap
belt during a collision, do not recline the
seat more than necessary.
If the seat is too reclined, the lap belt may
slide past the hips and apply restraint
forces directly to the abdomen, or your
neck may contact the shoulder belt,
increasing the risk of death or serious
injury in the event of an accident.
Adjustments should not be made while
driving as the seat may unexpectedly
move and cause the driver to lose control
of the vehicle.
Adjustment procedure
A
B
C
D
E