display LEXUS RC300 2020 Owner's Manual
[x] Cancel search | Manufacturer: LEXUS, Model Year: 2020, Model line: RC300, Model: LEXUS RC300 2020Pages: 390, PDF Size: 8.65 MB
Page 75 of 390
752-1. Instrument cluster
2
Vehicle status information and indicators
Speed Setting*
Select to set the desired vehicle speed at
which the speed indicato r will begin to be
displayed.
*: Always observe the legal speed limit when driving on public roads.
■Clock ( P.64)
Select to switch between 12-hour dis-
play and 24-hour display.
■Vehicle Settings
Scheduled Maintenance ( P.240)
Select to reset th e message indicating
maintenance is required , after the required
maintenance is performed.
Oil maintenance ( P.252)
Select to reset the en gine oil maintenance
information (message indicating mainte-
nance is required and distance until the
next oil change) after engine oil mainte-
nance is performed.
■Meter settings
Language
Select to change the language on the dis-
play.
Units
Select to change the units of measure dis-
played.
Eco Driving Indicator Light
( P.72)
Select to enable/disable the Eco Driving
Indicator Light.
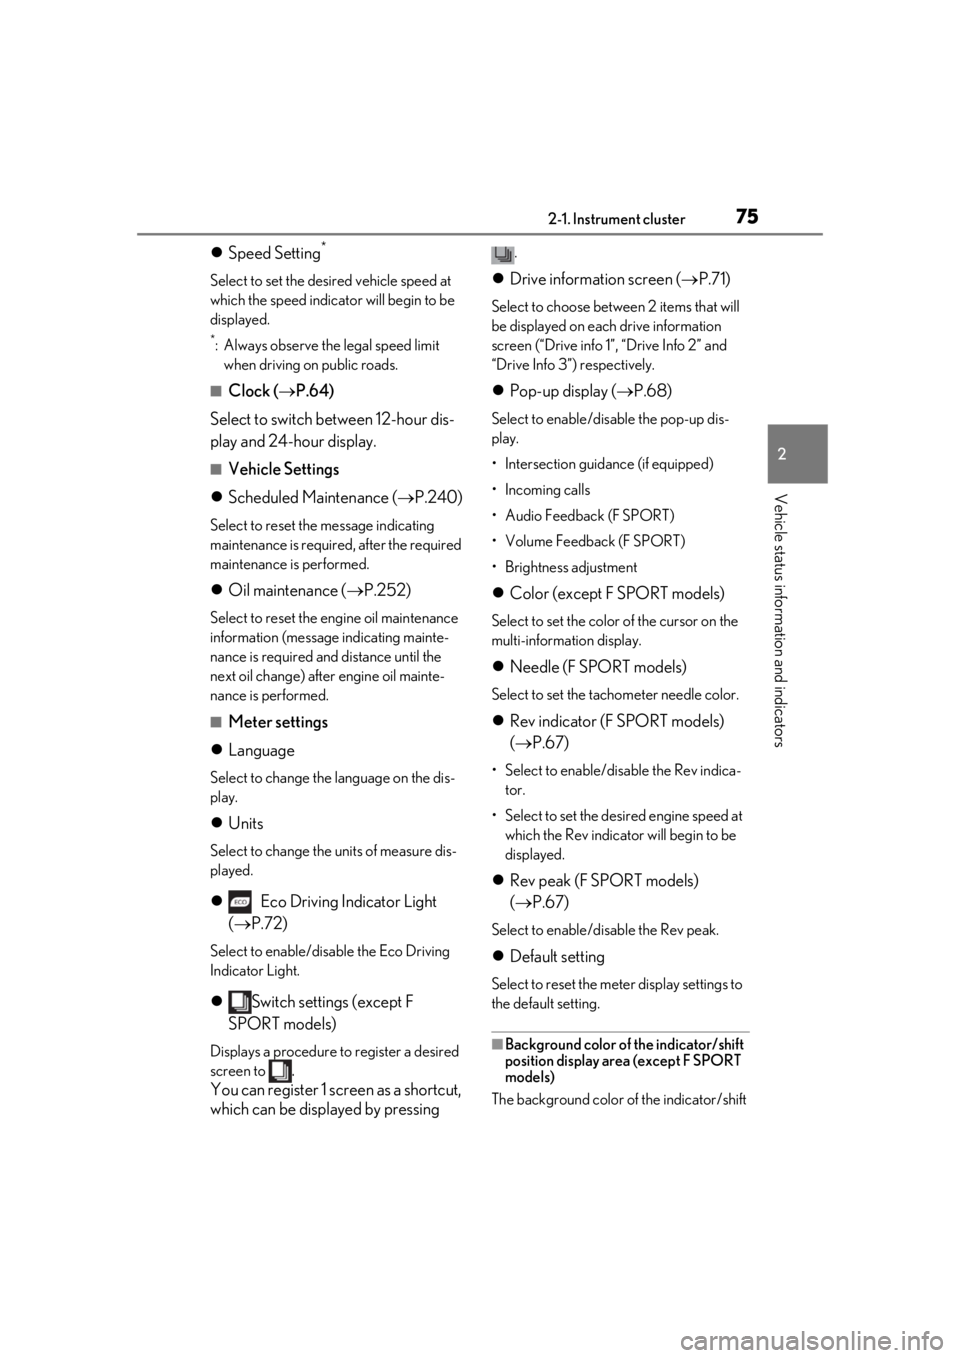
Switch settings (except F
SPORT models)
Displays a procedure to register a desired
screen to
.
You can register 1 screen as a shortcut,
which can be displayed by pressing
.
Drive information screen ( P.71)
Select to choose between 2 items that will
be displayed on each drive information
screen (“Drive info 1”, “Drive Info 2” and
“Drive Info 3”) respectively.
Pop-up display ( P.68)
Select to enable/disable the pop-up dis-
play.
• Intersection guidance (if equipped)
• Incoming calls
• Audio Feedback (F SPORT)
• Volume Feedback (F SPORT)
• Brightness adjustment
Color (except F SPORT models)
Select to set the color of the cursor on the
multi-information display.
Needle (F SPORT models)
Select to set the tachometer needle color.
Rev indicator (F SPORT models)
( P.67)
• Select to enable/disable the Rev indica-
tor.
• Select to set the desired engine speed at which the Rev indicator will begin to be
displayed.
Rev peak (F SPORT models)
( P.67)
Select to enable/disable the Rev peak.
Default setting
Select to reset the meter display settings to
the default setting.
■Background color of the indicator/shift
position display area (except F SPORT
models)
The background color of the indicator/shift
Page 76 of 390
762-1. Instrument cluster
position display area is changed according
to the driving mode as follows (P.192):
●Eco drive mode: Blue
●Sport mode: Red
■G-force display (if equipped)
The G-force values may not be zero even
when the vehicle is parked, such as when it
is parked on an incline.
■Suspension of the settings display
●Some settings cannot be changed while
driving. When changing settings, park
the vehicle in a safe place.
●If a warning message is displayed, opera-
tion of the settings display will be sus-
pended.
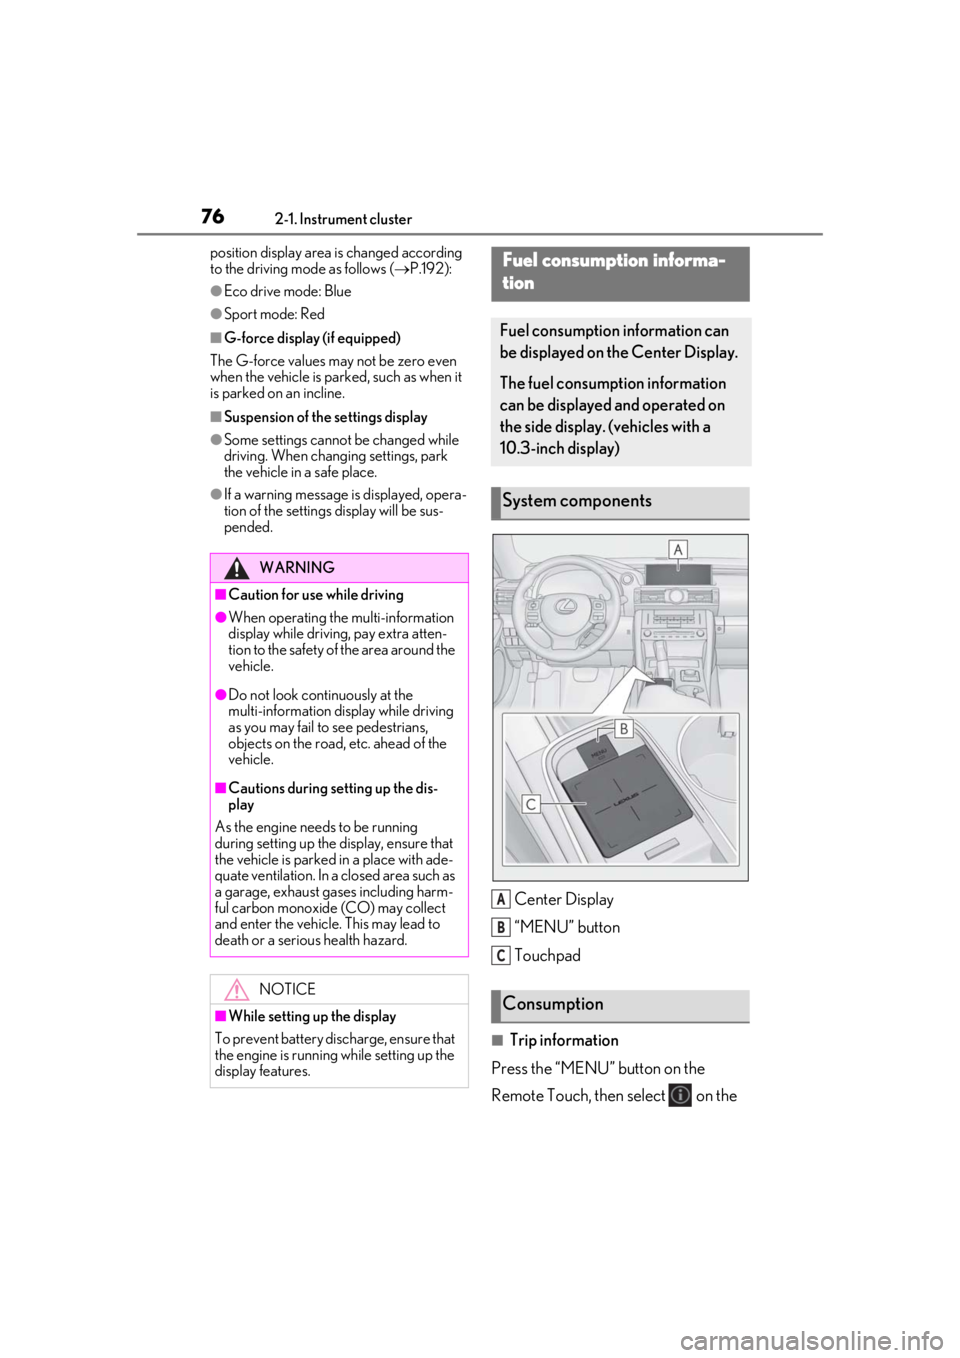
Center Display
“MENU” button
Touchpad
■Trip information
Press the “MENU” button on the
Remote Touch, then select on the
WARNING
■Caution for use while driving
●When operating the multi-information
display while driving, pay extra atten-
tion to the safety of the area around the
vehicle.
●Do not look continuously at the
multi-information di splay while driving
as you may fail to see pedestrians,
objects on the road, etc. ahead of the
vehicle.
■Cautions during setting up the dis-
play
As the engine needs to be running
during setting up the display, ensure that
the vehicle is parked in a place with ade-
quate ventilation. In a closed area such as
a garage, exhaust gases including harm-
ful carbon monoxide (CO) may collect
and enter the vehicle. This may lead to
death or a serious health hazard.
NOTICE
■While setting up the display
To prevent battery discharge, ensure that
the engine is running while setting up the
display features.
Fuel consumption informa-
tion
Fuel consumption information can
be displayed on the Center Display.
The fuel consumption information
can be displayed and operated on
the side display. (vehicles with a
10.3-inch display)
System components
Consumption
A
B
C
Page 77 of 390
772-1. Instrument cluster
2
Vehicle status information and indicators
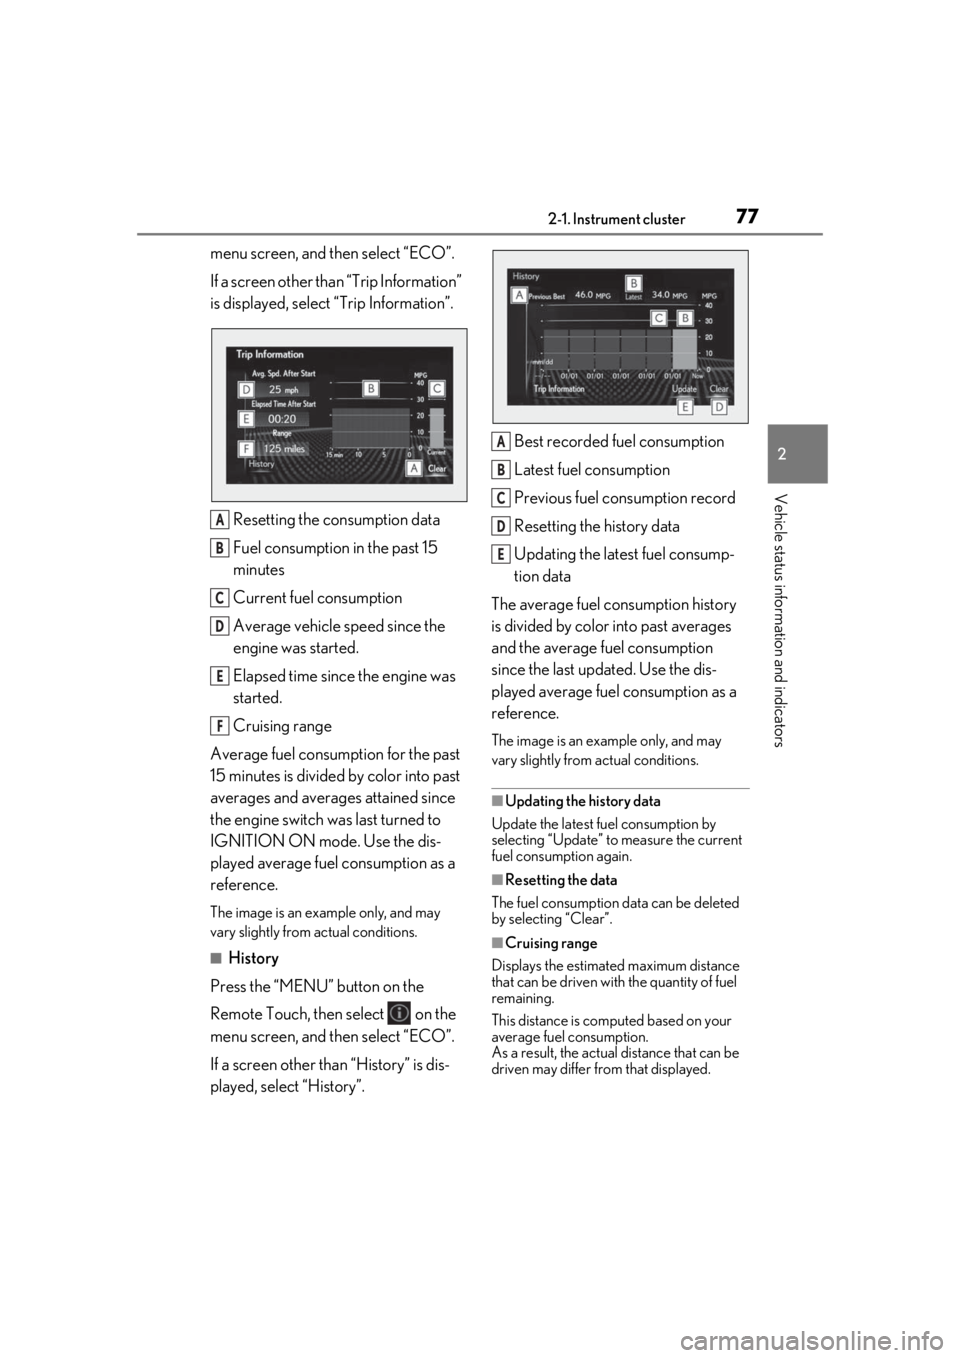
menu screen, and then select “ECO”.
If a screen other than “Trip Information”
is displayed, select “Trip Information”.
Resetting the consumption data
Fuel consumption in the past 15
minutes
Current fuel consumption
Average vehicle speed since the
engine was started.
Elapsed time since the engine was
started.
Cruising range
Average fuel consumption for the past
15 minutes is divided by color into past
averages and averages attained since
the engine switch was last turned to
IGNITION ON mode. Use the dis-
played average fuel consumption as a
reference.
The image is an example only, and may
vary slightly from actual conditions.
■History
Press the “MENU” button on the
Remote Touch, then select on the
menu screen, and then select “ECO”.
If a screen other than “History” is dis-
played, select “History”. Best recorded fuel consumption
Latest fuel consumption
Previous fuel consumption record
Resetting the history data
Updating the latest fuel consump-
tion data
The average fuel consumption history
is divided by color into past averages
and the average fuel consumption
since the last updated. Use the dis-
played average fuel consumption as a
reference.
The image is an example only, and may
vary slightly from actual conditions.
■Updating the history data
Update the latest fuel consumption by
selecting “Update” to measure the current
fuel consumption again.
■Resetting the data
The fuel consumption data can be deleted
by selecting “Clear”.
■Cruising range
Displays the estimated maximum distance
that can be driven with the quantity of fuel
remaining.
This distance is computed based on your
average fuel consumption.
As a result, the actual distance that can be
driven may differ from that displayed.
A
B
C
D
E
F
A
B
C
D
E
Page 78 of 390
782-1. Instrument cluster
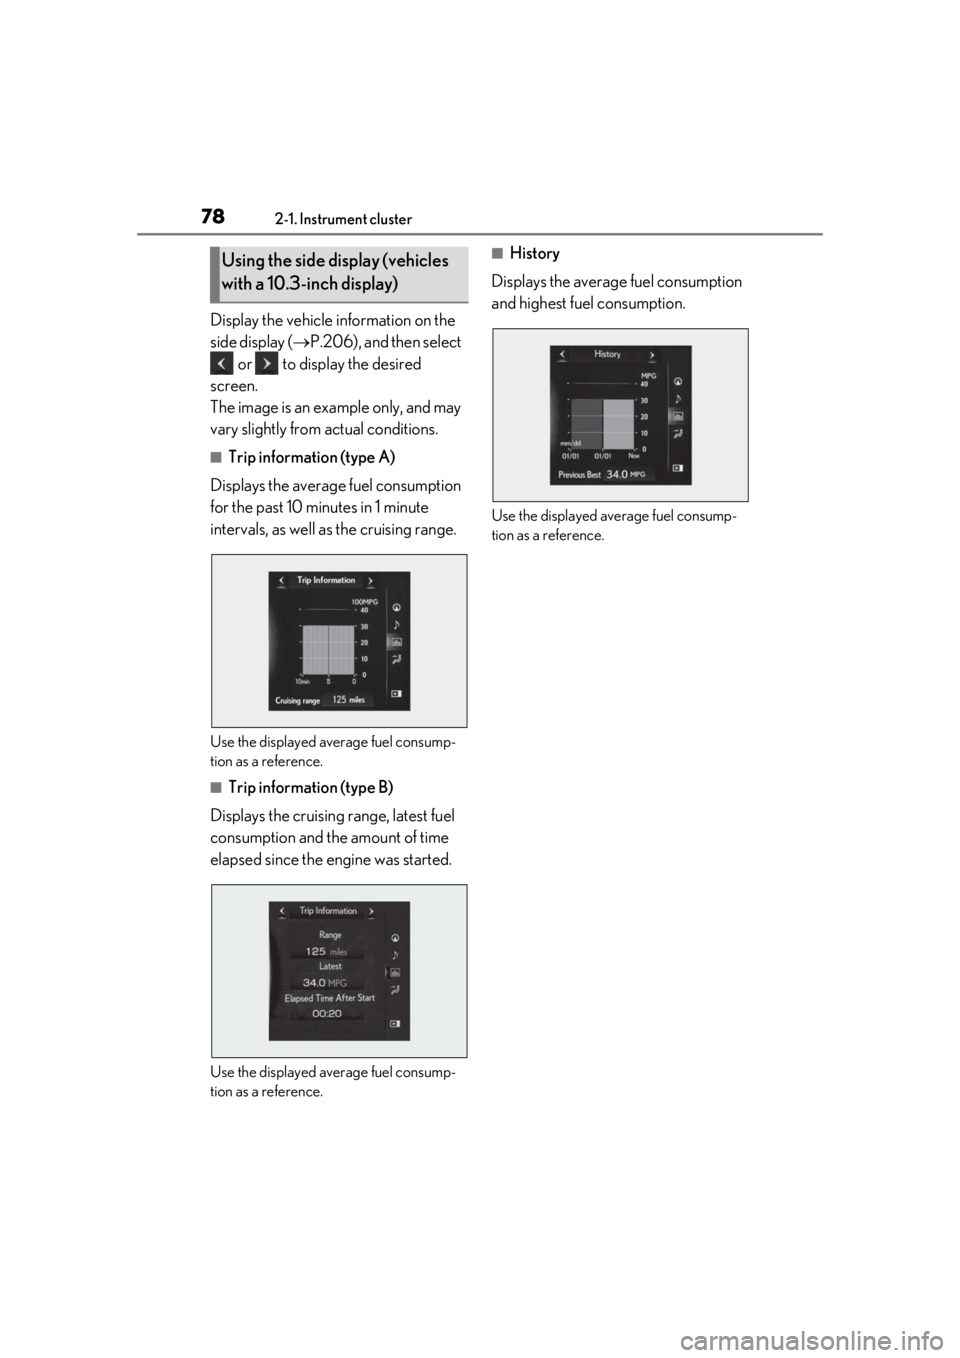
Display the vehicle information on the
side display (P.206), and then select
or to display the desired
screen.
The image is an example only, and may
vary slightly from actual conditions.
■Trip information (type A)
Displays the average fuel consumption
for the past 10 minutes in 1 minute
intervals, as well as the cruising range.
Use the displayed average fuel consump-
tion as a reference.
■Trip information (type B)
Displays the cruising range, latest fuel
consumption and the amount of time
elapsed since the engine was started.
Use the displayed average fuel consump-
tion as a reference.
■History
Displays the average fuel consumption
and highest fuel consumption.
Use the displayed average fuel consump-
tion as a reference.
Using the side display (vehicles
with a 10.3-inch display)
Page 82 of 390
823-1. Key information
3-1.Key information
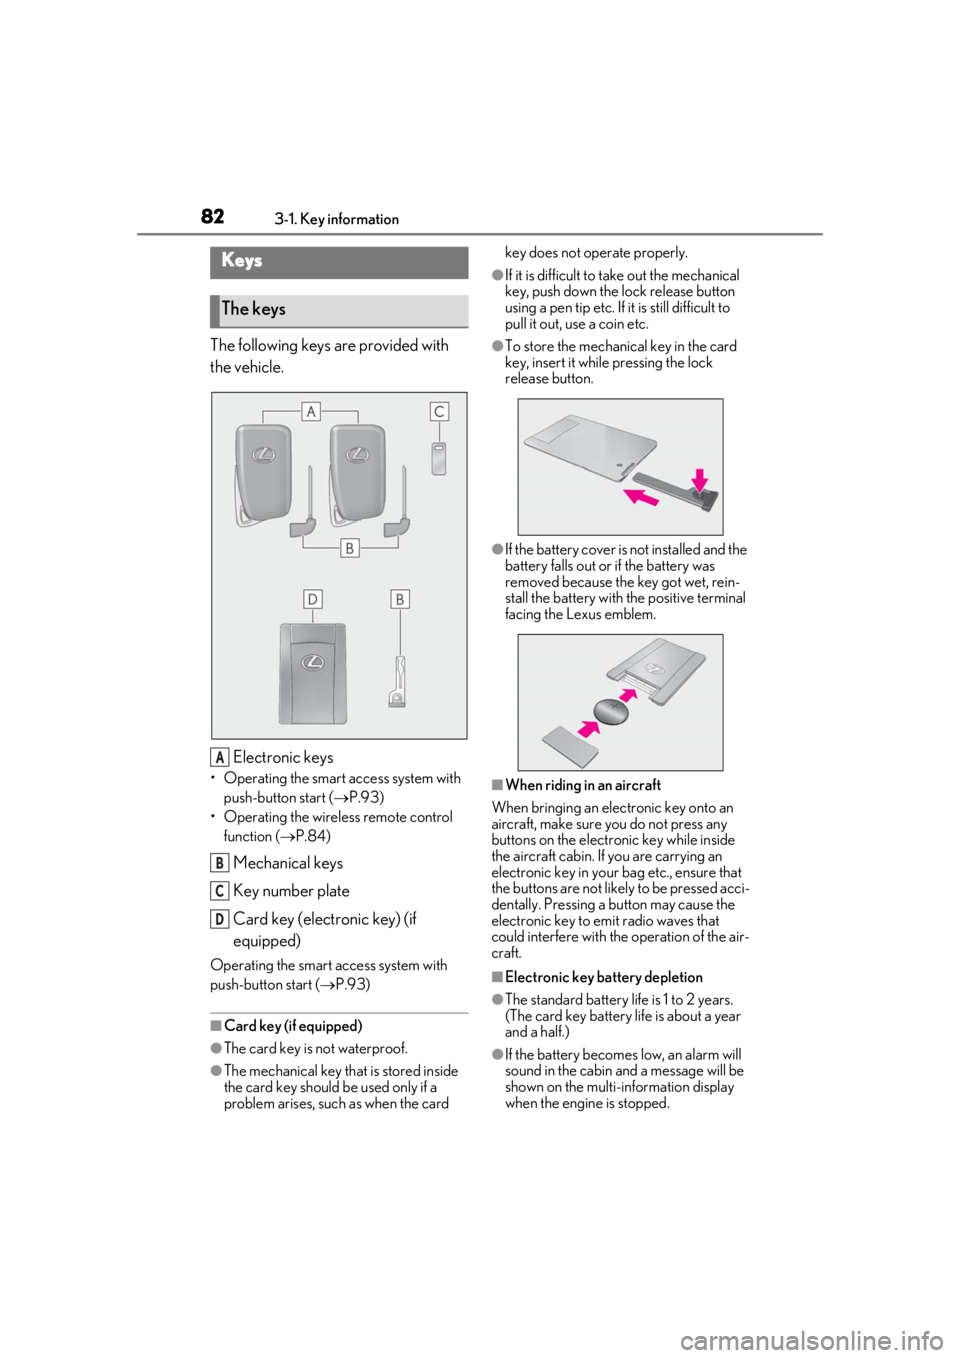
The following keys are provided with
the vehicle.
Electronic keys
• Operating the smart access system with push-button start ( P.93)
• Operating the wireless remote control function ( P.84)
Mechanical keys
Key number plate
Card key (electronic key) (if
equipped)
Operating the smart access system with
push-button start ( P.93)
■Card key (if equipped)
●The card key is not waterproof.
●The mechanical key that is stored inside
the card key should be used only if a
problem arises, such as when the card key does not operate properly.
●If it is difficult to take out the mechanical
key, push down the lock release button
using a pen tip etc. If it is still difficult to
pull it out, use a coin etc.
●To store the mechanical key in the card
key, insert it while pressing the lock
release button.
●If the battery cover is not installed and the
battery falls out or if the battery was
removed because the key got wet, rein-
stall the battery with the positive terminal
facing the Lexus emblem.
■When riding in an aircraft
When bringing an electronic key onto an
aircraft, make sure you do not press any
buttons on the electronic key while inside
the aircraft cabin. If you are carrying an
electronic key in your bag etc., ensure that
the buttons are not likely to be pressed acci-
dentally. Pressing a button may cause the
electronic key to emit radio waves that
could interfere with the operation of the air-
craft.
■Electronic key battery depletion
●The standard battery life is 1 to 2 years.
(The card key battery life is about a year
and a half.)
●If the battery becomes low, an alarm will
sound in the cabin and a message will be
shown on the multi-information display
when the engine is stopped.
Keys
The keys
A
B
C
D
Page 87 of 390
873-2. Opening, closing and locking the doors and trunk
3
Before driving
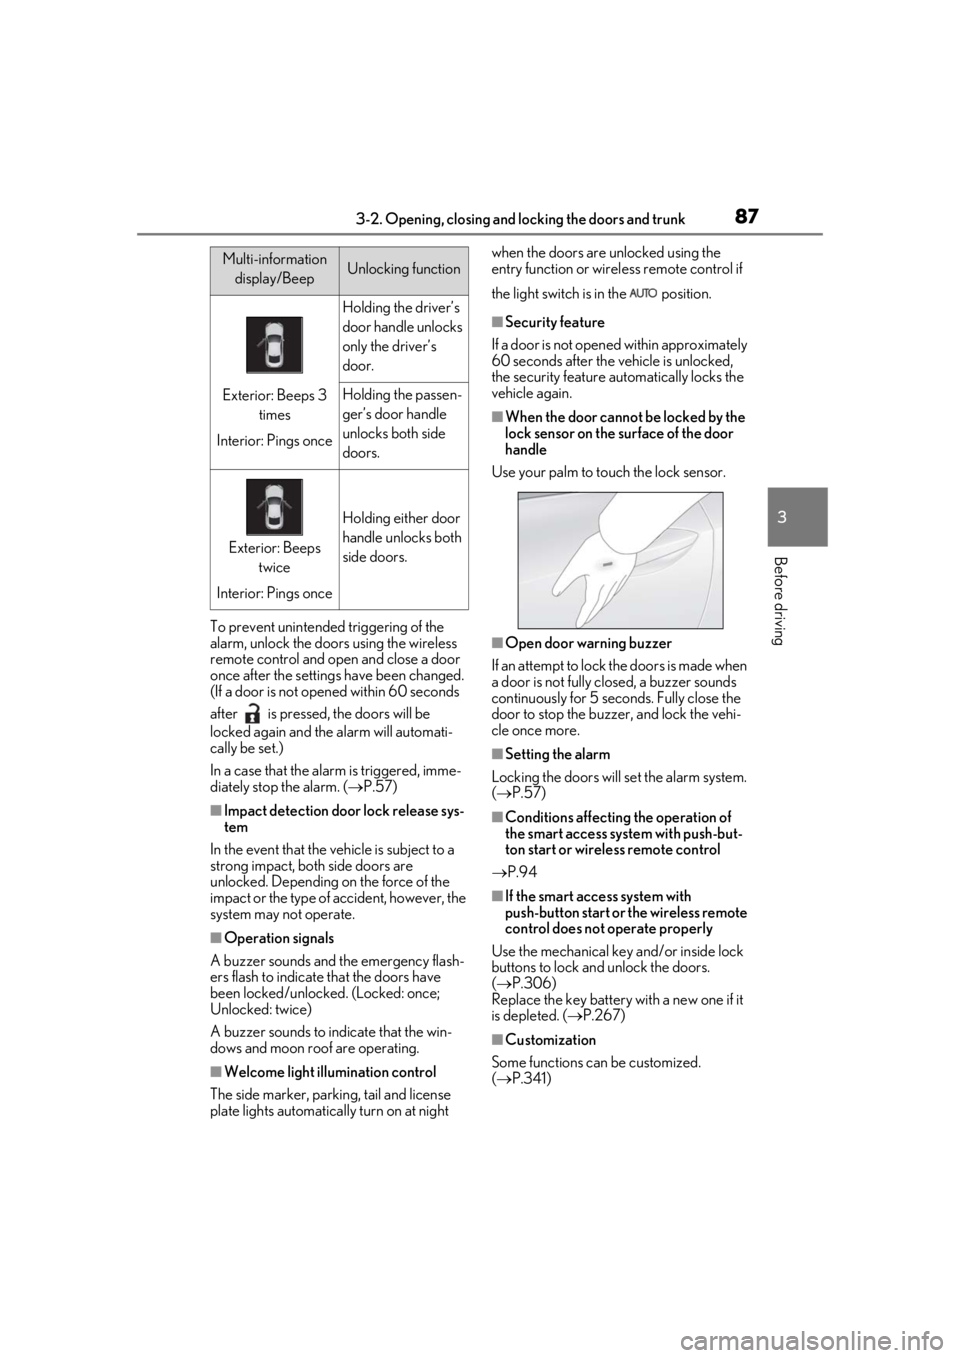
To prevent unintended triggering of the
alarm, unlock the doors using the wireless
remote control and open and close a door
once after the settings have been changed.
(If a door is not opened within 60 seconds
after is pressed, the doors will be
locked again and the alarm will automati-
cally be set.)
In a case that the alarm is triggered, imme-
diately stop the alarm. (P.57)
■Impact detection door lock release sys-
tem
In the event that the vehicle is subject to a
strong impact, both side doors are
unlocked. Depending on the force of the
impact or the type of accident, however, the
system may not operate.
■Operation signals
A buzzer sounds and the emergency flash-
ers flash to indicate that the doors have
been locked/unlocked. (Locked: once;
Unlocked: twice)
A buzzer sounds to indicate that the win-
dows and moon roof are operating.
■Welcome light illumination control
The side marker, parking, tail and license
plate lights automatically turn on at night when the doors are unlocked using the
entry function or wireless remote control if
the light switch is in the position.
■Security feature
If a door is not opened within approximately
60 seconds after the vehicle is unlocked,
the security feature automatically locks the
vehicle again.
■When the door cannot be locked by the
lock sensor on the surface of the door
handle
Use your palm to touch the lock sensor.
■Open door warning buzzer
If an attempt to lock the doors is made when
a door is not fully closed, a buzzer sounds
continuously for 5 seconds. Fully close the
door to stop the buzzer, and lock the vehi-
cle once more.
■Setting the alarm
Locking the doors will set the alarm system.
( P.57)
■Conditions affecting the operation of
the smart access system with push-but-
ton start or wireless remote control
P.94
■If the smart access system with
push-button start or the wireless remote
control does not operate properly
Use the mechanical key and/or inside lock
buttons to lock and unlock the doors.
( P.306)
Replace the key battery with a new one if it
is depleted. ( P.267)
■Customization
Some functions can be customized.
( P.341)
Multi-information
display/BeepUnlocking function
Exterior: Beeps 3 times
Interior: Pings once
Holding the driver’s
door handle unlocks
only the driver’s
door.
Holding the passen-
ger’s door handle
unlocks both side
doors.
Exterior: Beeps twice
Interior: Pings once
Holding either door
handle unlocks both
side doors.
Page 88 of 390
883-2. Opening, closing and locking the doors and trunk
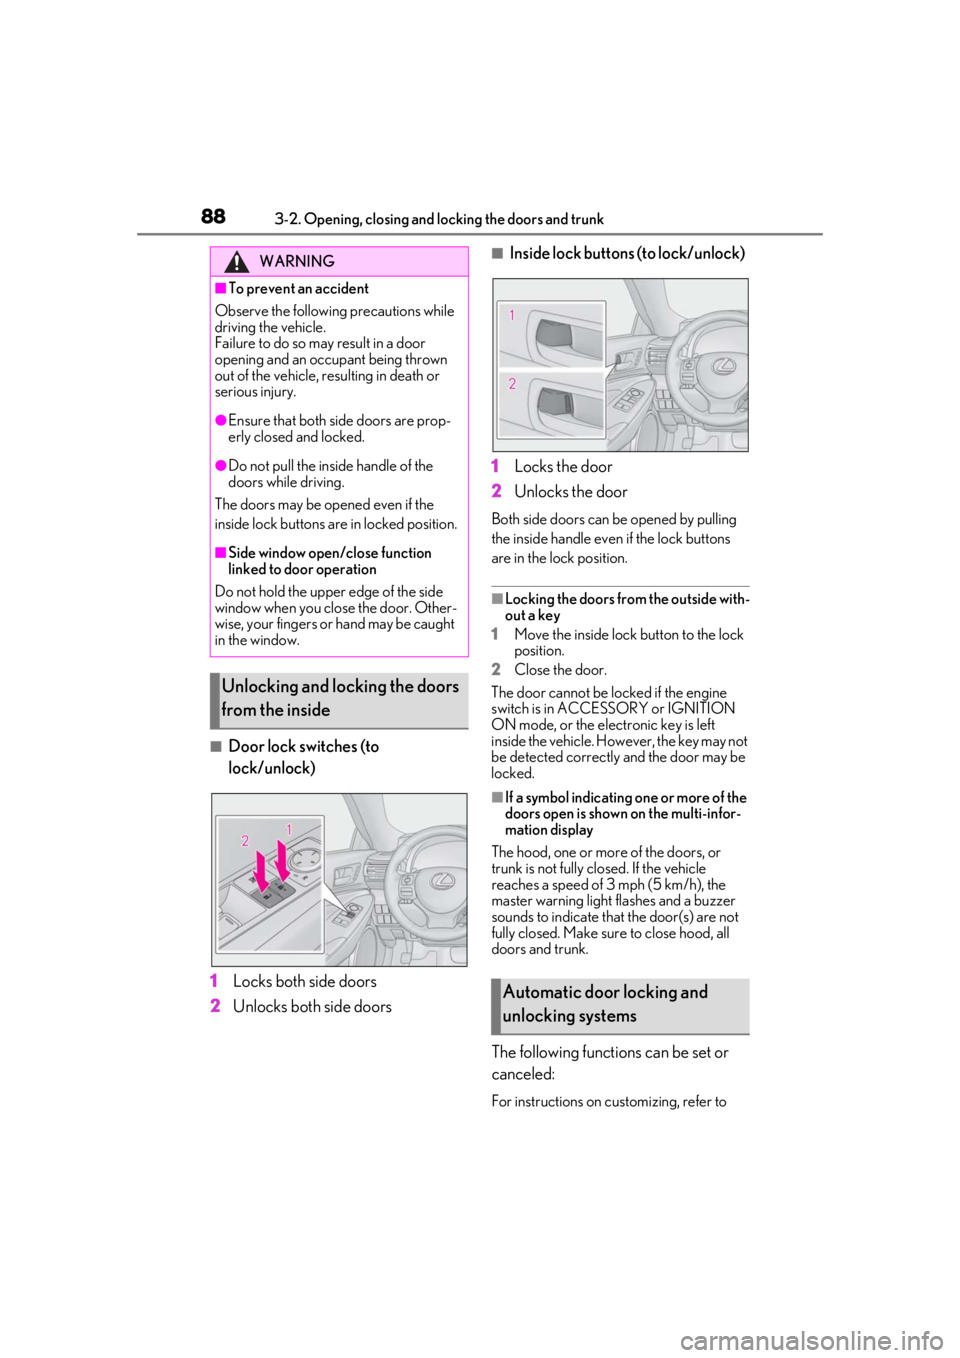
■Door lock switches (to
lock/unlock)
1
Locks both side doors
2
Unlocks both side doors
■Inside lock buttons (to lock/unlock)
1
Locks the door
2
Unlocks the door
Both side doors can be opened by pulling
the inside handle even if the lock buttons
are in the lock position.
■Locking the doors from the outside with-
out a key
1
Move the inside lock button to the lock
position.
2
Close the door.
The door cannot be locked if the engine
switch is in ACCESSORY or IGNITION
ON mode, or the electronic key is left
inside the vehicle. However, the key may not
be detected correctly and the door may be
locked.
■If a symbol indicating one or more of the
doors open is shown on the multi-infor-
mation display
The hood, one or more of the doors, or
trunk is not fully closed. If the vehicle
reaches a speed of 3 mph (5 km/h), the
master warning light flashes and a buzzer
sounds to indicate that the door(s) are not
fully closed. Make sure to close hood, all
doors and trunk.
The following functions can be set or
canceled:
For instructions on customizing, refer to
WARNING
■To prevent an accident
Observe the following precautions while
driving the vehicle.
Failure to do so may result in a door
opening and an occupant being thrown
out of the vehicle, re sulting in death or
serious injury.
●Ensure that both side doors are prop-
erly closed and locked.
●Do not pull the inside handle of the
doors while driving.
The doors may be opened even if the
inside lock buttons are in locked position.
■Side window open/close function
linked to door operation
Do not hold the upper edge of the side
window when you close the door. Other-
wise, your fingers or hand may be caught
in the window.
Unlocking and locking the doors
from the inside
Automatic door locking and
unlocking systems
Page 92 of 390
923-2. Opening, closing and locking the doors and trunk
■If the smart access system with
push-button start or the wireless remote
control does not operate properly
Use the mechanical key to unlock the trunk.
( P.306)
Replace the key battery with a new one if it
is depleted. ( P.267)
■If a symbol indicating the trunk opens is
shown on the multi-information display
P.88
■Customization
Some functions can be customized.
( P.341)
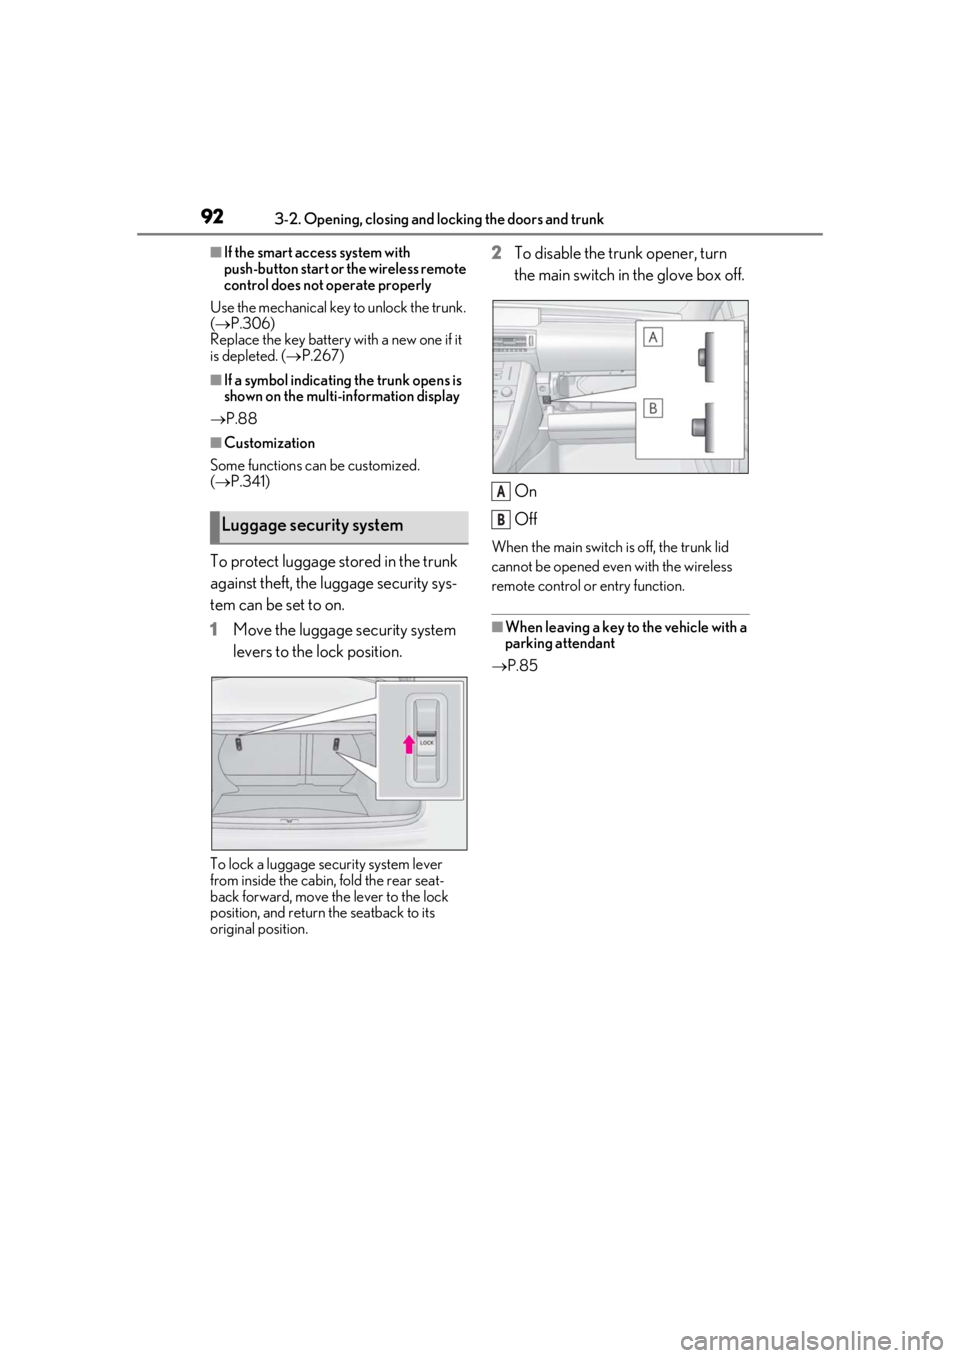
To protect luggage stored in the trunk
against theft, the luggage security sys-
tem can be set to on.
1 Move the luggage security system
levers to the lock position.
To lock a luggage security system lever
from inside the cabin, fold the rear seat-
back forward, move the lever to the lock
position, and return the seatback to its
original position.
2To disable the trunk opener, turn
the main switch in the glove box off.
On
Off
When the main switch is off, the trunk lid
cannot be opened even with the wireless
remote control or entry function.
■When leaving a key to the vehicle with a
parking attendant
P.85
Luggage security system
A
B
Page 93 of 390

933-2. Opening, closing and locking the doors and trunk
3
Before driving
■Antenna location
Antennas outside the cabin
Antennas inside the cabin
Antenna inside the trunk
Antenna outside the trunk
■Effective range (areas within which the
electronic key is detected)When locking or unlocking the doors
The system can be operated when the
electronic key is within about 2.3 ft. (0.7 m)
of an outside door handle. (Only the doors
detecting the key can be operated.)
When opening the trunk
The system can be operated when the
electronic key is within about 2.3 ft. (0.7 m)
of the trunk release button.
When starting the engine or changing
engine switch modes
The system can be operated when the
electronic key is inside the vehicle.
■Alarms and warning messages
An alarm sounds and warning messages
are displayed on the multi-information dis-
play to protect against unexpected acci-
dents or theft of the vehicle resulting from
erroneous operation. When a warning mes-
sage is displayed, take appropriate mea-
sures based on the displayed message.
( P.292)
When only an alarm sounds, circumstances
and correction procedures are as follows.
Smart access system with
push-button start
The following operations can be
performed simply by carrying the
electronic key (including the card
key) on your person, for example in
your pocket. The driver should
always carry the electronic key.
Locks and unlocks the doors
( P.86)
Opens the trunk ( P.90)
Starts the engine ( P.125)
A
B
C
D
A
B
C
Page 94 of 390
943-2. Opening, closing and locking the doors and trunk
●When an exterior alarm sounds once for
5 seconds
●When an interior alarm sounds continu-
ously
■Battery-saving function
The battery-saving fu nction will be acti-
vated in order to prevent the electronic key
battery and the vehicle battery from being
discharged while the vehicle is not in opera-
tion for a long time.
●In the following situations, the smart
access system with pu sh-button start may
take some time to unlock the doors.
• The electronic key has been left within approximately 6 ft. (2 m) of the outside of
the vehicle for 10 minutes or longer.
• The smart access system with push-but- ton start has not been used for 5 days or
longer.
●If the smart access system with push-but-
ton start has not been used for 14 days or
longer, the doors cann ot be unlocked at
the passenger door. In this case, take hold
of the driver’s door handle, or use the
wireless remote control or mechanical
key, to unlock the doors.
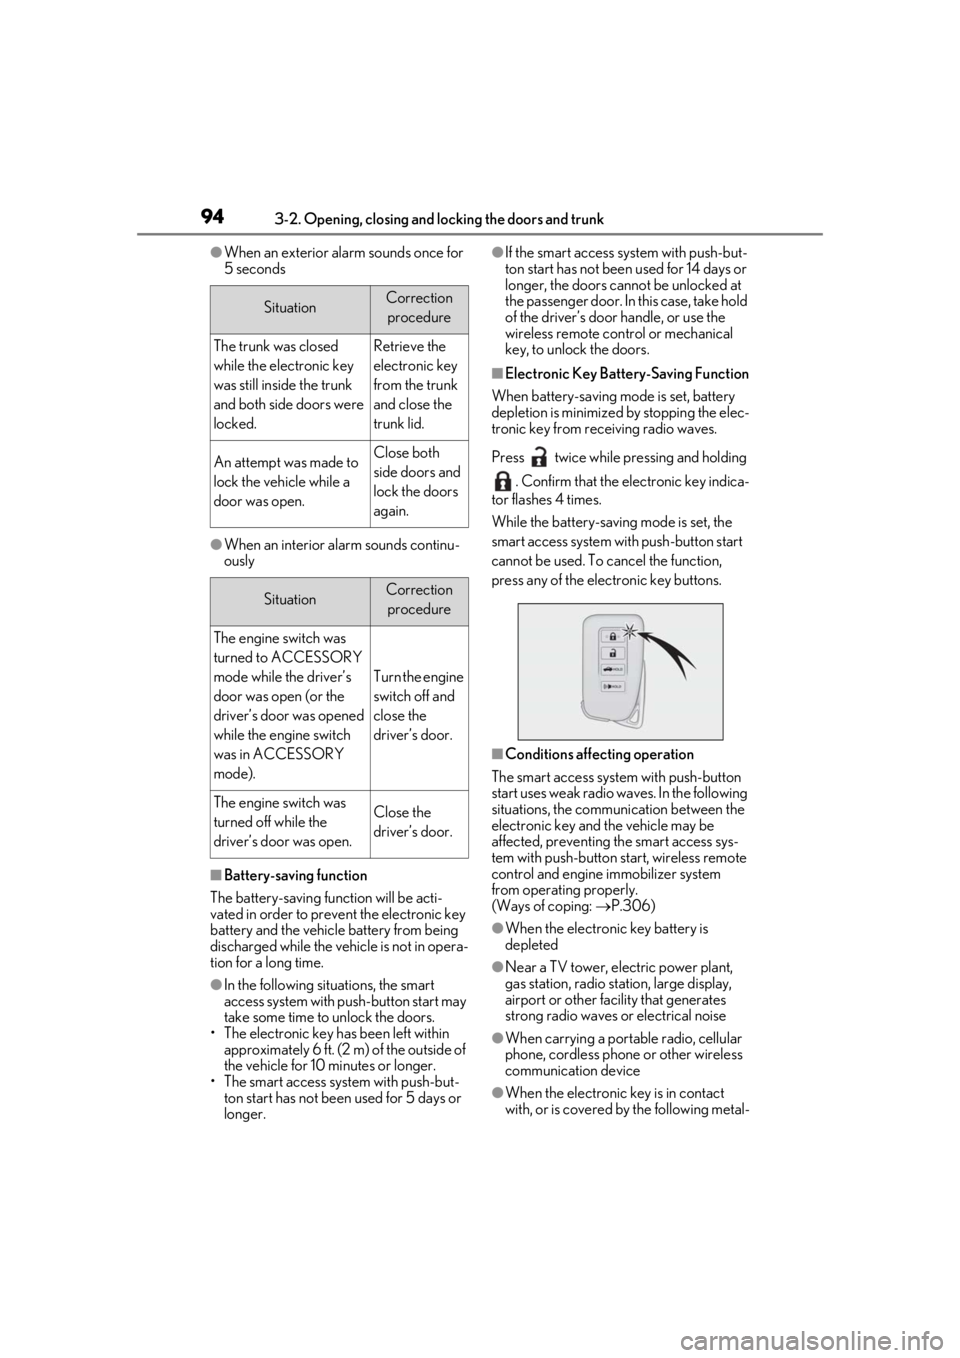
■Electronic Key Battery-Saving Function
When battery-saving mode is set, battery
depletion is minimized by stopping the elec-
tronic key from receiving radio waves.
Press twice while pressing and holding
. Confirm that the electronic key indica-
tor flashes 4 times.
While the battery-saving mode is set, the
smart access system with push-button start
cannot be used. To cancel the function,
press any of the electronic key buttons.
■Conditions affecting operation
The smart access system with push-button
start uses weak radio waves. In the following
situations, the communication between the
electronic key and the vehicle may be
affected, preventing the smart access sys-
tem with push-button start, wireless remote
control and engine immobilizer system
from operating properly.
(Ways of coping: P.306)
●When the electronic key battery is
depleted
●Near a TV tower, electric power plant,
gas station, radio stat ion, large display,
airport or other fac ility that generates
strong radio waves or electrical noise
●When carrying a portable radio, cellular
phone, cordless phone or other wireless
communication device
●When the electronic key is in contact
with, or is covered by the following metal-
SituationCorrection
procedure
The trunk was closed
while the electronic key
was still inside the trunk
and both side doors were
locked.Retrieve the
electronic key
from the trunk
and close the
trunk lid.
An attempt was made to
lock the vehicle while a
door was open.Close both
side doors and
lock the doors
again.
SituationCorrection procedure
The engine switch was
turned to ACCESSORY
mode while the driver’s
door was open (or the
driver’s door was opened
while the engine switch
was in ACCESSORY
mode).
Turn the engine
switch off and
close the
driver’s door.
The engine switch was
turned off while the
driver’s door was open.Close the
driver’s door.