reset LEXUS RC300 2020 Owners Manual
[x] Cancel search | Manufacturer: LEXUS, Model Year: 2020, Model line: RC300, Model: LEXUS RC300 2020Pages: 390, PDF Size: 8.65 MB
Page 15 of 390
15Pictorial index
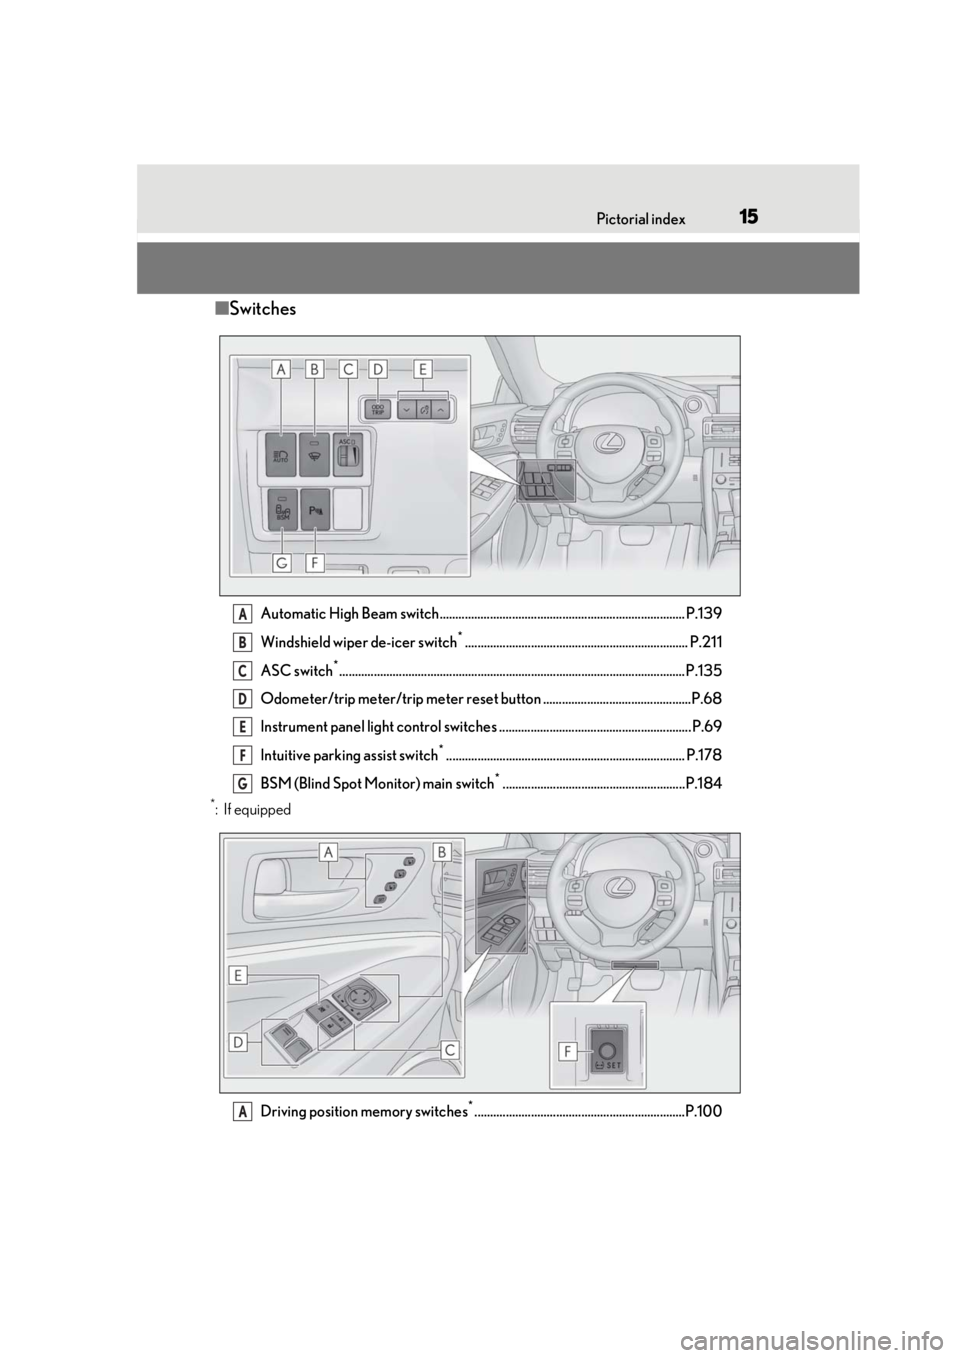
■Switches
Automatic High Beam switch.............................................................................. P.139
Windshield wiper de-icer switch
*....................................................................... P.211
ASC switch
*..............................................................................................................P.135
Odometer/trip meter/trip meter reset button ...............................................P.68
Instrument panel light control switches ............................................................. P.69
Intuitive parking assist switch
*............................................................................ P.178
BSM (Blind Spot Monitor) main switch
*..........................................................P.184
*:If equipped
Driving position memory switches
*...................................................................P.100
A
B
C
D
E
F
G
A
Page 16 of 390
16Pictorial index
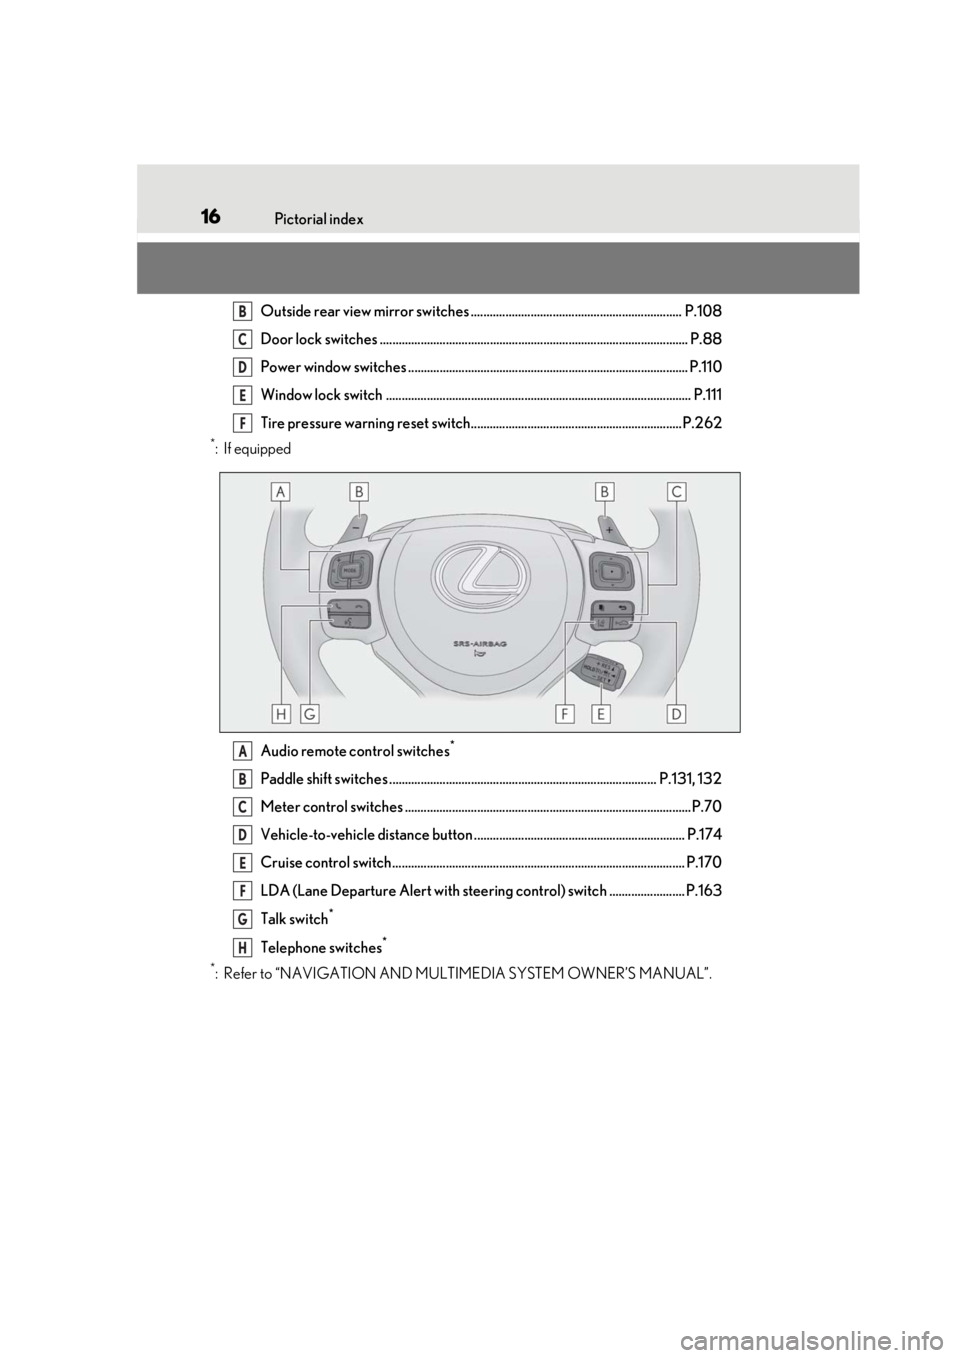
Outside rear view mirror switches ................................................................... P.108
Door lock switches .................................................................................................. P.88
Power window switches ......................................................................................... P.110
Window lock switch ................................................................................................. P.111
Tire pressure warning reset switch...................................................................P.262
*:If equippedAudio remote control switches
*
Paddle shift switches ..................................................................................... P.131, 132
Meter control switches ...........................................................................................P.70
Vehicle-to-vehicle distance button ................................................................... P.174
Cruise control switch............................................................................................. P.170
LDA (Lane Departure Alert with steering control) switch ........................ P.163
Talk switch
*
Telephone switches*
*
: Refer to “NAVIGATION AND MULTIMEDIA SYSTEM OWNER’S MANUAL”.
B
C
D
E
F
A
B
C
D
E
F
G
H
Page 68 of 390
![LEXUS RC300 2020 Owners Manual 682-1. Instrument cluster
outside temperature may not be dis-
played, or the display may take longer
than normal to change:
• When stopped, or driving at low speeds (less than 12 mph [20 km/h])
� LEXUS RC300 2020 Owners Manual 682-1. Instrument cluster
outside temperature may not be dis-
played, or the display may take longer
than normal to change:
• When stopped, or driving at low speeds (less than 12 mph [20 km/h])
�](/img/36/58950/w960_58950-67.png)
682-1. Instrument cluster
outside temperature may not be dis-
played, or the display may take longer
than normal to change:
• When stopped, or driving at low speeds (less than 12 mph [20 km/h])
• When the outside temperature has
changed suddenly (at the entrance/exit of
a garage, tunnel, etc.)
●When “_ _”or “E” is displayed, the system
may be malfunctioning.
Take your vehicle to your Lexus dealer.
■Pop-up display
●In some situations, su ch as when a switch
operation is performed, a pop-up display
will be temporarily displayed on the
multi-information display or the odome-
ter/trip meter screen (F SPORT models).
●Some pop-up displays can be set on/off.
( P.74)
■Customization
The meter display can be customized on
the multi-information display. ( P.341)
■Display items
Odometer
Displays the total distance the vehicle has
been driven.
Trip meter A/trip meter B
Displays the distance the vehicle has been
driven since the meter was last reset. Trip
meters A and B can be used to record and
display different distances independently.
Distance until next engine oil
change
Displays the distance the vehicle can be
driven until an oil change is necessary.
■Changing the display
Each time the “ODO TRIP” switch is
pressed, the displayed item will be
changed. When the trip meter is dis-
played, pressing and holding the switch
will reset the trip meter.
WARNING
■The information display at low tem-
peratures
Allow the interior of the vehicle to warm
up before using the liquid crystal infor-
mation display. At extremely low tem-
peratures, the information display
monitor may respond slowly, and display
changes may be delayed.
For example, there is a lag between the
driver’s shifting and the new gear number
appearing on the display. This lag could
cause the driver to downshift again,
causing rapid and excessive engine brak-
ing and possibly an accident resulting in
death or injury.
NOTICE
■To prevent damage to the engine and
its components
●Do not let the indicator needle of the
tachometer enter the red zone, which
indicates the maximum engine speed.
●The engine may be overheating if the
engine coolant temperature gauge is
in the red zone (H). In this case, imme-
diately stop the vehicle in a safe place,
and check the engine after it has
cooled completely. ( P.311)
Odometer and trip meter dis-
play
Page 70 of 390
702-1. Instrument cluster
■Menu icons
■Liquid crystal display
P.68
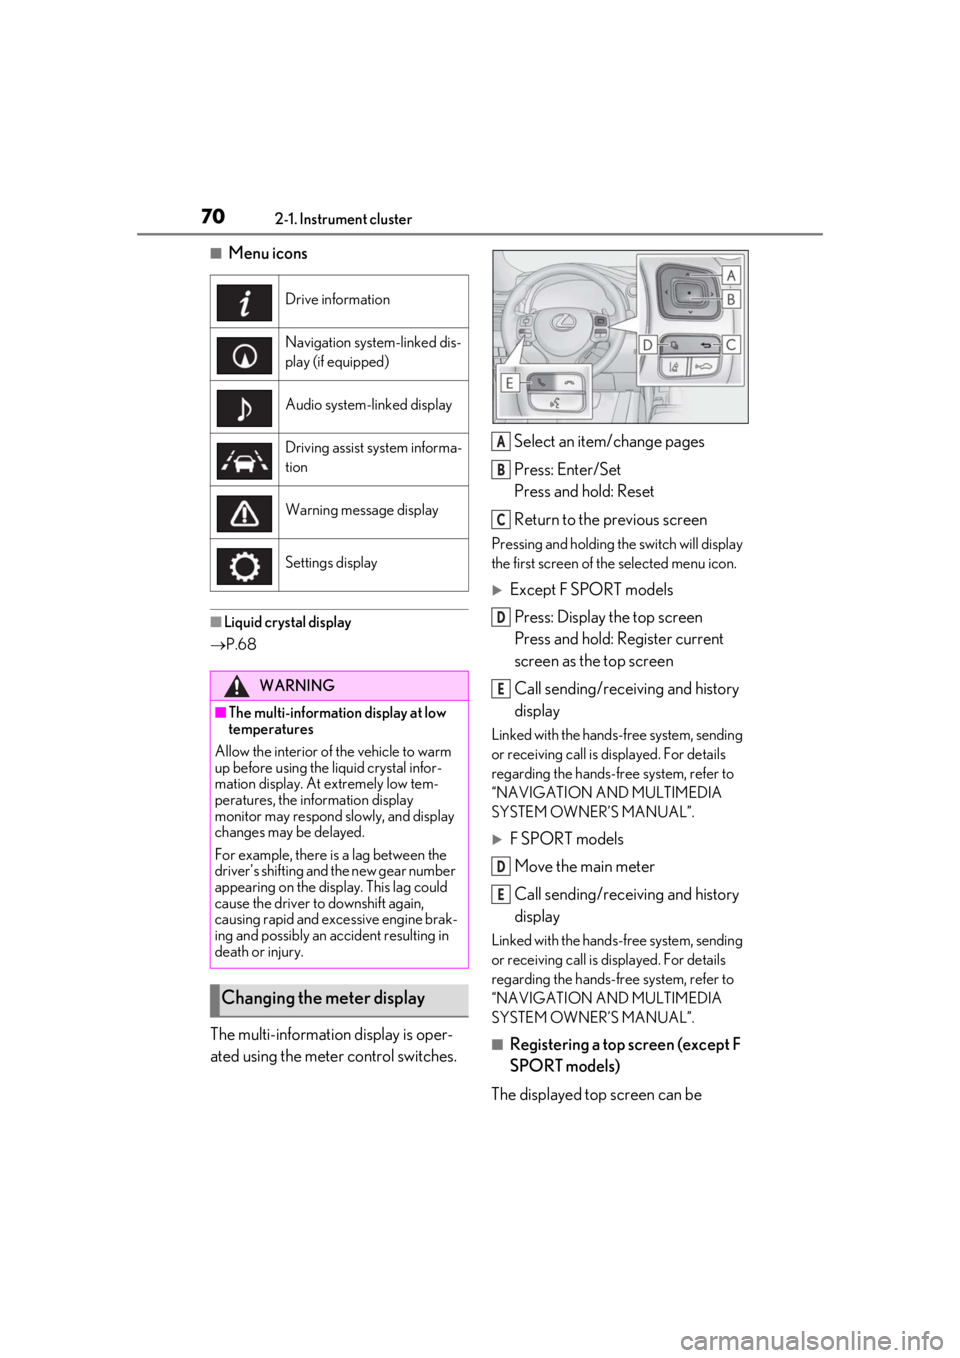
The multi-information display is oper-
ated using the meter control switches. Select an item/change pages
Press: Enter/Set
Press and hold: Reset
Return to the previous screen
Pressing and holding the switch will display
the first screen of the selected menu icon.
Except F SPORT models
Press: Display the top screen
Press and hold: Register current
screen as the top screen
Call sending/receiving and history
display
Linked with the hands-free system, sending
or receiving call is di splayed. For details
regarding the hands-free system, refer to
“NAVIGATION AND MULTIMEDIA
SYSTEM OWNER’S MANUAL”.
F SPORT models
Move the main meter
Call sending/receiving and history
display
Linked with the hands-free system, sending
or receiving call is di splayed. For details
regarding the hands-free system, refer to
“NAVIGATION AND MULTIMEDIA
SYSTEM OWNER’S MANUAL”.
■Registering a top screen (except F
SPORT models)
The displayed top screen can be
Drive information
Navigation system-linked dis-
play (if equipped)
Audio system-linked display
Driving assist system informa-
tion
Warning message display
Settings display
WARNING
■The multi-information display at low
temperatures
Allow the interior of the vehicle to warm
up before using the liquid crystal infor-
mation display. At extremely low tem-
peratures, the information display
monitor may respond slowly, and display
changes may be delayed.
For example, there is a lag between the
driver’s shifting and the new gear number
appearing on the display. This lag could
cause the driver to downshift again,
causing rapid and excessive engine brak-
ing and possibly an accident resulting in
death or injury.
Changing the meter display
A
B
C
D
E
D
E
Page 71 of 390
712-1. Instrument cluster
2
Vehicle status information and indicators
changed to a registered screen of your
choice.
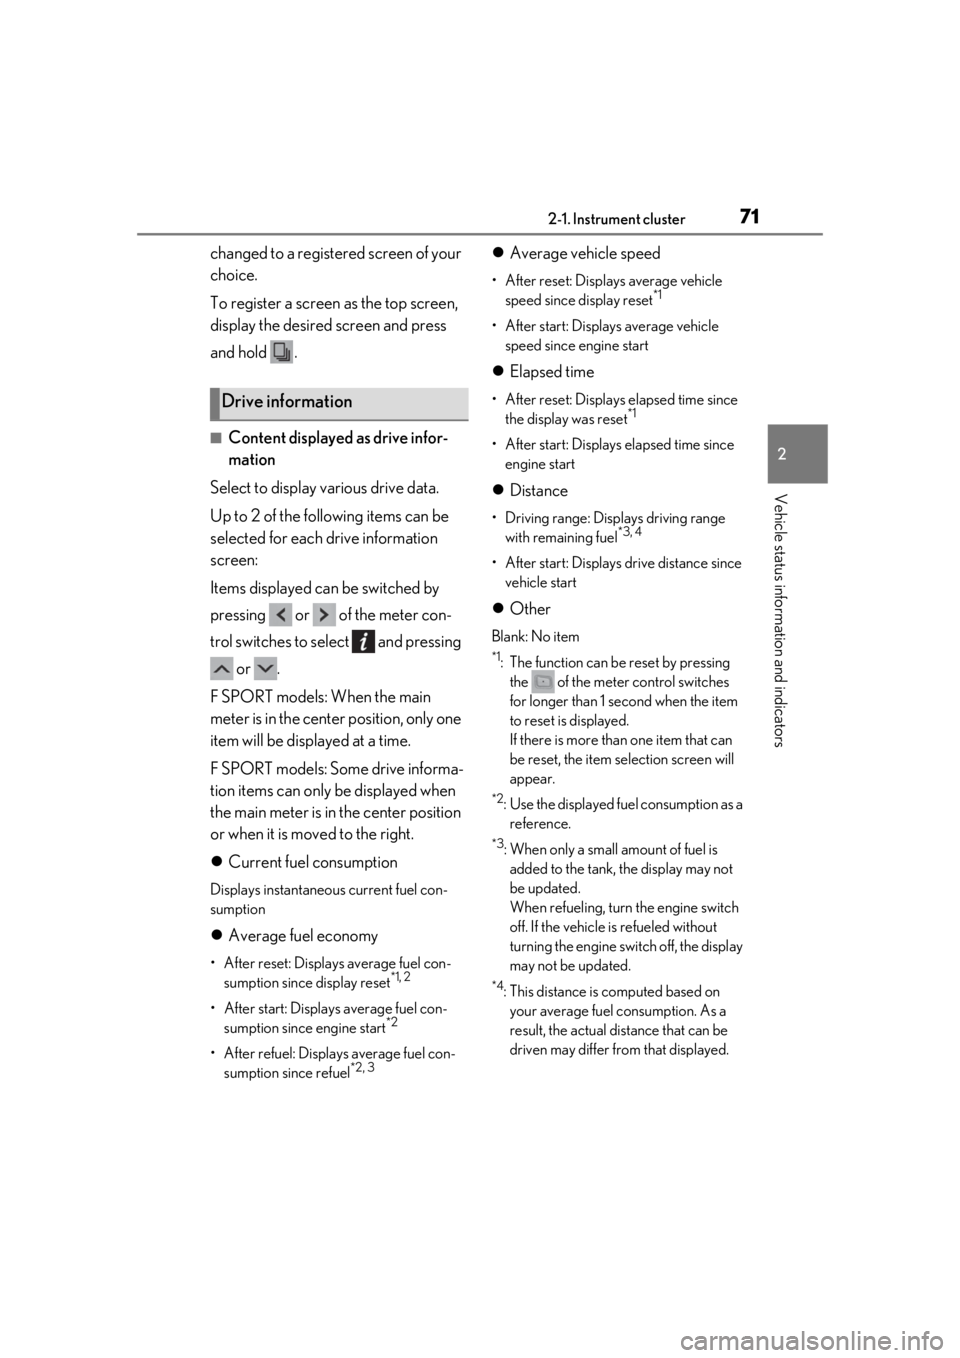
To register a screen as the top screen,
display the desired screen and press
and hold .
■Content displayed as drive infor-
mation
Select to display various drive data.
Up to 2 of the following items can be
selected for each drive information
screen:
Items displayed can be switched by
pressing or of the meter con-
trol switches to select and pressing or .
F SPORT models: When the main
meter is in the center position, only one
item will be displayed at a time.
F SPORT models: Some drive informa-
tion items can only be displayed when
the main meter is in the center position
or when it is moved to the right.
Current fuel consumption
Displays instantaneous current fuel con-
sumption
Average fuel economy
• After reset: Displays average fuel con-
sumption since display reset*1, 2
• After start: Displays average fuel con-sumption since engine start*2
• After refuel: Displays average fuel con-sumption since refuel*2, 3
Average vehicle speed
• After reset: Displays average vehicle
speed since display reset*1
• After start: Displays average vehicle speed since engine start
Elapsed time
• After reset: Displays elapsed time since
the display was reset*1
• After start: Displays elapsed time since engine start
Distance
• Driving range: Displays driving range
with remaining fuel*3, 4
• After start: Displays drive distance since vehicle start
Other
Blank: No item
*1: The function can be reset by pressing
the of the meter control switches
for longer than 1 second when the item
to reset is displayed.
If there is more than one item that can
be reset, the item selection screen will
appear.
*2: Use the displayed fuel consumption as a reference.
*3: When only a small amount of fuel is added to the tank, the display may not
be updated.
When refueling, turn the engine switch
off. If the vehicle is refueled without
turning the engine switch off, the display
may not be updated.
*4: This distance is computed based on your average fuel consumption. As a
result, the actual distance that can be
driven may differ from that displayed.
Drive information
Page 73 of 390
732-1. Instrument cluster
2
Vehicle status information and indicators
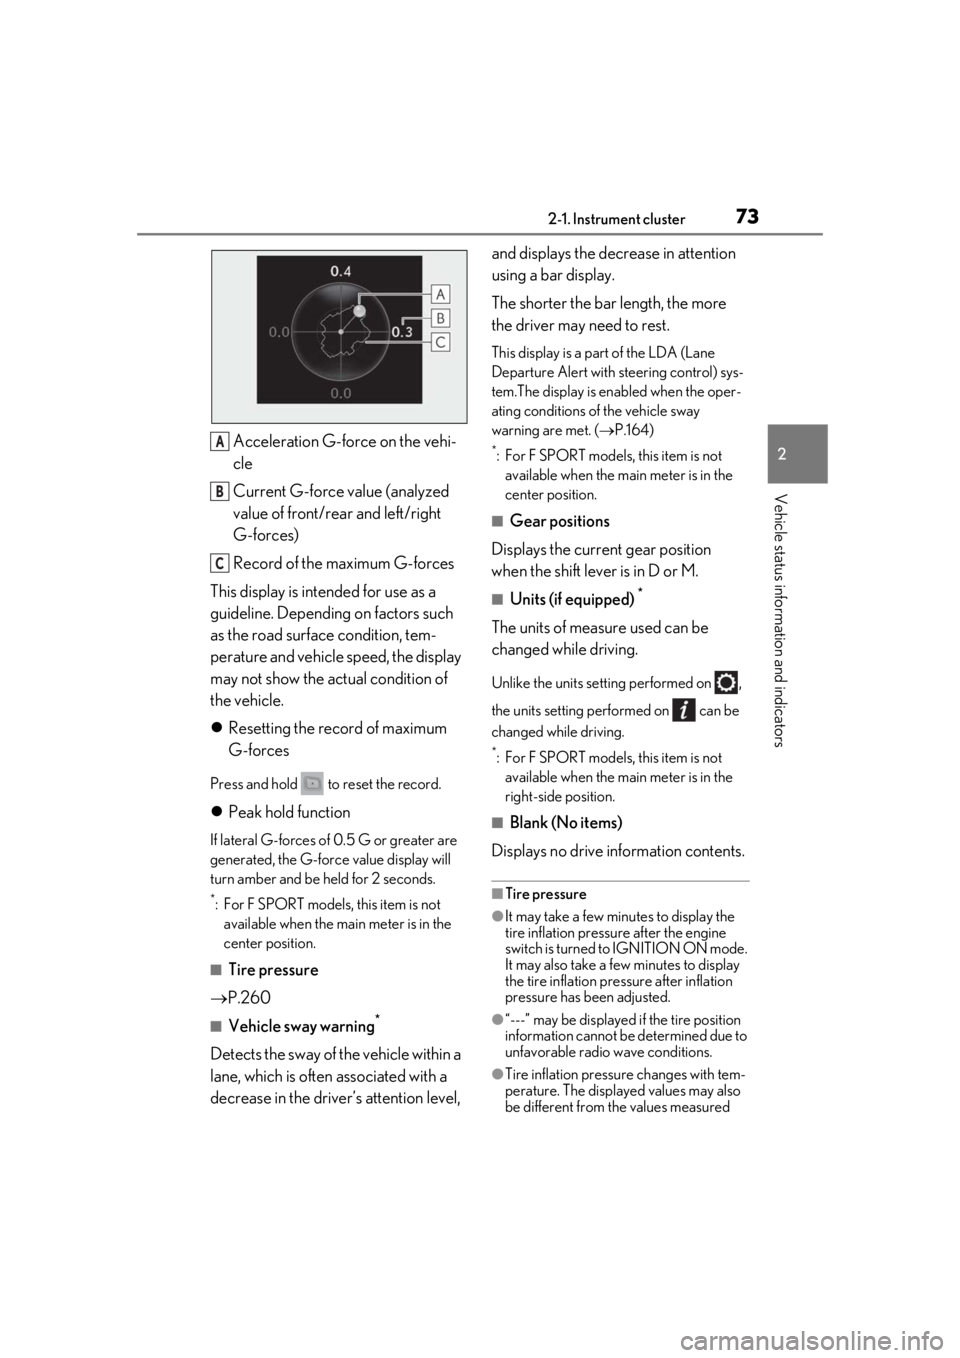
Acceleration G-force on the vehi-
cle
Current G-force value (analyzed
value of front/rear and left/right
G-forces)
Record of the maximum G-forces
This display is intended for use as a
guideline. Depending on factors such
as the road surface condition, tem-
perature and vehicle speed, the display
may not show the actual condition of
the vehicle.
Resetting the record of maximum
G-forces
Press and hold to reset the record.
Peak hold function
If lateral G-forces of 0.5 G or greater are
generated, the G-forc e value display will
turn amber and be held for 2 seconds.
*: For F SPORT models, this item is not available when the ma in meter is in the
center position.
■Tire pressure
P.260
■Vehicle sway warning*
Detects the sway of the vehicle within a
lane, which is often associated with a
decrease in the driver’s attention level, and displays the decrease in attention
using a bar display.
The shorter the bar length, the more
the driver may need to rest.
This display is a pa
rt of the LDA (Lane
Departure Alert with steering control) sys-
tem.The display is en abled when the oper-
ating conditions of the vehicle sway
warning are met. ( P.164)
*: For F SPORT models, this item is not
available when the main meter is in the
center position.
■Gear positions
Displays the current gear position
when the shift lever is in D or M.
■Units (if equipped) *
The units of measure used can be
changed while driving.
Unlike the units sett ing performed on ,
the units setting performed on can be
changed while driving.
*: For F SPORT models, this item is not available when the main meter is in the
right-side position.
■Blank (No items)
Displays no drive information contents.
■Tire pressure
●It may take a few minutes to display the
tire inflation pressu re after the engine
switch is turned to IGNITION ON mode.
It may also take a few minutes to display
the tire inflation pressure after inflation
pressure has b een adjusted.
●“---” may be displayed if the tire position
information cannot be determined due to
unfavorable radio wave conditions.
●Tire inflation pressure changes with tem-
perature. The displaye d values may also
be different from the values measured
A
B
C
Page 75 of 390

752-1. Instrument cluster
2
Vehicle status information and indicators
Speed Setting*
Select to set the desired vehicle speed at
which the speed indicato r will begin to be
displayed.
*: Always observe the legal speed limit when driving on public roads.
■Clock ( P.64)
Select to switch between 12-hour dis-
play and 24-hour display.
■Vehicle Settings
Scheduled Maintenance ( P.240)
Select to reset th e message indicating
maintenance is required , after the required
maintenance is performed.
Oil maintenance ( P.252)
Select to reset the en gine oil maintenance
information (message indicating mainte-
nance is required and distance until the
next oil change) after engine oil mainte-
nance is performed.
■Meter settings
Language
Select to change the language on the dis-
play.
Units
Select to change the units of measure dis-
played.
Eco Driving Indicator Light
( P.72)
Select to enable/disable the Eco Driving
Indicator Light.
Switch settings (except F
SPORT models)
Displays a procedure to register a desired
screen to
.
You can register 1 screen as a shortcut,
which can be displayed by pressing
.
Drive information screen ( P.71)
Select to choose between 2 items that will
be displayed on each drive information
screen (“Drive info 1”, “Drive Info 2” and
“Drive Info 3”) respectively.
Pop-up display ( P.68)
Select to enable/disable the pop-up dis-
play.
• Intersection guidance (if equipped)
• Incoming calls
• Audio Feedback (F SPORT)
• Volume Feedback (F SPORT)
• Brightness adjustment
Color (except F SPORT models)
Select to set the color of the cursor on the
multi-information display.
Needle (F SPORT models)
Select to set the tachometer needle color.
Rev indicator (F SPORT models)
( P.67)
• Select to enable/disable the Rev indica-
tor.
• Select to set the desired engine speed at which the Rev indicator will begin to be
displayed.
Rev peak (F SPORT models)
( P.67)
Select to enable/disable the Rev peak.
Default setting
Select to reset the meter display settings to
the default setting.
■Background color of the indicator/shift
position display area (except F SPORT
models)
The background color of the indicator/shift
Page 77 of 390
772-1. Instrument cluster
2
Vehicle status information and indicators
menu screen, and then select “ECO”.
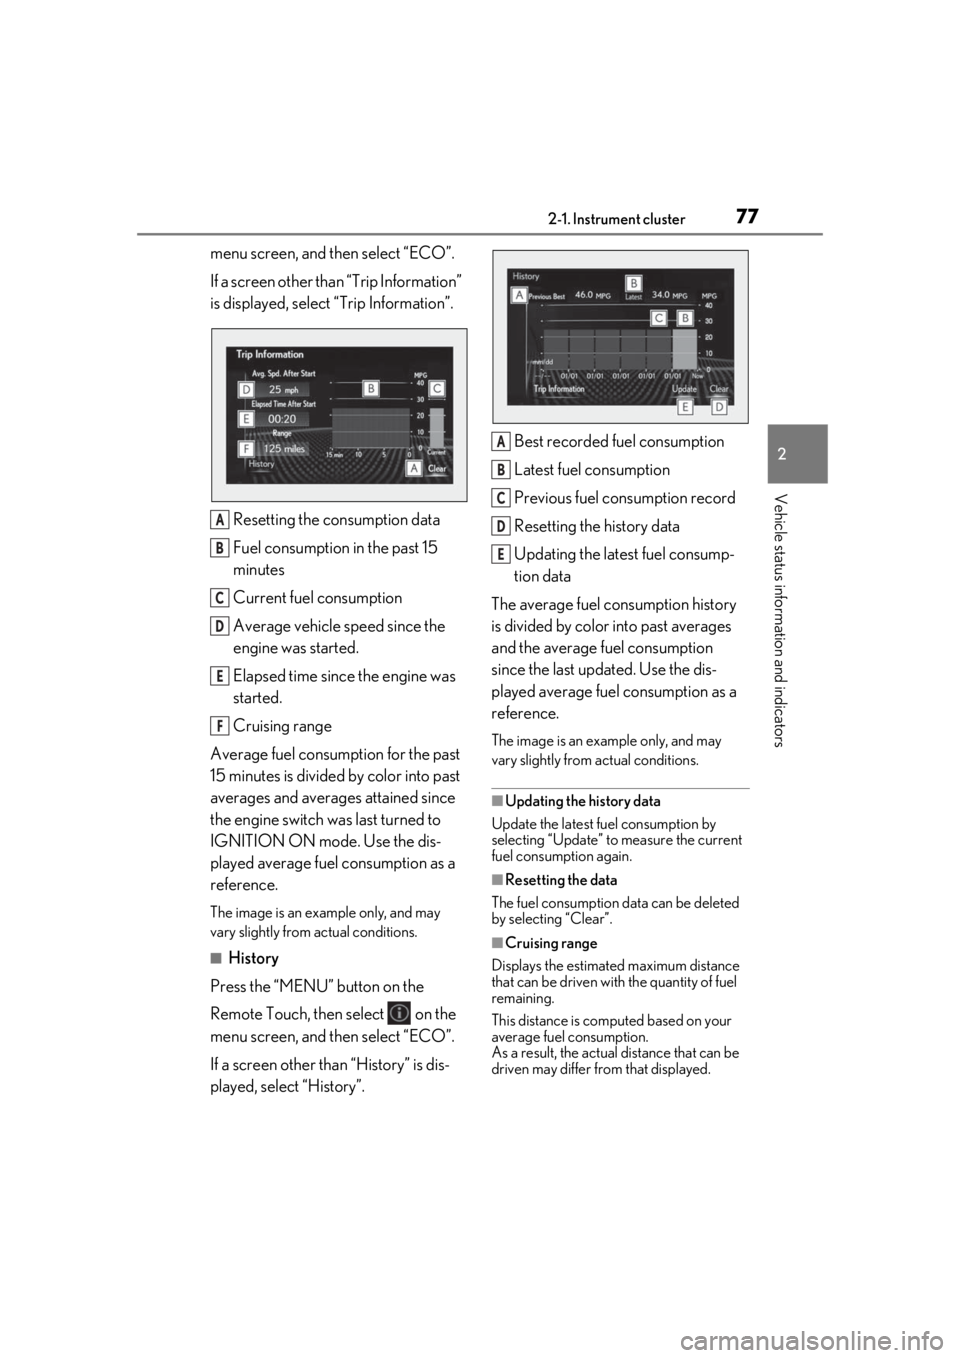
If a screen other than “Trip Information”
is displayed, select “Trip Information”.
Resetting the consumption data
Fuel consumption in the past 15
minutes
Current fuel consumption
Average vehicle speed since the
engine was started.
Elapsed time since the engine was
started.
Cruising range
Average fuel consumption for the past
15 minutes is divided by color into past
averages and averages attained since
the engine switch was last turned to
IGNITION ON mode. Use the dis-
played average fuel consumption as a
reference.
The image is an example only, and may
vary slightly from actual conditions.
■History
Press the “MENU” button on the
Remote Touch, then select on the
menu screen, and then select “ECO”.
If a screen other than “History” is dis-
played, select “History”. Best recorded fuel consumption
Latest fuel consumption
Previous fuel consumption record
Resetting the history data
Updating the latest fuel consump-
tion data
The average fuel consumption history
is divided by color into past averages
and the average fuel consumption
since the last updated. Use the dis-
played average fuel consumption as a
reference.
The image is an example only, and may
vary slightly from actual conditions.
■Updating the history data
Update the latest fuel consumption by
selecting “Update” to measure the current
fuel consumption again.
■Resetting the data
The fuel consumption data can be deleted
by selecting “Clear”.
■Cruising range
Displays the estimated maximum distance
that can be driven with the quantity of fuel
remaining.
This distance is computed based on your
average fuel consumption.
As a result, the actual distance that can be
driven may differ from that displayed.
A
B
C
D
E
F
A
B
C
D
E
Page 101 of 390

1013-3. Adjusting the seats
3
Before driving
ing wheel* automatically return to their
original positions.
The engine switch has been turned
to ACCESSORY mode or IGNI-
TION ON mode.
The driver’s seat belt has been fas-
tened.
*: Power type
■Operation of the power easy access sys-
tem
When exiting the vehicle, the power easy
access system may not operate if the seat is
already close to the rear position, etc.
■Customization
Some functions can be customized.
( P.341)
1Check that the shift lever is in P.
2
Turn the engine switch to IGNI-
TION ON mode.
3
Adjust the driver’s seat, steering
wheel, and outside rear view mir-
rors to the desired positions.
4
While pressing the “SET” button, or
within 3 seconds after the “SET”
button is pressed, press button “1”,
“2” or “3” until the buzzer sounds.
If the selected button has already been
preset, the previously recorded position will be overwritten.
1Check that the shift lever is in P.
2
Turn the engine switch to IGNI-
TION ON mode.
3
Press one of the buttons for the
driving position you want to recall
until the buzzer sounds.
■To stop the position recall operation
part-way through
Perform any of the following:
●Press the “SET” button.
Recording a driving position into
memory (vehicles with driving
position memory)
WARNING
■Seat adjustme nt caution
Take care during seat adjustment so that
the seat does not strike the rear passen-
ger or squeeze your body against the
steering wheel.
Recalling a driving position
(vehicles with driving position
memory)
Page 126 of 390
1264-2. Driving procedures
■When “Access System with Elec. Key
Malfunction See Owner’s Manual” is
displayed on the multi-information dis-
play
The system may be malfunctioning. Have
the vehicle inspected by your Lexus dealer
immediately.
■Electronic key battery
P.267
■Operation of the engine switch
●If the switch is not pressed shortly and
firmly, the engine switch mode may not
change or the engine may not start.
●If attempting to restart the engine imme-
diately after turning the engine switch off,
the engine may not start in some cases.
After turning the engine switch off, please
wait a few seconds before restarting the
engine.
■Customization
If the smart access sy stem with push-button
start has been deactivated in a customized
setting, refer to P.306.
1Stop the vehicle.
2
Set the parking brake ( P.135),
and shift the shift lever to P.
3
Press the engine switch.
4
Release the brake pedal and check
that the display on the meters is off.
■Automatic engine shut off feature
●The vehicle is equipped with a feature
that automatically shuts off the engine
when the shift lever is in P with the engine
running for an extended period.
●The engine will automatically shut off
after approximately 1 hour if it has been
left running while the shift lever is in P.
●The timer for the automatic engine shut
off feature will reset if the brake pedal is
depressed or if the shift lever is in a posi-
tion other than P.
●After the vehicle is parked, if the door is
locked with the door lock switch
( P.88) from the inside or the mechani-
cal key ( P.306) from the outside, the
automatic engine shut off feature will be
disabled. The timer for the automatic
engine shut off feature will be re-enabled
if the driver’s door is opened.
WARNING
■When starting the engine
Always start the engine while sitting in
the driver’s seat. Do not depress the
accelerator pedal while starting the
engine under any circumstances.
Doing so may cause an accident result-
ing in death or serious injury.
■Caution while driving
If engine failure occurs while the vehicle
is moving, do not lock or open the doors
until the vehicle reaches a safe and com-
plete stop. Activation of the steering lock
in this circumstance may lead to an acci-
dent, resulting in death or serious injury.
NOTICE
■When starting the engine
●Do not race a cold engine.
●If the engine becomes difficult to start
or stalls frequently, have your vehicle
checked by your Lexus dealer immedi-
ately.
■Symptoms indicating a malfunction
with the engine switch
If the engine switch seems to be operat-
ing somewhat differently than usual, such
as the switch sticking slightly, there may
be a malfunction. Contact your Lexus
dealer immediately.
Stopping the engine