seats LEXUS RC300 2021 Owner's Manual
[x] Cancel search | Manufacturer: LEXUS, Model Year: 2021, Model line: RC300, Model: LEXUS RC300 2021Pages: 400, PDF Size: 7.9 MB
Page 104 of 400
1043-3. Adjusting the seats
●Press button “1”, “2” or “3”.
●Operate any of the seat adjustment
switches (only cancels seat position
recall).
●Operate the tilt and telescopic steering
control switch (only cancels steering
wheel position recall).
■Seat positions that can be memorized
( P.99)
The adjusted positions other than the posi-
tion adjusted by lumbar support switch can
be recorded.
■Operating the driving position memory
after turning the engine switch off
Recorded seat positions can be activated
up to 180 seconds after the driver’s door is
opened and another 60 seconds after it is
closed again.
■In order to correctly use the driving
position memory function
If a seat position is already in the furthest
possible position and the seat is operated in
the same direction, the recorded position
may be slightly differen t when it is recalled.
■Registering procedure
Record your driving position to button
“1”, “2” or “3” before performing the
following:
Carry only the key you want to register,
and then close the driver’s door.
If 2 or more keys are in the vehicle, the
driving position cannot be recorded
properly.
1 Check that the shift lever is in P. 2
Turn the engine switch to IGNI-
TION ON mode.
3 Recall the driving position that you
want to record.
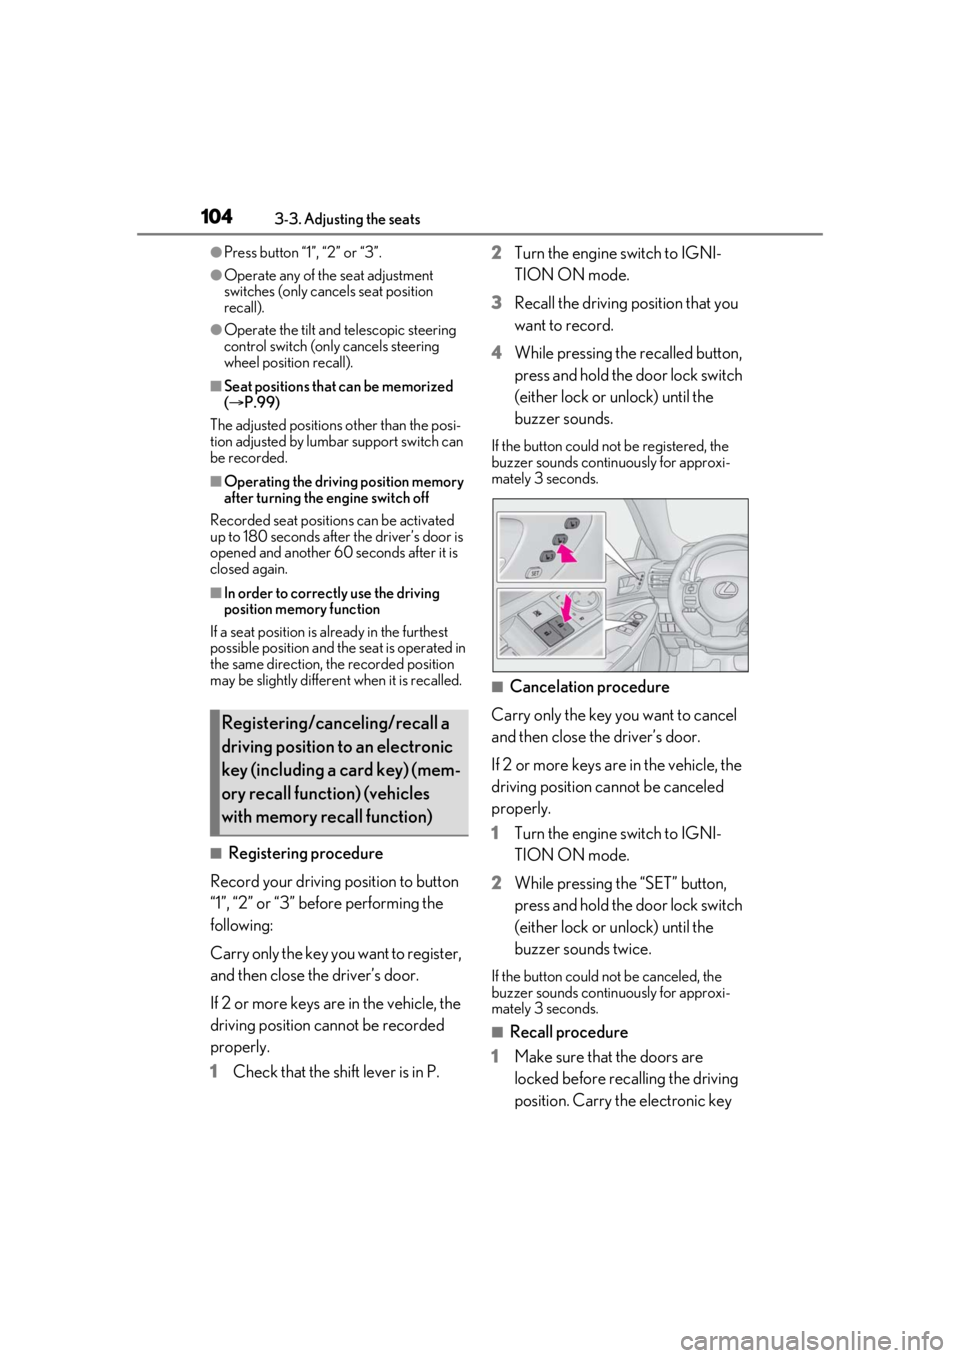
4 While pressing the recalled button,
press and hold the door lock switch
(either lock or unlock) until the
buzzer sounds.
If the button could not be registered, the
buzzer sounds continuously for approxi-
mately 3 seconds.
■Cancelation procedure
Carry only the key you want to cancel
and then close the driver’s door.
If 2 or more keys are in the vehicle, the
driving position cannot be canceled
properly.
1 Turn the engine switch to IGNI-
TION ON mode.
2 While pressing the “SET” button,
press and hold the door lock switch
(either lock or unlock) until the
buzzer sounds twice.
If the button could not be canceled, the
buzzer sounds continuously for approxi-
mately 3 seconds.
■Recall procedure
1 Make sure that the doors are
locked before recalling the driving
position. Carry the electronic key
Registering/canceling/recall a
driving position to an electronic
key (including a card key) (mem-
ory recall function) (vehicles
with memory recall function)
Page 105 of 400
1053-3. Adjusting the seats
3
Before driving
that has been registered to the driv-
ing position, and then unlock and
open the driver’s door using the
smart access system with push-but-
ton start or wireless remote control.
The driving position will move to the
recorded position (not including the steer-
ing wheel). However, the seat will move to
a position slightly behind the recorded
position in order to make entering the vehi-
cle easier.
If the driving position is in a position that
has already been recorded, the seat and
outside rear view mirrors will not move.
2 Turn the engine switch to ACCES-
SORY mode or IGNITION ON
mode, or fasten a seat belt.
The seat and steering wheel will move to
the recorded position.
■Recalling the driving position using the
memory recall function
●Different driving positions can be regis-
tered for each electronic key. Therefore,
the driving position that is recalled may
be different depending on the key being
carried.
●If a door other than the driver’s door is
unlocked with the smart access system
with push-button start, the driving posi-
tion cannot be recalled. In this case, press
the driving position button which has
been set.
■Customization
Some functions can be customized.
( P.351)
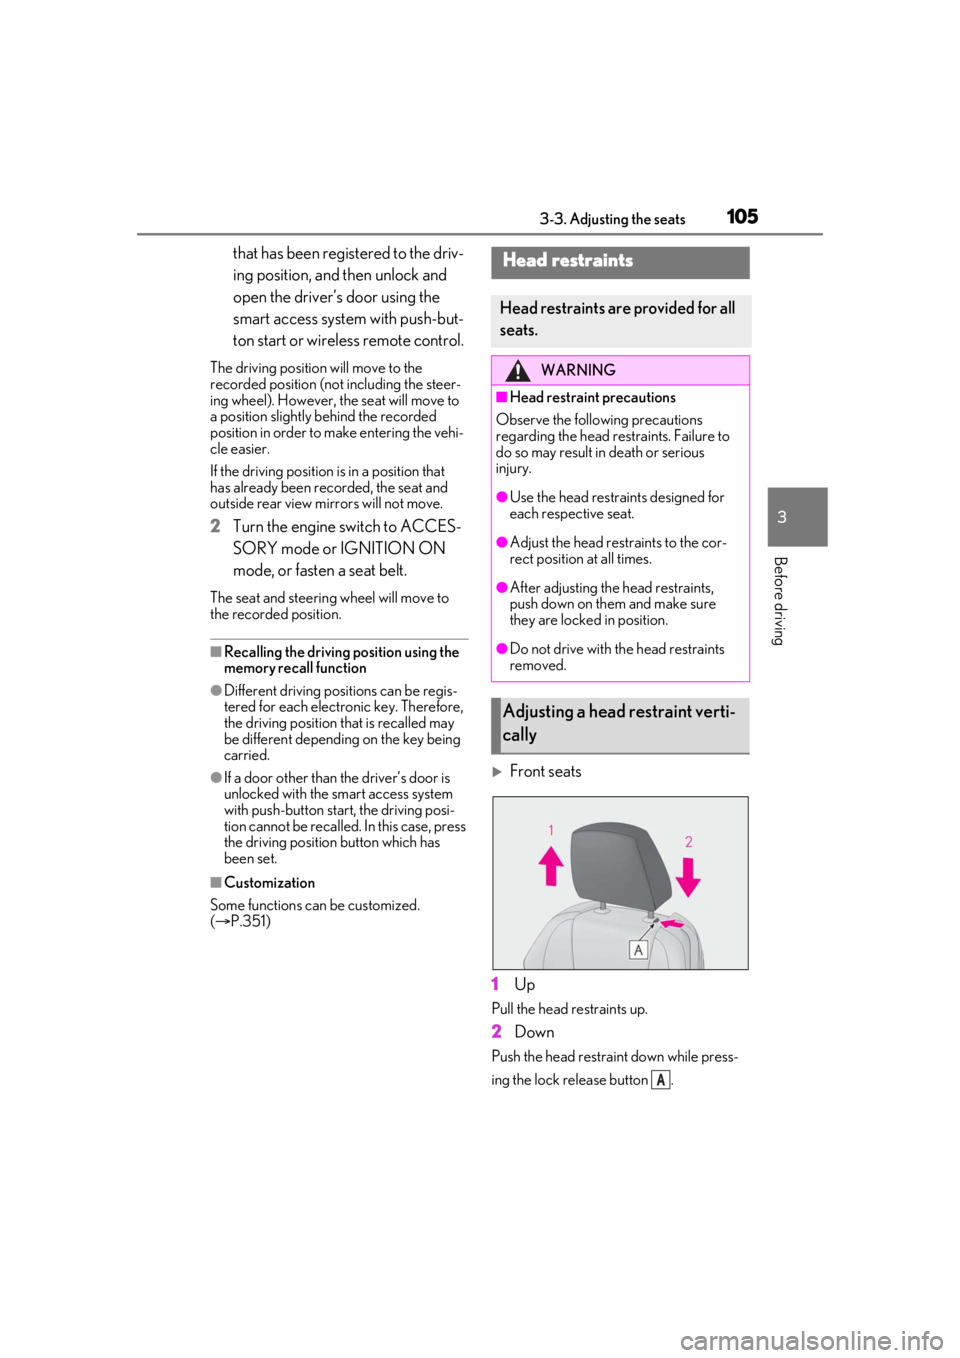
Front seats
1 Up
Pull the head restraints up.
2Down
Push the head restra int down while press-
ing the lock release button .
Head restraints
Head restraints are provided for all
seats.
WARNING
■Head restraint precautions
Observe the following precautions
regarding the head re straints. Failure to
do so may result in death or serious
injury.
●Use the head restraints designed for
each respective seat.
●Adjust the head restraints to the cor-
rect position at all times.
●After adjusting the head restraints,
push down on them and make sure
they are locked in position.
●Do not drive with the head restraints
removed.
Adjusting a head restraint verti-
cally
A
Page 106 of 400
1063-3. Adjusting the seats
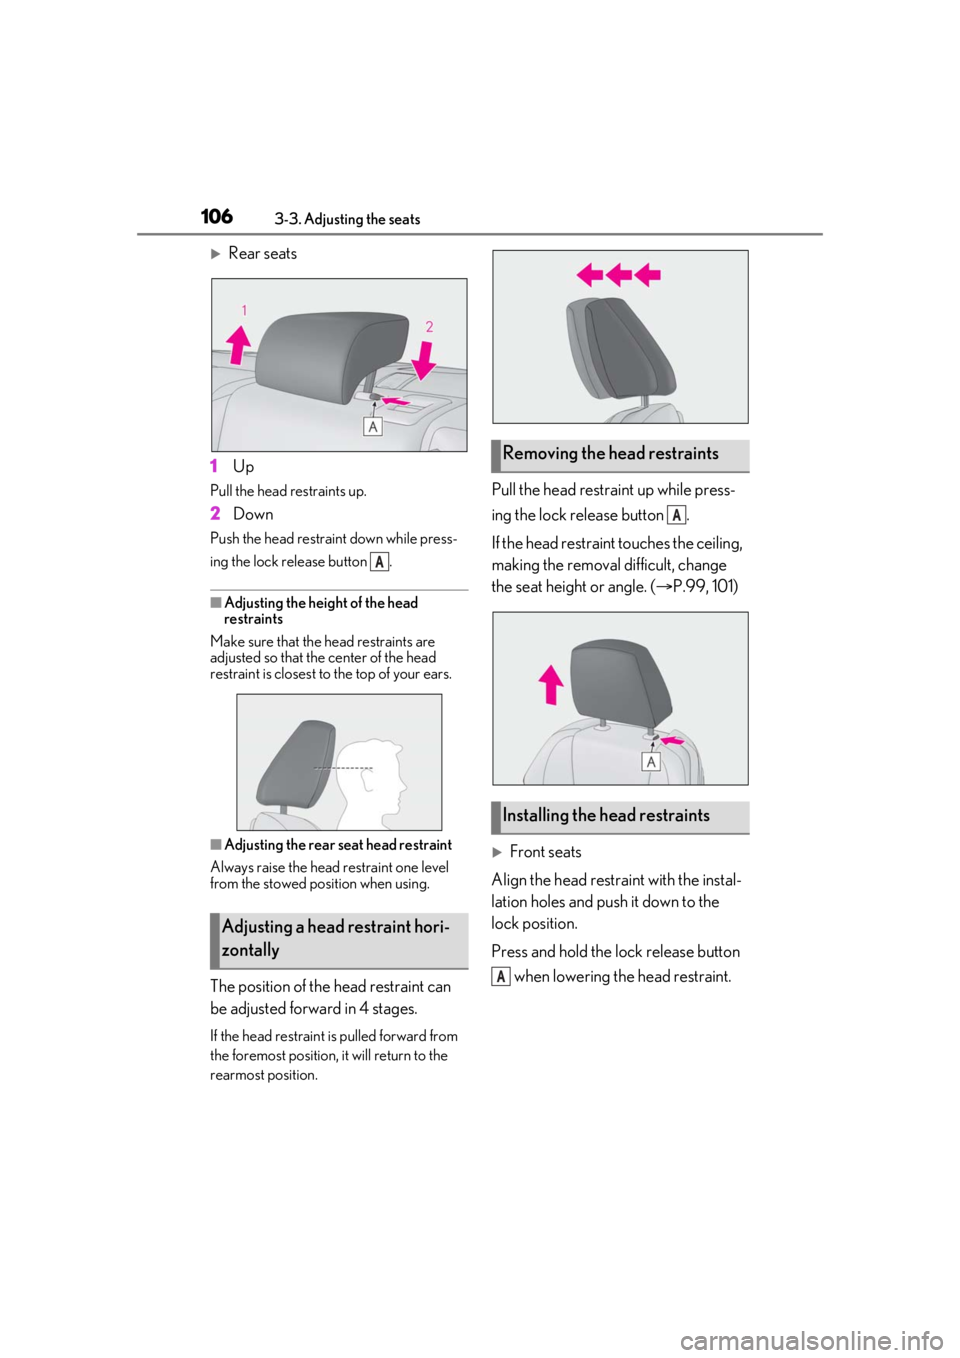
Rear seats
1 Up
Pull the head restraints up.
2Down
Push the head restraint down while press-
ing the lock release button .
■Adjusting the height of the head
restraints
Make sure that the head restraints are
adjusted so that the center of the head
restraint is closest to the top of your ears.
■Adjusting the rear seat head restraint
Always raise the head restraint one level
from the stowed position when using.
The position of the head restraint can
be adjusted forward in 4 stages.
If the head restraint is pulled forward from
the foremost position, it will return to the
rearmost position.
Pull the head restraint up while press-
ing the lock release button .
If the head restraint touches the ceiling,
making the removal difficult, change
the seat height or angle. ( P.99, 101)
Front seats
Align the head restraint with the instal-
lation holes and push it down to the
lock position.
Press and hold the lock release button when lowering the head restraint.
Adjusting a head restraint hori-
zontally
A
Removing the head restraints
Installing the head restraints
A
A
Page 107 of 400
1073-3. Adjusting the seats
3
Before driving
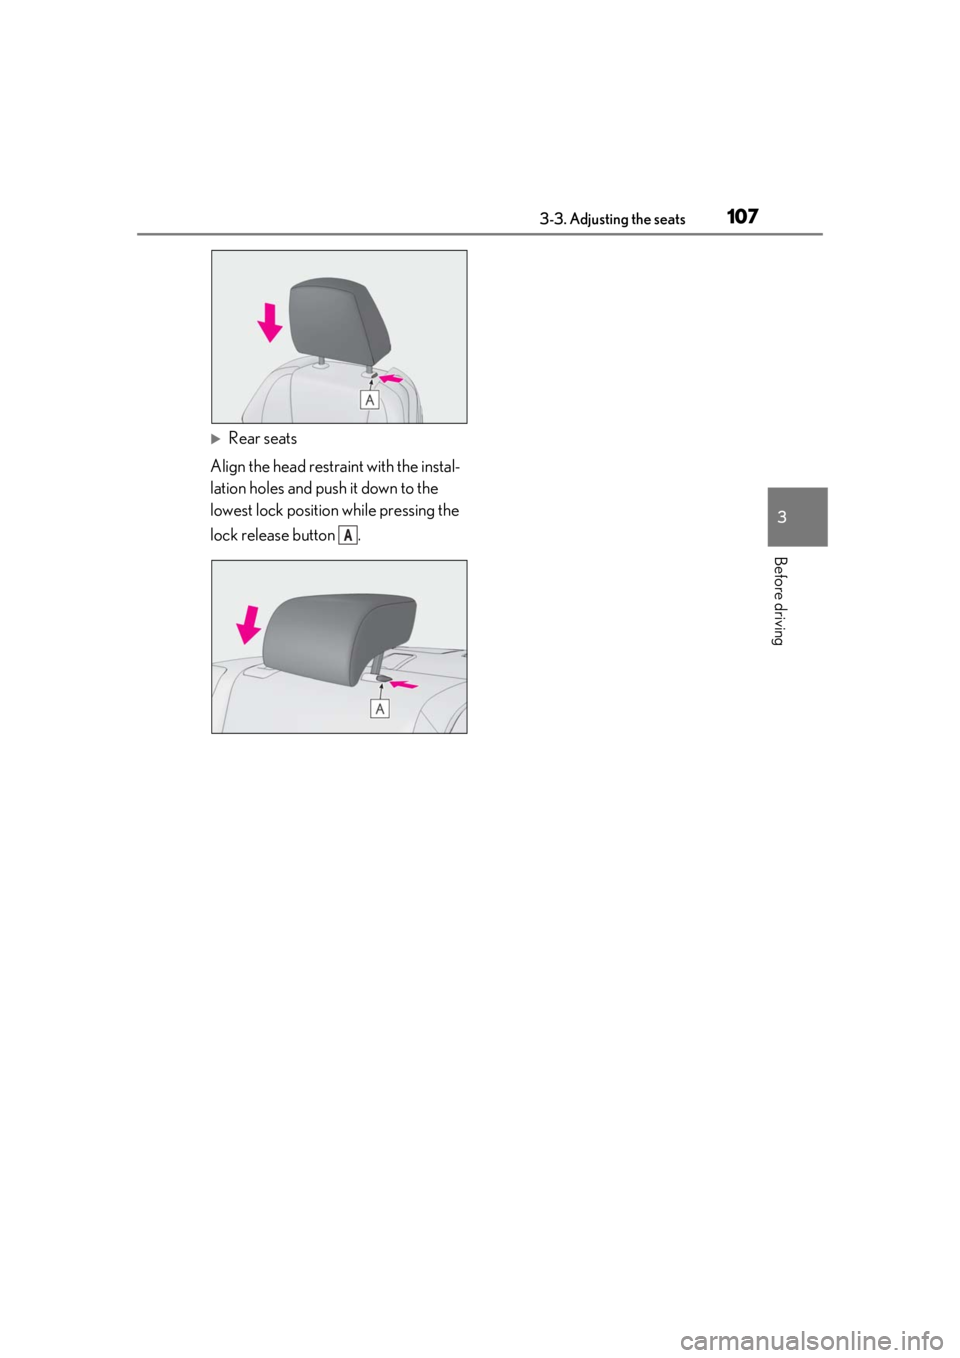
Rear seats
Align the head restraint with the instal-
lation holes and push it down to the
lowest lock position while pressing the
lock release button .
A
Page 125 of 400
1254-1. Before driving
4
Driving
■Total load capacity and seating capacity
These details are also described on the tire
and loading information label. ( P.273)
WARNING
●To prevent cargo and luggage from
sliding forward during braking, do not
stack anything in th e enlarged trunk.
Keep cargo and luggage low, as close
to the floor as possible.
●When you fold down the rear seats,
long items should not be placed
directly behind the front seats.
●Never allow anyone to ride in the
enlarged trunk. It is not designed for
passengers. They should ride in their
seats with their seat belts properly fas-
tened.
●Do not place cargo or luggage in or on
the following locations.
• At the feet of the driver
• On the front passenger or rear seats (when stacking items)
• On the package tray
• On the instrument panel
•On the dashboard
• In front of the Center Display
●Secure all items in the occupant com-
partment.
■Capacity and distribution
●Do not exceed the maximum axle
weight rating or the total vehicle
weight rating.
●Even if the total load of occupant’s
weight and the cargo load is less than
the total load capacity, do not apply the
load unevenly. Improper loading may
cause deterioration of steering or
braking control which may cause
death or serious injury.
Vehicle load limits
Vehicle load limits include total
load capacity, seating capacity,
towing capacity and cargo capac-
ity.
Total load capacity (vehicle
capacity weight): P.328
Total load capacity means the com-
bined weight of occupants, cargo
and luggage.
Seating capacity: P.328
Seating capacity means the maxi-
mum number of occupants whose
estimated average weight is 150 lb.
(68 kg) per person.
Towing capacity
Lexus does not recommend towing
a trailer with your vehicle.
Cargo capacity
Cargo capacity may increase or
decrease depending on the weight
and the number of occupants.
WARNING
■Overloading the vehicle
Do not overload the vehicle.
It may not only cause damage to the tires,
but also degrade steering and braking
ability, resulting in an accident.
Page 217 of 400
2175-2. Using the air conditioning system
5
Interior features
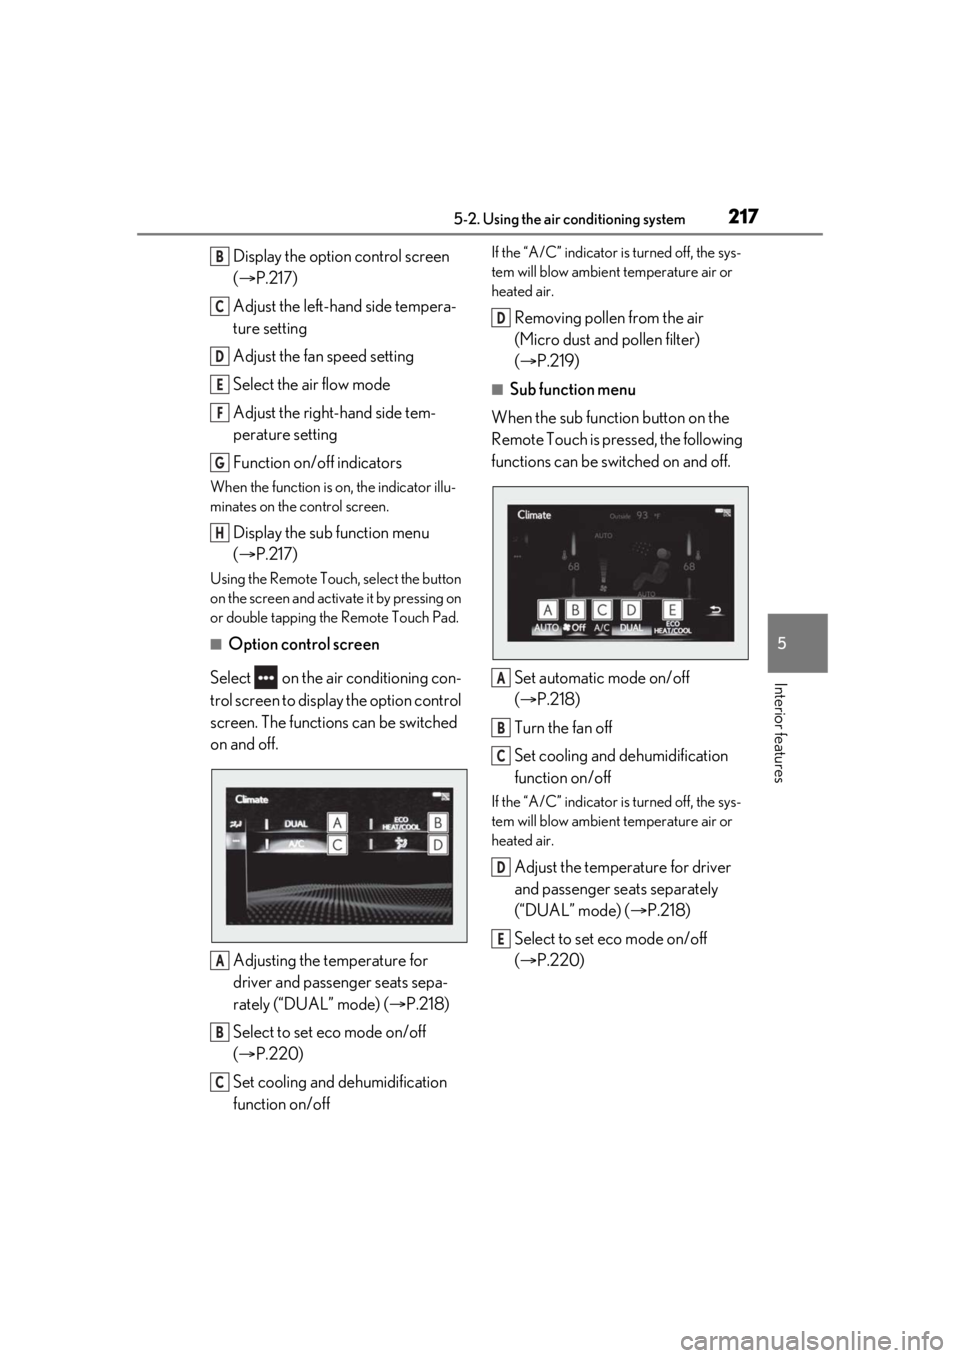
Display the option control screen
(P.217)
Adjust the left-hand side tempera-
ture setting
Adjust the fan speed setting
Select the air flow mode
Adjust the right-hand side tem-
perature setting
Function on/off indicators
When the function is on, the indicator illu-
minates on the control screen.
Display the sub function menu
( P.217)
Using the Remote Touch, select the button
on the screen and activate it by pressing on
or double tapping the Remote Touch Pad.
■Option control screen
Select on the air conditioning con-
trol screen to display the option control
screen. The functions can be switched
on and off.
Adjusting the temperature for
driver and passenger seats sepa-
rately (“DUAL” mode) ( P.218)
Select to set eco mode on/off
( P.220)
Set cooling and dehumidification
function on/off
If the “A/C” indicator is turned off, the sys-
tem will blow ambient temperature air or
heated air.
Removing pollen from the air
(Micro dust and pollen filter)
( P.219)
■Sub function menu
When the sub function button on the
Remote Touch is pressed, the following
functions can be switched on and off.
Set automatic mode on/off
(P.218)
Turn the fan off
Set cooling and dehumidification
function on/off
If the “A/C” indicator is turned off, the sys-
tem will blow ambient temperature air or
heated air.
Adjust the temperature for driver
and passenger seats separately
(“DUAL” mode) ( P.218)
Select to set eco mode on/off
( P.220)
B
C
D
E
F
G
H
A
B
C
D
A
B
C
D
E
Page 218 of 400
2185-2. Using the air conditioning system
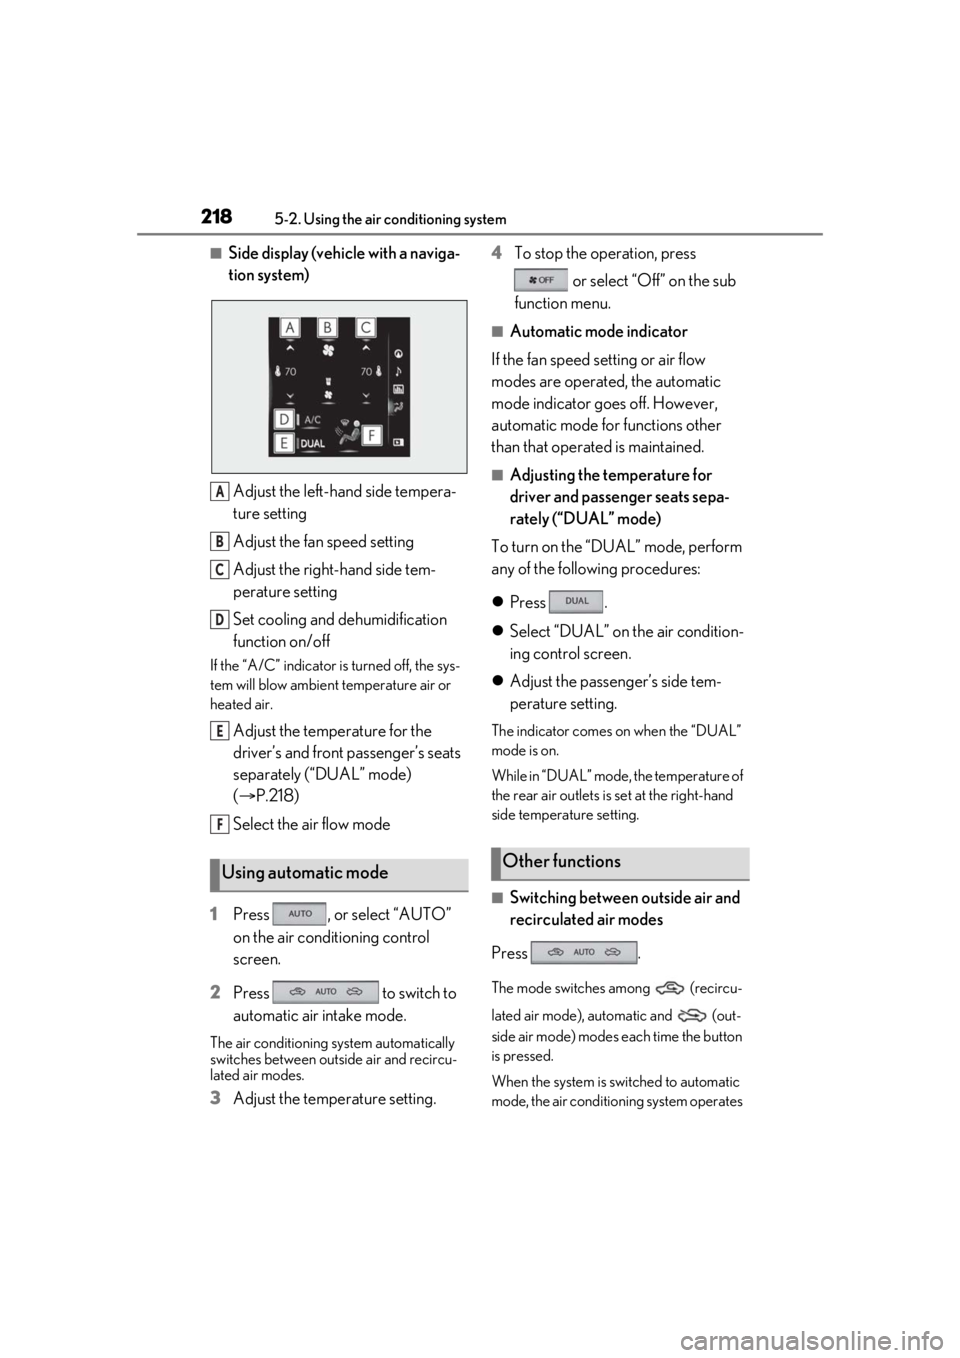
■Side display (vehicle with a naviga-
tion system)Adjust the left-hand side tempera-
ture setting
Adjust the fan speed setting
Adjust the right-hand side tem-
perature setting
Set cooling and dehumidification
function on/off
If the “A/C” indicator is turned off, the sys-
tem will blow ambient temperature air or
heated air.
Adjust the temperature for the
driver’s and front passenger’s seats
separately (“DUAL” mode)
( P.218)
Select the air flow mode
1 Press , or select “AUTO”
on the air conditioning control
screen.
2 Press to switch to
automatic air intake mode.
The air conditioning system automatically
switches between outside air and recircu-
lated air modes.
3Adjust the temperature setting. 4
To stop the operation, press
or select “Off” on the sub
function menu.
■Automatic mode indicator
If the fan speed setting or air flow
modes are operated, the automatic
mode indicator goes off. However,
automatic mode for functions other
than that operated is maintained.
■Adjusting the temperature for
driver and passenger seats sepa-
rately (“DUAL” mode)
To turn on the “DUAL” mode, perform
any of the following procedures:
Press .
Select “DUAL” on the air condition-
ing control screen.
Adjust the passenger’s side tem-
perature setting.
The indicator comes on when the “DUAL”
mode is on.
While in “DUAL” mode, the temperature of
the rear air outlets is set at the right-hand
side temperature setting.
■Switching between outside air and
recirculated air modes
Press .
The mode switches among (recircu-
lated air mode), automatic and (out-
side air mode) modes each time the button
is pressed.
When the system is switched to automatic
mode, the air conditioning system operates
Using automatic mode
A
B
C
D
E
F
Other functions
Page 223 of 400
2235-2. Using the air conditioning system
5
Interior features
*:If equipped
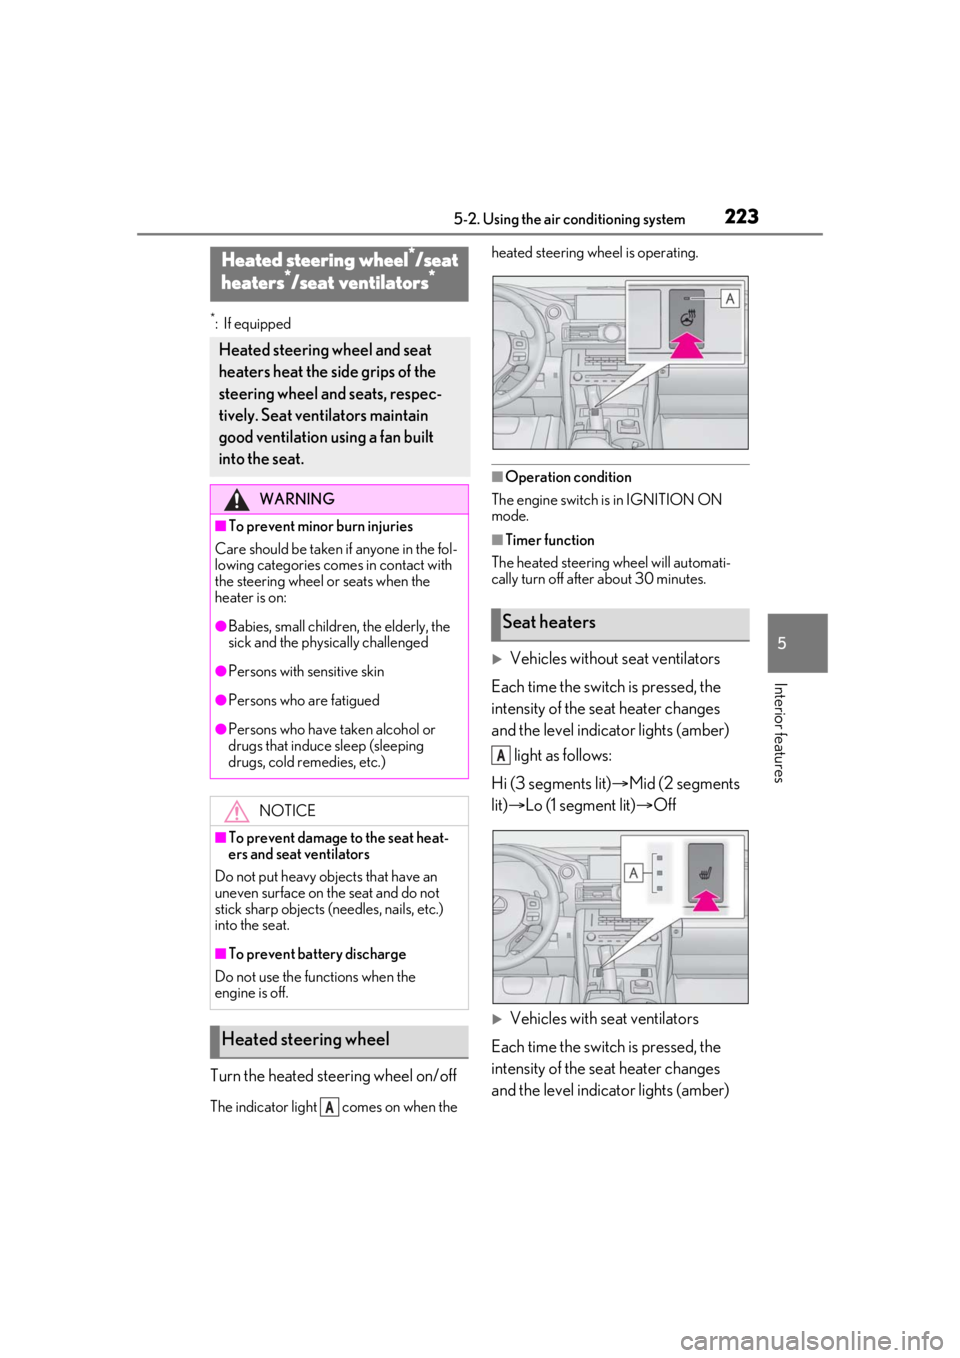
Turn the heated steering wheel on/off
The indicator light comes on when the heated steering wheel is operating.
■Operation condition
The engine switch is in IGNITION ON
mode.
■Timer function
The heated steering wheel will automati-
cally turn off after about 30 minutes.
Vehicles without seat ventilators
Each time the switch is pressed, the
intensity of the seat heater changes
and the level indicator lights (amber) light as follows:
Hi (3 segments lit) Mid (2 segments
lit) Lo (1 segment lit) Off
Vehicles with seat ventilators
Each time the switch is pressed, the
intensity of the seat heater changes
and the level indicator lights (amber)
Heated steering wheel*/seat
heaters*/seat ventilators*
Heated steering wheel and seat
heaters heat the side grips of the
steering wheel and seats, respec-
tively. Seat ventilators maintain
good ventilation using a fan built
into the seat.
WARNING
■To prevent minor burn injuries
Care should be taken if anyone in the fol-
lowing categories comes in contact with
the steering wheel or seats when the
heater is on:
●Babies, small children, the elderly, the
sick and the phys ically challenged
●Persons with sensitive skin
●Persons who are fatigued
●Persons who have taken alcohol or
drugs that induce sleep (sleeping
drugs, cold remedies, etc.)
NOTICE
■To prevent damage to the seat heat-
ers and seat ventilators
Do not put heavy objects that have an
uneven surface on the seat and do not
stick sharp objects (needles, nails, etc.)
into the seat.
■To prevent battery discharge
Do not use the functions when the
engine is off.
Heated steering wheel
A
Seat heaters
A
Page 246 of 400
2466-1. Maintenance and care
Remove dirt and dust using a vac-
WARNING
■Water in the vehicle
●Do not splash or spill liquid in the vehi-
cle.
Doing so may cause electrical compo-
nents, etc. to malfunction or catch fire.
●Do not get any of the SRS components
or wiring in the vehicle interior wet.
( P.28)
An electrical malfunction may cause the
airbags to deploy or not function prop-
erly, resulting in death or serious injury.
■Cleaning the interior (especially
instrument panel)
Do not use polish wax or polish cleaner.
The instrument panel may reflect off the
windshield, obstructing the driver’s view
and leading to an accident, resulting in
death or serious injury.
NOTICE
■Cleaning detergents
●Do not use the following liquids, as
they may discolor the vehicle interior
or cause streaks or damage to painted
surfaces:
• Center Display: Organic substances such as benzine or gasoline, alkaline
solutions, and alcohol
• Seats: Alkaline solutions, organic sub- stances such as thinner or benzine,
and alcohol
• Other parts: Organic substances such as benzine or gasoline, alkaline or
acidic solutions, dye, and bleach
●Do not use polish wax or polish
cleaner. The instrument panel’s or
other interior part’s painted surface
may be damaged.
■Preventing damage to leather sur-
faces
Observe the following precautions to
avoid damage to and deterioration of
leather surfaces:
●Remove any dust or dirt from leather
surfaces immediately.
●Do not expose the vehicle to direct
sunlight for extended periods of time.
Park the vehicle in the shade, espe-
cially during summer.
●Do not place items made of vinyl, plas-
tic, or containing wax on the uphol-
stery, as they may stick to the leather
surface if the vehicle interior heats up
significantly.
■Water on the floor
Do not wash the vehicle floor with water.
Vehicle systems such as the audio system
may be damaged if water comes into
contact with electrical components such
as the audio system above or under the
floor of the vehicle. Water may also
cause the body to rust.
■When cleaning the inside of the wind-
shield
Do not allow glass cleaner to contact the
lens. Also, do not touch the lens.
( P.158)
■Cleaning the inside of the rear win-
dow
●Do not use glass cleaner to clean the
rear window, as this may cause dam-
age to the rear window defogger
heater wires or antenna. Use a cloth
dampened with lukewarm water to
gently wipe the window clean. Wipe
the window in strokes running parallel
to the heater wires or antenna.
●Be careful not to scratch or damage
the heater wires or antenna.
Cleaning the leather areas
Page 251 of 400
2516-2. Maintenance
6
Maintenance and care
Seats• Do the seat controls operate properly?
Steering wheel
• Does the steering wheel rotate
smoothly?
• Does the steering wheel have the cor-
rect amount of free
play?
•There should not be any strange sounds
coming from the
steering wheel.
Vehicle exterior
ItemsCheck points
Doors/trunk• Do the doors/trunk operate smoothly?
Engine hood
•Does the engine hood lock system
work properly?
Fluid leaks
•There should not be any signs of fluid
leakage after the
vehicle has been
parked.
ItemsCheck points
Tires
• Is the tire inflation pressure correct?
• The tires should not be damaged or
excessively worn.
• Have the tires been rotated according to
the maintenance
schedule?
•The wheel nuts should not be loose.
Windshield wip-
ers
• The wiper blades should not show any
signs of cracking,
splitting, wear, con-
tamination or defor-
mation.
• The wiper blades should clear the
windshield without
streaking or skip-
ping.
ItemsCheck points