lane LEXUS RC300 2021 Owners Manual
[x] Cancel search | Manufacturer: LEXUS, Model Year: 2021, Model line: RC300, Model: LEXUS RC300 2021Pages: 400, PDF Size: 7.9 MB
Page 3 of 400
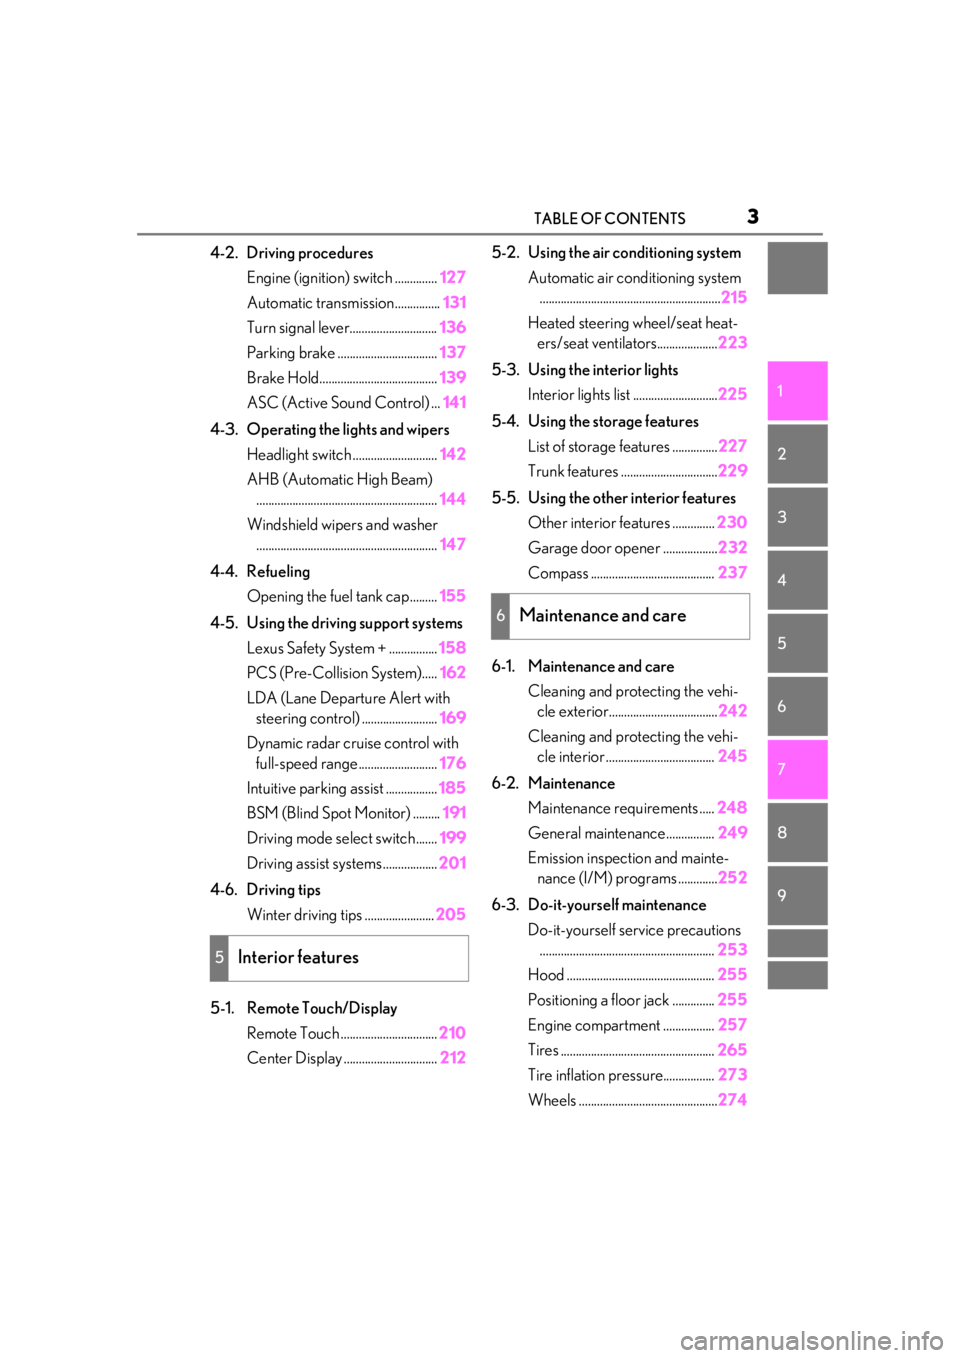
3TABLE OF CONTENTS
1
2
3
4
5
6
7
8
9
4-2. Driving proceduresEngine (ignition) switch .............. 127
Automatic transmission............... 131
Turn signal lever............................. 136
Parking brake ................................. 137
Brake Hold....................................... 139
ASC (Active Sound Control) ... 141
4-3. Operating the lights and wipers Headlight switch ............................ 142
AHB (Automatic High Beam) ............................................................ 144
Windshield wipers and washer ............................................................ 147
4-4. Refueling Opening the fuel tank cap......... 155
4-5. Using the driving support systems Lexus Safety System + ................ 158
PCS (Pre-Collision System)..... 162
LDA (Lane Departure Alert with steering control) ......................... 169
Dynamic radar crui se control with
full-speed range.......................... 176
Intuitive parking assist ................. 185
BSM (Blind Spot Monitor) ......... 191
Driving mode select switch....... 199
Driving assist systems .................. 201
4-6. Driving tips Winter driving tips ....................... 205
5-1. Remote Touch/Display Remote Touch ................................ 210
Center Display ............................... 2125-2. Using the air conditioning system
Automatic air conditioning system............................................................ 215
Heated steering wheel/seat heat- ers/seat ventilators.................... 223
5-3. Using the interior lights Interior lights list ............................ 225
5-4. Using the storage features List of storage features ............... 227
Trunk features ................................ 229
5-5. Using the other interior features Other interior features .............. 230
Garage door opener .................. 232
Compass ......................................... 237
6-1. Maintenance and care Cleaning and protecting the vehi-cle exterior.................................... 242
Cleaning and protecting the vehi- cle interior .................................... 245
6-2. Maintenance Maintenance re quirements .....248
General maintenance................ 249
Emission inspection and mainte- nance (I/M) programs ............. 252
6-3. Do-it-yourself maintenance Do-it-yourself service precautions.......................................................... 253
Hood ................................................. 255
Positioning a floor jack .............. 255
Engine compartment ................. 257
Tires ...
................................................ 265
Tire inflation pressure................. 273
Wheels .............................................. 274
5Interior features
6Maintenance and care
Page 16 of 400
16Pictorial index
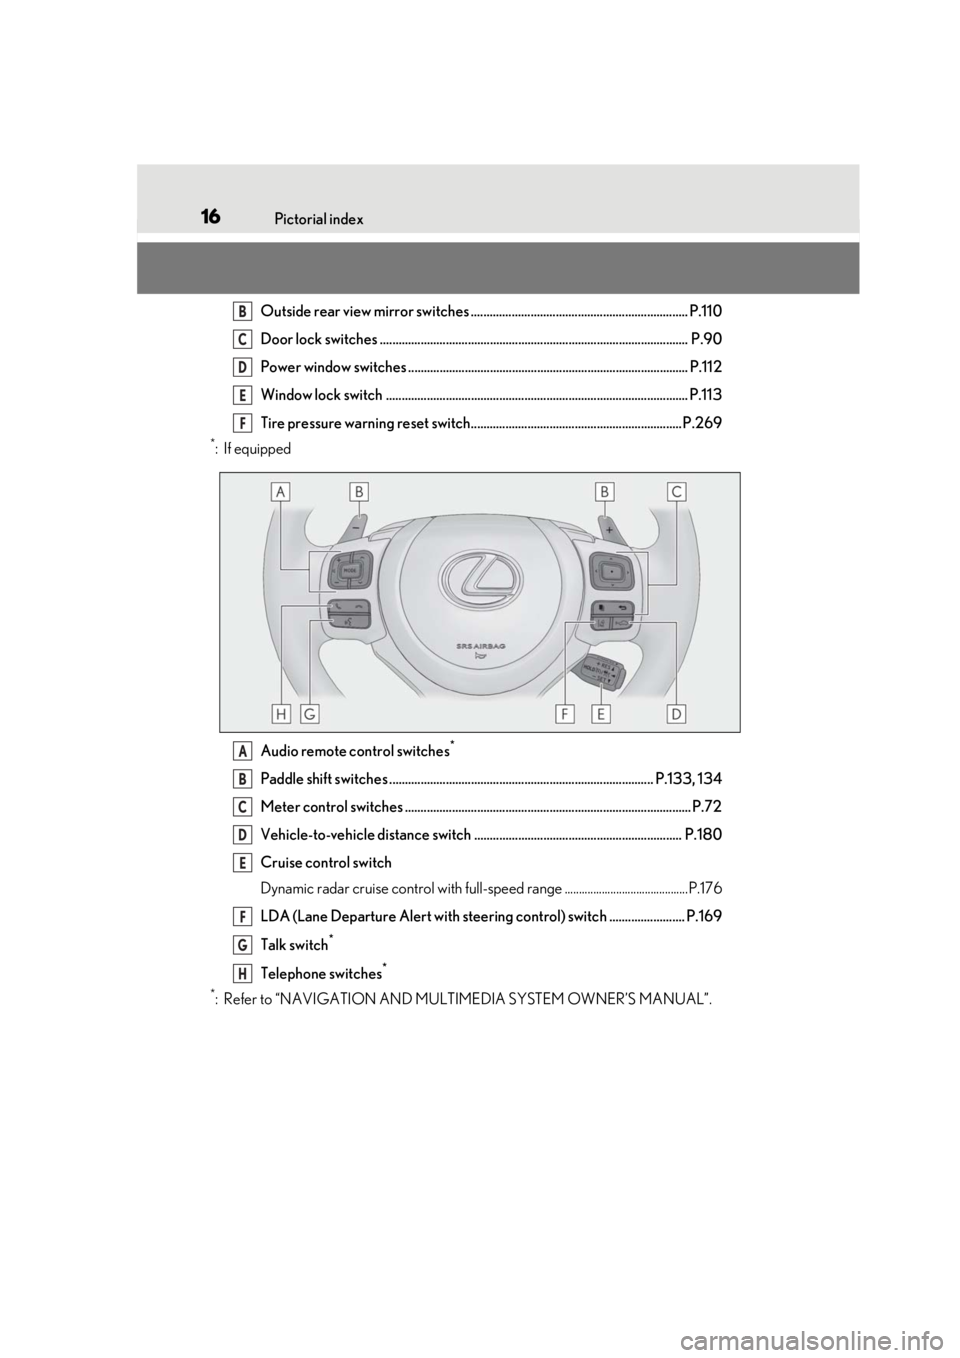
Outside rear view mirror switches ..................................................................... P.110
Door lock switches .................................................................................................. P.90
Power window switches ......................................................................................... P.112
Window lock switch ................................................................................................ P.113
Tire pressure warning reset switch................................................................... P.269
*:If equippedAudio remote control switches
*
Paddle shift switches .................................................................................... P.133, 134
Meter control switches ........................................................................................... P.72
Vehicle-to-vehicle distance switch .................................................................. P.180
Cruise control switch
Dynamic radar cruise control with full-spee d range ...........................................P.176
LDA (Lane Departure Alert with steering control) switch ........................ P.169
Talk switch
*
Telephone switches*
*
: Refer to “NAVIGATION AND MULTIMEDIA SYSTEM OWNER’S MANUAL”.
B
C
D
E
F
A
B
C
D
E
F
G
H
Page 63 of 400
632-1. Instrument cluster
2
Vehicle status information and indicators
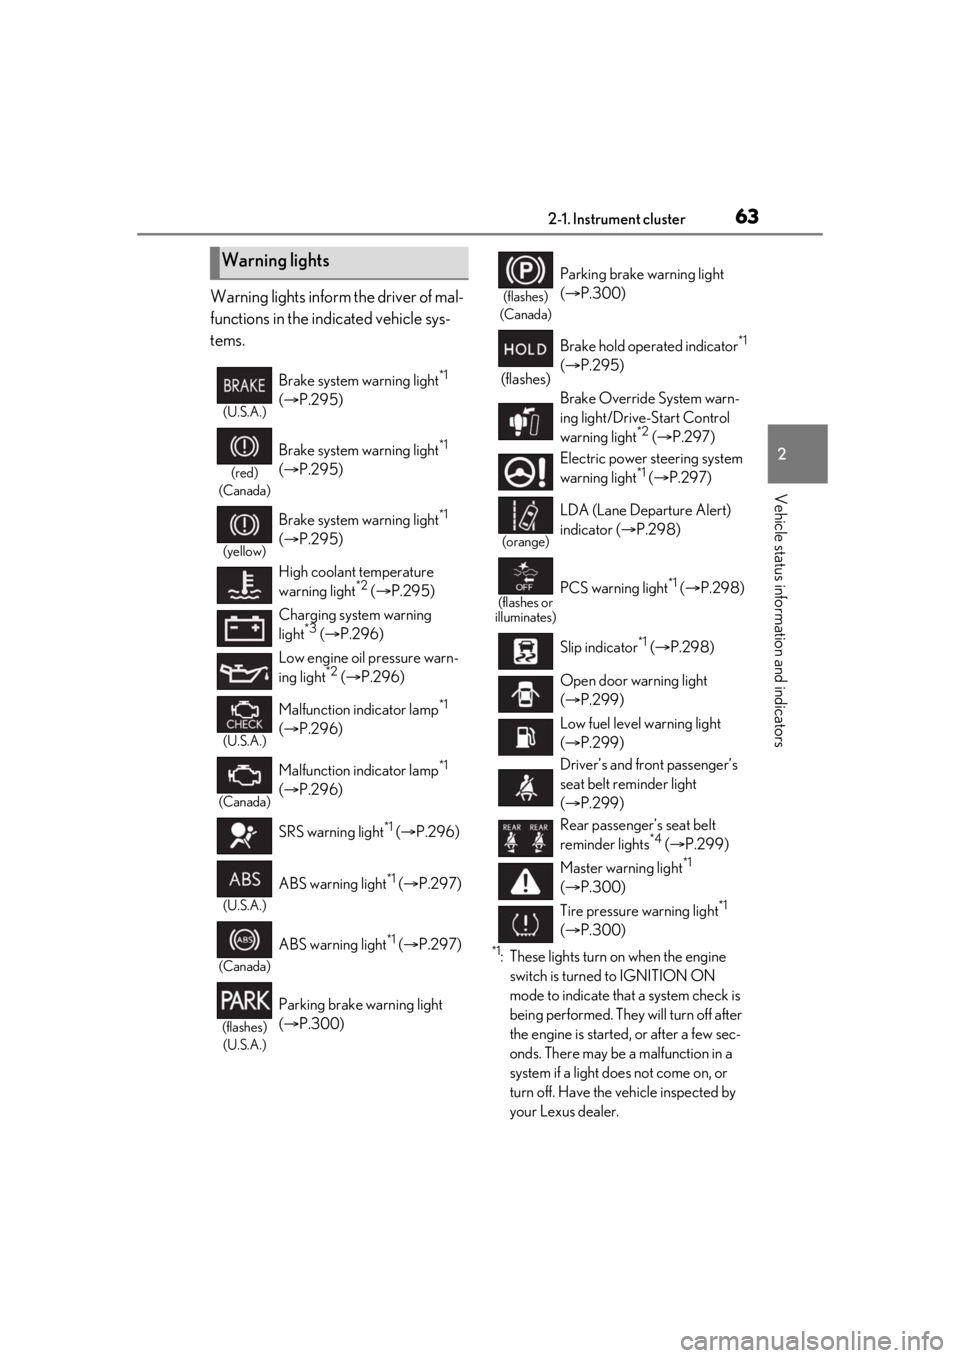
Warning lights inform the driver of mal-
functions in the indicated vehicle sys-
tems.
*1: These lights turn on when the engine switch is turned to IGNITION ON
mode to indicate that a system check is
being performed. They will turn off after
the engine is started, or after a few sec-
onds. There may be a malfunction in a
system if a light does not come on, or
turn off. Have the vehicle inspected by
your Lexus dealer.
Warning lights
(U.S.A.)
Brake system warning light*1
( P.295)
(red)
(Canada)
Brake system warning light*1
( P.295)
(yellow)
Brake system warning light*1
( P.295)
High coolant temperature
warning light
*2 ( P.295)
Charging system warning
light
*3 ( P.296)
Low engine oil pressure warn-
ing light
*2 ( P.296)
(U.S.A.)
Malfunction indicator lamp*1
( P.296)
(Canada)
Malfunction indicator lamp*1
( P.296)
SRS warning light
*1 ( P.296)
(U.S.A.)
ABS warning light*1 ( P.297)
(Canada)
ABS warning light*1 ( P.297)
(flashes)
(U.S.A.)
Parking brake warning light
( P.300)
(flashes)
(Canada)
Parking brake warning light
( P.300)
(flashes) Brake hold operated indicator
*1
( P.295)
Brake Override System warn-
ing light/Drive-Start Control
warning light
*2 ( P.297)
Electric power steering system
warning light
*1 ( P.297)
(orange)
LDA (Lane Departure Alert)
indicator ( P.298)
(flashes or
illuminates)PCS warning light*1 ( P.298)
Slip indicator
*1 ( P.298)
Open door warning light
( P.299)
Low fuel level warning light
( P.299)
Driver’s and front passenger’s
seat belt reminder light
( P.299)
Rear passenger’s seat belt
reminder lights
*4 ( P.299)
Master warning light
*1
( P.300)
Tire pressure warning light
*1
( P.300)
Page 64 of 400
642-1. Instrument cluster
*2: This light illuminates on the multi-infor-mation display.
*3: Except F SPORT models: This light illu-minates on the multi-information dis-
play.
F SPORT models: This light illuminates
on the meter.
*4: This light illuminates on the center panel.
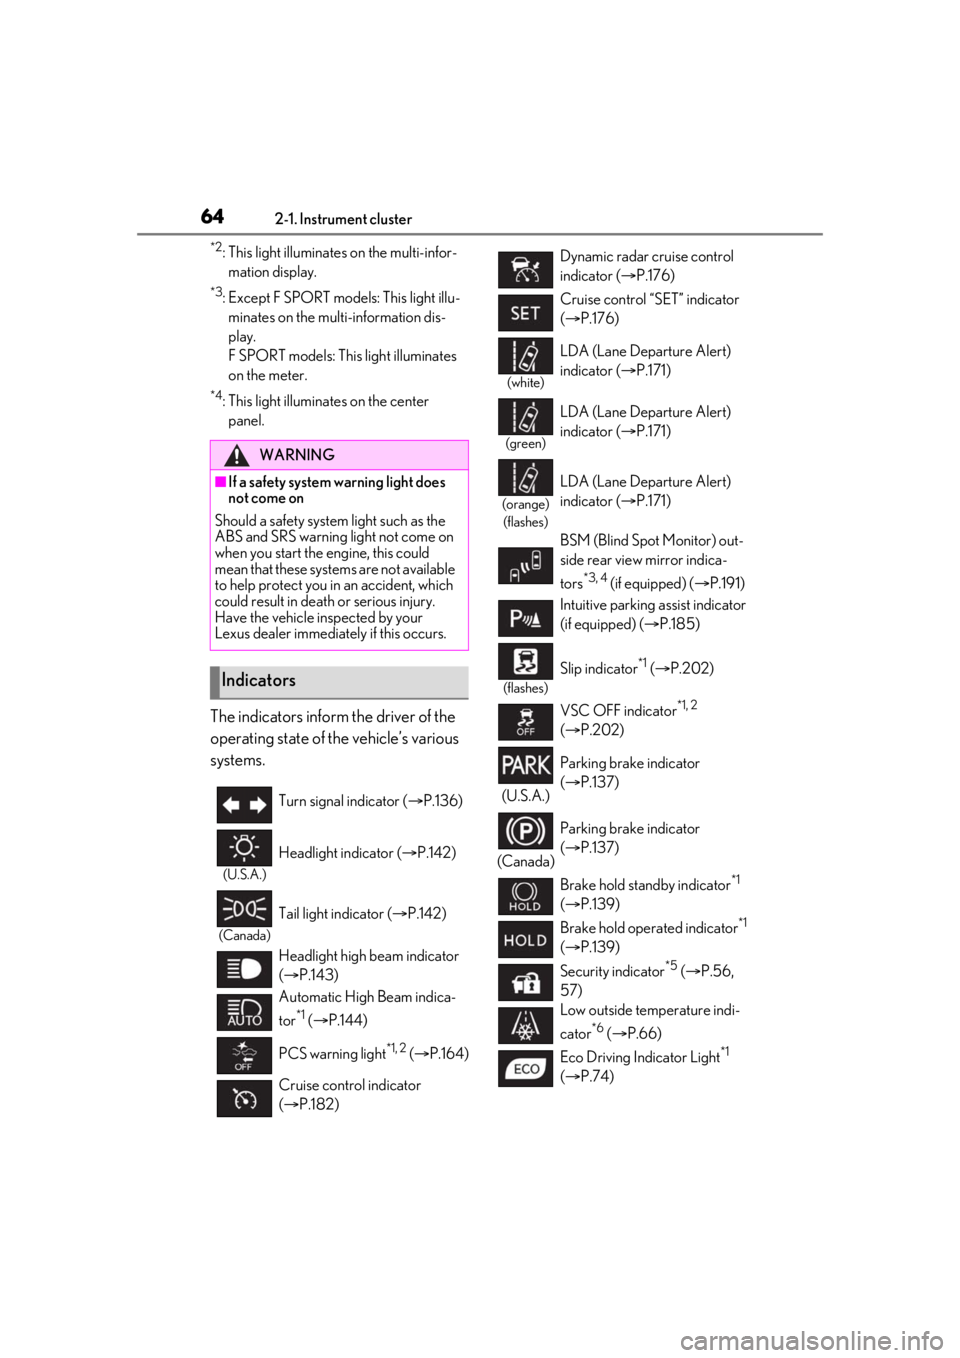
The indicators inform the driver of the
operating state of the vehicle’s various
systems.
WARNING
■If a safety system warning light does
not come on
Should a safety system light such as the
ABS and SRS warning light not come on
when you start the engine, this could
mean that these systems are not available
to help protect you in an accident, which
could result in death or serious injury.
Have the vehicle inspected by your
Lexus dealer immediately if this occurs.
Indicators
Turn signal indicator ( P.136)
(U.S.A.)
Headlight indicator ( P.142)
(Canada)
Tail light indicator ( P.142)
Headlight high beam indicator
( P.143)
Automatic High Beam indica-
tor
*1 ( P.144)
PCS warning light
*1, 2 ( P.164)
Cruise control indicator
( P.182)
Dynamic radar cruise control
indicator ( P.176)
Cruise control “SET” indicator
( P.176)
(white)
LDA (Lane Departure Alert)
indicator ( P.171)
(green)
LDA (Lane Departure Alert)
indicator ( P.171)
(orange)
(flashes)
LDA (Lane Departure Alert)
indicator ( P.171)
BSM (Blind Spot Monitor) out-
side rear view mirror indica-
tors
*3, 4 (if equipped) ( P.191)
Intuitive parking assist indicator
(if equipped) ( P.185)
(flashes)
Slip indicator*1 ( P.202)
VSC OFF indicator
*1, 2
( P.202)
(U.S.A.) Parking brake indicator
(
P.137)
(Canada) Parking brake indicator
(
P.137)
Brake hold standby indicator
*1
( P.139)
Brake hold operated indicator
*1
( P.139)
Security indicator
*5 ( P.56,
57)
Low outside temperature indi-
cator
*6 ( P.66)
Eco Driving Indicator Light
*1
( P.74)
Page 75 of 400
752-1. Instrument cluster
2
Vehicle status information and indicators
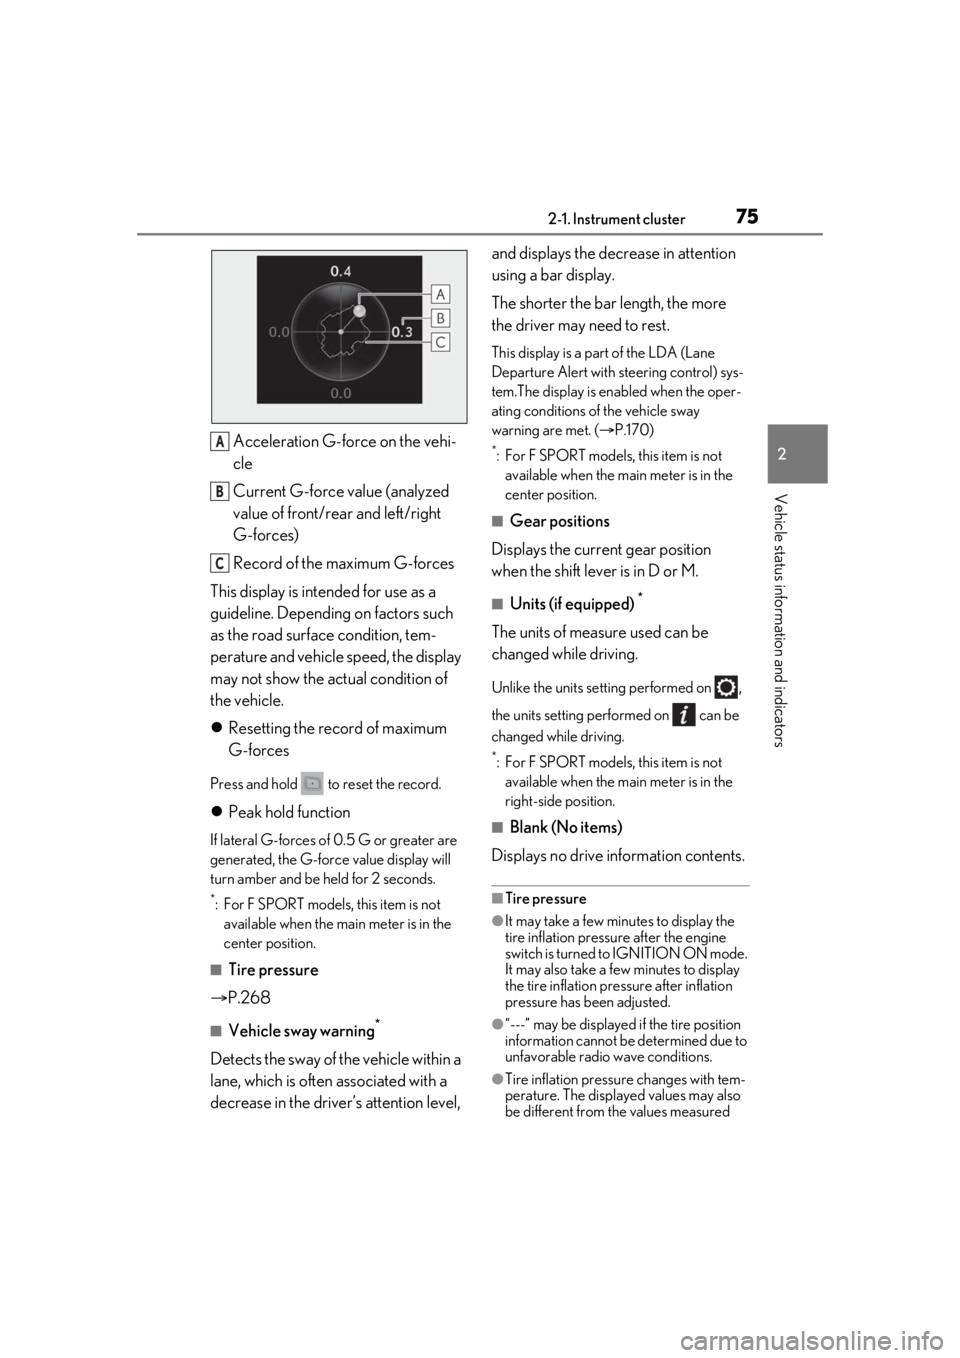
Acceleration G-force on the vehi-
cle
Current G-force value (analyzed
value of front/rear and left/right
G-forces)
Record of the maximum G-forces
This display is intended for use as a
guideline. Depending on factors such
as the road surface condition, tem-
perature and vehicle speed, the display
may not show the actual condition of
the vehicle.
Resetting the record of maximum
G-forces
Press and hold to reset the record.
Peak hold function
If lateral G-forces of 0.5 G or greater are
generated, the G-forc e value display will
turn amber and be held for 2 seconds.
*: For F SPORT models, this item is not available when the ma in meter is in the
center position.
■Tire pressure
P.268
■Vehicle sway warning*
Detects the sway of the vehicle within a
lane, which is often associated with a
decrease in the driver’s attention level, and displays the decrease in attention
using a bar display.
The shorter the bar length, the more
the driver may need to rest.
This display is a pa
rt of the LDA (Lane
Departure Alert with steering control) sys-
tem.The display is en abled when the oper-
ating conditions of the vehicle sway
warning are met. ( P.170)
*: For F SPORT models, this item is not
available when the main meter is in the
center position.
■Gear positions
Displays the current gear position
when the shift lever is in D or M.
■Units (if equipped) *
The units of measure used can be
changed while driving.
Unlike the units sett ing performed on ,
the units setting performed on can be
changed while driving.
*: For F SPORT models, this item is not available when the main meter is in the
right-side position.
■Blank (No items)
Displays no drive information contents.
■Tire pressure
●It may take a few minutes to display the
tire inflation pressu re after the engine
switch is turned to IGNITION ON mode.
It may also take a few minutes to display
the tire inflation pressure after inflation
pressure has b een adjusted.
●“---” may be displayed if the tire position
information cannot be determined due to
unfavorable radio wave conditions.
●Tire inflation pressure changes with tem-
perature. The displaye d values may also
be different from the values measured
A
B
C
Page 76 of 400
762-1. Instrument cluster
using a tire pressure gauge.
Select to display the following naviga-
tion system-linked information.
Route guidance
Compass display (heading-up dis-
play)
Select to enable selection of an audio
source or track on the display using the
meter control switches.
Select to display the operational status
of the following systems:
LDA (Lane Departure Alert with
steering control) ( P.169)
Dynamic radar cruise control with
full-speed range ( P.176)
Select to display warning messages
and measures to be taken if a malfunc-
tion is detected. ( P.303)
The settings of the following items can
be changed using the meter control
switches.
For functions that can be enabled or
disabled, the function switches between on and off each time is
pressed.
■LDA (Lane Departure Alert
with steering control) ( P.169)
Select to set up the following items.
Steering Assist
Select to enable/dis able steering wheel
assistance.
Alert
Select to set a vibrator or buzzer as the
notification method used to warn the
driver.
Sensitivity
Select to set the warning sensitivity.
Sway warning
Select to enable/disable the vehicle sway
warning.
Sway sensitivity
Select to set the vehicle sway warning sen-
sitivity.
■PCS (Pre-Collision System)
( P.162)
Select to set up the following items.
PCS
Select to enable/disable the pre-collision
system.
Warning sensitivity
Select to change the warning timing.
■Speed indicator (F SPORT mod-
els) ( P.68)
Select to set up the following items.
Speed Indicator
Select to enable/disable the speed indica-
tor.
Navigation system-linked dis-
play (if equipped)
Audio system-linked display
Driving assist system information
Warning message display
Settings display
Page 117 of 400
117
4
4
Driving
Driving
.4-1. Before drivingDriving the vehicle ...................... 118
Cargo and luggage ................... 123
Vehicle load limits ...................... 125
Trailer towing ............................... 126
Dinghy towing ............................. 126
4-2. Driving procedures Engine (ignition) switch ........... 127
Automatic transmission............ 131
Turn signal lever.......................... 136
Parking brake .............................. 137
Brake Hold.................................... 139
ASC (Active Sound Control) .......................................................... 141
4-3. Operating the lights and wipers Headlight switch ......................... 142
AHB (Automatic High Beam) ......................................................... 144
Windshield wipers and washer ......................................................... 147
4-4. Refueling Opening the fuel tank cap...... 155
4-5. Using the driving support sys- tems
Lexus Safety System + ............. 158
PCS (Pre-Collision System) ......................................................... 162
LDA (Lane Departure Alert with steering control) ...................... 169
Dynamic radar cruise control with full-speed range....................... 176Intuitive parking assist ..............
185
BSM (Blind Spot Monitor) ...... 191
Driving mode select switch ... 199
Driving assist systems............... 201
4-6. Driving tips Winter driving tips .................... 205
Page 136 of 400
1364-2. Driving procedures
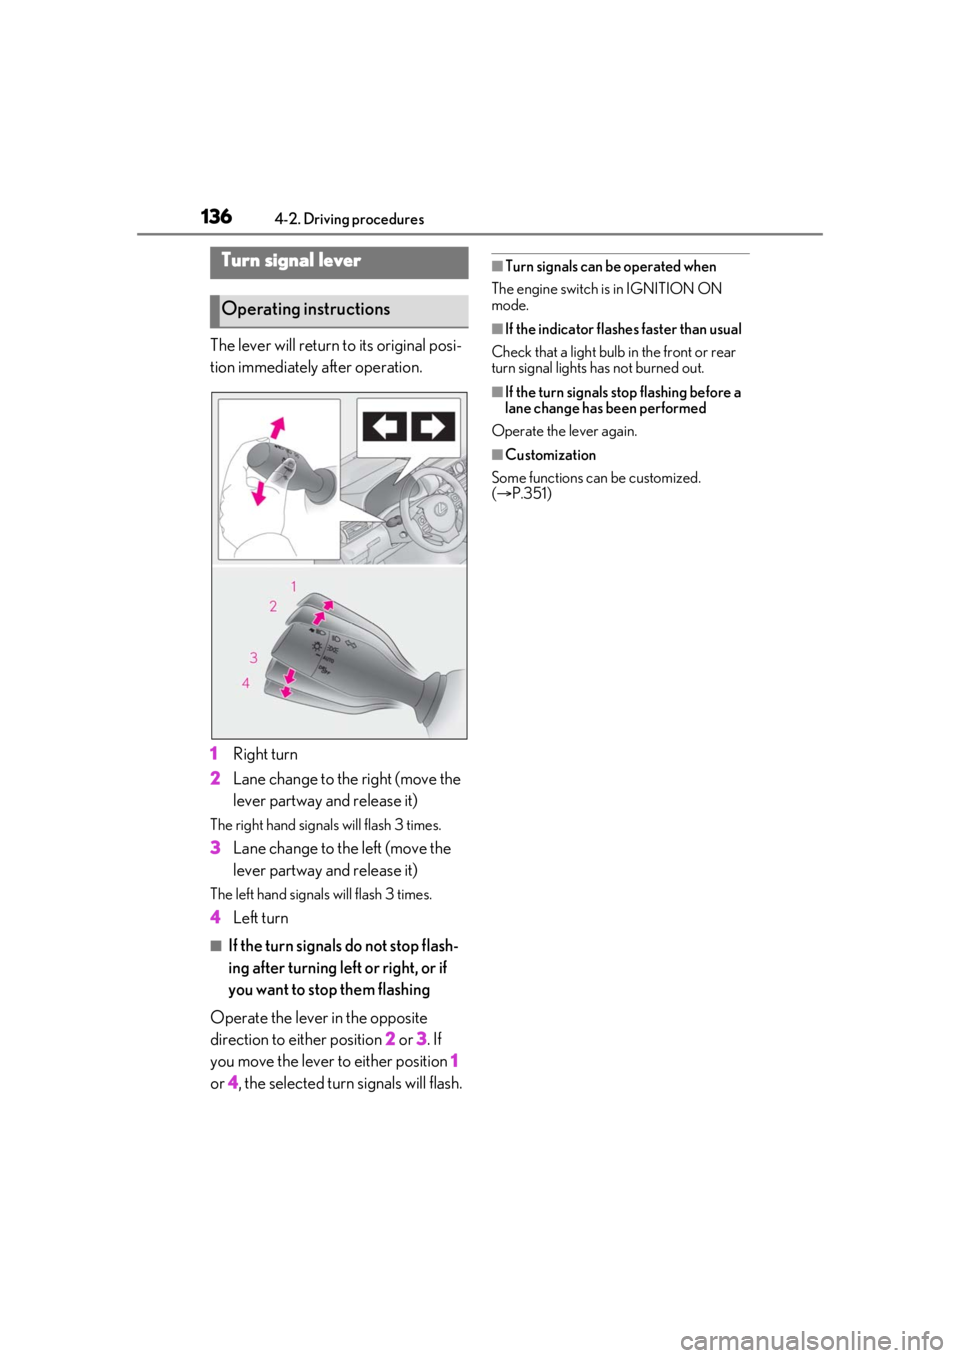
The lever will return to its original posi-
tion immediately after operation.
1Right turn
2 Lane change to the right (move the
lever partway and release it)
The right hand signals will flash 3 times.
3Lane change to the left (move the
lever partway and release it)
The left hand signals will flash 3 times.
4Left turn
■If the turn signals do not stop flash-
ing after turning left or right, or if
you want to stop them flashing
Operate the lever in the opposite
direction to either position 2 or 3 . If
you move the lever to either position 1
or 4, the selected turn signals will flash.
■Turn signals can be operated when
The engine switch is in IGNITION ON
mode.
■If the indicator flashes faster than usual
Check that a light bulb in the front or rear
turn signal lights has not burned out.
■If the turn signals stop flashing before a
lane change has been performed
Operate the lever again.
■Customization
Some functions can be customized.
( P.351)
Turn signal lever
Operating instructions
Page 145 of 400
1454-3. Operating the lights and wipers
4
Driving
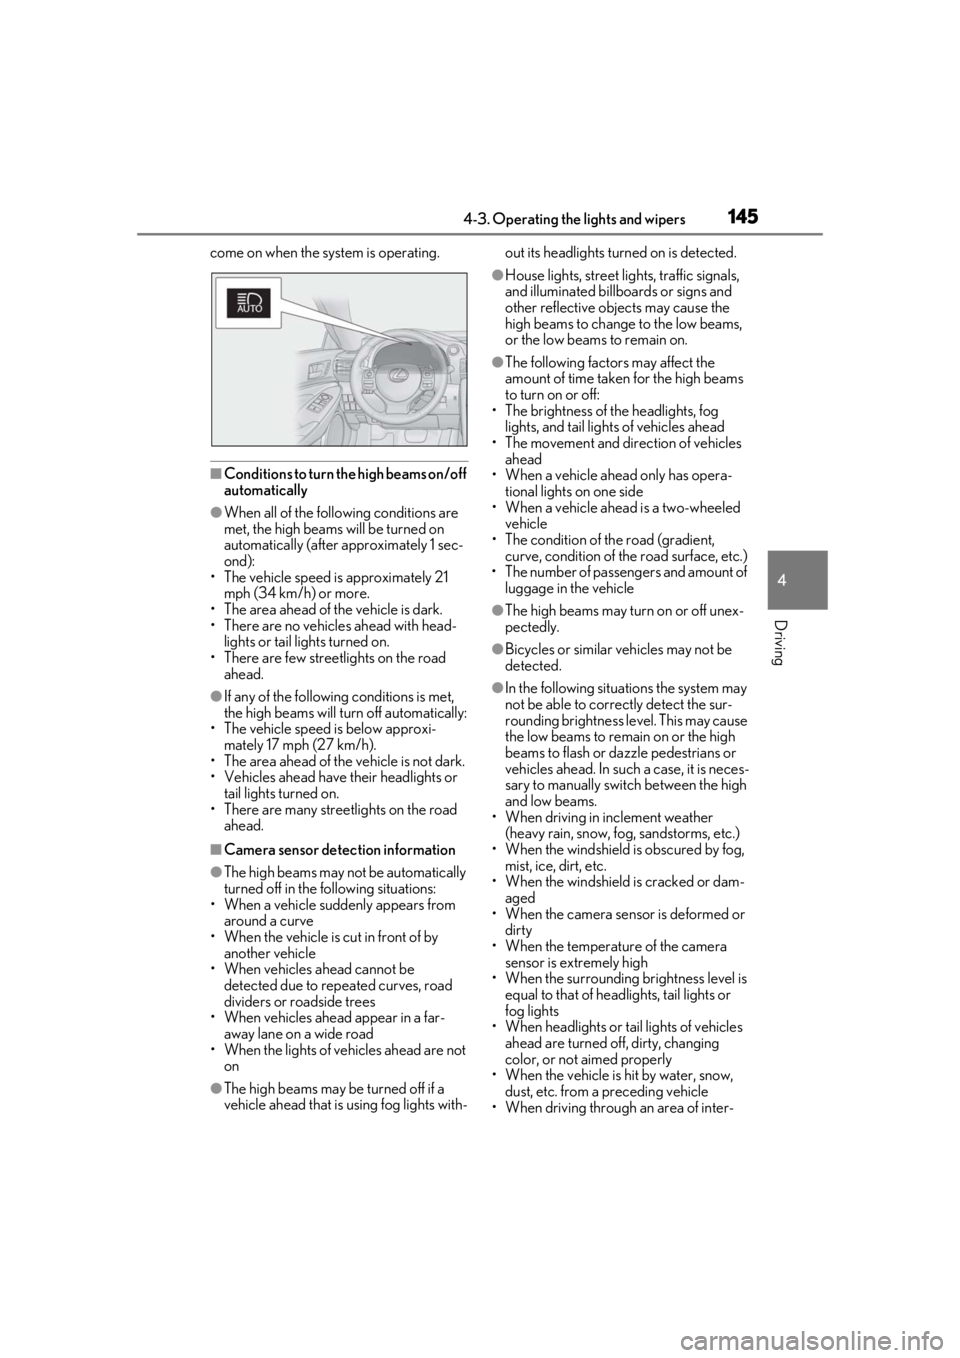
come on when the system is operating.
■Conditions to turn the high beams on/off
automatically
●When all of the following conditions are
met, the high beams will be turned on
automatically (after approximately 1 sec-
ond):
• The vehicle speed is approximately 21 mph (34 km/h) or more.
• The area ahead of the vehicle is dark.
• There are no vehicles ahead with head- lights or tail lights turned on.
• There are few streetlights on the road ahead.
●If any of the following conditions is met,
the high beams will turn off automatically:
• The vehicle speed is below approxi-
mately 17 mph (27 km/h).
• The area ahead of the vehicle is not dark.
• Vehicles ahead have their headlights or tail lights turned on.
• There are many streetlights on the road ahead.
■Camera sensor detection information
●The high beams may not be automatically
turned off in the following situations:
• When a vehicle suddenly appears from around a curve
• When the vehicle is cut in front of by
another vehicle
• When vehicles ahead cannot be detected due to repe ated curves, road
dividers or roadside trees
• When vehicles ahead appear in a far- away lane on a wide road
• When the lights of vehicles ahead are not
on
●The high beams may be turned off if a
vehicle ahead that is using fog lights with- out its headlights turned on is detected.
●House lights, street lig
hts, traffic signals,
and illuminated billboards or signs and
other reflective objects may cause the
high beams to change to the low beams,
or the low beams to remain on.
●The following factors may affect the
amount of time taken for the high beams
to turn on or off:
• The brightness of the headlights, fog
lights, and tail lights of vehicles ahead
• The movement and direction of vehicles ahead
• When a vehicle ahead only has opera- tional lights on one side
• When a vehicle ahead is a two-wheeled
vehicle
• The condition of the road (gradient, curve, condition of th e road surface, etc.)
• The number of passengers and amount of luggage in the vehicle
●The high beams may turn on or off unex-
pectedly.
●Bicycles or similar vehicles may not be
detected.
●In the following situations the system may
not be able to correctly detect the sur-
rounding brightness level. This may cause
the low beams to remain on or the high
beams to flash or dazzle pedestrians or
vehicles ahead. In such a case, it is neces-
sary to manually swit ch between the high
and low beams.
• When driving in inclement weather
(heavy rain, snow, fo g, sandstorms, etc.)
• When the windshield is obscured by fog, mist, ice, dirt, etc.
• When the windshield is cracked or dam- aged
• When the camera sensor is deformed or
dirty
• When the temperature of the camera sensor is extremely high
• When the surrounding brightness level is equal to that of headlights, tail lights or
fog lights
• When headlights or tail lights of vehicles
ahead are turned off, dirty, changing
color, or not aimed properly
• When the vehicle is hit by water, snow,
dust, etc. from a preceding vehicle
• When driving through an area of inter-
Page 158 of 400
1584-5. Using the driving support systems
4-5.Using the driving support systems
■PCS (Pre-Collision System)
P.162
■LDA (Lane Departure Alert with
steering control)
P.169
■AHB(Automatic High Beam)
P.144
■Dynamic radar cruise control with
full-speed range
P.176
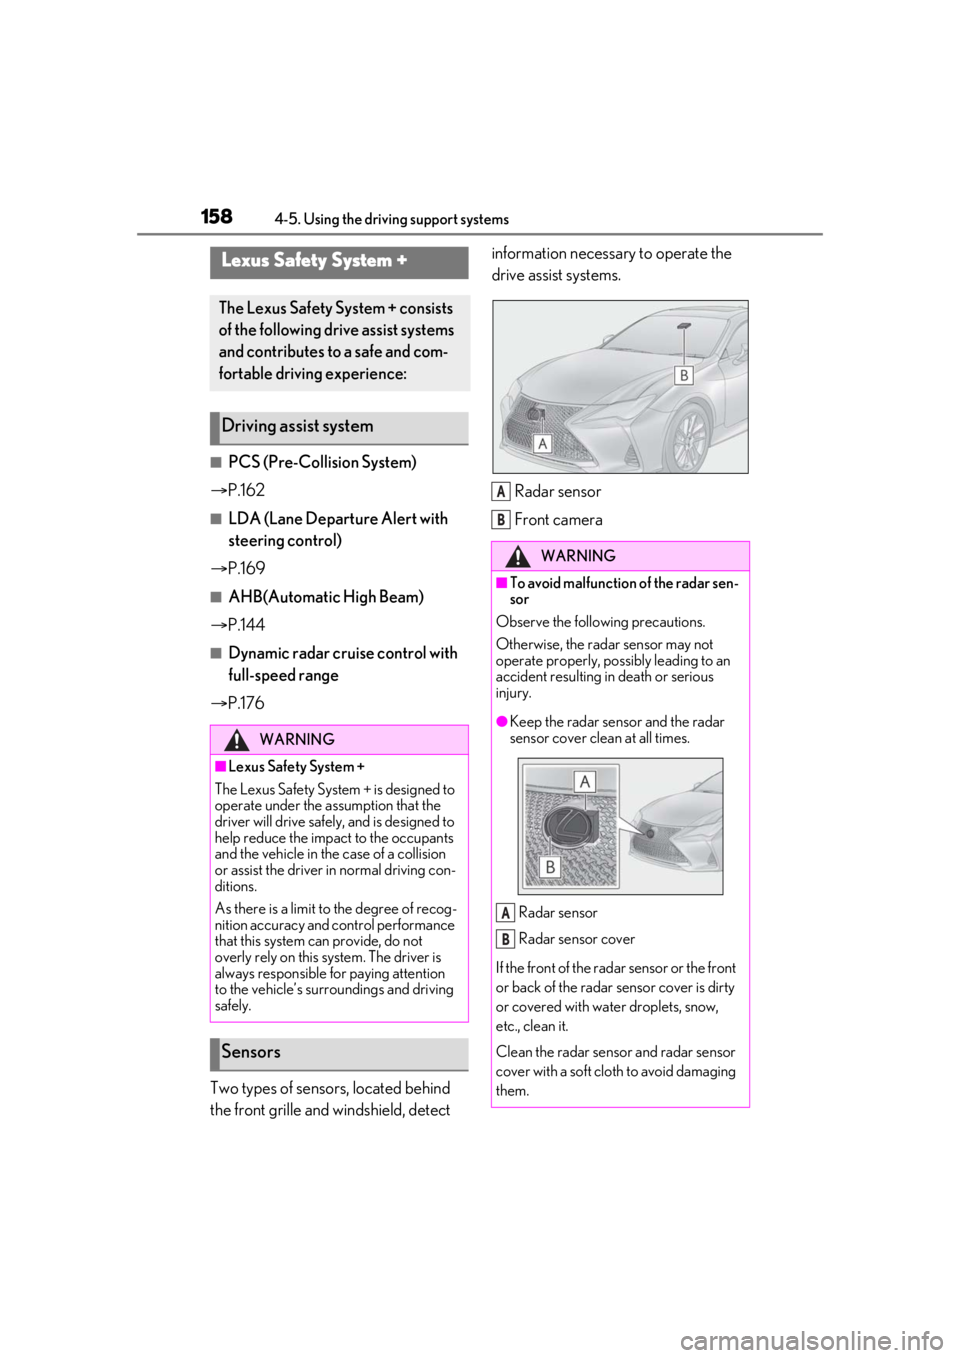
Two types of sensors, located behind
the front grille and windshield, detect information necessary to operate the
drive assist systems.
Radar sensor
Front camera
Lexus Safety System +
The Lexus Safety Sy stem + consists
of the following drive assist systems
and contributes to a safe and com-
fortable driving experience:
Driving assist system
WARNING
■Lexus Safety System +
The Lexus Safety System + is designed to
operate under the assumption that the
driver will drive safely, and is designed to
help reduce the impact to the occupants
and the vehicle in the case of a collision
or assist the driver in normal driving con-
ditions.
As there is a limit to the degree of recog-
nition accuracy and control performance
that this system can provide, do not
overly rely on this system. The driver is
always responsible for paying attention
to the vehicle’s surro undings and driving
safely.
Sensors
WARNING
■To avoid malfunction of the radar sen-
sor
Observe the following precautions.
Otherwise, the radar sensor may not
operate properly, possibly leading to an
accident resulting in death or serious
injury.
●Keep the radar sensor and the radar
sensor cover clean at all times.
Radar sensor
Radar sensor cover
If the front of the rada r sensor or the front
or back of the radar sensor cover is dirty
or covered with water droplets, snow,
etc., clean it.
Clean the radar sensor and radar sensor
cover with a soft cloth to avoid damaging
them.
A
B
A
B