light LEXUS RC300 2022 Owner's Guide
[x] Cancel search | Manufacturer: LEXUS, Model Year: 2022, Model line: RC300, Model: LEXUS RC300 2022Pages: 400, PDF Size: 27.73 MB
Page 67 of 400

652-1. Instrument cluster
RC350/RC300 Owner's Manual
2
Vehicle status information and indicators
Drive mode indicators
Except F SPORT models
F SPORT models
*1: These lights turn on when the engine
switch is turned to IGNITION ON
mode to indicate that a system check is
being performed. They will turn off after
the engine is started, or after a few sec-
onds. There may be a malfunction in a
system if a light does not come on, or
turn off. Have the vehicle inspected by
your Lexus dealer.
*2: The light comes on when the system is turned off.
*3: In order to confirm operation, the BSM outside rear view mirror indicators illu-
minate in the following situations:
• When the engine switch is turned to
IGNITION ON mode while the
BSM main switch is turned on.
• When the BSM main switch is turned on while the engine switch is
in IGNITION ON mode.
If the system is functioning correctly, the
BSM outside rear view mirror indicators
will turn off after a few seconds. If the BSM
outside rear view mirror indicators do not
illuminate or do not turn off, there may be a
malfunction in the syst em. If this occurs,
have the vehicle inspected by your Lexus
dealer.
*4: This light illuminates on the outside rear view mirrors.
*5: This light illuminates on the center panel.
*6: When the outside temperature is approximately 37°F (3°C) or lower, this
indicator will flash for approximately 10
seconds, then stay on.
Eco Driving Indicator Light
*1
( P.74)
(U.S.A.)
“AIR BAG ON/OFF”
indicator
*1, 5 ( P.36)
(Canada)
“AIR BAG ON/OFF”
indicator
*1, 5 (P.36)
Eco drive mode indicator
( P.196)
“SPORT” indicator ( P.196)
Snow mode indicator ( P.131)
Eco drive mode indicator
( P.196)
“SPORT S” indicator ( P.196)
“SPORT S+” indicator
( P.196)
“CUSTOM” indicator ( P.196)
Snow mode indicator ( P.131)
Page 72 of 400

702-1. Instrument cluster
RC350/RC300 Owner's Manual
■Display items
Odometer
Displays the total distance the vehicle has
been driven.
Trip meter A/trip meter B
Displays the distance the vehicle has been
driven since the meter was last reset. Trip
meters A and B can be used to record and
display different distances independently.
Distance until next engine oil change
Displays the distance the vehicle can be
driven until an oil change is necessary.
■Changing the display
Each time the “ODO TRIP” switch is
pressed, the displayed item will be
changed. When the trip meter is dis-
played, pressing and holding the switch
will reset the trip meter.
■Pop-up display
In some situations the following will be
temporarily displayed:
Distance until next engine oil
change
Distance until the next engine oil change
will displayed when a warning message
indicating that oil maintenance should be
performed soon or is required is displayed.
The brightness of the instrument panel
lights can be adjusted.
WARNING
■The information display at low tem-
peratures
Allow the interior of the vehicle to warm
up before using the liquid crystal infor-
mation display. At extremely low tem-
peratures, the information display
monitor may respond slowly, and display
changes may be delayed.
For example, there is a lag between the
driver’s shifting and the new gear number
appearing on the display. This lag could
cause the driver to downshift again,
causing rapid and excessive engine brak-
ing and possibly an accident resulting in
death or injury.
NOTICE
■To prevent damage to the engine and
its components
●Do not let the indicator needle of the
tachometer enter the red zone, which
indicates the maxi mum engine speed.
●The engine may be overheating if the
engine coolant temperature gauge is
in the red zone (H). In this case, imme-
diately stop the vehicle in a safe place,
and check the engine after it has
cooled completely. ( P.320)
Odometer and trip meter dis-
play
Changing the instrument panel
light brightness
Page 73 of 400
712-1. Instrument cluster
RC350/RC300 Owner's Manual
2
Vehicle status information and indicators
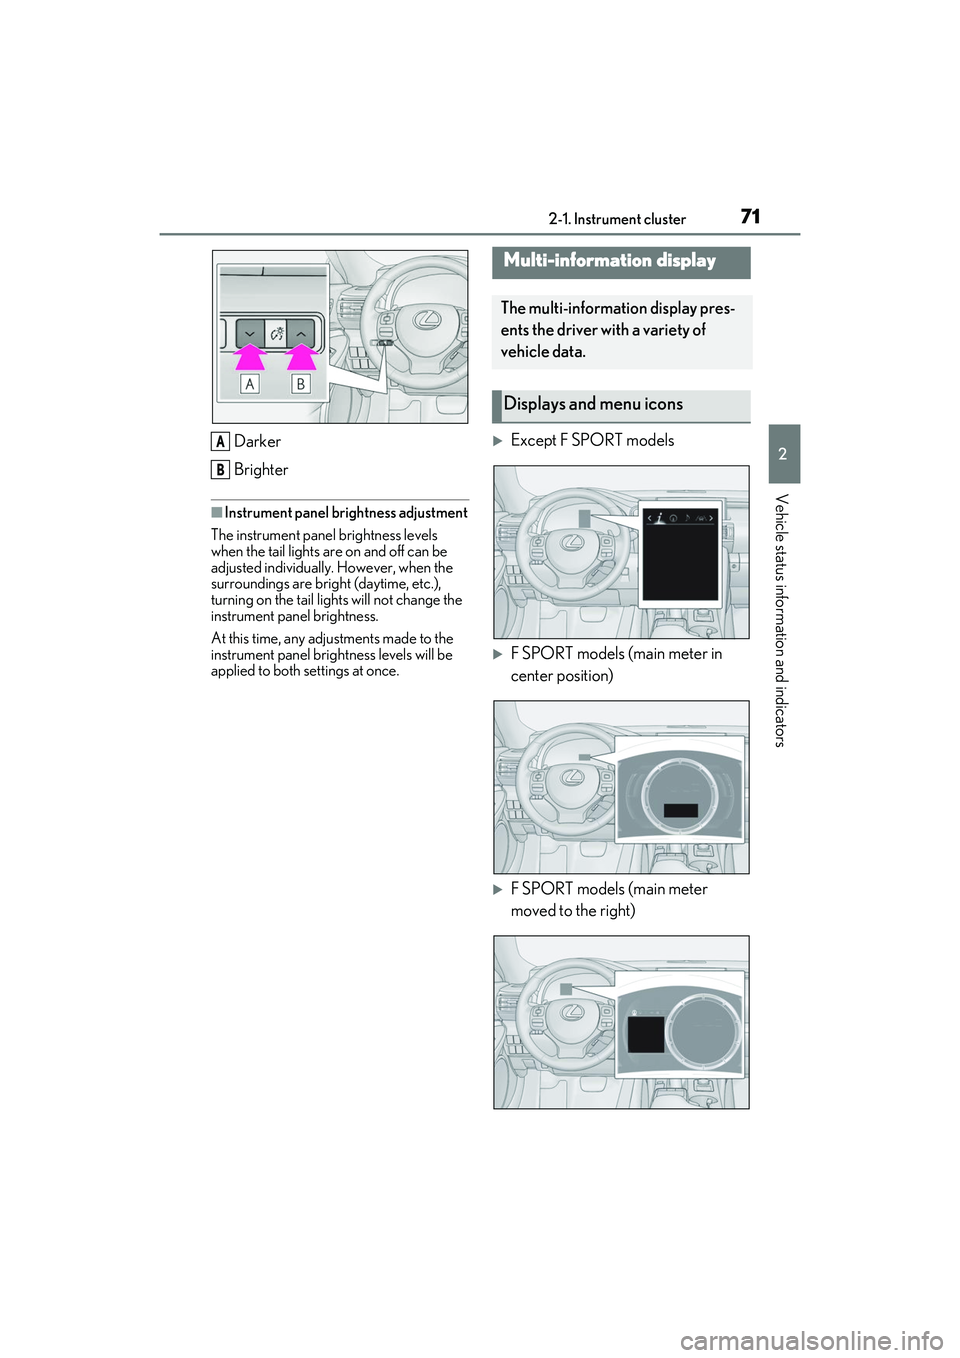
Darker
Brighter
■Instrument panel brightness adjustment
The instrument pane l brightness levels
when the tail lights are on and off can be
adjusted individually. However, when the
surroundings are bright (daytime, etc.),
turning on the tail lights will not change the
instrument panel brightness.
At this time, any adjustments made to the
instrument panel brig htness levels will be
applied to both settings at once.
Except F SPORT models
F SPORT models (main meter in
center position)
F SPORT models (main meter
moved to the right)
A
B
Multi-information display
The multi-information display pres-
ents the driver with a variety of
vehicle data.
Displays and menu icons
Page 76 of 400

742-1. Instrument cluster
RC350/RC300 Owner's Manual
■Eco Driving IndicatorEco Driving Indicator Light
During Eco-friendly acceleration (Eco
driving), the Eco Driving Indicator Light
will turn on. When the acceleration
exceeds the Zone of Ec o driving, or when
the vehicle is stopped, the light turns off.
Eco Driving Indicator Zone Display
Suggests the Zone of Eco driving with cur-
rent Eco driving ratio based on accelera-
tion.
Eco driving ratio based on acceler-
ation
If the acceleration exceeds the Zone of
Eco driving, the right side of the Eco Driv-
ing Indicator Zone Display will illuminate.
At this time, the Eco Driving Indicator Light
will turn off.
Zone of Eco driving
Eco Driving Indicator will not operate
under the following conditions:
The shift lever is in any position
other than D.
A paddle shift switch is operated.
Neither normal mode nor Eco drive
mode is selected. ( P.196)
The vehicle speed is approximately
80 mph (130 km/h) or higher.
■Boost gauge/engine oil tempera-
ture gauge/engine oil pressure
gauge (if equipped)
*
Boost gauge
Displays the boost pressure. The display
will change color if the specified pressure is
exceeded.
Engine oil temp erature gauge
Displays the engine oil temperature.The
display will flash if the engine oil tempera-
ture exceeds 284 °F (140 °C).
Engine oil pressure gauge
Displays the engine oil pressure. A buzzer
will sound and warning message will be
displayed if the engine oil pressure
becomes low. (P.293)
This display is intend ed for use as a guide-
line. Depending on fact ors such as the road
surface condition, temperature and vehicle
speed, the display may not show the actual
condition of the vehicle.
*: For F SPORT models, this item is not available when the main meter is in the
center position.
■G-force (if equipped)*
Displays lateral G-forces on the vehi-
cle.
A
B
C
D
A
B
C
Page 79 of 400
772-1. Instrument cluster
RC350/RC300 Owner's Manual
2
Vehicle status information and indicators
maintenance is required, after the required
maintenance is performed.
Oil maintenance ( P.258)
Select to reset the en gine oil maintenance
information (message indicating mainte-
nance is required and distance until the
next oil change) after engine oil mainte-
nance is performed.
■Meter settings
Language
Select to change the language on the dis-
play.
Units
Select to change the units of measure dis-
played.
Eco Driving Indicator Light
( P.74)
Select to enable/disable the Eco Driving
Indicator Light.
Switch settings (except F
SPORT models)
Displays a procedure to register a desired
screen to
.
You can register 1 screen as a shortcut,
which can be displayed by pressing
.
Drive information screen ( P.73)
Select to choose betwee n 2 items that will
be displayed on each drive information
screen (“Drive info 1”, “Drive Info 2” and
“Drive Info 3”) respectively.
Pop-up display ( P.69)
Select to enable/disable the pop-up dis-
play.
• Intersection guidance (if equipped)
• Incoming calls • Audio Feedback (F SPORT)
• Volume Feedback (F SPORT)
• Brightness adjustment
Color
Select to set the color of the cursor on the
multi-information display.
Rev indicator (F SPORT models)
( P.68)
• Select to enable/disable the Rev indica-
tor.
• Select to set the desired engine speed at which the Rev indicator will begin to be
displayed.
Rev peak (F SPORT models)
( P.69)
Select to enable/dis able the Rev peak.
Default setting
Select to reset the meter display settings to
the default setting.
■Background color of the indicator/shift
position display area (except F SPORT
models)
The background color of the indicator/shift
position display area is changed according
to the driving mode as follows ( P.196):
●Eco drive mode: Blue
●Sport mode: Red
■G-force display (if equipped)
The G-force values may not be zero even
when the vehicle is parked, such as when it
is parked on an incline.
■Suspension of the settings display
●Some settings cannot be changed while
driving. When changing settings, park
the vehicle in a safe place.
●If a warning message is displayed, opera-
tion of the settings display will be sus-
pended.
Page 81 of 400
792-1. Instrument cluster
RC350/RC300 Owner's Manual
2
Vehicle status information and indicators
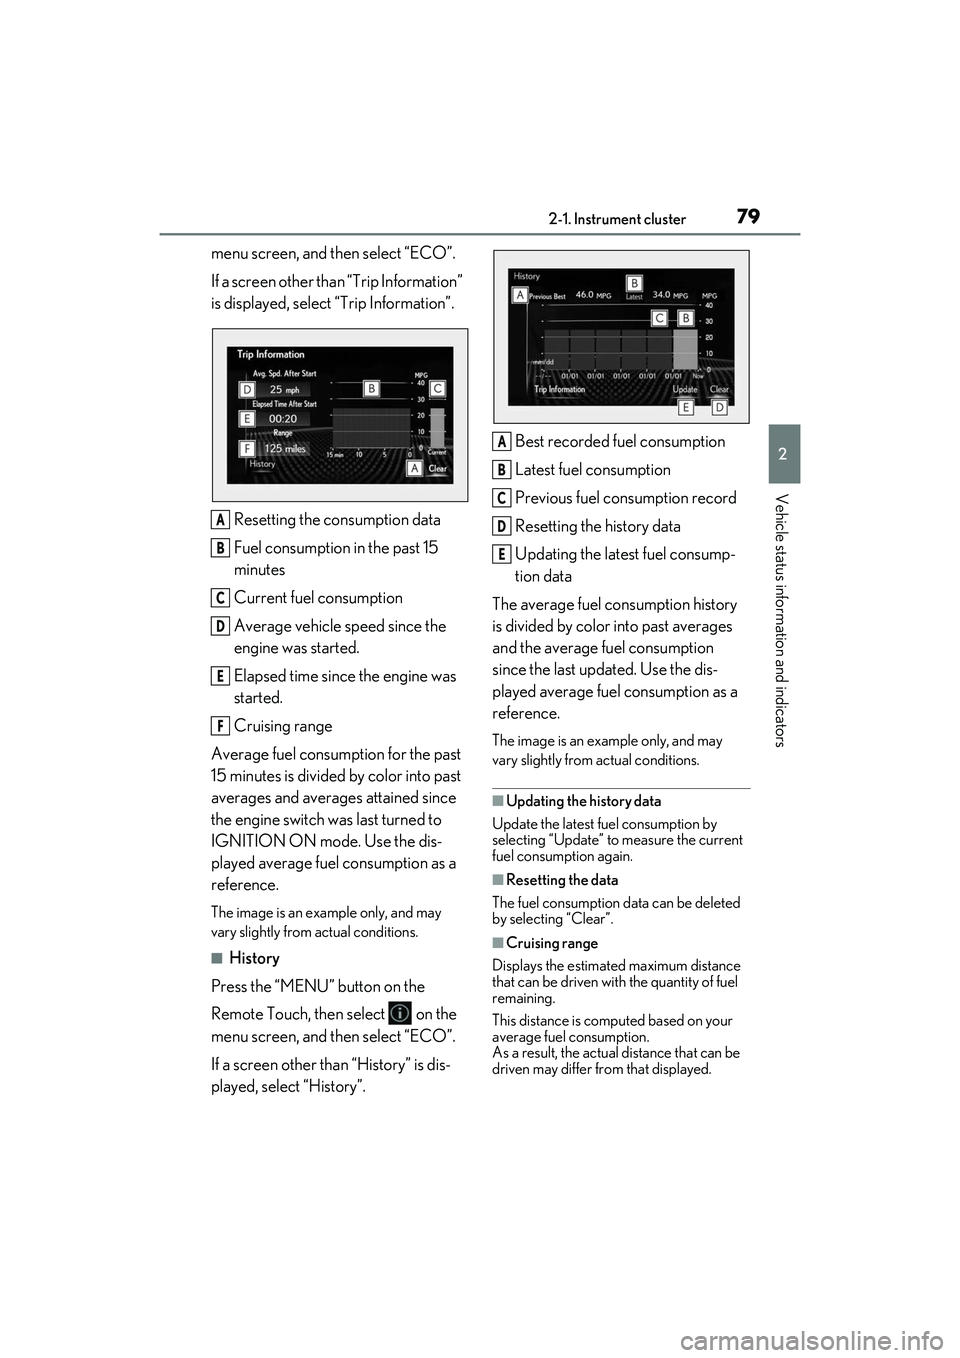
menu screen, and then select “ECO”.
If a screen other than “Trip Information”
is displayed, select “Trip Information”.
Resetting the consumption data
Fuel consumption in the past 15
minutes
Current fuel consumption
Average vehicle speed since the
engine was started.
Elapsed time since the engine was
started.
Cruising range
Average fuel consumption for the past
15 minutes is divided by color into past
averages and averages attained since
the engine switch was last turned to
IGNITION ON mode. Use the dis-
played average fuel consumption as a
reference.
The image is an example only, and may
vary slightly from actual conditions.
■History
Press the “MENU” button on the
Remote Touch, then select on the
menu screen, and then select “ECO”.
If a screen other than “History” is dis-
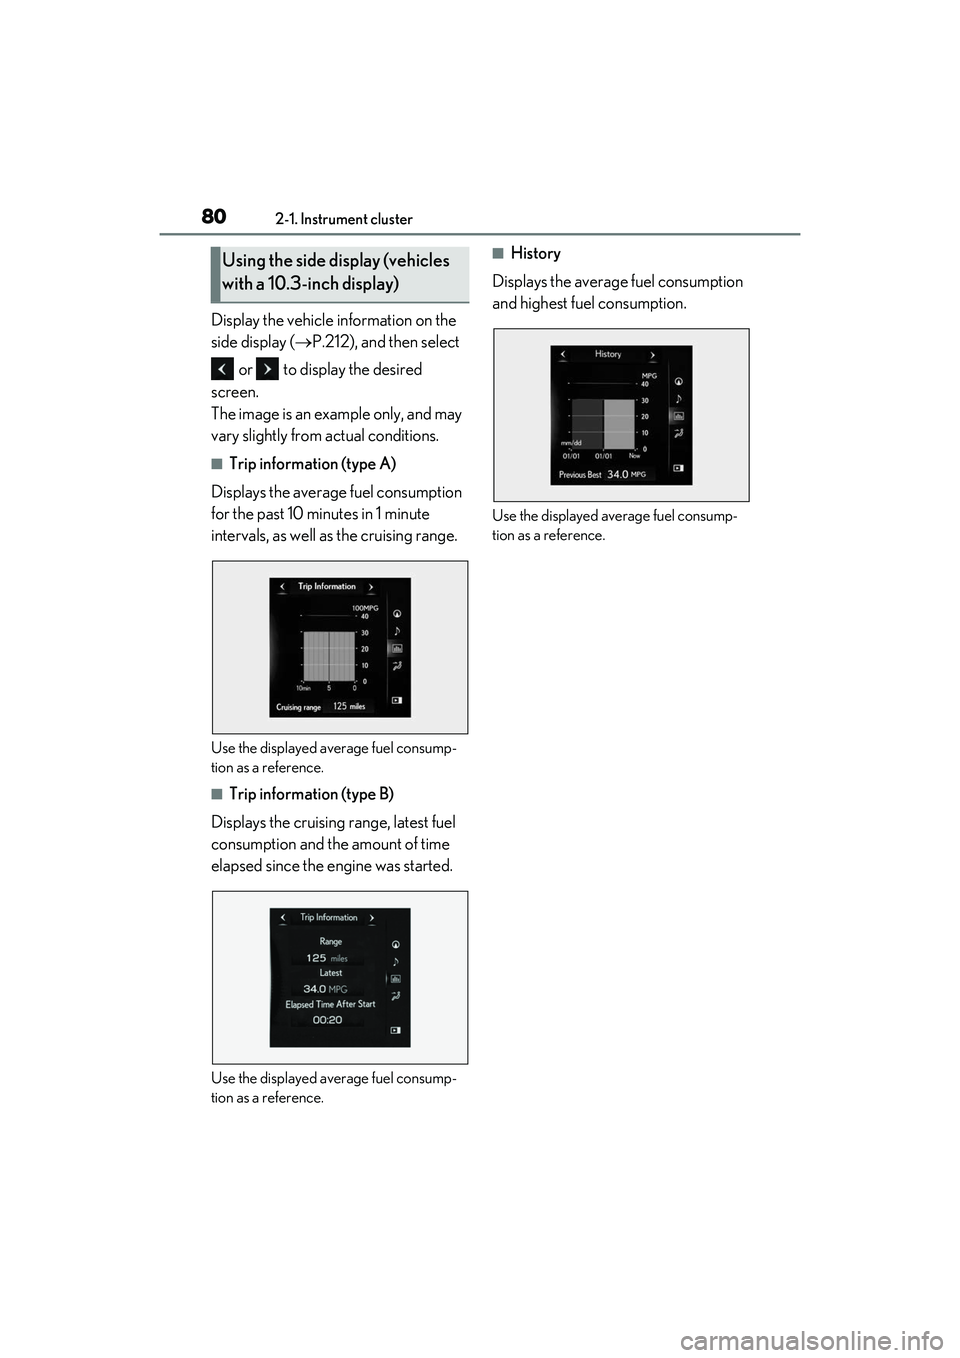
played, select “History”. Best recorded fuel consumption
Latest fuel consumption
Previous fuel consumption record
Resetting the history data
Updating the latest fuel consump-
tion data
The average fuel consumption history
is divided by color into past averages
and the average fuel consumption
since the last updated. Use the dis-
played average fuel consumption as a
reference.
The image is an example only, and may
vary slightly from actual conditions.
■Updating the history data
Update the latest fuel consumption by
selecting “Update” to measure the current
fuel consumption again.
■Resetting the data
The fuel consumption data can be deleted
by selecting “Clear”.
■Cruising range
Displays the estimated maximum distance
that can be driven with the quantity of fuel
remaining.
This distance is computed based on your
average fuel consumption.
As a result, the actual distance that can be
driven may differ from that displayed.
A
B
C
D
E
F
A
B
C
D
E
Page 82 of 400
802-1. Instrument cluster
RC350/RC300 Owner's Manual
Display the vehicle information on the
side display (P.212), and then select
or to display the desired
screen.
The image is an example only, and may
vary slightly from actual conditions.
■Trip information (type A)
Displays the average fuel consumption
for the past 10 minutes in 1 minute
intervals, as well as the cruising range.
Use the displayed average fuel consump-
tion as a reference.
■Trip information (type B)
Displays the cruising range, latest fuel
consumption and the amount of time
elapsed since the engine was started.
Use the displayed average fuel consump-
tion as a reference.
■History
Displays the average fuel consumption
and highest fuel consumption.
Use the displayed average fuel consump-
tion as a reference.
Using the side display (vehicles
with a 10.3-inch display)
Page 85 of 400
833-1. Key information
RC350/RC300 Owner's Manual
3
Before driving
●As the electronic key always receives
radio waves, the battery will become
depleted even if the electronic key is not
used. The following symptoms indicate
that the electronic key battery may be
depleted. Replace the battery when nec-
essary.
• The smart access system with push-but- ton start or the wireless remote control
does not operate.
• The detection area becomes smaller.
• The LED indicator on the key surface does not turn on.
●To avoid serious deterioration, do not
leave the electronic key within 3 ft. (1 m)
of the following electrical appliances that
produce a magnetic field:
•TVs
• Personal computers
• Cellular phones, cordless phones and battery chargers
• Recharging cellular phones or cordless phones
• Table lamps
• Induction cookers
■Replacing the battery
P.275
■Confirmation of the registered key
number
The number of keys al ready registered to
the vehicle can be confirmed. Ask your
Lexus dealer for details.
NOTICE
■To prevent key damage
●Do not drop the keys, subject them to
strong shocks or bend them.
●Do not expose the keys to high tem-
peratures for long periods of time.
●Do not get the keys wet or wash them
in an ultrasonic washer etc.
●Do not attach meta llic or magnetic
materials to the keys or place the keys
close to such materials.
●Do not disassemb le the keys.
●Do not attach a sticker or anything else
to the surface of the electronic key.
●Do not place the keys near objects that
produce magnetic fields, such as TVs,
audio systems and induction cookers.
■Carrying the electronic key on your
person
Carry the electronic key 3.9 in. (10 cm)
or more away from electric appliances
that are turned on. Radio waves emitted
from electric appliances within 3.9 in. (10
cm) of the electronic key may interfere
with the key, causing the key to not func-
tion properly.
■In case of a smart access system with
push-button start malfunction or
other key-rela ted problems
P.315
■When an electronic key is lost
P.314
■Handling the card key (if equipped)
●Do not apply excess force when insert-
ing the mechanical key into the card
key. Doing so may damage the card
key.
●If the battery or card key terminals get
wet, the battery may corrode. If the key
is dropped into water, or if drinking
water etc. is spilled on the key, immedi-
ately remove the battery cover and
wipe the battery and terminals. (To
remove the battery cover, lightly grasp
and pull it.) If the battery is corroded,
have your Lexus dealer replace the
battery.
●Do not crush the battery cover or use
a screwdriver to remove the battery
cover. Forcibly removing the battery
cover may bend or damage the key.
●If the battery cover is frequently
removed, the battery cover may
become loose.
Page 86 of 400
843-1. Key information
RC350/RC300 Owner's Manual
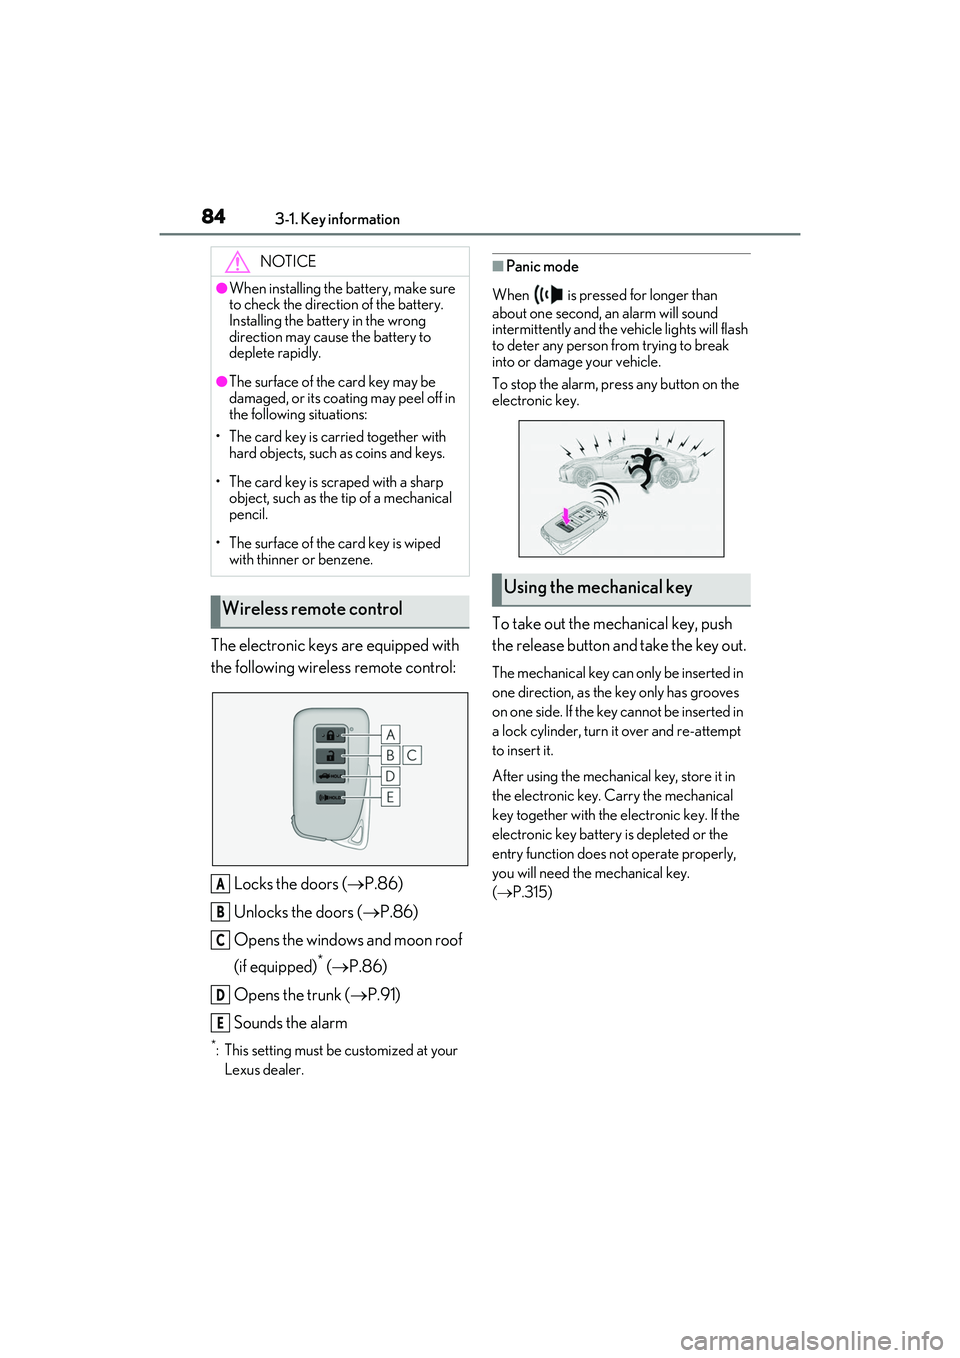
The electronic keys are equipped with
the following wireless remote control:Locks the doors ( P.86)
Unlocks the doors ( P.86)
Opens the windows and moon roof
(if equipped)
* ( P.86)
Opens the trunk ( P.91)
Sounds the alarm
*: This setting must be customized at your
Lexus dealer.
■Panic mode
When is pressed for longer than
about one second, an alarm will sound
intermittently and the vehicle lights will flash
to deter any person from trying to break
into or damage your vehicle.
To stop the alarm, pr ess any button on the
electronic key.
To take out the mechanical key, push
the release button and take the key out.
The mechanical key can only be inserted in
one direction, as the key only has grooves
on one side. If the key cannot be inserted in
a lock cylinder, turn it over and re-attempt
to insert it.
After using the mechanical key, store it in
the electronic key. Carry the mechanical
key together with the electronic key. If the
electronic key battery is depleted or the
entry function does not operate properly,
you will need the mechanical key.
( P.315)
NOTICE
●When installing the battery, make sure
to check the direction of the battery.
Installing the battery in the wrong
direction may cause the battery to
deplete rapidly.
●The surface of the card key may be
damaged, or its coating may peel off in
the following situations:
• The card key is carried together with hard objects, such as coins and keys.
• The card key is scraped with a sharp object, such as the tip of a mechanical
pencil.
• The surface of the card key is wiped with thinner or benzene.
Wireless remote control
A
B
C
D
E
Using the mechanical key
Page 88 of 400
863-2. Opening, closing and locking the doors and trunk
RC350/RC300 Owner's Manual
3-2.Opening, closing and locking the doors and trunk
■Smart access system with
push-button start
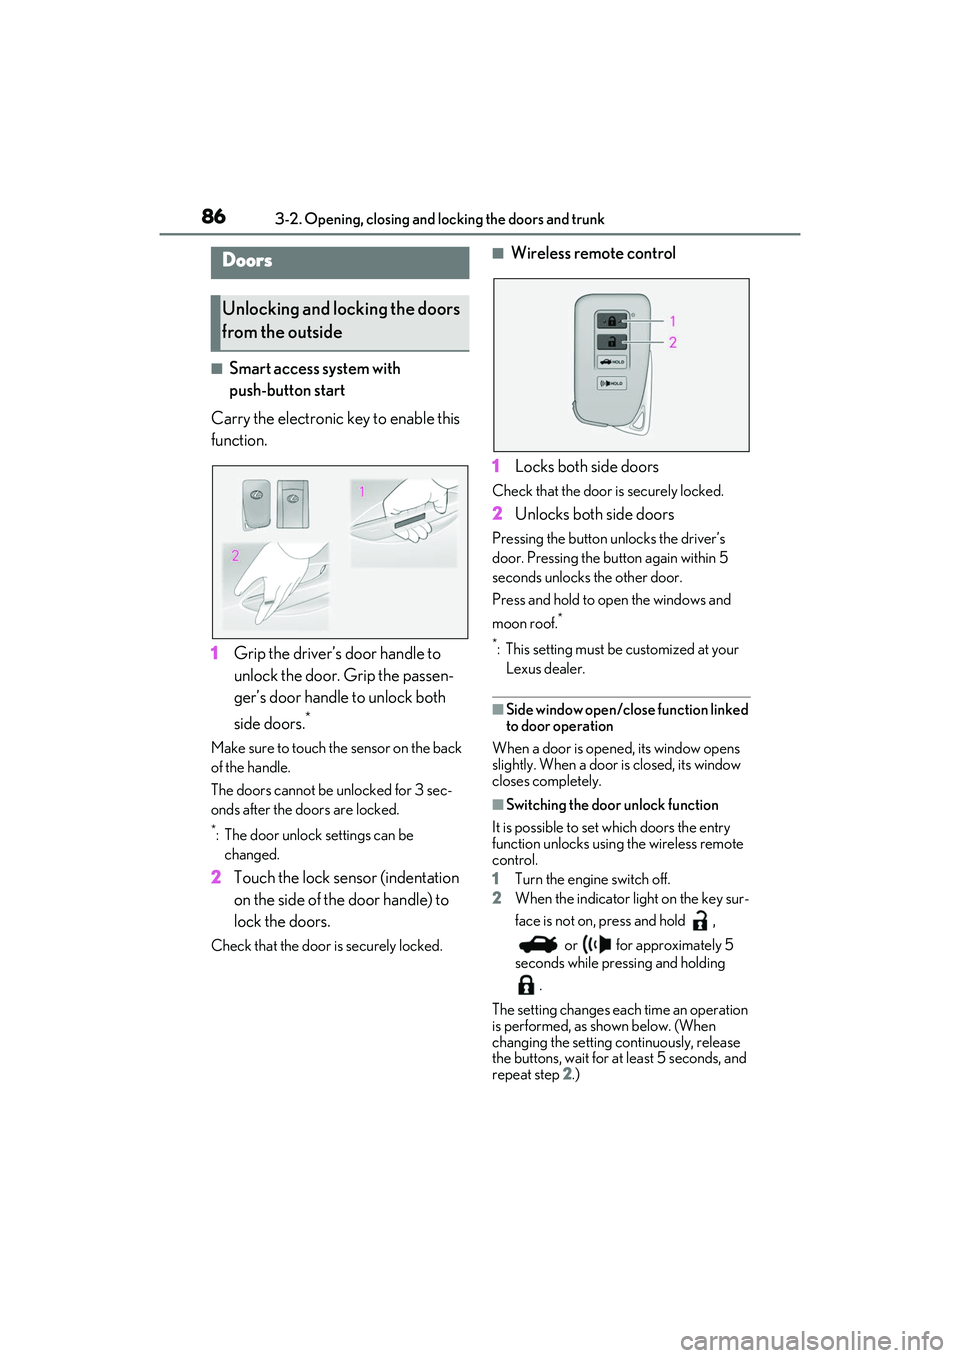
Carry the electronic key to enable this
function.
1 Grip the driver’s door handle to
unlock the door. Grip the passen-
ger’s door handle to unlock both
side doors.
*
Make sure to touch the sensor on the back
of the handle.
The doors cannot be unlocked for 3 sec-
onds after the doors are locked.
*: The door unlock settings can be
changed.
2 Touch the lock sensor (indentation
on the side of the door handle) to
lock the doors.
Check that the door is securely locked.
■Wireless remote control
1 Locks both side doors
Check that the door is securely locked.
2Unlocks both side doors
Pressing the button unlocks the driver’s
door. Pressing the button again within 5
seconds unlocks the other door.
Press and hold to open the windows and
moon roof.
*
*
: This setting must be customized at your Lexus dealer.
■Side window open/close function linked
to door operation
When a door is opened, its window opens
slightly. When a door is closed, its window
closes completely.
■Switching the door unlock function
It is possible to set which doors the entry
function unlocks using the wireless remote
control.
1 Turn the engine switch off.
2 When the indicator light on the key sur-
face is not on, press and hold ,
or for approximately 5
seconds while pre ssing and holding
.
The setting changes each time an operation
is performed, as shown below. (When
changing the setting continuously, release
the buttons, wait for at least 5 seconds, and
repeat step 2 .)
Doors
Unlocking and locking the doors
from the outside