clock LEXUS RC350 2016 Owners Manual
[x] Cancel search | Manufacturer: LEXUS, Model Year: 2016, Model line: RC350, Model: LEXUS RC350 2016Pages: 700, PDF Size: 14.12 MB
Page 6 of 700
TABLE OF CONTENTS6
RC350_RC300_RC200t_RC F_U (OM24671U)
6-4. Using the other interior features
Other interior features ............ 439 • Sun visors ................................ 439
• Vanity mirrors ........................ 439
• Clock ........................................ 440
• Power outlet ........................... 440
• Armrest......................................441
•Trunk storage extension ................................. 442
• Assist grips ............................. 443
• Coat hooks ............................. 443
Garage door opener ............... 444
Compass ......................................... 451
LEXUS Enform Safety Connect...................................... 455
LEXUS Enform Remote ......... 460
LEXUS Enform Service Connect........................................ 461
7-1. Maintenance and care Cleaning and protecting the vehicle exterior ................ 464
Cleaning and protecting the vehicle inte rior.................. 469
7-2. Maintenance Maintenance requirements ............................. 472
General maintenance...............475
Emission inspection and maintenance (I/M)
programs .....................................478 7-3. Do-it-yourself maintenance
Do-it-yourself service precautions.................................479
Hood ................................................ 481
Positioning a floor jack............. 482
Engine compartment ............... 485
Tires................................................... 501
Tire inflation pressure ................ 510
Wheels .............................................513
Air conditio ning filter .................515
Electronic key battery................ 517
Checking and replacing fuses................................................519
Light bulbs .................................... 522
8-1. Essential information Emergency flashers .................. 532
If your vehicle has to be stopped in an
emergency ................................ 533
7Maintenance and care
8When trouble arises
Page 342 of 700
3425-2. Setup
RC350_RC300_RC200t_RC F_U (OM24671U)
Select “General” or “Camera” on the “Display” screen or select “Display” on
each audio menu screen. ( P. 3 4 8 )
Adjust the display as desired by turning the controller clockwise (+) or coun-
terclockwise (-).
To select “Contrast”, “Brightness”, “Color” or “Tone”, move the controller to the left.
(“Color” and “Tone” are available when “Display” on each audio menu screen or the
audio settings screen for each audio source is selected.)
■Changing the sample image (when “General” is selected)
Move the controller to the right and select the desired sample image.
Adjusting the screen quality
1
2
Page 419 of 700
419
Interior features6
RC350_RC300_RC200t_RC F_U (OM24671U)
6-1. Using the air conditioning system
Automatic air conditioning system ..........................................420
Heated steering wheel/ seat heaters/
seat ventilators.......................... 429
6-2. Using the interior lights Interior lights list..........................432• Interior lights ..........................433
• Personal lights........................434
6-3. Using the storage features List of storage features.............435• Glove box................................436
• Console box ...........................436
• Cup holders............................ 437
Trunk features ............................. 438 6-4. Using the other interior
features
Other interior features ............ 439 • Sun visors ................................ 439
• Vanity mirrors ........................ 439
• Clock ........................................440
• Power outlet ...........................440
• Armrest ......................................441
•Trunk storage extension ................................. 442
• Assist grips.............................. 443
• Coat hooks ............................. 443
Garage door opener................ 444
Compass .........................................451
LEXUS Enform Safety Connect ...................................... 455
LEXUS Enform Remote .........460
LEXUS Enform Service Connect ........................................461
Page 440 of 700
4406-4. Using the other interior features
RC350_RC300_RC200t_RC F_U (OM24671U)
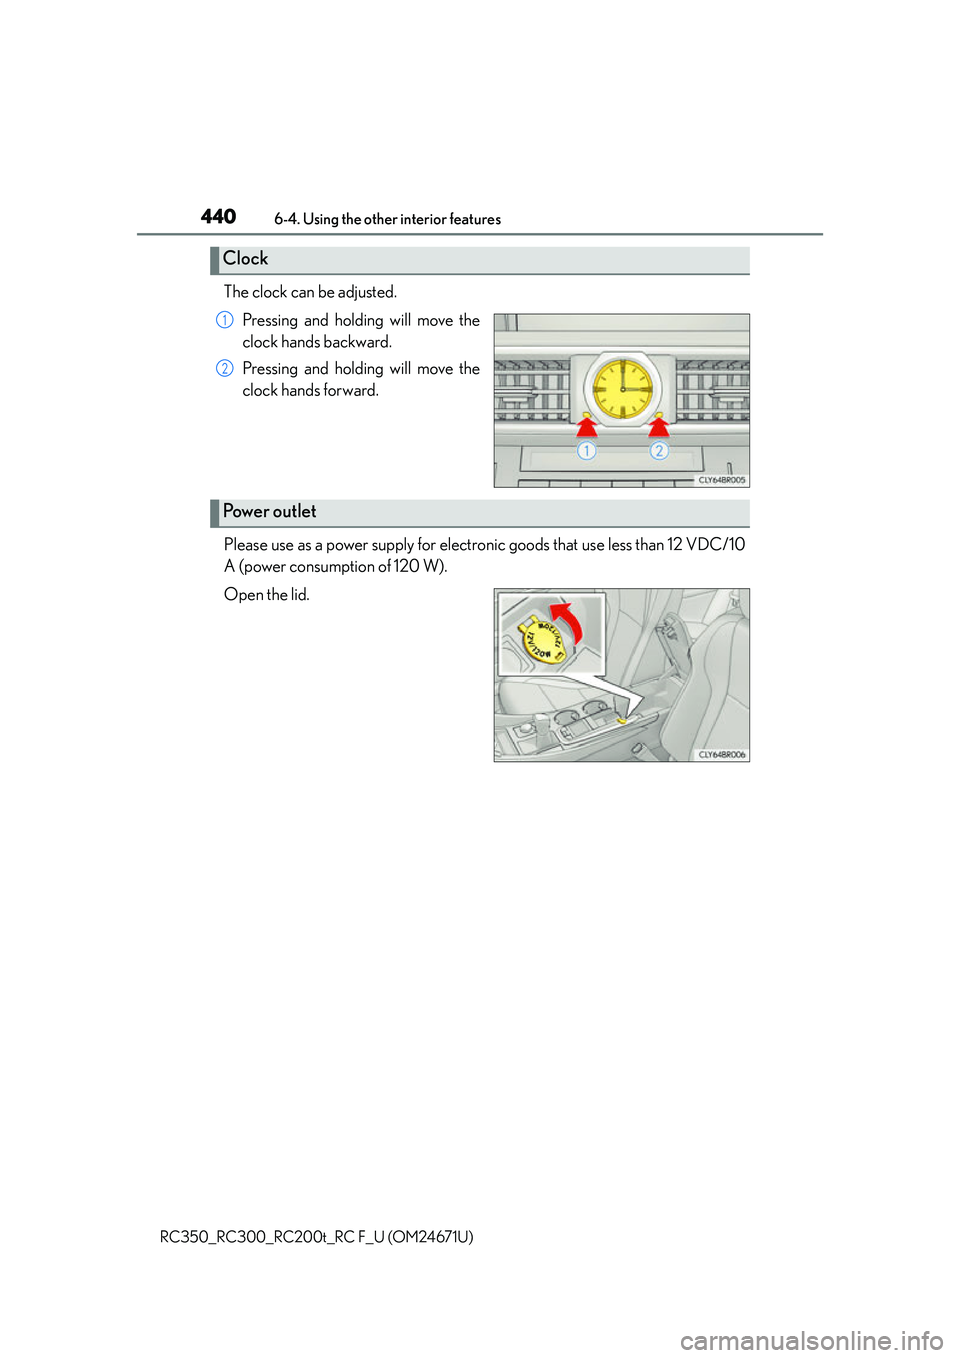
The clock can be adjusted. Pressing and holding will move the
clock hands backward.
Pressing and holding will move the
clock hands forward.
Please use as a power supply for electronic goods that use less than 12 VDC/10
A (power consumption of 120 W).
Open the lid.
Clock
1
2
Power outlet
Page 490 of 700
4907-3. Do-it-yourself maintenance
RC350_RC300_RC200t_RC F_U (OM24671U)
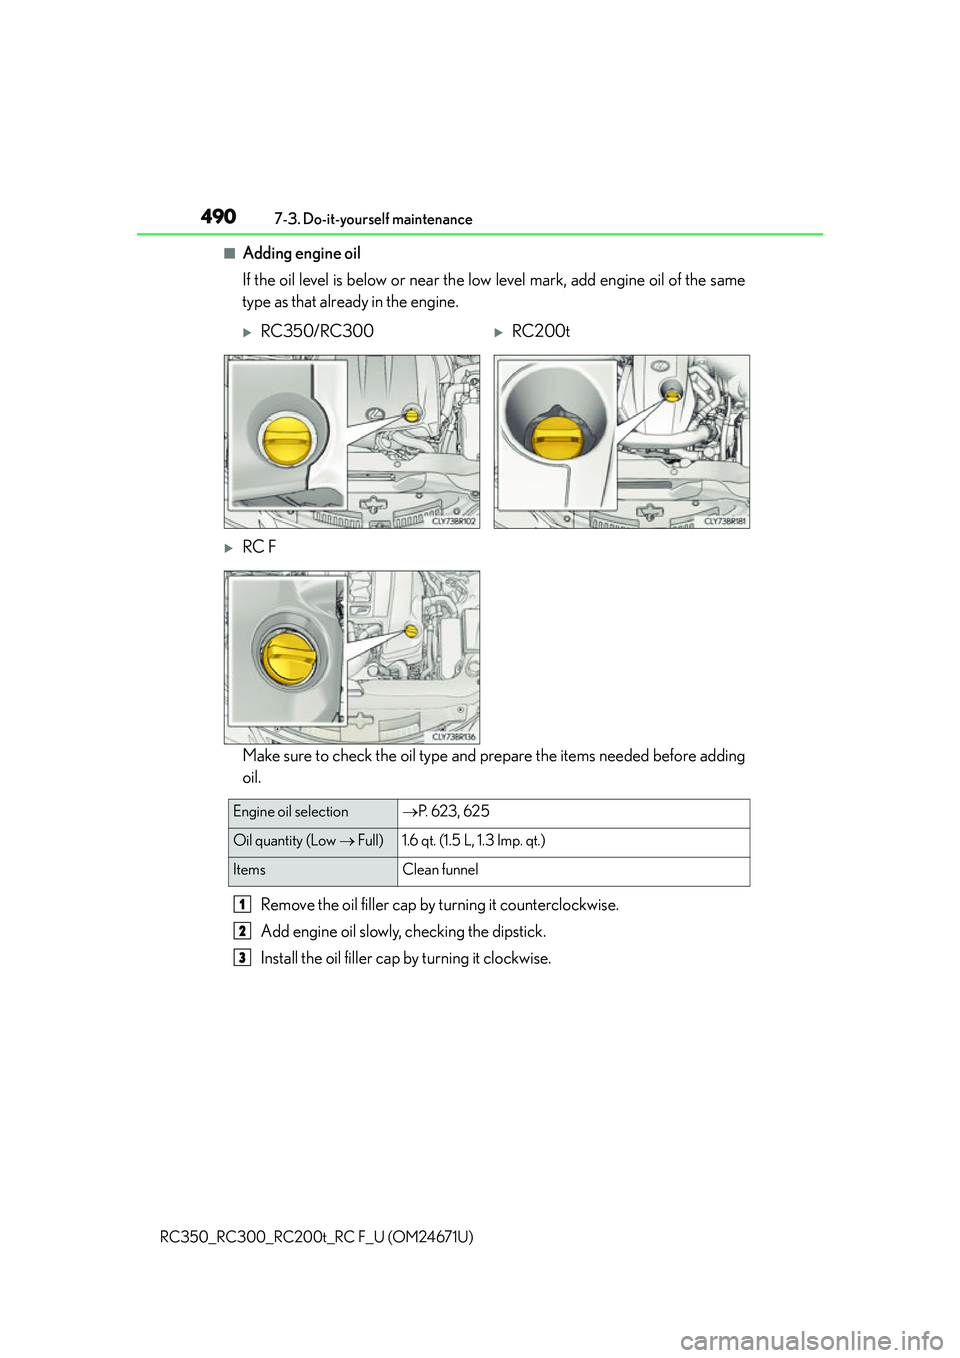
■Adding engine oil
If the oil level is below or near the lo w level mark, add engine oil of the same
type as that already in the engine.
Make sure to check the oil type and prepare the items needed before adding
oil.
Remove the oil filler cap by turning it counterclockwise.
Add engine oil slowly, checking the dipstick.
Install the oil filler cap by turning it clockwise.
RC350/RC300RC200t
RC F
Engine oil selection P. 623, 625
Oil quantity (Low Full) 1.6 qt. (1.5 L, 1.3 Imp. qt.)
Items Clean funnel
1
2
3
Page 524 of 700
5247-3. Do-it-yourself maintenance
RC350_RC300_RC200t_RC F_U (OM24671U)
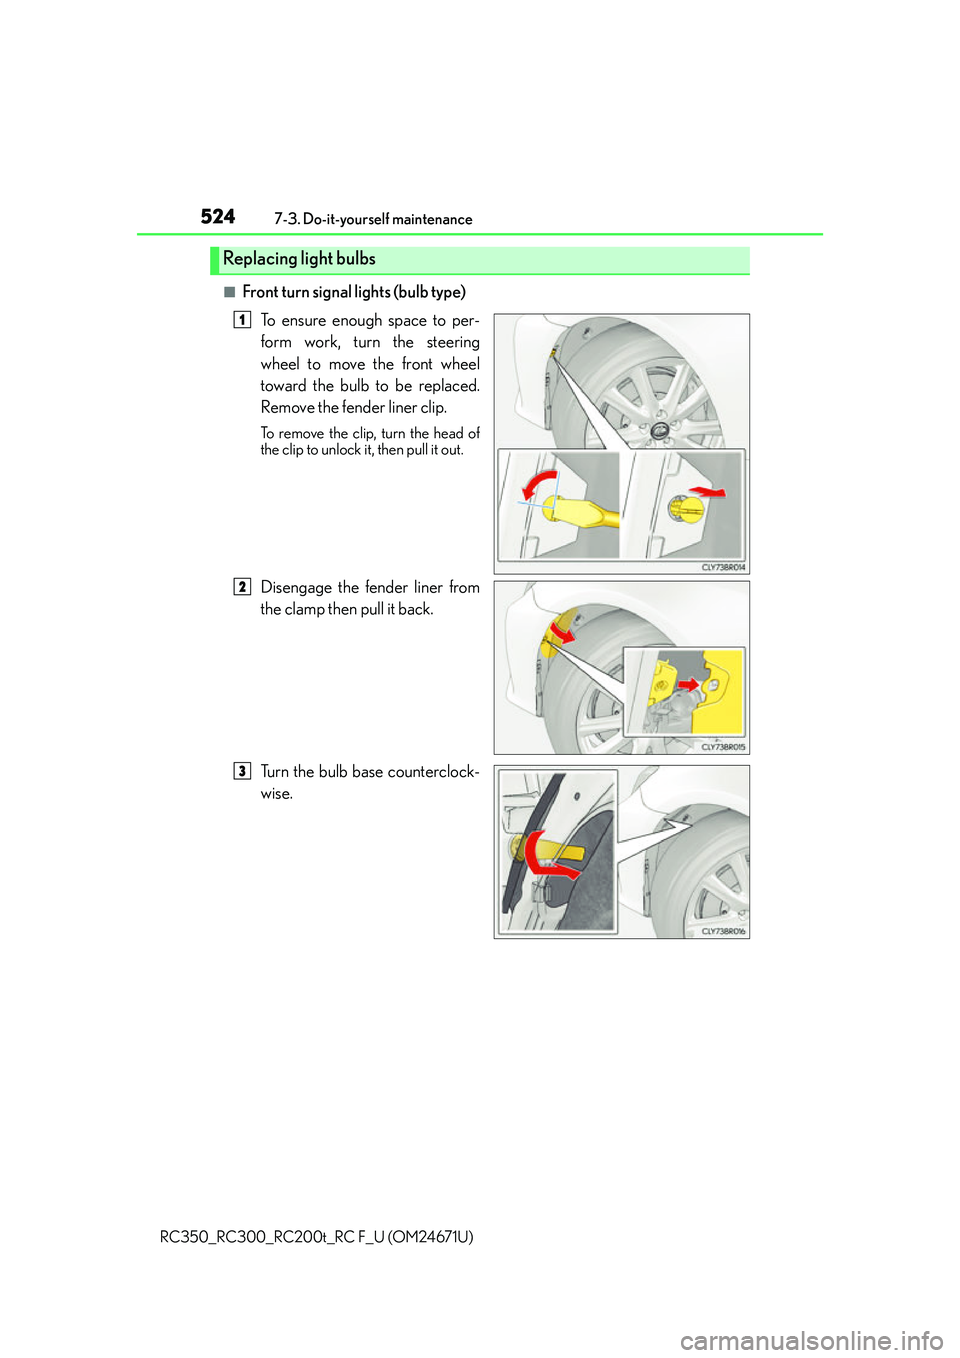
■Front turn signal lights (bulb type) To ensure enough space to per-
form work, turn the steering
wheel to move the front wheel
toward the bulb to be replaced.
Remove the fender liner clip.
To remove the clip, turn the head of
the clip to unlock it, then pull it out.
Disengage the fender liner from
the clamp then pull it back.
Turn the bulb base counterclock-
wise.
Replacing light bulbs
1
2
3
Page 525 of 700
5257-3. Do-it-yourself maintenance
7
Maintenance and care
RC350_RC300_RC200t_RC F_U (OM24671U)
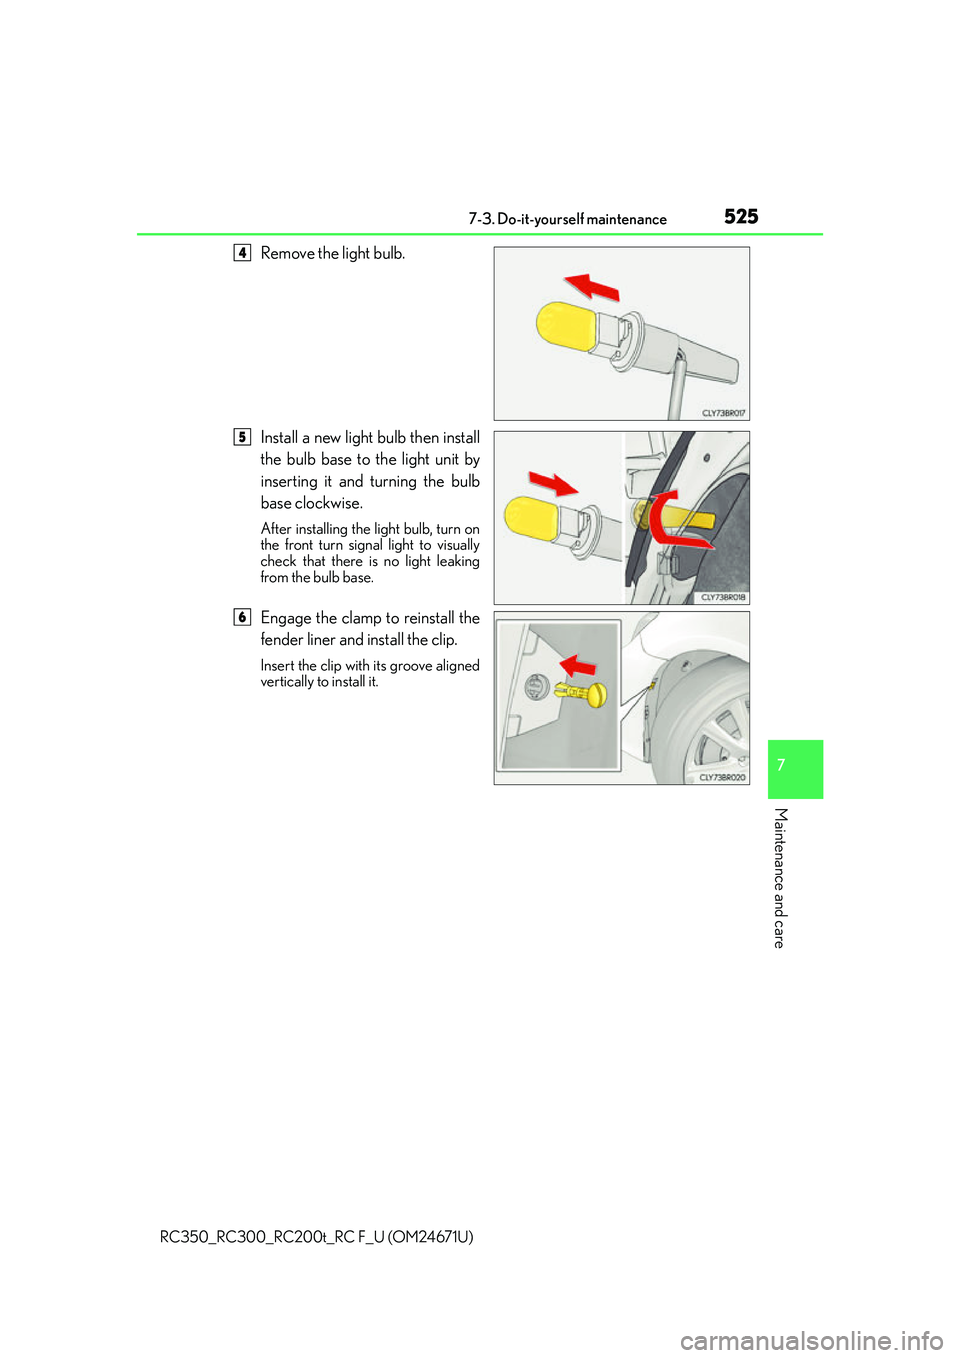
Remove the light bulb.
Install a new light bulb then install
the bulb base to the light unit by
inserting it and turning the bulb
base clockwise.
After installing the light bulb, turn on
the front turn signal light to visually
check that there is no light leaking
from the bulb base.
Engage the clamp to reinstall the
fender liner and install the clip.
Insert the clip with its groove aligned
vertically to install it.
4
5
6
Page 526 of 700
5267-3. Do-it-yourself maintenance
RC350_RC300_RC200t_RC F_U (OM24671U)
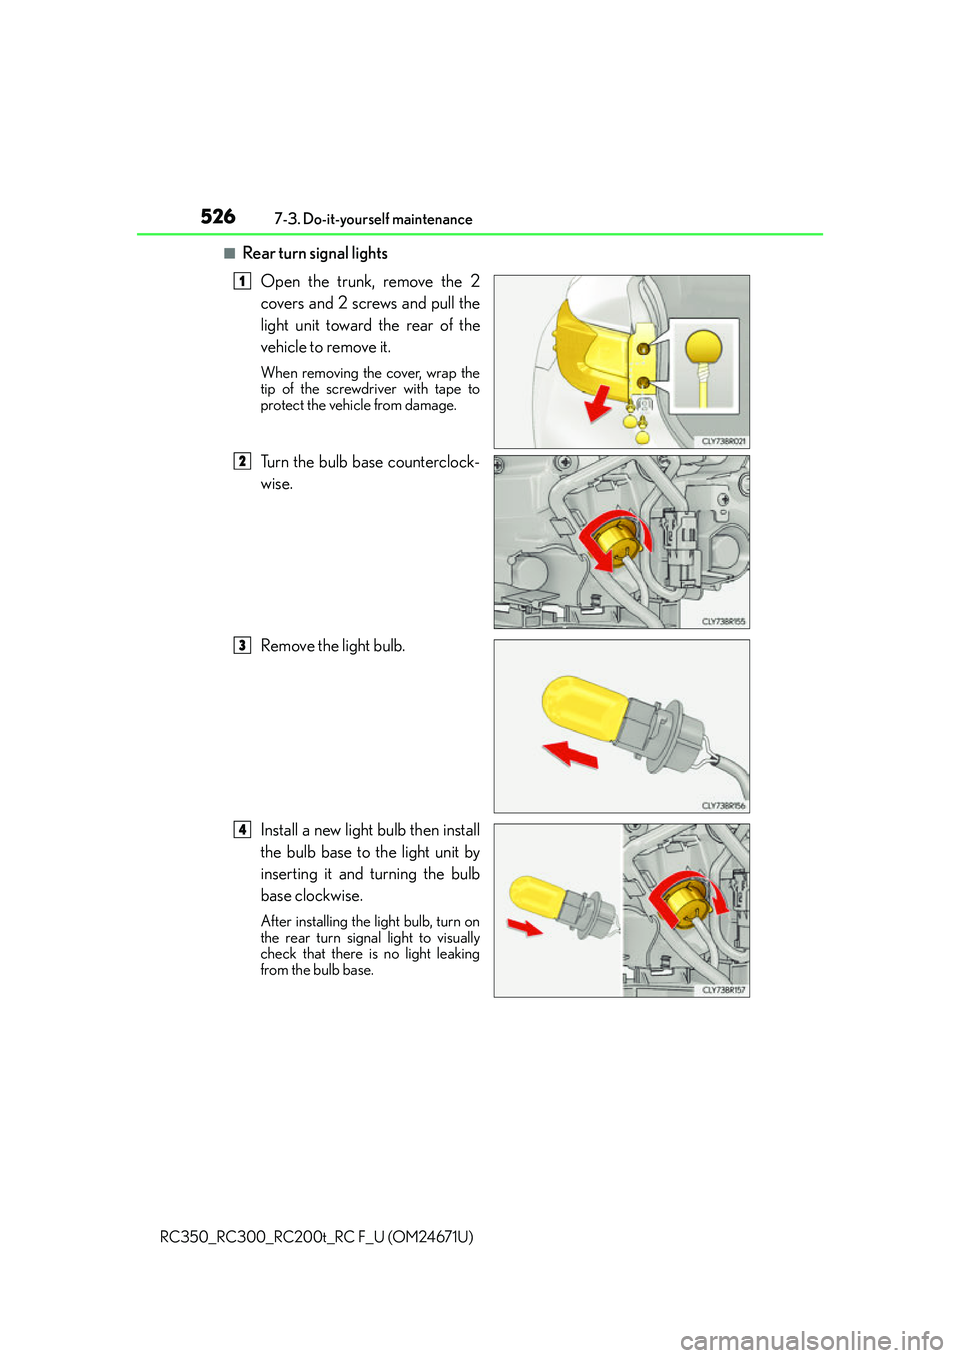
■Rear turn signal lights Open the trunk, remove the 2
covers and 2 screws and pull the
light unit toward the rear of the
vehicle to remove it.
When removing the cover, wrap the
tip of the screwdriver with tape to
protect the vehicle from damage.
Turn the bulb base counterclock-
wise.
Remove the light bulb.
Install a new light bulb then install
the bulb base to the light unit by
inserting it and turning the bulb
base clockwise.
After installing the light bulb, turn on
the rear turn signal light to visually
check that there is no light leaking
from the bulb base.
1
2
3
4
Page 528 of 700
5287-3. Do-it-yourself maintenance
RC350_RC300_RC200t_RC F_U (OM24671U)
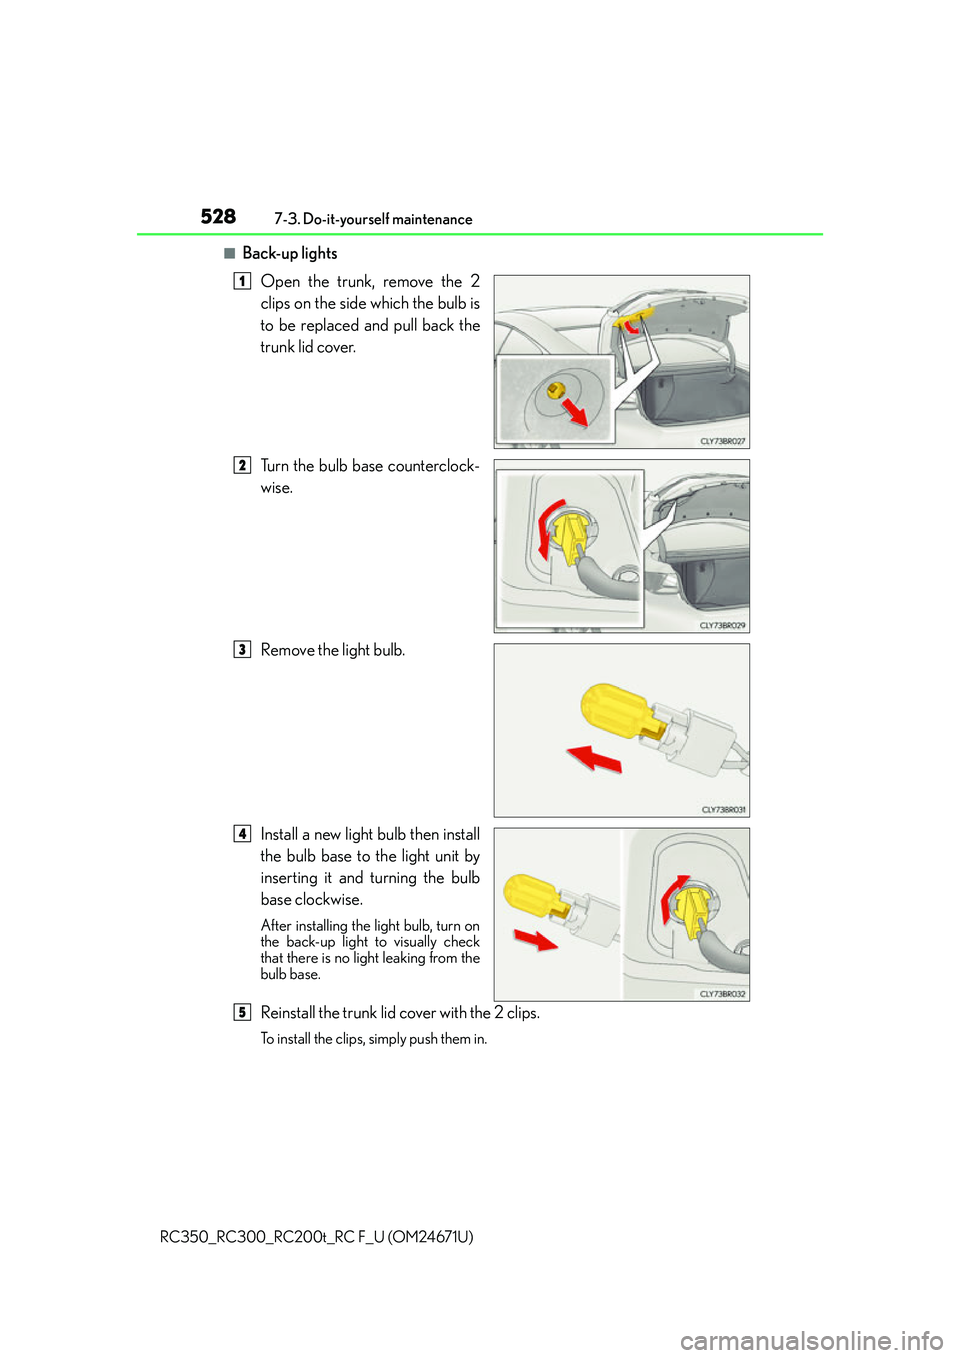
■Back-up lights Open the trunk, remove the 2
clips on the side which the bulb is
to be replaced and pull back the
trunk lid cover.
Turn the bulb base counterclock-
wise.
Remove the light bulb.
Install a new light bulb then install
the bulb base to the light unit by
inserting it and turning the bulb
base clockwise.
After installing the light bulb, turn on
the back-up light to visually check
that there is no li ght leaking from the
bulb base.
Reinstall the trunk lid cover with the 2 clips.
To install the clips, simply push them in.
1
2
3
4
5
Page 588 of 700
5888-2. Steps to take in an emergency
RC350_RC300_RC200t_RC F_U (OM24671U)
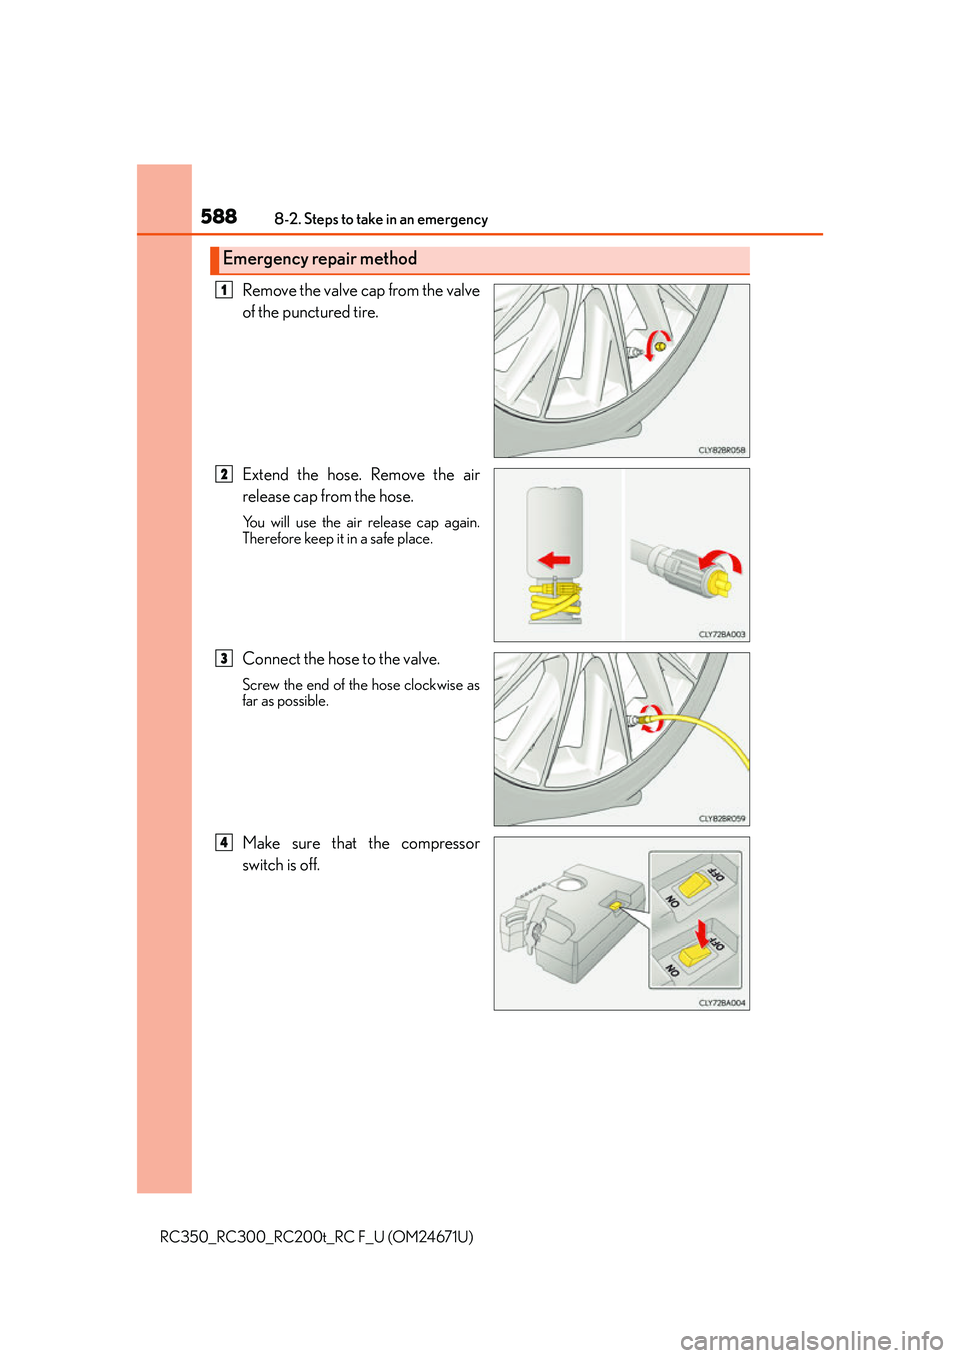
Remove the valve cap from the valve
of the punctured tire.
Extend the hose. Remove the air
release cap from the hose.
You will use the air release cap again.
Therefore keep it in a safe place.
Connect the hose to the valve.
Screw the end of the hose clockwise as
far as possible.
Make sure that the compressor
switch is off.
Emergency repair method
1
2
3
4