ignition LEXUS RCF 2021 User Guide
[x] Cancel search | Manufacturer: LEXUS, Model Year: 2021, Model line: RCF, Model: LEXUS RCF 2021Pages: 408, PDF Size: 8.25 MB
Page 104 of 408
1043-3. Adjusting the seats
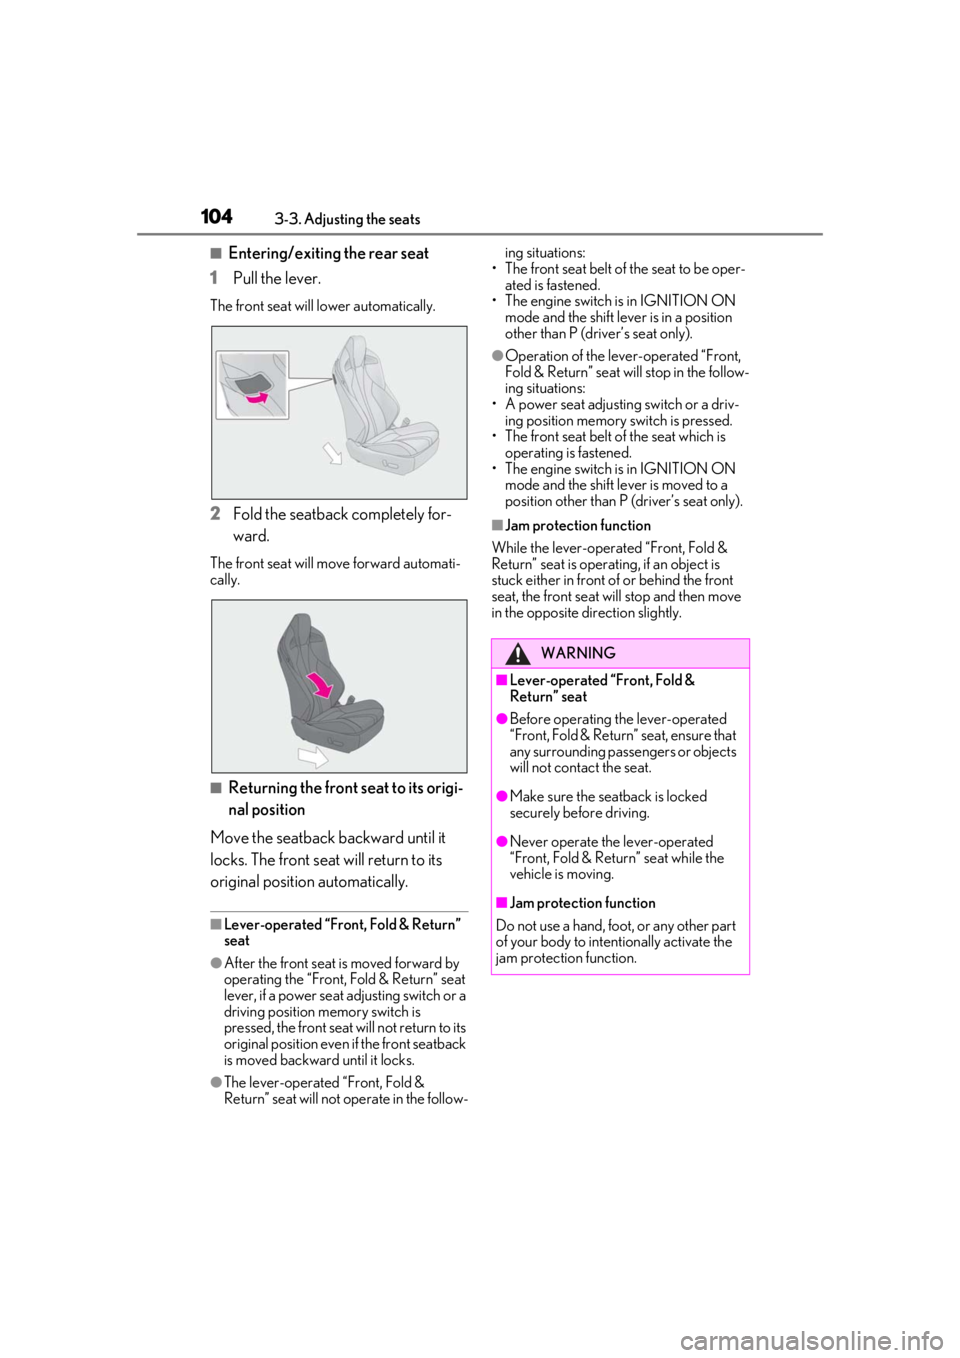
■Entering/exiting the rear seat
1 Pull the lever.
The front seat will lower automatically.
2Fold the seatback completely for-
ward.
The front seat will move forward automati-
cally.
■Returning the front seat to its origi-
nal position
Move the seatback backward until it
locks. The front seat will return to its
original position automatically.
■Lever-operated “Front, Fold & Return”
seat
●After the front seat is moved forward by
operating the “Front, Fold & Return” seat
lever, if a power seat adjusting switch or a
driving position memory switch is
pressed, the front seat will not return to its
original position even if the front seatback
is moved backward until it locks.
●The lever-operated “Front, Fold &
Return” seat will not operate in the follow- ing situations:
• The front seat belt of the seat to be oper- ated is fastened.
• The engine switch is in IGNITION ON mode and the shift lever is in a position
other than P (driver’s seat only).
●Operation of the lever-operated “Front,
Fold & Return” seat will stop in the follow-
ing situations:
• A power seat adjusting switch or a driv- ing position memory switch is pressed.
• The front seat belt of the seat which is operating is fastened.
• The engine switch is in IGNITION ON
mode and the shift lever is moved to a
position other than P (driver’s seat only).
■Jam protection function
While the lever-operat ed “Front, Fold &
Return” seat is operatin g, if an object is
stuck either in front of or behind the front
seat, the front seat will stop and then move
in the opposite direction slightly.
WARNING
■Lever-operated “Front, Fold &
Return” seat
●Before operating th e lever-operated
“Front, Fold & Return” seat, ensure that
any surrounding passengers or objects
will not contact the seat.
●Make sure the seat back is locked
securely before driving.
●Never operate the lever-operated
“Front, Fold & Return” seat while the
vehicle is moving.
■Jam protection function
Do not use a hand, foot, or any other part
of your body to intentionally activate the
jam protection function.
Page 107 of 408

1073-3. Adjusting the seats
3
Before driving
2Turn the engine switch to IGNI-
TION ON mode.
3 Recall the driving position that you
want to record.
4 While pressing the recalled button,
press and hold the door lock switch
(either lock or unlock) until the
buzzer sounds.
If the button could not be registered, the
buzzer sounds continuously for approxi-
mately 3 seconds.
■Cancelation procedure
Carry only the key you want to cancel
and then close the driver’s door.
If 2 or more keys are in the vehicle, the
driving position cannot be canceled
properly.
1 Turn the engine switch to IGNI-
TION ON mode.
2 While pressing the “SET” button,
press and hold the door lock switch
(either lock or unlock) until the
buzzer sounds twice.
If the button could not be canceled, the
buzzer sounds continuously for approxi-
mately 3 seconds.
■Recall procedure
1 Make sure that the doors are
locked before recalling the driving
position. Carry the electronic key that has been registered to the driv-
ing position, and then unlock and
open the driver’s door using the
smart access system with push-but-
ton start or wireless remote control.
The driving position will move to the
recorded position (not including the steer-
ing wheel). However, th
e seat will move to
a position slightly behind the recorded
position in order to make entering the vehi-
cle easier.
If the driving position is in a position that
has already been recorded, the seat and
outside rear view mirrors will not move.
2 Turn the engine switch to ACCES-
SORY mode or IGNITION ON
mode, or fasten a seat belt.
The seat and steering wheel will move to
the recorded position.
■Recalling the driving position using the
memory recall function
●Different driving positions can be regis-
tered for each electronic key. Therefore,
the driving position that is recalled may
be different depending on the key being
carried.
●If a door other than the driver’s door is
unlocked with the smart access system
with push-button start, the driving posi-
tion cannot be recalled. In this case, press
the driving position button which has
been set.
■Customization
Some functions can be customized.
( P.360)
Page 108 of 408

1083-4. Adjusting the steering wheel and mirrors
3-4.Adjusting the steering wheel and mirrors
Manual type
1 Hold the steering wheel and push
the lever down.
2 Adjust to the ideal position by mov-
ing the steering wheel horizontally
and vertically.
After adjustment, pull the lever up to
secure the steering wheel.
Power type
Operating the switch moves the steer-
ing wheel in the following directions: 1
Up
2 Down
3 Toward the driver
4 Away from the driver
■The steering wheel can be adjusted
when (power type)
The engine switch is in ACCESSORY or
IGNITION ON mode
*.
*: If the driver’s seat belt is fastened, the
steering wheel can be adjusted regard-
less of engine switch mode.
■Automatic adjustment of the steering
position (if equipped)
A desired steering posi tion can be entered
to memory and recalled automatically by
the driving position memory system.
( P.105)
■Power easy access system (power type)
The steering wheel and driver’s seat move
in accordance with engine switch mode and
the driver’s seat belt condition. ( P.105)
Steering wheel
Adjustment procedure
WARNING
■Caution while driving
Do not adjust the steering wheel while
driving.
Doing so may cause the driver to mis-
handle the vehicle and cause an acci-
dent, resulting in death or serious injury.
Page 111 of 408
1113-4. Adjusting the steering wheel and mirrors
3
Before driving
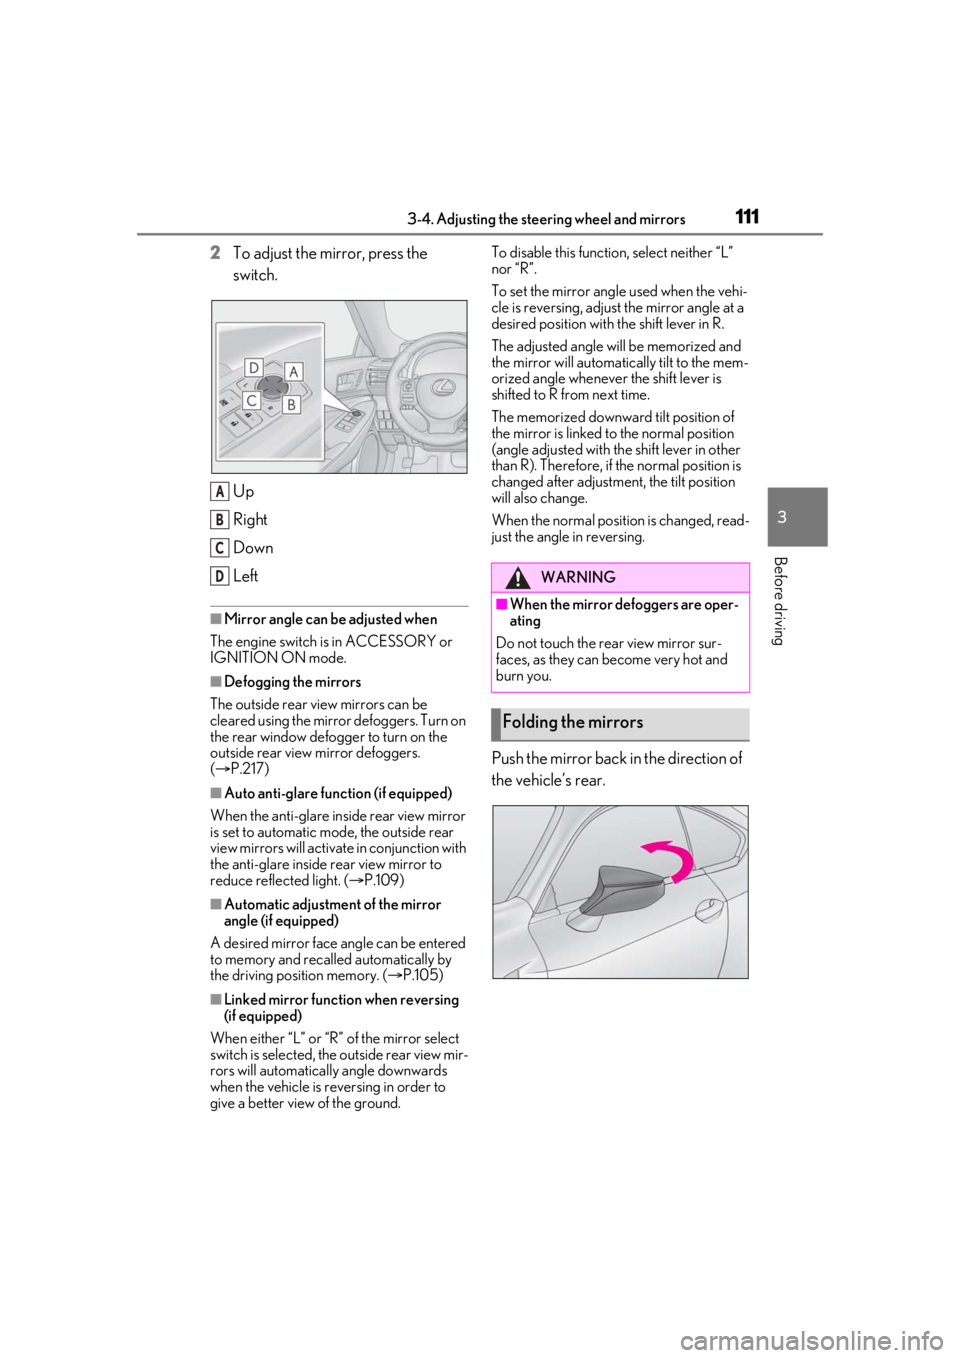
2To adjust the mirror, press the
switch.
Up
Right
Down
Left
■Mirror angle can be adjusted when
The engine switch is in ACCESSORY or
IGNITION ON mode.
■Defogging the mirrors
The outside rear view mirrors can be
cleared using the mirror defoggers. Turn on
the rear window defogger to turn on the
outside rear view mirror defoggers.
( P.217)
■Auto anti-glare function (if equipped)
When the anti-glare insi de rear view mirror
is set to automatic mode, the outside rear
view mirrors will activate in conjunction with
the anti-glare inside rear view mirror to
reduce reflected light. ( P.109)
■Automatic adjustment of the mirror
angle (if equipped)
A desired mirror face angle can be entered
to memory and recalled automatically by
the driving position memory. ( P.105)
■Linked mirror function when reversing
(if equipped)
When either “L” or “R” of the mirror select
switch is selected, the outside rear view mir-
rors will automatically angle downwards
when the vehicle is reversing in order to
give a better view of the ground. To disable this function, select neither “L”
nor “R”.
To set the mirror angle used when the vehi-
cle is reversing, adjust the mirror angle at a
desired position with the shift lever in R.
The adjusted angle will be memorized and
the mirror will automatically tilt to the mem-
orized angle whenever the shift lever is
shifted to R from next time.
The memorized downward tilt position of
the mirror is linked to the normal position
(angle adjusted with th
e shift lever in other
than R). Therefore, if the normal position is
changed after adjustment, the tilt position
will also change.
When the normal position is changed, read-
just the angle in reversing.
Push the mirror back in the direction of
the vehicle’s rear.
A
B
C
DWARNING
■When the mirror defoggers are oper-
ating
Do not touch the rear view mirror sur-
faces, as they can become very hot and
burn you.
Folding the mirrors
Page 112 of 408
1123-5. Opening, closing the windows and moon roof
3-5.Opening, closing the windows and moon roof
The power windows can be opened
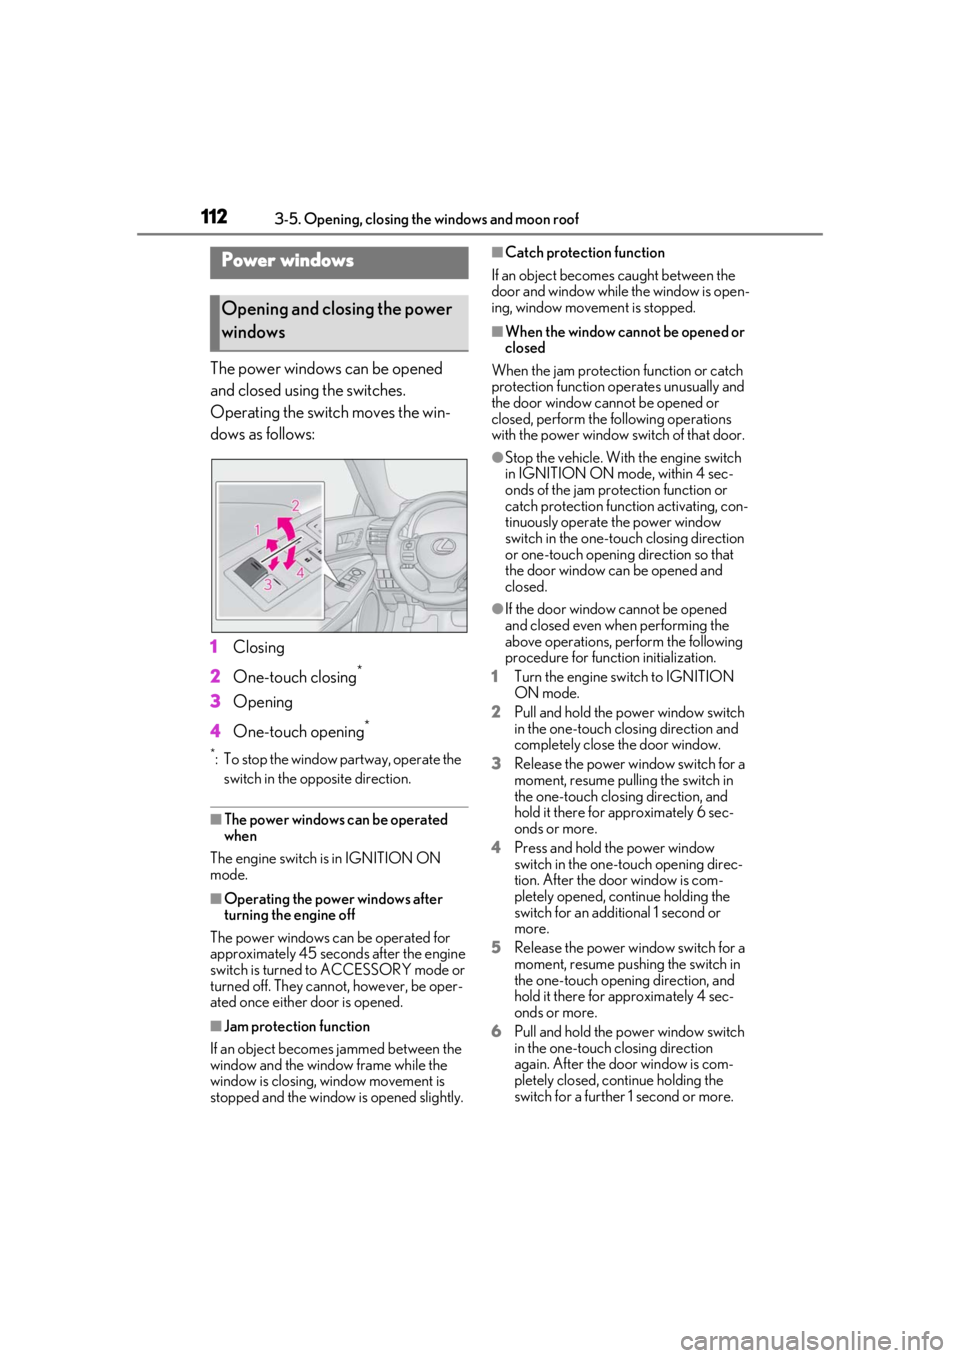
and closed using the switches.
Operating the switch moves the win-
dows as follows:
1Closing
2 One-touch closing
*
3Opening
4 One-touch opening
*
*: To stop the window partway, operate the
switch in the op posite direction.
■The power windows can be operated
when
The engine switch is in IGNITION ON
mode.
■Operating the power windows after
turning the engine off
The power windows can be operated for
approximately 45 seconds after the engine
switch is turned to ACCESSORY mode or
turned off. They cannot, however, be oper-
ated once either door is opened.
■Jam protection function
If an object becomes jammed between the
window and the window frame while the
window is closing, window movement is
stopped and the window is opened slightly.
■Catch protection function
If an object becomes caught between the
door and window while the window is open-
ing, window movement is stopped.
■When the window cannot be opened or
closed
When the jam protection function or catch
protection function operates unusually and
the door window cannot be opened or
closed, perform the following operations
with the power window switch of that door.
●Stop the vehicle. With the engine switch
in IGNITION ON mode, within 4 sec-
onds of the jam protection function or
catch protection function activating, con-
tinuously operate the power window
switch in the one-touch closing direction
or one-touch opening direction so that
the door window can be opened and
closed.
●If the door window cannot be opened
and closed even when performing the
above operations, perform the following
procedure for function initialization.
1 Turn the engine switch to IGNITION
ON mode.
2 Pull and hold the power window switch
in the one-touch closing direction and
completely close the door window.
3 Release the power window switch for a
moment, resume pulling the switch in
the one-touch closing direction, and
hold it there for approximately 6 sec-
onds or more.
4 Press and hold the power window
switch in the one-touch opening direc-
tion. After the door window is com-
pletely opened, continue holding the
switch for an additional 1 second or
more.
5 Release the power window switch for a
moment, resume pushing the switch in
the one-touch opening direction, and
hold it there for approximately 4 sec-
onds or more.
6 Pull and hold the power window switch
in the one-touch closing direction
again. After the door window is com-
pletely closed, continue holding the
switch for a further 1 second or more.
Power windows
Opening and closing the power
windows
Page 115 of 408

1153-5. Opening, closing the windows and moon roof
3
Before driving
■The moon roof can be operated when
The engine switch is in IGNITION ON
mode.
■Operating the moon roof after turning
the engine off
The moon roof can be operated for approx-
imately 45 seconds after the engine switch
is turned to ACCESSORY mode or turned
off. It cannot, however, be operated once
either door is opened.
■Jam protection function
If an object is detected between the moon
roof and the frame while the moon roof is
closing or tilting down, travel is stopped and
the moon roof opens slightly.
■Sunshade
The sunshade can be opened and closed
manually. However, the sunshade will open
automatically when the moon roof is
opened.
■Door lock linked moon roof operation
●The moon roof can be opened and
closed using the mechanical key.*
( P.333)
●The moon roof can be opened using the
wireless remote control.* ( P.90)*: These settings must be customized at
your Lexus dealer.
■If the moon roof does not close normally
Perform the following procedure:
1 Stop the vehicle.
2 Press and hold the “CLOSE” switch.
*
The moon roof will close, reopen and pause
for approximately 10 se conds. Then it will
close again and stop at the completely
closed position.
3 Check to make sure that the moon roof
is completely closed and then release
the switch.
*: If the switch is released at the incorrect
time, the procedure will have to be per-
formed again from the beginning.
If the moon roof does not fully close even
after performing the above procedure cor- rectly, have the vehicle inspected by your
Lexus dealer.
■If the moon roof does not move normally
If the moon roof does not open or close
normally or the automatic opening function
does not operate, perform the following ini-
tialization procedure.
1 Turn the engine switch to IGNITION
ON mode.
2 Operate the moon roof.
Depending on the kind of malfunction per-
form either of the following:
If the moon roof does not open when the
“OPEN” switch is pressed
3 Press and hold the “DOWN” switch or
“CLOSE” switch until the moon roof is
completely closed.
The moon roof will open and close a few
times before it closes completely.
4 Confirm that the moon roof has com-
pletely stopped and release the switch.
If the moon roof does not open com-
pletely automatically even though it tilts
up and opens while the “OPEN” switch is
being pressed and held
3 Press and hold the “O PEN” switch until
the moon roof opens completely.
4 Press and hold th e “CLOSE” switch
until the moon roof closes completely.
5 Press and hold the “U P” switch until the
moon roof tilts up and stops.
6 Press and hold the “DOWN” switch
until the moon roof tilts down and stops
at the completely closed position.
If you release the switch while the moon
roof is moving, perform the procedure
again from the beginning.
If, after performing the above procedures
correctly, the moon roof still does not open
or close normally or the automatic opening
function does not operate, have the vehicle
inspected by your Lexus dealer.
■Moon roof open warning buzzer
A buzzer sounds and a message is shown
on the multi-informat ion display in the
instrument cluster when the engine switch
is turned off and the driver’s door is opened
with the moon roof open.
Page 117 of 408
117
4
4
Driving
Driving
.4-1. Before drivingDriving the vehicle ...................... 118
Cargo and luggage ................... 124
Vehicle load limits ...................... 126
Trailer towing ............................... 127
Dinghy towing ............................. 127
4-2. Driving procedures Engine (ignition) switch ........... 128
Automatic transmission........... 132
Turn signal lever.......................... 136
Parking brake .............................. 137
ASC (Active Sound Control) ......................................................... 137
4-3. Operating the lights and wipers Headlight switch ......................... 138
AHB (Automatic High Beam) ......................................................... 140
Windshield wipers and washer ......................................................... 143
4-4. Refueling Opening the fuel tank cap...... 150
4-5. Using the driving support sys- tems
Lexus Safety System + ............. 153
PCS (Pre-Collision System) ......................................................... 157
LDA (Lane Departure Alert with steering control) ...................... 164
Dynamic radar cruise control .......................................................... 171
BSM (Blind Spot Monitor) ..... 179Intuitive parking assist ..............
187
Driving mode select switch ... 192
Launch control ............................ 194
Active rear wing ......................... 195
TVD (Torque Vectoring Differen- tial)................................................. 198
Driving assist systems............... 199
4-6. Driving tips Winter driving tips .................... 204
Page 128 of 408
1284-2. Driving procedures
4-2.Driving procedures
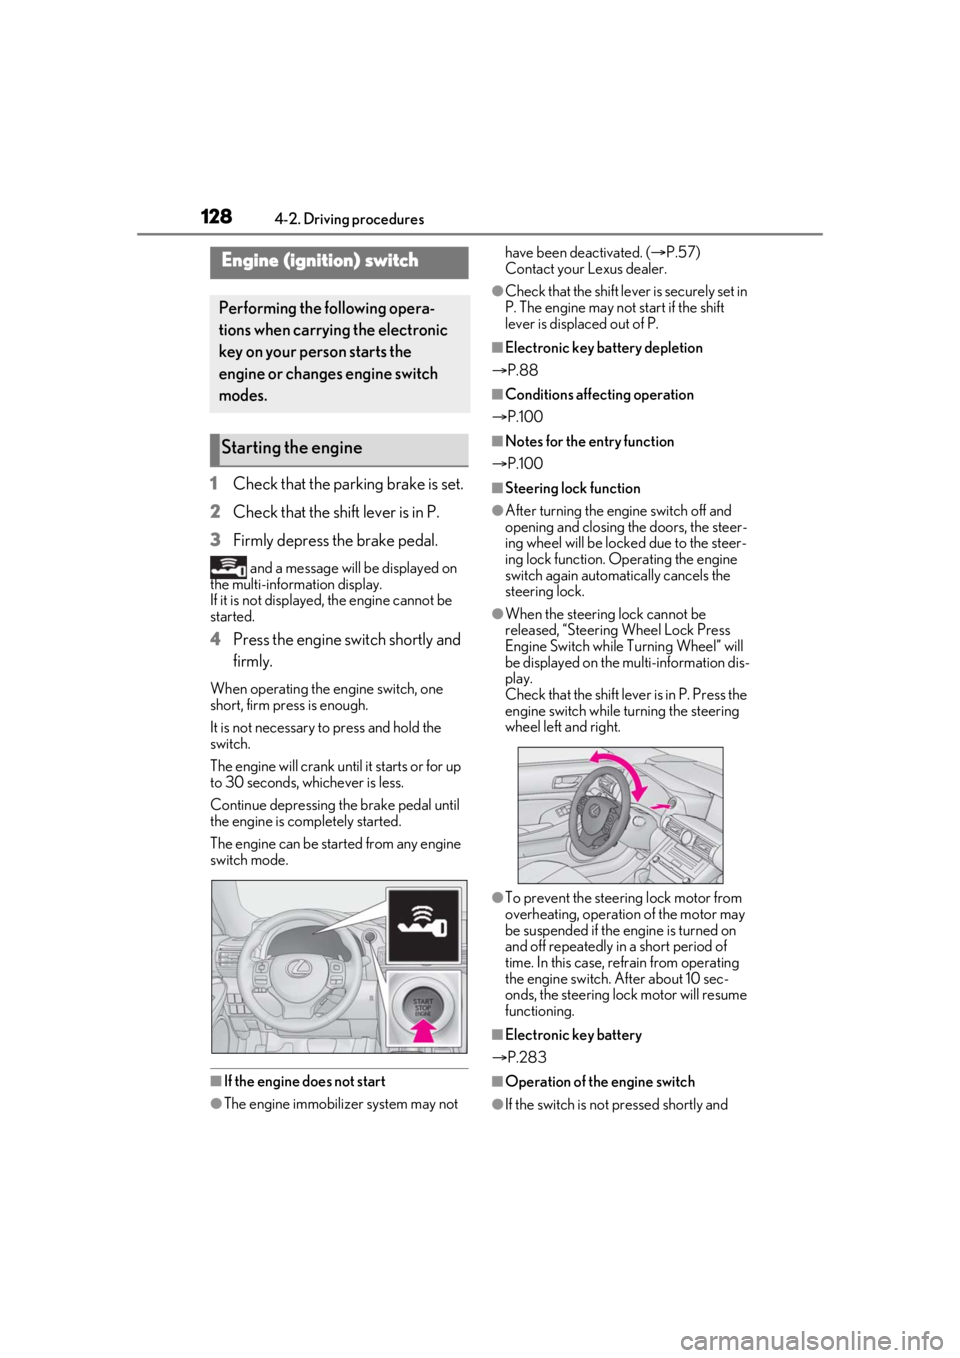
1Check that the parking brake is set.
2 Check that the shift lever is in P.
3 Firmly depress the brake pedal.
and a message will be displayed on
the multi-information display.
If it is not displayed, the engine cannot be
started.
4 Press the engine switch shortly and
firmly.
When operating the engine switch, one
short, firm press is enough.
It is not necessary to press and hold the
switch.
The engine will crank until it starts or for up
to 30 seconds, whichever is less.
Continue depressing the brake pedal until
the engine is completely started.
The engine can be started from any engine
switch mode.
■If the engine does not start
●The engine immobilizer system may not have been deactivated. (
P.57)
Contact your Lexus dealer.
●Check that the shift leve r is securely set in
P. The engine may not start if the shift
lever is displaced out of P.
■Electronic key battery depletion
P.88
■Conditions affecting operation
P.100
■Notes for the entry function
P.100
■Steering lock function
●After turning the engine switch off and
opening and closing the doors, the steer-
ing wheel will be lock ed due to the steer-
ing lock function. Operating the engine
switch again automatically cancels the
steering lock.
●When the steering lock cannot be
released, “Steering Wheel Lock Press
Engine Switch while Turning Wheel” will
be displayed on the multi-information dis-
play.
Check that the shift lever is in P. Press the
engine switch while turning the steering
wheel left and right.
●To prevent the steering lock motor from
overheating, operation of the motor may
be suspended if the engine is turned on
and off repeatedly in a short period of
time. In this case, refrain from operating
the engine switch. After about 10 sec-
onds, the steering lock motor will resume
functioning.
■Electronic key battery
P.283
■Operation of the engine switch
●If the switch is no t pressed shortly and
Engine (ignition) switch
Performing the following opera-
tions when carryin g the electronic
key on your person starts the
engine or changes engine switch
modes.
Starting the engine
Page 131 of 408
1314-2. Driving procedures
4
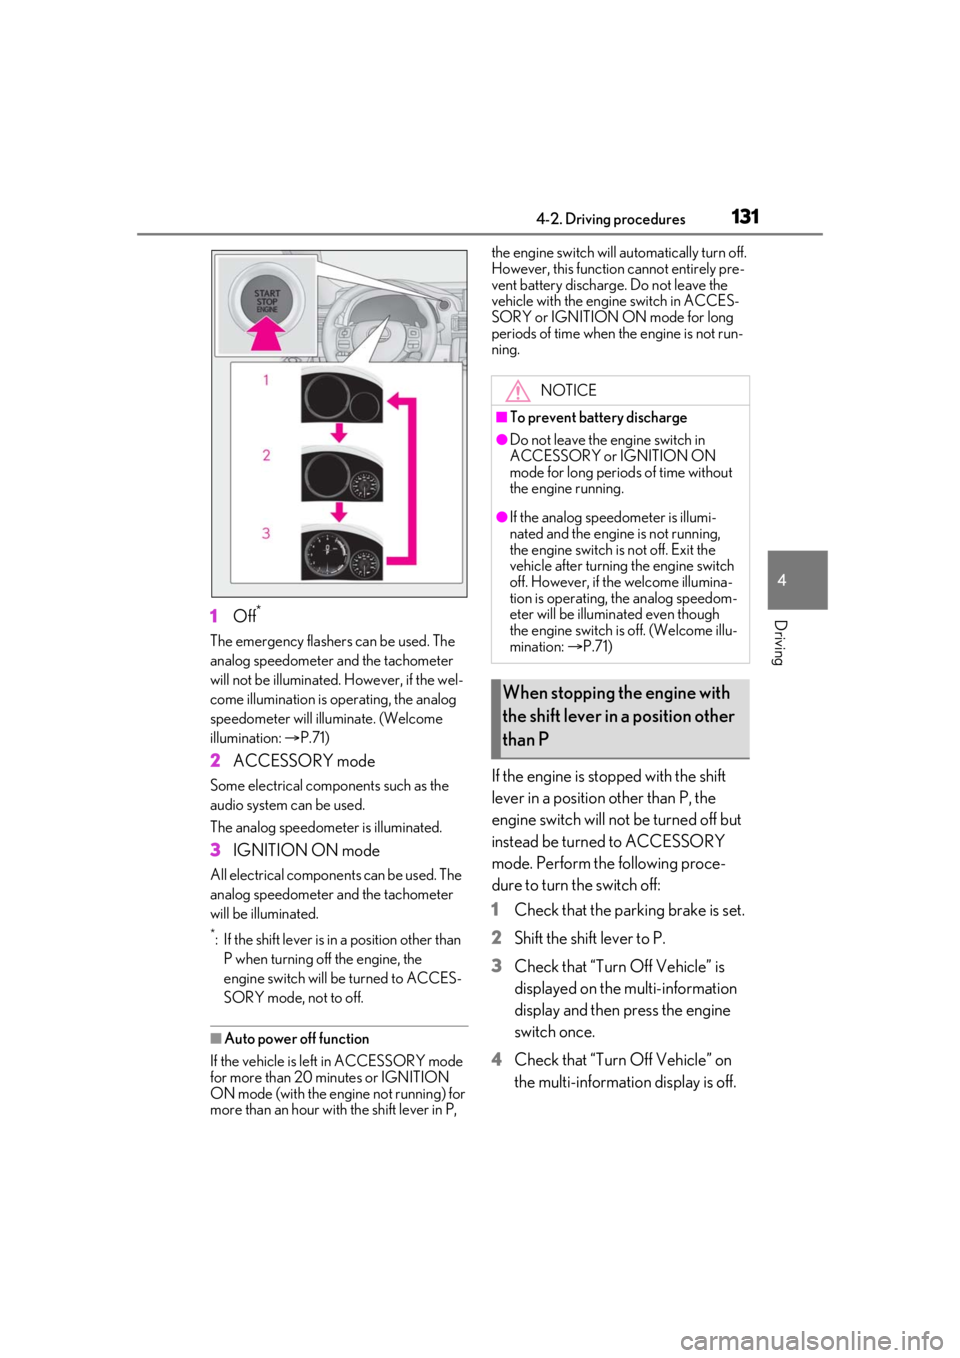
Driving1Off*
The emergency flashers can be used. The
analog speedometer and the tachometer
will not be illuminated. However, if the wel-
come illumination is op erating, the analog
speedometer will illuminate. (Welcome
illumination: P.71)
2ACCESSORY mode
Some electrical components such as the
audio system can be used.
The analog speedome ter is illuminated.
3IGNITION ON mode
All electrical components can be used. The
analog speedometer and the tachometer
will be illuminated.
*: If the shift lever is in a position other than
P when turning off the engine, the
engine switch will be turned to ACCES-
SORY mode, not to off.
■Auto power off function
If the vehicle is left in ACCESSORY mode
for more than 20 minutes or IGNITION
ON mode (with the engine not running) for
more than an hour with the shift lever in P, the engine switch will automatically turn off.
However, this function cannot entirely pre-
vent battery discharge. Do not leave the
vehicle with the engine switch in ACCES-
SORY or IGNITION ON mode for long
periods of time when the engine is not run-
ning.
If the engine is stopped with the shift
lever in a position other than P, the
engine switch will not be turned off but
instead be turned
to ACCESSORY
mode. Perform the following proce-
dure to turn the switch off:
1 Check that the parking brake is set.
2 Shift the shift lever to P.
3 Check that “Turn Off Vehicle” is
displayed on the multi-information
display and then press the engine
switch once.
4 Check that “Turn Off Vehicle” on
the multi-information display is off.
NOTICE
■To prevent battery discharge
●Do not leave the engine switch in
ACCESSORY or IGNITION ON
mode for long periods of time without
the engine running.
●If the analog speedometer is illumi-
nated and the engine is not running,
the engine switch is not off. Exit the
vehicle after turning the engine switch
off. However, if the welcome illumina-
tion is operating, the analog speedom-
eter will be illuminated even though
the engine switch is off. (Welcome illu-
mination: P.71)
When stopping the engine with
the shift lever in a position other
than P
Page 133 of 408
1334-2. Driving procedures
4
Driving
shifting to 7, 6, 5 or 4. (P.134)
●When switching the driving mode to
sport mode while driving in the D posi-
tion. ( P.192)
■Restraining sudden start (Drive-Start
Control)
P.119
■AI-SHIFT
●The AI-SHIFT automatically selects the
suitable gear accordin g to driver perfor-
mance and driving conditions.
The AI-SHIFT automatically operates
when the shift lever is in D. (Shifting the
shift lever to the M position cancels the
function.)
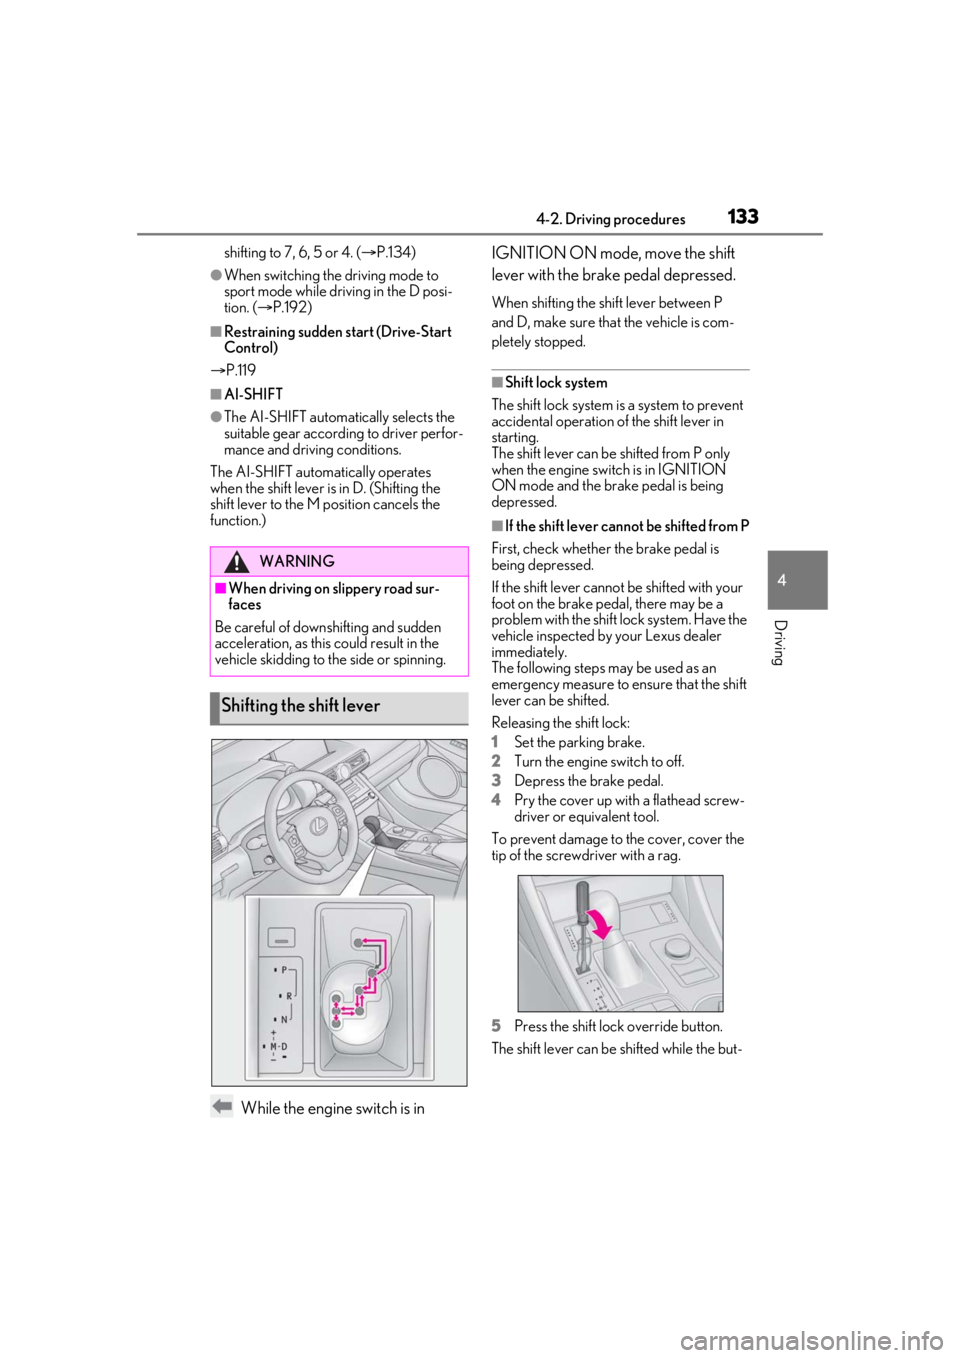
While the engine switch is in IGNITION ON mode, move the shift
lever with the brake pedal depressed.
When shifting the shift lever between P
and D, make sure that the vehicle is com-
pletely stopped.
■Shift lock system
The shift lock system is a system to prevent
accidental operation of the shift lever in
starting.
The shift lever can be shifted from P only
when the engine swit ch is in IGNITION
ON mode and the brake pedal is being
depressed.
■If the shift lever cannot be shifted from P
First, check whether the brake pedal is
being depressed.
If the shift lever cannot be shifted with your
foot on the brake pedal, there may be a
problem with the shift lock system. Have the
vehicle inspected by your Lexus dealer
immediately.
The following steps may be used as an
emergency measure to ensure that the shift
lever can be shifted.
Releasing the shift lock:
1 Set the parking brake.
2 Turn the engine switch to off.
3 Depress the brake pedal.
4 Pry the cover up with a flathead screw-
driver or equivalent tool.
To prevent damage to the cover, cover the
tip of the screwdriver with a rag.
5 Press the shift lock override button.
The shift lever can be shifted while the but-
WARNING
■When driving on slippery road sur-
faces
Be careful of downshifting and sudden
acceleration, as this could result in the
vehicle skidding to th e side or spinning.
Shifting the shift lever