low beam LEXUS RCF 2021 Owners Manual
[x] Cancel search | Manufacturer: LEXUS, Model Year: 2021, Model line: RCF, Model: LEXUS RCF 2021Pages: 408, PDF Size: 8.25 MB
Page 63 of 408
632-1. Instrument cluster
2
Vehicle status information and indicators
*1: These lights turn on when the engine switch is turned to IGNITION ON
mode to indicate that a system check is
being performed. They will turn off after
the engine is started, or after a few sec-
onds. There may be a malfunction in a
system if a light does not come on, or
turn off. Have the vehicle inspected by
your Lexus dealer.
*2: This light illuminates on the multi-infor-
mation display.
*3: This light illuminates on the center panel.
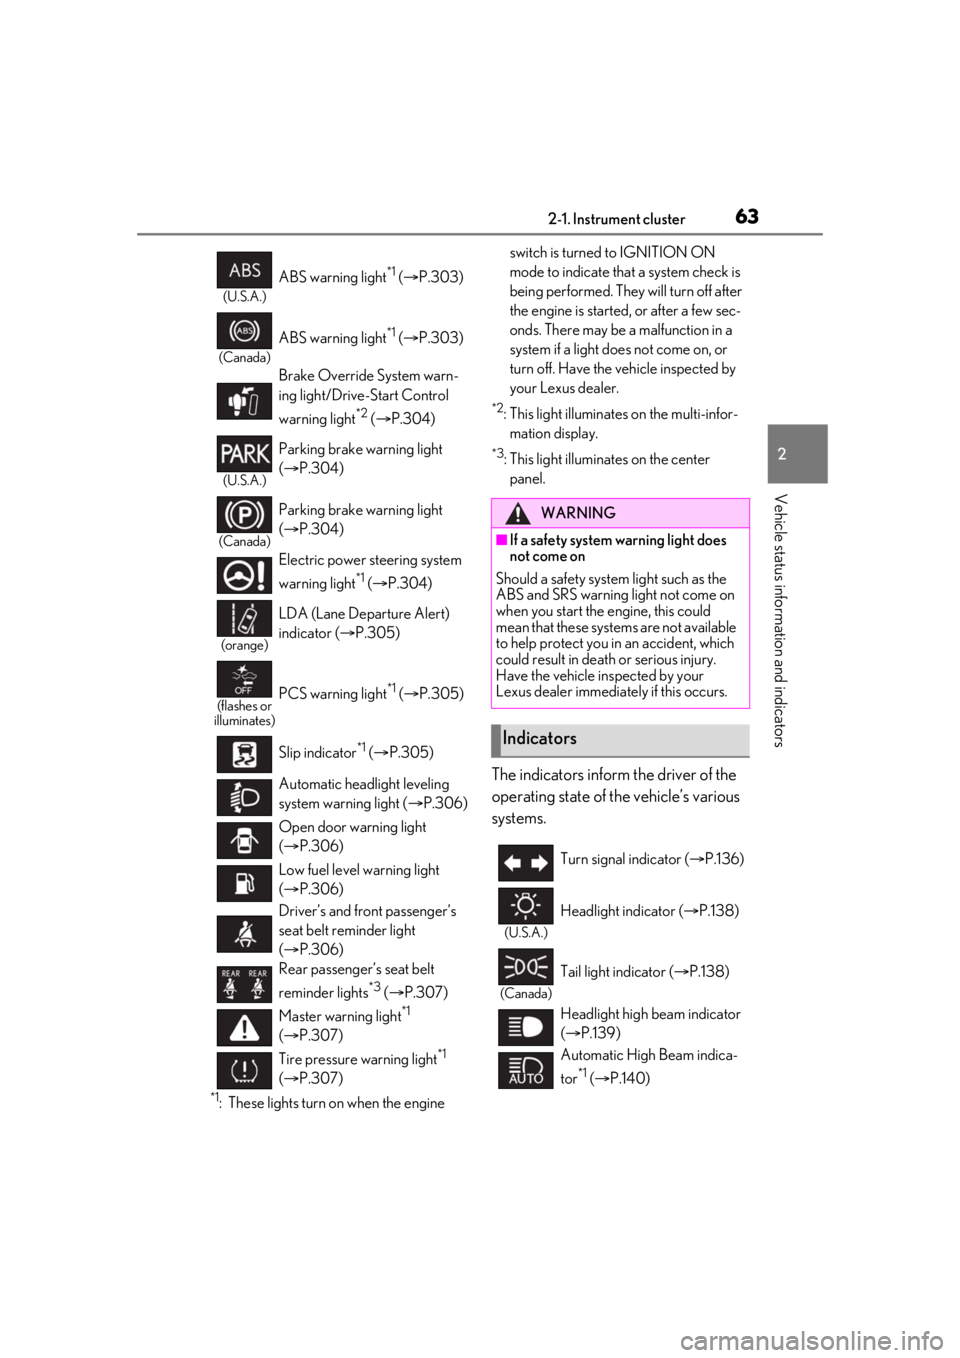
The indicators inform the driver of the
operating state of the vehicle’s various
systems.
(U.S.A.)
ABS warning light*1 ( P.303)
(Canada)
ABS warning light*1 ( P.303)
Brake Override System warn-
ing light/Drive-Start Control
warning light
*2 ( P.304)
(U.S.A.)
Parking brake warning light
( P.304)
(Canada)
Parking brake warning light
( P.304)
Electric power st eering system
warning light
*1 ( P.304)
(orange)
LDA (Lane Departure Alert)
indicator ( P.305)
(flashes or
illuminates)PCS warning light*1 ( P.305)
Slip indicator
*1 ( P.305)
Automatic headlight leveling
system warning light ( P.306)
Open door warning light
( P.306)
Low fuel level warning light
( P.306)
Driver’s and front passenger’s
seat belt reminder light
( P.306)
Rear passenger’s seat belt
reminder lights
*3 ( P.307)
Master warning light
*1
( P.307)
Tire pressure warning light
*1
( P.307)
WARNING
■If a safety system warning light does
not come on
Should a safety system light such as the
ABS and SRS warning light not come on
when you start the engine, this could
mean that these systems are not available
to help protect you in an accident, which
could result in death or serious injury.
Have the vehicle inspected by your
Lexus dealer immediately if this occurs.
Indicators
Turn signal indicator ( P.136)
(U.S.A.)
Headlight indicator ( P.138)
(Canada)
Tail light indicator ( P.138)
Headlight high beam indicator
( P.139)
Automatic High Beam indica-
tor
*1 ( P.140)
Page 140 of 408
1404-3. Operating the lights and wipers
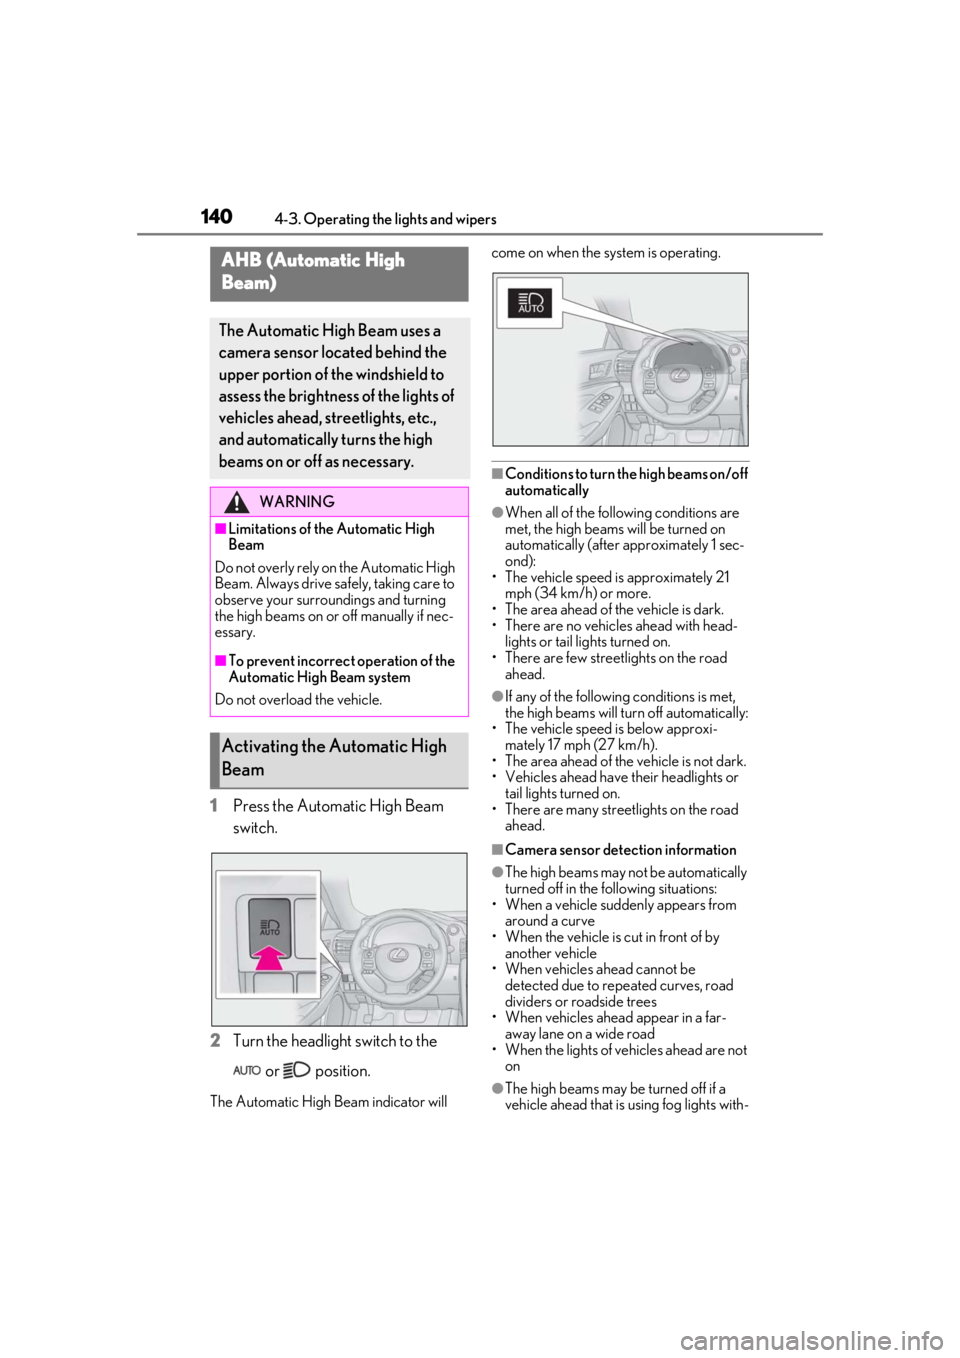
1Press the Automatic High Beam
switch.
2 Turn the headlight switch to the
or position.
The Automatic High Beam indicator will come on when the system is operating.
■Conditions to turn the high beams on/off
automatically
●When all of the follo
wing conditions are
met, the high beams will be turned on
automatically (after approximately 1 sec-
ond):
• The vehicle speed is approximately 21 mph (34 km/h) or more.
• The area ahead of the vehicle is dark.
• There are no vehicles ahead with head- lights or tail lights turned on.
• There are few streetlights on the road ahead.
●If any of the following conditions is met,
the high beams will turn off automatically:
• The vehicle speed is below approxi-
mately 17 mph (27 km/h).
• The area ahead of the vehicle is not dark.
• Vehicles ahead have their headlights or
tail lights turned on.
• There are many streetlights on the road ahead.
■Camera sensor dete ction information
●The high beams may not be automatically
turned off in the following situations:
• When a vehicle suddenly appears from around a curve
• When the vehicle is cut in front of by
another vehicle
• When vehicles ahead cannot be detected due to repeated curves, road
dividers or roadside trees
• When vehicles ahead appear in a far- away lane on a wide road
• When the lights of vehicles ahead are not
on
●The high beams may be turned off if a
vehicle ahead that is using fog lights with-
AHB (Automatic High
Beam)
The Automatic High Beam uses a
camera sensor located behind the
upper portion of the windshield to
assess the brightness of the lights of
vehicles ahead, streetlights, etc.,
and automatically turns the high
beams on or off as necessary.
WARNING
■Limitations of the Automatic High
Beam
Do not overly rely on the Automatic High
Beam. Always drive sa fely, taking care to
observe your surroundings and turning
the high beams on or off manually if nec-
essary.
■To prevent incorrect operation of the
Automatic High Beam system
Do not overload the vehicle.
Activating the Automatic High
Beam
Page 141 of 408
1414-3. Operating the lights and wipers
4
Driving
out its headlights turned on is detected.
●House lights, street lights, traffic signals,
and illuminated billboards or signs and
other reflective objects may cause the
high beams to change to the low beams,
or the low beams to remain on.
●The following factors may affect the
amount of time taken for the high beams
to turn on or off:
• The brightness of the headlights, fog
lights, and tail lights of vehicles ahead
• The movement and direction of vehicles ahead
• When a vehicle ahead only has opera- tional lights on one side
• When a vehicle ahead is a two-wheeled
vehicle
• The condition of the road (gradient, curve, condition of th e road surface, etc.)
• The number of passengers and amount of luggage in the vehicle
●The high beams may turn on or off unex-
pectedly.
●Bicycles or similar vehicles may not be
detected.
●In the following situations the system may
not be able to correctly detect the sur-
rounding brightness le vel. This may cause
the low beams to remain on or the high
beams to flash or dazzle pedestrians or
vehicles ahead. In such a case, it is neces-
sary to manually switch between the high
and low beams.
• When driving in inclement weather
(heavy rain, snow, fog, sandstorms, etc.)
• When the windshield is obscured by fog, mist, ice, dirt, etc.
• When the windshield is cracked or dam- aged
• When the camera sensor is deformed or
dirty
• When the temperature of the camera sensor is extremely high
• When the surrounding brightness level is equal to that of head lights, tail lights or
fog lights
• When headlights or tail lights of vehicles
ahead are turned off, dirty, changing
color, or not aimed properly
• When the vehicle is hit by water, snow,
dust, etc. from a preceding vehicle
• When driving through an area of inter-mittently changing brightness and dark-
ness
• When frequently and repeatedly driving
ascending/descending roads, or roads
with rough, bumpy or uneven surfaces
(such as stone-paved roads, gravel roads,
etc.)
• When frequently and repeatedly taking curves or driving on a winding road
• When there is a highly reflective object ahead of the vehicle, such as a sign or
mirror
• When the back of a preceding vehicle is highly reflective, such as a container on a
truck
• When the vehicle’s headlights are dam- aged or dirty, or are not aimed properly
• When the vehicle is listing or titling due to
a flat tire, a trailer being towed, etc.
• When the headlights are changed between the high beams and low beams
repeatedly in an abnormal manner
• When the driver believes that the high beams may be flashing or dazzling
pedestrians or other drivers
■Temporarily lowering sensor sensitivity
The sensitivity of the sensor can be tempo-
rarily lowered.
1 Turn the engine switch off while the fol-
lowing conditions are met.
●The headlight switch is in or .
●The headlight switch lever is in the origi-
nal position.
●Automatic High Beam switch is on.
2 Turn the engine switch to IGNITION
ON mode.
3 Within 30 seconds after 2, repeat
pushing the headlight switch lever to the
high beam position then pulling it to the
original position quickly 10 times, then
leave the lever in original position.
4 If the sensitivity is changed, the Auto-
matic High Beam indicator is turn on
and off 3 times.
Page 142 of 408
1424-3. Operating the lights and wipers
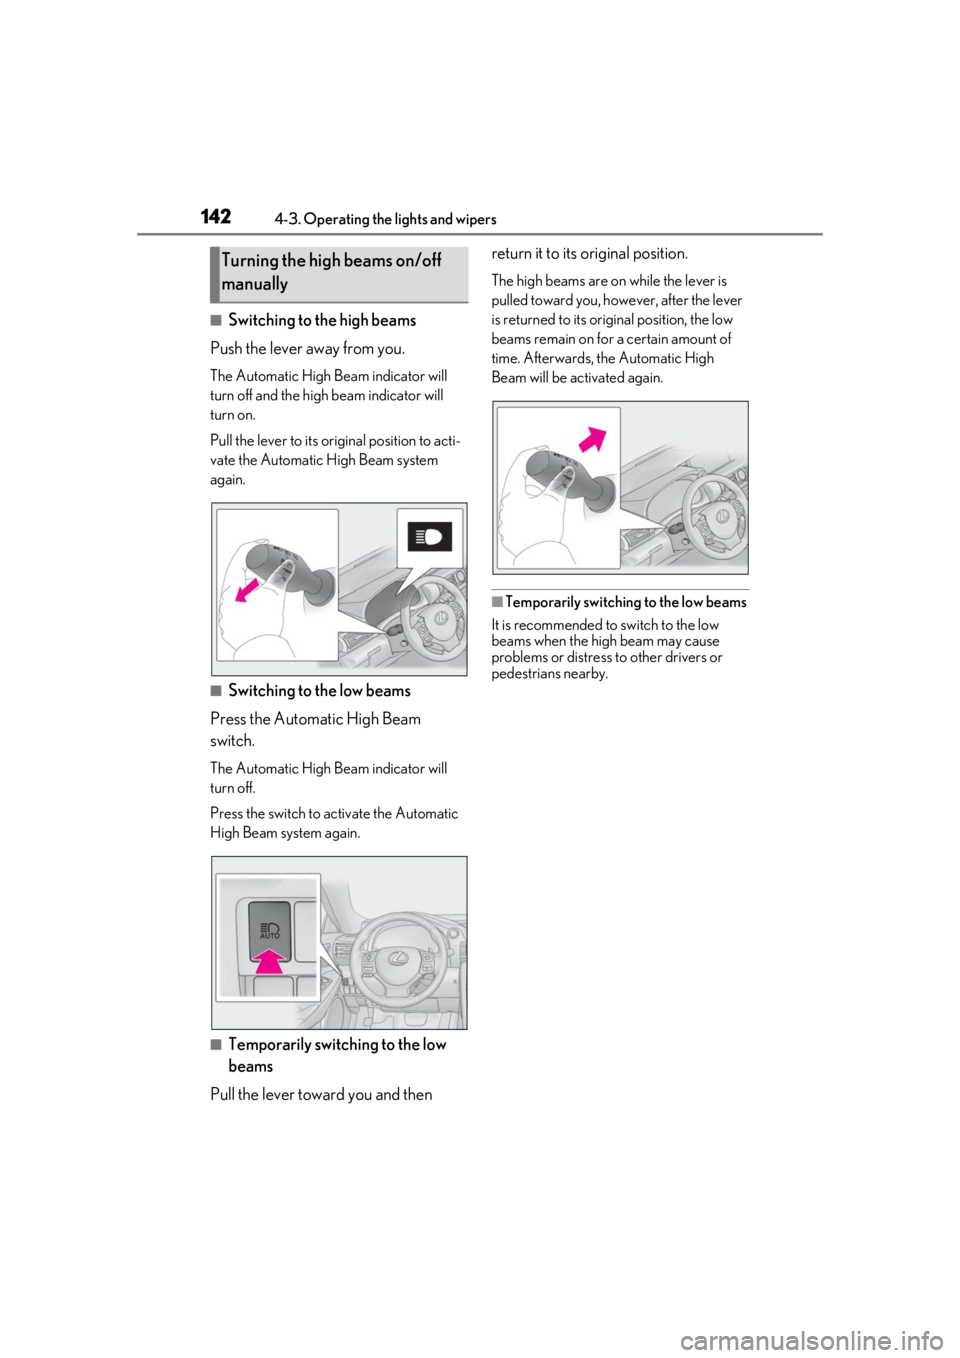
■Switching to the high beams
Push the lever away from you.
The Automatic High Beam indicator will
turn off and the high beam indicator will
turn on.
Pull the lever to its original position to acti-
vate the Automatic High Beam system
again.
■Switching to the low beams
Press the Automatic High Beam
switch.
The Automatic High Beam indicator will
turn off.
Press the switch to activate the Automatic
High Beam system again.
■Temporarily switching to the low
beams
Pull the lever toward you and then return it to its original position.
The high beams are on while the lever is
pulled toward you, however, after the lever
is returned to its original position, the low
beams remain on for a certain amount of
time. Afterwards, the Automatic High
Beam will be activated again.
■Temporarily switchin
g to the low beams
It is recommended to switch to the low
beams when the high beam may cause
problems or distress to other drivers or
pedestrians nearby.
Turning the high beams on/off
manually
Page 153 of 408
1534-5. Using the driving support systems
4
Driving
4-5.Using the driving support systems
■PCS (Pre-Collision System)
P.157
■LDA (Lane Departure Alert with
steering control)
P.164
■AHB (Automatic High Beam)
P.140
■Dynamic radar cruise control
P.171
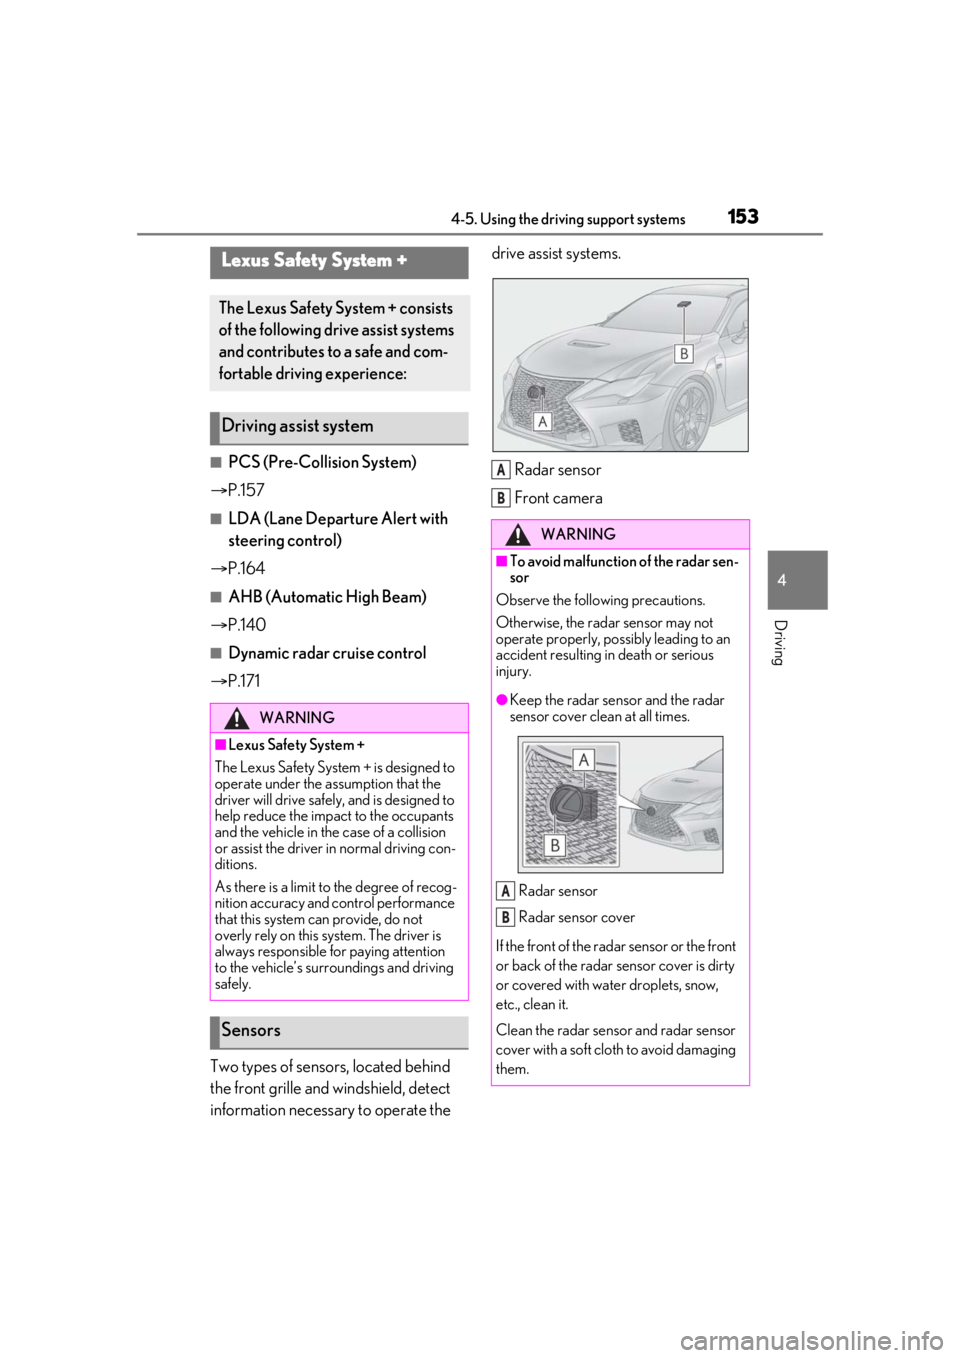
Two types of sensors, located behind
the front grille and windshield, detect
information necessary to operate the drive assist systems.
Radar sensor
Front camera
Lexus Safety System +
The Lexus Safety Sy stem + consists
of the following drive assist systems
and contributes to a safe and com-
fortable driving experience:
Driving assist system
WARNING
■Lexus Safety System +
The Lexus Safety System + is designed to
operate under the assumption that the
driver will drive safely, and is designed to
help reduce the impact to the occupants
and the vehicle in the case of a collision
or assist the driver in normal driving con-
ditions.
As there is a limit to the degree of recog-
nition accuracy and control performance
that this system can provide, do not
overly rely on this system. The driver is
always responsible for paying attention
to the vehicle’s surro undings and driving
safely.
Sensors
WARNING
■To avoid malfunction of the radar sen-
sor
Observe the following precautions.
Otherwise, the radar sensor may not
operate properly, possibly leading to an
accident resulting in death or serious
injury.
●Keep the radar sensor and the radar
sensor cover clean at all times.
Radar sensor
Radar sensor cover
If the front of the rada r sensor or the front
or back of the radar sensor cover is dirty
or covered with water droplets, snow,
etc., clean it.
Clean the radar sensor and radar sensor
cover with a soft cloth to avoid damaging
them.
A
B
A
B
Page 169 of 408

1694-5. Using the driving support systems
4
Driving
●There are shadows on the road that run
parallel with, or cover, the white (yellow)
lines.
●The vehicle is driven in an area without
white (yellow) lines, such as in front of a
tollgate or checkpoint, or at an intersec-
tion, etc.
●The white (yellow) lines are cracked,
“Botts’ dots”, “Raised pavement marker”
or stones are present.
●The white (yellow) lines cannot be seen
or are difficult to see due to sand, etc.
●The vehicle is driven on a road surface
that is wet due to rain, puddles, etc.
●The traffic lines are yellow (which may be
more difficult to recognize than lines that
are white).
●The white (yellow) lines cross over a curb,
etc.
●The vehicle is driven on a bright surface,
such as concrete.
●The vehicle is driven on a surface that is
bright due to reflected light, etc.
●The vehicle is driven in an area where the
brightness changes suddenly, such as at
the entrances and exits of tunnels, etc.
●Light from the headlights of an oncoming
vehicle, the sun, etc. enters the camera.
●The vehicle is driven where the road
diverges, merges, etc.
●The vehicle is driven on a slope.
●The vehicle is driven on a road which tilts
left or right, or a winding road.
●The vehicle is driven on an unpaved or
rough road.
●The vehicle is driven around a sharp
curve.
●The traffic lane is ex cessively narrow or
wide.
●The vehicle is extremely tilted due to car-
rying heavy luggage or having improper
tire pressure.
●The distance to the preceding vehicle is
extremely short.
●The vehicle is moving up and down a
large amount due to road conditions during driving (poor roads or road
seams).
●The headlight lenses are dirty and emit a
faint amount of light at night, or the beam
axis has deviated.
●The vehicle is struck by a crosswind.
●The vehicle has just changed lanes or
crossed an intersection.
●Snow tires, etc. are equipped.
■Warning message
If the following warning message is dis-
played on the multi-in formation display and
the LDA indicator illuminates in orange, fol-
low the appropriate troubleshooting proce-
dure.
Warning mes-
sageDetails/Actions
“Lane Depar-
ture Alert
Malfunction
Visit Your
Dealer”The system may not be
operating properly.
Have the vehicle
inspected at your Lexus
dealer.
“Front Cam-
era Unavail-
able Remove
Debris On
Windshield”
Dirt, rain, condensation,
ice, snow, etc. are present
on the windshield in front
of the camera sensor.
Turn the LDA system off,
remove any dirt, rain, con-
densation, ice, snow, etc.
from the windshield, and
then turn the LDA system
back on.
Page 312 of 408

3127-2. Steps to take in an emergency
power off function. Next time when starting
the engine, increase the engine speed
slightly and maintain that level for approxi-
mately 5 minutes to recharge the battery.
■If “Headlight System Malfunction Visit
Your Dealer” is displayed
The following systems may be malfunction-
ing. Have the vehicle inspected by your
Lexus dealer immediately.
●The LED headlight system
●The automatic headlight leveling system
●Automatic High Beam
■If “Radar Cruise Control Unavailable” is
displayed
The dynamic radar cruise control system
cannot be used temporar ily. Use the system
when it becomes available again.
■If a message that indicates the malfunc-
tion of front camera is displayed
The following systems may be suspended
until the problem shown in the message is
resolved. ( P.155, 305)
●PCS (Pre-Collision System)
●LDA (Lane Departure Alert with steering
control)
●Dynamic radar cruise control
●Automatic High Beam
■If “Maintenance Required Soon” is dis-
played
Indicates that all maintenance according to
the driven distance on the maintenance
schedule
* should be performed soon.
Comes on approximately 4500 miles
(7200 km) after the message has been
reset. If necessary, perform maintenance.
Please reset the message after the mainte-
nance is performed. ( P.257)
*: Refer to the separa te “Scheduled Main-
tenance” or “Owner’s Manual Supple-
ment” for the maintenance interval
applicable to your vehicle.
■If “Maintenance Required Visit Your
Dealer” is displayed
Indicates that all maintenance is required to
correspond to the driven distance on the maintenance schedule
*.
Comes on approximately 5000 miles
(8000 km) after the message has been
reset. (The indicator will not work properly
unless the message ha s been reset.) Per-
form the necessary maintenance. Please
reset the message after the maintenance is
performed. ( P.257)
*: Refer to the separate “Scheduled Main-
tenance” or “Owner’s Manual Supple-
ment” for the main tenance interval
applicable to your vehicle.
■If “Active Rear Wing Off Go to Settings
to turn On” is displayed
The active rear wing switch was pressed
when the active rear wing
* was disabled.
Enable the active rear wing before pressing
the active rear wing switch. ( P.195)
*: If equipped
■If “TVD System Overheated Reduce
Engine Speed and Load” is displayed
The TVD system
* has overheated, this mes-
sage may be displayed when driving under
high load conditions, such as the following:
●When driving at high speeds or through
sharp turns continuously
●When either rear tire has lost traction
and spun continuously
Drive the vehicle for a while, while avoiding
high load conditions.
*: If equipped
■If a message that indicates the need for
visiting your Lexus dealer is displayed
The system or part shown on the
multi-information display is malfunctioning.
Have the vehicle inspected by your Lexus
dealer immediately.
■If “See Owner’s Manual” is displayed
●If the following messages are shown, fol-
lowing the instruct ions, accordingly.
• “Engine Coolant Temp High” ( P.337)
• “Transmission Fluid Temp High” ( P.132)
●If any of the following messages are
shown on the multi-information display, it
may indicate a malfunction. Have the
Page 396 of 408

396Alphabetical Index
Preparing and checking before winter......................................................................... 204
Engine coolant temperature gauge ....... 66
Engine immobilizer system .........................57
Engine oil Capacity ......................................................... 343
Checking ....................................................... 267
Low engine oil pressure warning light.........................................................................303
Preparing and checking before winter ......................................................................... 204
Engine switch ..................................................128 Auto power off function ............................ 131
Changing the engine switch modes. 130
If your vehicle has to be stopped in an
emergency ................................................ 294
EPS (Electric Power Steering) ..............200 Electric power steer ing system warning
light ................................................................304
Event data recorder (EDR) ............................7
F
First-aid kit storage belt .............................227
Flat tire Tire pressure warning system ............. 275
Vehicles with a spare tire ........................313
Vehicles without a spare tire .................319
Floor mats ...........................................................22
Fluid Automatic transmission .......................... 345
Brake.................................................... 270, 346
Washer ............................................................272
Footwell light ................................................. 223
Front passenger occupant classification system .............................................................. 36
Front seats Adjustment..................................................... 103
Cleaning......................................................... 245
Correct driving posture .............................23
Driving position memory........................ 105
Memory recall function ........................... 106
Power easy access system .................... 105 Seat heaters .................................................... 221
Seat position memory .............................. 105
Seat ventilators .............................................. 221
Front side marker light Light switch .................................................... 138
Front turn signal lights Replacing light bulbs ............................... 289
Turn signal lever .......................................... 136
Fuel Capacity .........................................................343
Fuel gauge ........................................................ 66
Fuel pump shut off system...................... 301
Information ....................................................349
Low fuel level warning light ................. 306
Refueling.......................................................... 150
Type ..................................................................343
Fuel consumption Average fuel economy .............................. 75
Current fuel consumption ........................ 75
Fuel filler door If the fuel filler do or cannot be opened
........................................................................... 331
Refueling.......................................................... 150
Fuel gauge ......................................................... 66
Fuel pump shut off system......................... 301
Fuses ................................................................. 285
G
Garage door opener ...................................231
Gauges ............................................................... 66
Gear Position ....................................................76
G-force................................................................79
Glove box ....................................................... 226
Glove box light ............................................. 226
H
Headlight aim ................................................ 287
Headlights Automatic High Beam system ............. 140
Light switch .................................................... 138
Replacing light bulbs ............................... 289