trunk release LEXUS RCF 2021 Owners Manual
[x] Cancel search | Manufacturer: LEXUS, Model Year: 2021, Model line: RCF, Model: LEXUS RCF 2021Pages: 408, PDF Size: 8.25 MB
Page 15 of 408
15Pictorial index
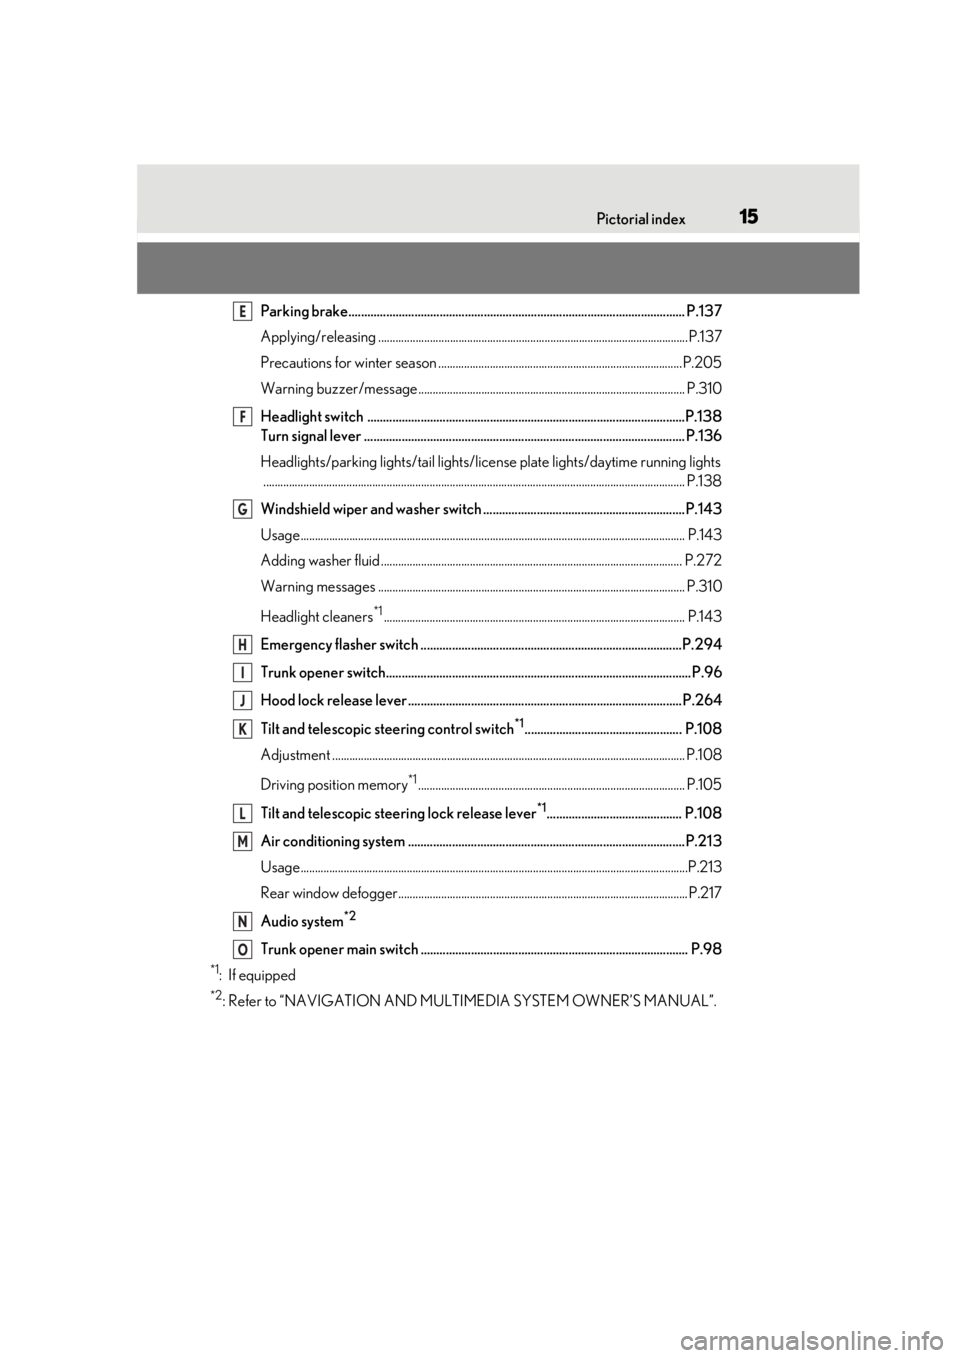
Parking brake........................................................................................................... P.137
Applying/releasing ............................................................................................................P.137
Precautions for winter season .. ...................................................................................P.205
Warning buzzer/message............................................................................................. P.310
Headlight switch .....................................................................................................P.138
Turn signal lever ...................................................................................................... P.136
Headlights/parking lights/tail lights/license plate lig hts/daytime running lights
................................................................................................................................................... P.138
Windshield wiper and washer switch ................................................................ P.143
Usage.......................................................................................................................... ............ P.143
Adding washer fluid ......................................................................................................... P.2 72
Warning messages ........................................................................................................... P.31 0
Headlight cleaners
*1......................................................................................................... P.143
Emergency flasher switch ...................................................................................P.294
Trunk opener switch................................................................................................. P.96
Hood lock release lever ....................................................................................... P.264
Tilt and telescopic steering control switch
*1.................................................. P.108
Adjustment ..................................................................................................................... ...... P.108
Driving position memory
*1............................................................................................. P.105
Tilt and telescopic steeri ng lock release lever
*1........................................... P.108
Air conditioning system ........................................................................................P.213
Usage.......................................................................................................................... .............P.213
Rear window defogger..................................................................................................... P.217
Audio system
*2
Trunk opener main switch ..................................................................................... P.98
*1: If equipped
*2: Refer to “NAVIGATION AND MULTIMEDIA SYSTEM OWNER’S MANUAL”.
E
F
G
H
I
J
K
L
M
N
O
Page 90 of 408

903-1. Key information
The electronic keys are equipped with
the following wireless remote control:Locks the doors ( P.92)
Unlocks the doors ( P.92)
Opens the windows and moon roof
(if equipped)
* ( P.92)
Opens the trunk ( P.97)
Sounds the alarm
*: This setting must be customized at your Lexus dealer.
■Panic mode
When is pressed for longer than
about one second, an alarm will sound
intermittently and the vehicle lights will flash
to deter any person from trying to break
into or damage your vehicle.
To stop the alarm, press any button on the
electronic key.
To take out the mechanical key, push
the release button and take the key out.
The mechanical key can only be inserted in
one direction, as the key only has grooves
on one side. If the key cannot be inserted in
a lock cylinder, turn it over and re-attempt
to insert it.
After using the mechanical key, store it in
the electronic key. Carry the mechanical
key together with the electronic key. If the
electronic key battery is depleted or the
entry function does not operate properly,
you will need the mechanical key.
( P.332)
NOTICE
●When installing the ba ttery, make sure
to check the direction of the battery.
Installing the battery in the wrong
direction may cause the battery to
deplete rapidly.
●The surface of the card key may be
damaged, or its coating may peel off in
the following situations:
• The card key is carried together with hard objects, such as coins and keys.
• The card key is scraped with a sharp object, such as the tip of a mechanical
pencil.
• The surface of the card key is wiped with thinner or benzene.
Wireless remote control
A
B
C
D
E
Using the mechanical key
Page 92 of 408

923-2. Opening, closing and locking the doors and trunk
3-2.Opening, closing and locking the doors and trunk
■Smart access system with
push-button start
Carry the electronic key to enable this
function.
1 Grip the driver’s door handle to
unlock the door. Grip the passen-
ger’s door handle to unlock both
side doors.
*
Make sure to touch the sensor on the back
of the handle.
The doors cannot be unlocked for 3 sec-
onds after the doors are locked.
*: The door unlock settings can be
changed.
2 Touch the lock sensor (indentation
on the side of the door handle) to
lock the doors.
Check that the door is securely locked.
■Wireless remote control
1 Locks both side doors
Check that the door is securely locked.
2Unlocks both side doors
Pressing the button unlocks the driver’s
door. Pressing the button again within 5
seconds unlocks the other door.
Press and hold to open the windows and
moon roof (if equipped).
*
*
: This setting must be customized at your Lexus dealer.
■Side window open/close function linked
to door operation
When a door is opened, its window opens
slightly. When a door is closed, its window
closes completely.
■Switching the door unlock function
It is possible to set which doors the entry
function unlocks using the wireless remote
control.
1 Turn the engine switch off.
2 When the indicator light on the key sur-
face is not on, press and hold ,
or for approximately 5
seconds while pre ssing and holding
.
The setting changes each time an operation
is performed, as shown below. (When
changing the setting continuously, release
the buttons, wait for at least 5 seconds, and
repeat step 2 .)
Doors
Unlocking and locking the doors
from the outside
Page 93 of 408

933-2. Opening, closing and locking the doors and trunk
3
Before driving
To prevent unintended triggering of the
alarm, unlock the doors using the wireless
remote control and open and close a door
once after the settings have been changed.
(If a door is not opened within 60 seconds
after is pressed, the doors will be
locked again and the alarm will automati-
cally be set.)
In a case that the alarm is triggered, imme-
diately stop the alarm. (P.58)
■Impact detection door lock release sys-
tem
In the event that the vehicle is subject to a
strong impact, both side doors are
unlocked. Depending on the force of the
impact or the type of accident, however, the
system may not operate.
■Operation signals
A buzzer sounds and the emergency flash-
ers flash to indicate that the doors have
been locked/unlocked. (Locked: once;
Unlocked: twice)
A buzzer sounds to indicate that the win-
dows and moon roof are operating.
■Welcome light illumination control
The side marker, parking, tail and license
plate lights automatically turn on at night when the doors are unlocked using the
entry function or wireless remote control if
the light switch is in the position.
■Security feature
If a door is not opened within approximately
60 seconds after the vehicle is unlocked,
the security feature automatically locks the
vehicle again.
■When the door cannot be locked by the
lock sensor on the surface of the door
handle
Use your palm to touch the lock sensor.
■Open door warning buzzer
If an attempt to lock the doors is made when
a door is not fully closed, a buzzer sounds
continuously for 5 seconds. Fully close the
door to stop the buzzer, and lock the vehi-
cle once more.
■Setting the alarm
Locking the doors will set the alarm system.
( P.58)
■Conditions affecting the operation of
the smart access system with push-but-
ton start or wireless remote control
P.100
■If the smart access system with
push-button start or the wireless remote
control does not operate properly
Use the mechanical key and/or inside lock
buttons to lock and unlock the doors.
( P.332)
Replace the key battery with a new one if it
is depleted. ( P.283)
■Customization
Some functions can be customized.
( P.360)
Multi-information
display/BeepUnlocking function
Exterior: Beeps 3 times
Interior: Pings once
Holding the driver’s
door handle unlocks
only the driver’s
door.
Holding the passen-
ger’s door handle
unlocks both side
doors.
Exterior: Beeps twice
Interior: Pings once
Holding either door
handle unlocks both
side doors.
Page 97 of 408

973-2. Opening, closing and locking the doors and trunk
3
Before driving
■Wireless remote control
Press and hold the switch.
A buzzer sounds.
■Trunk grip
Using the trunk grip, lower the trunk
without applying force to the side and
push the trunk down from the outside
to close it.
■Trunk light
●The trunk light turns on when the trunk is
opened.
●If the trunk light is left on when the engine
switch is turned off, the light will go off automatically after 20 minutes.
■Function to prevent the trunk being
locked with the electronic key inside
●When both side doors are locked, closing
the trunk lid with the electronic key left
inside the trunk will sound an alarm.
In this case, the trun
k lid can be opened
by pressing the trunk release button on
the trunk lid.
●If the spare electronic key is put in the
trunk with both side doors locked, the key
confinement prevention function is acti-
vated so the trunk can be opened. In
order to prevent theft, take all electronic
keys with you when leaving the vehicle.
●If the electronic key is put in the trunk with
both side doors locked, the key may not
be detected depending on the location of
the key and the surrounding radio wave
conditions. In this case, the key confine-
ment prevention function cannot be acti-
vated, causing the doors to lock when the
trunk is closed. Make sure to check
where the key is before closing the trunk.
●The key confinement prevention function
cannot be activated if either door is
unlocked. In this case, open the trunk
using the trunk opener.
■Internal trunk release lever
The trunk lid can be opened by pulling the
glow-in-the-dark lever located on the inside
of the trunk lid upward.
The lever will continue to glow for some
time after the trunk lid is closed.
■Using the mechanical key
The trunk can be also opened using the
mechanical key. ( P.332)
Page 99 of 408
993-2. Opening, closing and locking the doors and trunk
3
Before driving
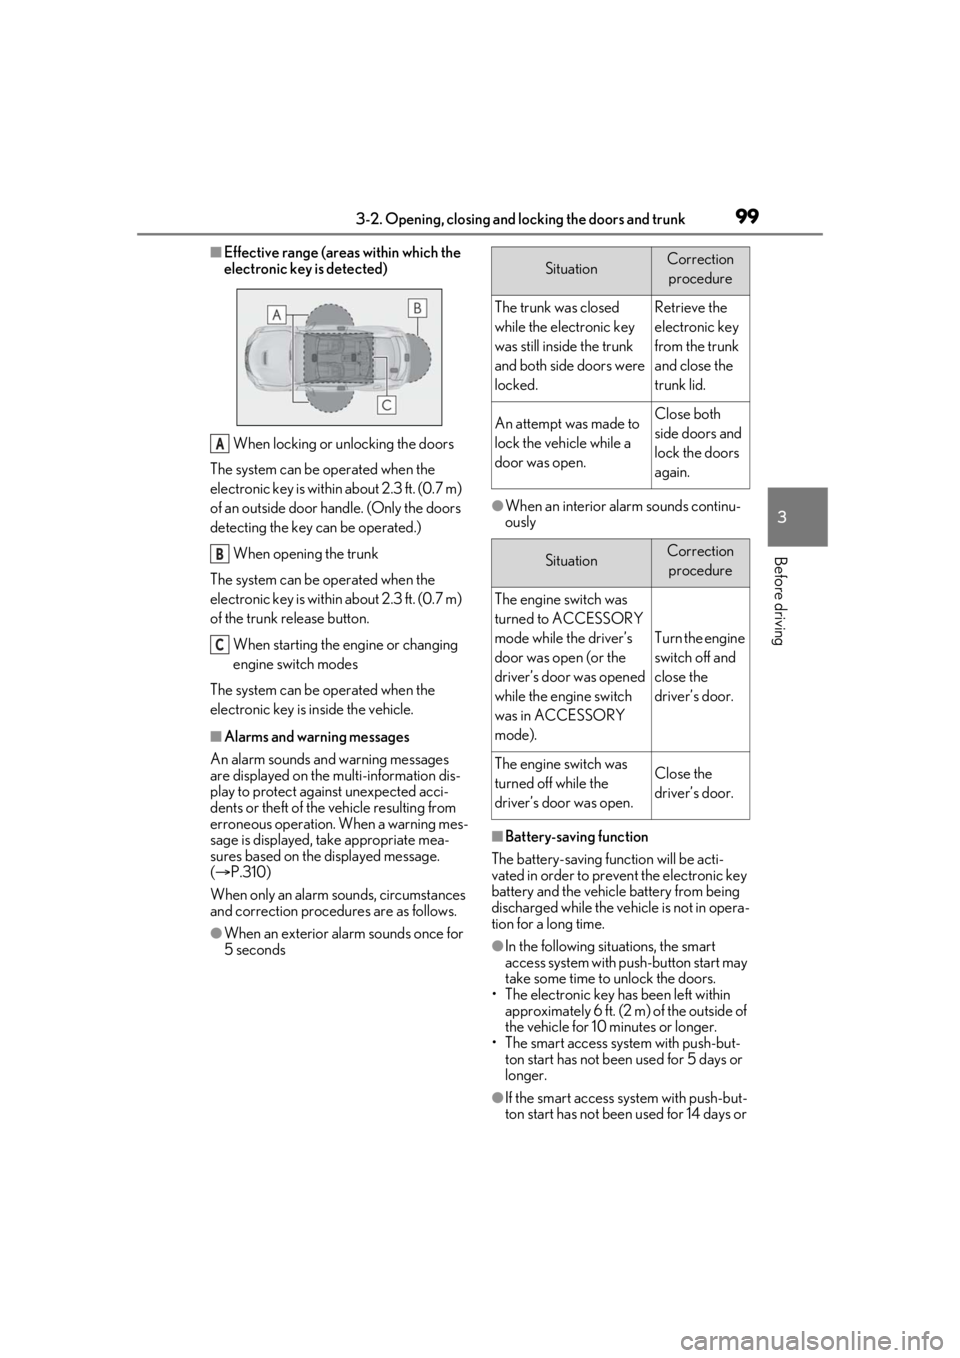
■Effective range (areas within which the
electronic key is detected)
When locking or unlocking the doors
The system can be operated when the
electronic key is within about 2.3 ft. (0.7 m)
of an outside door handle. (Only the doors
detecting the key can be operated.)
When opening the trunk
The system can be operated when the
electronic key is within about 2.3 ft. (0.7 m)
of the trunk release button.
When starting the engine or changing
engine switch modes
The system can be operated when the
electronic key is inside the vehicle.
■Alarms and warning messages
An alarm sounds and warning messages
are displayed on the multi-information dis-
play to protect against unexpected acci-
dents or theft of the vehicle resulting from
erroneous operation. When a warning mes-
sage is displayed, take appropriate mea-
sures based on the displayed message.
( P.310)
When only an alarm sounds, circumstances
and correction procedures are as follows.
●When an exterior alarm sounds once for
5 seconds
●When an interior alarm sounds continu-
ously
■Battery-saving function
The battery-saving function will be acti-
vated in order to prevent the electronic key
battery and the vehicle battery from being
discharged while the vehicle is not in opera-
tion for a long time.
●In the following situations, the smart
access system with pu sh-button start may
take some time to unlock the doors.
• The electronic key has been left within approximately 6 ft. (2 m) of the outside of
the vehicle for 10 minutes or longer.
• The smart access system with push-but- ton start has not been used for 5 days or
longer.
●If the smart access system with push-but-
ton start has not been used for 14 days or
A
B
C
SituationCorrection
procedure
The trunk was closed
while the electronic key
was still inside the trunk
and both side doors were
locked.Retrieve the
electronic key
from the trunk
and close the
trunk lid.
An attempt was made to
lock the vehicle while a
door was open.Close both
side doors and
lock the doors
again.
SituationCorrection procedure
The engine switch was
turned to ACCESSORY
mode while the driver’s
door was open (or the
driver’s door was opened
while the engine switch
was in ACCESSORY
mode).
Turn the engine
switch off and
close the
driver’s door.
The engine switch was
turned off while the
driver’s door was open.Close the
driver’s door.
Page 139 of 408
1394-3. Operating the lights and wipers
4
Driving
that blocks the sensor is affixed to the wind-
shield.
Doing so interferes with the sensor detect-
ing the level of ambient light and may cause
the automatic headlight system to malfunc-
tion.
■Automatic light off system
When the light switch is in , or : The headlights and tail lights turn off
30 seconds after the engine switch is
turned to ACCESSORY mode or turned
off and a door is opened and all of the doors
and trunk are closed. (The lights turn off
immediately if on the key is pressed
twice after both side doors are closed.)
To turn the lights on again, turn the engine
switch to IGNITION ON mode, or turn the
light switch off once and then back to
or .
If any of the doors or trunk lid is left open,
the lights automatically turn off after 20
minutes.
■Light reminder buzzer
A buzzer sounds when the engine switch is
turned off or turned to ACCESSORY
mode and the driver’s door is opened while
the lights are turned on.
■Automatic headlight leveling system
The level of the headlights is automatically
adjusted according to the number of pas-
sengers and the loading condition of the
vehicle to ensure that the headlights do not
interfere with other road users.
■Customization
Some functions can be customized.
( P.360)
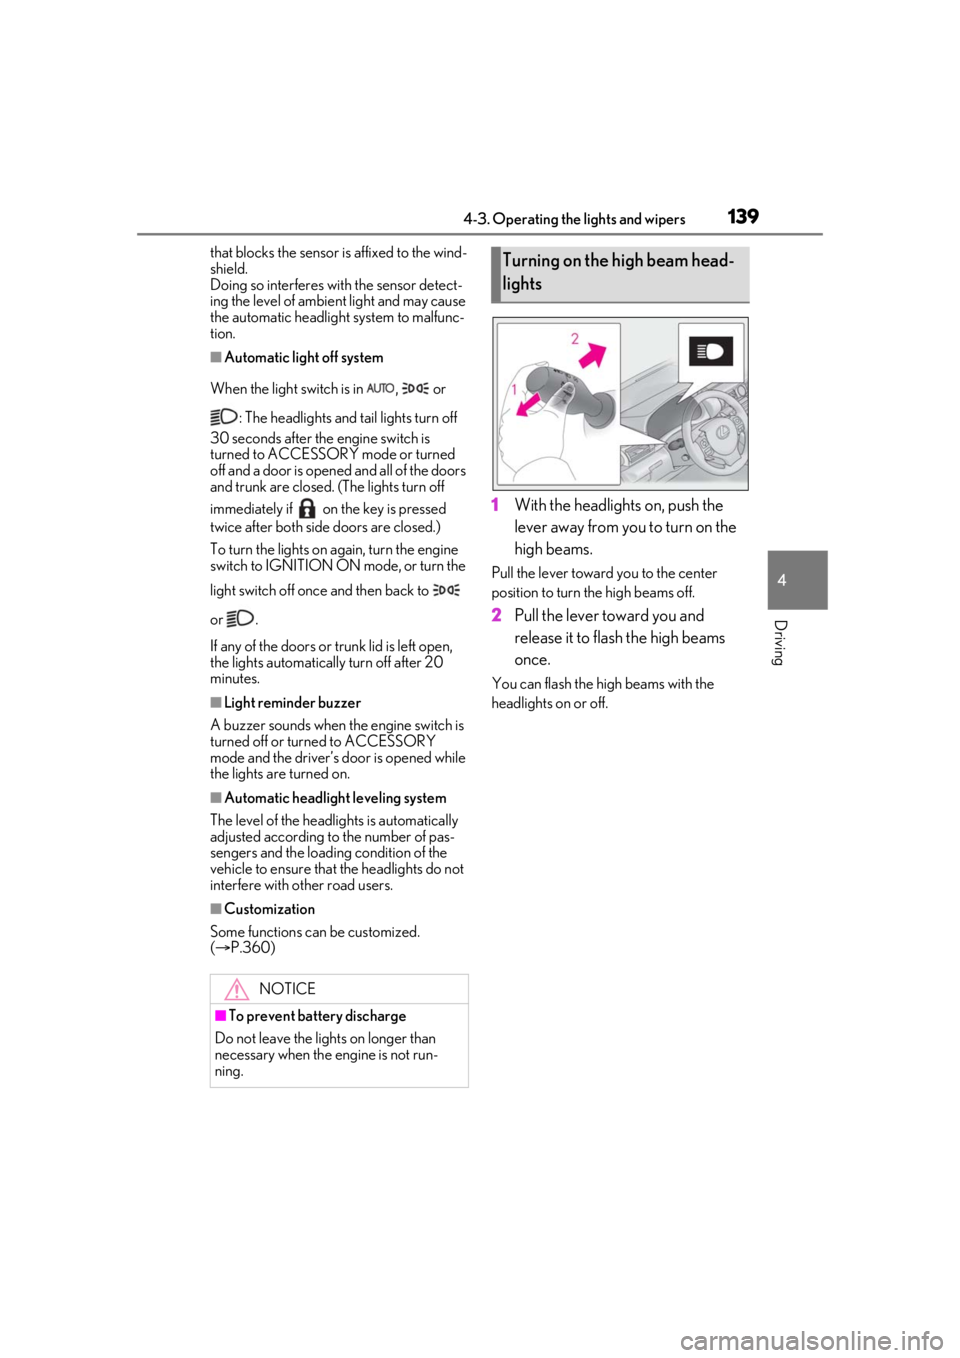
1 With the headlights on, push the
lever away from you to turn on the
high beams.
Pull the lever toward you to the center
position to turn the high beams off.
2Pull the lever toward you and
release it to flash the high beams
once.
You can flash the high beams with the
headlights on or off.
NOTICE
■To prevent battery discharge
Do not leave the lights on longer than
necessary when the engine is not run-
ning.
Turning on the high beam head-
lights
Page 196 of 408
1964-5. Using the driving support systems
●The active rear wing has been activated
in a customized setting.
■Conditions which stop the operation
In the following situations operation of the
active rear wing will stop:
●The engine switch is turned off while the
active rear wing is operating.
●The trunk is opened while the active rear
wing is operating.
●The raising operation of the active rear
wing is interrupted by an object, etc.
●The active rear wing is operated in an
unusual manner causing it to stop at an
irregular position.
In such cases, pressing the active rear wing
switch will fully raise the active rear wing.
Or, begin driving the vehicle and the active
rear wing will raise automatically when the
vehicle speed reaches 16 mph (25 km/h).
■When there is a malfunction in the sys-
tem
A warning message will be displayed on the
multi-information display. ( P.311)
■Customization
Some functions can be customized.
( P.360)
The active rear wing will operate auto- matically at the following speeds
according to the selected driving
mode (
P.192). (Always observe the
legal speed limit when driving on pub-
lic roads.)
When other than Eco drive mode is
selected
Up: Approximately 50 mph (80 km/h)
Down: Approximately 25 mph (40 km/h)
When Eco drive mode is selected
Up: Approximately 80 mph (130 km/h)
Down: Approximately 25 mph (40 km/h)
Operate the active rear wing switch to
raise/retract the active rear wing man-
ually. (The active rear wing retracts
when it is raised and raises when
retracted.)
■Operation by switch
*: Press and hold the sw itch until the indi-
cator turns off. If the switch is released
while the active rear wing is moving, it
will return to the raised position auto-
NOTICE
■To prevent system damage
●Do not apply pressure to the active
rear wing when pushing or pulling the
vehicle.
●Do not lean on the active rear wing.
●Do not attach any accessories or other
objects to the active rear wing.
●Do not modify or disassemble the
active rear wing.
●Do not subject the active rear wing to
severe impact.
Automatic operation
Manual operation
Vehicle speedUp/Down
0 mph (0 km/h)
(vehicle stopped)Press/Press and
hold
*
Approximately 0 – 12 mph (0 – 20 km/h)Operation not pos- sible
Approximately 12 – 80 mph (20 – 130 km/h)
Press/Press
Approximately 80
mph (130 km/h) or moreOperation not pos- sible
Page 299 of 408
2997-2. Steps to take in an emergency
7
When trouble arises
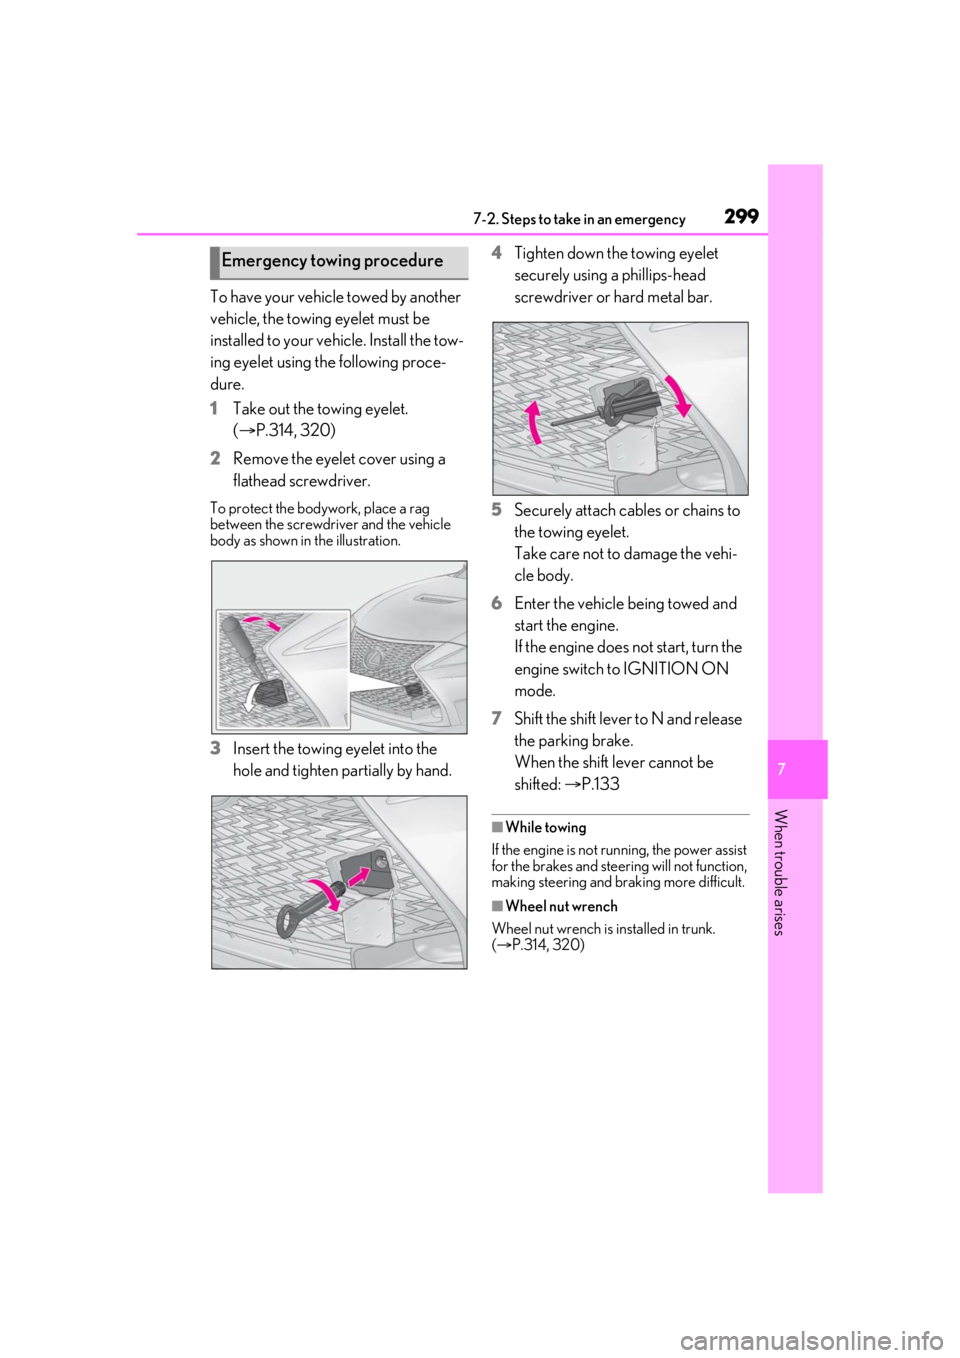
To have your vehicle towed by another
vehicle, the towing eyelet must be
installed to your vehicle. Install the tow-
ing eyelet using the following proce-
dure.
1Take out the towing eyelet.
(P.314, 320)
2 Remove the eyelet cover using a
flathead screwdriver.
To protect the bodywork, place a rag
between the screwdriver and the vehicle
body as shown in the illustration.
3Insert the towing eyelet into the
hole and tighten partially by hand. 4
Tighten down the towing eyelet
securely using a phillips-head
screwdriver or hard metal bar.
5 Securely attach cables or chains to
the towing eyelet.
Take care not to damage the vehi-
cle body.
6 Enter the vehicle being towed and
start the engine.
If the engine does not start, turn the
engine switch to IGNITION ON
mode.
7 Shift the shift lever to N and release
the parking brake.
When the shift lever cannot be
shifted: P.133
■While towing
If the engine is not running, the power assist
for the brakes and steering will not function,
making steering and braking more difficult.
■Wheel nut wrench
Wheel nut wrench is installed in trunk.
( P.314, 320)
Emergency towing procedure
Page 323 of 408
3237-2. Steps to take in an emergency
7
When trouble arises
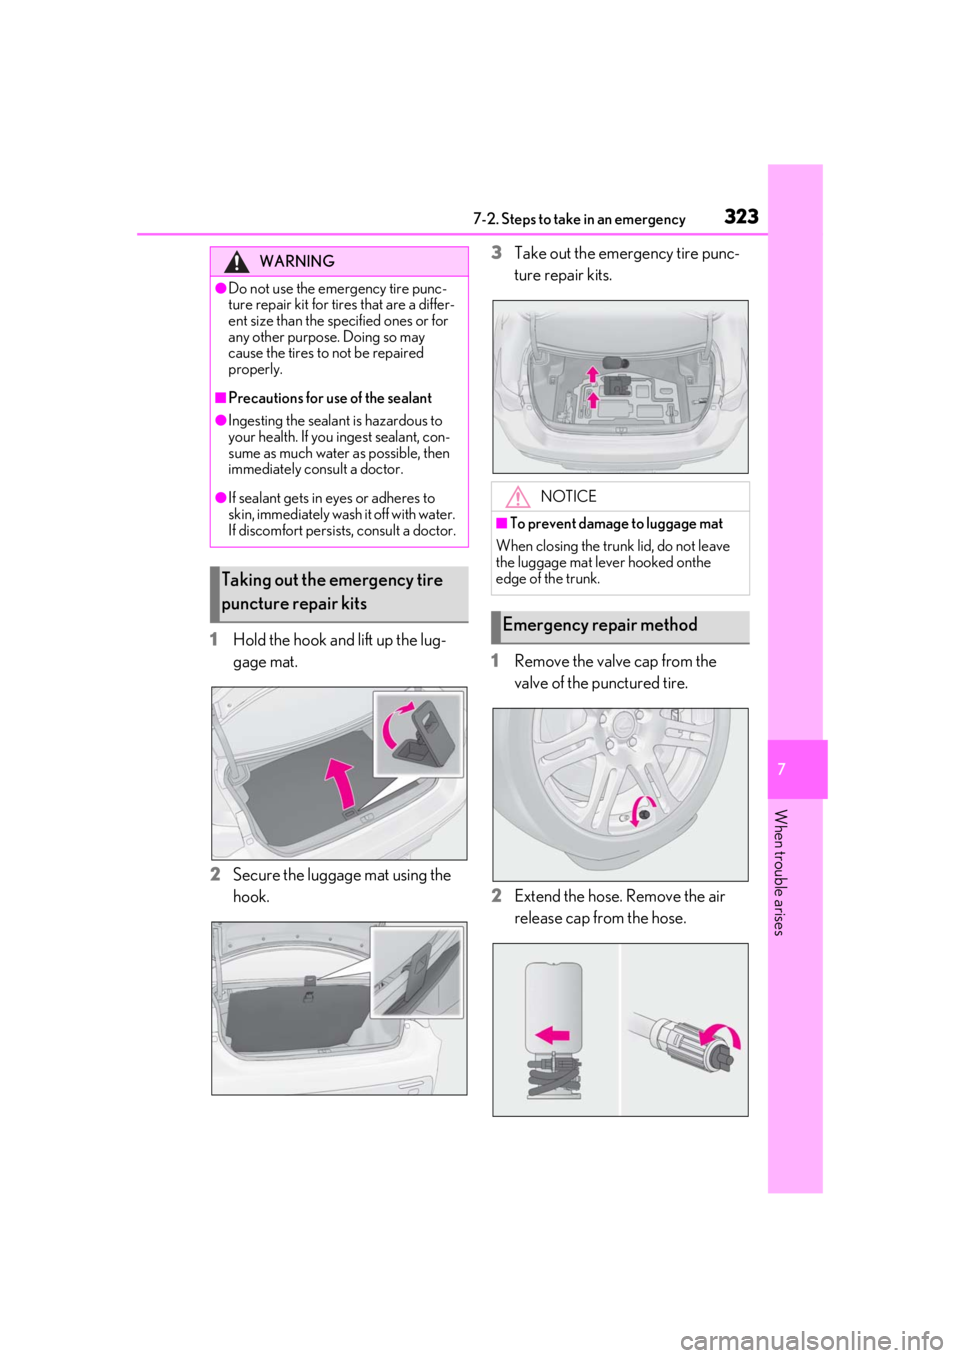
1Hold the hook and lift up the lug-
gage mat.
2 Secure the luggage mat using the
hook. 3
Take out the emergency tire punc-
ture repair kits.
1 Remove the valve cap from the
valve of the punctured tire.
2 Extend the hose. Remove the air
release cap from the hose.
WARNING
●Do not use the emergency tire punc-
ture repair kit for ti res that are a differ-
ent size than the specified ones or for
any other purpose. Doing so may
cause the tires to not be repaired
properly.
■Precautions for use of the sealant
●Ingesting the sealant is hazardous to
your health. If you ingest sealant, con-
sume as much water as possible, then
immediately consult a doctor.
●If sealant gets in eyes or adheres to
skin, immediately wash it off with water.
If discomfort persists, consult a doctor.
Taking out the emergency tire
puncture repair kits
NOTICE
■To prevent damage to luggage mat
When closing the trunk lid, do not leave
the luggage mat lever hooked onthe
edge of the trunk.
Emergency repair method