set LEXUS RX 2023 User Guide
[x] Cancel search | Manufacturer: LEXUS, Model Year: 2023, Model line: RX, Model: LEXUS RX 2023Pages: 112, PDF Size: 5.24 MB
Page 32 of 112
31
RX500h/RX350h_QG_U
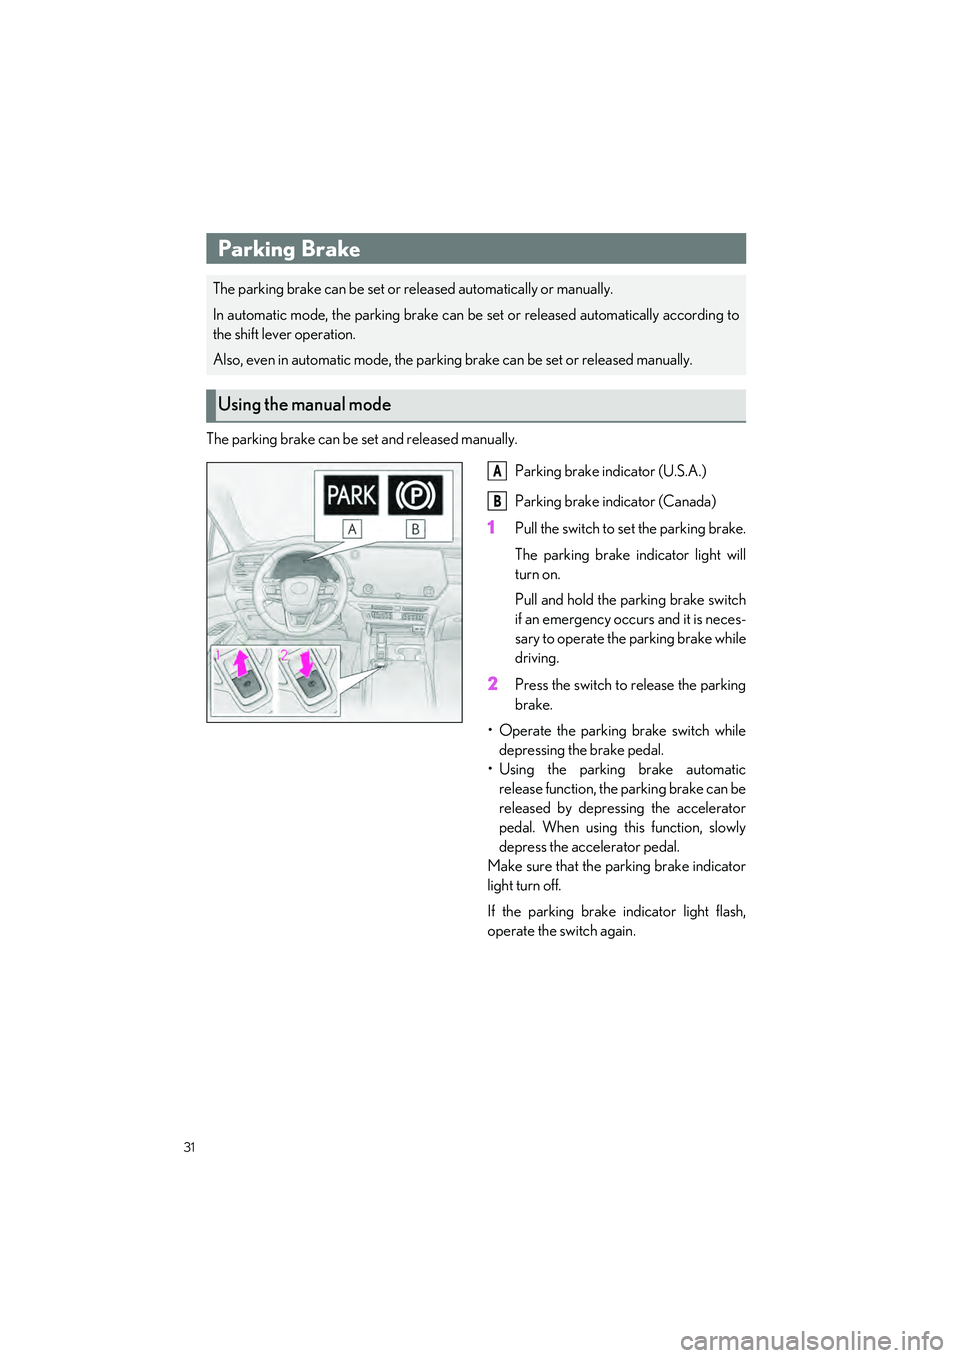
The parking brake can be set and released manually.Parking brake indicator (U.S.A.)
Parking brake indicator (Canada)
1Pull the switch to set the parking brake.
The parking brake indicator light will
turn on.
Pull and hold the parking brake switch
if an emergency occurs and it is neces-
sary to operate the parking brake while
driving.
2Press the switch to release the parking
brake.
• Operate the parking brake switch while depressing the brake pedal.
• Using the parking brake automatic release function, the parking brake can be
released by depressing the accelerator
pedal. When using this function, slowly
depress the accelerator pedal.
Make sure that the parking brake indicator
light turn off.
If the parking brake indicator light flash,
operate the switch again.
Parking Brake
The parking brake can be set or released automatically or manually.
In automatic mode, the parking brake can be set or released automatically according to
the shift lever operation.
Also, even in automatic mode, the parking brake can be set or released manually.
Using the manual mode
A
B
Page 33 of 112
32
RX500h/RX350h_QG_U
While the vehicle is stopped, pull and hold the parking brake switch until a buzzer sounds
and a message is shown on th e multi-information display.
When the automatic mode is turned on, the parking brake operates as follows.
● When the shift position is shifted from P, th e parking brake will be released, and the park-
ing brake indicator light will turn off.
● When the shift position is shifted to P, the parking brake will be set, and the parking brake
indicator light will turn on.
Operate the shift lever and P position switch with the vehicle stopped and the brake pedal
depressed.
The auto function may not operate if the shift lever is moved extremely quickly. In this situa-
tion, apply the parking brake manually.
While the vehicle is stopped and depressing the brake pedal, press and hold the parking
brake switch until a buzzer sounds and a message is shown on the multi-information display.
Turning the automatic mode on
Turning the automatic mode off
Page 35 of 112

34
RX500h/RX350h_QG_U
A variety of driving-related information can be displayed. Depending on the situation, warn-
ing or advice pop-up displa ys will also be displayed.
■Items displayed in the content display area
Vehicles without a head-up display
By selecting menu icons on th e multi-information display, the following items can be dis-
played.
Vehicles with a head-up display
The following items can be displayed.
● Drive information 1
● Drive information 2
● Energy monitor/EV driving ratio
● Audio system-linked display
● Navigation system-linke d display (if equipped)
*
●RX500h: Boost gauge/engine oil temperature gauge/engine oil pressure gauge
● G-force
● RX500h: Gear Position
● Driving support system information display
*
●Blank (No items)
*: Displayed on the head-up display when the display mode is set to display the maximum.
Multi-information Display
Displayed contents summary
Driving information display
Navigation system-linked display (if equipped)
Audio system-linked display
Driving support system information display
Warning message
If a problem is detected in any of the vehicle’s systems, a warning message is shown on the
multi-information display.
Page 36 of 112
35
RX500h/RX350h_QG_U
Vehicles without a head-up display
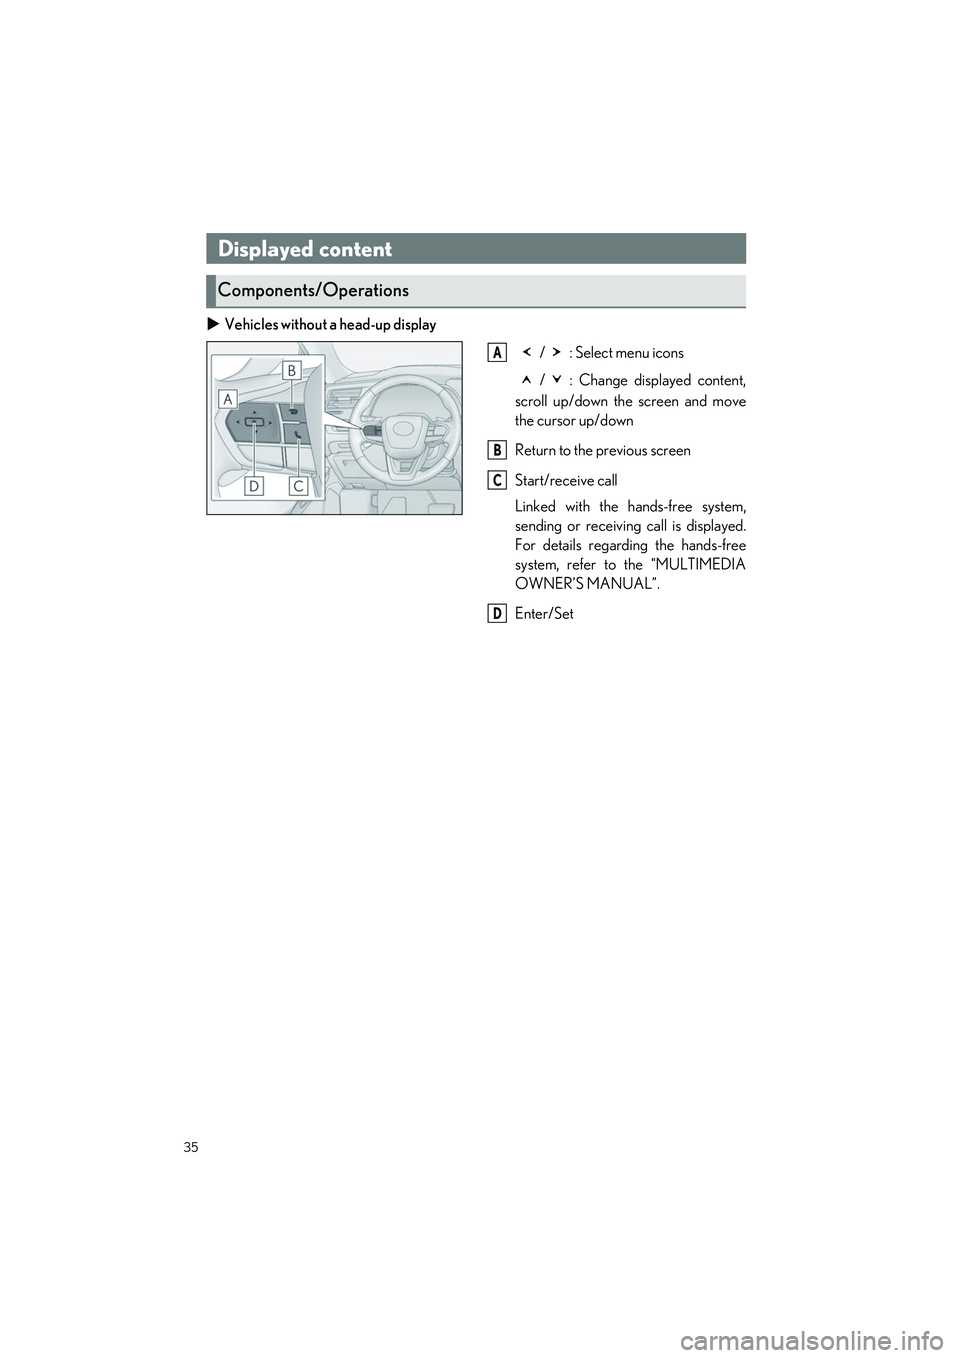
/ : Select menu icons
/ : Change displayed content,
scroll up/down the screen and move
the cursor up/down
Return to the previous screen
Start/receive call
Linked with the hands-free system,
sending or receivin g call is displayed.
For details regard ing the hands-free
system, refer to the “MULTIMEDIA
OWNER’S MANUAL”.
Enter/Set
Displayed content
Components/Operations
A
B
C
D
Page 37 of 112

36
RX500h/RX350h_QG_U
Vehicles with a head-up display
Center display
Steering switch
The function of each swit ch differs depending on th e conditions and settings.
When a switch is touched, th e function of each switch is displayed on the head-up dis-
play. If the head-up display is off, or when it is not possible to display content on the
head-up display, the functions will be di splayed on the multi-information display.
Also, preferred functions for each swit ch can be set on the center display.
Switch function change switch
Each time this switch is pressed, the functions will change.
Switch icon display
The icon of each switch will be displayed. The touched switch will be highlighted. ( )
Switch function guide display
The function guide for the touc hed switch will be displayed.
A
B
C
D
F
E
The head-up display may seem dark or hard to see when viewed through sunglasses,
especially polarized sunglasses.
Adjust the brightness of the head-up display or remove your sunglasses.
Page 39 of 112
38
RX500h/RX350h_QG_U
■EV driving ratio since starting (If equipped)
Displays the percentage of EV driving since starting.
It is reset each time the hybrid system stops.
Fuel consumption information can be displayed on the center display.
■Displaying fuel consumption/history screen on the center display
1
Select on the main menu.
2Select “Trip information”.
3Select “Current” or “History”.
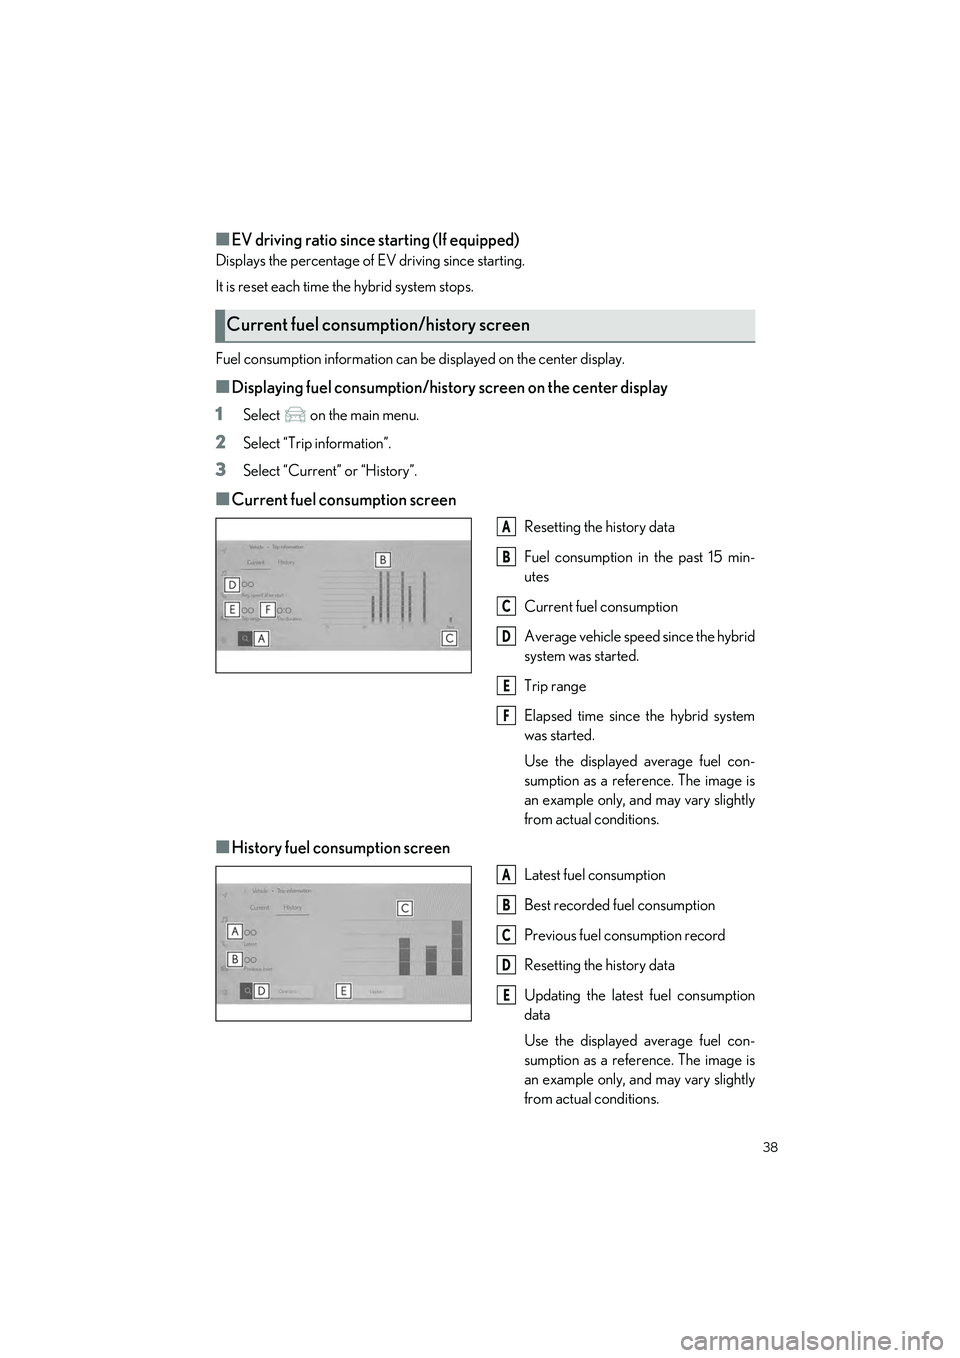
■Current fuel consumption screen
Resetting the history data
Fuel consumption in the past 15 min-
utes
Current fuel consumption
Average vehicle speed since the hybrid
system was started.
Trip range
Elapsed time since the hybrid system
was started.
Use the displayed average fuel con-
sumption as a refe rence. The image is
an example only, and may vary slightly
from actual conditions.
■History fuel consumption screen
Latest fuel consumption
Best recorded fuel consumption
Previous fuel consumption record
Resetting the history data
Updating the latest fuel consumption
data
Use the displayed average fuel con-
sumption as a refe rence. The image is
an example only, and may vary slightly
from actual conditions.
Current fuel consumption/history screen
A
B
C
D
E
F
A
B
C
D
E
Page 50 of 112

49
RX500h/RX350h_QG_U
4Custom mode
Allows you to drive with the power
train, steering, suspensions
* and air
conditioning system functions set to
your preferred settings.
When the Custom mode is selected,
Custom mode indicator comes on.
*: Vehicles with Adapti ve Variable Suspen-
sion System
Page 51 of 112
50
RX500h/RX350h_QG_U
Driving Comfort
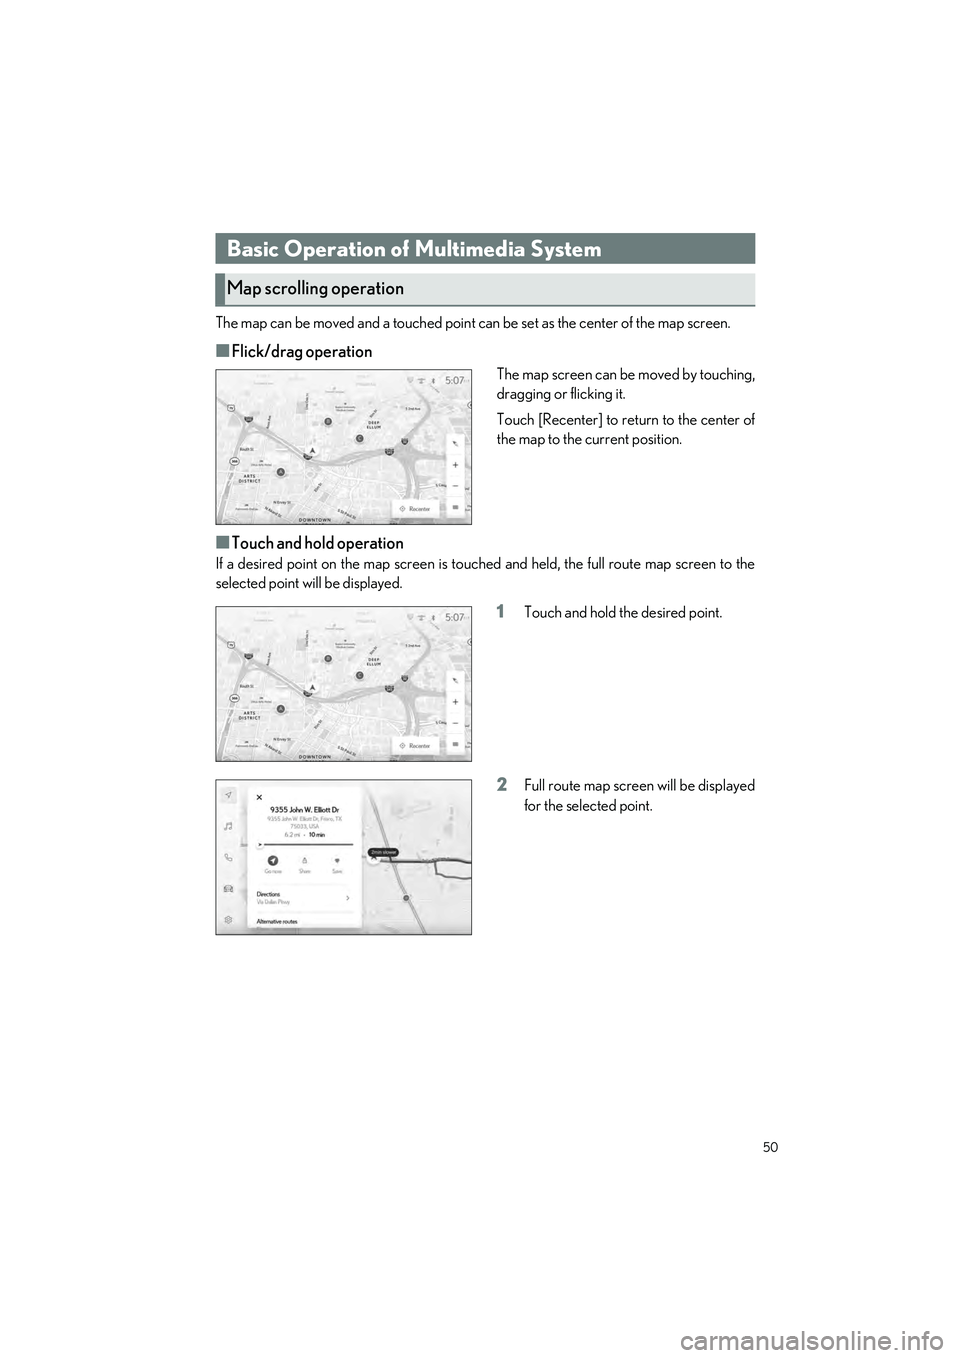
The map can be moved and a touched point can be set as the center of the map screen.
■Flick/drag operation
The map screen can be moved by touching,
dragging or flicking it.
Touch [Recenter] to return to the center of
the map to the current position.
■Touch and hold operation
If a desired point on the map screen is touched and held, the full route map screen to the
selected point will be displayed.
1Touch and hold the desired point.
2Full route map screen will be displayed
for the selected point.
Basic Operation of Multimedia System
Map scrolling operation
Page 53 of 112
![LEXUS RX 2023 User Guide 52
RX500h/RX350h_QG_U
■Searching for a destination by category
A destination can be searched for from a list of categories.
1Touch [ ] or [ ] on the map screen.
2Touch [Destinations].
3Touch the des](/img/36/58962/w960_58962-52.png "LEXUS RX 2023 User Guide 52
RX500h/RX350h_QG_U
■Searching for a destination by category
A destination can be searched for from a list of categories.
1Touch [ ] or [ ] on the map screen.
2Touch [Destinations].
3Touch the des")
52
RX500h/RX350h_QG_U
■Searching for a destination by category
A destination can be searched for from a list of categories.
1Touch [ ] or [ ] on the map screen.
2Touch [Destinations].
3Touch the desired search method.
[Home]: Touch to set the registered
home as the destination. A point must
be registered as home before using
this function.
*
[Work]: Touch to set the registered
workplace as the destination. A point
must be registered as a workplace
before using this function.
*
[Favorites]: Touch to set a registered favorite as the destination. A point must be regis-
tered as a favorite before using this function.
[Recents]: Touch to set a destination from the destination history as the destination.
[Sent to car]: Send to car enables customer to send a destination or POI to the vehicle
from Lexus app.
[Parking]: Touch to search for a nearby parking lot to set as a destination.
[Fuel/Charging]: Touch to search for a fuel station/charging facility to set as a destina-
tion.
[Food]: Touch to search for a rest aurant to set as a destination.
[Hospitals]: Touch to search for a hospital to set as a destination.
When setting a business as a destination, if your estimated time of arrival is outside of
business hours or near closing time, a notifica tion asking to confirm the destination will
be displayed.
*: Home and Work must be added via Lexus app.
Page 57 of 112
![LEXUS RX 2023 User Guide 56
RX500h/RX350h_QG_U
6Check that the displayed PIN code matches the PIN code displayed on the
Bluetooth
® device, and then touch [OK].
● Some Bluetooth
® devices may need to be operat ed to compl](/img/36/58962/w960_58962-56.png "LEXUS RX 2023 User Guide 56
RX500h/RX350h_QG_U
6Check that the displayed PIN code matches the PIN code displayed on the
Bluetooth
® device, and then touch [OK].
● Some Bluetooth
® devices may need to be operat ed to compl")
56
RX500h/RX350h_QG_U
6Check that the displayed PIN code matches the PIN code displayed on the
Bluetooth
® device, and then touch [OK].
● Some Bluetooth
® devices may need to be operat ed to complete registration.
● You may be prompted to install the Lexus Application on your phone. Please follow
the displayed instruction.
● Primary device settings may be displayed. Perform the operation according to the
screen guidance.
● The Apple CarPlay or Android Auto settings may be displayed. The Apple CarPlay
or Android Auto screen will be displa yed if the use of either is enabled.
● A message indicating that connection is comp lete is displayed, and the name of the
registered Bluetooth
® device is displayed in the submenu.
● If an operation failed screen is displayed, follow the operation instructions on the
screen.
■Registering from a Bluetooth® device
If the Bluetooth® device cannot be found by searching with the multimedia system, register
by searching for the multimedia system from the Bluetooth
® device.
1Touch [ ] from the main menu.
2Touch [Bluetooth & Devices] on the submenu.
If no device is registered, proceed to Procedure 4.
3Touch [Add another device].
While a device is connected to the multimedia system, the confirmation screen for dis-
connecting the device may be displayed. Di sconnect the device to perform registra-
tion.
4Register the multimedia system from
the Bluetooth
® device to be used.
● Perform the operation according to
the operating procedure of the
Bluetooth
® device.
● Be sure to displa y this Bluetooth
®
connection screen before perform-
ing registration on the Bluetooth
®
device.