rear view mirror LEXUS RX 2023 Owners Manual
[x] Cancel search | Manufacturer: LEXUS, Model Year: 2023, Model line: RX, Model: LEXUS RX 2023Pages: 112, PDF Size: 5.24 MB
Page 7 of 112

6
RX500h/RX350h_QG_U
Outside rear view mirror switches*
Door lock switches ...................................................................................................P.80
Power window switches.......................................................................................... P.82
Window lock switch ................................................................................................. P.82
*: Refer to the “OWNER’S MANUAL”.
A
B
C
D
Page 11 of 112

10
RX500h/RX350h_QG_U
■Ceiling
Interior light*1
Personal lights*1, 2
Moon roof switches*3............................................................................................ P.83
Panoramic moon roof switches
*3....................................................................... P.84
Door-linked interior light switch
*1
“SOS” button*1, 3
Auxiliary box*1
Vanity mirrors*1
Sun visors*1
Inside rear view mirror*1, 3
Digital Rearview Mirror*1, 3
Garage door opener switches ............................................................................. P.93
*1: Refer to the “OWNER’S MANUAL”.
*2: The illustration shows the front, but th ey are also equipped in the rear.
*3: If equipped
A
B
C
D
E
F
G
H
I
Page 94 of 112

93
RX500h/RX350h_QG_U
■HomeLink® programming procedure
The programming procedures can also be found at the following URL.
Website: www.homelink.com/lexus
For support, contact customer support at the following.
Help Line: 1-800-355-3515
The HomeLink
® wireless control system in your vehicle has 3 buttons which can be pro-
grammed to operate 3 different devices. Refe r to the programming methods on the follow-
ing pages to determine the method wh ich is appropriate for the device.
Vehicles with auto anti-glare inside rear view mirror
HomeLink
® indicator light
Garage door operation indicators
HomeLink
® icon
Illuminates while HomeLink
® is oper-
ating.
Buttons
Garage Door Opener
The garage door opener can be programmed using the HomeLink® to operate garage
doors, gates, entry doors, door locks, home lighting systems, security systems, and other
devices.
System components
A
B
C
D
Page 95 of 112

94
RX500h/RX350h_QG_U
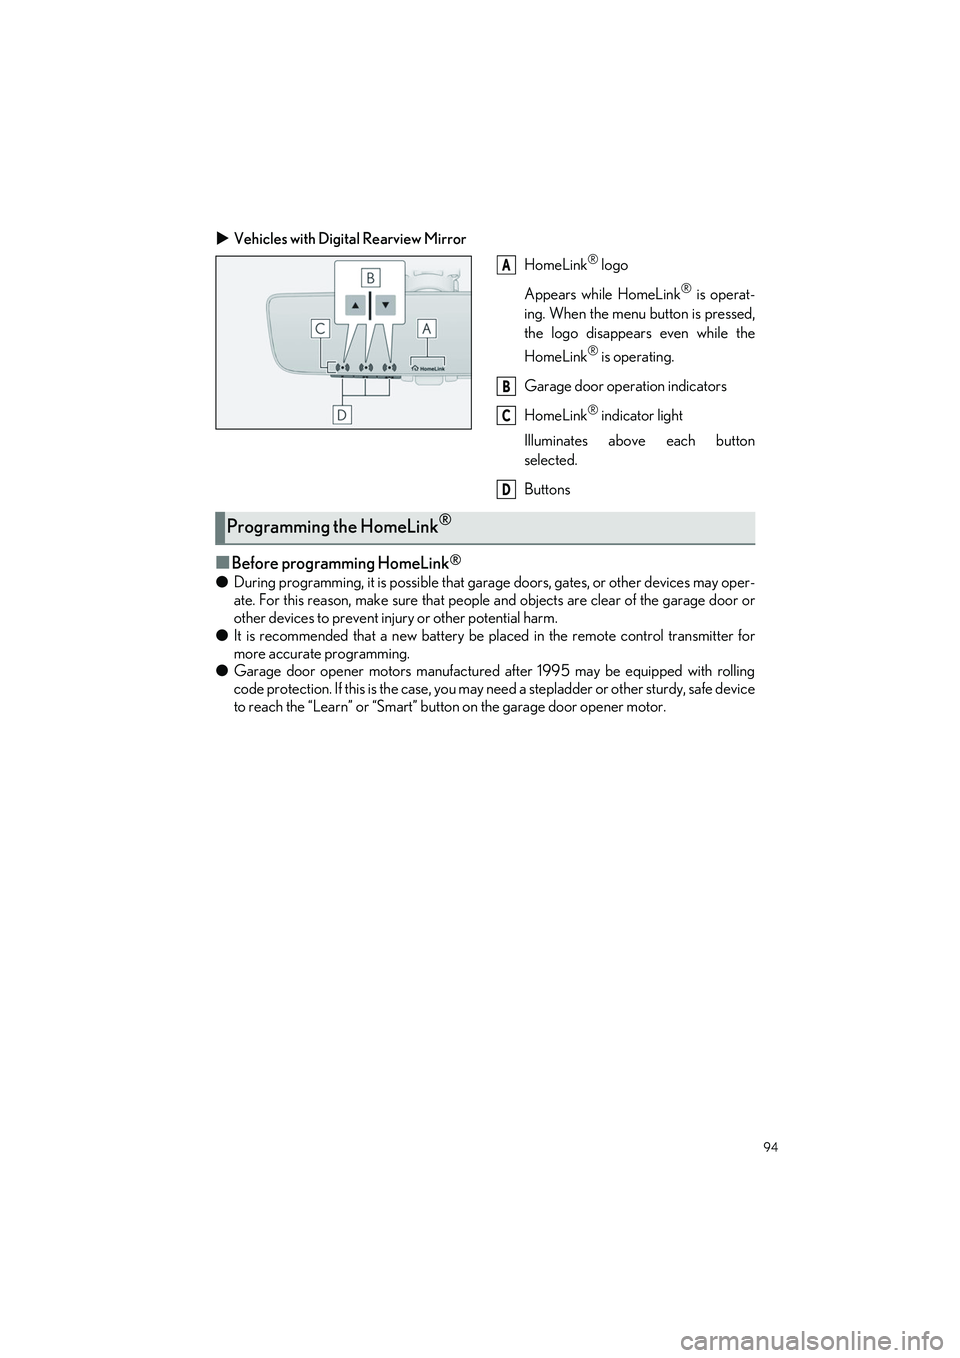
Vehicles with Digital Rearview Mirror
HomeLink
® logo
Appears while HomeLink
® is operat-
ing. When the menu button is pressed,
the logo disappears even while the
HomeLink
® is operating.
Garage door operation indicators
HomeLink
® indicator light
Illuminates above each button
selected.
Buttons
■Before programming HomeLink®
● During programming, it is possible that gara ge doors, gates, or other devices may oper-
ate. For this reason, make su re that people and objects ar e clear of the garage door or
other devices to prevent injury or other potential harm.
● It is recommended that a new battery be placed in the remote control transmitter for
more accurate programming.
● Garage door opener motors manufactured after 1995 may be equipped with rolling
code protection. If this is the case, you may need a stepladder or other sturdy, safe device
to reach the “Learn” or “Smart” button on the garage door opener motor.
A
B
C
D
Programming the HomeLink®
Page 96 of 112

95
RX500h/RX350h_QG_U
■Programming HomeLink®
Steps 1 through 3 must be performed within 60 seconds, otherwise the HomeLink® indica-
tor light will stop flashing and programming will not be successfully completed.
1Press and release the HomeLink® button you want to program and check that the
HomeLink
® indicator light flashes (orange).
2Point the remote control transmitter for the device at the rear view mirror, 1 to 3 in. (25
to 75 mm) from the HomeLink
® buttons.
Keep the HomeLink
® indicator light in view while programming.
Vehicles with auto anti-glare inside rear view mirror
Vehicles with Digital Rearview Mirror
3Program a device.
Vehicles with auto anti-glare inside rear view mirror
Page 97 of 112

96
RX500h/RX350h_QG_U
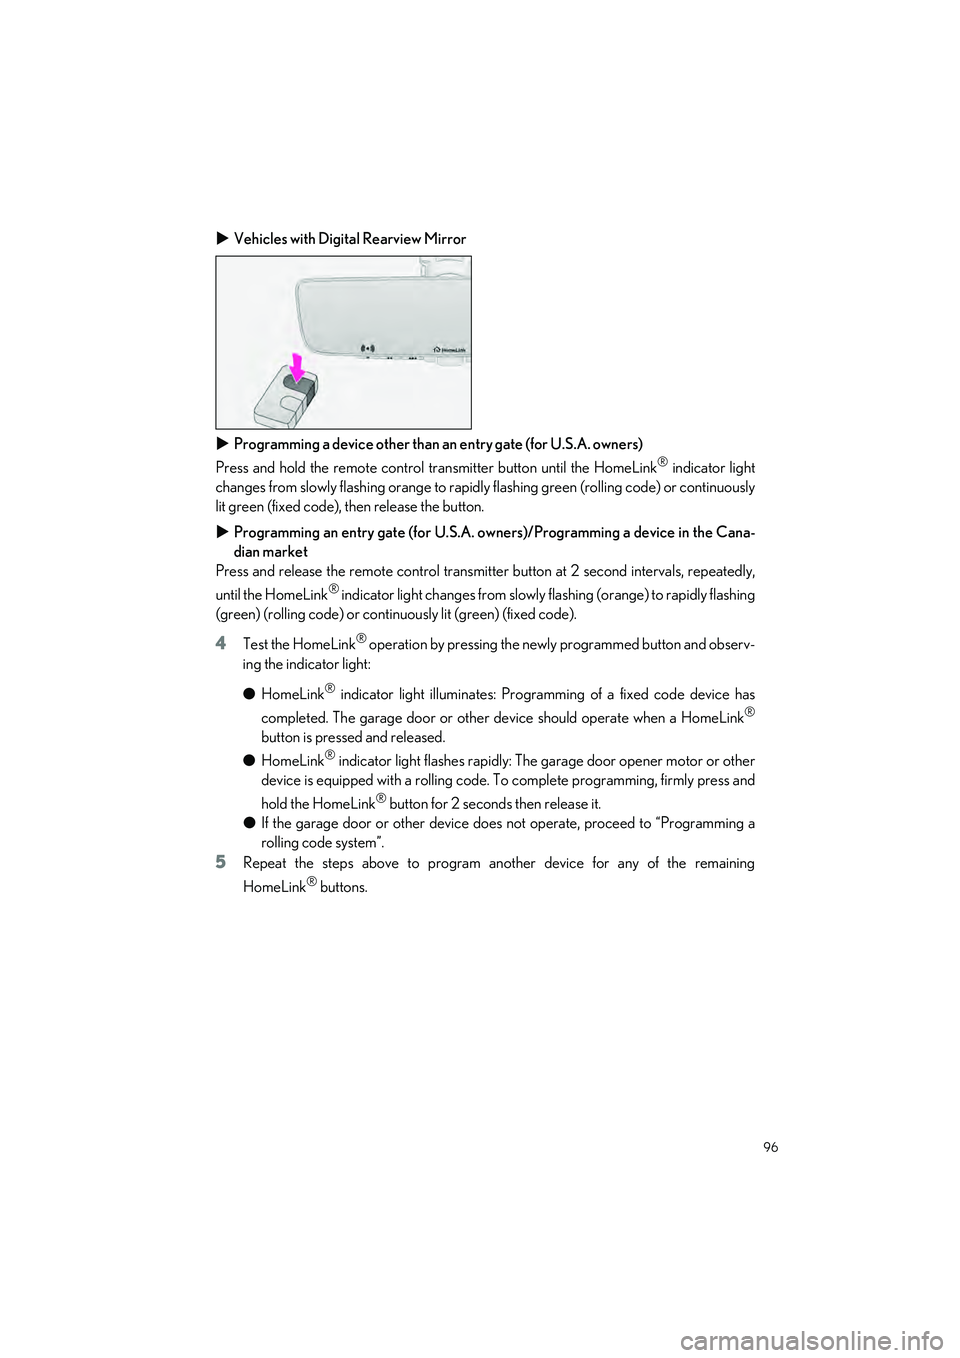
Vehicles with Digital Rearview Mirror
Programming a device other than an entry gate (for U.S.A. owners)
Press and hold the remote control transmitter button until the HomeLink
® indicator light
changes from slowly flashing orange to rapidl y flashing green (rolling code) or continuously
lit green (fixed code), then release the button.
Programming an entry gate (for U.S.A. owners)/Programming a device in the Cana-
dian market
Press and release the remote control transmitter button at 2 second intervals, repeatedly,
until the HomeLink
® indicator light changes from slowly flashing (orange) to rapidly flashing
(green) (rolling code) or continuo usly lit (green) (fixed code).
4Test the HomeLink® operation by pressing the newly programmed button and observ-
ing the indicator light:
● HomeLink
® indicator light illuminates: Programming of a fixed code device has
completed. The garage door or other device should operate when a HomeLink
®
button is pressed and released.
● HomeLink
® indicator light flashes rapidly: The garage door opener motor or other
device is equipped with a rolling code. To complete programming, firmly press and
hold the HomeLink
® button for 2 seconds then release it.
● If the garage door or other device does not operate, proceed to “Programming a
rolling code system”.
5Repeat the steps above to program another device for any of the remaining
HomeLink
® buttons.
Page 98 of 112

97
RX500h/RX350h_QG_U
■Programming a rolling code system
Two or more people may be necessary to complete rolling code programming.
1Locate the “Learn” or “Smart” button
on the garage door opener motor in
the garage.
This button can usually be found where
the hanging antenna wire is attached to
the unit. The name and color of the but-
ton may vary by manufacturer. Refer to
the owner’s manual supplied with the
garage door opener motor for details.
2Press and release the “Learn” or
“Smart” button.
Perform
3 within 30 seconds after
performing
2.
3Press and hold the desired HomeLink® button (inside the vehicle) for 2 seconds and
release it. Repeat this sequence (press/hold/release) up to 3 times to complete pro-
gramming.
If the garage door opener mo tor operates when the HomeLink
® button is pressed, the
garage door opener motor recognizes the HomeLink
® signal.
Vehicles with auto anti-glare inside rear view mirror
Page 99 of 112

98
RX500h/RX350h_QG_U
Vehicles with Digital Rearview Mirror
■Enabling 2-way communication with a ga rage door (only available for compat-
ible devices)
When enabled, 2-way communication allows yo u to check the status of the opening and
closing of a garage door through indicators in your vehicle.
2-way communication is only av ailable if the garage door opener motor used is a compati-
ble device. (To check device compatib ility, refer to www.homelink.com.)
1Within 5 seconds after programming the garage door opener has been completed, if
the garage door opener motor is trained to HomeLink
®, both garage door operation
indicators will flash rapidly (green) and the light on the garage door opener motor will
blink twice, indicating that 2-way communication is enabled.
If the indicators do not flash, perform
2 and 3 within the first 10 presses of the HomeLink®
button after programmin g has been completed.
2Press a programmed HomeLink® button to operate a garage door.
3Within 1 minute of pressing the HomeLink® button, after the garage door operation
has stopped, press the “Learn ” or “Smart” button on the garage door opener motor.
Within 5 seconds of the establishment of 2-way communication with the garage door
opener, both garage door operation indicators in th e vehicle will flash rapidly (green)
and the light on the garage do or opener motor will blink twice, indicating that 2-way
communication is enabled.
■Reprogramming a single HomeLink® button
When the following procedure is performed, buttons which already have devices registered
to them can be overwritten:
1Press and hold the desired HomeLink® button.
2When the HomeLink® indicator starts flashing orange, release the HomeLink® button
and perform “Programming HomeLink
®” 1 (it takes 20 seconds for the HomeLink®
indicator to start flashing).
Page 100 of 112

99
RX500h/RX350h_QG_U
Press the appropriate HomeLink® button. The HomeLink® indicator light should turn on.
The status of the opening and closing of a garage door is shown by the indicators.\
Vehicles with auto anti-glare inside rear view mirror
Opening
Closing
Vehicles with Digital Rearview Mirror
Opening
Closing
This function is only available if the garage door opener motor used is a compatible device.
(To check device co mpatibility, refer to www.homelink.com.)
The indicators can operate within approximatel y 820 ft. (250 m) of the garage door. How-
ever, if there are obstructions between the gara ge door and the vehicle, such as houses and
trees, feedback signals from the garage door may not be received.
To recall the previous door operation status, press and release either HomeLink
® buttons
and or and (vehicles with auto anti-glare inside rear view
mirror), and or and (veh icles with Digital Rearview Mir-
ror), simultaneously. The last recorded status will be displayed for 3 seconds.
Operating HomeLink®
A
B
A
B
ColorStatus
Orange (flashing)Currently opening/closing
GreenOpening/closing has completed
Red (flashing)Feedback signals cannot be received
Page 103 of 112

102
What to do if...
RX500h/RX350h_QG_U
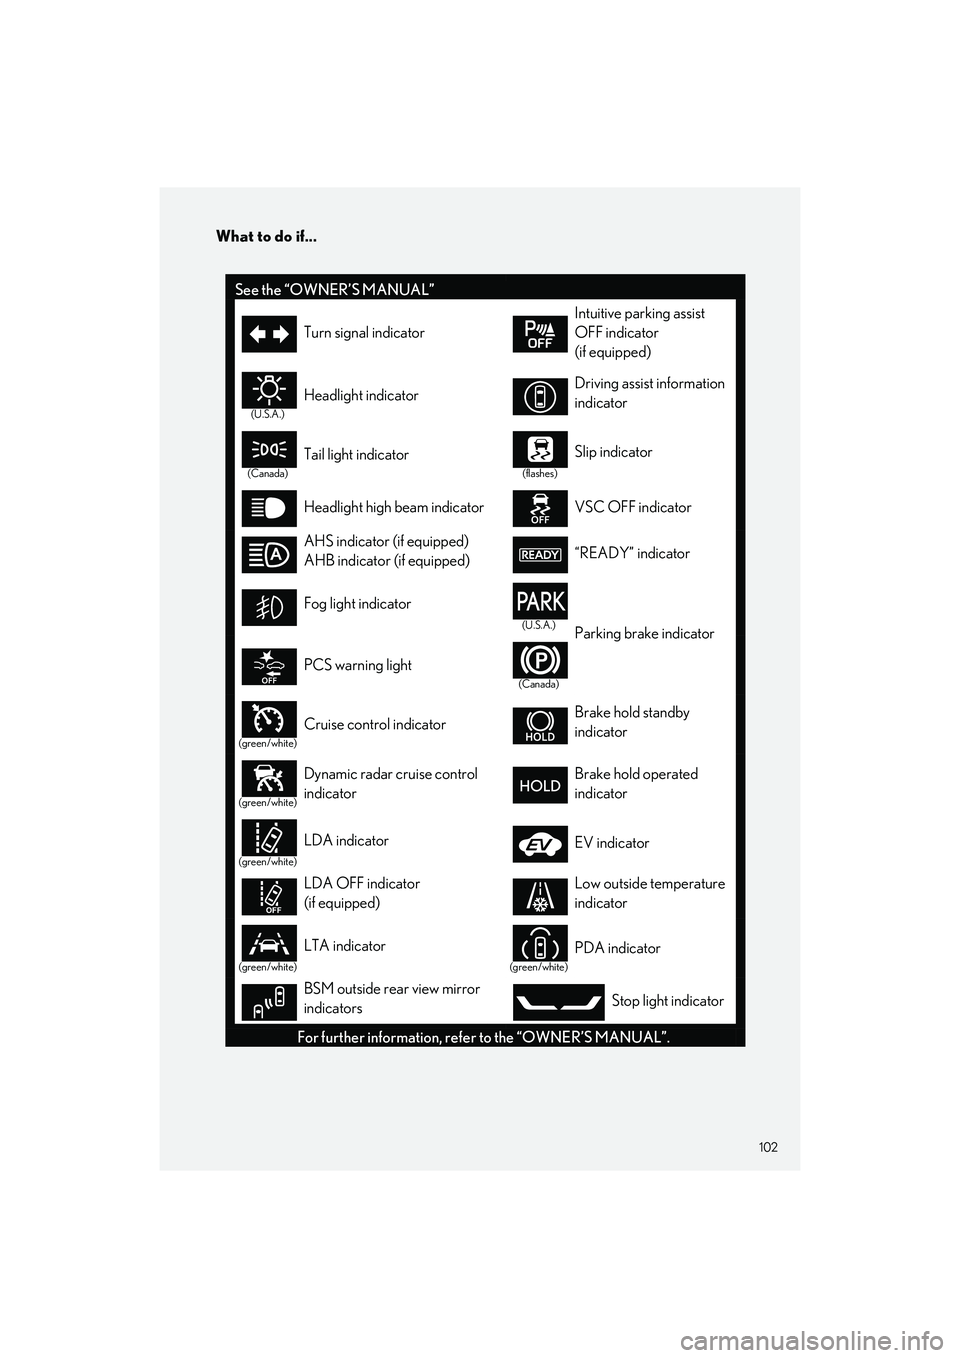
See the “OWNER’S MANUAL”
Turn signal indicator
Intuitive parking assist
OFF indicator
(if equipped)
(U.S.A.)
Headlight indicatorDriving assist information
indicator
(Canada)
Tail light indicator
(flashes)
Slip indicator
Headlight high beam indicatorVSC OFF indicator
AHS indicator (if equipped)
AHB indicator (if equipped)“READY” indicator
Fog light indicator
(U.S.A.)Parking brake indicator
PCS warning light
(Canada)
(green/white)
Cruise control indicatorBrake hold standby
indicator
(green/white)
Dynamic radar cruise control
indicatorBrake hold operated
indicator
(green/white)
LDA indicatorEV indicator
LDA OFF indicator
(if equipped)Low outside temperature
indicator
(green/white)
LTA indicator
(green/white)
PDA indicator
BSM outside rear view mirror
indicatorsStop light indicator
For further information, refer to the “OWNER’S MANUAL”.