inflation LEXUS RX200T 2017 Owner's Guide
[x] Cancel search | Manufacturer: LEXUS, Model Year: 2017, Model line: RX200T, Model: LEXUS RX200T 2017Pages: 776, PDF Size: 44.51 MB
Page 701 of 776

7018-2. Steps to take in an emergency
8
When trouble arises
RX350/RX200t_EE_OM48F32E
Inflate the tire until the recom-
mended pressure is reached.
The sealant will be injected and
the pressure will spike to between
300 kPa (3.0 kgf/cm2 or bar, 44
psi) and 400 kPa (4.0 kgf/cm2 or
bar, 58 psi), then gradually
decrease.
The air pressure gauge will dis-
play the actual tire inflation pres-
sure about 1 to 5 minutes after the
switch is turned on.
• Turn the compressor switch off
and then check the tire infla-
tion pressure. Being careful
not to over inflate, check and
repeat the inflation procedure
until the recommended tire
inflation pressure is reached.
• If the tire inflation pressure is still lower than the recommended level
after inflation for 25 minutes with the switch on, the tire is too damaged
to be repaired. Turn the compressor switch off and contact any autho-
rized Lexus dealer or repairer, or another duly qualified and equipped
professional.
• If the tire inflation pressure exceeds the recommended level, let out
some air to adjust the tire inflation pressure. ( P. 704)
With the compressor switch off, disconne ct the hose from the valve on the tire
and then pull out the power plug from the power outlet socket.
Some sealant may leak wh en the hose is removed.
Install the valve cap onto the valve of the emergency repaired tire.
13
1
2
14
15
Page 702 of 776
7028-2. Steps to take in an emergency
RX350/RX200t_EE_OM48F32E
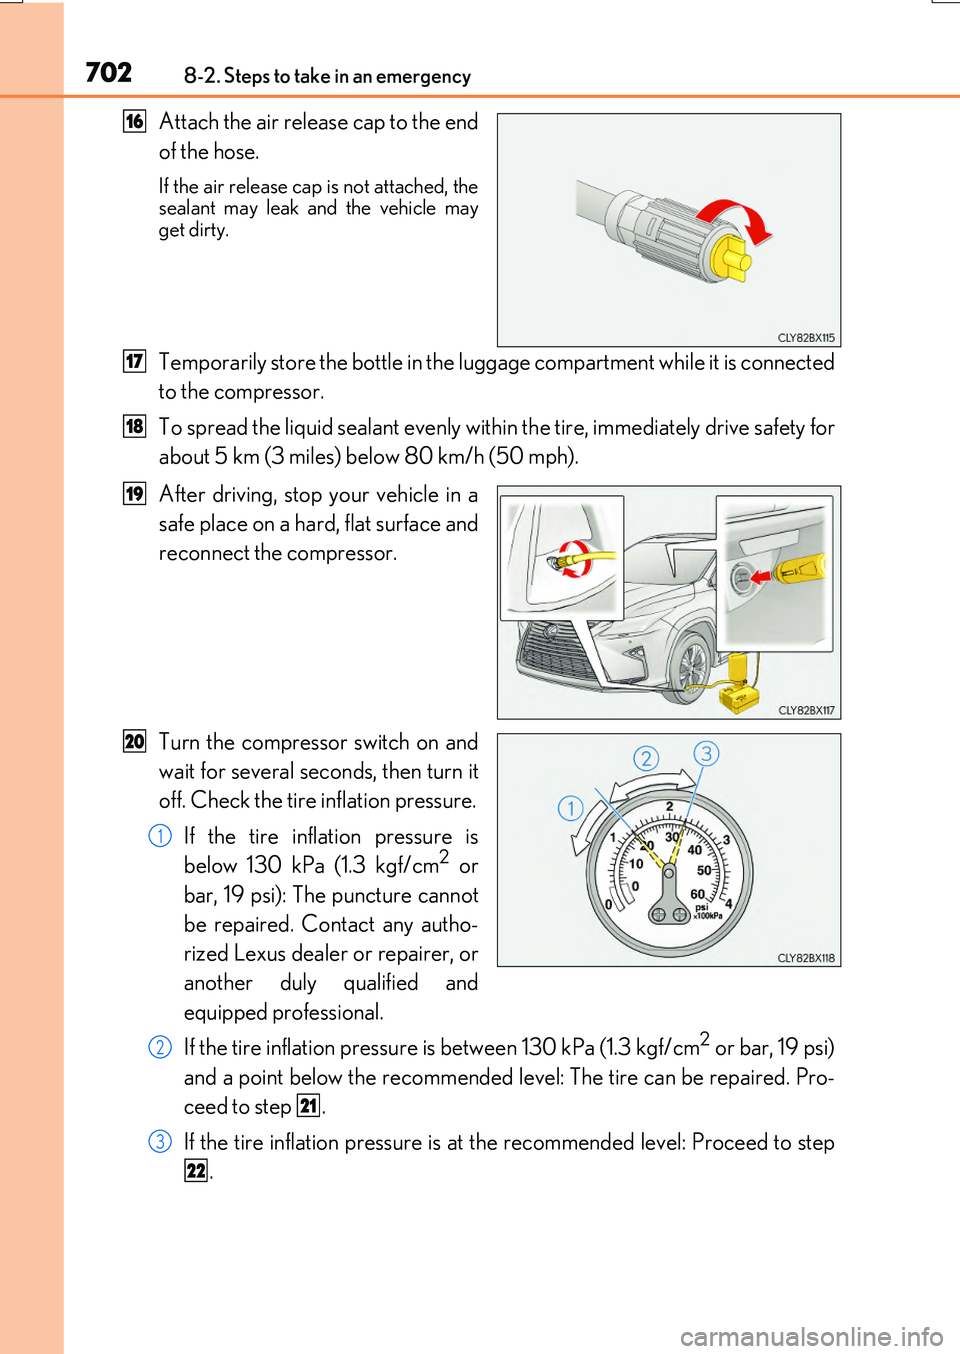
Attach the air release cap to the end
of the hose.
If the air release cap is not attached, the sealant may leak and the vehicle mayget dirty.
Temporarily store the bottle in the luggage compartment while it is connected
to the compressor.
To spread the liquid sealant evenly within the tire, immediately drive safety for
about 5 km (3 miles) below 80 km/h (50 mph).
After driving, stop your vehicle in a
safe place on a hard, flat surface and
reconnect the compressor.
Turn the compressor switch on and
wait for several seconds, then turn it
off. Check the tire inflation pressure.
If the tire inflation pressure is
below 130 kPa (1.3 kgf/cm2 or
bar, 19 psi): The puncture cannot
be repaired. Contact any autho-
rized Lexus dealer or repairer, or
another duly qualified and
equipped professional.
If the tire inflation pressure is between 130 kPa (1.3 kgf/cm2 or bar, 19 psi)
and a point below the recommended level: The tire can be repaired. Pro-
ceed to step .
If the tire inflation pressure is at the recommended level: Proceed to step
.
16
17
18
19
20
1
2
21
3
22
Page 703 of 776

7038-2. Steps to take in an emergency
8
When trouble arises
RX350/RX200t_EE_OM48F32E
Turn the compressor switch on to inflate the tire until the recommended tire
inflation pressure is reached. Drive for about 5 km (3 miles) and then perform
step .
Attach the air release cap to the end
of the hose.
If the air release cap is not attached, the
sealant may leak and the vehicle may
get dirty.
Store the bottle in the luggage compartment while it is connected to the com-
pressor.
Taking precautions to avoid sudden br aking, sudden acceleration and sharp
turns, drive carefully at under 80 km/h (50 mph) to any authorized Lexus
dealer or repairer, or another duly qualified and equipped professional that is
less than 100 km (62 miles) away for tire repair or replacement.
Make sure to tell any authorized Lexus deal er or repairer, or another duly qualified
and equipped professional when you have them repair or replace the tire that sealant
is injected.
21
19
22
23
24
Page 704 of 776
7048-2. Steps to take in an emergency
RX350/RX200t_EE_OM48F32E
■Emergency tire puncture repair kit
●The sealant has a limited life span. The expiry date is marked on the bottle. The sealant should be replaced before the expiry da te. Contact any authorized Lexus dealer or repairer, or another duly qualified an d equipped professional for replacement.
●The sealant stored in the emergency tire puncture repair kit can be used only once to temporarily repair a single tire. If the seal ant has been used and needs to be purchased, contact any authorized Lexus dealer or repairer, or another duly qualified and
equipped professional. The compressor is reusable.
●The compressor can be used repeatedly.
●The sealant can be used when the outside temperature is from -40 C (-40F) to 60C
(140 F).
●The kit is exclusively designed for size and type of tires originally installed on your vehi- cle. Do not use it for tires that a different size than the original ones, or for any other
purposes.
●If the sealant gets on your clothes, it may stain.
●If the sealant adheres to a wheel or the surface of the vehicle body, the stain may not be
removable if it is not cleaned at once. Immediately wipe away the sealant with a wet cloth.
●During operation of the kit, a loud operatio n noise is produced. This does not indicate a
malfunction.
●Do not use to check or to adjust the tire pressure.
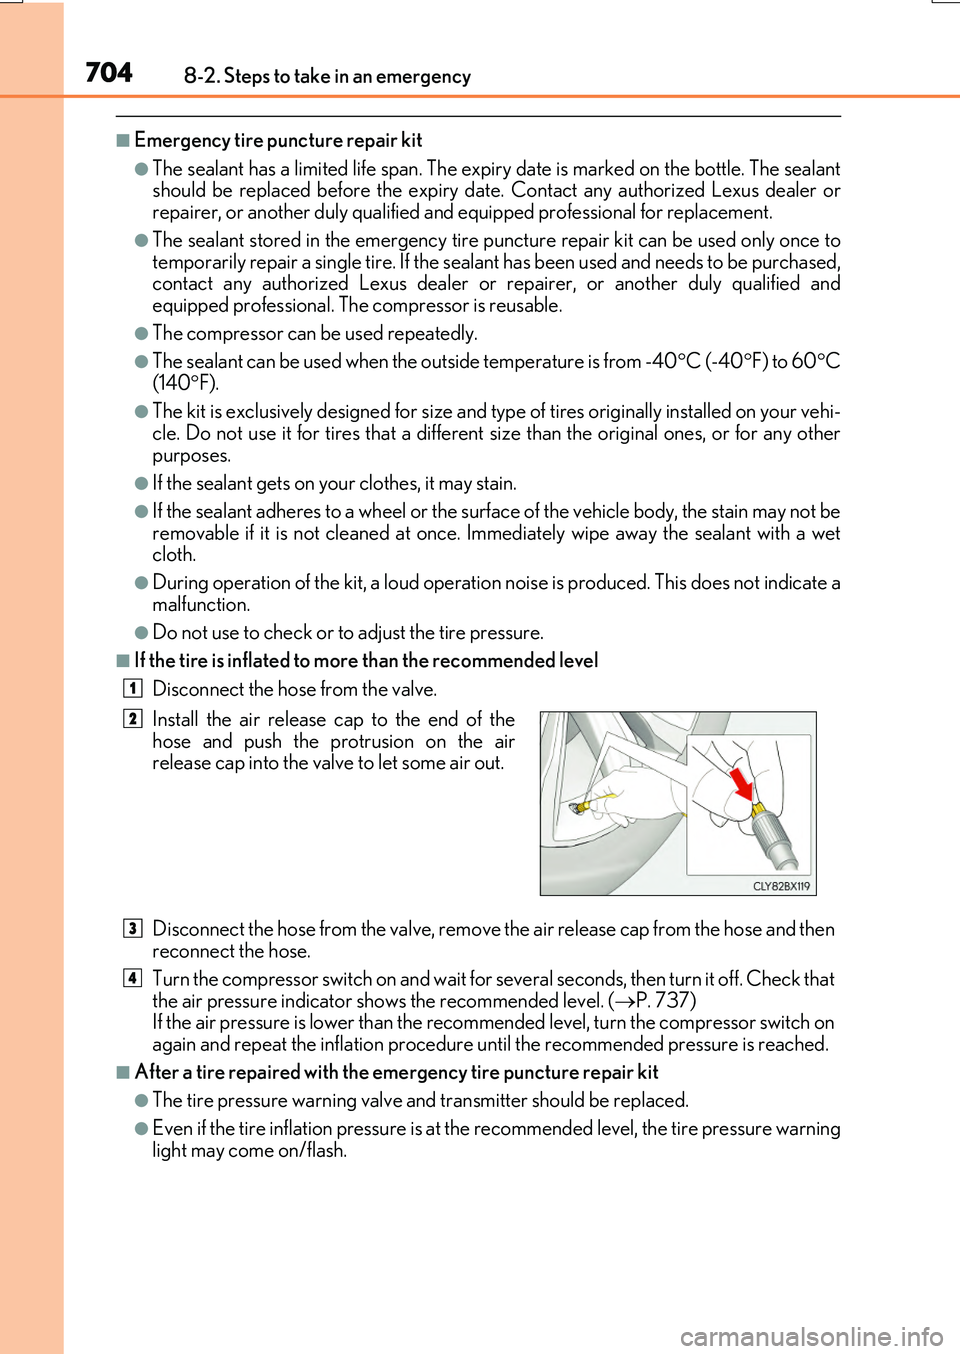
■If the tire is inflated to mo re than the recommended level
Disconnect the hose from the valve.
Disconnect the hose from the valve, remove the air release cap from the hose and then reconnect the hose.
Turn the compressor switch on and wait for several seconds, then turn it off. Check that
the air pressure indicator sh ows the recommended level. (P. 737) If the air pressure is lower than the reco mmended level, turn the compressor switch on again and repeat the inflation procedure un til the recommended pressure is reached.
■After a tire repaired with the emergency tire puncture repair kit
●The tire pressure warning valve and transmitter should be replaced.
●Even if the tire inflation pressure is at the recommended level, the tire pressure warning
light may come on/flash.
Install the air release cap to the end of the
hose and push the protrusion on the air release cap into the valve to let some air out.
1
2
3
4
Page 706 of 776
7068-2. Steps to take in an emergency
RX350/RX200t_EE_OM48F32E
WARNING
■When fixing the flat tire
●Stop your vehicle in a safe and flat area.
●Do not touch the wheels or the area around the brakes immediately after the vehicle
has been driven. After the vehicle has been driven, the wheels and the area around the brakes may beextremely hot. Touching these areas with hands, feet or other body parts may result in
burns.
●Connect the valve and hose securely with the tire installed on the vehicle.
●If the hose is not properly connected to the valve, air leakage may occur or sealant
may be sprayed out.
●If the hose comes off the valve while inflating the tire, there is a risk that the hose will move abruptly due to air pressure.
●After inflation of the tire has completed, the sealant may splatter when the hose is dis-connected or some air is let out of the tire.
●Follow the operation procedure to repair the tire. If the procedure is not followed, the
sealant may spray out.
●Keep back from the tire while it is being repaired, as there is a chance of it bursting while the repair operation is being performe d. If you notice any cracks or deforma-
tion of the tire, turn off the compressor sw itch and stop the repair operation immedi- ately.
●The kit may overheat if operated for a long period of time. Do not operate the com-
pressor continuously for more than 40 minutes.
●Parts of the kit become hot during operatio n. Be careful handling the kit during and after operation. Do not touch the metal part around the connecting area between the
bottle and compressor. It will be extremely hot.
●Do not attach the vehicle speed warning sticker to an area other than the one indi- cated. If the sticker is attached to an area where an SRS airbag is located, such as the
pad of the steering wheel, it may prevent the SRS air bag from operating properly.
■Driving to spread the liquid sealant evenly
●Drive the vehicle carefully at a low speed. Be especially careful when turning and cor-
nering.
●If the vehicle does not drive straight or you feel a pull through the steering wheel, stop the vehicle and check the following:
• Tire condition. The tire may have separated from the wheel. • Tire inflation pressure. If tire inflation pressure is 130 kPa (1.3 kgf/cm2 or b ar, 1 9 p si)or below, this may indica te severe tire damage.
Page 737 of 776
737
9
9-1. Specifications
Vehicle specifications
RX350/RX200t_EE_OM48F32E
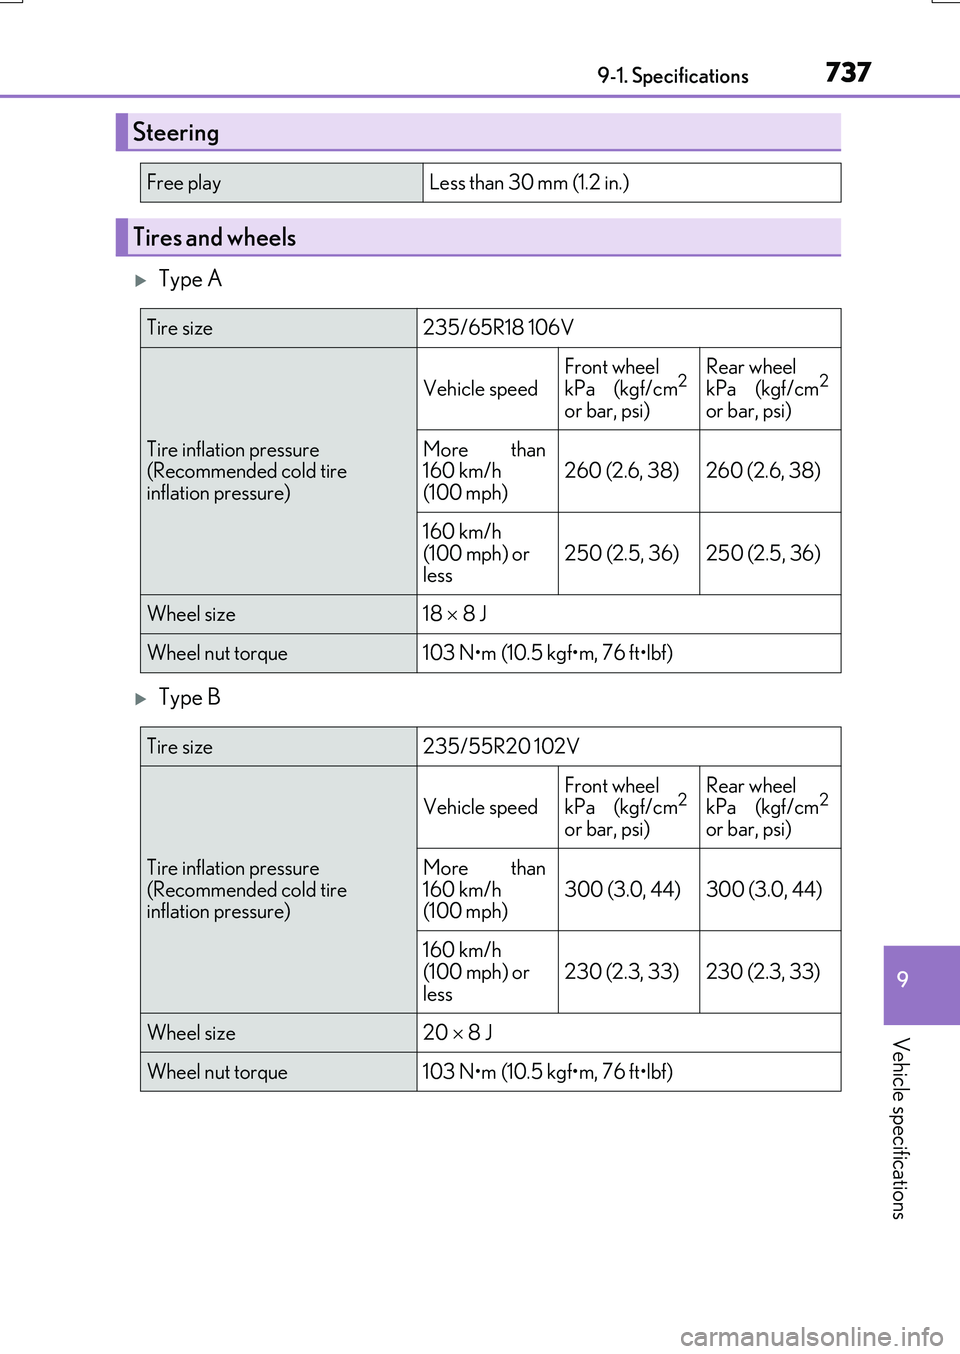
Type A
Type B
Steering
Free playLess than 30 mm (1.2 in.)
Tires and wheels
Tire size235/65R18 106V
Tire inflation pressure
(Recommended cold tire
inflation pressure)
Vehicle speedFront wheel
kPa (kgf/cm2
or bar, psi)
Rear wheel
kPa (kgf/cm2
or bar, psi)
More than
160 km/h
(100 mph)
260 (2.6, 38)260 (2.6, 38)
160 km/h
(100 mph) or
less
250 (2.5, 36)250 (2.5, 36)
Wheel size18
8 J
Wheel nut torque103 N•m (10.5 kgf•m, 76 ft•lbf)
Tire size235/55R20 102V
Tire inflation pressure
(Recommended cold tire
inflation pressure)
Vehicle speedFront wheel
kPa (kgf/cm2
or bar, psi)
Rear wheel
kPa (kgf/cm2
or bar, psi)
More than
160 km/h
(100 mph)
300 (3.0, 44)300 (3.0, 44)
160 km/h
(100 mph) or
less
230 (2.3, 33)230 (2.3, 33)
Wheel size20 8 J
Wheel nut torque103 N•m (10.5 kgf•m, 76 ft•lbf)
Page 738 of 776
7389-1. Specifications
RX350/RX200t_EE_OM48F32E
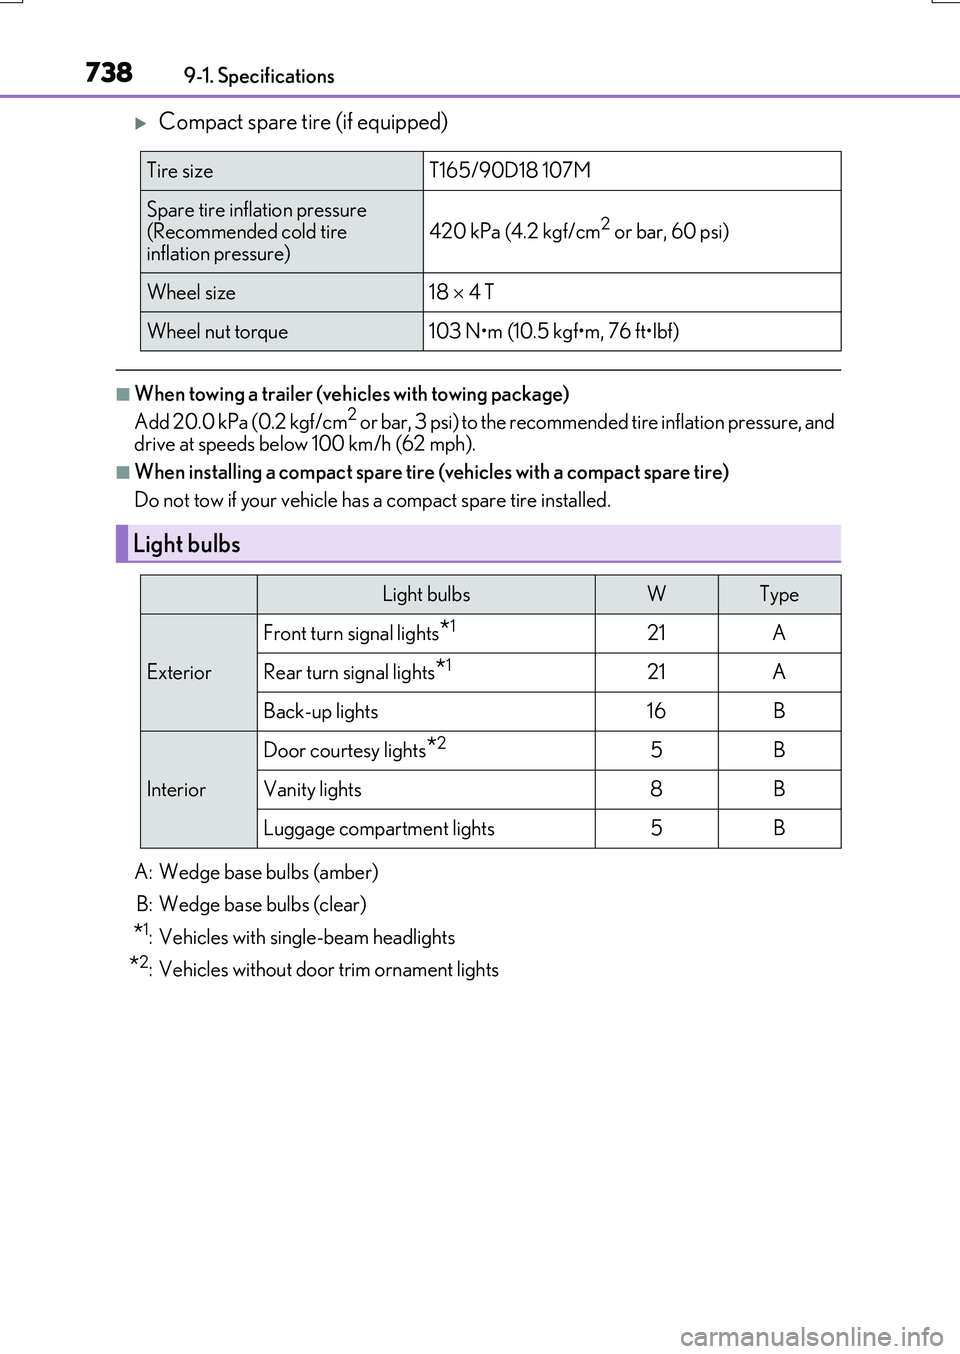
Compact spare tire (if equipped)
■When towing a trailer (vehicles with towing package)
Add 20.0 kPa (0.2 kgf/cm2 or bar, 3 psi) to the recommend ed tire inflation pressure, and drive at speeds below 100 km/h (62 mph).
■When installing a compact spare tire (vehicles with a compact spare tire)
Do not tow if your vehicle has a compact spare tire installed.
A: Wedge base bulbs (amber)
B: Wedge base bulbs (clear)
*1: Vehicles with single-beam headlights
*2: Vehicles without door trim ornament lights
Tire sizeT165/90D18 107M
Spare tire inflation pressure
(Recommended cold tire inflation pressure)420 kPa (4.2 kgf/cm2 or bar, 60 psi)
Wheel size18 4 T
Wheel nut torque103 N•m (10.5 kgf•m, 76 ft•lbf)
Light bulbs
Light bulbsWType
Exterior
Front turn signal lights*121A
Rear turn signal lights*121A
Back-up lights16B
Interior
Door courtesy lights*25B
Vanity lights8B
Luggage compartment lights5B
Page 752 of 776
752
RX350/RX200t_EE_OM48F32E
9-3. Initialization
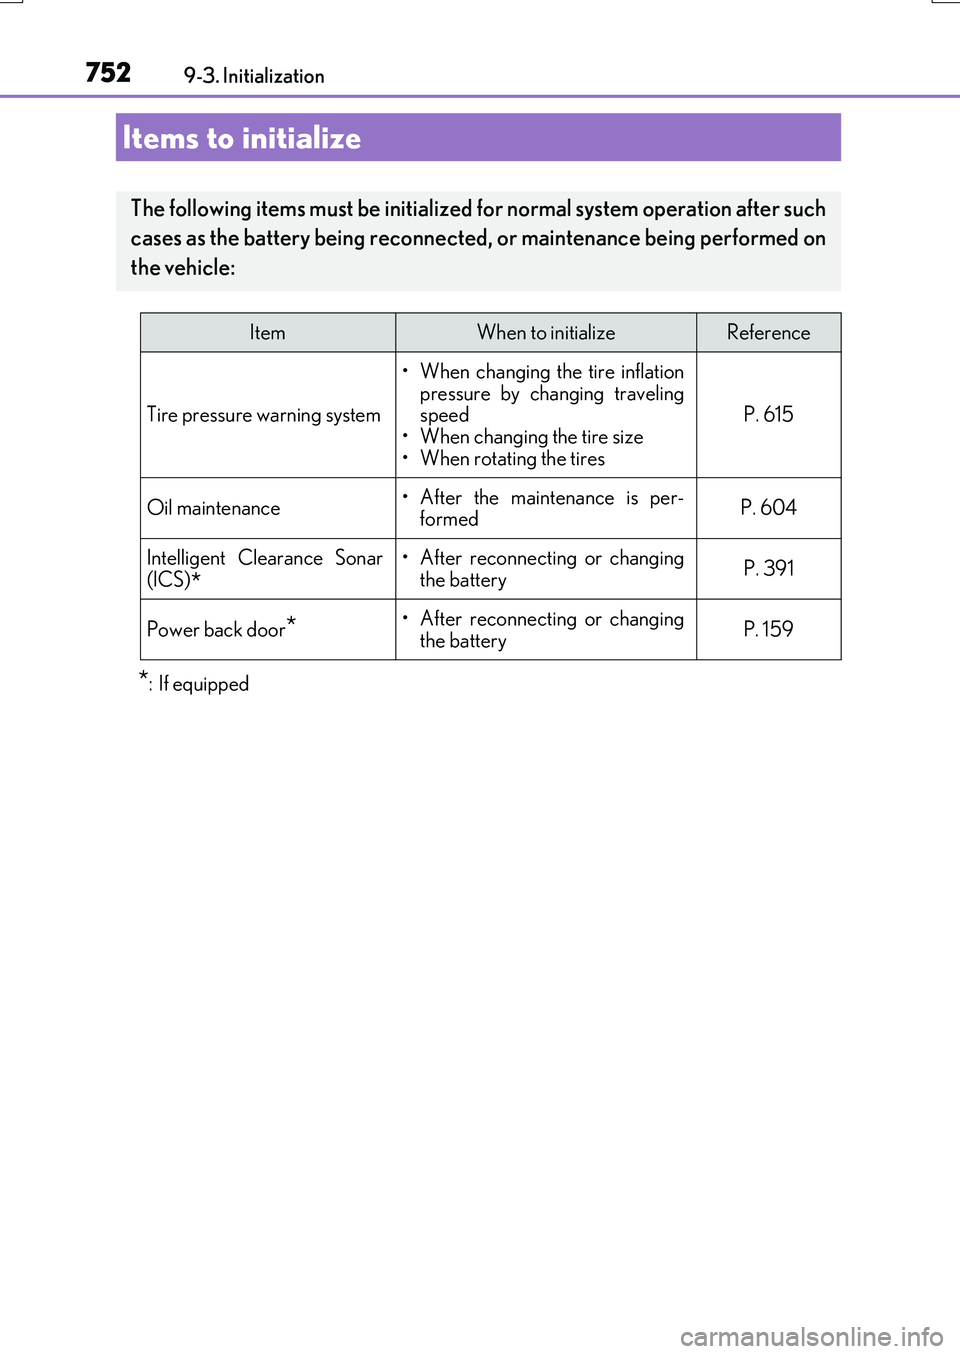
*: If equipped
Items to initialize
The following items must be initialized for normal system operation after such
cases as the battery being reconnected, or maintenance being performed on
the vehicle:
ItemWhen to initializeReference
Tire pressure warning system
• When changing the tire inflation
pressure by changing traveling speed• When changing the tire size
• When rotating the tires
P. 615
Oil maintenance• After the maintenance is per- formedP. 604
Intelligent Clearance Sonar(ICS)*
• After reconnecting or changingthe batteryP. 391
Power back door*• After reconnecting or changing
the batteryP. 159
Page 771 of 776
771Alphabetical index
RX350/RX200t_EE_OM48F32E
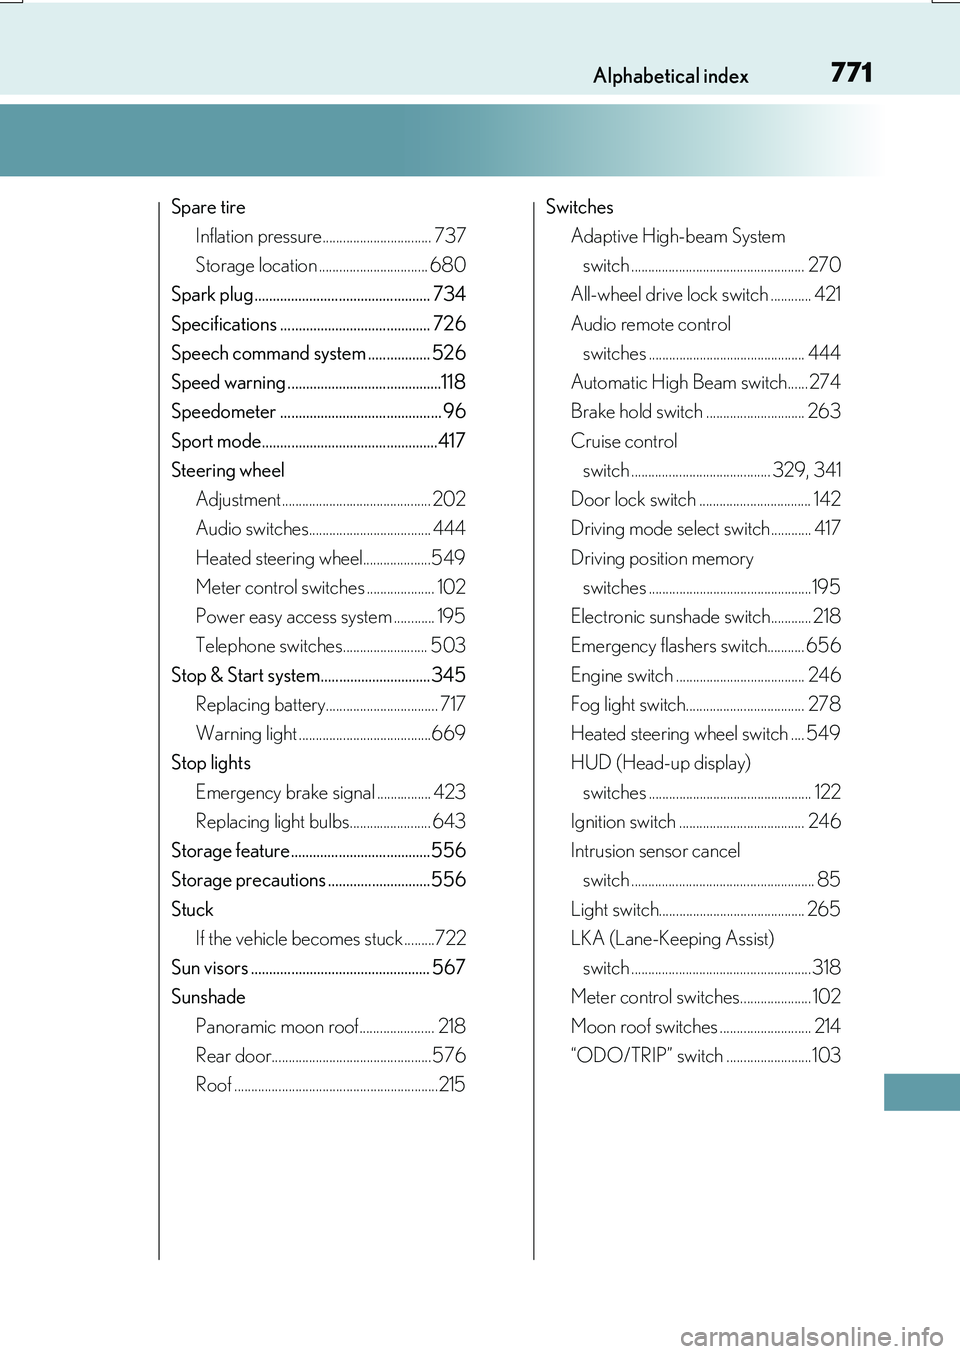
Spare tire
Inflation pressure................................ 737
Storage location ................................ 680
Spark plug................................................ 734
Specifications ......................................... 726
Speech command system ................. 526
Speed warning ..........................................118
Speedometer ............................................ 96
Sport mode................................................417
Steering wheel
Adjustment............................................ 202
Audio switches.................................... 444
Heated steering wheel....................549
Meter control switches .................... 102
Power easy access system ............ 195
Telephone switches......................... 503
Stop & Start system..............................345
Replacing battery................................. 717
Warning light .......................................669
Stop lights
Emergency brake signal ................ 423
Replacing light bulbs........................ 643
Storage feature......................................556
Storage precautions ............................556
Stuck
If the vehicle becomes stuck .........722
Sun visors ................................................. 567
Sunshade
Panoramic moon roof...................... 218
Rear door............................................... 576
Roof ............................................................215
Switches
Adaptive High-beam System
switch ................................................... 270
All-wheel drive lock switch ............ 421
Audio remote control
switches .............................................. 444
Automatic High Beam switch...... 274
Brake hold switch ............................. 263
Cruise control
switch ......................................... 329, 341
Door lock switch ................................. 142
Driving mode select switch............ 417
Driving position memory
switches ................................................195
Electronic sunshade switch............ 218
Emergency flashers switch........... 656
Engine switch ...................................... 246
Fog light switch................................... 278
Heated steering wheel switch .... 549
HUD (Head-up display)
switches ................................................ 122
Ignition switch ..................................... 246
Intrusion sensor cancel
switch ...................................................... 85
Light switch........................................... 265
LKA (Lane-Keeping Assist)
switch ..................................................... 318
Meter control switches..................... 102
Moon roof switches ........................... 214
“ODO/TRIP” switch .........................103
Page 772 of 776
772Alphabetical index
RX350/RX200t_EE_OM48F32E
Outside rear view mirror
switches...............................................206
Paddle shift switches ............ 252, 253
Panoramic moon roof
switches................................................ 218
Parking brake switch ....................... 259
Power back door opener
and closer switch................... 152, 154
Power window switch ...................... 210
Rear window and outside
rear view mirror defoggers
switch.................................................... 542
Rear window wiper and
washer switch...................................285
Seat heater switches ....................... 550
“SOS” button .......................................578
Seat ventilator switches ................... 551
Stop & Start cancel switch ............348
Talk switch ................................ 503, 526
Telephone switches......................... 503
Vehicle-to-vehicle
distance button................................ 329
VSC OFF switch ............................... 424
Window lock switch.......................... 210
Windshield wiper and
washer switch................................... 279
Tachometer ............................................... 96
Tail lights
Light switch........................................... 265
Replacing light bulbs ....................... 643
Talk switch ................................... 503, 526
Telephone switch .................................503
Theft deterrent system
Alarm .......................................................... 83
Double locking system ...................... 82
Engine immobilizer system .............. 77
Intrusion sensor ..................................... 85
Tilt sensor ................................................. 85
Tilt sensor .................................................... 85
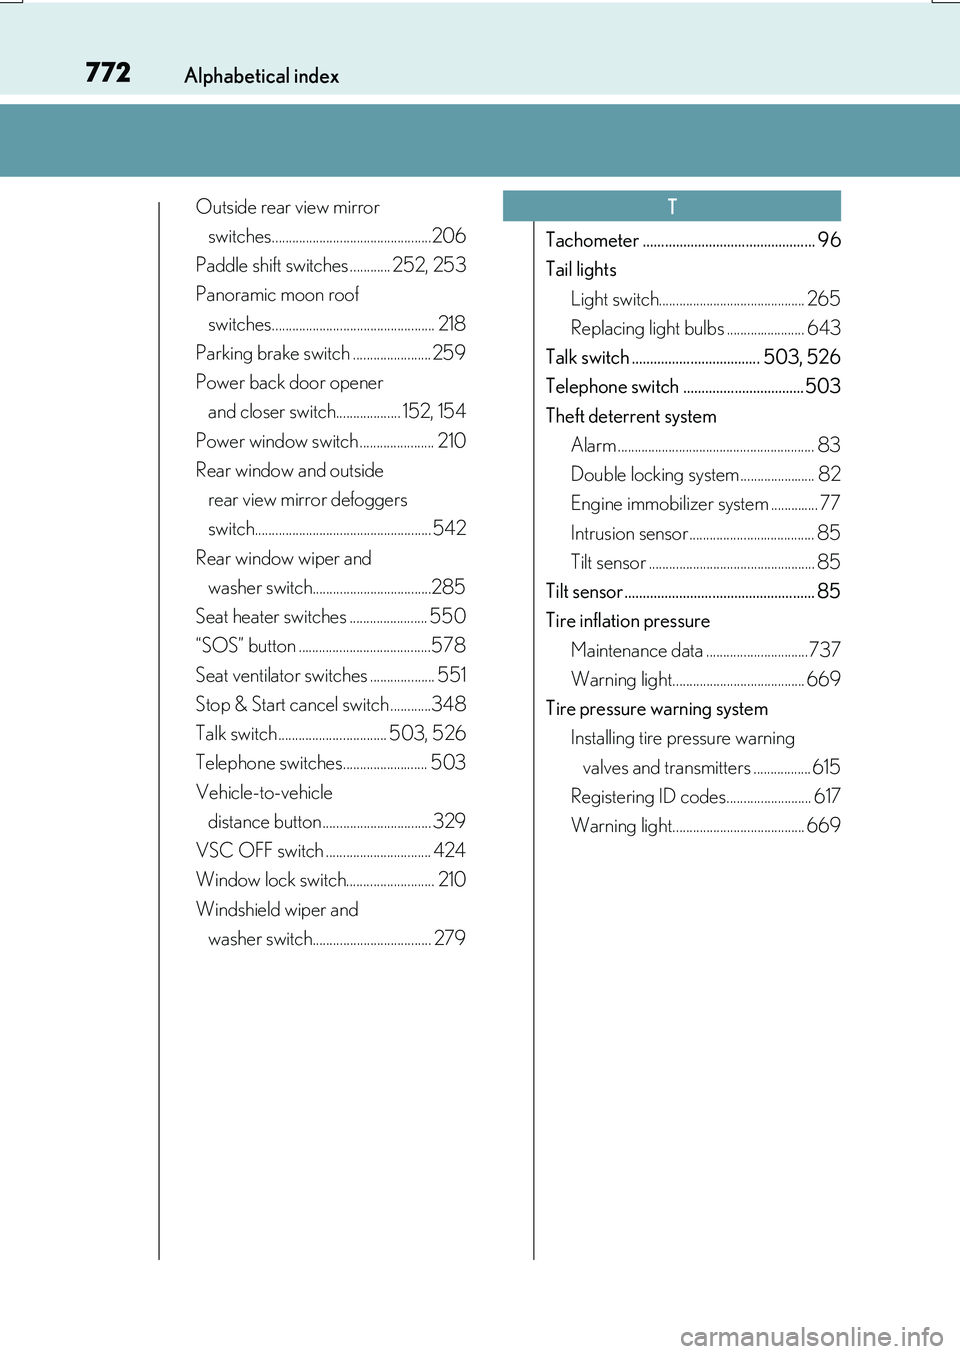
Tire inflation pressure
Maintenance data .............................. 737
Warning light....................................... 669
Tire pressure warning system
Installing tire pressure warning
valves and transmitters ................. 615
Registering ID codes......................... 617
Warning light....................................... 669
T