light LEXUS RX350 2019 Owners Manual
[x] Cancel search | Manufacturer: LEXUS, Model Year: 2019, Model line: RX350, Model: LEXUS RX350 2019Pages: 777, PDF Size: 12.44 MB
Page 530 of 777
5296-4. Using the storage features
6
Interior features
RX350/RX350L_U
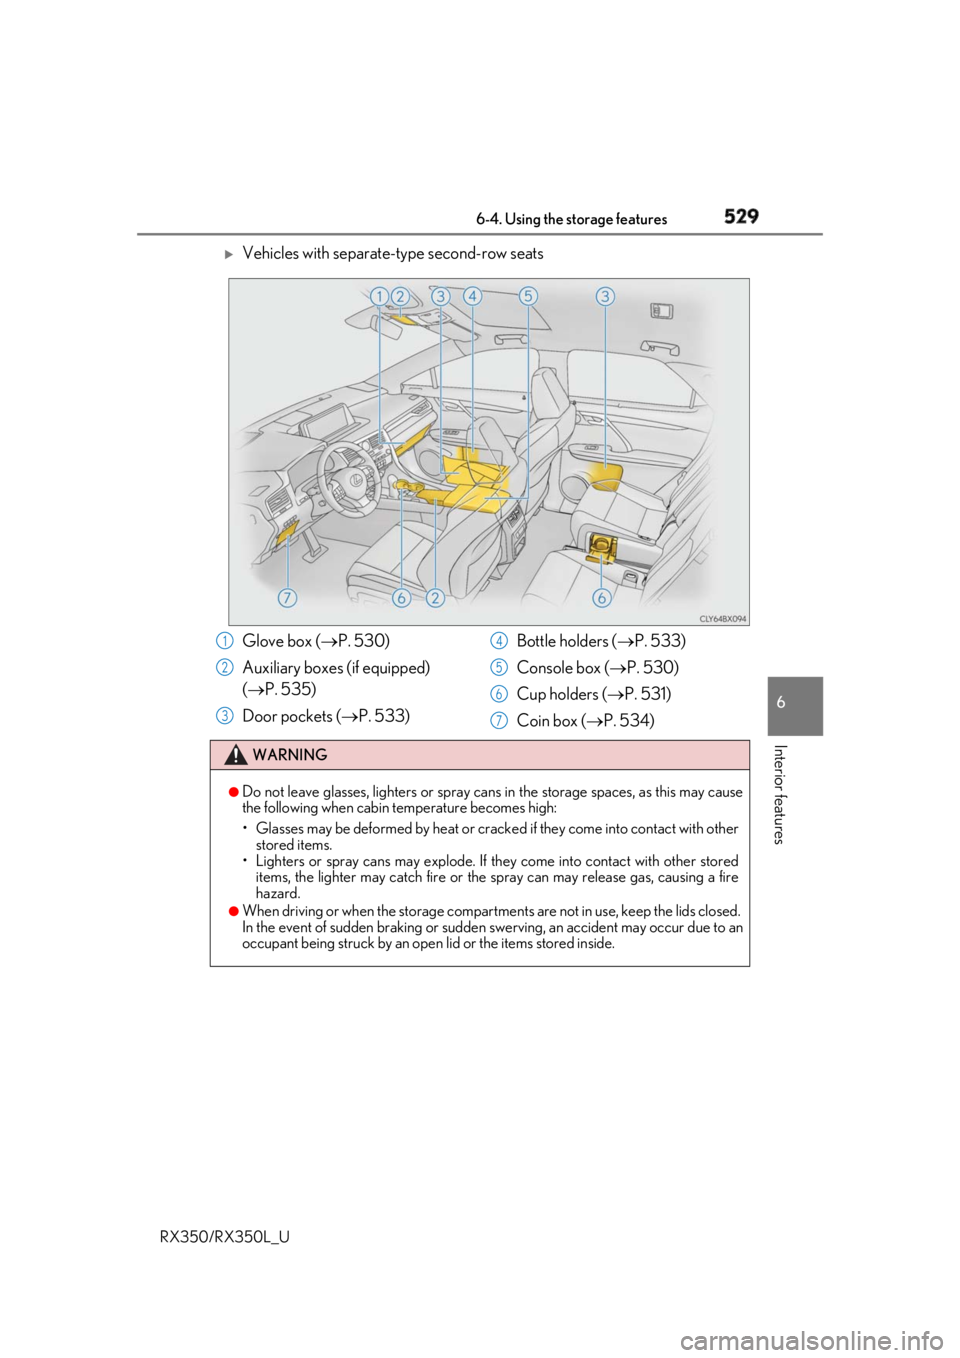
Vehicles with separate-type second-row seats
Glove box ( P. 530)
Auxiliary boxes (if equipped)
( P. 535)
Door pockets ( P. 533) Bottle holders ( P. 533)
Console box ( P. 530)
Cup holders ( P. 531)
Coin box ( P. 534)WARNING ●
Do not leave glasses, lighters or spray cans in the storage spaces, as this may cause
the following when cabin temperature becomes high:
• Glasses may be deformed by heat or cracke d if they come into contact with other
stored items.
• Lighters or spray cans may explode. If they come into contact with other stored
items, the lighter may catch fire or the spray can may release gas, causing a fire
hazard. ●
When driving or when the storage compartments are not in use, keep the lids closed.
In the event of sudden braking or sudden swerving, an accident may occur due to an
occupant being struck by an open lid or the items stored inside.1
2
3 4
5
6
7
Page 531 of 777
530 6-4. Using the storage features
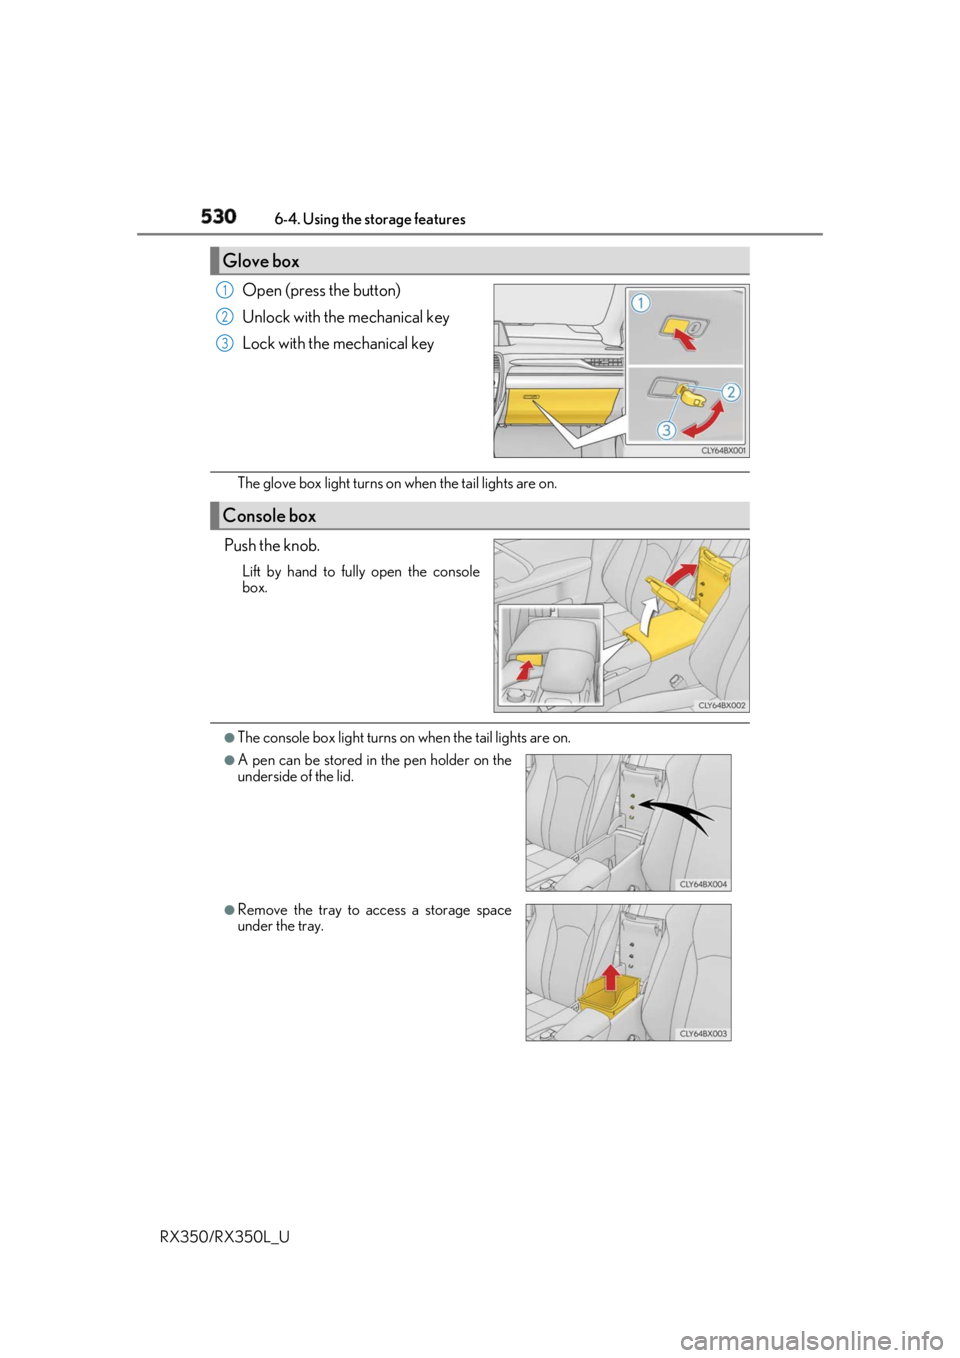
RX350/RX350L_U Open (press the button)
Unlock with the mechanical key
Lock with the mechanical key
The glove box light turns on when the tail lights are on.
Push the knob. Lift by hand to fully open the console
box.
●
The console box light turns on when the tail lights are on.Glove box 1
2
3
Console box ●
A pen can be stored in the pen holder on the
underside of the lid.
●
Remove the tray to access a storage space
under the tray.
Page 544 of 777
543
RX350/RX350L_U 6
Interior features 6-5. Using the other interior features
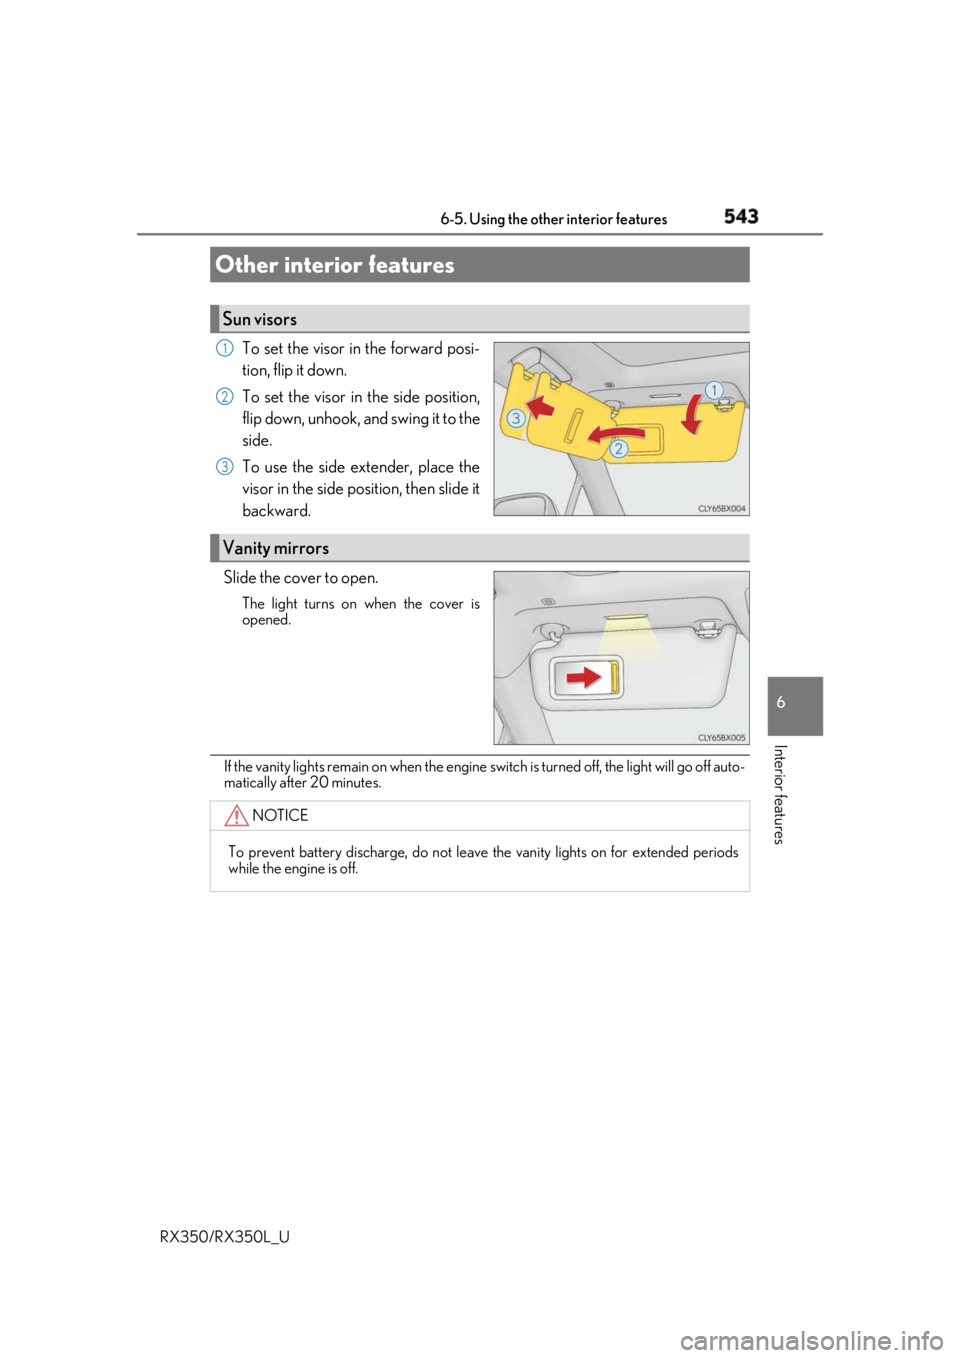
To set the visor in the forward posi-
tion, flip it down.
To set the visor in the side position,
flip down, unhook, and swing it to the
side.
To use the side extender, place the
visor in the side position, then slide it
backward.
Slide the cover to open. The light turns on when the cover is
opened.
If the vanity lights remain on when the engine switch is turned off, the light will go off auto-
matically after 20 minutes.Other interior features Sun visors 1
2
3
Vanity mirrors
NOTICE
To prevent battery discharge, do not leave the vanity lights on for extended periods
while the engine is off.
Page 546 of 777
5456-5. Using the other interior features
6
Interior features
RX350/RX350L_U ■
Name for all parts
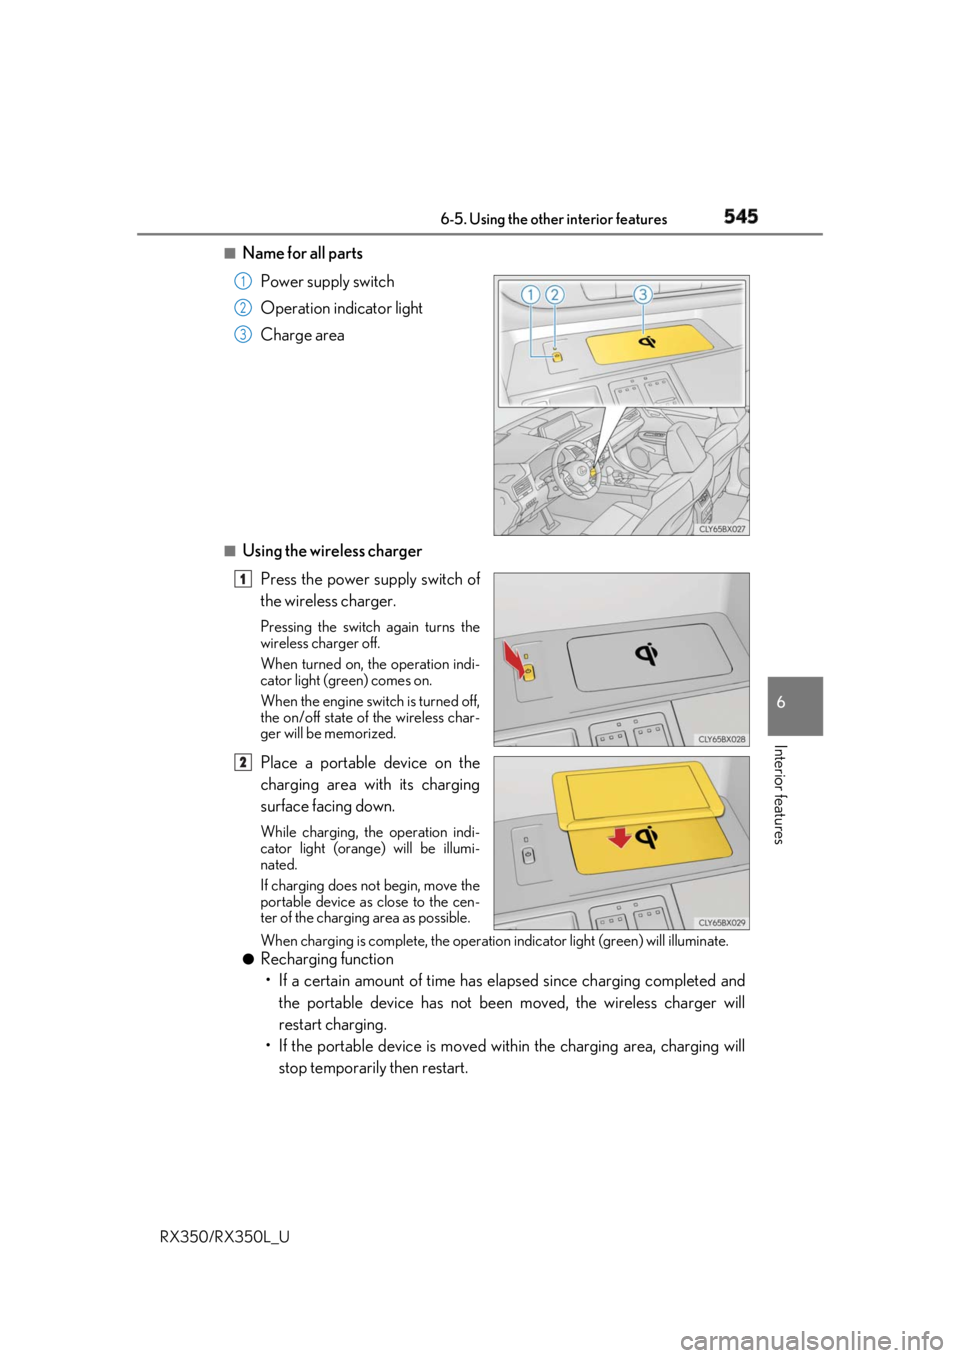
Power supply switch
Operation indicator light
Charge area
■
Using the wireless charger
Press the power supply switch of
the wireless charger. Pressing the switch again turns the
wireless charger off.
When turned on, the operation indi-
cator light (green) comes on.
When the engine switch is turned off,
the on/off state of the wireless char-
ger will be memorized.
Place a portable device on the
charging area with its charging
surface facing down. While charging, the operation indi-
cator light (orange) will be illumi-
nated.
If charging does not begin, move the
portable device as close to the cen-
ter of the charging area as possible.
When charging is complete, the operatio n indicator light (g reen) will illuminate.●
Recharging function
• If a certain amount of time has elapsed since charging completed and
the portable device has not been moved, the wireless charger will
restart charging.
• If the portable device is moved with in the charging area, charging will
stop temporarily then restart. 1
2
3
1
2
Page 547 of 777
546 6-5. Using the other interior features
RX350/RX350L_U ■
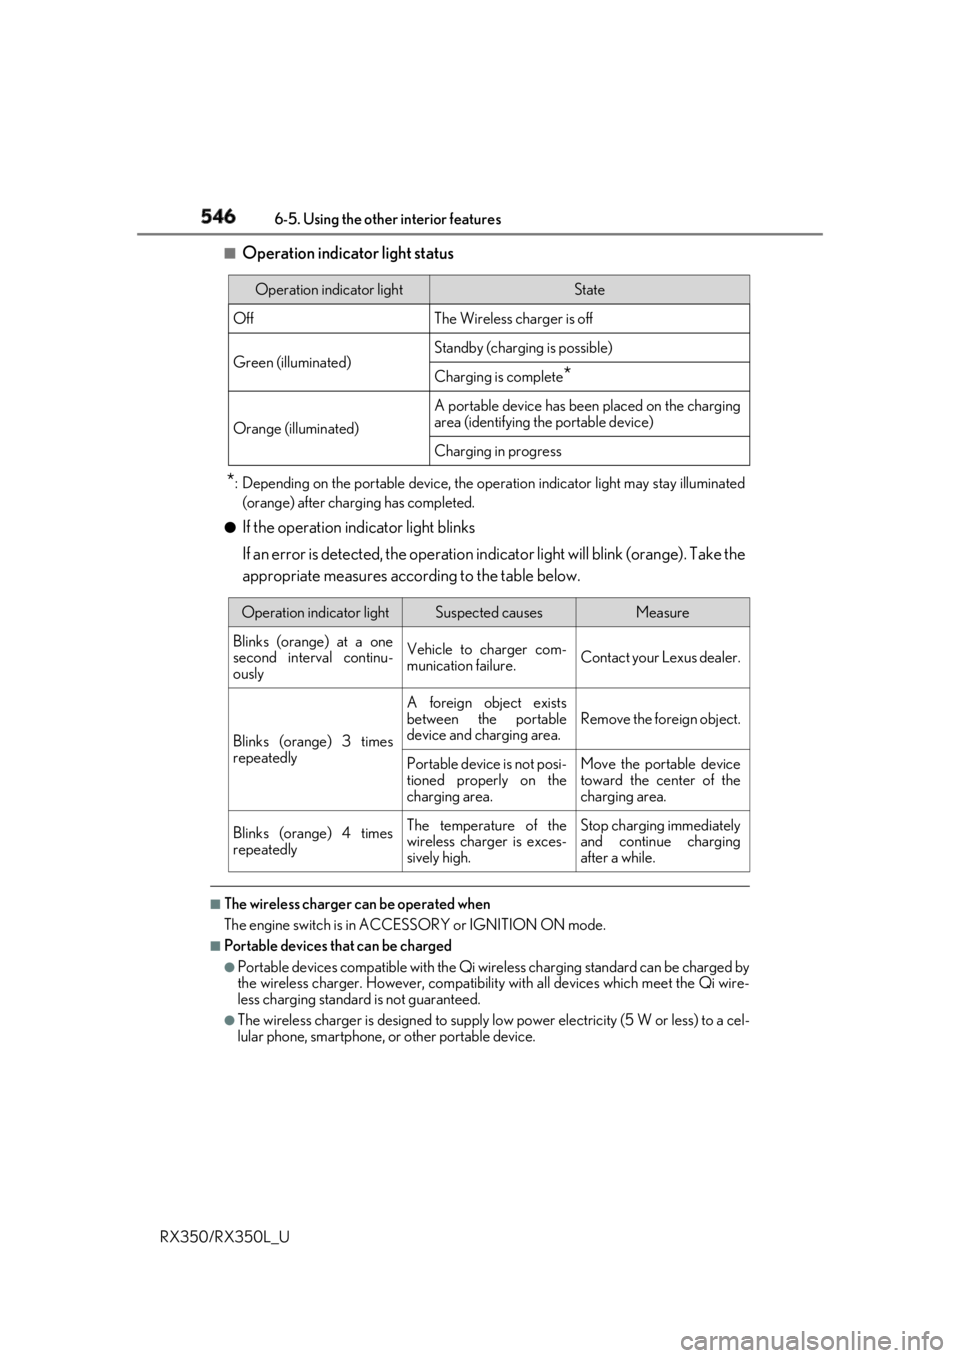
Operation indicator light status
* : Depending on the portable device, the oper ation indicator light may stay illuminated
(orange) after charging has completed.●
If the operation indicator light blinks
If an error is detected, the operation in dicator light will blink (orange). Take the
appropriate measures according to the table below.
■
The wireless charger can be operated when
The engine switch is in ACCESSORY or IGNITION ON mode. ■
Portable devices t hat can be charged●
Portable devices compatible with the Qi wireless charging standard can be charged by
the wireless charger. However, compatibility with all devices which meet the Qi wire-
less charging standard is not guaranteed. ●
The wireless charger is designed to supply low power electricity (5 W or less) to a cel-
lular phone, smartphone, or other portable device.Operation indicator light State
Off The Wireless charger is off
Green (illuminated) Standby (charging is possible)
Charging is complete
*Orange (illuminated) A portable device has been placed on the charging
area (identifying the portable device)
Charging in progress
Operation indicator light Suspected causes Measure
Blinks (orange) at a one
second interval continu-
ously Vehicle to charger com-
munication failure. Contact your Lexus dealer.
Blinks (orange) 3 times
repeatedly A foreign object exists
between the portable
device and charging area. Remove the foreign object.
Portable device is not posi-
tioned properly on the
charging area. Move the portable device
toward the center of the
charging area.
Blinks (orange) 4 times
repeatedly The temperature of the
wireless charger is exces-
sively high. Stop charging immediately
and continue charging
after a while.
Page 551 of 777
550 6-5. Using the other interior features
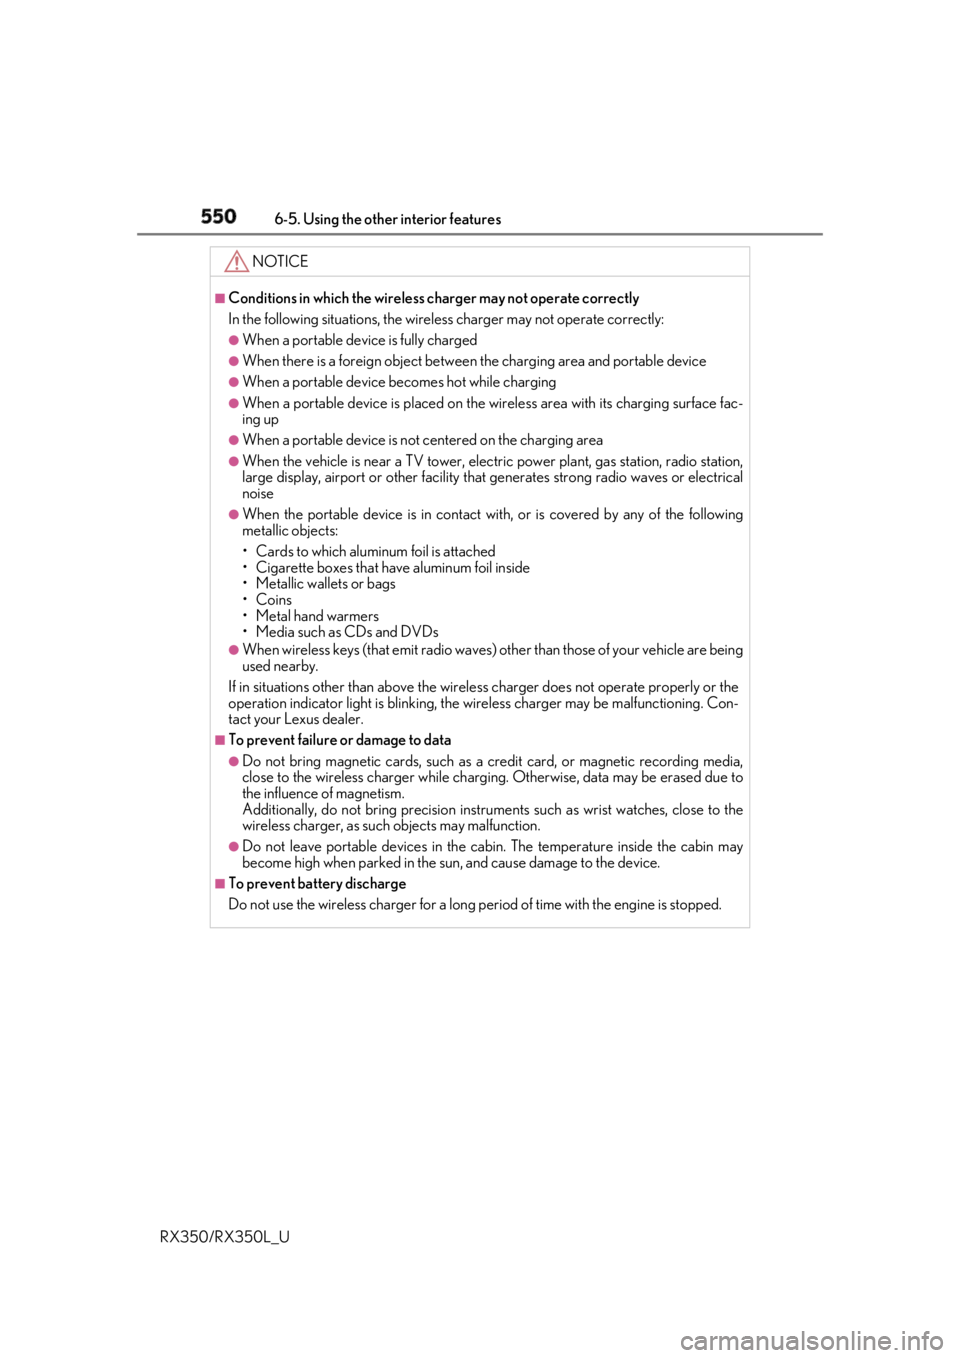
RX350/RX350L_U NOTICE ■
Conditions in which the wireless charger may not operate correctly
In the following situations, the wire less charger may not operate correctly:●
When a portable device is fully charged ●
When there is a foreign object between the charging area and portable device●
When a portable device becomes hot while charging●
When a portable device is placed on the wireless area with its charging surface fac-
ing up ●
When a portable device is not centered on the charging area ●
When the vehicle is near a TV tower, electric power plant, gas station, radio station,
large display, airport or other facility that generates stro ng radio waves or electrical
noise ●
When the portable device is in contact with, or is covered by any of the following
metallic objects:
• Cards to which aluminum foil is attached
• Cigarette boxes that ha ve aluminum foil inside
• Metallic wallets or bags
•Coins
•Metal hand warmers
• Media such as CDs and DVDs ●
When wireless keys (that emit radio waves) other than those of your vehicle are being
used nearby.
If in situations other than above the wirele ss charger does not operate properly or the
operation indicator light is blinking, the wireless charge r may be malfunctioning. Con-
tact your Lexus dealer. ■
To prevent failure or damage to data ●
Do not bring magnetic cards, such as a cr edit card, or magnetic recording media,
close to the wireless charger while charging. Otherwise, data may be erased due to
the influence of magnetism.
Additionally, do not bring pr ecision instruments such as wrist watches, close to the
wireless charger, as such objects may malfunction. ●
Do not leave portable devices in the cab in. The temperature inside the cabin may
become high when parked in the sun, and cause damage to the device. ■
To prevent battery discharge
Do not use the wireless charger for a long pe riod of time with the engine is stopped.
Page 555 of 777
554 6-5. Using the other interior features
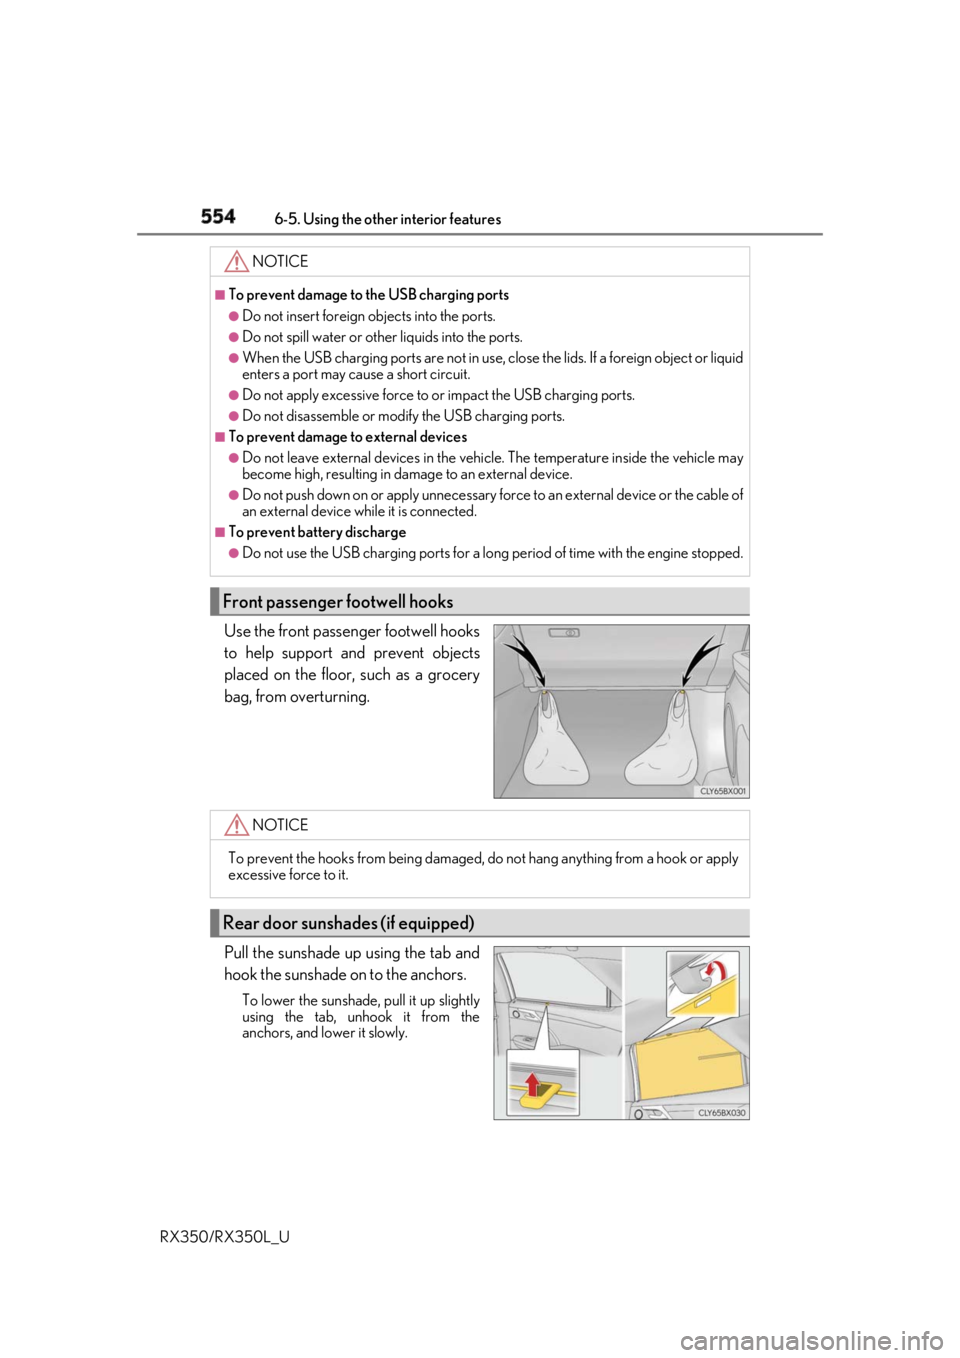
RX350/RX350L_U Use the front passenger footwell hooks
to help support and prevent objects
placed on the floor, such as a grocery
bag, from overturning.
Pull the sunshade up using the tab and
hook the sunshade on to the anchors. To lower the sunshade, pull it up slightly
using the tab, unhook it from the
anchors, and lower it slowly. NOTICE ■
To prevent damage to the USB charging ports●
Do not insert foreign objects into the ports. ●
Do not spill water or othe r liquids into the ports.●
When the USB charging ports are not in use, close the lids. If a foreign object or liquid
enters a port may cause a short circuit. ●
Do not apply excessive force to or impact the USB charging ports.●
Do not disassemble or modi fy the USB charging ports.■
To prevent damage to external devices●
Do not leave external devices in the vehicle. The temperature inside the vehicle may
become high, resulting in damage to an external device. ●
Do not push down on or appl y unnecessary force to an exte rnal device or the cable of
an external device while it is connected. ■
To prevent battery discharge ●
Do not use the USB charging ports for a long period of time with the engine stopped.
Front passenger footwell hooks
NOTICE
To prevent the hooks from being damaged, do not hang anything from a hook or apply
excessive force to it.
Rear door sunshades (if equipped)
Page 558 of 777
5576-5. Using the other interior features
6
Interior features
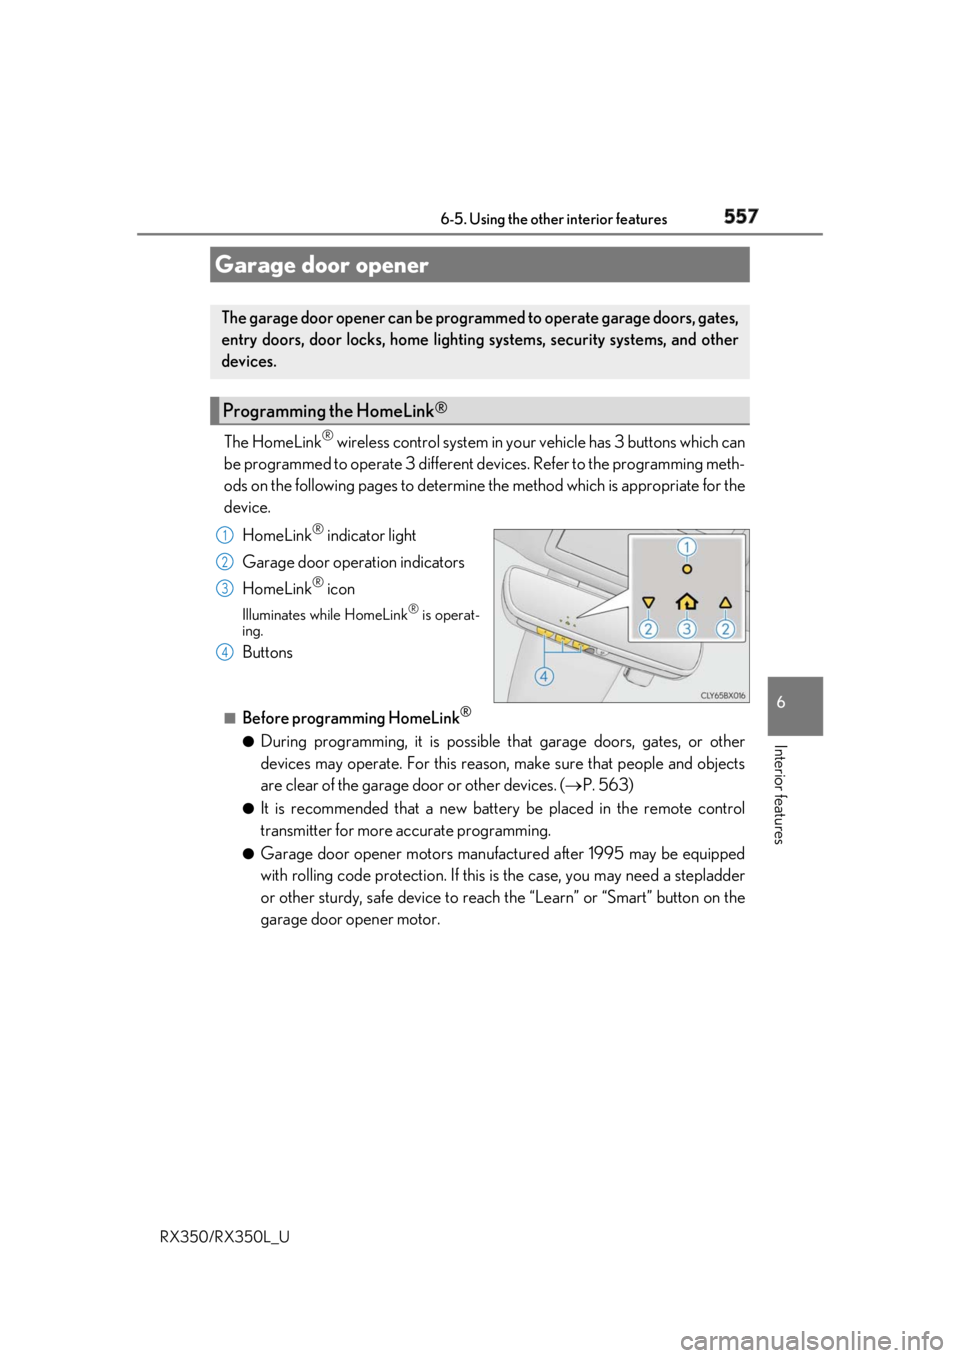
RX350/RX350L_U The HomeLink ®
wireless control system in your vehicle has 3 buttons which can
be programmed to operate 3 different de vices. Refer to the programming meth-
ods on the following pages to determine the method which is appropriate for the
device.
HomeLink ®
indicator light
Garage door operation indicators
HomeLink ®
iconIlluminates while HomeLink ®
is operat-
ing.
Buttons ■
Before programming HomeLink ®
●
During programming, it is possible that garage doors, gates, or other
devices may operate. For this reason, make sure that people and objects
are clear of the garage door or other devices. ( P. 563)●
It is recommended that a new batter y be placed in the remote control
transmitter for more accurate programming. ●
Garage door opener motors manufa ctured after 1995 may be equipped
with rolling code protection. If this is the case, you may need a stepladder
or other sturdy, safe device to reach the “Learn” or “Smart” button on the
garage door opener motor.Garage door opener The garage door opener can be programmed to operate garage doors, gates,
entry doors, door locks, home lightin g systems, security systems, and other
devices.
Programming the HomeLink ®
1
2
3
4
Page 559 of 777
558 6-5. Using the other interior features
RX350/RX350L_U ■
Programming HomeLink ®
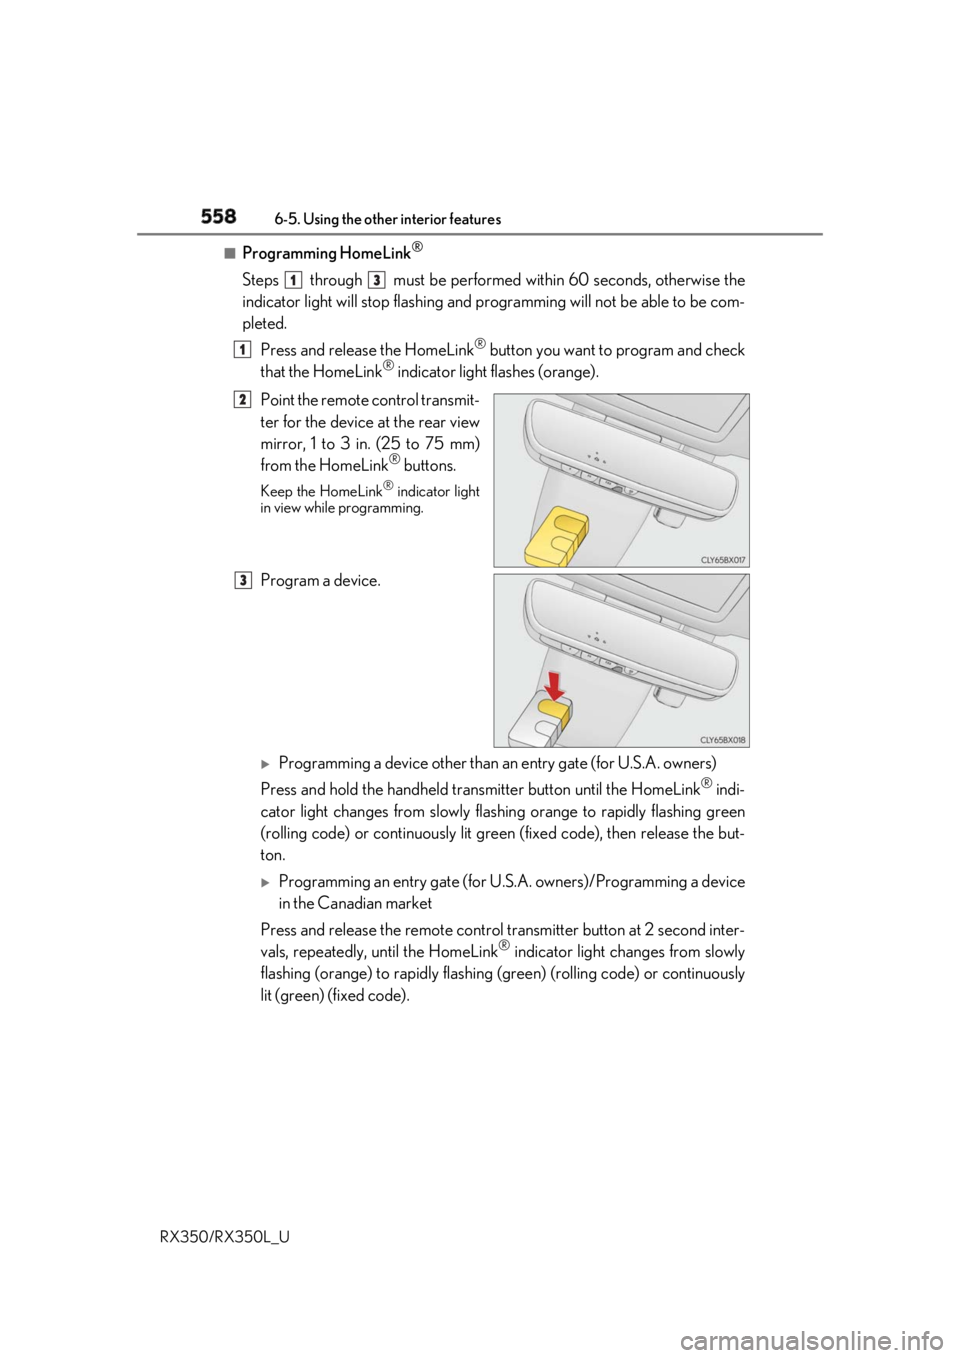
Steps through must be performed within 60 seconds, otherwise the
indicator light will stop flashing and pr ogramming will not be able to be com-
pleted.
Press and release the HomeLink ®
button you want to program and check
that the HomeLink ®
indicator light flashes (orange).
Point the remote control transmit-
ter for the device at the rear view
mirror, 1 to 3 in. (25 to 75 mm)
from the HomeLink ®
buttons.Keep the HomeLink ®
indicator light
in view while programming.
Program a device.
Programming a device other than an entry gate (for U.S.A. owners)
Press and hold the handheld transmitter button until the HomeLink ®
indi-
cator light changes from slowly flashi ng orange to rapidly flashing green
(rolling code) or continuously lit green (fixed code), then release the but-
ton.
Programming an entry gate (for U. S.A. owners)/Programming a device
in the Canadian market
Press and release the remo te control transm itter button at 2 second inter-
vals, repeatedly, until the HomeLink ®
indicator light changes from slowly
flashing (orange) to rapidly flashing (green) (rolling code) or continuously
lit (green) (fixed code). 1 3
1
2
3
Page 560 of 777
5596-5. Using the other interior features
6
Interior features
RX350/RX350L_U Test the HomeLink ®
operation by pressing the newly programmed button
and observing the indicator light: ●
Indicator light illuminates: Programming of a fixed code device has com-
pleted. The garage door or other de vice should operate when a Home-
Link ®
button is pressed and released.●
Indicator light flashes rapidly: The garage door opener motor or other
device is equipped with a rolling co de. To complete programming, firmly
press and hold the HomeLink ®
button for 2 seconds then release it.●
If the garage door or other device does not operate, proceed to “Pro-
gramming a rollin g code system”.
Repeat the steps above to program anot her device for any of the remaining
HomeLink ®
buttons.■
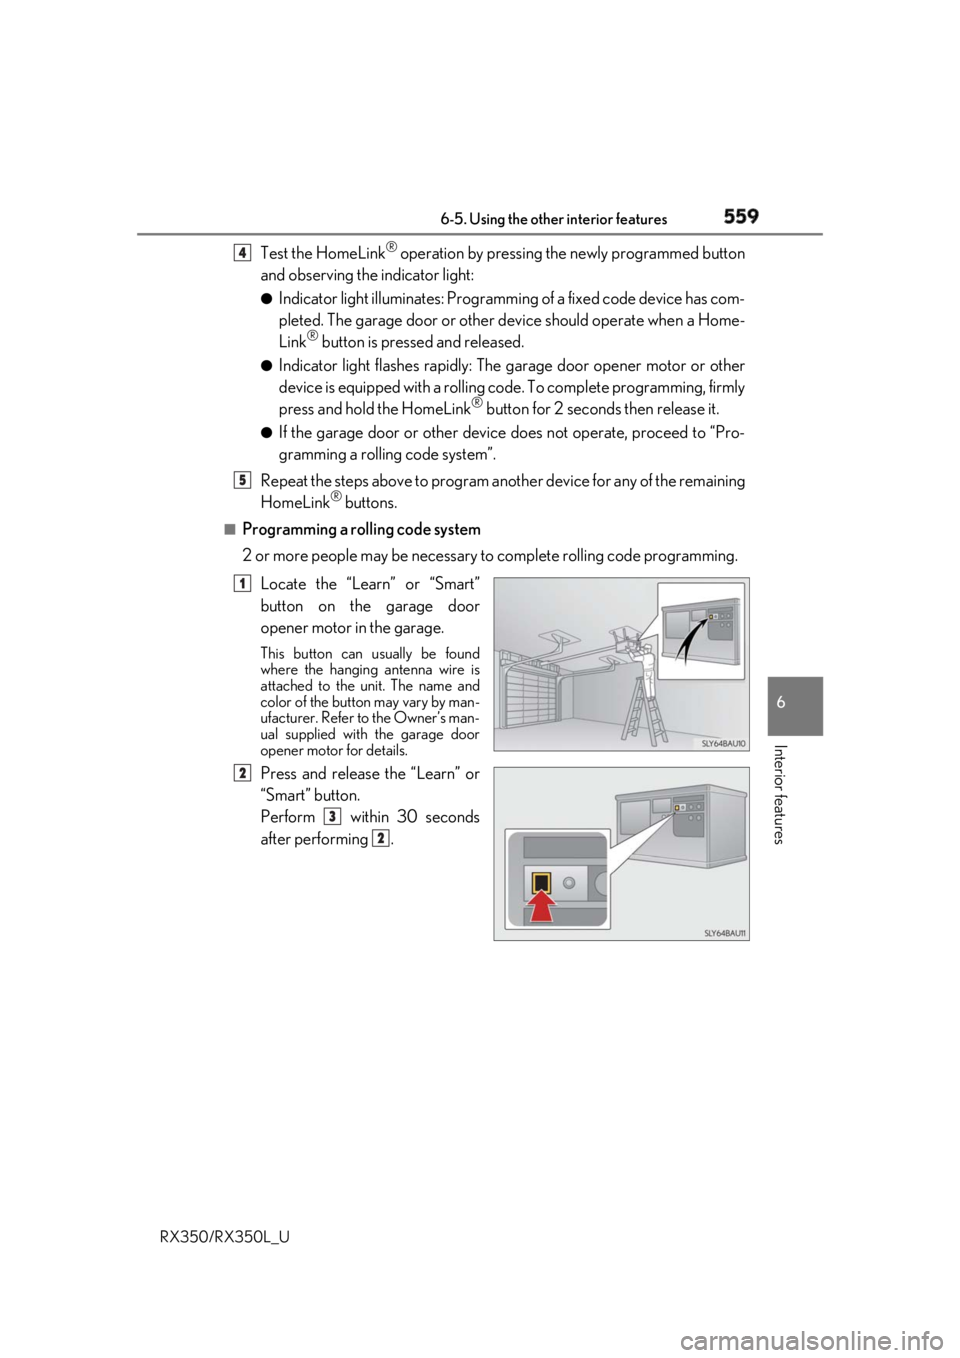
Programming a rolling code system
2 or more people may be necessary to complete rolling code programming.
Locate the “Learn” or “Smart”
button on the garage door
opener motor in the garage. This button can usually be found
where the hanging antenna wire is
attached to the unit. The name and
color of the button may vary by man-
ufacturer. Refer to the Owner’s man-
ual supplied with the garage door
opener motor for details.
Press and release the “Learn” or
“Smart” button.
Perform within 30 seconds
after performing . 4
5
1
2
3
2