ESP LEXUS RX350 2019 Repair Manual
[x] Cancel search | Manufacturer: LEXUS, Model Year: 2019, Model line: RX350, Model: LEXUS RX350 2019Pages: 777, PDF Size: 12.44 MB
Page 583 of 777

582 7-1. Maintenance and care
RX350/RX350L_U ■
Caring for leather areas
Lexus recommends cleaning the interior of the vehicle at least twice a year to maintain
the quality of the vehicle’s interior. ■
Shampooing the carpets
There are several commercial foaming-type cl eaners available. Use a sponge or brush to
apply the foam. Rub in overlapp ing circles. Do not use water. Wipe dirty surfaces and let
them dry. Excellent results are obtained by keeping the carpet as dry as possible.■
Seat belts
Clean with mild soap and lukewarm water us ing a cloth or sponge. Also check the belts
periodically for excessive wear, fraying or cuts.
WARNING ■
Water in the vehicle ●
Do not splash or spill liquid in the vehicle.
Doing so may cause electrical components , etc. to malfunction or catch fire.●
Do not get any of the SRS components or wiring in the vehicle interior wet.
( P. 38)
An electrical malfunction ma y cause the airbags to deploy or not function properly,
resulting in death or serious injury. ●
Vehicles with wireless charger:
Do not let the wireless charger ( P. 545) get wet. Failure to do so may cause the
charger to become hot and cause burns or could cause electric shock resulting in
death or serious injury. ■
Cleaning the interior (especially instrument panel)
Do not use polish wax or polish cleaner. Th e instrument panel may reflect off the wind-
shield, obstructing the driver’s view and le ading to an accident, resulting in death or
serious injury.
Page 584 of 777
5837-1. Maintenance and care
7
Maintenance and care
RX350/RX350L_U NOTICE ■
Cleaning detergents ●
Do not use the following types of detergent, as they may discolor the vehicle interior
or cause streaks or damage to painted surfaces:
• Non-seat portions: Organic substances su ch as benzene or gasoline, alkaline or
acidic solutions, dye, and bleach
• Seats: Alkaline or ac idic solutions, such as thinner, benzene, and alcohol●
Do not use polish wax or polis h cleaner. The instrument pane l’s or other interior part’s
painted surface may be damaged. ■
Preventing damage to leather surfaces
Observe the following precautions to avoid damage to and deterioration of leather
surfaces: ●
Remove any dust or dirt from leather surfaces immediately.●
Do not expose the vehicle to direct sunlight for extended periods of time. Park the
vehicle in the shade, especially during summer. ●
Do not place items made of vinyl, plastic, or containing wax on the upholstery, as they
may stick to the leather su rface if the vehicle interior heats up significantly.■
Water on the floor
Do not wash the vehicle floor with water.
Vehicle systems such as the audio system ma y be damaged if wate r comes into contact
with electrical components such as the au dio system above or un der the floor of the
vehicle. Water may also cause the body to rust. ■
When cleaning the inside of the windshield
Do not allow glass cleaner to contact the lens. Also, do not touch the lens.
( P. 276) ■
Cleaning the inside of the rear window ●
Do not use glass cleaner to clean the rear window, as this may cause damage to the
rear window defogger heater wires or antenna. Use a cloth dampened with luke-
warm water to gently wipe the window clean. Wipe th e window in strokes running
parallel to the heater wires or antenna. ●
Be careful not to scratch or damage the heater wires or antenna.
Page 661 of 777
660 8-2. Steps to take in an emergency
RX350/RX350L_U WARNING ■
Maintenance of the tires
Each tire, including the spare (if provided), should be checked monthly when cold and
inflated to the inflation pressure recomm ended by the vehicle manufacturer on the
vehicle placard or tire inflation pressure label (tire and load information label). (If your
vehicle has tires of a different size than the size indicated on the vehicle placard or tire
inflation pressure label [tire and load in formation label], you should determine the
proper tire inflation pressure for those tires.)
As an added safety feature, your vehicle ha s been equipped with a tire pressure moni-
toring system (TPMS-tire pressure warning system) that illuminates a low tire pressure
telltale (tire pressure warning light) when on e or more of your tires is significantly
under-inflated. Accordingly, when the low ti re pressure telltale (tire pressure warning
light) illuminates, you should st op and check your tires as soon as possible, and inflate
them to the proper pressure. Driving on a si gnificantly under-inflat ed tire causes the
tire to overheat and can lead to tire failure . Under-inflation also reduces fuel efficiency
and tire tread life, and may affect the vehicle’s handling and stopping ability.
Please note that the TPMS (tire pressure wa rning system) is not a substitute for proper
tire maintenance, and it is th e driver’s responsibility to ma intain correct tire pressure,
even if under-inflation has not reached the le vel to trigger illumina tion of the TPMS low
tire pressure telltale (tir e pressure warning light).
Your vehicle has also been equipped with a TPMS (tire pressure warning system) mal-
function indicator to indicate when the system is not operating properly. The TPMS
(tire pressure warning system) malfunction indi cator is combined with the low tire pres-
sure telltale (tire pressure warning light). When the system detects a malfunction, the
telltale will flash for approximately one mi nute and then remain continuously illumi-
nated. This sequence will cont inue upon subsequent vehicl e start-ups as long as the
malfunction exists. When the malfunction in dicator is illuminated, the system may not
be able to detect or signal low tire pressure as intended.
TPMS (tire pressure warning system) malfun ctions may occur for a variety of reasons,
including the installation of replacement or alternate tires or wheels on the vehicle that
prevent the TPMS (tire pressure warning system) from functioning properly. Always
check the TPMS (tire pressure warning system) malfunction telltale after replacing one
or more tires or wheels on your vehicle to ensure that the replacement or alternate
tires and wheels allow the TPMS (tire pressu re warning system) to continue to function
properly.
NOTICE ■
To ensure the tire pressure warning system operates properly
Do not install tires with different specificatio ns or makers, as the tire pressure warning
system may not operate properly.
Page 666 of 777
6658-2. Steps to take in an emergency
8
When trouble arises
RX350/RX350L_U ■
If “Maintenance Required Visit Your Dealer” is displayed (U.S.A. only)
Indicates that all maintenance is requir ed to correspond to the driven distance
on the maintenance schedule
* .
Comes on approximately 5000 miles (8000 km) after the message has
been reset.
(The indicator will not work properly unless the message has been reset.)
Perform the necessary maintenance. Please reset the message after the main-
tenance is performed. ( P. 585)
* : Refer to the separate “Scheduled Mainte nance” or “Owner’s Manual Supplement”
for the maintenance interval applicable to your vehicle. ■
System warning lights
The master warning light does not come on or flash in the following cases. Instead, a sep-
arate system warning light will come on along with a message shown on the multi-infor-
mation display. ●
“Antilock Brake System Malfunction Visit Your Dealer”:
The ABS warning light comes on. ( P. 654)●
“Charging System Malfunction See Ow ner’s Manual” (F SPORT models):
The charging system wa rning light comes on. ( P. 654)■
Warning buzzer
P. 658
NOTICE ■
“High Power Consumption Partial Limit On AC/Heater Operation” is frequently
shown
There is a possible malfunctio n relating to the charging system or the battery may be
deteriorating. Have the vehicle inspected by your Lexus dealer.
Page 690 of 777
6898-2. Steps to take in an emergency
8
When trouble arises
RX350/RX350L_U ■
Starting the engine when the battery is discharged
The engine cannot be started by push-starting. ■
To prevent battery discharge ●
Turn off the headlights and the audio system while the engine is off. ●
Turn off any unnecessary electrical componen ts when the vehicle is running at a low
speed for an extended period , such as in heavy traffic.■
When removing the battery terminals
When the battery terminals are removed, the information stored in the ECU is cleared.
Before removing the battery termin als, contact your Lexus dealer.■
Charging the battery
The electricity stored in the battery will disc harge gradually even when the vehicle is not
in use, due to natural discharge and the draini ng effects of certain electrical appliances. If
the vehicle is left for a long time, the battery may discharge, and the engine may be
unable to start. (The battery recharges automatically during driving.) ■
When the battery is removed or discharged ●
In some cases, it may not be possible to un lock the doors using the smart access system
with push-button start when the battery is discharged. Use the wireless remote control
or the mechanical key to lock or unlock the doors. ●
The engine may not start on the first attempt after the battery has recharged but will
start normally after the second attempt. This is not a malfunction. ●
The engine switch mode is memorized by the vehicle. When the battery is recon-
nected, the system will return to the mode it was in before the battery was discharged.
Before disconnecting the battery, turn the engine switch off.
If you are unsure what mode the engine switch was in before the battery discharged, be
especially careful when reconnecting the battery. ●
The power back door must be initialized. ( P. 138)■
When replacing the battery ●
Use a battery with the same case size as the previous battery and an equivalent 20
hour rate capacity (20HR) or greater.
• If the sizes differ, the battery cannot be properly secured.
• If the 20 hour rate capacity is low, even if the time period where the vehicle is not
used is a short time, the battery may discharge and the engine may not be able to
start. ●
For details, consult your Lexus dealer.
Page 695 of 777
694 8-2. Steps to take in an emergency
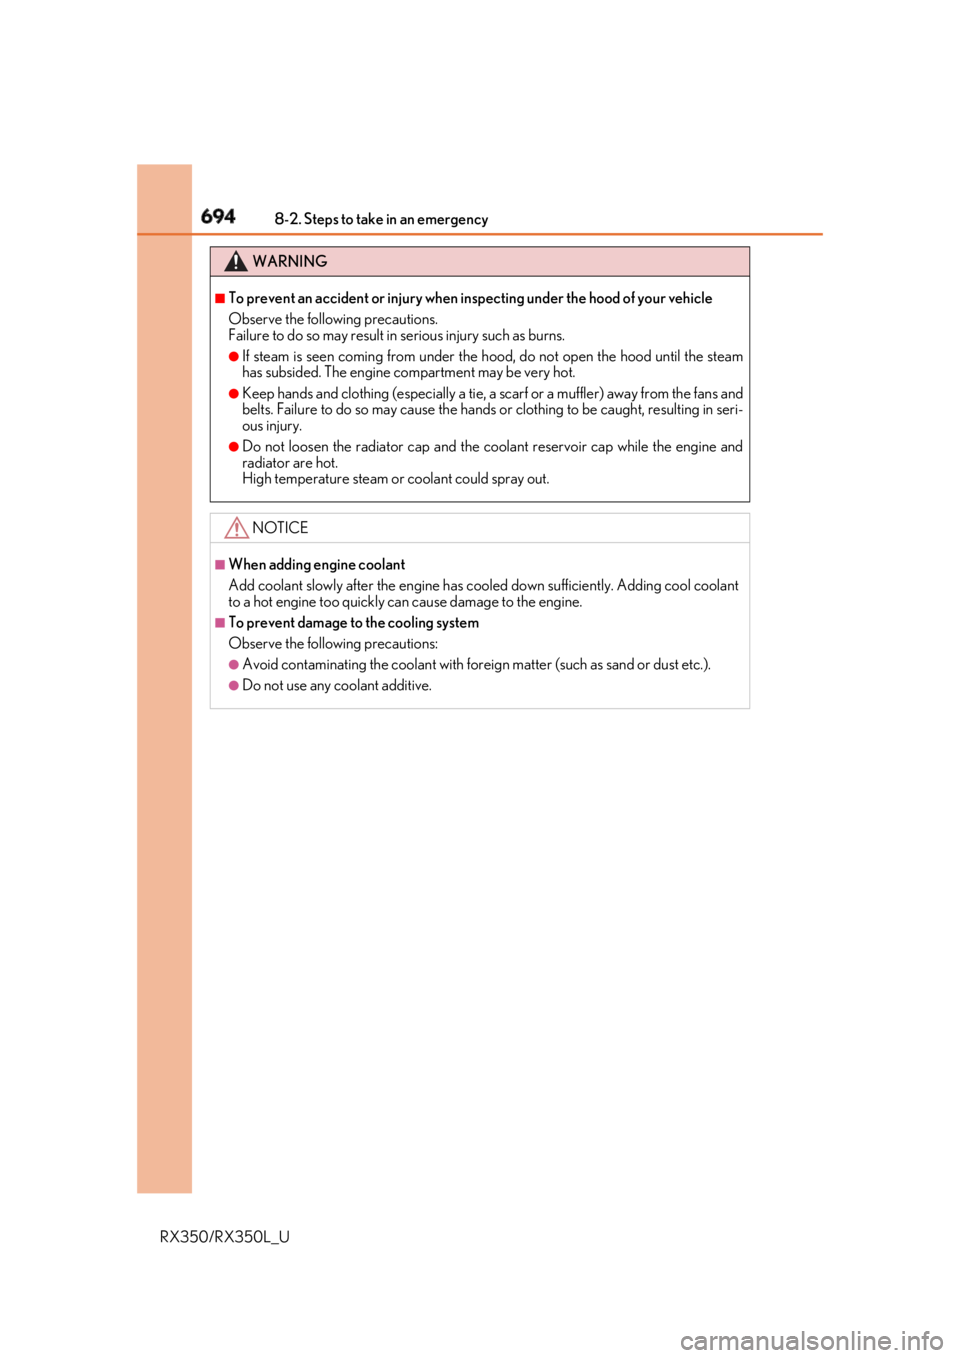
RX350/RX350L_U WARNING ■
To prevent an accident or injury when inspecting under the hood of your vehicle
Observe the following precautions.
Failure to do so may result in serious injury such as burns.●
If steam is seen coming from under the h ood, do not open the hood until the steam
has subsided. The engine compartment may be very hot. ●
Keep hands and clothing (especially a tie, a scarf or a muffler) away from the fans and
belts. Failure to do so may cause the hands or clothing to be caught, resulting in seri-
ous injury. ●
Do not loosen the radiator cap and the c oolant reservoir cap while the engine and
radiator are hot.
High temperature steam or coolant could spray out.
NOTICE ■
When adding engine coolant
Add coolant slowly after the engine has cool ed down sufficiently. Adding cool coolant
to a hot engine too quickly can cause damage to the engine. ■
To prevent damage to the cooling system
Observe the following precautions: ●
Avoid contaminating the coolant with foreig n matter (such as sand or dust etc.).●
Do not use any coolant additive.
Page 716 of 777

7159-1. Specifications
9
Vehicle specifications
RX350/RX350L_U ■
Temperature A, B, C
The temperature grades are A (the highes t), B, and C, representing the tire’s
resistance to the generation of heat and its ability to dissipate heat when
tested under controlled conditions on a specified indoor laboratory test
wheel. Sustained high temperature can cause the ma terial of the tire to degenerate and
reduce tire life, and excessive temperature can lead to sudden tire failure.
Grade C corresponds to a level of perfor mance which all passenger car tires must
meet under the Federa l Motor Vehicle Safety Standard No. 109.
Grades B and A represent higher levels of performance on the laboratory test
wheel than the minimum required by law.
Warning: The temperature grades of a tire assume that it is properly inflated and
not overloaded.
Excessive speed, underi nflation, or excessive loading, either separately or in com-
bination, can cause heat buildup and possible tire failure.
Page 719 of 777
718 9-1. Specifications
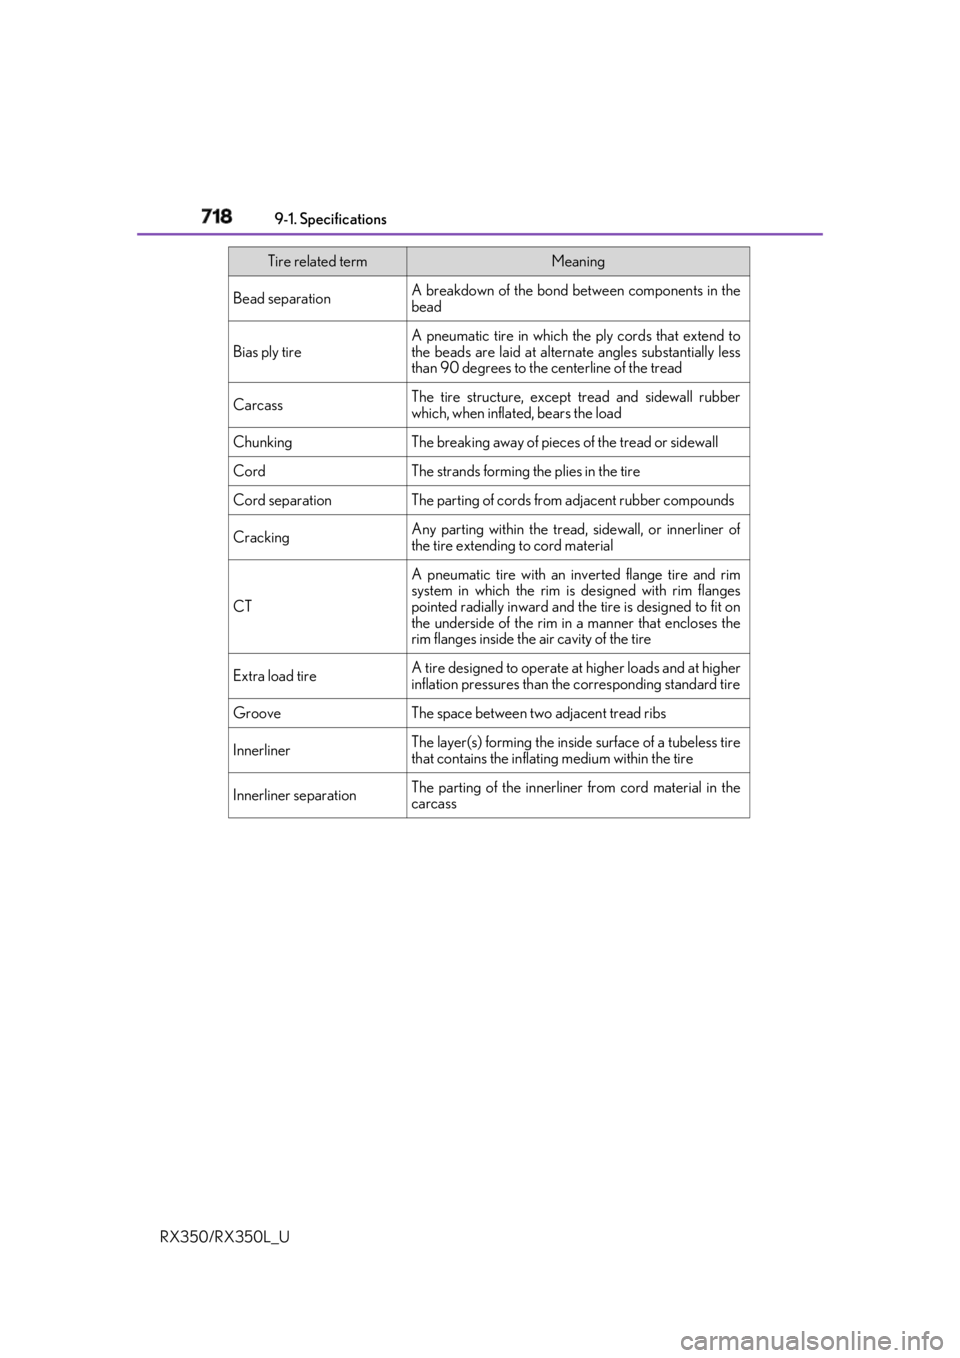
RX350/RX350L_U Bead separation A breakdown of the bond between components in the
bead
Bias ply tire A pneumatic tire in which the ply cords that extend to
the beads are laid at altern ate angles substantially less
than 90 degrees to the centerline of the tread
Carcass The tire structure, except tread and sidewall rubber
which, when inflated, bears the load
Chunking The breaking away of pieces of the tread or sidewall
Cord The strands forming th e plies in the tire
Cord separation The parting of cords from adjacent rubber compounds
Cracking Any parting within the tread, sidewall, or innerliner of
the tire extending to cord material
CT A pneumatic tire with an inverted flange tire and rim
system in which the rim is designed with rim flanges
pointed radially inward and the tire is designed to fit on
the underside of the rim in a manner that encloses the
rim flanges inside the air cavity of the tire
Extra load tire A tire designed to operate at higher loads and at higher
inflation pressures than the corresponding standard tire
Groove The space between two adjacent tread ribs
Innerliner The layer(s) forming the insi de surface of a tubeless tire
that contains the inflating medium within the tire
Innerliner separation The parting of the innerliner from cord material in the
carcassTire related term Meaning
Page 721 of 777
720 9-1. Specifications
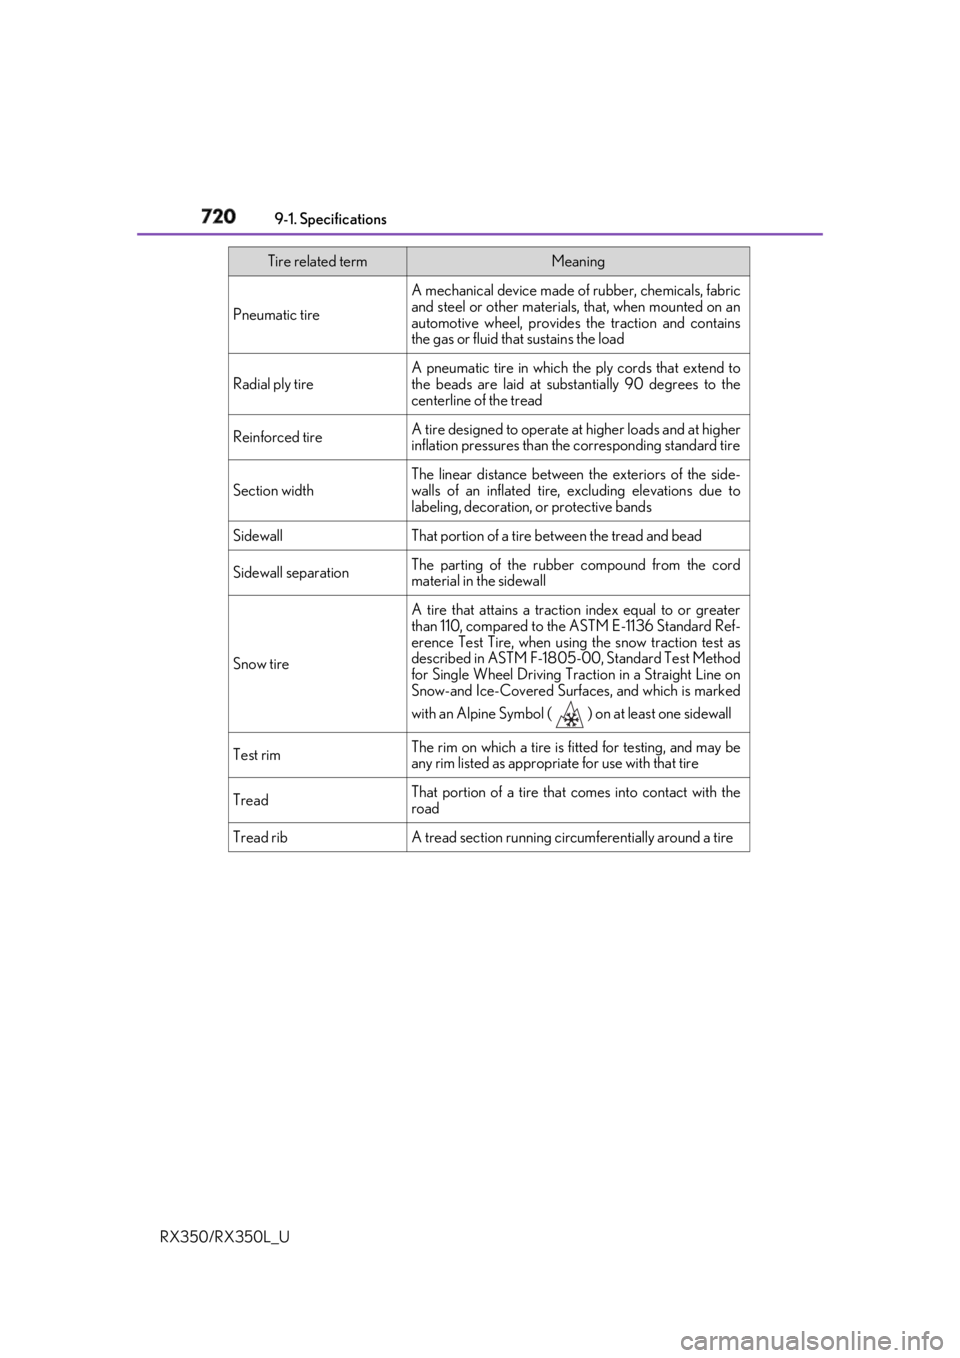
RX350/RX350L_U Pneumatic tire A mechanical device made of rubber, chemicals, fabric
and steel or other materials, that, when mounted on an
automotive wheel, provides the traction and contains
the gas or fluid that sustains the load
Radial ply tire A pneumatic tire in which the ply cords that extend to
the beads are laid at substa ntially 90 degrees to the
centerline of the tread
Reinforced tire A tire designed to operate at higher loads and at higher
inflation pressures than the corresponding standard tire
Section width The linear distance between the exteriors of the side-
walls of an inflated tire, excluding elevations due to
labeling, decoration, or protective bands
Sidewall That portion of a tire between the tread and bead
Sidewall separation The parting of the rubber compound from the cord
material in the sidewall
Snow tire A tire that attains a traction index equal to or greater
than 110, compared to the ASTM E-1136 Standard Ref-
erence Test Tire, when using the snow traction test as
described in ASTM F-1805-00, Standard Test Method
for Single Wheel Driving Traction in a Straight Line on
Snow-and Ice-Covered Surf aces, and which is marked
with an Alpine Symbol (
) on at least one sidewall
Test rim The rim on which a tire is fitted for testing, and may be
any rim listed as appropriate for use with that tire
Tread That portion of a tire that comes into contact with the
road
Tread rib A tread section running circ umferentially around a tireTire related term Meaning
Page 744 of 777
743
10
For owners
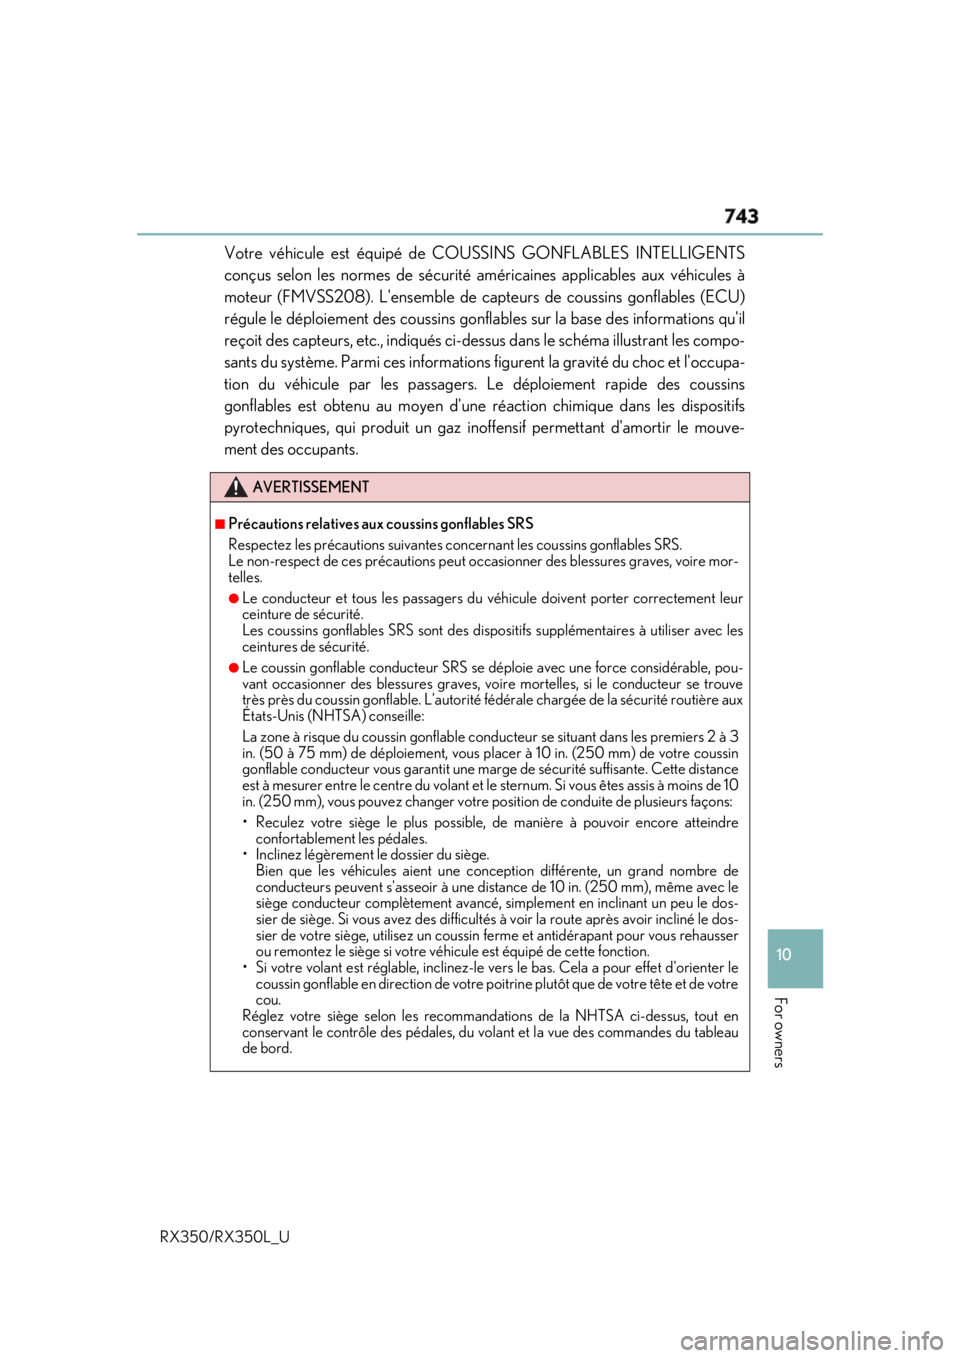
RX350/RX350L_U Votre véhicule est équipé de CO USSINS GONFLABLES INTELLIGENTS
conçus selon les normes de sécurité américaines applicables aux véhicules à
moteur (FMVSS208). L'ensemble de cap teurs de coussins gonflables (ECU)
régule le déploiement des coussins gonfla bles sur la base des informations qu'il
reçoit des capteurs, etc., indiqués ci-de ssus dans le schéma illustrant les compo-
sants du système. Parmi ces informations fi gurent la gravité du choc et l'occupa-
tion du véhicule par les passagers. Le déploiement rapide des coussins
gonflables est obtenu au moyen d'une réaction chimique dans les dispositifs
pyrotechniques, qui produit un gaz ino ffensif permettant d'amortir le mouve-
ment des occupants. AVERTISSEMENT ■
Précautions relatives aux coussins gonflables SRS
Respectez les précautions su ivantes concernant les co ussins gonflables SRS.
Le non-respect de ces précautions peut oc casionner des blessures graves, voire mor-
telles. ●
Le conducteur et tous les passagers du véhicule doivent porter correctement leur
ceinture de sécurité.
Les coussins gonflables SRS sont des disp ositifs supplémentaire s à utiliser avec les
ceintures de sécurité. ●
Le coussin gonflable conducteur SRS se déploie avec une force considérable, pou-
vant occasionner des blessures graves, voir e mortelles, si le conducteur se trouve
très près du coussin gonflable. L'autorité fédérale chargée de la sécurité routière aux
États-Unis (NHTSA) conseille:
La zone à risque du coussin gonflable cond ucteur se situant dans les premiers 2 à 3
in. (50 à 75 mm) de déploiement, vous placer à 10 in. (250 mm) de votre coussin
gonflable conducteur vous garantit une ma rge de sécurité suffisante. Cette distance
est à mesurer entre le centre du volant et le sternum. Si vous êtes assis à moins de 10
in. (250 mm), vous pouvez changer votre po sition de conduite de plusieurs façons:
• Reculez votre siège le plus possible, de manière à pouvoir encore atteindre
confortablement les pédales.
• Inclinez légèrement le dossier du siège.
Bien que les véhicules aient une conception différente, un grand nombre de
conducteurs peuvent s' asseoir à une distance de 10 in. (250 mm), même avec le
siège conducteur complètement avancé, si mplement en inclinant un peu le dos-
sier de siège. Si vous avez des difficulté s à voir la route aprè s avoir incliné le dos-
sier de votre siège, utilisez un coussin ferme et antidérapant pour vous rehausser
ou remontez le siège si votre véhicule est équipé de cette fonction.
• Si votre volant est réglable, inclinez-le vers le bas. Cela a pour effet d'orienter le
coussin gonflable en direction de votre poitrine plutôt que de votre tête et de votre
cou.
Réglez votre siège selon les recommanda tions de la NHTSA ci-dessus, tout en
conservant le contrôle des pédales, du vo lant et la vue des commandes du tableau
de bord.