warning lights LEXUS RX350 2020 User Guide
[x] Cancel search | Manufacturer: LEXUS, Model Year: 2020, Model line: RX350, Model: LEXUS RX350 2020Pages: 516, PDF Size: 17.3 MB
Page 71 of 516
712-1. Instrument cluster
2
Vehicle status information and indicators
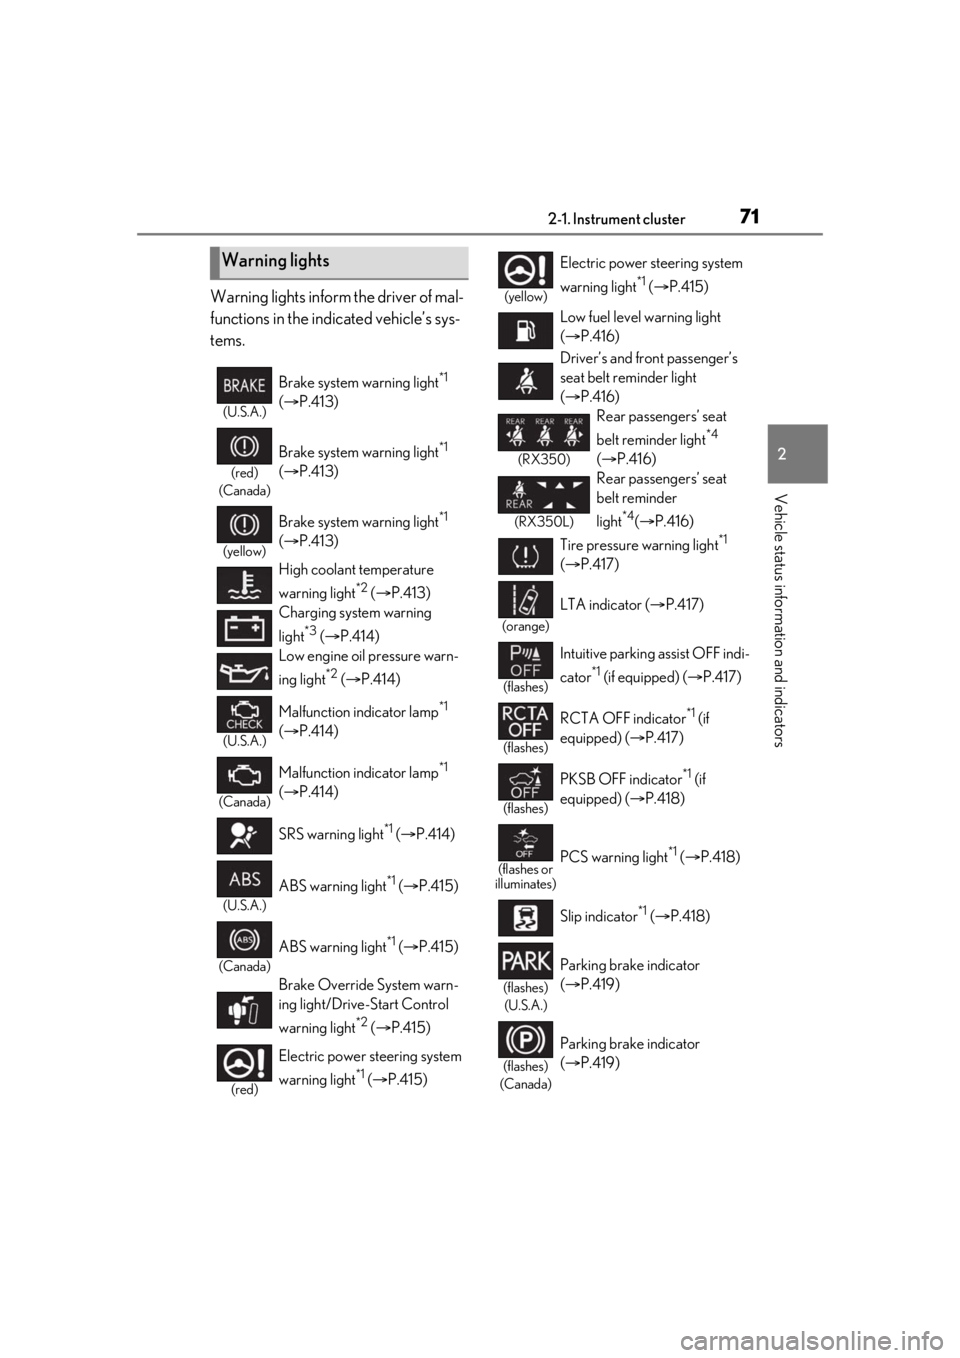
Warning lights inform the driver of mal-
functions in the indicated vehicle’s sys-
tems.
Warning lights
(U.S.A.)
Brake system warning light*1
( P.413)
(red)
(Canada)
Brake system warning light*1
( P.413)
(yellow)
Brake system warning light*1
( P.413)
High coolant temperature
warning light
*2 ( P.413)
Charging system warning
light
*3 ( P.414)
Low engine oil pressure warn-
ing light
*2 ( P.414)
(U.S.A.)
Malfunction indicator lamp*1
( P.414)
(Canada)
Malfunction indicator lamp*1
( P.414)
SRS warning light
*1 ( P.414)
(U.S.A.)
ABS warning light*1 ( P.415)
(Canada)
ABS warning light*1 ( P.415)
Brake Override System warn-
ing light/Drive-Start Control
warning light
*2 ( P.415)
(red)
Electric power st eering system
warning light
*1 ( P.415)
(yellow)
Electric power steering system
warning light
*1 ( P.415)
Low fuel level warning light
( P.416)
Driver’s and front passenger’s
seat belt reminder light
( P.416)
(RX350)
Rear passengers’ seat
belt reminder light
*4
( P.416)
(RX350L)
Rear passengers’ seat
belt reminder
light
*4( P.416)
Tire pressure warning light
*1
( P.417)
(orange)
LTA indicator ( P.417)
(flashes)
Intuitive parking assist OFF indi-
cator
*1 (if equipped) ( P.417)
(flashes)
RCTA OFF indicator*1 (if
equipped) ( P.417)
(flashes)
PKSB OFF indicator*1 (if
equipped) ( P.418)
(flashes or
illuminates)PCS warning light*1 ( P.418)
Slip indicator
*1 ( P.418)
(flashes)
(U.S.A.)
Parking brake indicator
( P.419)
(flashes)
(Canada)
Parking brake indicator
( P.419)
Page 72 of 516
722-1. Instrument cluster
*1: These lights turn on when the engine switch is turned to IGNITION ON
mode to indicate that a system check is
being performed. They will turn off after
the engine is started, or after a few sec-
onds. There may be a malfunction in a
system if a light does not come on, or
turn off. Have the vehicle inspected by
your Lexus dealer.
*2: This light illuminates on the multi-infor-mation display.
*3: Except F SPORT models: This light illu-minates on the multi-information dis-
play.
F SPORT models: This light illuminates
on the meter.
*4: This light illuminates on the center panel.
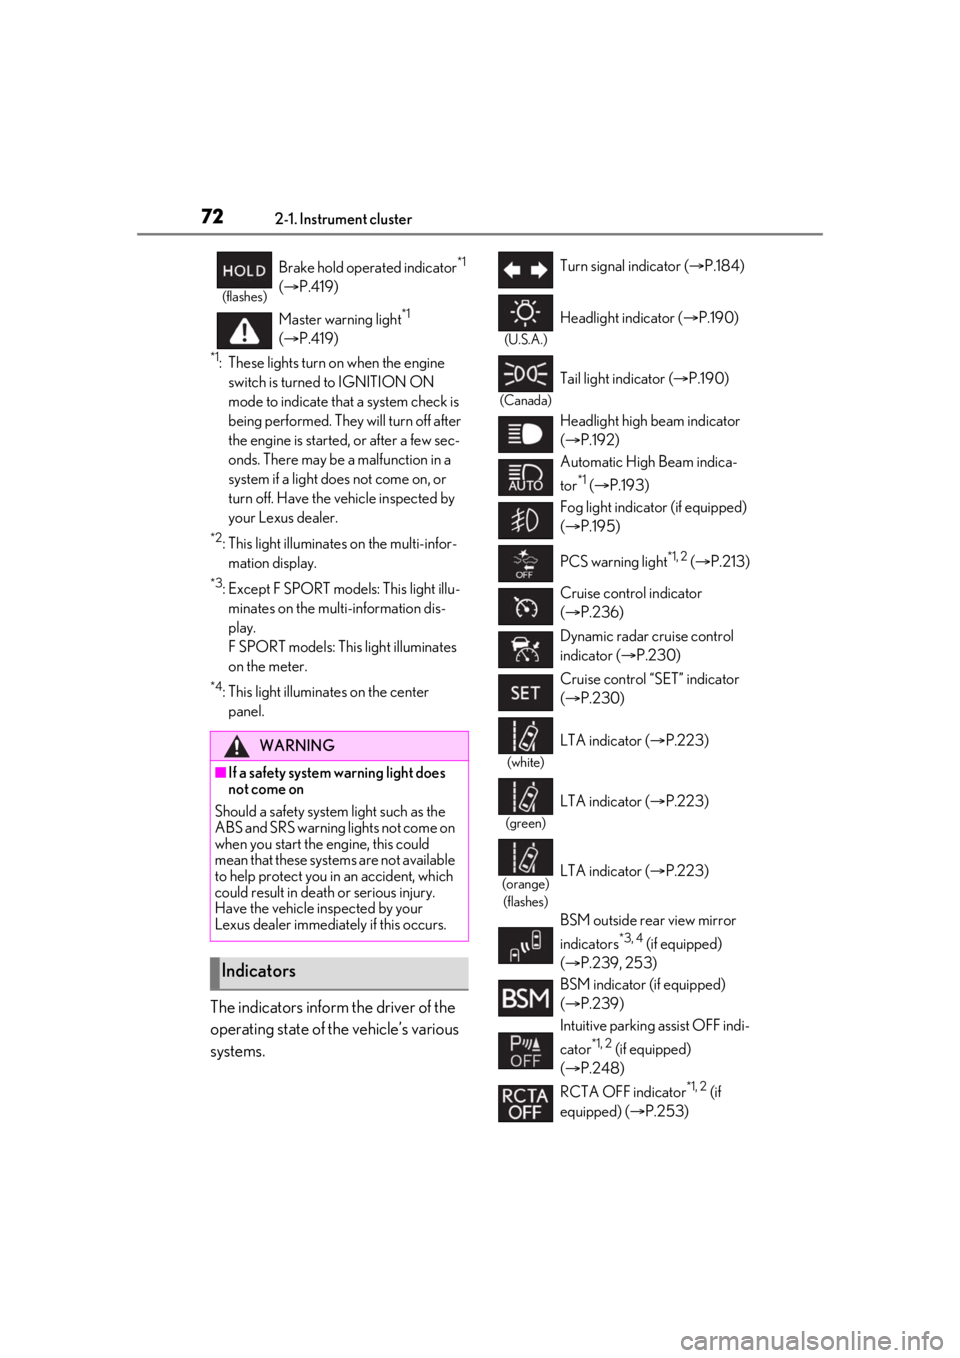
The indicators inform the driver of the
operating state of the vehicle’s various
systems.
(flashes)
Brake hold operated indicator*1
( P.419)
Master warning light
*1
( P.419)
WARNING
■If a safety system warning light does
not come on
Should a safety system light such as the
ABS and SRS warning lights not come on
when you start the engine, this could
mean that these systems are not available
to help protect you in an accident, which
could result in death or serious injury.
Have the vehicle inspected by your
Lexus dealer immediately if this occurs.
Indicators
Turn signal indicator ( P.184)
(U.S.A.)
Headlight indicator ( P.190)
(Canada)
Tail light indicator ( P.190)
Headlight high beam indicator
( P.192)
Automatic High Beam indica-
tor
*1 ( P.193)
Fog light indicator (if equipped)
( P.195)
PCS warning light
*1, 2 ( P.213)
Cruise control indicator
( P.236)
Dynamic radar cruise control
indicator ( P.230)
Cruise control “SET” indicator
( P.230)
(white)
LTA indicator ( P.223)
(green)
LTA indicator ( P.223)
(orange)
(flashes)LTA indicator ( P.223)
BSM outside rear view mirror
indicators
*3, 4 (if equipped)
( P.239, 253)
BSM indicator (if equipped)
( P.239)
Intuitive parking assist OFF indi-
cator
*1, 2 (if equipped)
( P.248)
RCTA OFF indicator
*1, 2 (if
equipped) ( P.253)
Page 78 of 516
782-1. Instrument cluster
■Display items
Odometer
Displays the total distance the vehicle has
been driven.
Trip meter A/trip meter B
Displays the distance the vehicle has been
driven since the meter was last reset. Trip
meters A and B can be used to record and
display different distances independently.
Distance until next engine oil
change
Displays the distance the vehicle can be
driven until an oil change is necessary.
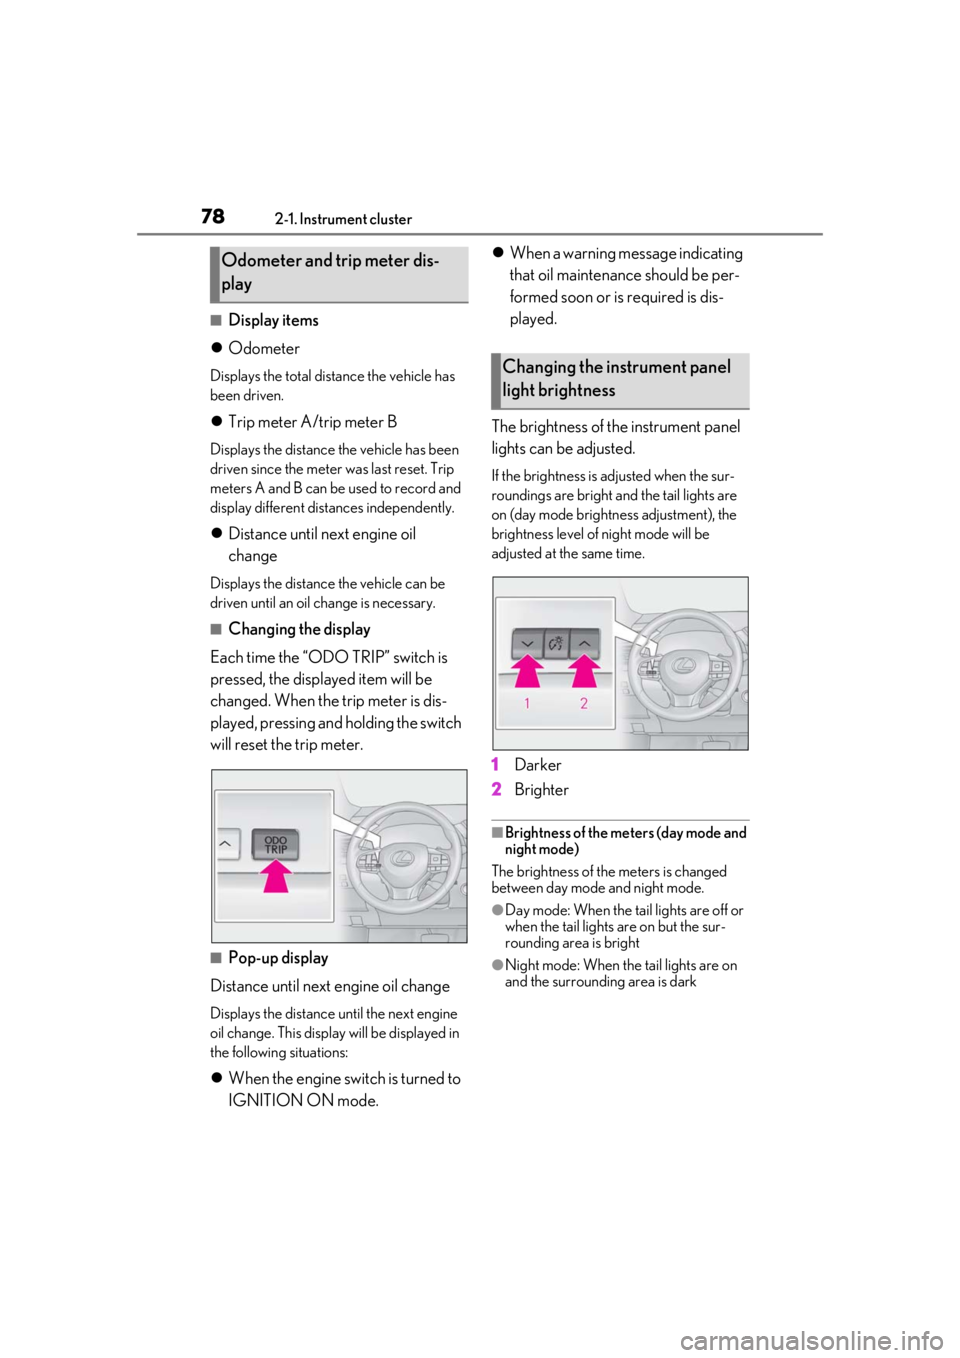
■Changing the display
Each time the “ODO TRIP” switch is
pressed, the displayed item will be
changed. When the trip meter is dis-
played, pressing and holding the switch
will reset the trip meter.
■Pop-up display
Distance until next engine oil change
Displays the distance until the next engine
oil change. This display will be displayed in
the following situations:
When the engine switch is turned to
IGNITION ON mode.
When a warning message indicating
that oil maintenance should be per-
formed soon or is required is dis-
played.
The brightness of the instrument panel
lights can be adjusted.
If the brightness is adjusted when the sur-
roundings are bright and the tail lights are
on (day mode bright ness adjustment), the
brightness level of night mode will be
adjusted at the same time.
1 Darker
2 Brighter
■Brightness of the meters (day mode and
night mode)
The brightness of the meters is changed
between day mode and night mode.
●Day mode: When the tail lights are off or
when the tail lights are on but the sur-
rounding area is bright
●Night mode: When the tail lights are on
and the surrounding area is dark
Odometer and trip meter dis-
play
Changing the instrument panel
light brightness
Page 141 of 516
1413-4. Adjusting the steering wheel and mirrors
3
Before driving
The height of the rear view mirror can
be adjusted to suit your driving pos-
ture.
Adjust the height of the rear view mir-
ror by moving it up and down.
Responding to the level of brightness
of the headlights of vehicles behind, the
reflected light is automatically
reduced.
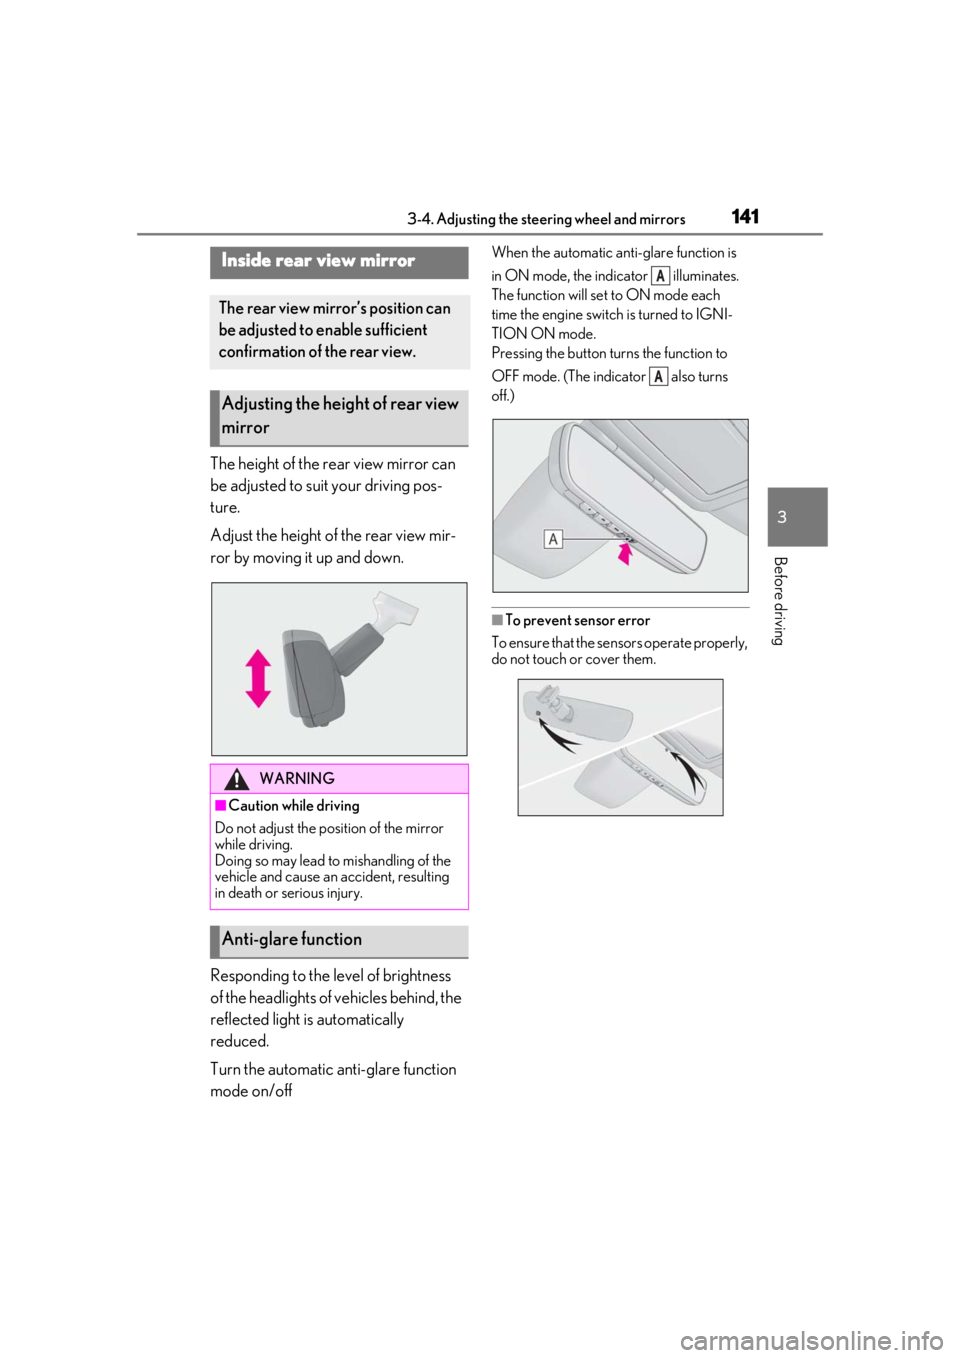
Turn the automatic anti-glare function
mode on/off
When the automatic anti-glare function is
in ON mode, the indicator illuminates.
The function will set to ON mode each
time the engine switch is turned to IGNI-
TION ON mode.
Pressing the button turns the function to
OFF mode. (The indicator also turns
off.)
■To prevent sensor error
To ensure that the sensors operate properly,
do not touch or cover them.
Inside rear view mirror
The rear view mirror’s position can
be adjusted to enable sufficient
confirmation of the rear view.
Adjusting the height of rear view
mirror
WARNING
■Caution while driving
Do not adjust the position of the mirror
while driving.
Doing so may lead to mishandling of the
vehicle and cause an accident, resulting
in death or serious injury.
Anti-glare function
A
A
Page 168 of 516
1684-1. Before driving
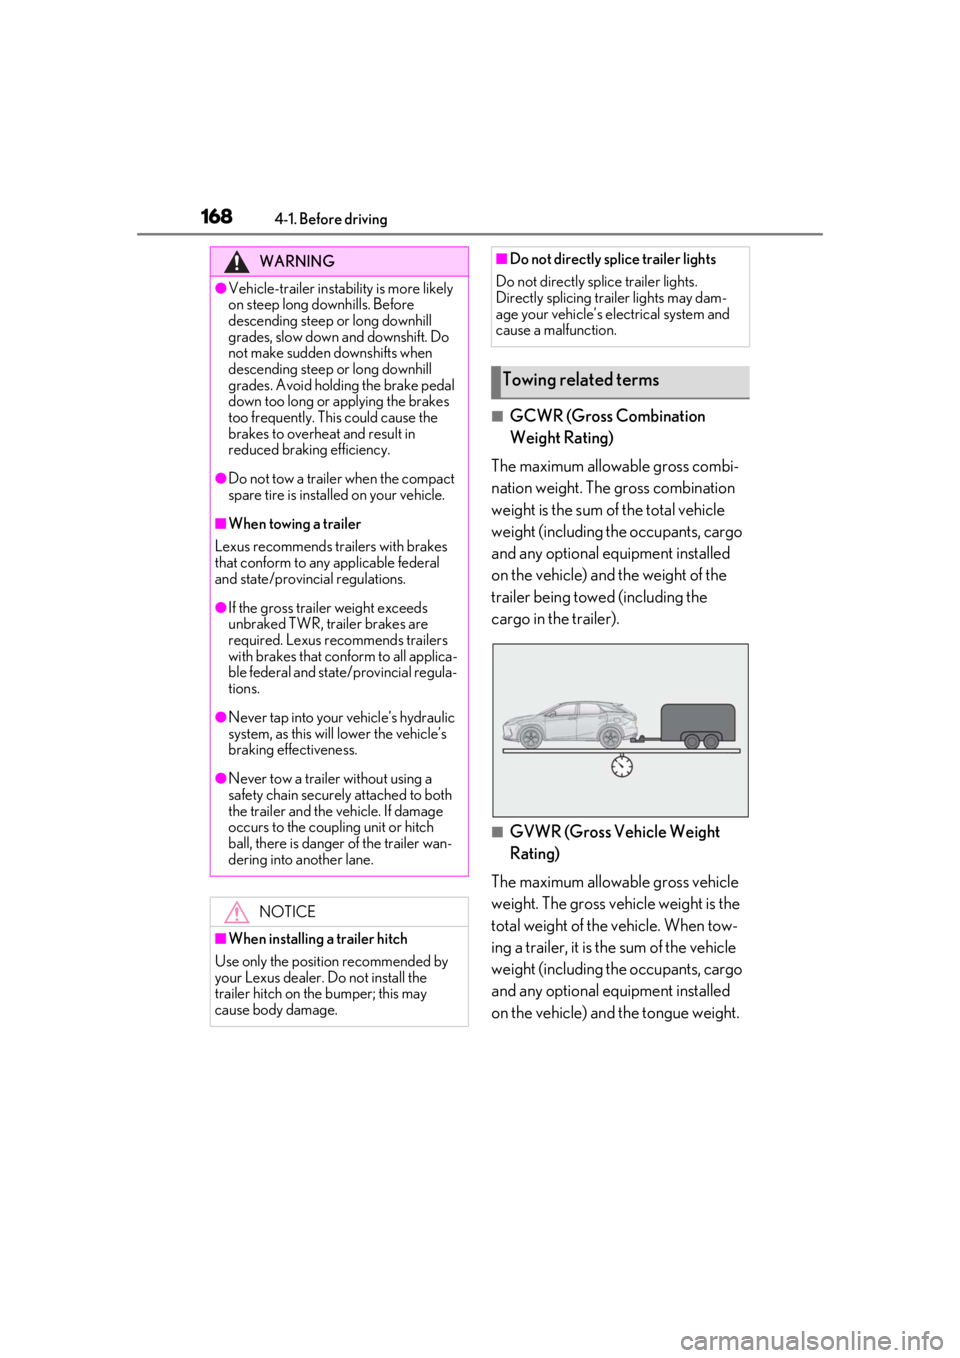
■GCWR (Gross Combination
Weight Rating)
The maximum allowable gross combi-
nation weight. The gross combination
weight is the sum of the total vehicle
weight (including the occupants, cargo
and any optional equipment installed
on the vehicle) and the weight of the
trailer being towed (including the
cargo in the trailer).
■GVWR (Gross Vehicle Weight
Rating)
The maximum allowable gross vehicle
weight. The gross vehicle weight is the
total weight of the vehicle. When tow-
ing a trailer, it is the sum of the vehicle
weight (including the occupants, cargo
and any optional equipment installed
on the vehicle) and the tongue weight.
WARNING
●Vehicle-trailer instabil ity is more likely
on steep long downhills. Before
descending steep or long downhill
grades, slow down and downshift. Do
not make sudden downshifts when
descending steep or long downhill
grades. Avoid holding the brake pedal
down too long or applying the brakes
too frequently. This could cause the
brakes to overheat and result in
reduced braking efficiency.
●Do not tow a trailer when the compact
spare tire is installed on your vehicle.
■When towing a trailer
Lexus recommends trailers with brakes
that conform to any applicable federal
and state/provincial regulations.
●If the gross trailer weight exceeds
unbraked TWR, trailer brakes are
required. Lexus recommends trailers
with brakes that conform to all applica-
ble federal and state/provincial regula-
tions.
●Never tap into your vehicle’s hydraulic
system, as this will lower the vehicle’s
braking effectiveness.
●Never tow a trailer without using a
safety chain securely attached to both
the trailer and the vehicle. If damage
occurs to the coupling unit or hitch
ball, there is danger of the trailer wan-
dering into another lane.
NOTICE
■When installing a trailer hitch
Use only the position recommended by
your Lexus dealer. Do not install the
trailer hitch on the bumper; this may
cause body damage.
■Do not directly splice trailer lights
Do not directly splice trailer lights.
Directly splicing trailer lights may dam-
age your vehicle’s electrical system and
cause a malfunction.
Towing related terms
Page 184 of 516

1844-2. Driving procedures
engine).
In the following situations, the gear will
not shift even if the shift lever or paddle
shift switches are operated.
The vehicle speed is low (upshift
only).
■Downshifting restriction warning
buzzer
To help ensure safety and driving perfor-
mance, downshifting operation may some-
times be restricted. In some circumstances,
downshifting may not be possible even
when the paddle shift switch is operated. (A
buzzer will sound twice.)
1 Right turn
2 Lane change to the right (move the
lever partway and release it)
The right hand signals will flash 3 times.
3Lane change to the left (move the
lever partway and release it)
The left hand signals will flash 3 times.
4Left turn
■Turn signals can be operated when
The engine switch is in IGNITION ON
mode.
■If the indicator flashes faster than usual
Check that a light bulb in the front or rear
turn signal lights has not burned out.
■If the turn signals stop flashing before a
lane change has been performed
Operate the lever again.
Turn signal lever
Operating instructions
Page 193 of 516
1934-3. Operating the lights and wipers
4
Driving
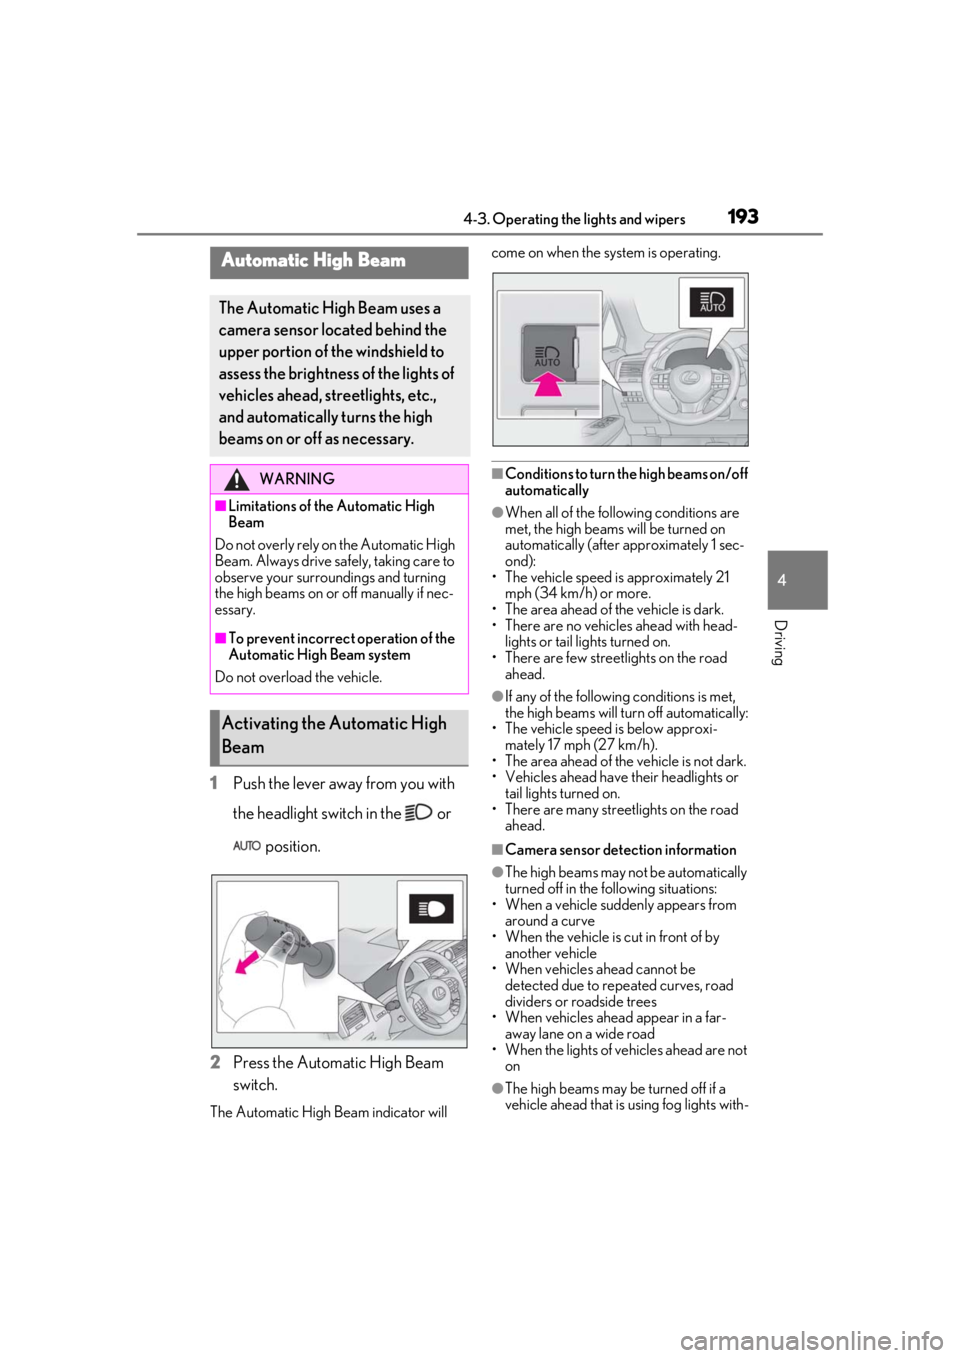
1Push the lever away from you with
the headlight switch in the or
position.
2 Press the Automatic High Beam
switch.
The Automatic High Beam indicator will come on when the system is operating.
■Conditions to turn the high beams on/off
automatically
●When all of the follo
wing conditions are
met, the high beams will be turned on
automatically (after approximately 1 sec-
ond):
• The vehicle speed is approximately 21 mph (34 km/h) or more.
• The area ahead of the vehicle is dark.
• There are no vehicles ahead with head- lights or tail lights turned on.
• There are few streetlights on the road ahead.
●If any of the following conditions is met,
the high beams will turn off automatically:
• The vehicle speed is below approxi-
mately 17 mph (27 km/h).
• The area ahead of the vehicle is not dark.
• Vehicles ahead have their headlights or
tail lights turned on.
• There are many streetlights on the road ahead.
■Camera sensor dete ction information
●The high beams may not be automatically
turned off in the following situations:
• When a vehicle suddenly appears from around a curve
• When the vehicle is cut in front of by
another vehicle
• When vehicles ahead cannot be detected due to repeated curves, road
dividers or roadside trees
• When vehicles ahead appear in a far- away lane on a wide road
• When the lights of vehicles ahead are not
on
●The high beams may be turned off if a
vehicle ahead that is using fog lights with-
Automatic High Beam
The Automatic High Beam uses a
camera sensor located behind the
upper portion of the windshield to
assess the brightness of the lights of
vehicles ahead, streetlights, etc.,
and automatically turns the high
beams on or off as necessary.
WARNING
■Limitations of the Automatic High
Beam
Do not overly rely on the Automatic High
Beam. Always drive sa fely, taking care to
observe your surroundings and turning
the high beams on or off manually if nec-
essary.
■To prevent incorrect operation of the
Automatic High Beam system
Do not overload the vehicle.
Activating the Automatic High
Beam
Page 199 of 516
1994-3. Operating the lights and wipers
4
Driving
opened, the operation of the windshield
wipers will be stopped to prevent anyone
near the vehicle from being sprayed by
water from the wipers, provided the vehicle
is stopped with the parking brake applied or
the shift lever in P. When the front door is
closed, wiper operation will resume.
■Customization
Some functions can be customized.
( P.470)
When the windshield wipers are not being used, they retract to below the
hood. To enable the windshield wipers
to be lifted when parking in cold condi-
tions or when replacing a windshield
wiper insert, change the rest position of
the windshield wipers to the service
position using the wiper lever.
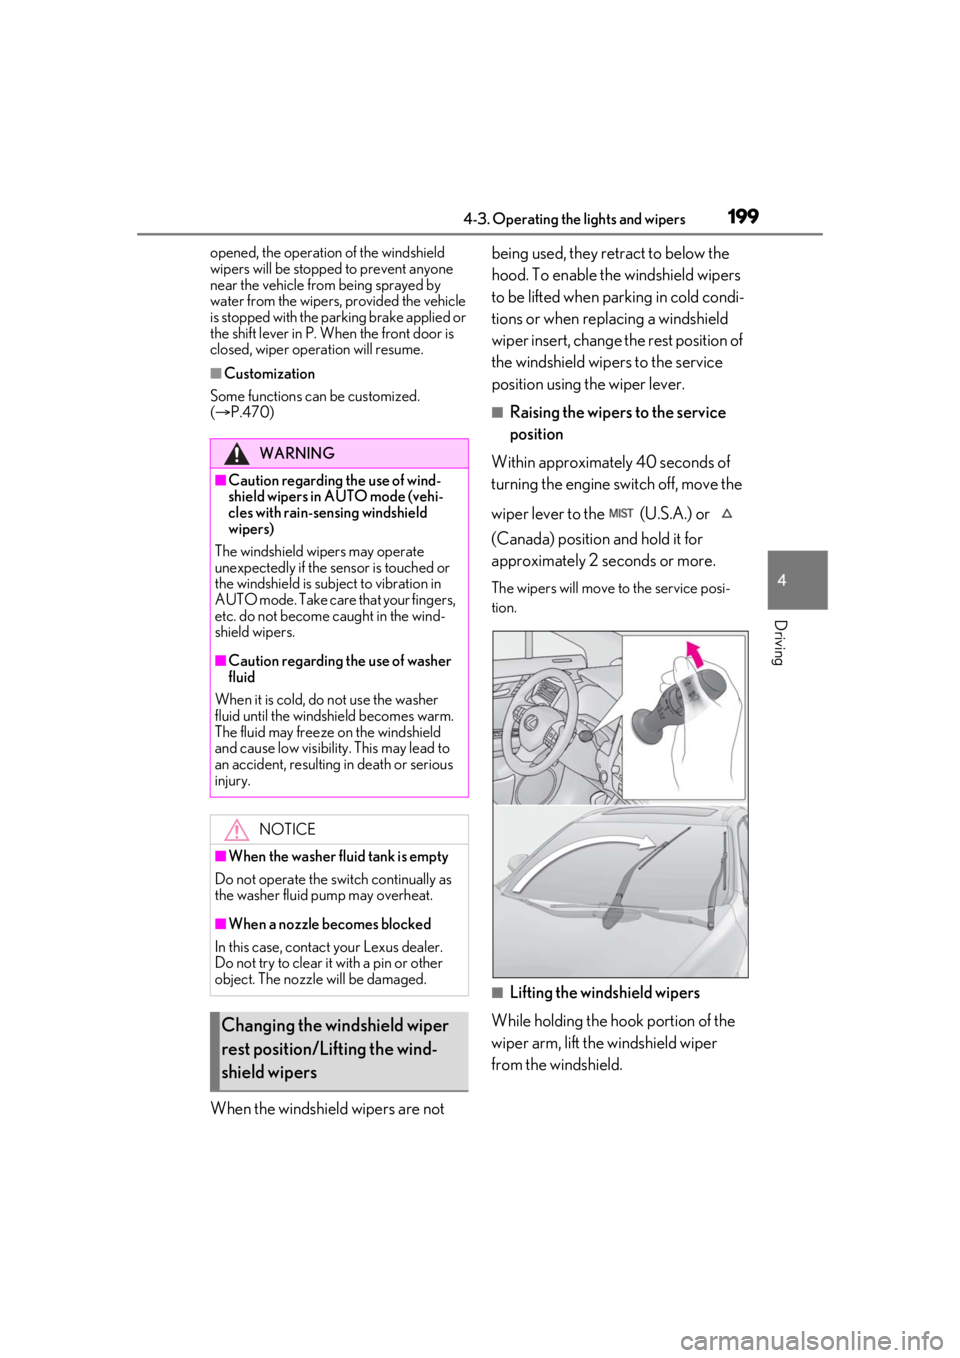
■Raising the wipers to the service
position
Within approximately 40 seconds of
turning the engine switch off, move the
wiper lever to the (U.S.A.) or
(Canada) position and hold it for
approximately 2 seconds or more.
The wipers will move to the service posi-
tion.
■Lifting the windshield wipers
While holding the hook portion of the
wiper arm, lift the windshield wiper
from the windshield.
WARNING
■Caution regarding the use of wind-
shield wipers in AUTO mode (vehi-
cles with rain-sen sing windshield
wipers)
The windshield wipers may operate
unexpectedly if the sensor is touched or
the windshield is subject to vibration in
AUTO mode. Take care that your fingers,
etc. do not become caught in the wind-
shield wipers.
■Caution regarding the use of washer
fluid
When it is cold, do not use the washer
fluid until the windshield becomes warm.
The fluid may freeze on the windshield
and cause low visibility. This may lead to
an accident, resulting in death or serious
injury.
NOTICE
■When the washer fluid tank is empty
Do not operate the switch continually as
the washer fluid pump may overheat.
■When a nozzle becomes blocked
In this case, contact your Lexus dealer.
Do not try to clear it with a pin or other
object. The nozzle will be damaged.
Changing the windshield wiper
rest position/Lifting the wind-
shield wipers
Page 207 of 516
2074-5. Using the driving support systems
4
Driving
WARNING
●If the part of the windshield in front of
the front camera is fogged up or cov-
ered with condensation, or ice, use the
windshield defogger to remove the
fog, condensation, or ice. (P.296)
●If water droplets cannot be properly
removed from the area of the wind-
shield in front of the front camera by
the windshield wipers, replace the
wiper insert or wiper blade.
• To replace a wiper insert:
P.388
• If the wiper blades need to be replaced, contact your Lexus dealer.
●Do not attach window tint to the wind-
shield.
●Replace the windshield if it is damaged
or cracked.
If the windshield needs to be replaced,
contact your Lexus dealer.
●Do not allow liquids to contact the
front camera.
●Do not allow bright lights to shine into
the front camera.
●Do not dirty or damage the front cam-
era.
When cleaning the inside of the wind-
shield, do not allow glass cleaner to
contact the lens of the front camera.
Also, do not touch the lens.
If the lens is dirty or damaged, contact
your Lexus dealer.
●Do not subject the front camera to a
strong impact.
●Do not change the installation position
or direction of the front camera or
remove it.
●Do not disassemble the front camera.
●Do not modify any components of the
vehicle around the front camera
(inside rear view mirror, etc.) or ceiling.
●Do not attach any accessories to the
hood, front grille or front bumper that
may obstruct the front camera. Con-
tact your Lexus dealerfor details.
●If a surfboard or other long object is to
be mounted on the roof, make sure
that it will not obstruct the front cam-
era.
●Do not modify the headlights or other
lights.
Page 219 of 516
2194-5. Using the driving support systems
4
Driving
WARNING
●When tires of a size other than speci-
fied are installed.
●Vehicle is driven in traffic lanes other
than that highways and freeways.
●When your vehicle is towing a trailer
(vehicles with towing package) or
during emergency towing.
■Preventing LTA system malfunctions
and operations performed by mistake
●Do not modify the headlights or place
stickers, etc. on the surface of the
lights.
●Do not modify the suspension etc. If
the suspension etc. needs to be
replaced, contact your Lexus dealer.
●Do not install or place anything on the
hood or grille. Also, do not install a
grille guard (bull bars, kangaroo bar,
etc.).
●If your windshield needs repairs, con-
tact your Lexus dealer.
■Conditions in which functions may
not operate properly
In the following situations, the functions
may not operate properly and the vehicle
may depart from its lane. Drive safely by
always paying careful attention to your
surroundings and operate the steering
wheel to correct the path of the vehicle
without relying solely on the functions.
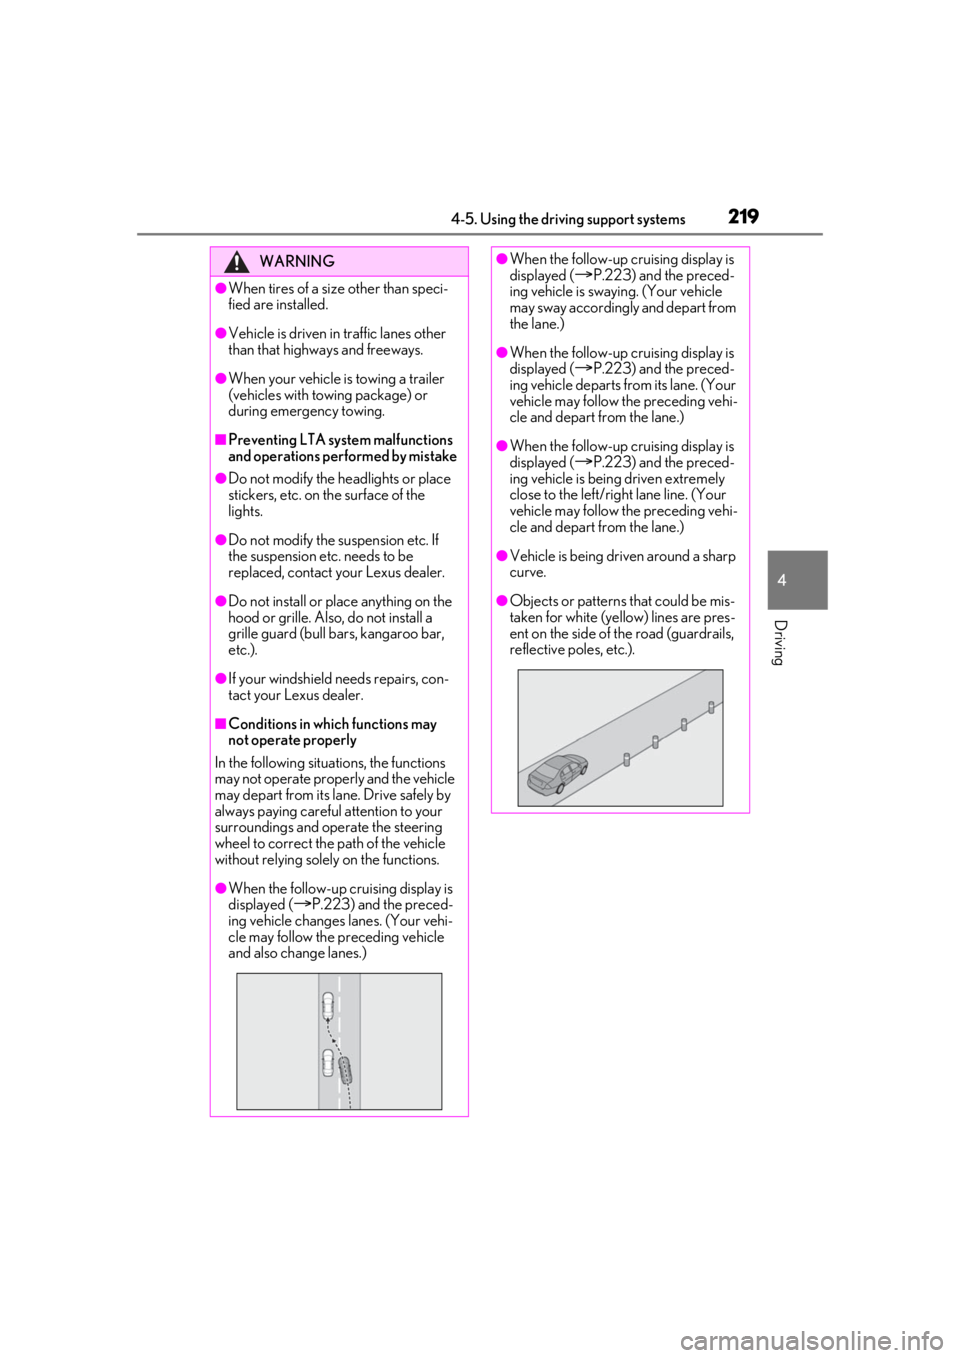
●When the follow-up cruising display is
displayed (P.223) and the preced-
ing vehicle changes lanes. (Your vehi-
cle may follow the preceding vehicle
and also change lanes.)
●When the follow-up cruising display is
displayed (P.223) and the preced-
ing vehicle is swaying. (Your vehicle
may sway accordingly and depart from
the lane.)
●When the follow-up cruising display is
displayed (
P.223) and the preced-
ing vehicle departs from its lane. (Your
vehicle may follow the preceding vehi-
cle and depart from the lane.)
●When the follow-up cruising display is
displayed (
P.223) and the preced-
ing vehicle is being driven extremely
close to the left/right lane line. (Your
vehicle may follow the preceding vehi-
cle and depart from the lane.)
●Vehicle is being driven around a sharp
curve.
●Objects or patterns that could be mis-
taken for white (yellow) lines are pres-
ent on the side of the road (guardrails,
reflective poles, etc.).