engine LEXUS RX350 2021 Owners Manual
[x] Cancel search | Manufacturer: LEXUS, Model Year: 2021, Model line: RX350, Model: LEXUS RX350 2021Pages: 508, PDF Size: 10.33 MB
Page 372 of 508
3726-3. Do-it-yourself maintenance
on.
Depending on the vehicle and driving con-
ditions, initialization may take up to
approximately 1 hour to complete.
■Initializing the tire pressure warning sys-
tem
Initialize the system with the tire inflation
pressure adjusted to the specified level.
■If you press the tire pressure warning
reset switch accidentally
If initialization is performed, adjust the tire
inflation pressure to the specified level and
initialize the tire pr essure warning system
again.
■Initialization procedure
●Make sure to carry ou t initialization after
adjusting the tire inflation pressure.
Also, make sure the tires are cold before
carrying out initializat ion or tire inflation
pressure adjustment.
●If you have accidentally turned the engine
switch off during initialization, it is not
necessary to press the reset switch again
as initialization will restart automatically
when the engine switch has been turned
to IGNITION ON mode for the next
time.
●If you accidentally pr ess the reset switch
when initialization is not necessary, adjust
the tire inflation pres sure to the specified
level when the tires are cold, and conduct
initialization again.
●While the position of each tire is being
determined and the inflation pressures
are not being displayed on the
multi-information display, if the inflation
pressure of a tire drops, the tire pressure
warning light will come on.
■When initialization of the tire pressure
warning system has failed
Initialization may take lo nger to complete if
the vehicle is driven on an unpaved road.
When performing initialization, drive on a
paved road if possible. Depending on the
driving environment and condition of the
tires, initialization will be completed in
approximately 10 to 30 minutes. If initializa-
tion is not complete after driving approxi- mately 10 to 30 minutes, continue driving
for a while.
If the inflation pressure of each tire is not
displayed after driving for approximately 1
hour, perform the following procedure.
●Park the vehicle in a safe place for
approximately 20 minutes. Then drive
straight (with occasional left and right
turns) at approximately 25 mph (40
km/h) or more for approximately 10 to
30 minutes.
However, in the following situations, the tire
inflation pressure will not be recorded and
the system will not operate properly. Per-
form initialization again.
●When operating the tire pressure warn-
ing reset switch, the tire pressure warning
light does not blink 3 times.
●After performing init ialization, the tire
pressure warning light blinks for 1 minute
then stays on while driving.
If the inflation pressure of each tire is still not
displayed, have the vehicle inspected by
your Lexus dealer.
The tire pressure warning valve and
transmitter is equipped with a unique
ID code. When replacing a tire pres-
sure warning valve and transmitter, it is
necessary to register the ID code.
Have the ID code registered by your
Lexus dealer.
WARNING
■When initializing the tire pressure
warning system
Do not initializing tire inflation pressure
without first adjusting the tire inflation
pressure to the spec ified level. Other-
wise, the tire pressu re warning light may
not come on even if the tire inflation pres-
sure is low, or it may come on when the
tire inflation pressure is actually normal.
Registering ID codes
Page 376 of 508
3766-3. Do-it-yourself maintenance
1Turn the engine switch off.
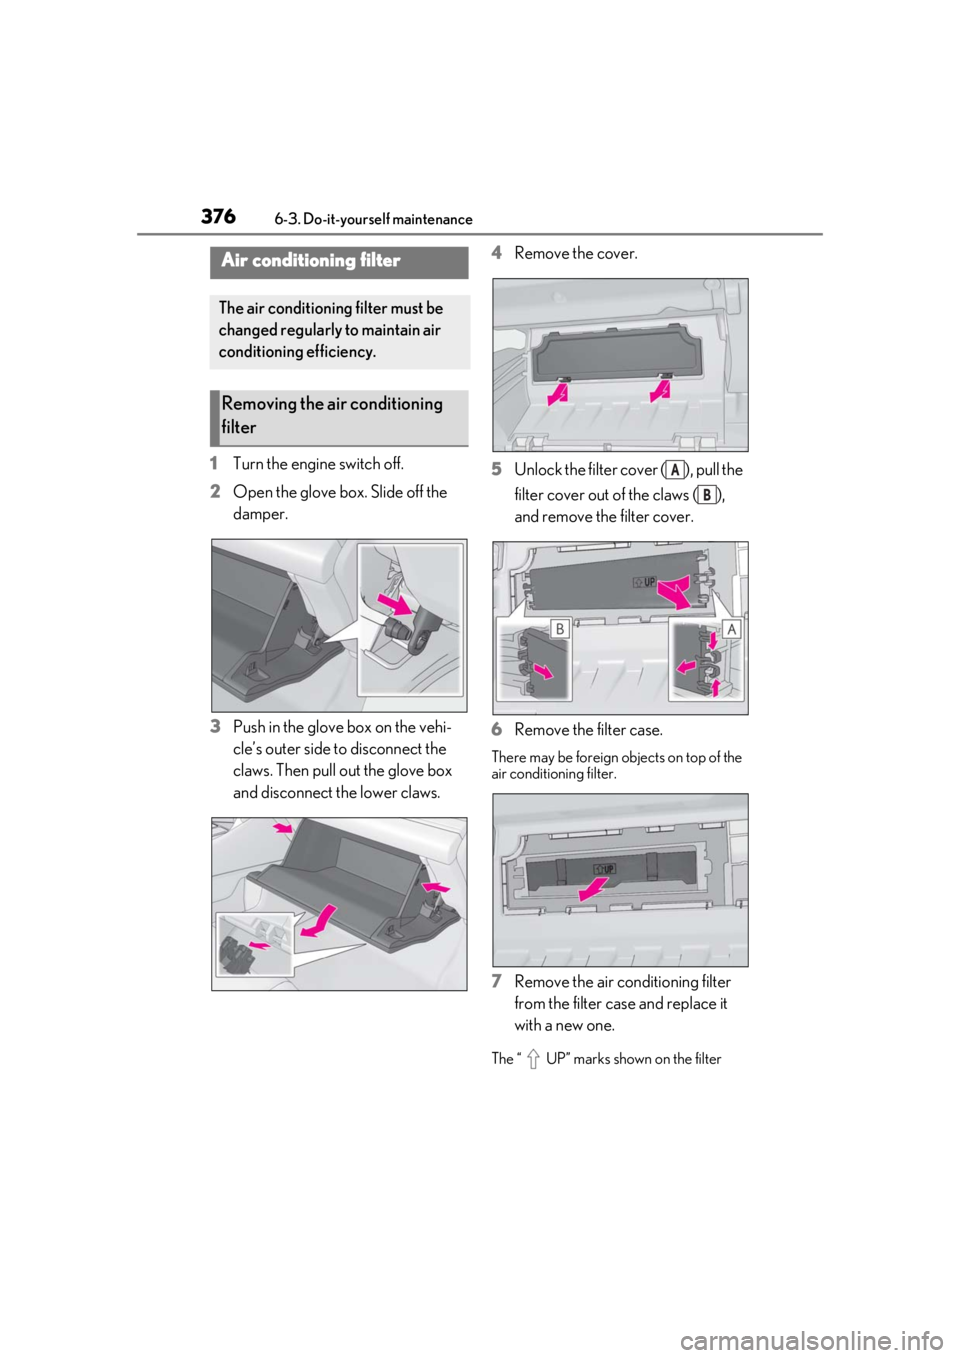
2 Open the glove box. Slide off the
damper.
3 Push in the glove box on the vehi-
cle’s outer side to disconnect the
claws. Then pull out the glove box
and disconnect the lower claws. 4
Remove the cover.
5 Unlock the filter cover ( ), pull the
filter cover out of the claws ( ),
and remove the filter cover.
6 Remove the filter case.
There may be foreign objects on top of the
air conditioning filter.
7Remove the air conditioning filter
from the filter case and replace it
with a new one.
The “ UP” marks shown on the filter
Air conditioning filter
The air conditioning filter must be
changed regularly to maintain air
conditioning efficiency.
Removing the air conditioning
filter
A
B
Page 381 of 508
3816-3. Do-it-yourself maintenance
6
Maintenance and care
1Turn the engine switch off.
2 Open the fuse box cover.
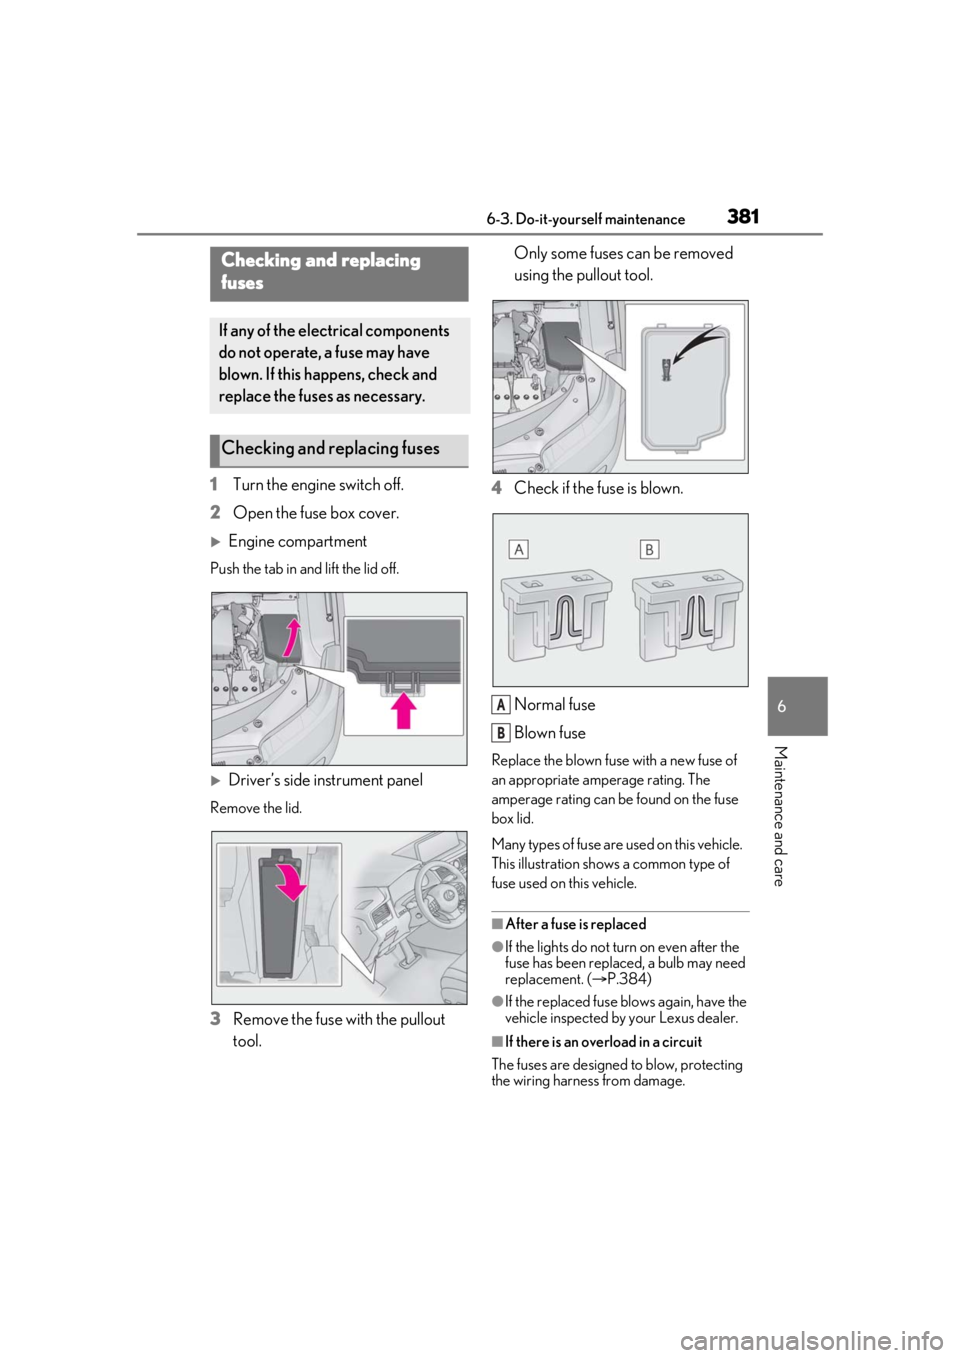
Engine compartment
Push the tab in and lift the lid off.
Driver’s side instrument panel
Remove the lid.
3Remove the fuse with the pullout
tool. Only some fuses can be removed
using the pullout tool.
4 Check if the fuse is blown.
Normal fuse
Blown fuse
Replace the blown fuse with a new fuse of
an appropriate amperage rating. The
amperage rating can be found on the fuse
box lid.
Many types of fuse are used on this vehicle.
This illustration shows a common type of
fuse used on this vehicle.
■After a fuse is replaced
●If the lights do not turn on even after the
fuse has been replaced, a bulb may need
replacement. ( P.384)
●If the replaced fuse blows again, have the
vehicle inspected by your Lexus dealer.
■If there is an overload in a circuit
The fuses are designed to blow, protecting
the wiring harness from damage.
Checking and replacing
fuses
If any of the electrical components
do not operate, a fuse may have
blown. If this happens, check and
replace the fuses as necessary.
Checking and replacing fuses
A
B
Page 387 of 508
3876-3. Do-it-yourself maintenance
6
Maintenance and care
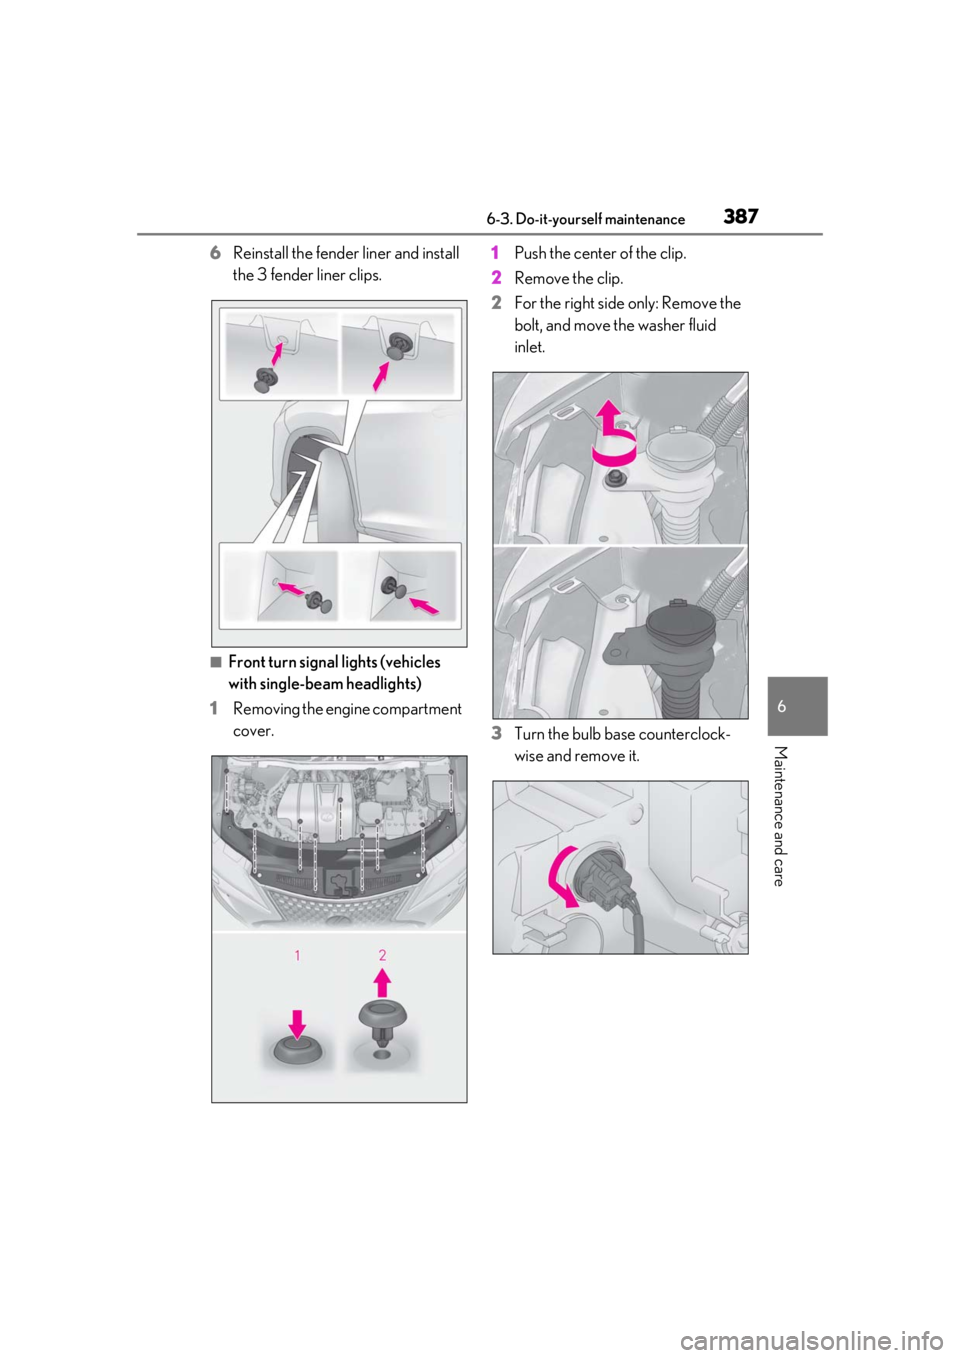
6Reinstall the fender liner and install
the 3 fender liner clips.
■Front turn signal lights (vehicles
with single-bea m headlights)
1 Removing the engine compartment
cover. 1
Push the center of the clip.
2 Remove the clip.
2 For the right side only: Remove the
bolt, and move the washer fluid
inlet.
3 Turn the bulb base counterclock-
wise and remove it.
Page 389 of 508
3896-3. Do-it-yourself maintenance
6
Maintenance and care
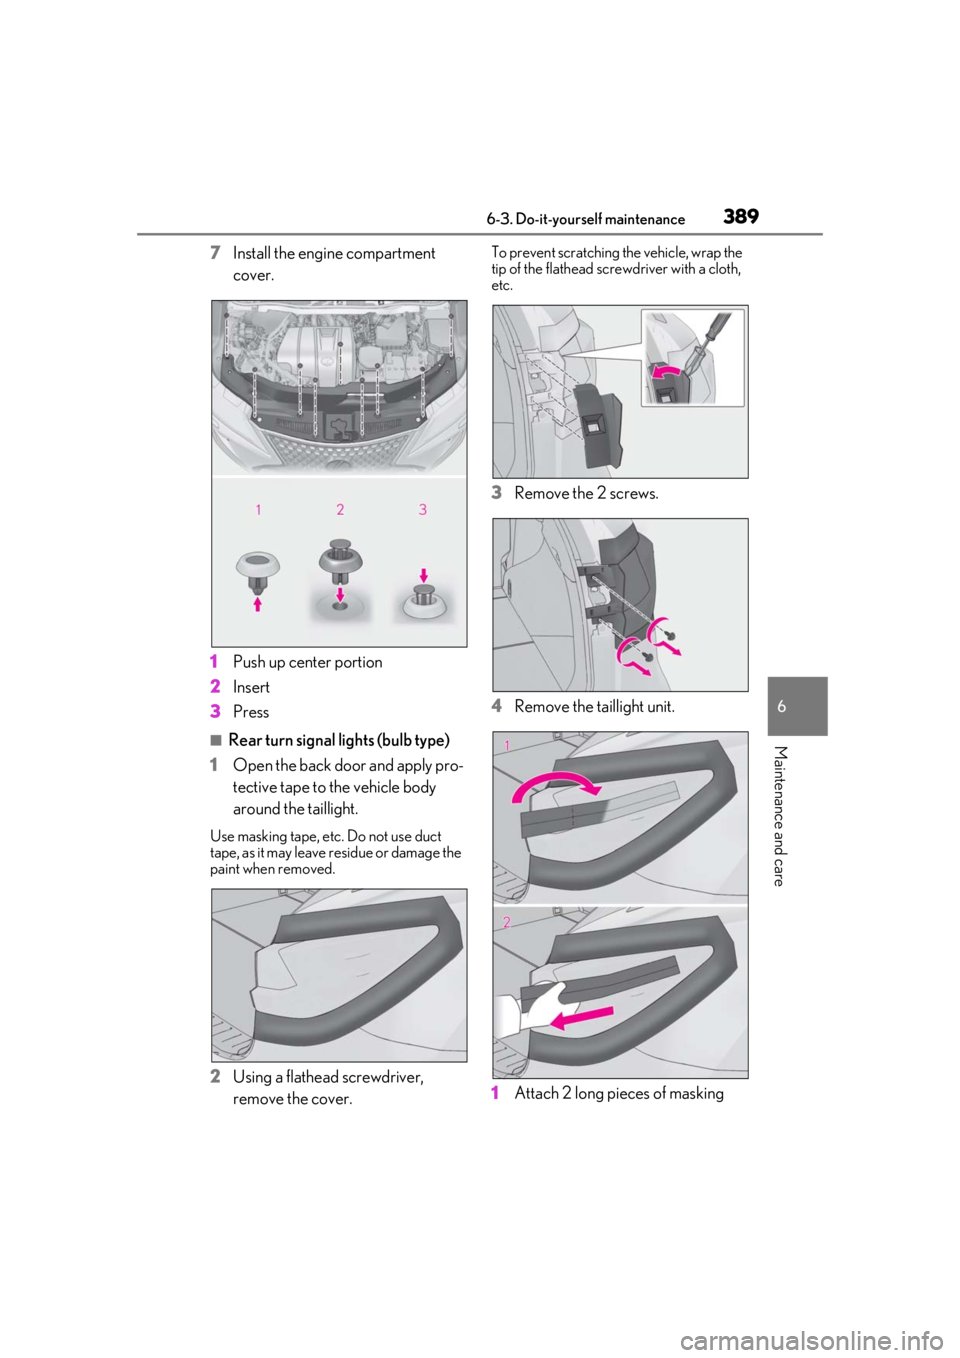
7Install the engine compartment
cover.
1 Push up center portion
2 Insert
3 Press
■Rear turn signal lights (bulb type)
1 Open the back door and apply pro-
tective tape to the vehicle body
around the taillight.
Use masking tape, etc. Do not use duct
tape, as it may leave residue or damage the
paint when removed.
2Using a flathead screwdriver,
remove the cover.
To prevent scratching the vehicle, wrap the
tip of the flathead scre wdriver with a cloth,
etc.
3 Remove the 2 screws.
4 Remove the taillight unit.
1 Attach 2 long pieces of masking
Page 392 of 508
3926-3. Do-it-yourself maintenance
WARNING
■To prevent injury
Before performing any light bulb
replacement procedure, be sure to turn
the engine switch off. Failure to do so
may result in burns from hot components
or a part of your bo dy may get caught on
an operating component, possibly caus-
ing serious injury.
■Replacing light bulbs
●Turn off the lights. Do not attempt to
replace the bulb immediately after
turning off the lights.
The bulbs become very hot and may
cause burns.
●Do not touch the glass portion of the
light bulb with bare hands. When it is
unavoidable to hold the glass portion,
use and hold with a clean dry cloth to
avoid getting moisture and oils on the
bulb.
Also, if the bulb is scratched or
dropped, it may blow out or crack.
●Fully install light bulbs and any parts
used to secure them. Failure to do so
may result in heat damage, fire, or
water entering the headlight unit. This
may damage the headlights or cause
condensation to build up on the lens.
●Do not attempt to repair or disassem-
ble the light bulbs, connectors, electric
circuits or component parts.
Doing so may result in death or serious
injury due to electric shock.
■To prevent damage or fire
●Make sure bulbs are fully seated and
locked.
●Check the wattage of the bulb before
installing to prev ent heat damage.
Page 393 of 508

393
7
7
When trouble arises
When trouble arises
.7-1. Essential informationEmergency flashers.................. 394
If your vehicle has to be stopped in an emergency .......................... 394
If the vehicle is trapped in rising water............................................ 395
7-2. Steps to take in an emergency If your vehicle needs to be towed........................................................ 397
If you think something is wrong ......................................................... 401
Fuel pump shut off system ..... 402
If a warning light turns on or a warning buzzer sounds ....... 403
If a warning message is displayed ......................................................... 412
If you have a flat tire................... 416
If the engine wi ll not start .......428
If you lose your keys ................. 430
If the fuel filler door cannot be opened........................................ 430
If the electronic key does not operate properly ..................... 431
If the vehicle battery is discharged ........................................................ 433
If your vehicle overheats ........ 437
If the vehicle becomes stuck ........................................................ 439
Page 394 of 508
3947-1. Essential information
7-1.Essential information
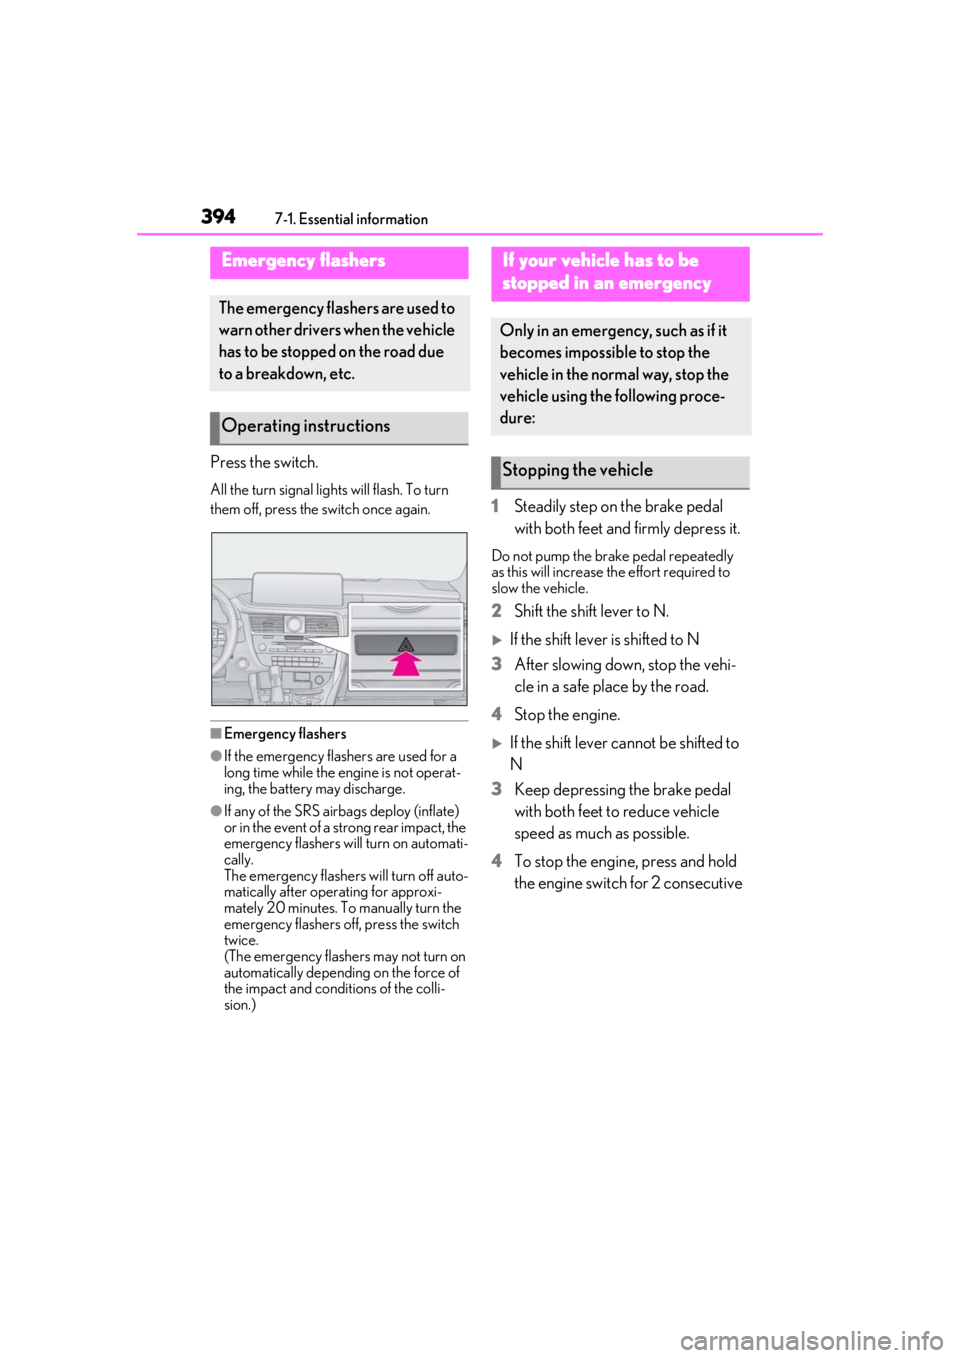
Press the switch.
All the turn signal lights will flash. To turn
them off, press the switch once again.
■Emergency flashers
●If the emergency flashers are used for a
long time while the engine is not operat-
ing, the battery may discharge.
●If any of the SRS airbags deploy (inflate)
or in the event of a strong rear impact, the
emergency flashers will turn on automati-
cally.
The emergency flashers will turn off auto-
matically after operating for approxi-
mately 20 minutes. To manually turn the
emergency flashers off, press the switch
twice.
(The emergency flashers may not turn on
automatically depending on the force of
the impact and conditions of the colli-
sion.)
1 Steadily step on the brake pedal
with both feet and firmly depress it.
Do not pump the brake pedal repeatedly
as this will increase the effort required to
slow the vehicle.
2Shift the shift lever to N.
If the shift lever is shifted to N
3 After slowing down, stop the vehi-
cle in a safe place by the road.
4 Stop the engine.
If the shift lever cannot be shifted to
N
3 Keep depressing the brake pedal
with both feet to reduce vehicle
speed as much as possible.
4 To stop the engine, press and hold
the engine switch for 2 consecutive
Emergency flashers
The emergency flashers are used to
warn other drivers when the vehicle
has to be stopped on the road due
to a breakdown, etc.
Operating instructions
If your vehicle has to be
stopped in an emergency
Only in an emergency, such as if it
becomes impossible to stop the
vehicle in the normal way, stop the
vehicle using the following proce-
dure:
Stopping the vehicle
Page 395 of 508
3957-1. Essential information
7
When trouble arises
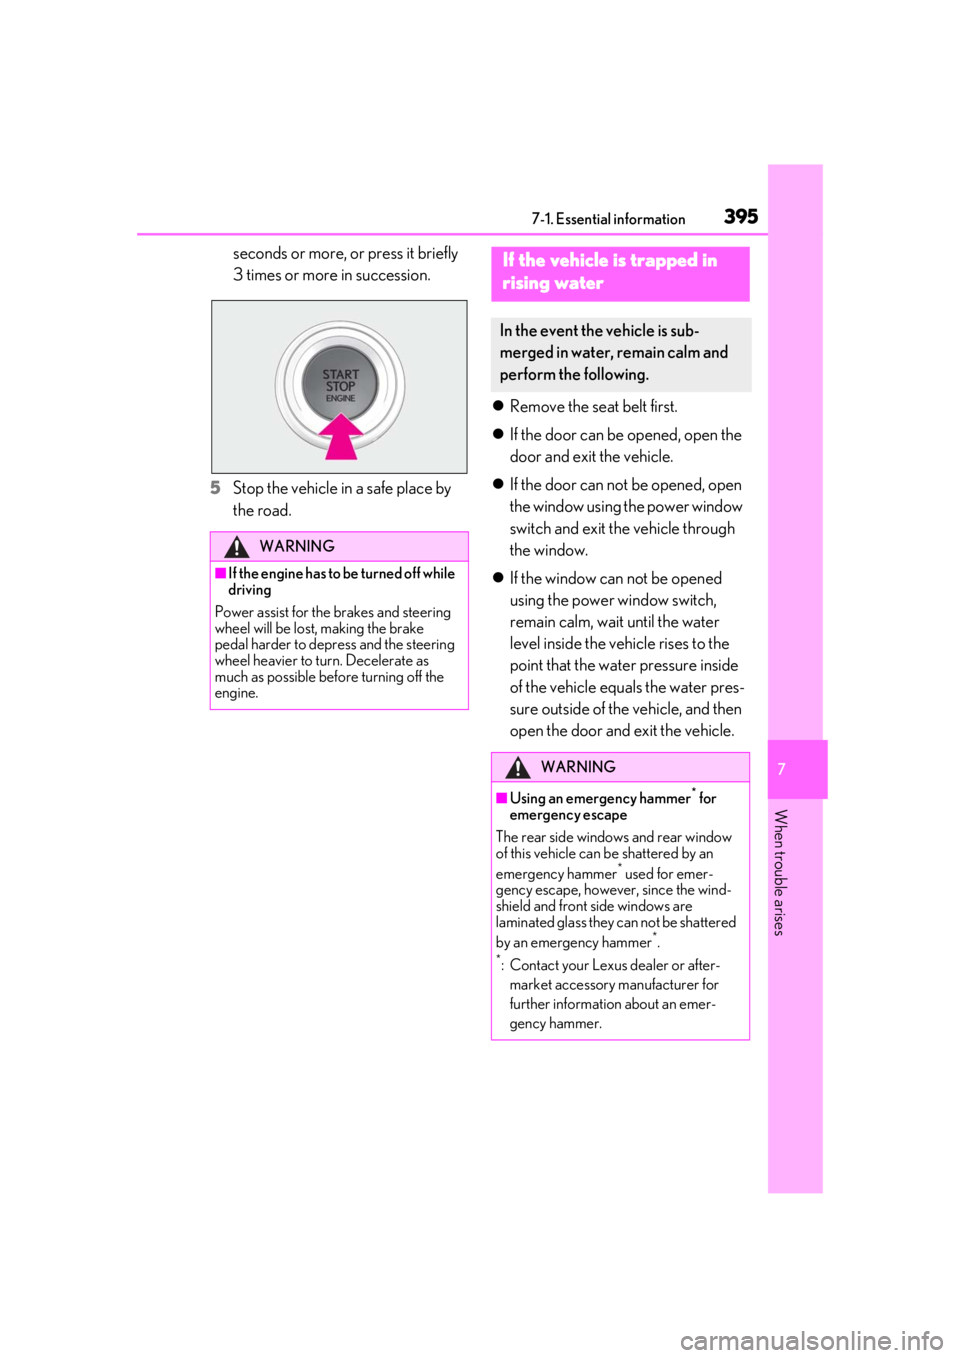
seconds or more, or press it briefly
3 times or more in succession.
5 Stop the vehicle in a safe place by
the road.
Remove the seat belt first.
If the door can be opened, open the
door and exit the vehicle.
If the door can not be opened, open
the window using the power window
switch and exit the vehicle through
the window.
If the window can not be opened
using the power window switch,
remain calm, wait until the water
level inside the vehicle rises to the
point that the water pressure inside
of the vehicle equals the water pres-
sure outside of the vehicle, and then
open the door and exit the vehicle.
WARNING
■If the engine has to be turned off while
driving
Power assist for the brakes and steering
wheel will be lost, making the brake
pedal harder to depress and the steering
wheel heavier to turn. Decelerate as
much as possible before turning off the
engine.
If the vehicle is trapped in
rising water
In the event the vehicle is sub-
merged in water, remain calm and
perform the following.
WARNING
■Using an emergency hammer* for
emergency escape
The rear side windows and rear window
of this vehicle can be shattered by an
emergency hammer
* used for emer-
gency escape, however, since the wind-
shield and front side windows are
laminated glass they can not be shattered
by an emergency hammer
*.
*: Contact your Lexus dealer or after-
market accessory manufacturer for
further information about an emer-
gency hammer.
Page 398 of 508

3987-2. Steps to take in an emergency
The following may indicate a problem
with your transmission. Contact your
Lexus dealer or commercial towing
service before towing.
The engine is running but the vehi-
cle does not move.
The vehicle makes an abnormal
sound.
From the front (2WD models)
Release the parking brake.
WARNING
●Do not turn the engine switch off.
There is a possibility that the steering
wheel is locked and cannot be oper-
ated.
■Installing towing eyelets to the vehi-
cle
Make sure that towing eyelets are
installed securely.If no t securely installed,
towing eyelets may come loose during
towing.
NOTICE
■To prevent damage to the vehicle
when towing using a wheel-lift type
truck
●Do not tow the vehicle from the rear
when the engine switch is off. The
steering lock mechanism is not strong
enough to hold the front wheels
straight.
●When raising the vehicle, ensure ade-
quate ground clearance for towing at
the opposite end of the raised vehicle.
Without adequate clearance, the vehi-
cle could be damaged while being
towed.
■To prevent damage to the vehicle
when towing with a sling-type truck
Do not tow with a sling-type truck, either
from the front or rear.
■To prevent damage to the vehicle
during emergency towing
Do not secure cables or chains to the
suspension components.
■Recreational towing (behind motor
home, etc.)
Never dinghy tow your vehicle to pre-
vent causing serious damage to the
Dynamic Torque Control AWD system
(AWD models) and transmission.
( P.173)
Situations when it is necessary to
contact dealers before towing
Towing with a wheel-lift type
truck