Power back door LEXUS RX350 2021 Owner's Manual
[x] Cancel search | Manufacturer: LEXUS, Model Year: 2021, Model line: RX350, Model: LEXUS RX350 2021Pages: 508, PDF Size: 10.33 MB
Page 132 of 508
1323-3. Adjusting the seats
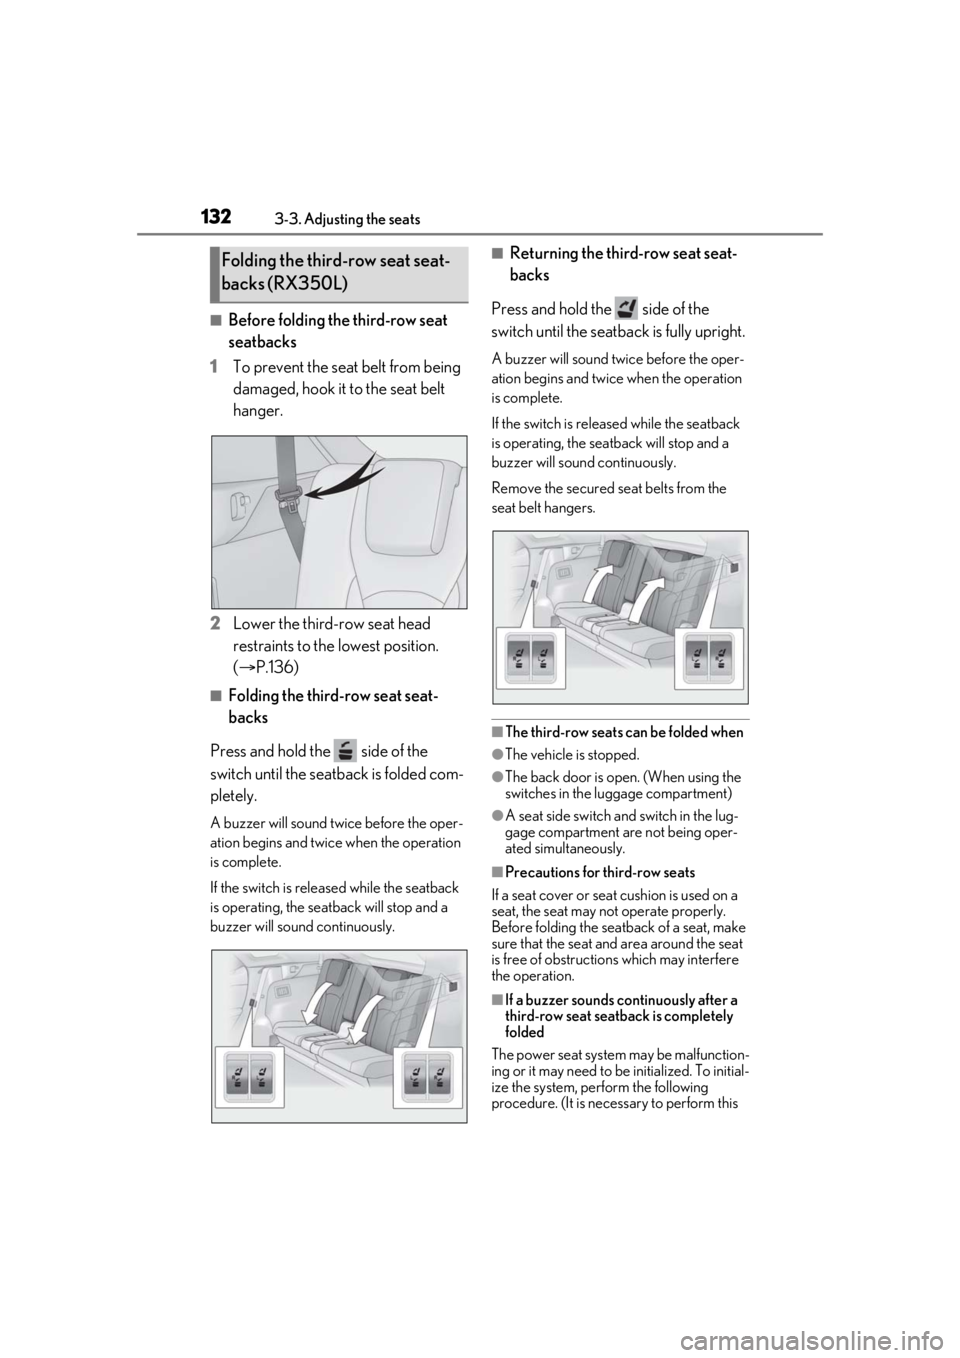
■Before folding the third-row seat
seatbacks
1 To prevent the seat belt from being
damaged, hook it to the seat belt
hanger.
2 Lower the third-row seat head
restraints to the lowest position.
(P.136)
■Folding the third-row seat seat-
backs
Press and hold the side of the
switch until the seatback is folded com-
pletely.
A buzzer will sound twice before the oper-
ation begins and twice when the operation
is complete.
If the switch is releas ed while the seatback
is operating, the seatback will stop and a
buzzer will sound continuously.
■Returning the third-row seat seat-
backs
Press and hold the side of the
switch until the seatback is fully upright.
A buzzer will sound twice before the oper-
ation begins and twice when the operation
is complete.
If the switch is releas ed while the seatback
is operating, the seatback will stop and a
buzzer will sound continuously.
Remove the secured se at belts from the
seat belt hangers.
■The third-row seats can be folded when
●The vehicle is stopped.
●The back door is open. (When using the
switches in the luggage compartment)
●A seat side switch and switch in the lug-
gage compartment are not being oper-
ated simultaneously.
■Precautions for third-row seats
If a seat cover or seat cushion is used on a
seat, the seat may not operate properly.
Before folding the seatback of a seat, make
sure that the seat and area around the seat
is free of obstructio ns which may interfere
the operation.
■If a buzzer sounds co ntinuously after a
third-row seat seatback is completely
folded
The power seat system may be malfunction-
ing or it may need to be initialized. To initial-
ize the system, perform the following
procedure. (It is necessary to perform this
Folding the third-row seat seat-
backs (RX350L)
Page 142 of 508
1423-4. Adjusting the steering wheel and mirrors
nor “R”.
To set the mirror angle used when the vehi-
cle is reversing, adjust the mirror angle at a
desired position with the shift lever in R.
The adjusted angle will be memorized and
the mirror will automatically tilt to the mem-
orized angle whenever the shift lever is
shifted to R from next time.
The memorized downward tilt position of
the mirror is linked to the normal position
(angle adjusted with the shift lever in other
than R). Therefore, if the normal position is
changed after adjustment, the tilt position
will also change.
When the normal position is changed, read-
just the angle in reversing.
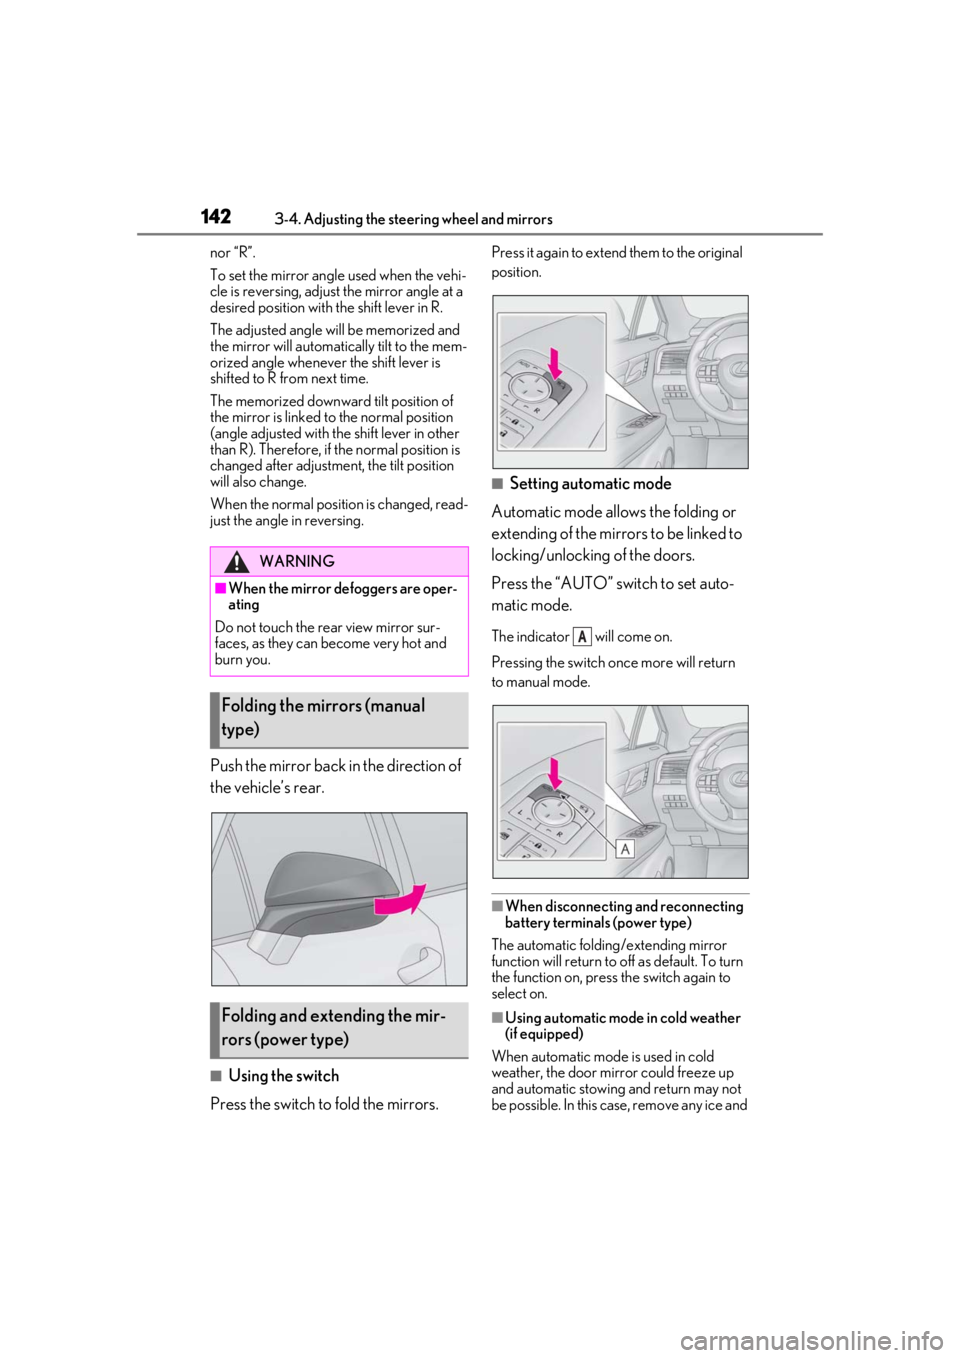
Push the mirror back in the direction of
the vehicle’s rear.
■Using the switch
Press the switch to fold the mirrors.
Press it again to extend them to the original
position.
■Setting automatic mode
Automatic mode allows the folding or
extending of the mirrors to be linked to
locking/unlocking of the doors.
Press the “AUTO” switch to set auto-
matic mode.
The indicator will come on.
Pressing the switch on ce more will return
to manual mode.
■When disconnecting and reconnecting
battery terminals (power type)
The automatic folding/extending mirror
function will return to off as default. To turn
the function on, press the switch again to
select on.
■Using automatic mode in cold weather
(if equipped)
When automatic mode is used in cold
weather, the door mirror could freeze up
and automatic stowing and return may not
be possible. In this case, remove any ice and
WARNING
■When the mirror defoggers are oper-
ating
Do not touch the rear view mirror sur-
faces, as they can become very hot and
burn you.
Folding the mirrors (manual
type)
Folding and extending the mir-
rors (power type)
A
Page 344 of 508
3446-1. Maintenance and care
6-1.Maintenance and care
Working from top to bottom, liber-
ally apply water to the vehicle body,
wheel wells and underside of the
vehicle to remove any dirt and dust.
Wash the vehicle body using a
sponge or soft cloth, such as a
chamois.
For hard-to-remove marks, use car
wash soap and rinse thoroughly with
water.
Wipe away any water.
Wax the vehicle when the water-
proof coating deteriorates.
If water does not bead on a clean surface,
apply wax when the vehicle body is cool.
■Self-restoring coat
The vehicle body has a self-restoring coat-
ing that is resistant to small surface
scratches caused in a car wash etc.
●The coating lasts for 5 to 8 years from
when the vehicle is delivered from the
plant.
●The restoration time differs depending on
the depth of the scratch and outside tem-
perature.
The restoration time may become
shorter when the coating is warmed by
applying warm water.
●Deep scratches caused by keys, coins,
etc. cannot be restored.
●Do not use wax that contains abrasives.
■Automatic car washes
●Before washing the vehicle:
• Fold the mirrors
• Turn off the power back door
Start washing from the front of the vehicle.
Extend the mirrors before driving.
●Brushes used in automatic car washes
may scratch the vehicle surface, parts
(wheel, etc.) and harm your vehicle’s
paint.
●Rear spoiler may not be washable in
some automatic car washes. There may
also be an increased risk of damage to
vehicle.
■High pressure car washes
As water may enter the cabin, do not bring
the nozzle tip near the gaps around the
doors or perimeter of the windows, or spray
these areas continuously.
■When using a car wash
If the door handle becomes wet while the
electronic key is within the effective range,
the door may lock and unlock repeatedly. In
that case, follow the following correction
procedures to wash the vehicle:
●Place the key in a position 6 ft. (2 m) or
more separate from the vehicle while the
vehicle is being wash ed. (Take care to
ensure that the key is not stolen.)
●Set the electronic key to battery-saving
mode to disable the smart access system
with push-button start. ( P.116)
■Wheels and wheel ornaments
●Remove any dirt immediately by using a
neutral detergent.
●Wash detergent off with water immedi-
ately after use.
●To protect the paint from damage, make
sure to observe the following precau-
tions.
• Do not use acidic, alkaline or abrasive
detergent
• Do not use hard brushes
• Do not use detergent on the wheels when they are hot, such as after driving or park-
ing in hot weather
Cleaning and protecting the
vehicle exterior
Perform cleaning in a manner
appropriate to each component
and its material.
Cleaning instructions
Page 384 of 508
3846-3. Do-it-yourself maintenance
Check the wattage of the light bulb to
be replaced. (P.449)
P.113
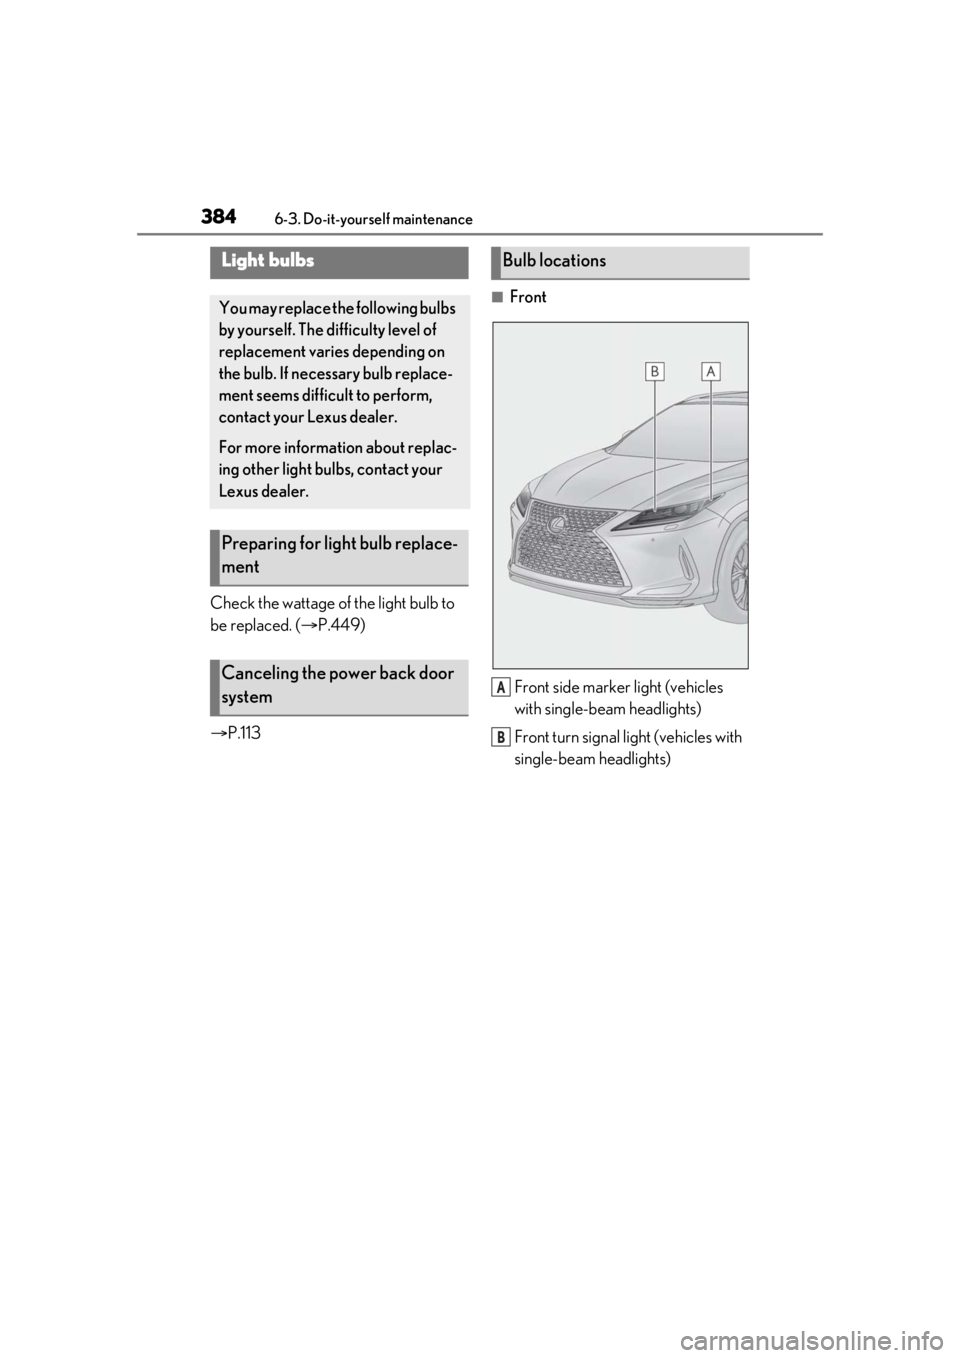
■Front
Front side marker light (vehicles
with single-beam headlights)
Front turn signal light (vehicles with
single-beam headlights)
Light bulbs
You may replace the following bulbs
by yourself. The difficulty level of
replacement varies depending on
the bulb. If necessary bulb replace-
ment seems difficult to perform,
contact your Lexus dealer.
For more information about replac-
ing other light bulbs, contact your
Lexus dealer.
Preparing for light bulb replace-
ment
Canceling the power back door
system
Bulb locations
A
B
Page 423 of 508
4237-2. Steps to take in an emergency
7
When trouble arises
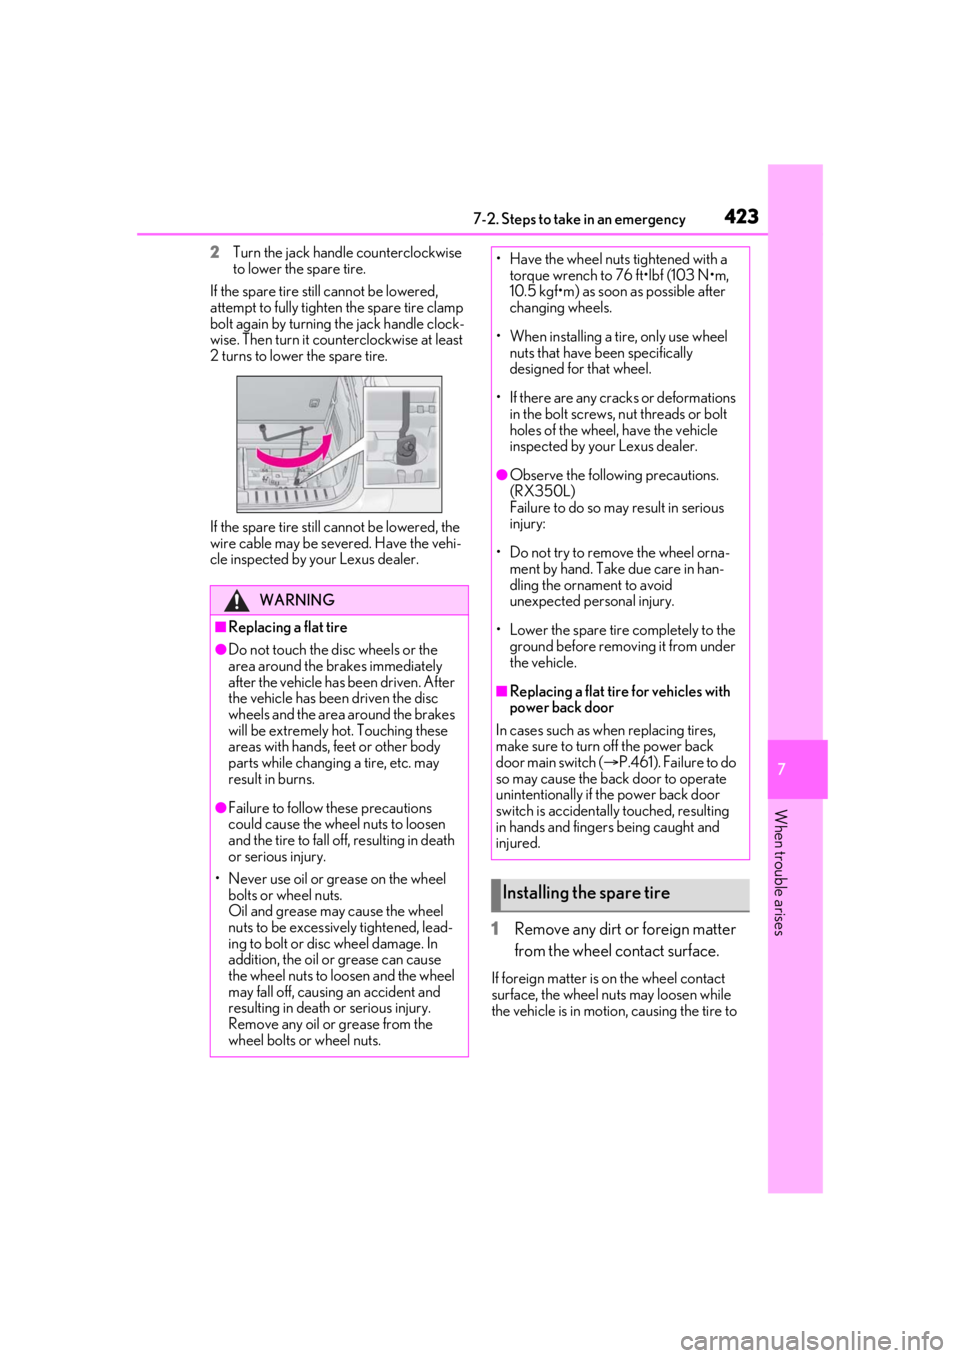
2Turn the jack handle counterclockwise
to lower the spare tire.
If the spare tire still cannot be lowered,
attempt to fully tighten the spare tire clamp
bolt again by turning the jack handle clock-
wise. Then turn it coun terclockwise at least
2 turns to lower the spare tire.
If the spare tire still ca nnot be lowered, the
wire cable may be seve red. Have the vehi-
cle inspected by your Lexus dealer.
1 Remove any dirt or foreign matter
from the wheel contact surface.
If foreign matter is on the wheel contact
surface, the wheel nuts may loosen while
the vehicle is in motion, causing the tire to
WARNING
■Replacing a flat tire
●Do not touch the disc wheels or the
area around the brakes immediately
after the vehicle has been driven. After
the vehicle has been driven the disc
wheels and the area around the brakes
will be extremely hot. Touching these
areas with hands, feet or other body
parts while changing a tire, etc. may
result in burns.
●Failure to follow these precautions
could cause the wheel nuts to loosen
and the tire to fall of f, resulting in death
or serious injury.
• Never use oil or grease on the wheel bolts or wheel nuts.
Oil and grease may cause the wheel
nuts to be excessively tightened, lead-
ing to bolt or disc wheel damage. In
addition, the oil or grease can cause
the wheel nuts to loosen and the wheel
may fall off, causing an accident and
resulting in death or serious injury.
Remove any oil or grease from the
wheel bolts or wheel nuts.
• Have the wheel nuts tightened with a torque wrench to 76 ft•lbf (103 N•m,
10.5 kgf•m) as soon as possible after
changing wheels.
• When installing a tire, only use wheel nuts that have been specifically
designed for that wheel.
• If there are any cracks or deformations in the bolt screws, nut threads or bolt
holes of the wheel, have the vehicle
inspected by your Lexus dealer.
●Observe the following precautions.
(RX350L)
Failure to do so may result in serious
injury:
• Do not try to remove the wheel orna- ment by hand. Take due care in han-
dling the ornament to avoid
unexpected personal injury.
• Lower the spare tire completely to the ground before removing it from under
the vehicle.
■Replacing a flat tire for vehicles with
power back door
In cases such as when replacing tires,
make sure to turn off the power back
door main switch ( P.461). Failure to do
so may cause the back door to operate
unintentionally if th e power back door
switch is accidentally touched, resulting
in hands and fingers being caught and
injured.
Installing the spare tire
Page 435 of 508
4357-2. Steps to take in an emergency
7
When trouble arises
6Maintain the engine speed of the
second vehicle and start the engine
of your vehicle by turning the
engine switch to IGNITION ON
mode.
7 Once the vehicle’s engine has
started, remove the jumper cables
in the exact reverse order from
which they were connected.
Once the engine starts, have the vehi-
cle inspected at your Lexus dealer as
soon as possible.
■Starting the engine when the battery is
discharged
The engine cannot be started by push-start-
ing.
■To prevent battery discharge
●Turn off the headlights and the audio sys-
tem while the engine is off.
●Turn off any unnecessary electrical com-
ponents when the vehicle is running at a
low speed for an extended period, such
as in heavy traffic.
■When removing the battery terminals
When the battery terminals are removed,
the information stored in the ECU is
cleared. Before removi ng the battery termi-
nals, contact your Lexus dealer.
■Charging the battery
The electricity stored in the battery will dis-
charge gradually even when the vehicle is
not in use, due to natural discharge and the
draining effects of certain electrical appli-
ances. If the vehicle is left for a long time,
the battery may discharge, and the engine
may be unable to start. (The battery
recharges automatically during driving.)
■When the battery is removed or dis-
charged
●In some cases, it may not be possible to
unlock the doors using the smart access
system with push-button start when the
battery is discharged. Use the wireless remote control or the mechanical key to
lock or unlock the doors.
●The engine may not start on the first
attempt after the battery has recharged
but will start normally after the second
attempt. This is not a malfunction.
●The engine switch mode is memorized by
the vehicle. When the battery is recon-
nected, the system will return to the
mode it was in before the battery was dis-
charged. Before disconnecting the bat-
tery, turn the engine switch off.
If you are unsure wh
at mode the engine
switch was in before the battery dis-
charged, be especially careful when
reconnecting the battery.
●The power back door must be initialized.
( P.109)
■Replacing the battery
●Use a battery with the same case size as
the previous battery and an equivalent
20 hour rate capacity (20HR) or greater.
• If the sizes differ, the battery cannot be properly secured.
• If the 20 hour rate capacity is low, even if the time period where the vehicle is not
used is a short time, the battery may dis-
charge and the engine may not be able to
start.
●For details, consult your Lexus dealer.
WARNING
■When removing the battery terminals
Always remove the negative (-) terminal
first. If the positive (+) terminal contacts
any metal in the surrounding area when
the positive (+) terminal is removed, a
spark may occur, leading to a fire in addi-
tion to electrical shocks and death or
serious injury.
■Avoiding battery fires or explosions
Observe the following precautions to
prevent accidentally igniting the flamma-
ble gas that may be emitted from the bat-
tery:
Page 464 of 508

4648-2. Customization
■Power back door (P.103)
*:If equipped
■Smart access system with push-button start and wireless remote control
( P.99, 115)
■Smart access system with push-button start ( P.99, 115)
FunctionDefault settingCustomized setting
Power back doorOnOff—O—
Power back door opening
position51 to 5O——
Buzzer volumeLevel 3Level 1—O—Level 2
Kick sensor*OnOff—O—
Hands free close & lock func-
tion
*OffOn——O
FunctionDefault settingCustomized setting
Operation buzzer volume5OffO—O1 to 7
Operation signal (Emergency
flashers)OnOffO—O
Time elapsed before automatic
door lock function is activated
if door is not opened after
being unlocked
60 seconds
Off
O—O30 seconds
120 seconds
Open door warning buzzerOffOn——O
Reservation lockOnOff——O
FunctionDefault settingCustomized setting
Smart access system with
push-button startOnOff——O
ABC
ABC
ABC
Page 466 of 508
4668-2. Customization
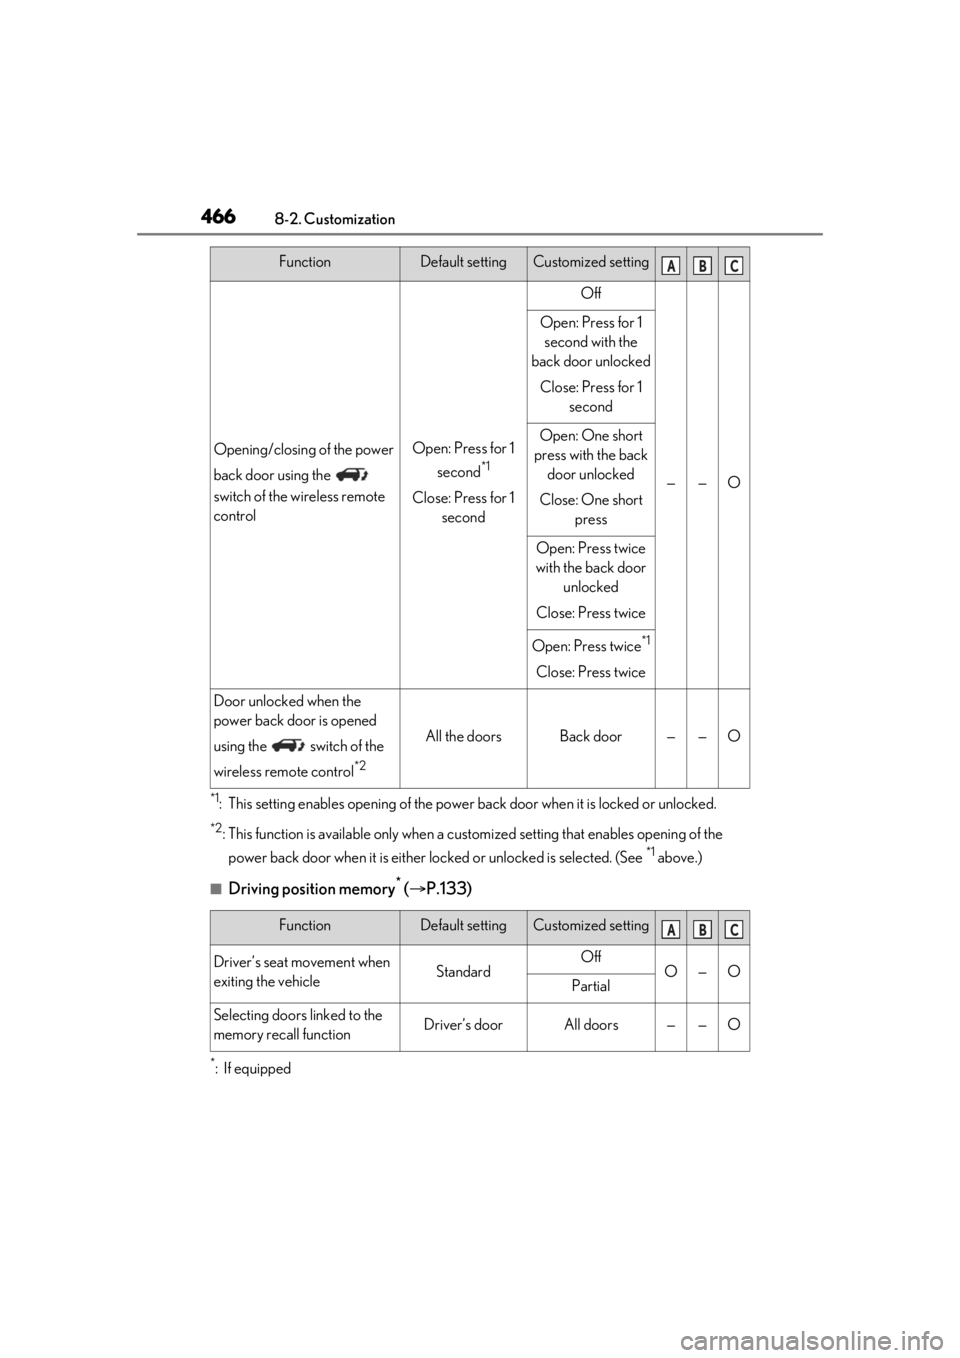
*1: This setting enables opening of the power back door when it is locked or unlocked.
*2: This function is available only when a customized setting that en ables opening of the
power back door when it is either lo cked or unlocked is selected. (See
*1 above.)
■Driving position memory* ( P.133)
*:If equipped
Opening/closing of the power
back door using the
switch of the wireless remote
controlOpen: Press for 1
second
*1
Close: Press for 1 second
Off
——O
Open: Press for 1 second with the
back door unlocked
Close: Press for 1 second
Open: One short
press with the back door unlocked
Close: One short press
Open: Press twice
with the back door unlocked
Close: Press twice
Open: Press twice*1
Close: Press twice
Door unlocked when the
power back door is opened
using the switch of the
wireless remote control
*2
All the doorsBack door——O
FunctionDefault settingCustomized setting
Driver’s seat movement when
exiting the vehicleStandardOffO—OPartial
Selecting doors linked to the
memory recall functionDriver’s doorAll doors——O
FunctionDefault settingCustomized settingABC
ABC
Page 474 of 508
4748-3. Initialization
8-3.Initialization
*:If equipped
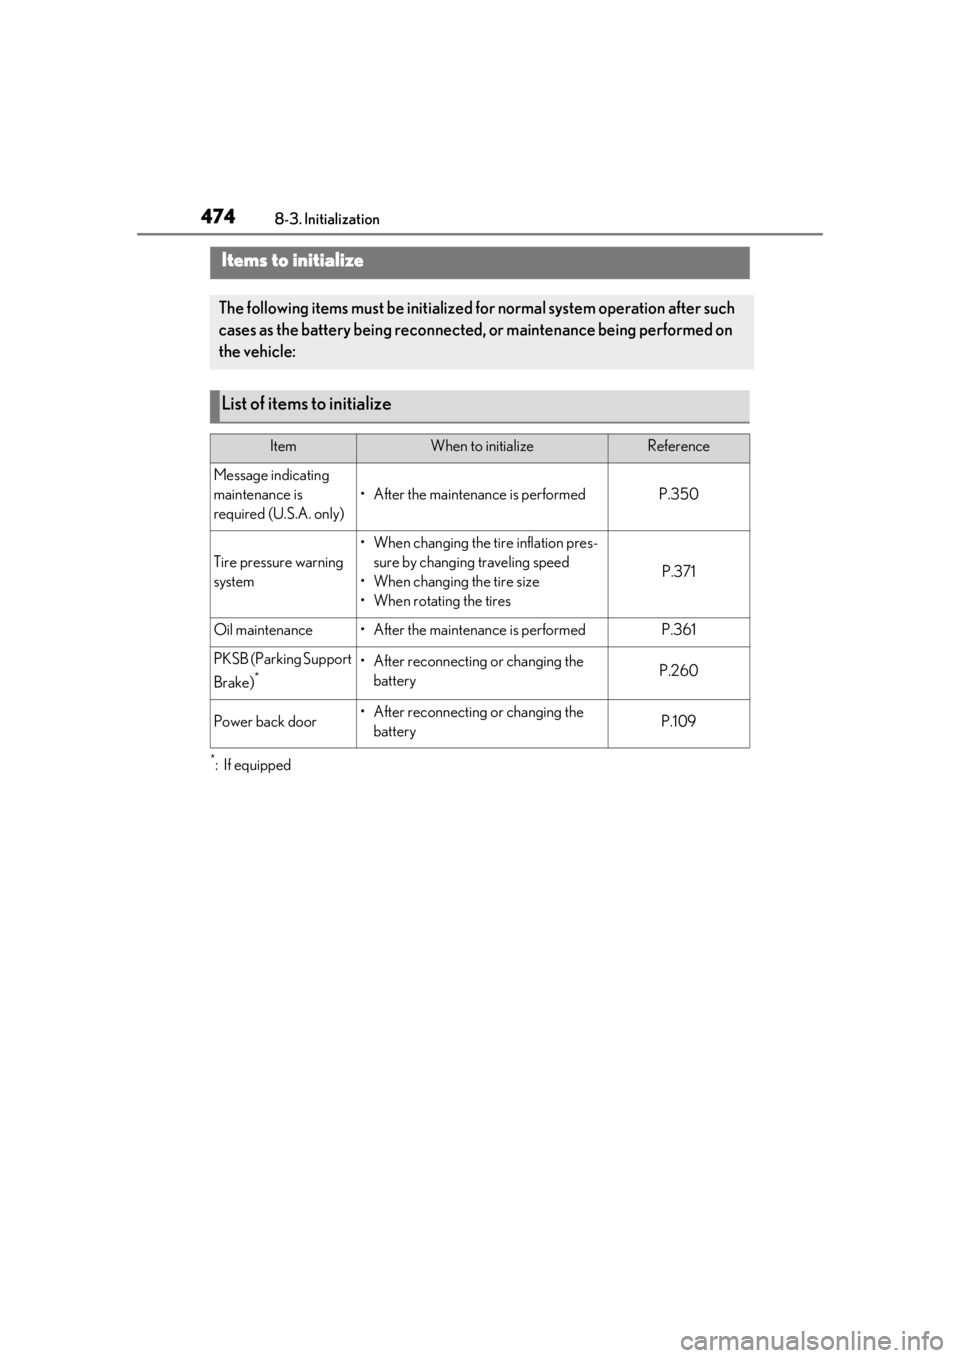
Items to initialize
The following items must be initialized for normal system operation after such
cases as the battery being reconnected, or maintenance being performed on
the vehicle:
List of items to initialize
ItemWhen to initializeReference
Message indicating
maintenance is
required (U.S.A. only)
• After the maintenance is performedP.350
Tire pressure warning
system
• When changing the tire inflation pres- sure by changing traveling speed
• When changing the tire size
• When rotating the tires
P.371
Oil maintenance• After the maintenance is performedP.361
PKSB (Parking Support
Brake)
*• After reconnecting or changing the batteryP.260
Power back door• After reconnecting or changing the batteryP.109
Page 494 of 508
494Alphabetical Index
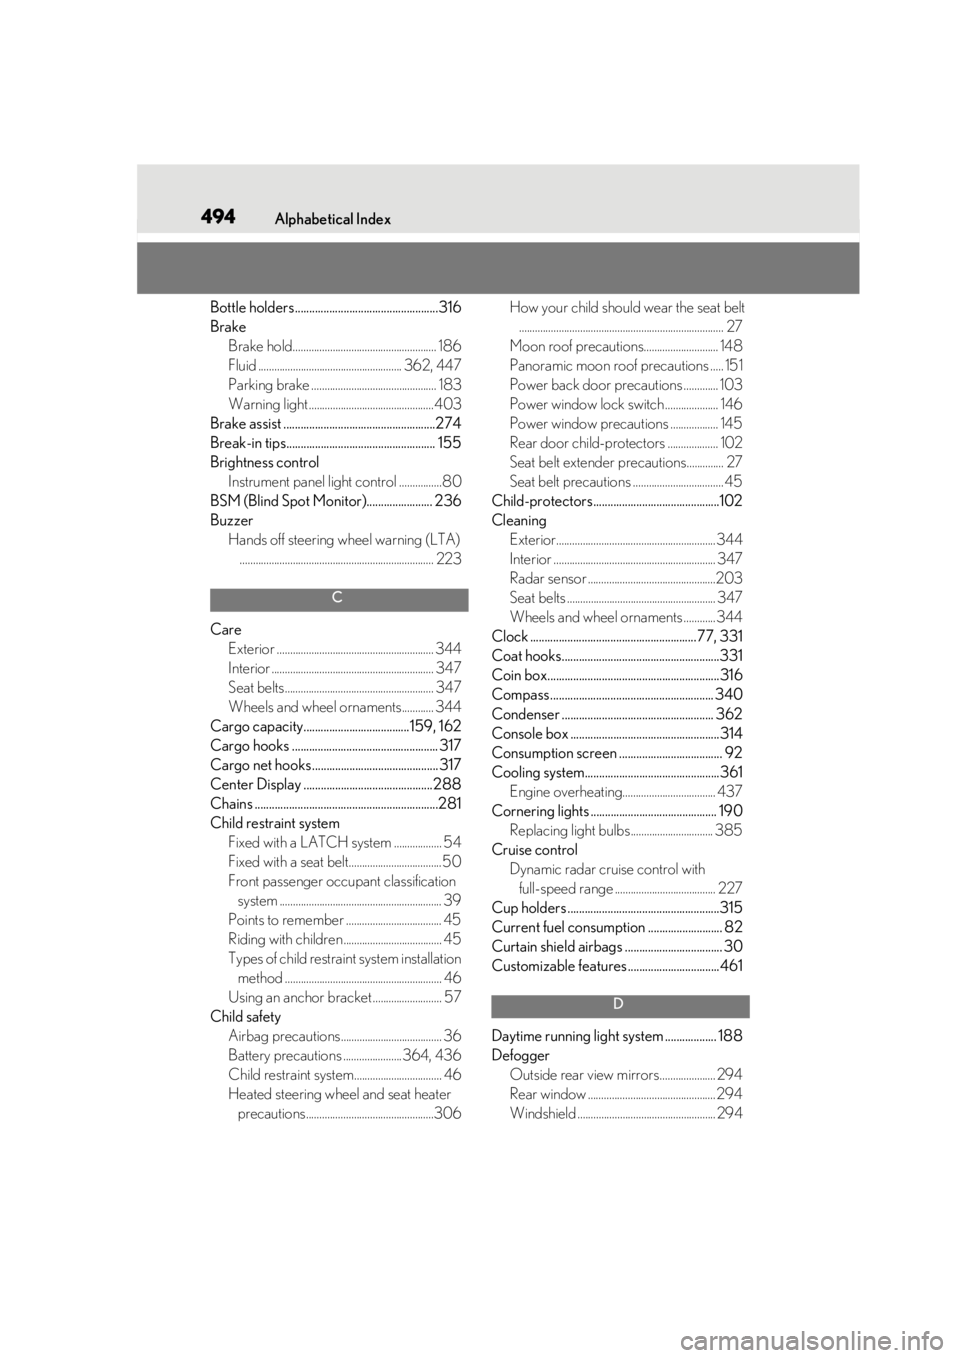
Bottle holders..................................................316
BrakeBrake hold...................................................... 186
Fluid ...................................................... 362, 447
Parking brake ............................................... 183
Warning light ...............................................403
Brake assist .....................................................274
Break-in tips.................................................... 155
Brightness control Instrument panel light control ................80
BSM (Blind Spot Monitor)....................... 236
Buzzer Hands off steering wheel warning (LTA)......................................................................... 223
C
Care Exterior ........................................................... 344
Interior ............................................................. 347
Seat belts........................................................ 347
Wheels and wheel ornaments............ 344
Cargo capacity.....................................159, 162
Cargo hooks ................................................... 317
Cargo net hooks ............................................ 317
Center Display .............................................288
Chains ................................................................281
Child restraint system Fixed with a LATCH system .................. 54
Fixed with a seat belt...................................50
Front passenger occupant classification system ............................................................. 39
Points to remember .................................... 45
Riding with children ..................................... 45
Types of child restraint system installation method ........................................................... 46
Using an anchor bracket .......................... 57
Child safety Airbag precautions...................................... 36
Battery precautions ......................364, 436
Child restraint system................................. 46
Heated steering wheel and seat heater precautions................................................306 How your child should wear the seat belt
............................................................................. 27
Moon roof precautions............................ 148
Panoramic moon roof precautions ..... 151
Power back door precautions ............. 103
Power window lock switch .................... 146
Power window precautions .................. 145
Rear door child-protectors ................... 102
Seat belt extender precautions.............. 27
Seat belt precautions .................................. 45
Child-protectors............................................102
Cleaning Exterior............................................................ 344
Interior ............................................................. 347
Radar sensor ................................................203
Seat belts ........................................................ 347
Wheels and wheel ornaments ............344
Clock ..........................................................77, 331
Coat hooks.......................................................331
Coin box............................................................316
Compass ......................................................... 340
Condenser ..................................................... 362
Console box ....................................................314
Consumption screen .................................... 92
Cooling system...............................................361 Engine overheating................................... 437
Cornering lights ............................................ 190 Replacing light bulbs ............................... 385
Cruise control Dynamic radar cruise control with full-speed range ...................................... 227
Cup holders .....................................................315
Current fuel consumption .......................... 82
Curtain shield airbags .................................. 30
Customizable features ................................461
D
Daytime running light system .................. 188
Defogger Outside rear view mirrors..................... 294
Rear window ................................................ 294
Windshield .................................................... 294