ECO mode LEXUS RX350 2021 Service Manual
[x] Cancel search | Manufacturer: LEXUS, Model Year: 2021, Model line: RX350, Model: LEXUS RX350 2021Pages: 508, PDF Size: 10.33 MB
Page 189 of 508

1894-3. Operating the lights and wipers
4
Driving
Doing so interferes with the sensor detect-
ing the level of ambient light and may cause
the automatic headlight system to malfunc-
tion.
■Automatic light off system
●When the headlights come on: The head-
lights and tail lights turn off 30 seconds
after a door is opened and closed if the
engine switch is turned to ACCESSORY
mode or turned off. (The lights turn off
immediately if on the key is pressed
after all the doors are locked.)
●When only the tail lights are on: The tail
lights turn off automatically if the engine
switch is turned to ACCESSORY mode
or turned off and the driver’s door is
opened.
To turn the lights on again, turn the engine
switch to IGNITION ON mode, or turn the
light switch off once and then back to
or .
■Automatic headlight leveling system (if
equipped)
The level of the headlights is automatically
adjusted according to the number of pas-
sengers and the loading condition of the
vehicle to ensure that the headlights do not
interfere with other road users.
■Light reminder buzzer
A buzzer sounds when the engine switch is
turned off or turned to ACCESSORY
mode and the driver’s door is opened while
the lights are turned on.
■Welcome lighting
If the headlight switch is turned to and
the surrounding area is dark, unlocking the
doors using the smart access system with
push-button start or wireless remote con-
trol will turn the parking lights and tail lights
on automatically.
■Windshield wiper linked headlight illu-
mination
When driving during daytime with the
headlight switch turned to , if the wind-
shield wipers are used, the headlights will turn on automatically after several seconds
to help enhance the visibility of your vehicle.
■Battery-saving function
In order to prevent the battery of the vehicle
from discharging, if the headlights and/or
tail lights are on when the engine switch is
turned off the battery saving function will
operate and automatically turn off all the
lights after approximately 20 minutes.
When the engine switch is turned to IGNI-
TION ON mode, the battery-saving func-
tion will be disabled.
When any of the following are performed,
the battery-saving function is canceled
once and then reactivated. All the lights will
turn off automatically 20 minutes after the
battery- saving function has been reacti-
vated:
●When the headlight switch is operated
●When a door is opened or closed
■Customization
Some functions can be customized.
( P.461)
1 With the headlights on, push the
lever away from you to turn on the
high beams.
NOTICE
■To prevent battery discharge
Do not leave the lights on longer than
necessary when the engine is off.
Turning on the high beam head-
lights
Page 192 of 508

1924-3. Operating the lights and wipers
out its headlights turned on is detected.
●House lights, street lights, traffic signals,
and illuminated billboards or signs and
other reflective objects may cause the
high beams to change to the low beams,
or the low beams to remain on.
●The following factors may affect the
amount of time taken for the high beams
to turn on or off:
• The brightness of the headlights, fog
lights, and tail lights of vehicles ahead
• The movement and direction of vehicles ahead
• When a vehicle ahead only has opera- tional lights on one side
• When a vehicle ahead is a two-wheeled
vehicle
• The condition of the road (gradient, curve, condition of th e road surface, etc.)
• The number of passengers and amount of luggage in the vehicle
●The high beams may turn on or off unex-
pectedly.
●Bicycles or similar vehicles may not be
detected.
●In the following situations the system may
not be able to correctly detect the sur-
rounding brightness le vel. This may cause
the low beams to remain on or the high
beams to flash or dazzle pedestrians or
vehicles ahead. In such a case, it is neces-
sary to manually switch between the high
and low beams.
• When driving in inclement weather
(heavy rain, snow, fog, sandstorms, etc.)
• When the windshield is obscured by fog, mist, ice, dirt, etc.
• When the windshield is cracked or dam- aged
• When the camera sensor is deformed or
dirty
• When the temperature of the camera sensor is extremely high
• When the surrounding brightness level is equal to that of head lights, tail lights or
fog lights
• When headlights or tail lights of vehicles
ahead are turned off, dirty, changing
color, or not aimed properly
• When the vehicle is hit by water, snow,
dust, etc. from a preceding vehicle
• When driving through an area of inter-mittently changing brightness and dark-
ness
• When frequently and repeatedly driving
ascending/descending roads, or roads
with rough, bumpy or uneven surfaces
(such as stone-paved roads, gravel roads,
etc.)
• When frequently and repeatedly taking curves or driving on a winding road
• When there is a highly reflective object ahead of the vehicle, such as a sign or
mirror
• When the back of a preceding vehicle is highly reflective, such as a container on a
truck
• When the vehicle’s headlights are dam- aged or dirty, or are not aimed properly
• When the vehicle is listing or titling due to
a flat tire, a trailer being towed, etc.
• When the headlights are changed between the high beams and low beams
repeatedly in an abnormal manner
• When the driver believes that the high beams may be flashing or dazzling
pedestrians or other drivers
■Temporarily lowering sensor sensitivity
The sensitivity of the sensor can be tempo-
rarily lowered.
1 Turn the engine switch off while the fol-
lowing conditions are met.
●The headlight switch is in or .
●The headlight switch lever is in high beam
position.
●Automatic High Beam switch is on.
2 Turn the engine switch to IGNITION
ON mode.
3 Within 60 seconds after step 2 , repeat
pulling the headlight switch lever to the
original position then pushing it to the
high beam position quickly 10 times,
then leave the lever in high beam posi-
tion.
4 If the sensitivity is changed, the Auto-
matic High Beam indicator is turn on
and off 3 times.
Automatic High Beam (headlights) may
turn on even when the vehicle is stopped.
Page 195 of 508

1954-3. Operating the lights and wipers
4
Driving1 (U.S.A.) or (Canada)
Off
2 (U.S.A.) or (Canada) Inter-
mittent operation
The intermittent windshield wiper operates
more frequently as vehicle speed becomes
higher.
3 (U.S.A.) or (Canada)
Low speed operation
4 (U.S.A.) or (Canada)
High speed operation
5 (U.S.A.) or (Canada)
Temporary operation 6
Increases the intermittent wind-
shield wiper frequency
7 Decreases the intermittent wind-
shield wiper frequency
8 Washer/wiper dual opera-
tion
Pulling the lever operates the wipers and
washer.
The wipers will automatically operate a
couple of times after the washer squirts.
Vehicles with headlight cleaners:
When the engine swit ch is in IGNITION
ON mode and the headlights are on, if the
lever is pulled, the he adlight cleaners will
operate once. After this, the headlight
cleaners will operate every 5th time the
lever is pulled.
Rain-sensing windshield wipers
When “AUTO” is selected, the wipers
will operate automatically when the
sensor detects falling rain. The system
automatically adjusts wiper timing in
Page 197 of 508

1974-3. Operating the lights and wipers
4
Driving
times, the wipers operate one more time
after a short delay to prevent dripping.
However, this function will not operate while
driving.
■Effects of vehicle speed on wiper opera-
tion
Vehicle speed affects the intermittent wiper
interval.
■Raindrop sensor (vehicles with
rain-sensing windshield wipers)
●The raindrop sensor judges the amount
of raindrops.
An optical sensor is adopted. It may not
operate properly when sunlight from the
rising or setting of the sun intermittently
strikes the windshield, or if bugs, etc. are
present on the windshield
●If the wiper switch is turned to the
“AUTO” position while the engine switch
is in IGNITION ON mode, the wipers
will operate once to show that AUTO
mode is activated.
●When the sensor sensit ivity ring is turned
toward high while in “AUTO” position, the
wipers will operate once to indicate that
the sensor sensitiv ity is enhanced.
●If the temperature of the raindrop sensor
is 194°F (90°C) or higher, or 5°F (-15°C)
or lower, automatic operation may not
occur. In this case, operate the wipers in
any mode other than AUTO mode.
■If no windshield washer fluid sprays
Check that the washer nozzles are not
blocked, if there is washer fluid in the
washer fluid tank.
■Front door opening linked windshield
wiper stop function (vehicles with
rain-sensing windshield wipers)
When “AUTO” is selected and the wind-
shield wipers are operatin g, if a front door is opened, the operation
of the windshield
wipers will be stopped to prevent anyone
near the vehicle from being sprayed by
water from the wipers, provided the vehicle
is stopped with the parking brake applied or
the shift lever in P. When the front door is
closed, wiper operation will resume.
■Customization
Some functions can be customized.
( P.461)
When the windshield wipers are not
WARNING
■Caution regarding the use of wind-
shield wipers in AUTO mode (vehi-
cles with rain-sensing windshield
wipers)
The windshield wipers may operate
unexpectedly if the sensor is touched or
the windshield is subj ect to vibration in
A U T O m o d e . T a k e c a r e t h a t y o u r f i n g e r s ,
etc. do not become caught in the wind-
shield wipers.
■Caution regarding the use of washer
fluid
When it is cold, do not use the washer
fluid until the windshield becomes warm.
The fluid may freeze on the windshield
and cause low visibility. This may lead to
an accident, resulting in death or serious
injury.
NOTICE
■When the washer fluid tank is empty
Do not operate the switch continually as
the washer fluid pump may overheat.
■When a nozzle becomes blocked
In this case, contact your Lexus dealer.
Do not try to clear it with a pin or other
object. The nozzle will be damaged.
Changing the windshield wiper
rest position/Lifting the wind-
shield wipers
Page 198 of 508
1984-3. Operating the lights and wipers
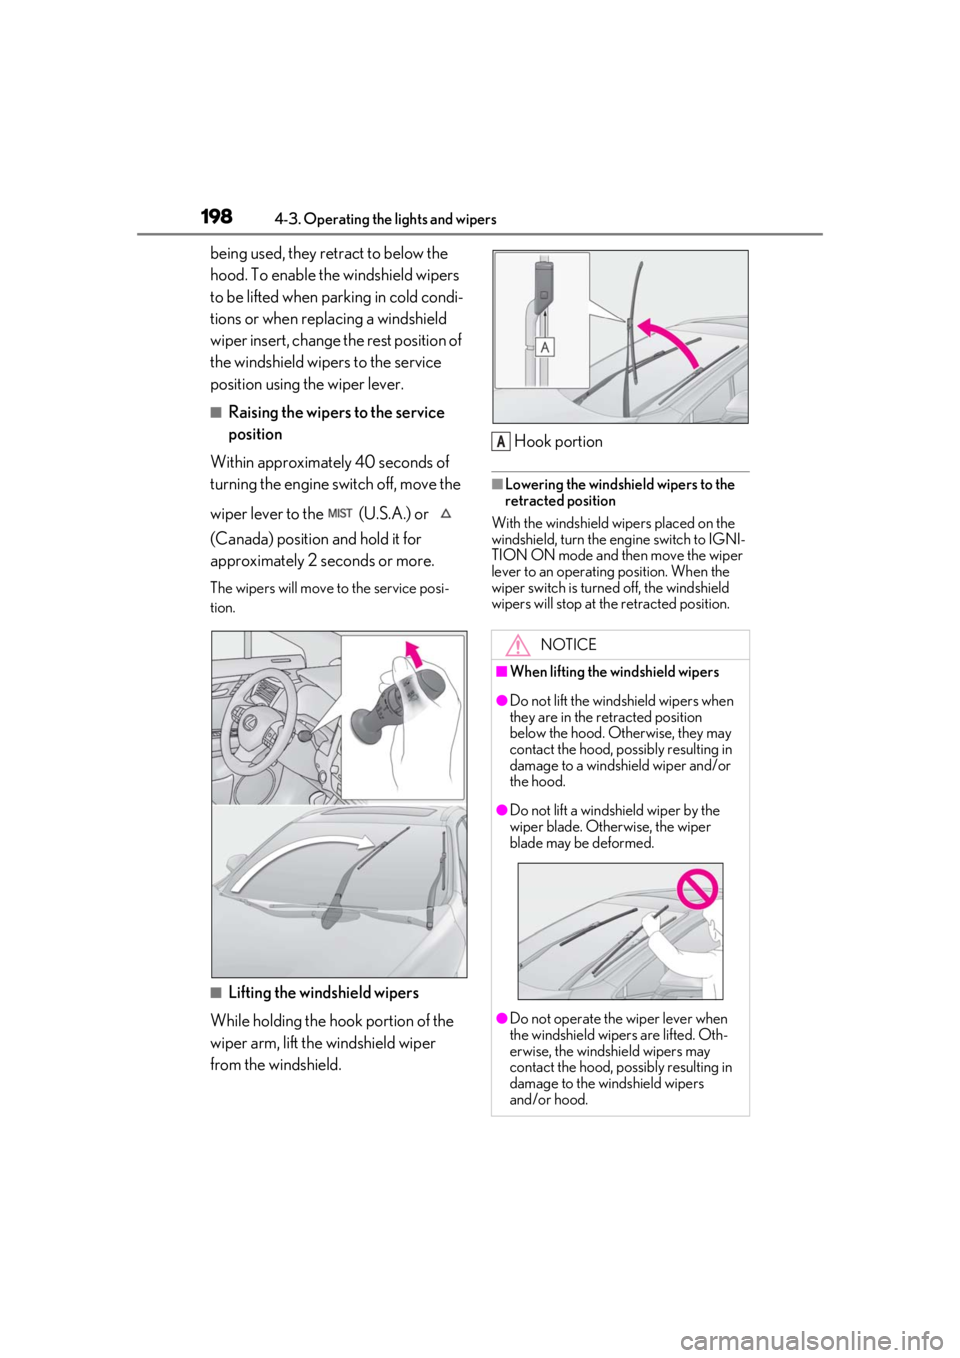
being used, they retract to below the
hood. To enable the windshield wipers
to be lifted when parking in cold condi-
tions or when replacing a windshield
wiper insert, change the rest position of
the windshield wipers to the service
position using the wiper lever.
■Raising the wipers to the service
position
Within approximately 40 seconds of
turning the engine switch off, move the
wiper lever to the (U.S.A.) or
(Canada) position and hold it for
approximately 2 se conds or more.
The wipers will move to the service posi-
tion.
■Lifting the windshield wipers
While holding the hook portion of the
wiper arm, lift the windshield wiper
from the windshield. Hook portion
■Lowering the windshield wipers to the
retracted position
With the windshield wipers placed on the
windshield, turn the en gine switch to IGNI-
TION ON mode and then move the wiper
lever to an operating position. When the
wiper switch is turned off, the windshield
wipers will stop at the retracted position.
NOTICE
■When lifting the windshield wipers
●Do not lift the wind shield wipers when
they are in the retracted position
below the hood. Otherwise, they may
contact the hood, possibly resulting in
damage to a windshield wiper and/or
the hood.
●Do not lift a windshield wiper by the
wiper blade. Otherwise, the wiper
blade may be deformed.
●Do not operate the wiper lever when
the windshield wipe rs are lifted. Oth-
erwise, the windshield wipers may
contact the hood, possibly resulting in
damage to the windshield wipers
and/or hood.
A
Page 199 of 508
1994-3. Operating the lights and wipers
4
Driving
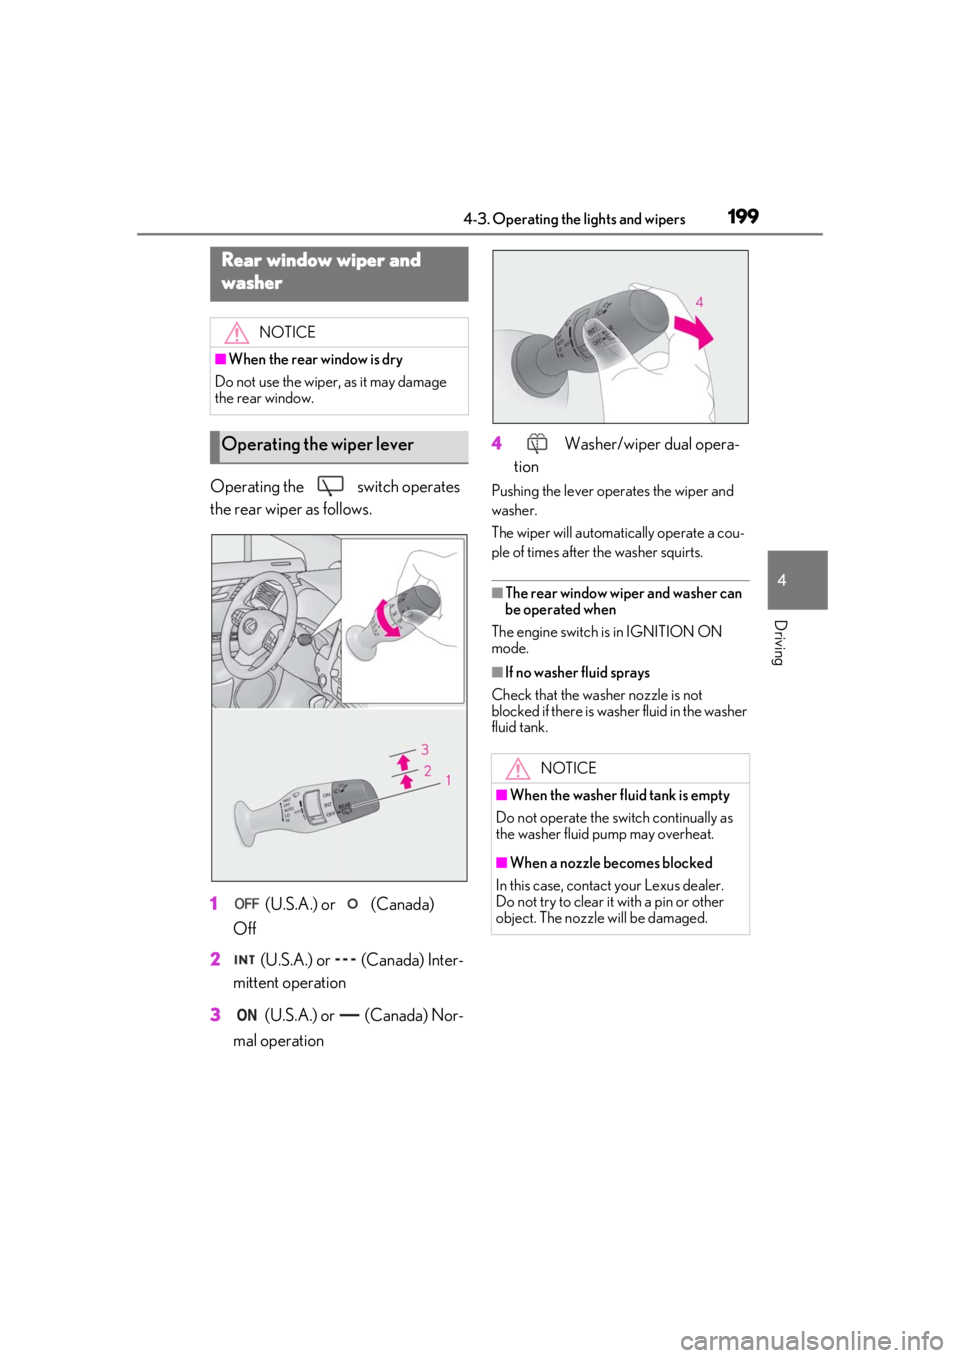
Operating the switch operates
the rear wiper as follows.
1 (U.S.A.) or (Canada)
Off
2 (U.S.A.) or (Canada) Inter-
mittent operation
3 (U.S.A.) or (Canada) Nor-
mal operation 4
Washer/wiper dual opera-
tionPushing the lever oper ates the wiper and
washer.
The wiper will automatically operate a cou-
ple of times after the washer squirts.
■The rear window wiper and washer can
be operated when
The engine switch is in IGNITION ON
mode.
■If no washer fluid sprays
Check that the wash er nozzle is not
blocked if there is wash er fluid in the washer
fluid tank.
Rear window wiper and
washer
NOTICE
■When the rear window is dry
Do not use the wiper, as it may damage
the rear window.
Operating the wiper lever
NOTICE
■When the washer fluid tank is empty
Do not operate the switch continually as
the washer fluid pump may overheat.
■When a nozzle becomes blocked
In this case, contact your Lexus dealer.
Do not try to clear it with a pin or other
object. The nozzle will be damaged.
Page 223 of 508
2234-5. Using the driving support systems
4
Driving
lowing conditions are met.
• LTA is turned on.
• Setting for “Steering Assist” and “Lane Center” in of the multi-information
display are set to “On”. ( P.81)
• This function recognizes white (yellow) lane lines or the position of a preceding
vehicle (except when the preceding vehi-
cle is small, such as a motorcycle).
• The dynamic radar cruise control with
full-speed range is operating in vehi-
cle-to-vehicle distance control mode.
• Width of traffic lane is approximately 10
to 13 ft. (3 to 4 m).
• Turn signal lever is not operated.
• Vehicle is not being driven around a sharp curve.
• No system malfunctions are detected. ( P.224)
• Vehicle does not acc elerate or deceler-
ate by a fixed amount or more.
• Steering wheel is not operated with a
steering force level su itable for changing
lanes.
• ABS, VSC, TRAC and PCS are not oper-
ating.
• TRAC or VSC is not turned off.
• Hands off steering wheel warning is not displayed. ( P.223)
• The vehicle is being driven in the center of a lane.
• Steering assist function is not operating.
■Temporary cancelation of functions
●When operation conditions are no longer
met, a function may be temporarily can-
celed. However, when the operation con-
ditions are met again, operation of the
function is automa tically restored.
( P.222)
●If the operation conditions ( P.222) are
no longer met while the lane centering
function is operating, the steering wheel
may vibrate and the buzzer may sound to
indicate that the function has been tem-
porarily canceled. However, if the “Alert”
customization setting is set to ,
the system will notify the driver by vibrat-
ing the steering wheel instead of sound-
ing the buzzer.
■Steering assist function/lane centering
function
●Depending on the vehicle speed, lane
departure situation, road conditions, etc.,
the driver may not feel the function is
operating or the function may not oper-
ate at all.
●The steering control of the function is
overridden by the driver’s steering wheel
operation.
●Do not attempt to test the operation of
the steering assist function.
■Lane departure alert function
●The warning buzzer may be difficult to
hear due to external noise, audio play-
back, etc. Also, it may be difficult to feel
steering wheel vibrations due to the road
conditions, etc.
●If the edge of the course* is not clear or
straight, the lane departure alert function
may not operate.
●Vehicle with BSM: It may not be possible
for the system to determine if there is a
danger of a collision with a vehicle in an
adjacent lane.
●Do not attempt to test the operation of
the lane departure alert function.
*: Boundary between asphalt and the side
of the road, such as grass, soil, or a curb
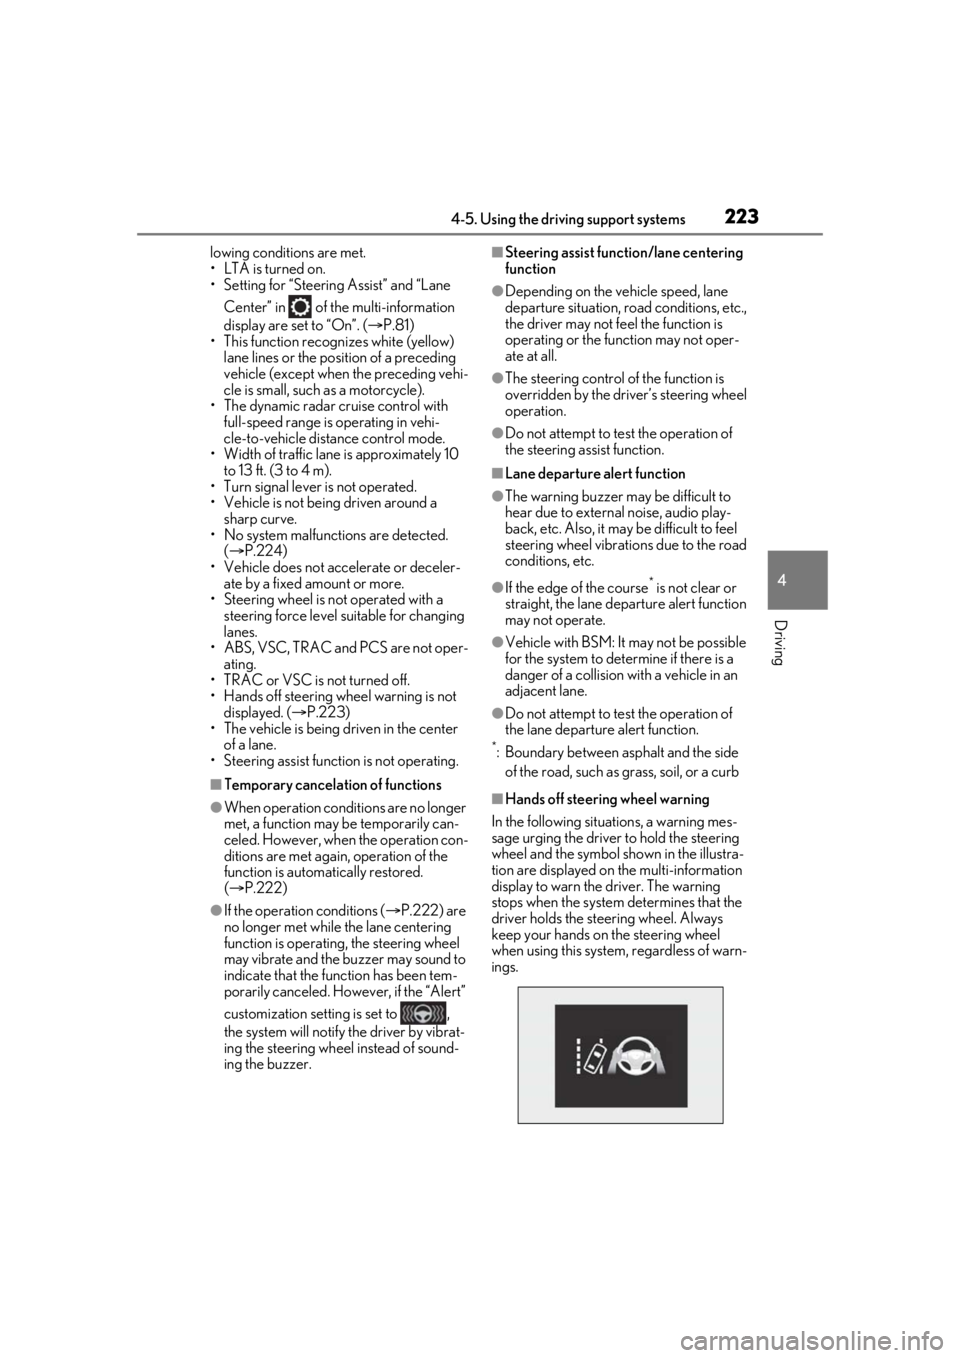
■Hands off steering wheel warning
In the following situations, a warning mes-
sage urging the driver to hold the steering
wheel and the symbol sh own in the illustra-
tion are displayed on the multi-information
display to warn the driver. The warning
stops when the system determines that the
driver holds the steering wheel. Always
keep your hands on the steering wheel
when using this system , regardless of warn-
ings.
Page 227 of 508
2274-5. Using the driving support systems
4
Driving
●Side road speed signs may be detected
and displayed (if positioned in sight of the
front camera) while the vehicle is travel-
ing on the main road.
●Roundabout exit road speed signs may
be detected and displayed (if positioned
in sight of the front camera) while travel-
ing on a roundabout.
●The front of the vehicle is raised or low-
ered due to the carried load.
●The surrounding brightness is not suffi-
cient or changes suddenly.
●When a sign intended for trucks, etc. is
recognized.
●The speed information displayed on the
meter and on the navigation system may
be different due to the navigation system
using map data.
■Speed limit sign display
If the engine switch wa s last turned off while
a speed limit sign wa s displayed on the
multi-information display, the same sign dis-
plays again when the engine switch is
turned to IGNITION ON mode.
■Customization
Some functions can be customized. (Cus-
tomizable features: P.461)
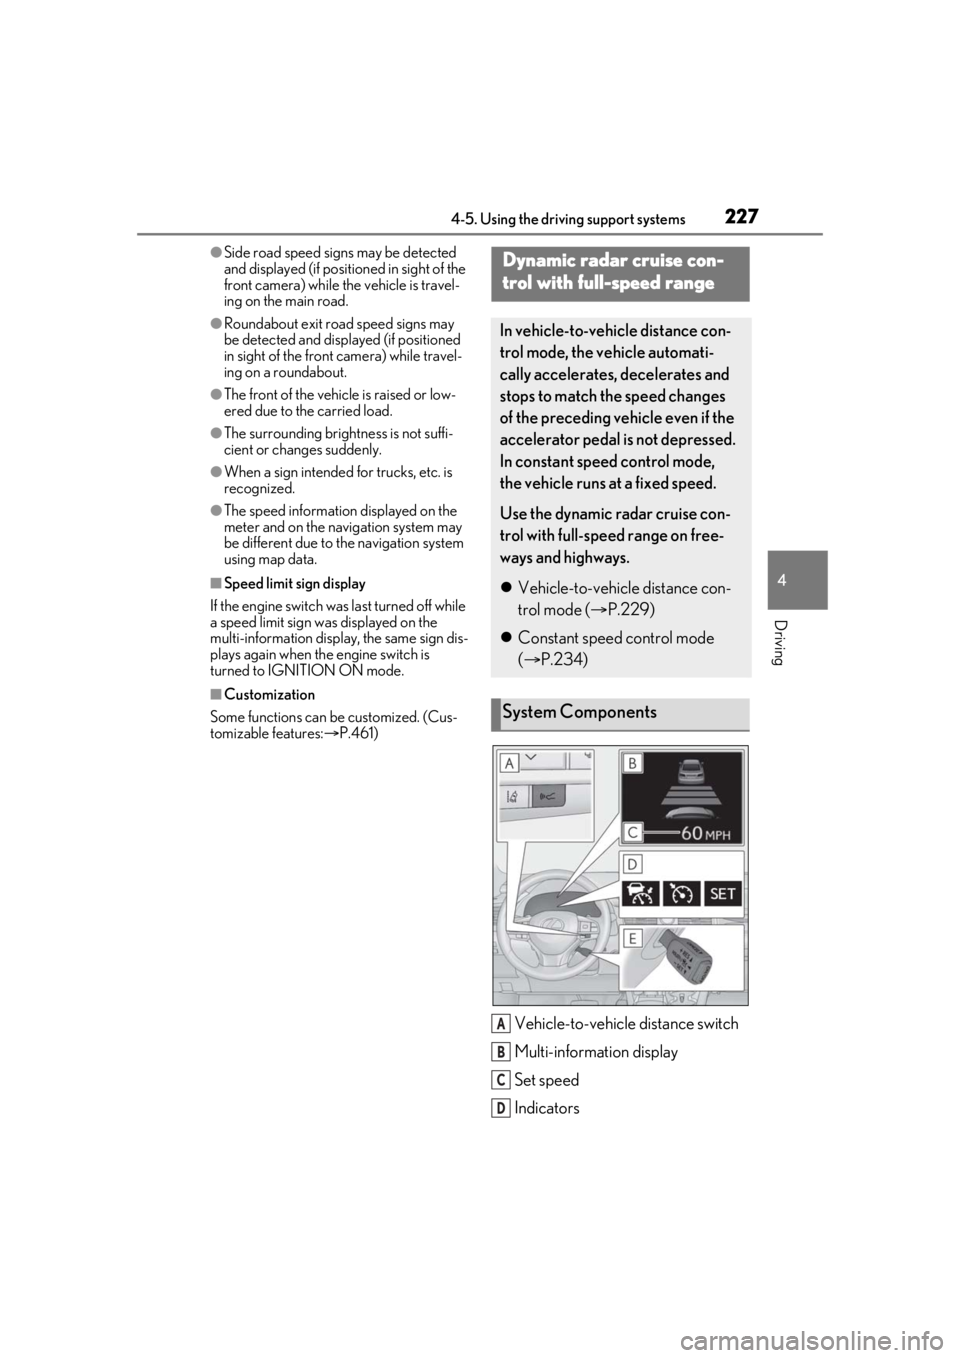
Vehicle-to-vehicle distance switch
Multi-information display
Set speed
Indicators
Dynamic radar cruise con-
trol with full-speed range
In vehicle-to-vehicle distance con-
trol mode, the ve hicle automati-
cally accelerates, decelerates and
stops to match the speed changes
of the preceding vehicle even if the
accelerator pedal is not depressed.
In constant speed control mode,
the vehicle runs at a fixed speed.
Use the dynamic radar cruise con-
trol with full-speed range on free-
ways and highways.
Vehicle-to-vehicle distance con-
trol mode ( P.229)
Constant speed control mode
( P.234)
System Components
A
B
C
D
Page 231 of 508
2314-5. Using the driving support systems
4
Driving
signal lever is operated in the opposite direction to the overtaking lane (e.g., if the driver
normally operates the vehicle in a region where the overtaking lane is to the right but then
drives to a region where the overtaking lane is to the left, the vehicle may accelerate when
the right turn signal is activated).
Example of acceleration
When there are no longer any preceding vehicles driving slower than the set
speed
The system accelerates until the set speed is re ached. The system then returns to constant
speed cruising.
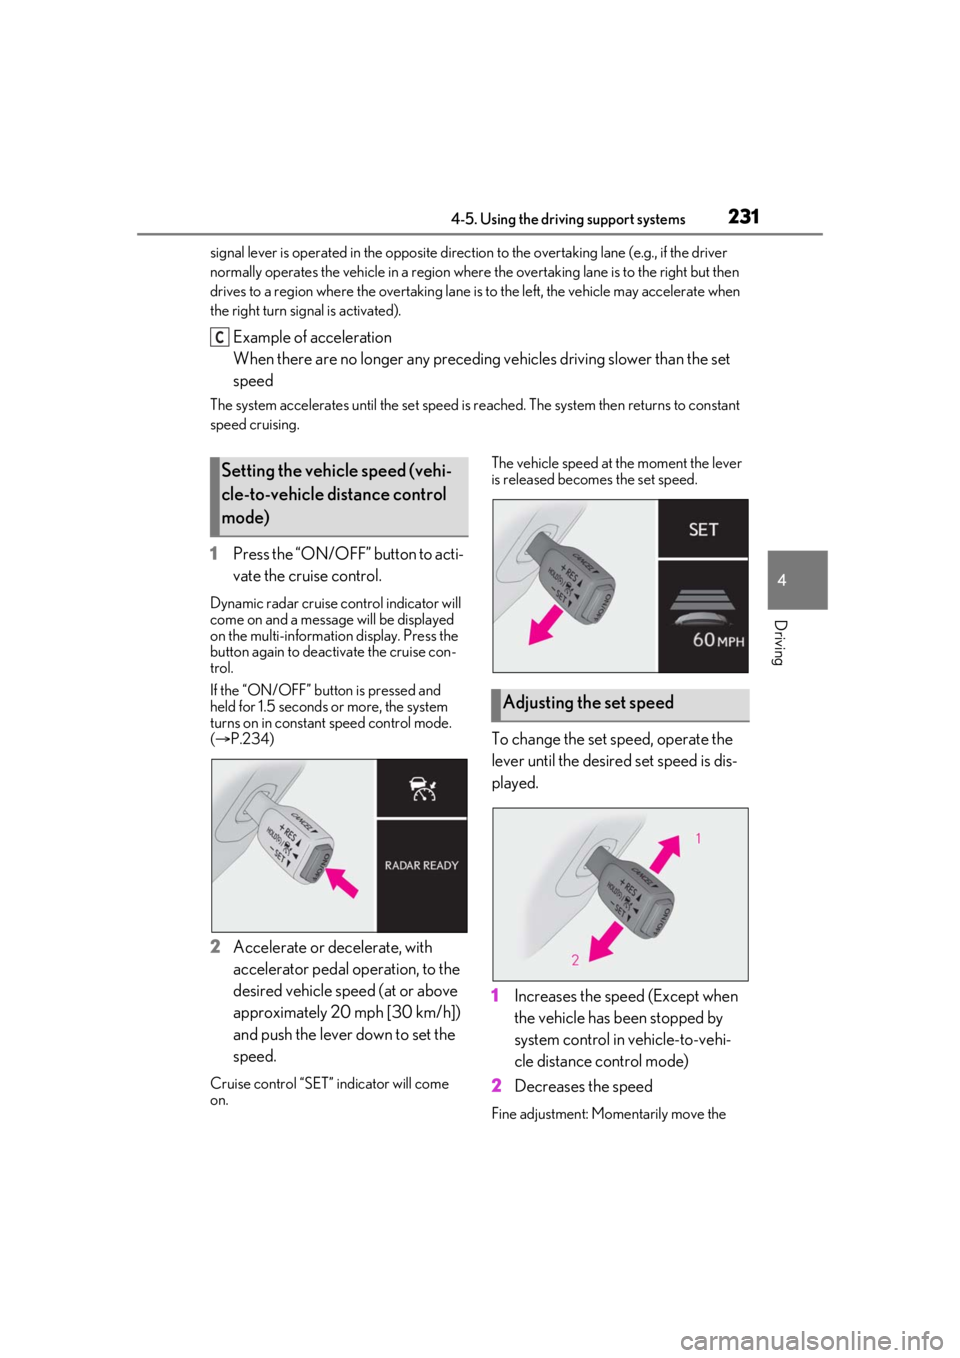
1 Press the “ON/OFF” button to acti-
vate the cruise control.
Dynamic radar cruise control indicator will
come on and a message will be displayed
on the multi-information display. Press the
button again to deactivate the cruise con-
trol.
If the “ON/OFF” button is pressed and
held for 1.5 seconds or more, the system
turns on in constant speed control mode.
( P.234)
2 Accelerate or decelerate, with
accelerator pedal operation, to the
desired vehicle speed (at or above
approximately 20 mph [30 km/h])
and push the lever down to set the
speed.
Cruise control “SET” indicator will come
on. The vehicle speed at the moment the lever
is released beco
mes the set speed.
To change the set speed, operate the
lever until the desired set speed is dis-
played.
1Increases the speed (Except when
the vehicle has been stopped by
system control in vehicle-to-vehi-
cle distance control mode)
2 Decreases the speed
Fine adjustment: Mo mentarily move the
C
Setting the vehicle speed (vehi-
cle-to-vehicle distance control
mode)
Adjusting the set speed
Page 234 of 508
2344-5. Using the driving support systems
pedal
When constant speed control mode is
selected, your vehicle will maintain a
set speed without controlling the vehi-
cle-to-vehicle distance. Select this
mode only when vehicle-to-vehicle dis-
tance control mode does not function
correctly due to a dirty radar, etc.
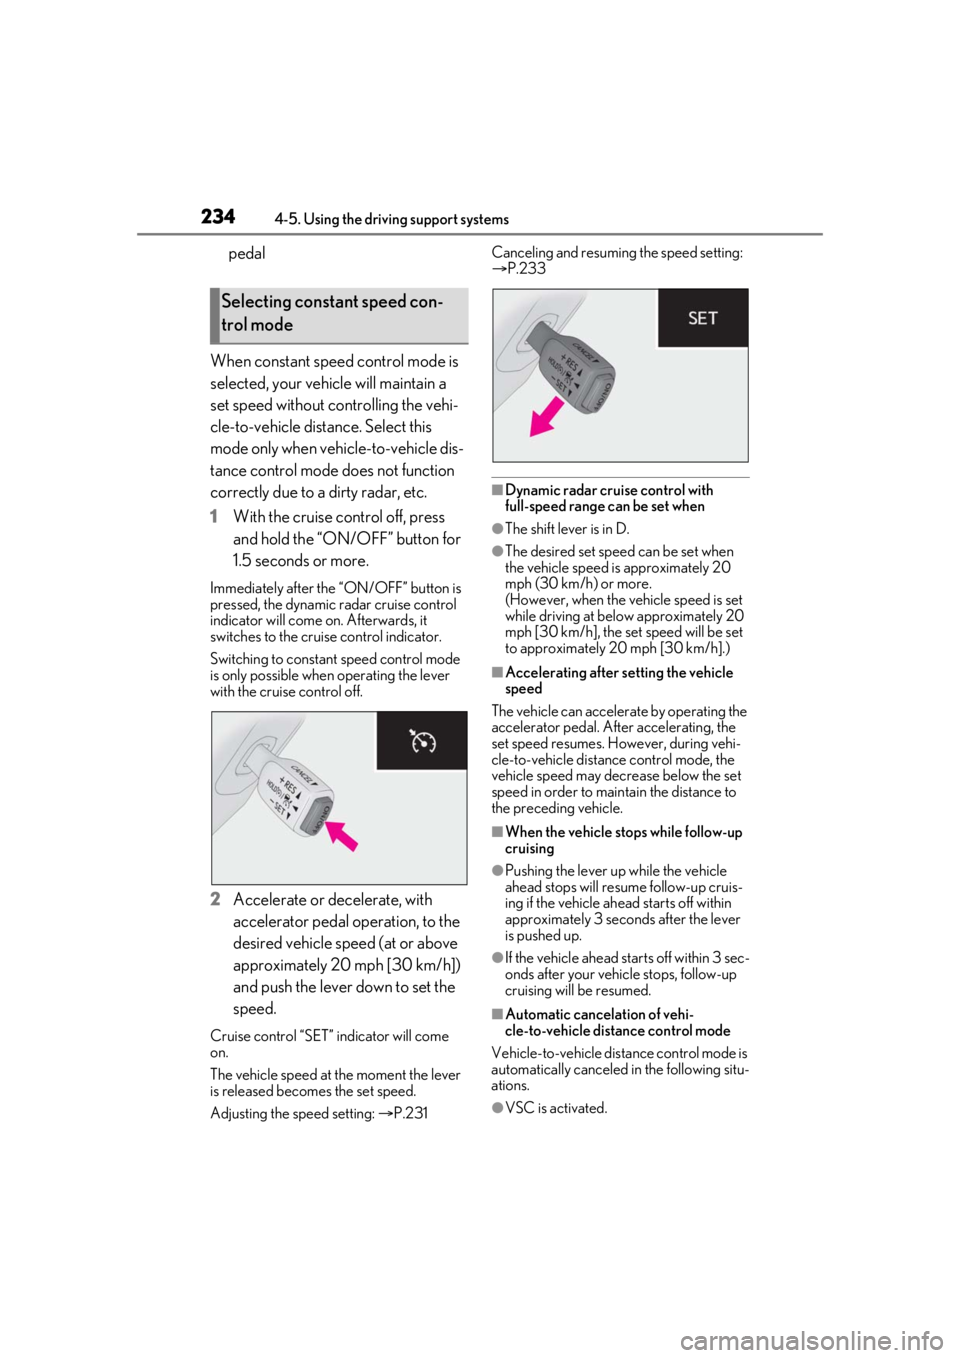
1 With the cruise control off, press
and hold the “ON/ OFF” button for
1.5 seconds or more.
Immediately after the “ON/OFF” button is
pressed, the dynamic radar cruise control
indicator will come on. Afterwards, it
switches to the cruise control indicator.
Switching to constant speed control mode
is only possible when operating the lever
with the cruise control off.
2 Accelerate or decelerate, with
accelerator pedal operation, to the
desired vehicle speed (at or above
approximately 20 mph [30 km/h])
and push the lever down to set the
speed.
Cruise control “SET” indicator will come
on.
The vehicle speed at the moment the lever
is released becomes the set speed.
Adjusting the sp eed setting: P.231 Canceling and resuming the speed setting:
P.233
■Dynamic radar cruise control with
full-speed range can be set when
●The shift lever is in D.
●The desired set spee d can be set when
the vehicle speed is approximately 20
mph (30 km/h) or more.
(However, when the vehicle speed is set
while driving at belo w approximately 20
mph [30 km/h], the se t speed will be set
to approximately 20 mph [30 km/h].)
■Accelerating after setting the vehicle
speed
The vehicle can accelerate by operating the
accelerator pedal. After accelerating, the
set speed resumes. Ho wever, during vehi-
cle-to-vehicle distance control mode, the
vehicle speed may decrease below the set
speed in order to main tain the distance to
the preceding vehicle.
■When the vehicle stops while follow-up
cruising
●Pushing the lever up while the vehicle
ahead stops will resu me follow-up cruis-
ing if the vehicle ahead starts off within
approximately 3 seconds after the lever
is pushed up.
●If the vehicle ahead starts off within 3 sec-
onds after your vehicle stops, follow-up
cruising will be resumed.
■Automatic cancelation of vehi-
cle-to-vehicle dist ance control mode
Vehicle-to-vehicle distance control mode is
automatically canceled in the following situ-
ations.
●VSC is activated.
Selecting constant speed con-
trol mode