ECU LEXUS RX450h 2015 Manual PDF
[x] Cancel search | Manufacturer: LEXUS, Model Year: 2015, Model line: RX450h, Model: LEXUS RX450h 2015Pages: 878, PDF Size: 11.62 MB
Page 714 of 878
7144-3. Do-it-yourself maintenance
■ Halogen headlight low beams (if equipped)
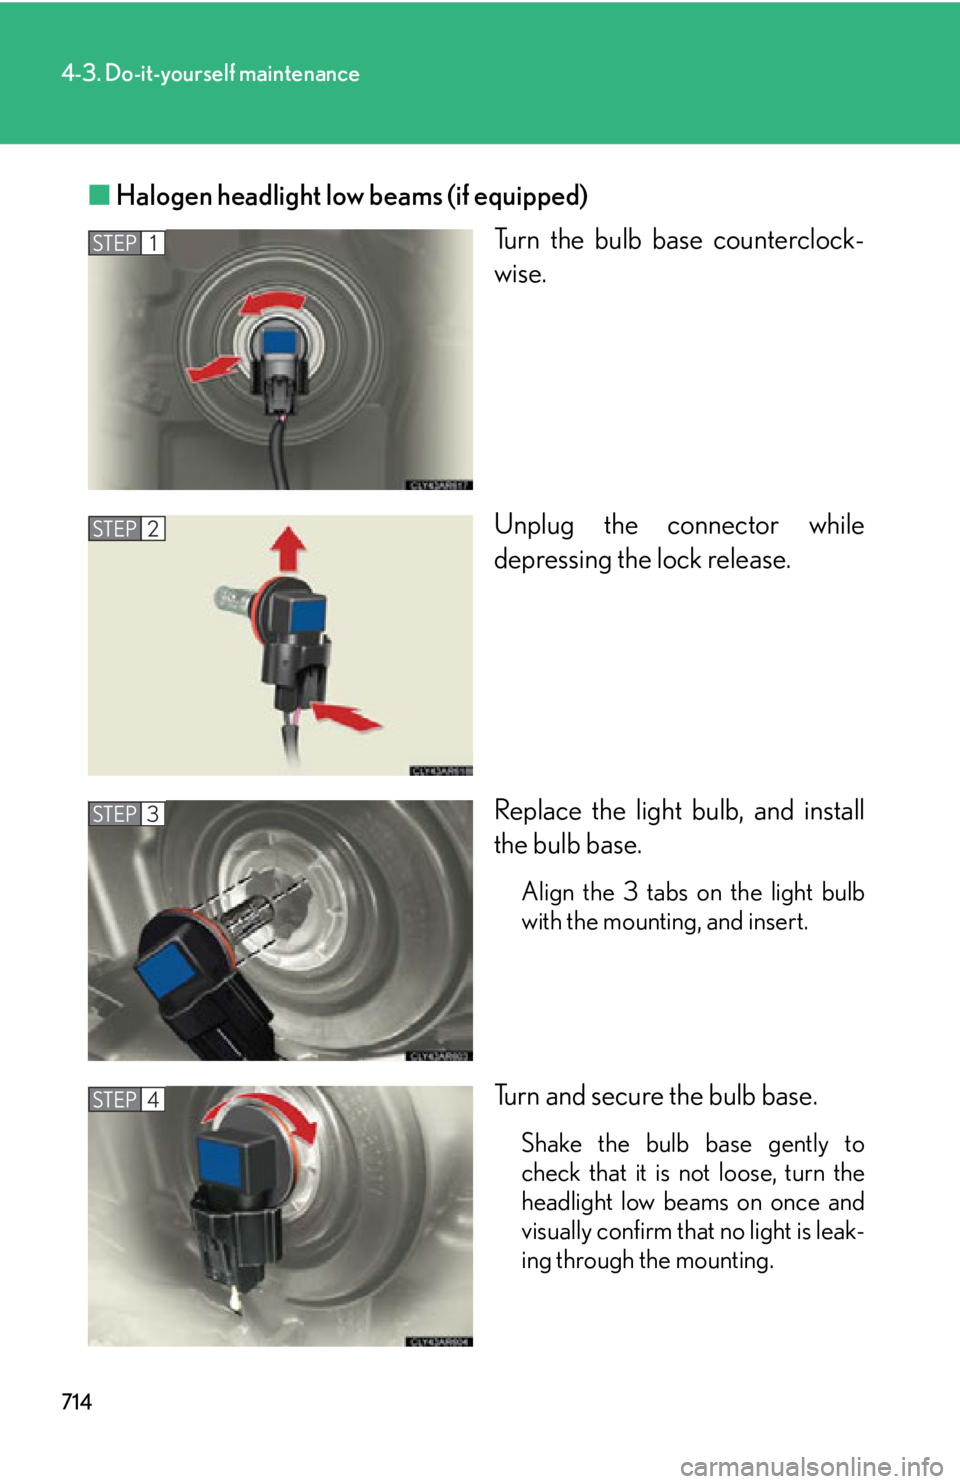
Turn the bulb base counterclock-
wise.
Unplug the connector while
depressing the lock release.
Replace the light bulb, and install
the bulb base. Align the 3 tabs on the light bulb
with the mounting, and insert.
Turn and secure the bulb base.
Shake the bulb base gently to
check that it is not loose, turn the
headlight low beams on once and
visually confirm that no light is leak-
ing through the mounting.STEP 1
STEP 2
STEP 3
STEP 4
Page 721 of 878
7214-3. Do-it-yourself maintenance
4
Maintenance and care ■
Discharge headlights (if equipped)
If voltage to the discharge bulbs is insufficient, the bulbs may not come on, or may
go out temporarily. The discharge bulbs will come on when normal power is
restored.■
LED light bulbs
The LED headlight low beams (if equipped), daytime running lights, parking lights,
front side marker lights, LED front fog ligh ts (if equipped), side turn signal lights,
stop lights, high mounted stoplight and licence plate lights consist of a number of
LEDs. If any of the LEDs burn out, take your vehicle to your Lexus dealer to have the
light replaced.■
Condensation build-up on the inside of the lens
Temporary condensation build-up on the inside of the headlight lens does not indi-
cate a malfunction. Contact your Lexus dealer for more information in the following
situations: ●
Large drops of water are built up on the inside of the lens.●
Water has built up in side the headlight.
CAUTION■
Replacing light bulbs ●
Turn off the lights. Do not attempt to replace the bulb immediately after turning
off the lights.
The bulbs become very hot and may cause burns.●
Do not touch the glass portion of the li ght bulb with bare hands. When it is
unavoidable to hold the glass portion, use and hold with a clean dry cloth to avoid
getting moisture and oils on the bulb.
Also, if the bulb is scratched or dropped, it may blow out or crack.
●
Fully install light bulbs and any parts used to secure them. Failure to do so may
result in heat damage, fire, or water en tering the headlight unit. This may damage
the headlights or cause condensation to build up on the lens.
Page 729 of 878
7285-1. Essential information
Emergency towing
If a tow truck is not available in an emergency, your vehicle may be tem-
porarily towed using a cable or chain secured to the emergency towing
eyelet. This should only be attempted on hard surfaced roads for short
distance at under 18 mph (30 km/h).
A driver must be in the vehicle to s teer and operate the brakes. The vehi-
cle’s wheels, drive train, axles, steering and brakes must be in good condi-
tion.
Emergency towing procedure
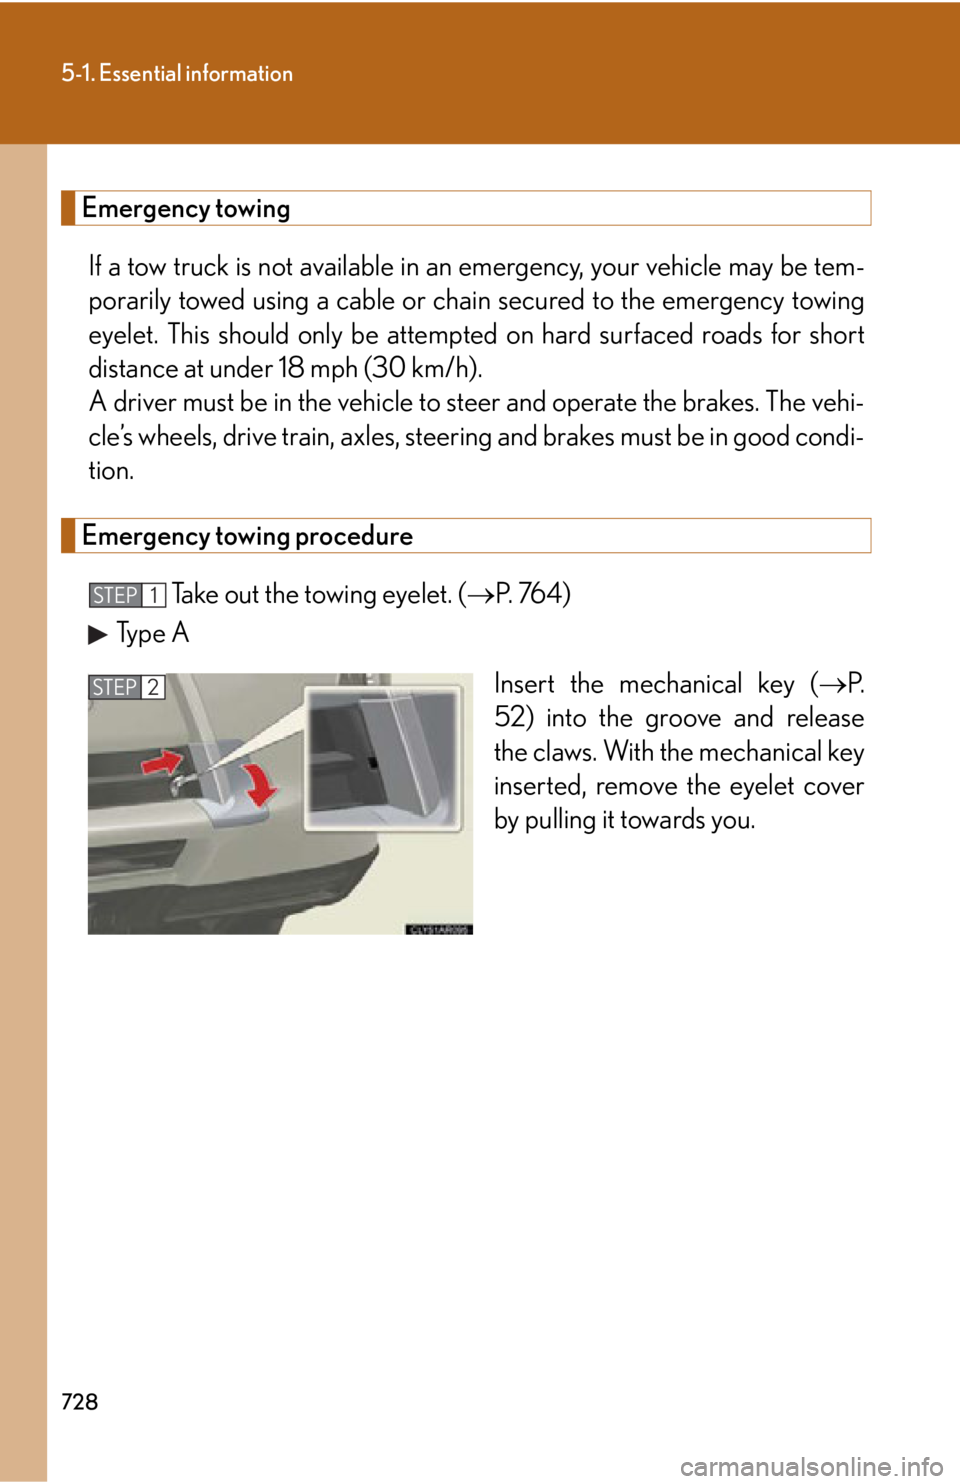
Take out the towing eyelet. ( P. 764)
Type A
Insert the mechanical key ( P.
52) into the groove and release
the claws. With the mechanical key
inserted, remove the eyelet cover
by pulling it towards you. STEP 1
STEP 2
Page 730 of 878
5
When trouble arises
7295-1. Essential information
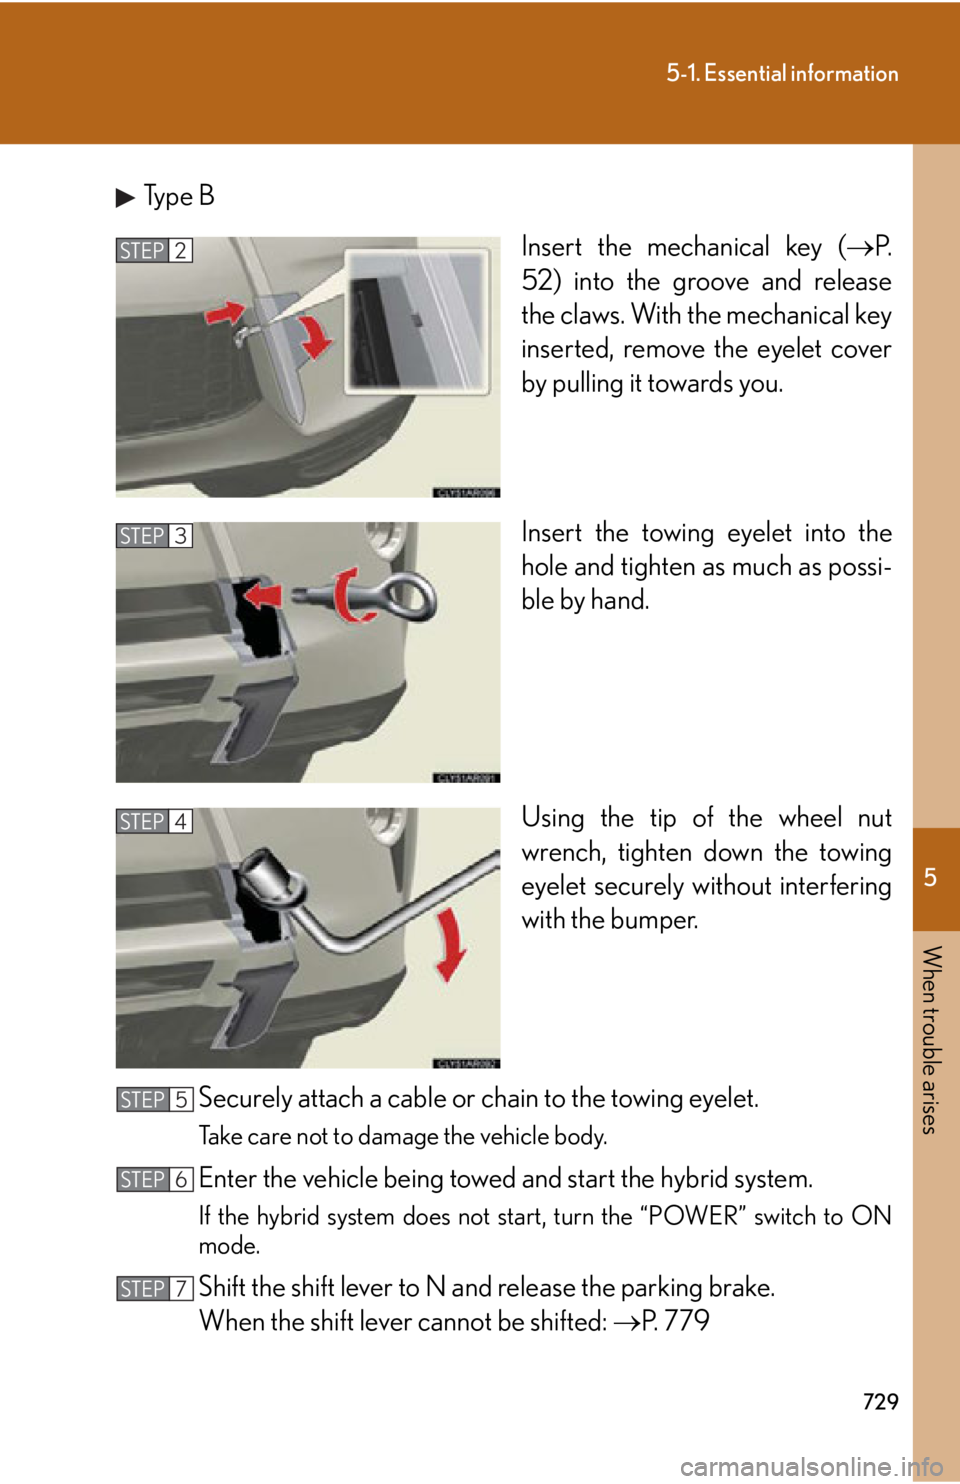
Type B
Insert the mechanical key ( P.
52) into the groove and release
the claws. With the mechanical key
inserted, remove the eyelet cover
by pulling it towards you.
Insert the towing eyelet into the
hole and tighten as much as possi-
ble by hand.
Using the tip of the wheel nut
wrench, tighten down the towing
eyelet securely without interfering
with the bumper.
Securely attach a cable or chain to the towing eyelet.
Take care not to damage the vehicle body.
Enter the vehicle being towed and start the hybrid system.
If the hybrid system does not start, turn the “POWER” switch to ON
mode.
Shift the shift lever to N and release the parking brake.
When the shift lever cannot be shifted: P. 7 7 9STEP 2
STEP 3
STEP 4
STEP 5
STEP 6
STEP 7
Page 732 of 878
5
When trouble arises
7315-1. Essential information
CAUTION■
While towing ●
When towing using a rope, avoid sudden starts, etc. which place excessive stress
on the towing hook and rope.
The towing hook or rope may become damaged, broken debris may hit people
and cause serious damage.●
Do not turn the “POWER” switch off.
There is a possibility that the steering wheel is locked and can not be operated.■
Installing towing eyelet to the vehicle
Make sure that towing eyelet is installed securely.
If not securely installed, towing eyelet may come loose during towing.
NOTICE■
To prevent damage to the vehicle when towing using a wheel-lift type truck
When raising the vehicle, ensure adequa te ground clearance for towing at the
opposite end of the raised vehicle. Without adequate clearance, the vehicle could
be damaged while being towed.■
To prevent body damage when to wing with a sling-type truck
Do not tow with a sling-type truck, either from the front or rear.■
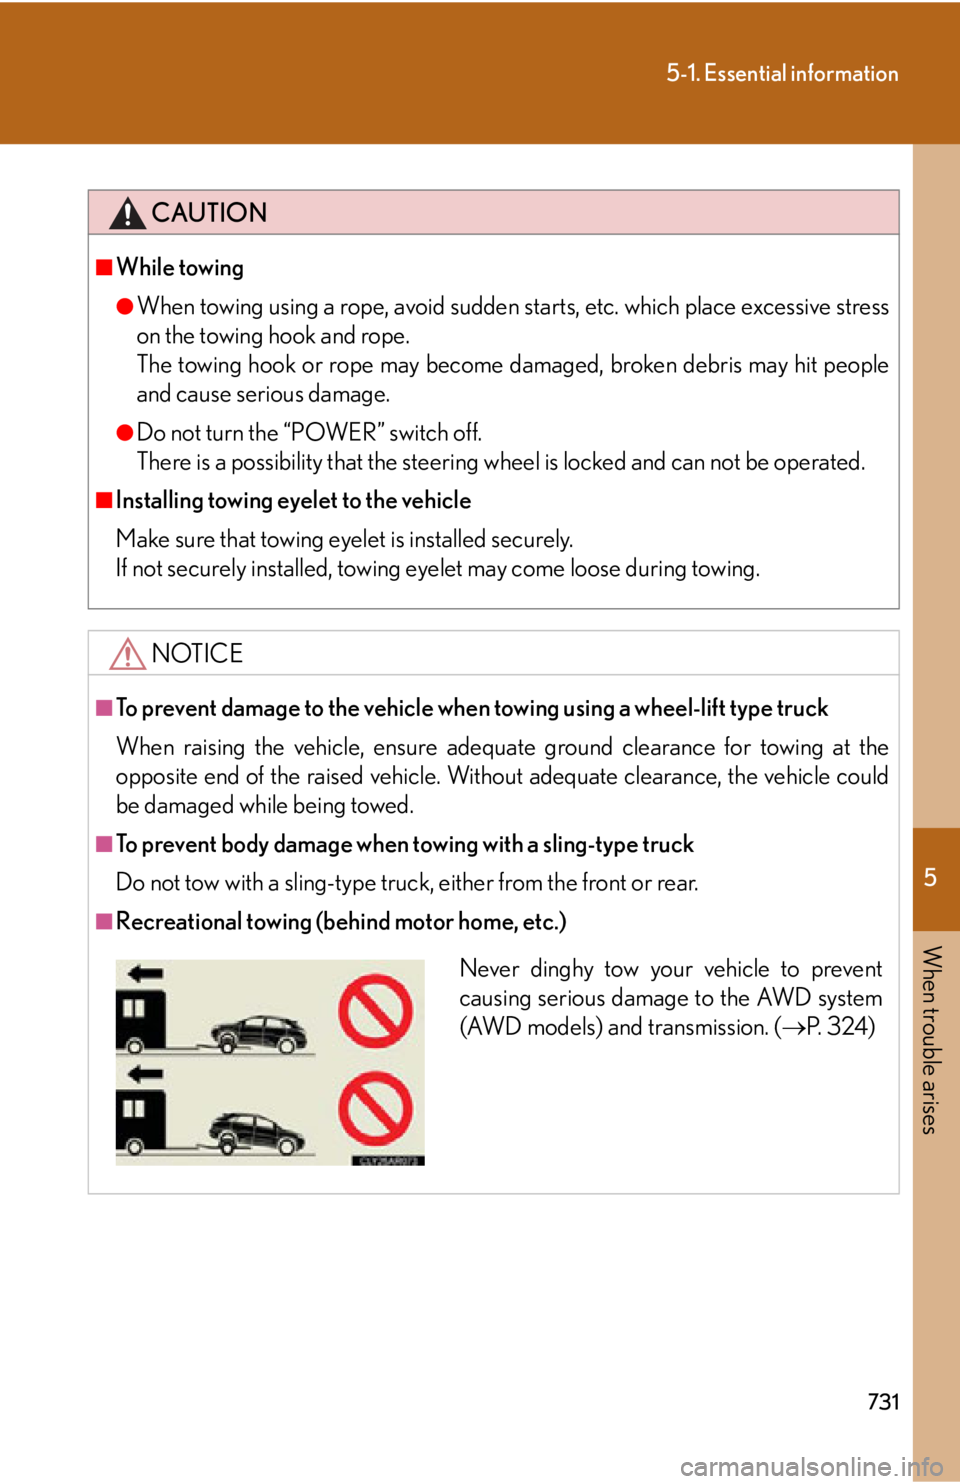
Recreational towing (behind motor home, etc.)
Never dinghy tow your vehicle to prevent
causing serious damage to the AWD system
(AWD models) and transmission. ( P. 3 2 4 )
Page 739 of 878

7385-2. Steps to take in an emergency
■
If the malfunction indicator lamp comes on while driving
First check the following: ●
Is the fuel tank empty?
If it is, fill the fuel tank immediately.●
Is the fuel tank cap loose?
If it is, tighten it securely.
The lamp will go off after several driving trips.
If the light does not go off even after several trips, contact your Lexus dealer as soon
as possible.■
SRS warning light
This warning light system monitors the airb ag sensor assembly, front airbag sensors,
side and curtain shield airbag sensors, curtain shield and rear side airbag sensors,
door sensors, driver's seat position sensor, driver's seat belt buckle switch, front
passenger occupant classification system (ECU and sensors), “AIR BAG ON” indi-
cator light, “AIR BAG OFF” in dicator light, front pass enger's seat belt buckle
switch, seat belt pretensioner assemblies, inflators, interconnecting wiring and
power sources. ( P. 1 3 2 )■
Front passenger detection sensor, passen ger seat belt reminder and warning
buzzer ●
If luggage is placed on the front passenger seat, the front passenger detection
sensor may cause the warning light to flash and the warning buzzer to sound
even if a passenger is not sitting in the seat.●
If a cushion is placed on the seat, the sensor may not detect a passenger, and the
warning light may not operate properly.■
Electric power steering system warning light (warning buzzer)
When the 12-volt battery charge becomes insufficient or the voltage temporarily
drops, the electric power steering system warning light may come on and the warn-
ing buzzer may sound.
■
When the tire pressure warning light comes on
Check the tire inflation pressure and adjust to the appropriate level. Pushing the tire
pressure warning reset switch will not turn off the tire pressure warning light.
Page 761 of 878
7605-2. Steps to take in an emergency
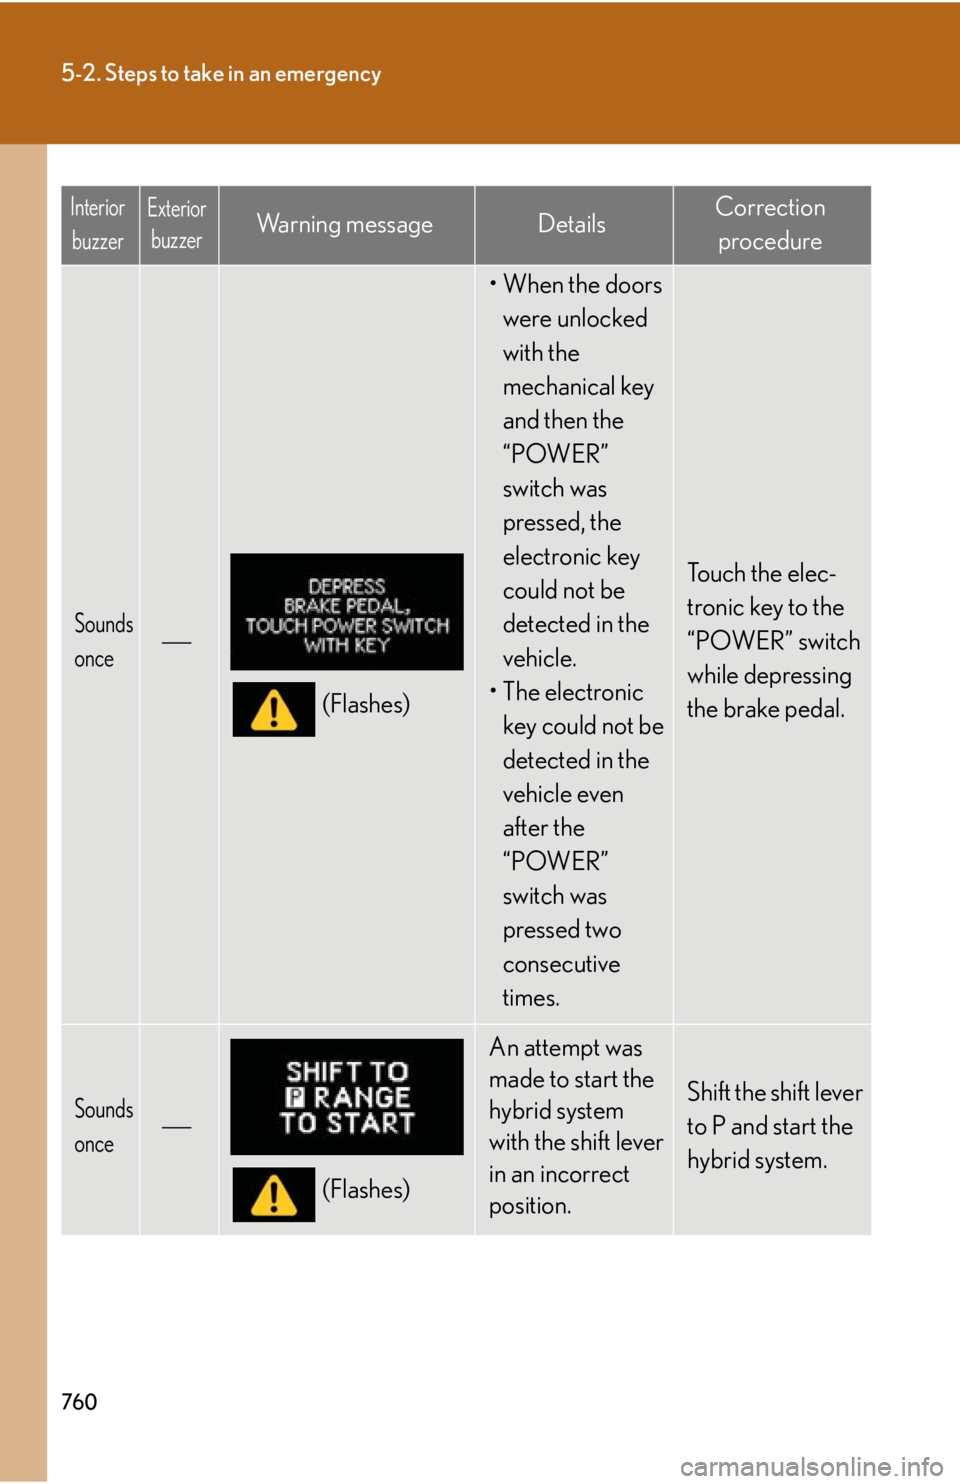
Sounds
once
(Flashes) •When the doors
were unlocked
with the
mechanical key
and then the
“POWER”
switch was
pressed, the
electronic key
could not be
detected in the
vehicle.
• The electronic
key could not be
detected in the
vehicle even
after the
“POWER”
switch was
pressed two
consecutive
times. Touch the elec-
tronic key to the
“POWER” switch
while depressing
the brake pedal.
Sounds
once
(Flashes) An attempt was
made to start the
hybrid system
with the shift lever
in an incorrect
position. Shift the shift lever
to P and start the
hybrid system.Interior
buzzer Exterior
buzzer Wa r n i n g m e s s a g e Details Correction
procedure
Page 768 of 878
5
When trouble arises
7675-2. Steps to take in an emergency
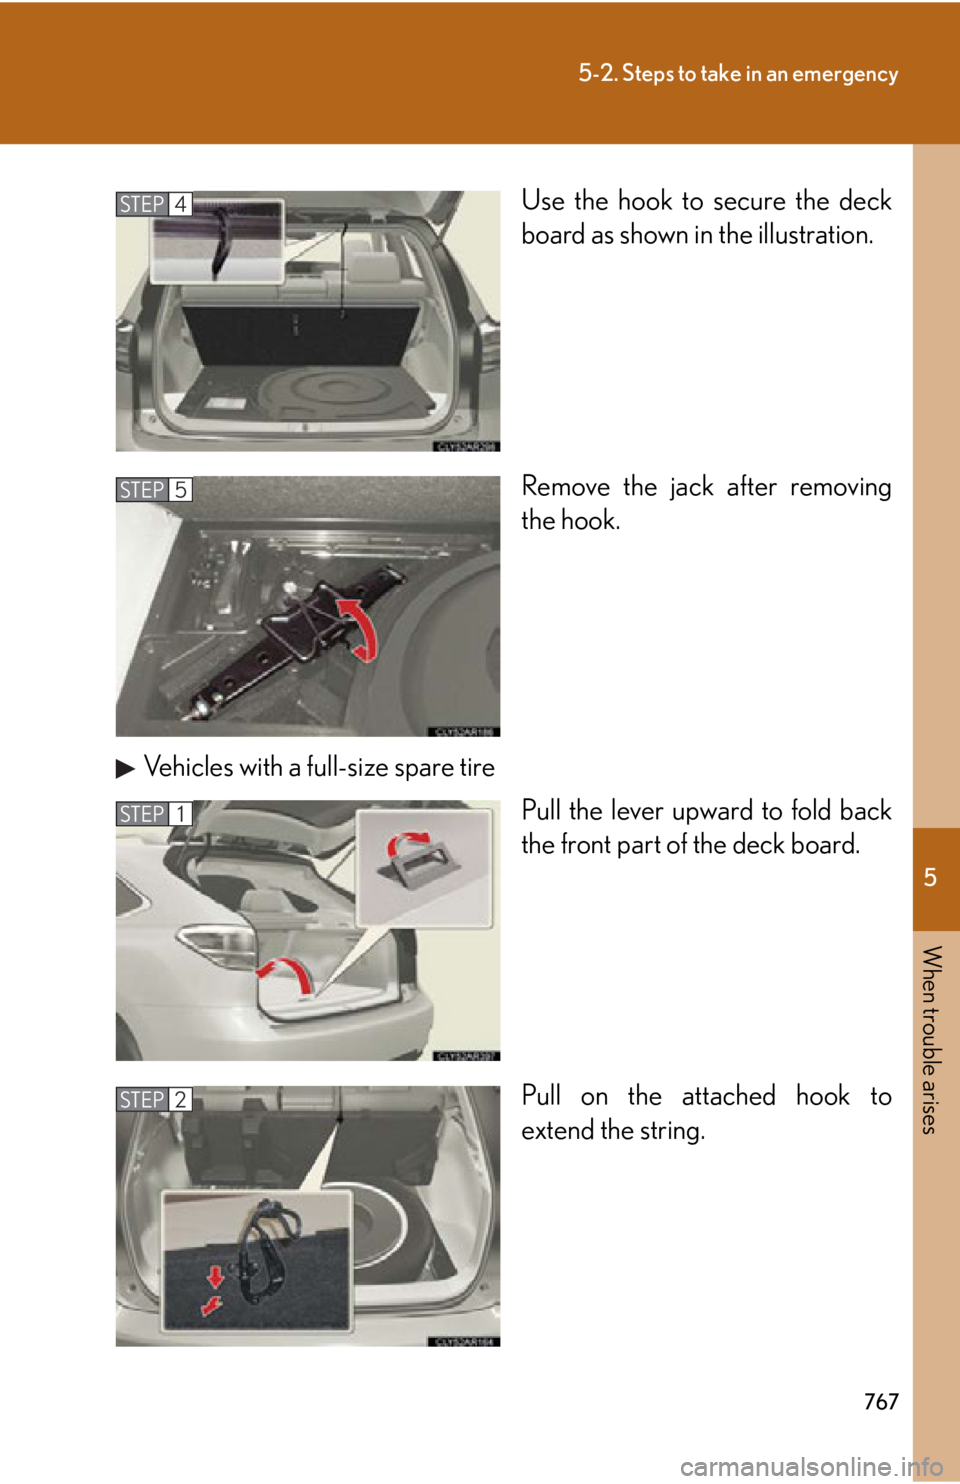
Use the hook to secure the deck
board as shown in the illustration.
Remove the jack after removing
the hook.
Vehicles with a full-size spare tire
Pull the lever upward to fold back
the front part of the deck board.
Pull on the attached hook to
extend the string.STEP 4
STEP 5
STEP 1
STEP 2
Page 769 of 878
7685-2. Steps to take in an emergency
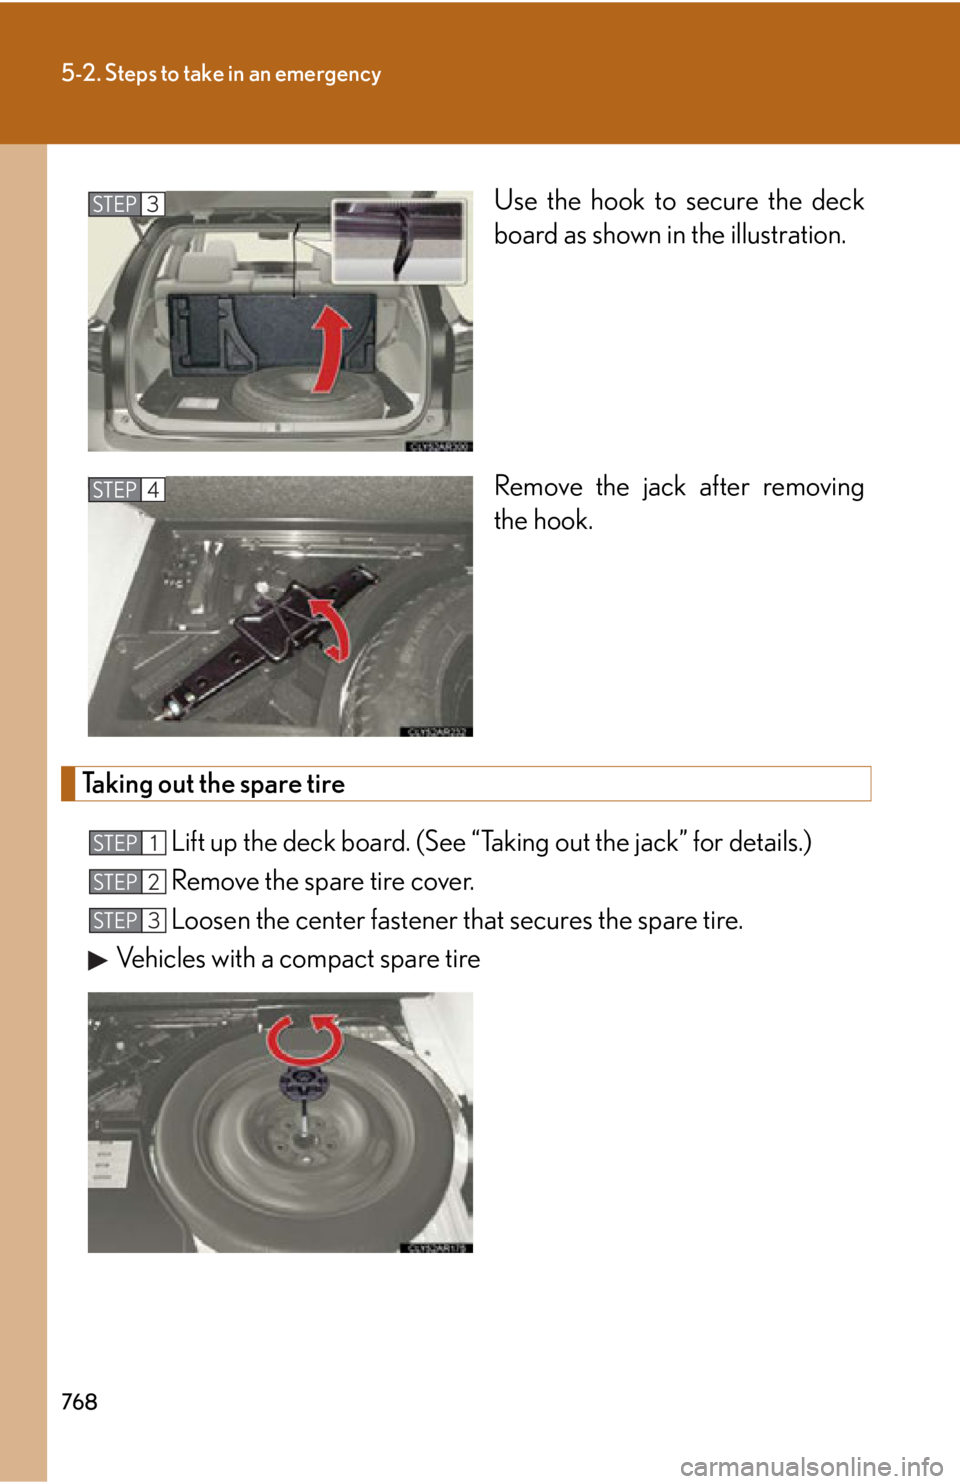
Use the hook to secure the deck
board as shown in the illustration.
Remove the jack after removing
the hook.
Taking out the spare tire
Lift up the deck board. (See “Taking out the jack” for details.)
Remove the spare tire cover.
Loosen the center fastener that secures the spare tire.
Vehicles with a compact spare tire STEP 3
STEP 4
STEP 1
STEP 2
STEP 3
Page 774 of 878
5
When trouble arises
7735-2. Steps to take in an emergency
■
If you have a flat front tire on a road covered with snow or ice (vehicles with a
compact spare tire)
Install the compact spare tire on one of the rear wheels of the vehicle. Perform the
following steps and fit tire chains to the front tires:
Replace a rear tire with the compact spare tire.
Replace the flat front tire with the tire removed from the rear of the vehi-
cle.
Fit tire chains to the front tires.■
After completing the tire change
The tire pressure warning system must be reset. ( P. 6 7 1 )
CAUTION■
Using the tire jack
Improper use of the tire jack may cause the vehicle to suddenly fall off the jack,
leading to death or serious injury. ●
Do not use the tire jack for any purpose other than replacing tires or installing and
removing tire chains.●
Only use the tire jack that comes with this vehicle for replacing a flat tire.
Do not use it on other vehicles, and do no t use other tire jacks for replacing tires
on this vehicle.●
Always check that the tire jack is securely set to the jack point.●
Do not put any part of your body under the vehicle while it is supported by the
jack.●
Do not start or run the hybrid system while your vehicle is supported by the jack.●
Do not raise the vehicle while someone is inside.●
When raising the vehicle, do not put an object on or under the jack.
●
Do not raise the vehicle to a height greate r than that required to replace the tire.
●
Use a jack stand if it is necessary to get under the vehicle.
Take particular care when lowering the vehicle to ensure that no one working on or
near the vehicle may be injured. STEP 1
STEP 2
STEP 3