headlights LEXUS RX450H 2016 Owner's Manual
[x] Cancel search | Manufacturer: LEXUS, Model Year: 2016, Model line: RX450H, Model: LEXUS RX450H 2016Pages: 660, PDF Size: 14.85 MB
Page 514 of 660
5146-3. Do-it-yourself maintenance
RX450h_U_OM0E013U
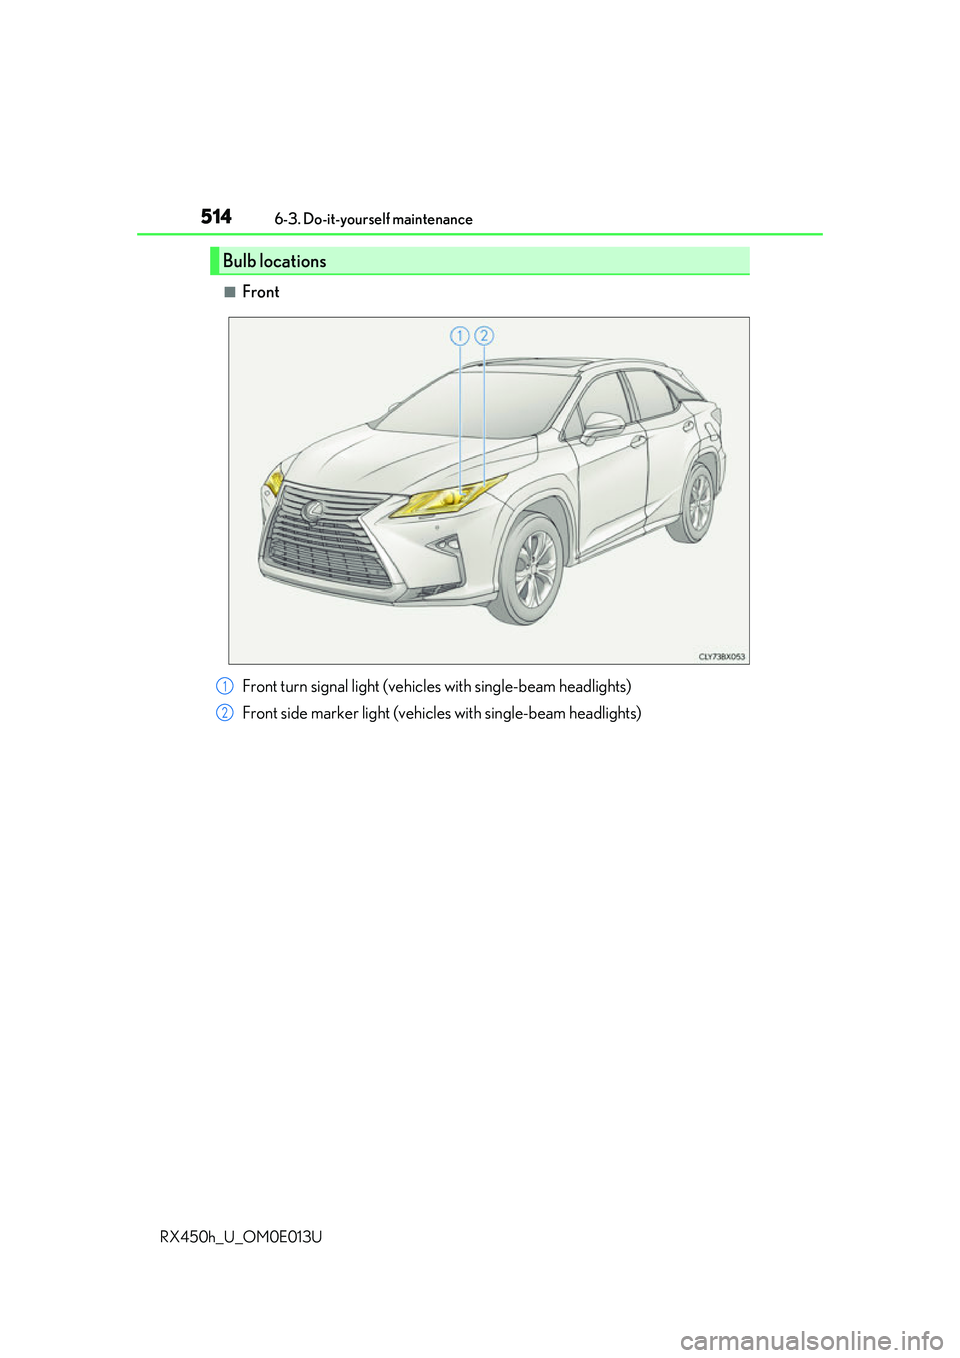
■Front
Bulb locations
Front turn signal light (vehic les with single-beam headlights)
Front side marker light (vehic les with single-beam headlights)1
2
Page 515 of 660
5156-3. Do-it-yourself maintenance
6
Maintenance and care
RX450h_U_OM0E013U
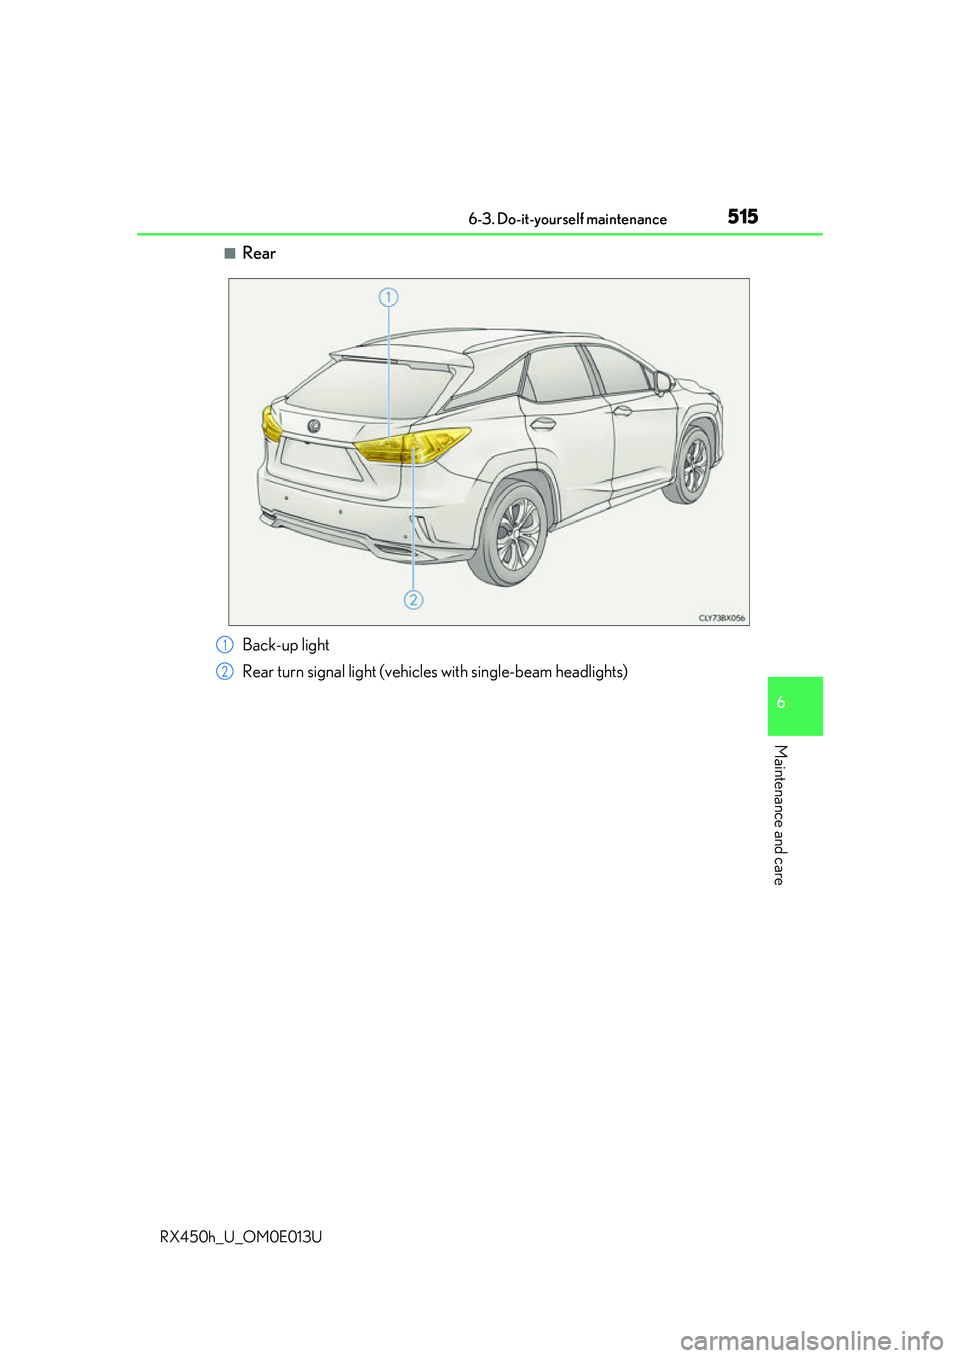
■Rear
Back-up light
Rear turn signal light (vehicles with single-beam headlights)1
2
Page 516 of 660
5166-3. Do-it-yourself maintenance
RX450h_U_OM0E013U
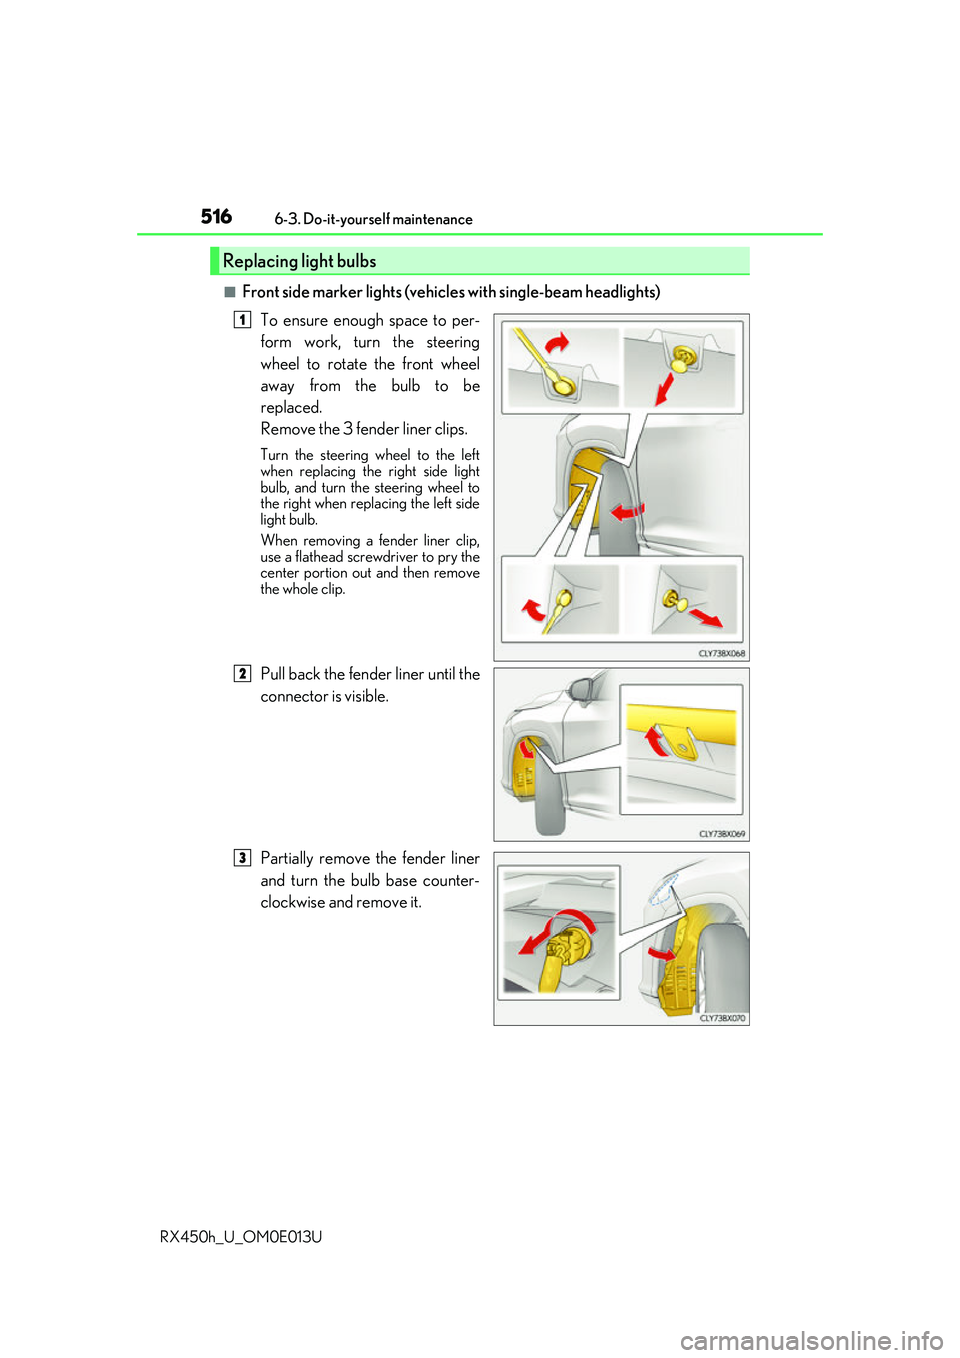
■Front side marker lights (vehicle s with single-beam headlights)
To ensure enough space to per-
form work, turn the steering
wheel to rotate the front wheel
away from the bulb to be
replaced.
Remove the 3 fender liner clips.
Turn the steering wheel to the left
when replacing the right side light
bulb, and turn the steering wheel to
the right when replacing the left side
light bulb.
When removing a fender liner clip,
use a flathead screwdriver to pry the
center portion out and then remove
the whole clip.
Pull back the fender liner until the
connector is visible.
Partially remove the fender liner
and turn the bulb base counter-
clockwise and remove it.
Replacing light bulbs
1
82
3
Page 518 of 660
5186-3. Do-it-yourself maintenance
RX450h_U_OM0E013U
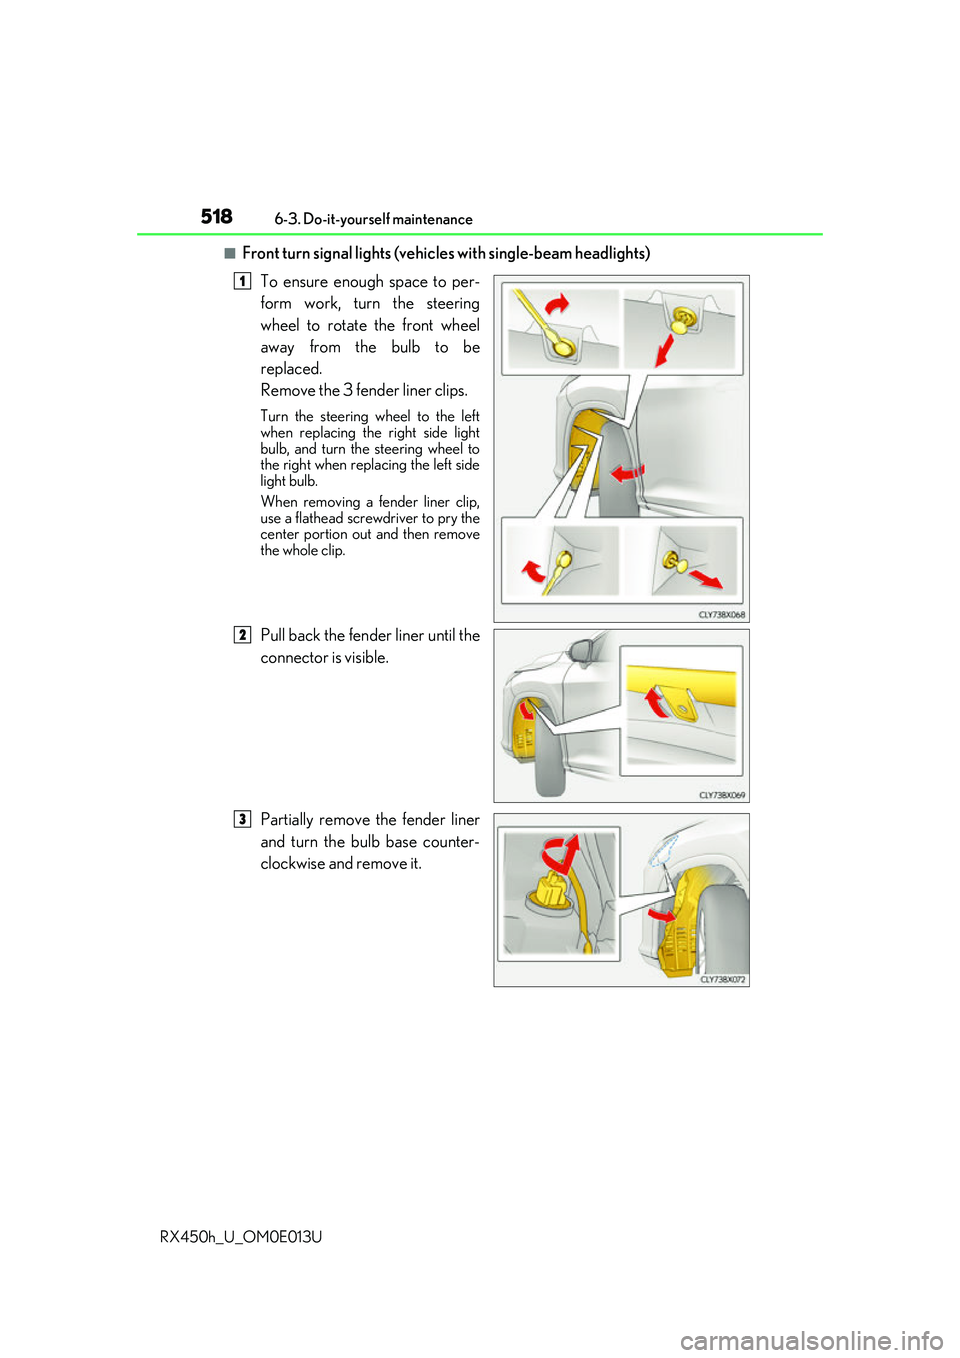
■Front turn signal lights (vehic les with single-beam headlights)
To ensure enough space to per-
form work, turn the steering
wheel to rotate the front wheel
away from the bulb to be
replaced.
Remove the 3 fender liner clips.
Turn the steering wheel to the left
when replacing the right side light
bulb, and turn the steering wheel to
the right when replacing the left side
light bulb.
When removing a fender liner clip,
use a flathead screwdriver to pry the
center portion out and then remove
the whole clip.
Pull back the fender liner until the
connector is visible.
Partially remove the fender liner
and turn the bulb base counter-
clockwise and remove it.
1
82
3
Page 520 of 660
5206-3. Do-it-yourself maintenance
RX450h_U_OM0E013U
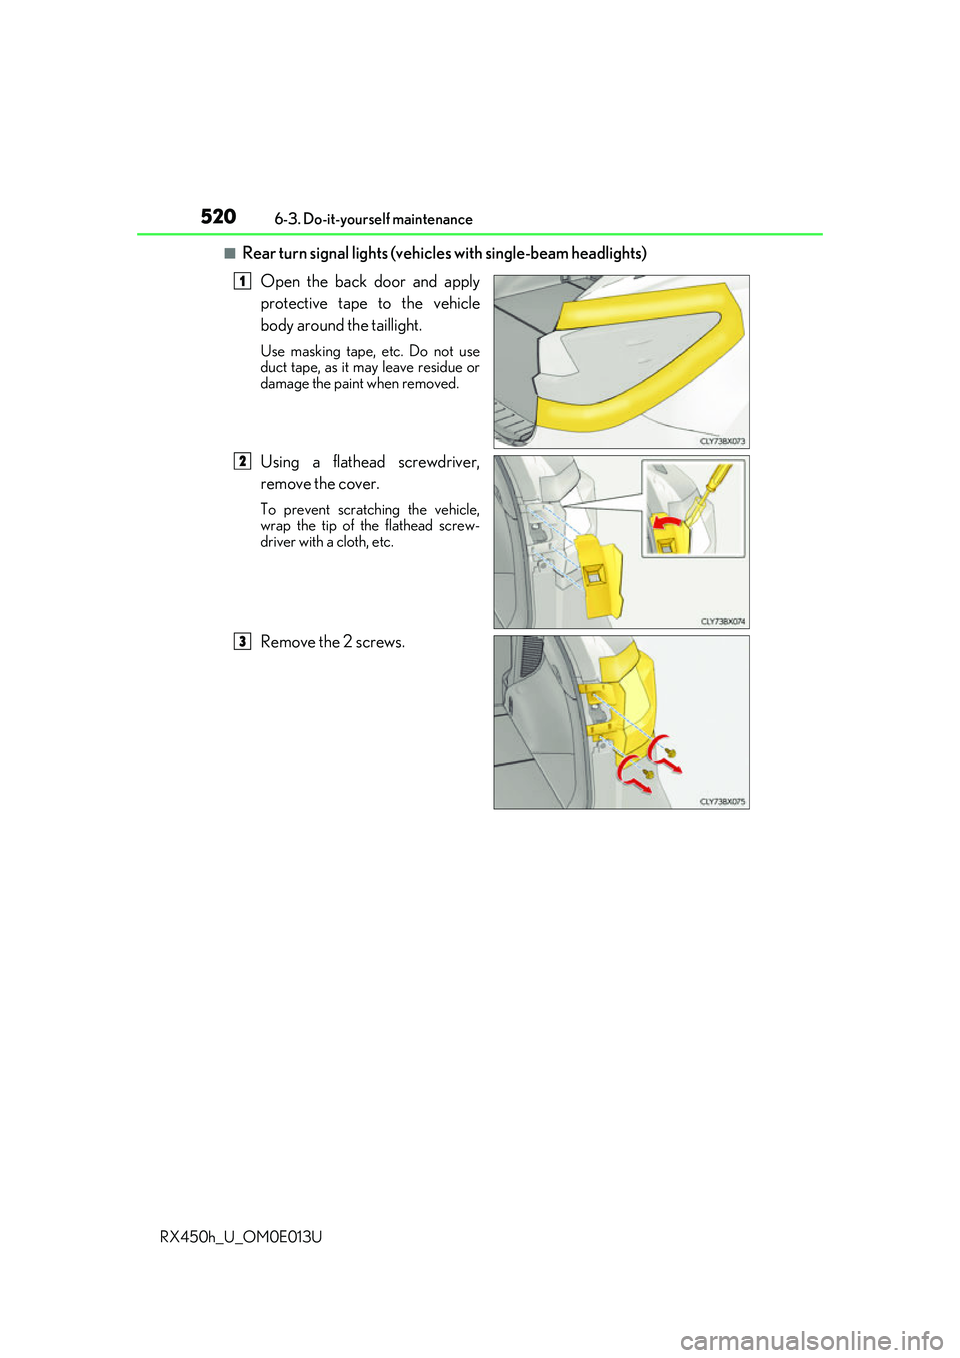
■Rear turn signal lights (vehic les with single-beam headlights)
Open the back door and apply
protective tape to the vehicle
body around the taillight.
Use masking tape, etc. Do not use
duct tape, as it may leave residue or
damage the paint when removed.
Using a flathead screwdriver,
remove the cover.
To prevent scratching the vehicle,
wrap the tip of the flathead screw-
driver with a cloth, etc.
Remove the 2 screws.
1
2
3
Page 524 of 660
5246-3. Do-it-yourself maintenance
RX450h_U_OM0E013U
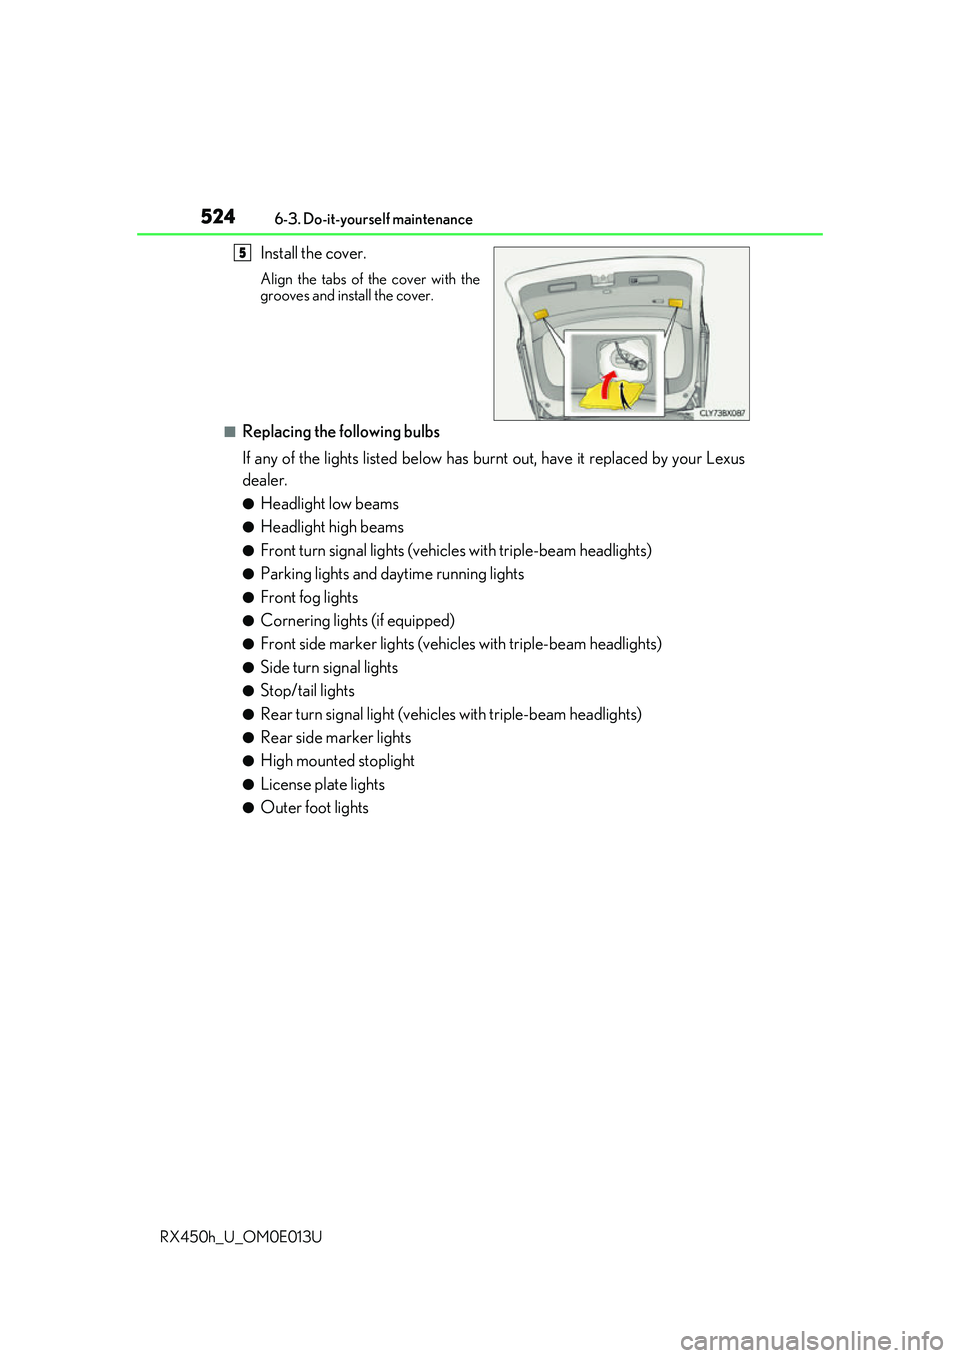
Install the cover.
Align the tabs of the cover with the
grooves and install the cover.
■Replacing the following bulbs
If any of the lights listed below has burnt out, have it replaced by your Lexus
dealer.
●Headlight low beams
●Headlight high beams
●Front turn signal lights (vehic les with triple-beam headlights)
●Parking lights and daytime running lights
●Front fog lights
●Cornering lights (if equipped)
●Front side marker lights (vehicles with triple-beam headlights)
●Side turn signal lights
●Stop/tail lights
●Rear turn signal light (vehicles with triple-beam headlights)
●Rear side marker lights
●High mounted stoplight
●License plate lights
●Outer foot lights
5
Page 525 of 660
5256-3. Do-it-yourself maintenance
6
Maintenance and care
RX450h_U_OM0E013U
■LED lights
The headlight low beams, headlight high beams, front turn signal lights (vehicles with tri-
ple-beam headlights), parking lights and daytime running lights, front fog lights, corner-
ing lights (if equipped), front side marker lights (vehicles with tr iple-beam headlights),
side turn signal lights, stop/t ail lights, rear turn signal light (vehicles with triple-beam
headlights), rear side marker lights, high moun ted stoplight, license plate lights, and outer
foot lights consist of a number of LEDs. If any of the LEDs has burned out, take your vehi-
cle to your Lexus dealer to have the light replaced.
■Condensation build-up on the inside of a lens
Temporary condensation build-up on the inside of the headlight lens does not indicate a
malfunction. Contact your Lexus dealer for more information in the following situations:
●Large drops of water have built up on the inside of a lens.
●Water has built up inside a headlight.
■When replacing light bulbs
P. 510
WARNING
■To prevent injury
Before performing any light bulb replacement procedure, be sure to turn the power
switch off. Failure to do so may result in burns from hot components or a part of your
body may get caught on an operating component, possibly causing serious injury.
■Replacing light bulbs
●Turn off the lights. Do not attempt to replac e the bulb immediately after turning off the
lights.
The bulbs become very hot and may cause burns.
●Do not touch the glass portion of the light bulb with bare hands. When it is unavoid-
able to hold the glass portion, use and hold with a clean dry cloth to avoid getting
moisture and oils on the bulb.
Also, if the bulb is scratched or dropped, it may blow out or crack.
●Fully install light bulbs and any parts used to secure them. Failure to do so may result
in heat damage, fire, or water entering th e headlight unit. This may damage the head-
lights or cause condensation to build up on the lens.
●Do not attempt to repair or disassemble th e light bulbs, connectors, electric circuits
or component parts.
Doing so may result in death or se rious injury due to electric shock.
■To prevent damage or fire
●Make sure bulbs are fully seated and locked.
●Check the wattage of the bulb before installing to prevent heat damage.
Page 561 of 660
5617-2. Steps to take in an emergency
7
When trouble arises
RX450h_U_OM0E013U
One of the following may be the cause of the problem:
●The electronic key may not be functioning properly. ( P. 564)
●There may not be sufficient fuel in the vehicle’s tank.
Refuel the vehicle.
●There may be a malfunction in the immobilizer system. ( P. 85)
●There may be a malfunction in the steering lock system.
●The hybrid system may be malfunctioni ng due to an electrical problem such
as electronic key battery depletion or a blown fuse. However, depending on
the type of malfunction, an interim meas ure is available to start the hybrid sys-
tem. ( P. 562)
One of the following may be the cause of the problem:
●The 12-volt battery may be discharged. ( P. 568)
●The 12-volt battery terminal connections may be loose or corroded.
( P. 483)
If the hybrid system will not start
Reasons for the hybrid system not star ting vary depending on the situation.
Check the following and perform the appropriate procedure:
The hybrid system will not start even though the correct starting proce-
dure is being followed. ( P. 232)
The interior lights and headlights are d im, or the horn does not sound or
sounds at a low volume.
Page 562 of 660
5627-2. Steps to take in an emergency
RX450h_U_OM0E013U
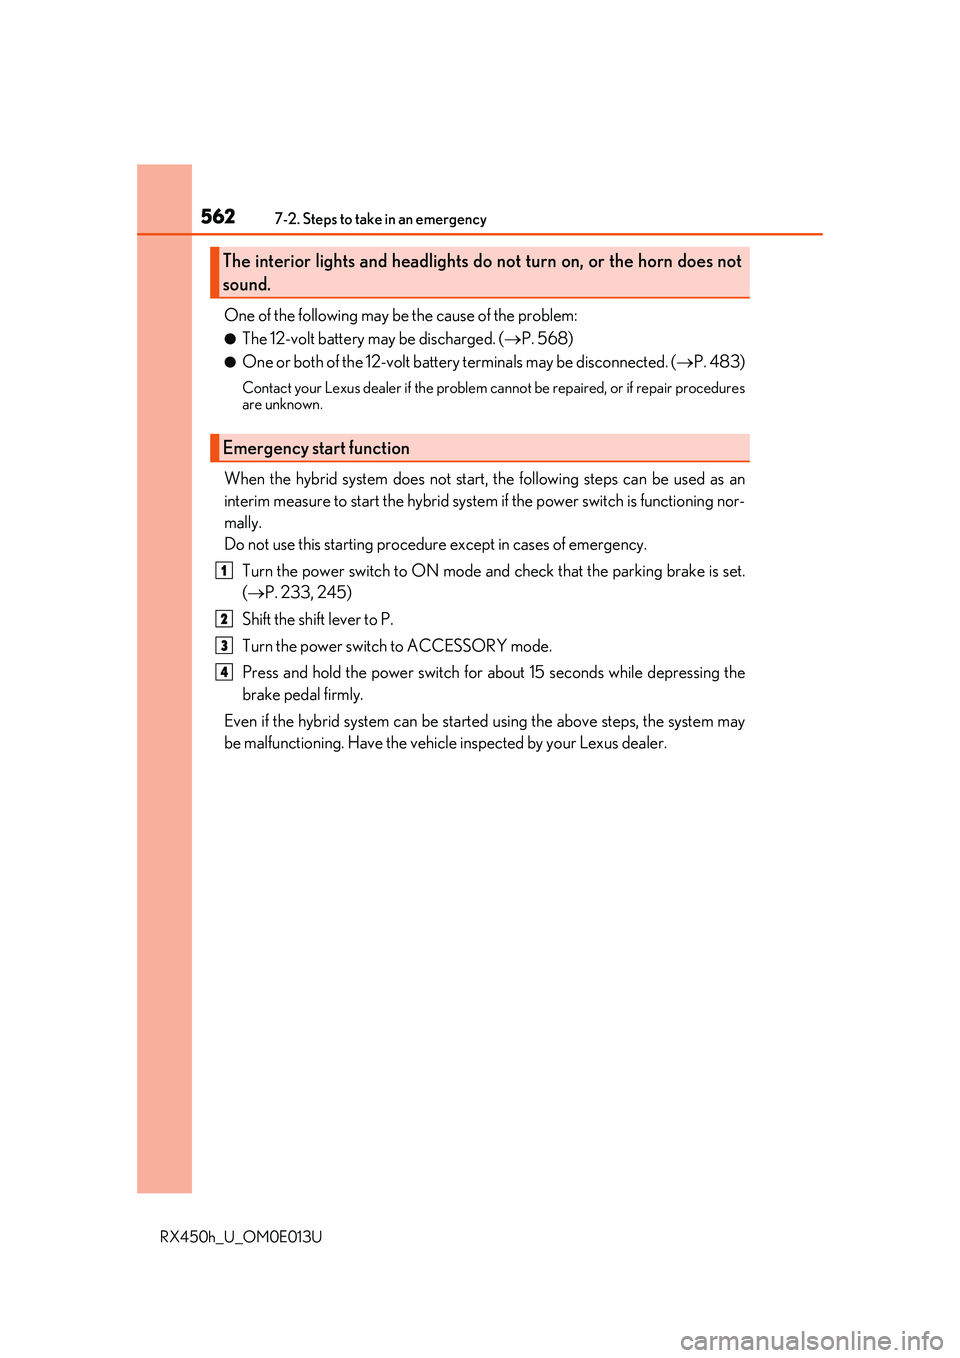
One of the following may be the cause of the problem:
●The 12-volt battery may be discharged. (P. 568)
●One or both of the 12-volt battery terminals may be disconnected. ( P. 483)
Contact your Lexus dealer if the problem cannot be repaired, or if repair procedures
are unknown.
When the hybrid system does not start, the following steps can be used as an
interim measure to start the hybrid system if the power switch is functioning nor-
mally.
Do not use this starting procedur e except in cases of emergency.
Turn the power switch to ON mode an d check that the parking brake is set.
( P. 233, 245)
Shift the shift lever to P.
Turn the power switch to ACCESSORY mode.
Press and hold the power switch for ab out 15 seconds while depressing the
brake pedal firmly.
Even if the hybrid system can be starte d using the above steps, the system may
be malfunctioning. Have the vehicle inspected by your Lexus dealer.
The interior lights and headlights do not turn on, or the horn does not
sound.
Emergency start function
1
2
3
4
Page 570 of 660
5707-2. Steps to take in an emergency
RX450h_U_OM0E013U
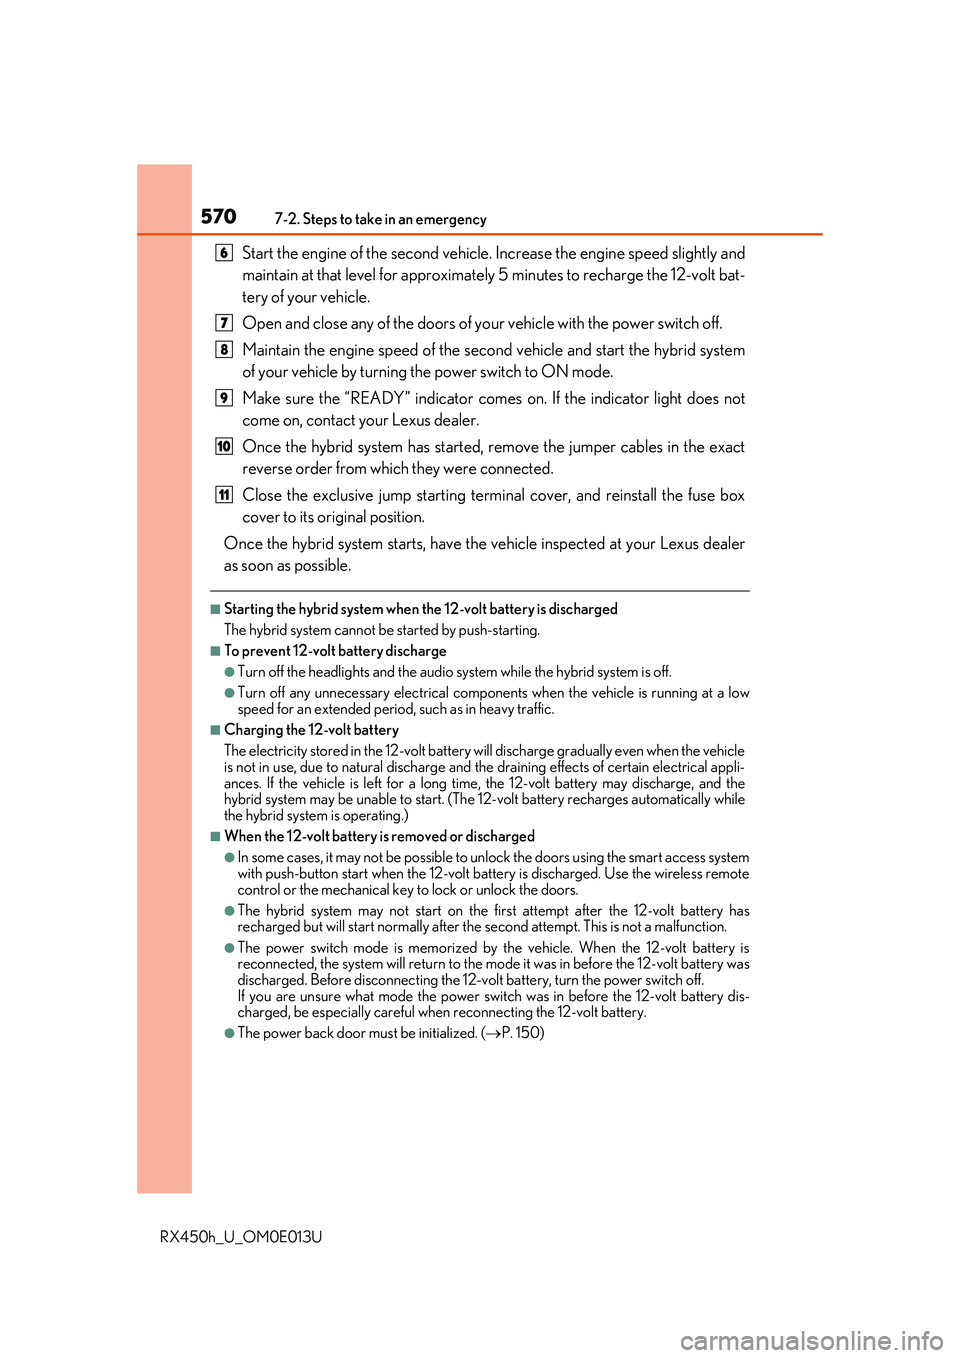
Start the engine of the second vehicle. Increase the engine speed slightly and
maintain at that level for approximatel y 5 minutes to recharge the 12-volt bat-
tery of your vehicle.
Open and close any of the doors of your vehicle with the power switch off.
Maintain the engine speed of the seco nd vehicle and start the hybrid system
of your vehicle by turning th e power switch to ON mode.
Make sure the “READY” indicator comes on. If the indicator light does not
come on, contact your Lexus dealer.
Once the hybrid system has started, remove the jumper cables in the exact
reverse order from which they were connected.
Close the exclusive jump starting termin al cover, and reinstall the fuse box
cover to its original position.
Once the hybrid system starts, have th e vehicle inspected at your Lexus dealer
as soon as possible.
■Starting the hybrid system when the 12-volt battery is discharged
The hybrid system cannot be started by push-starting.
■To prevent 12-volt battery discharge
●Turn off the headlights and the audio system while the hybrid system is off.
●Turn off any unnecessary electrical components when the vehicle is running at a low
speed for an extended period , such as in heavy traffic.
■Charging the 12-volt battery
The electricity stored in the 12-volt battery w ill discharge gradually even when the vehicle
is not in use, due to natural discharge and the draining effects of certain electrical appli-
ances. If the vehicle is left for a long time, the 12-volt battery may discharge, and the
hybrid system may be unable to start. (The 12-volt battery recharges automatically while
the hybrid system is operating.)
■When the 12-volt battery is removed or discharged
●In some cases, it may not be possible to un lock the doors using the smart access system
with push-button start when the 12-volt battery is discharged. Use the wireless remote
control or the mechanical key to lock or unlock the doors.
●The hybrid system may not start on the first attempt after the 12-volt battery has
recharged but will start normally after the second attempt. This is not a malfunction.
●The power switch mode is memorized by the vehicle. When the 12-volt battery is
reconnected, the system will retu rn to the mode it was in before the 12-volt battery was
discharged. Before disconnect ing the 12-volt battery, turn the power switch off.
If you are unsure what mode the power switch was in before the 12-volt battery dis-
charged, be especially careful when reconnecting the 12-volt battery.
●The power back door must be initialized. ( P. 150)
6
7
8
9
10
11