fuel pressure LEXUS RX450H 2016 Owners Manual
[x] Cancel search | Manufacturer: LEXUS, Model Year: 2016, Model line: RX450H, Model: LEXUS RX450H 2016Pages: 660, PDF Size: 14.85 MB
Page 17 of 660
17Pictorial index
RX450h_U_OM0E013U
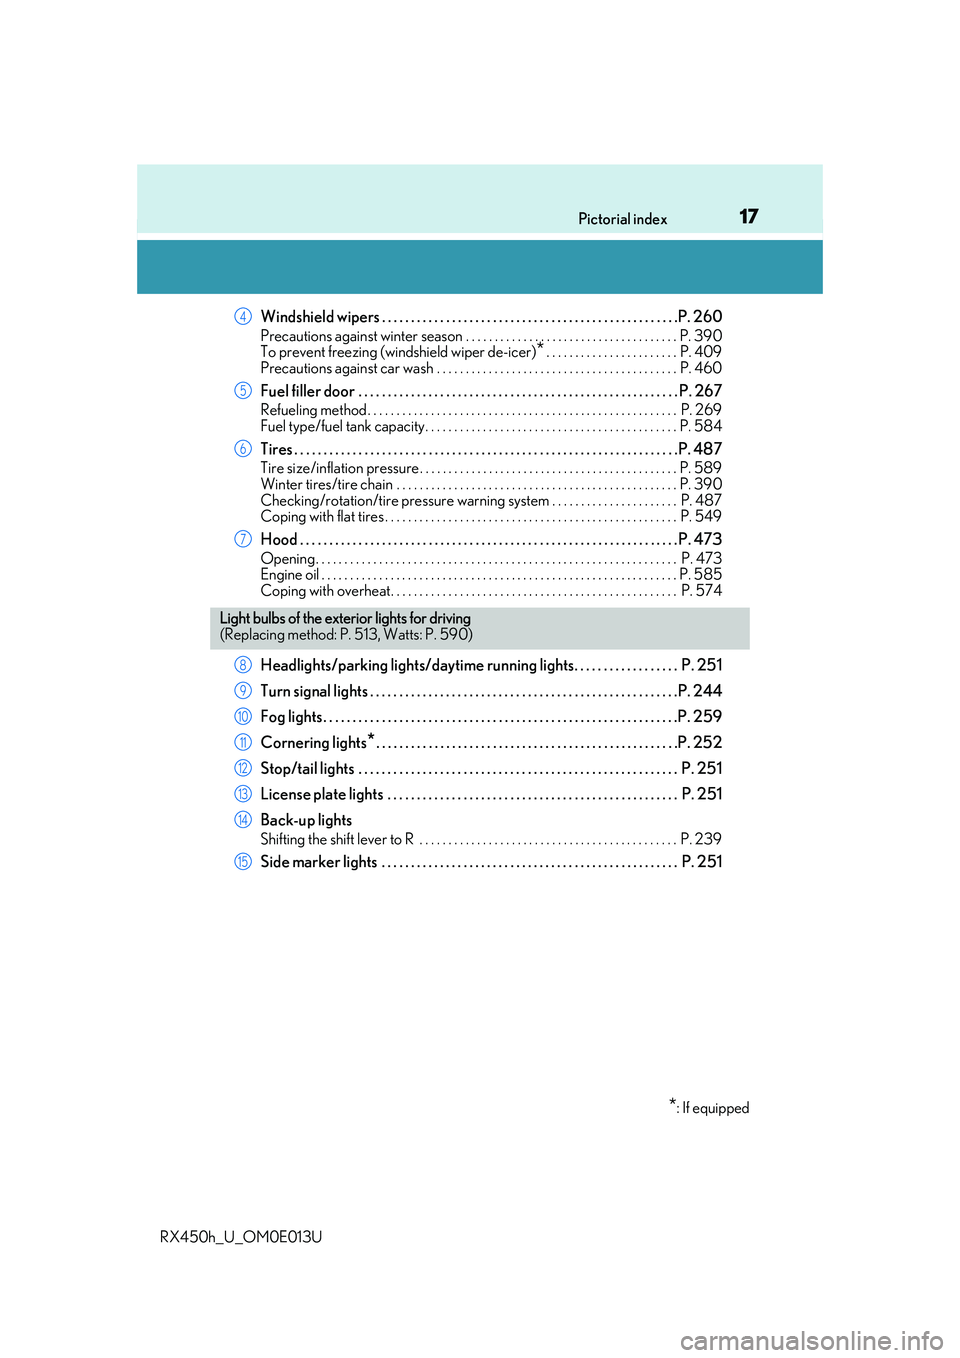
Windshield wipers . . . . . . . . . . . . . . . . . . . . . . . . . . . . . . . . . . . . . . . . . . . . . . . . . . .P. 260
Precautions against winter season . . . . . . . . . . . . . . . . . . . . . . . . . . . . . . . . . . . . . P. 390
To prevent freezing (windshield wiper de-icer)
*. . . . . . . . . . . . . . . . . . . . . . . P. 409
Precautions against car wash . . . . . . . . . . . . . . . . . . . . . . . . . . . . . . . . . . . . . . . . . . P. 460
Fuel filler door . . . . . . . . . . . . . . . . . . . . . . . . . . . . . . . . . . . . . . . . . . . . . . . . . . . . . . . P. 267
Refueling method . . . . . . . . . . . . . . . . . . . . . . . . . . . . . . . . . . . . . . . . . . . . . . . . . . . . . . P. 269
Fuel type/fuel tank capacity . . . . . . . . . . . . . . . . . . . . . . . . . . . . . . . . . . . . . . . . . . . . P. 584
Tires . . . . . . . . . . . . . . . . . . . . . . . . . . . . . . . . . . . . . . . . . . . . . . . . . . . . . . . . . . . . . . . . . .P. 487
Tire size/inflation pressure . . . . . . . . . . . . . . . . . . . . . . . . . . . . . . . . . . . . . . . . . . . . . P. 589
Winter tires/tire chain . . . . . . . . . . . . . . . . . . . . . . . . . . . . . . . . . . . . . . . . . . . . . . . . . P. 39 0
Checking/rotation/tire pressure warning system . . . . . . . . . . . . . . . . . . . . . . P. 487
Coping with flat tires . . . . . . . . . . . . . . . . . . . . . . . . . . . . . . . . . . . . . . . . . . . . . . . . . . . P. 549
Hood . . . . . . . . . . . . . . . . . . . . . . . . . . . . . . . . . . . . . . . . . . . . . . . . . . . . . . . . . . . . . . . . . P. 473
Opening. . . . . . . . . . . . . . . . . . . . . . . . . . . . . . . . . . . . . . . . . . . . . . . . . . . . . . . . . . . . . . . P. 473
Engine oil . . . . . . . . . . . . . . . . . . . . . . . . . . . . . . . . . . . . . . . . . . . . . . . . . . . . . . . . . . . . . . P. 585
Coping with overheat. . . . . . . . . . . . . . . . . . . . . . . . . . . . . . . . . . . . . . . . . . . . . . . . . . P. 574
Headlights/parking lights/daytime running lights. . . . . . . . . . . . . . . . . . P. 251
Turn signal lights . . . . . . . . . . . . . . . . . . . . . . . . . . . . . . . . . . . . . . . . . . . . . . . . . . . . .P. 2 44
Fog lights. . . . . . . . . . . . . . . . . . . . . . . . . . . . . . . . . . . . . . . . . . . . . . . . . . . . . . . . . . . . .P. 259
Cornering lights
*. . . . . . . . . . . . . . . . . . . . . . . . . . . . . . . . . . . . . . . . . . . . . . . . . . . .P. 252
Stop/tail lights . . . . . . . . . . . . . . . . . . . . . . . . . . . . . . . . . . . . . . . . . . . . . . . . . . . . . . . P. 251
License plate lights . . . . . . . . . . . . . . . . . . . . . . . . . . . . . . . . . . . . . . . . . . . . . . . . . . P. 251
Back-up lights
Shifting the shift lever to R . . . . . . . . . . . . . . . . . . . . . . . . . . . . . . . . . . . . . . . . . . . . . P. 239
Side marker lights . . . . . . . . . . . . . . . . . . . . . . . . . . . . . . . . . . . . . . . . . . . . . . . . . . . P. 251
4
5
6
7
Light bulbs of the exte rior lights for driving
(Replacing method: P. 513, Watts: P. 590)
*: If equipped
8
9
10
11
12
13
14
15
Page 94 of 660
942. Instrument cluster
RX450h_U_OM0E013U
*1: These lights turn on when the power switch is turned to ON mode to indicate that a system check is being performe d. They will turn off after the hybrid system is on, or
after a few seconds. There may be a malfunctio n in a system if the lights do not turn on,
or turn off. Have the vehicle inspected by your Lexus dealer.
*2: The light flashes to indicate a malfunction.
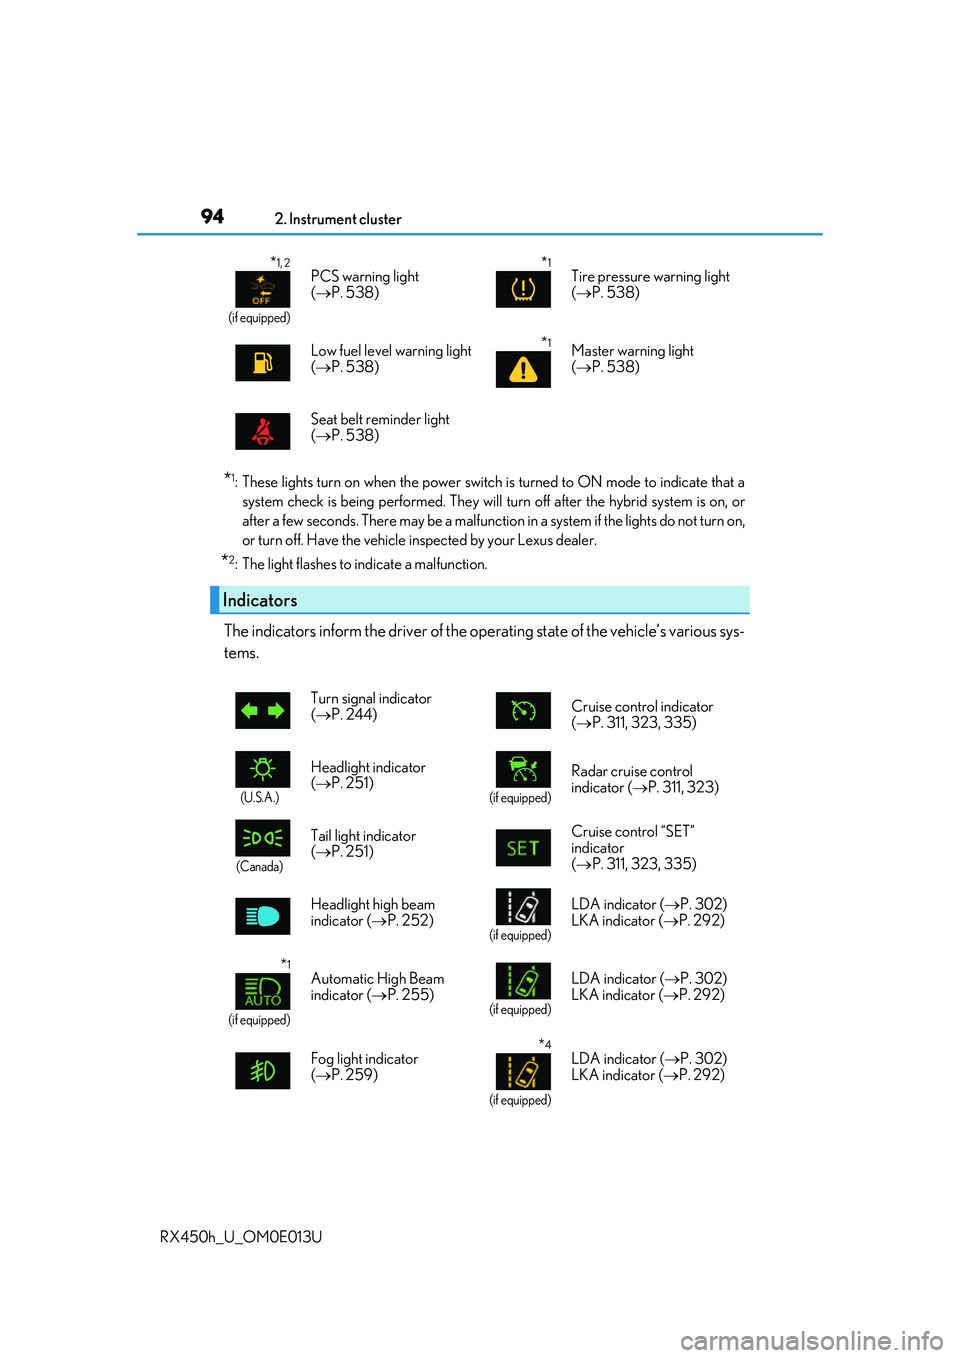
The indicators inform the driver of the op erating state of the vehicle’s various sys-
tems.
*1, 2
(if equipped)
PCS warning light
( P. 538)*1Tire pressure warning light
( P. 538)
Low fuel level warning light
( P. 538)
*1Master warning light
( P. 538)
Seat belt reminder light
( P. 538)
Indicators
Turn signal indicator
( P. 244) Cruise control indicator
(
P. 311, 323, 335)
(U.S.A.)
Headlight indicator
( P. 251)
(if equipped)
Radar cruise control
indicator ( P. 311, 323)
(Canada)
Tail light indicator
( P. 251) Cruise control “SET”
indicator
(
P. 311, 323, 335)
Headlight high beam
indicator ( P. 252)
(if equipped)
LDA indicator ( P. 302)
LKA indicator ( P. 292)
*1
(if equipped)
Automatic High Beam
indicator (P. 255)
(if equipped)
LDA indicator ( P. 302)
LKA indicator ( P. 292)
Fog light indicator
( P. 259)
*4
(if equipped)
LDA indicator ( P. 302)
LKA indicator ( P. 292)
Page 267 of 660
267
4
Driving
RX450h_U_OM0E013U4-4. Refueling
●Close all the doors and windows,
and turn the power switch off.
●Confirm the type of fuel.
■Fuel types
P. 591
■Fuel tank opening for unleaded gasoline
To help prevent incorrect fueling, your vehi cle has a fuel tank opening that only accom-
modates the specia l nozzle on unleaded fuel pumps.
Opening the fuel tank cap
The fuel tank of your vehicle has a special structure, which requires a reduc-
tion in fuel tank pressure before refu eling. After the opener switch has been
pressed, it will take several seconds un til the vehicle is ready for refueling.
Before refueling the vehicle
Page 269 of 660
2694-4. Refueling
4
Driving
RX450h_U_OM0E013U
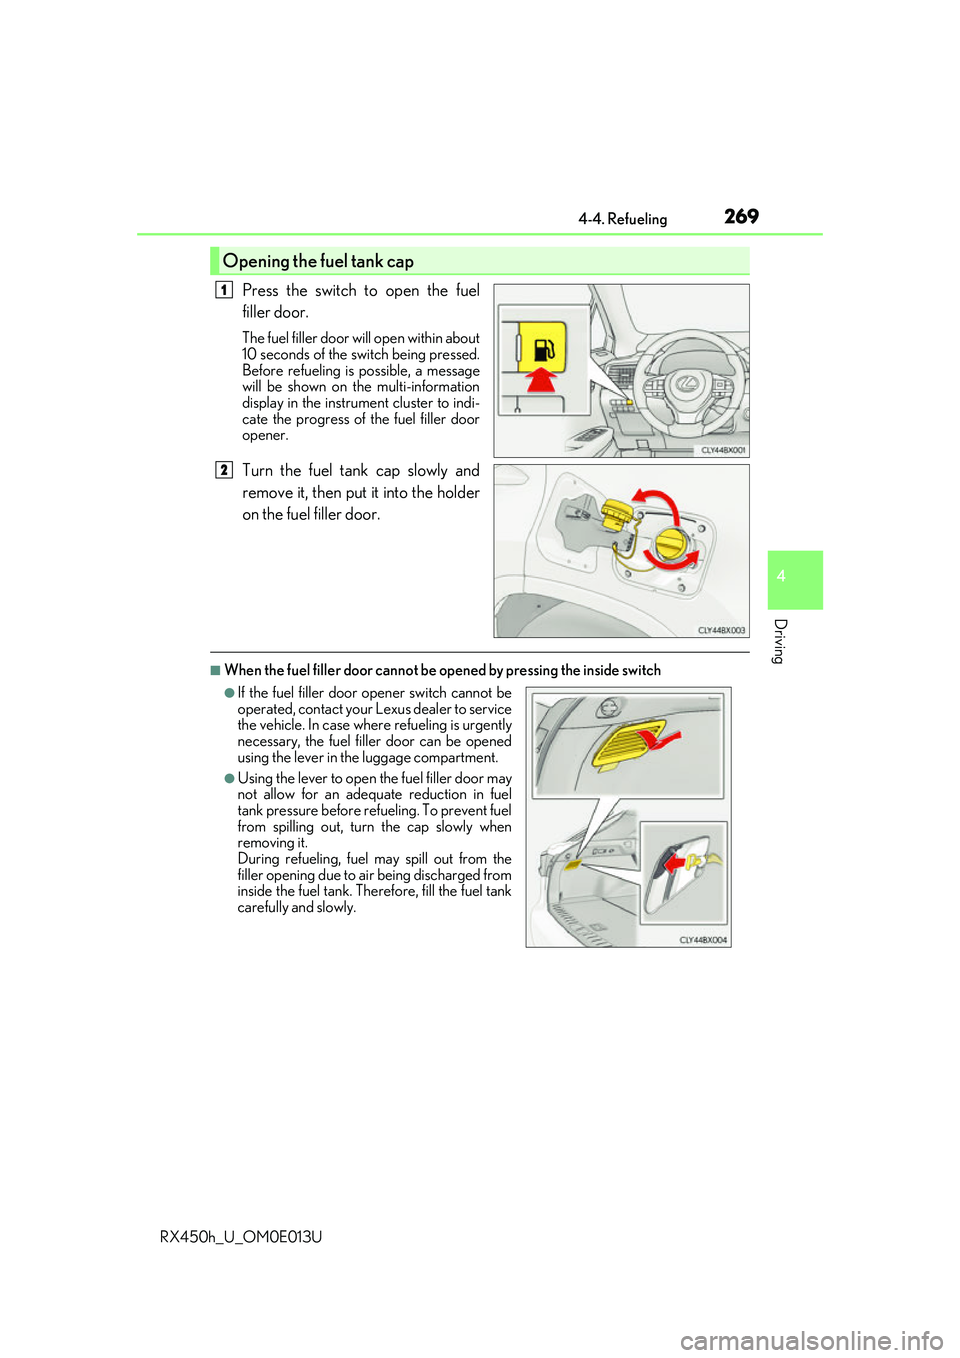
Press the switch to open the fuel
filler door.
The fuel filler door will open within about
10 seconds of the sw itch being pressed.
Before refueling is possible, a message
will be shown on the multi-information
display in the instrument cluster to indi-
cate the progress of the fuel filler door
opener.
Turn the fuel tank cap slowly and
remove it, then put it into the holder
on the fuel filler door.
■When the fuel filler door cannot be opened by pressing the inside switch
Opening the fuel tank cap
1
2
●If the fuel filler door opener switch cannot be
operated, contact your Lexus dealer to service
the vehicle. In case where refueling is urgently
necessary, the fuel filler door can be opened
using the lever in th e luggage compartment.
●Using the lever to open the fuel filler door may
not allow for an adequate reduction in fuel
tank pressure before refueling. To prevent fuel
from spilling out, turn the cap slowly when
removing it.
During refueling, fuel may spill out from the
filler opening due to ai r being discharged from
inside the fuel tank. Therefore, fill the fuel tank
carefully and slowly.
Page 388 of 660
3884-6. Driving tips
RX450h_U_OM0E013U
◆Delays
Repeated acceleration and deceleration, as well as long waits at traffic lights,
will lead to bad fuel economy. Check traffic reports before leaving and avoid
delays as much as possible. When drivin g in a traffic jam, gently release the
brake pedal to allow the vehicle to move forward slightly while avoiding over-
use of the accelerator pedal. Doing so can help control excessive gasoline
consumption.
◆Highway driving
Control and maintain the vehicle at a co nstant speed. Before stopping at a toll
booth or similar, allow plenty of ti me to release the accelerator and gently
apply the brakes. A greater amount of electrical energy can be regenerated
when slowing down.
◆Air conditioning
Use the air conditioning only when necessary. Doing so can help reduce
excessive gasoline consumption.
In summer: When the ambient temperature is high, use the recirculated air
mode. Doing so will help to reduce the burden on the air conditioning system
and reduce fuel consumption as well.
In winter: Because the gasoline engine will not automatically cut out until it
and the interior of the vehicle are warm , it will consume fuel. Also, fuel con-
sumption can be improved by av oiding overuse of the heater.
◆Checking tire inflation pressure
Make sure to check the tire inflation pr essure frequently. Improper tire infla-
tion pressure can cause poor fuel economy.
Also, as snow tires can cause large amou nts of friction, their use on dry roads
can lead to poor fuel economy. Use tires that are appropriate for the season.
Page 458 of 660
458
RX450h_U_OM0E013U6-1. Maintenance and care
●Working from top to bott
om, liberally apply water to the vehicle body, wheel
wells and underside of the vehicl e to remove any dirt and dust.
●Wash the vehicle body using a sponge or soft cloth, such as a chamois.
●For hard-to-remove marks, use car wa sh soap and rinse thoroughly with
water.
●Wipe away any water.
●Wax the vehicle when the waterproof coating deteriorates.
If water does not bead on a clean surface, apply wax when the vehicle body is cool.
■Self-restoring coat
The vehicle body has a self-restoring coating that is resistant to small surface scratches
caused in a car wash etc.
●The coating lasts for 5 to 8 years from when the vehicle is delivered from the plant.
●The restoration time differs depending on the depth of the scratch and outside tem-
perature. The restoration ti me may become shorter when the coating is warmed by
applying warm water.
●Deep scratches caused by keys, coins, etc. cannot be restored.
●Do not use wax that contain abrasives.
■Automatic car washes
●Before washing the vehicle:
• Fold the mirrors
• Turn off the power back door
Start washing from the front of the vehicle. Extend the mirrors before driving.
●Brushes used in automatic car washes may scratch the vehicle surface and harm your
vehicle’s paint.
●Rear spoiler may not be wash able in some automatic car washes. There may also be an
increased risk of damage to vehicle.
■High pressure car washes
●Do not allow the nozzles of the car wash to come within close proximity of the windows.
●Before using the car wash, check that the fuel filler door on your vehicle is closed prop-
erly.
Cleaning and protecting the vehicle exterior
Perform the following to protect the ve hicle and maintain it in prime condi-
tion:
Page 497 of 660
4976-3. Do-it-yourself maintenance
6
Maintenance and care
RX450h_U_OM0E013U
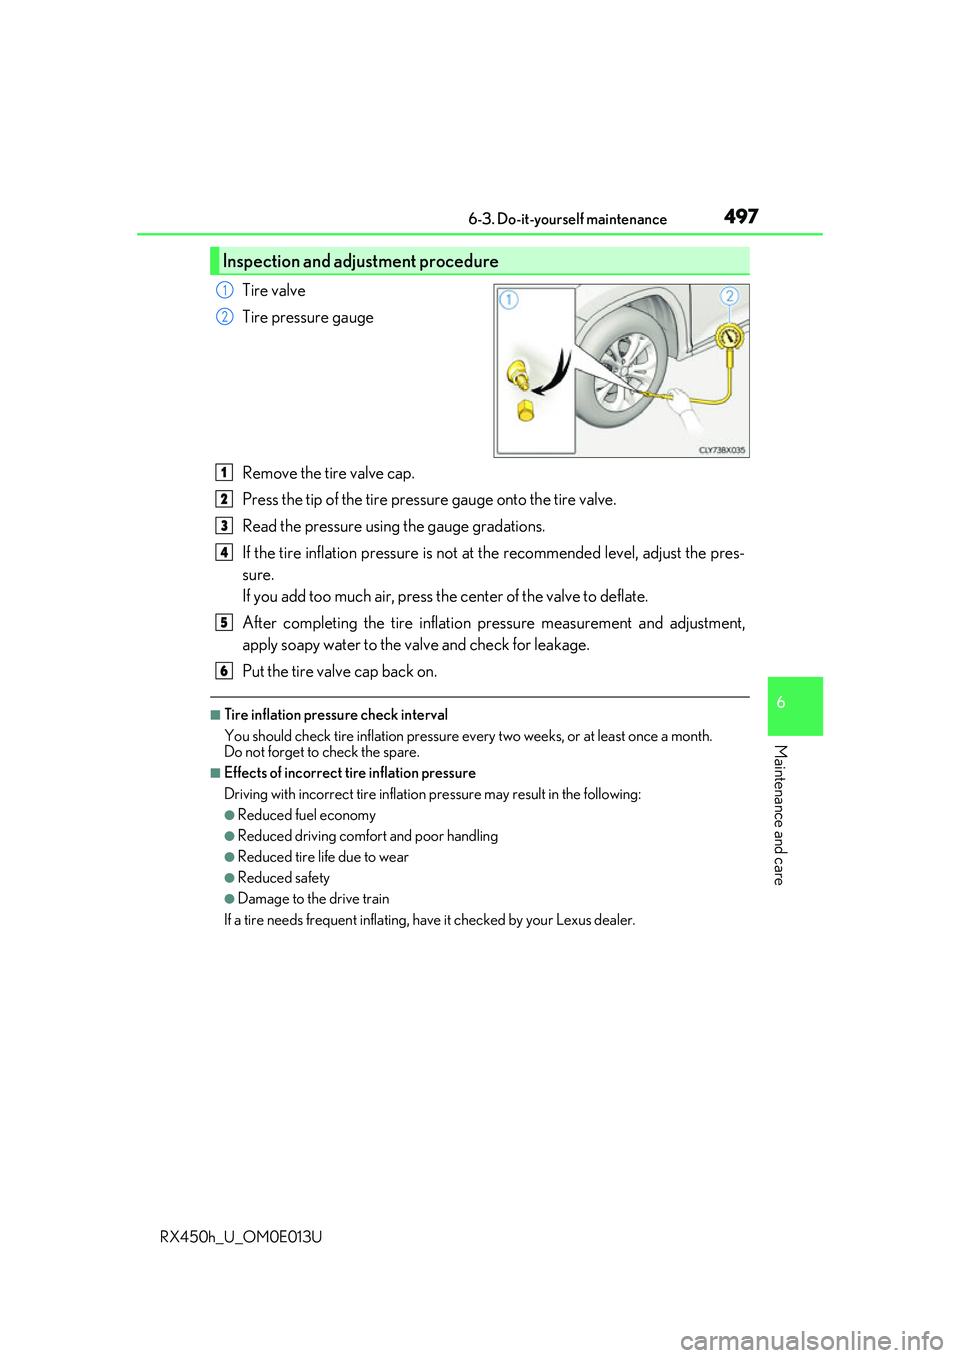
Tire valve
Tire pressure gauge
Remove the tire valve cap.
Press the tip of the tire pressure gauge onto the tire valve.
Read the pressure using the gauge gradations.
If the tire inflation pressure is not at the recommended level, adjust the pres-
sure.
If you add too much air, press the center of the valve to deflate.
After completing the tire inflation pressure measurement and adjustment,
apply soapy water to the valve and check for leakage.
Put the tire valve cap back on.
■Tire inflation pressure check interval
You should check tire inflation pressure ev ery two weeks, or at least once a month.
Do not forget to check the spare.
■Effects of incorrect tire inflation pressure
Driving with incorrect tire inflation pressure may result in the following:
●Reduced fuel economy
●Reduced driving comfort and poor handling
●Reduced tire life due to wear
●Reduced safety
●Damage to the drive train
If a tire needs frequent inflating, ha ve it checked by your Lexus dealer.
Inspection and adjustment procedure
1
2
1
2
3
4
5
6
Page 538 of 660
5387-2. Steps to take in an emergency
RX450h_U_OM0E013U
(If equipped)
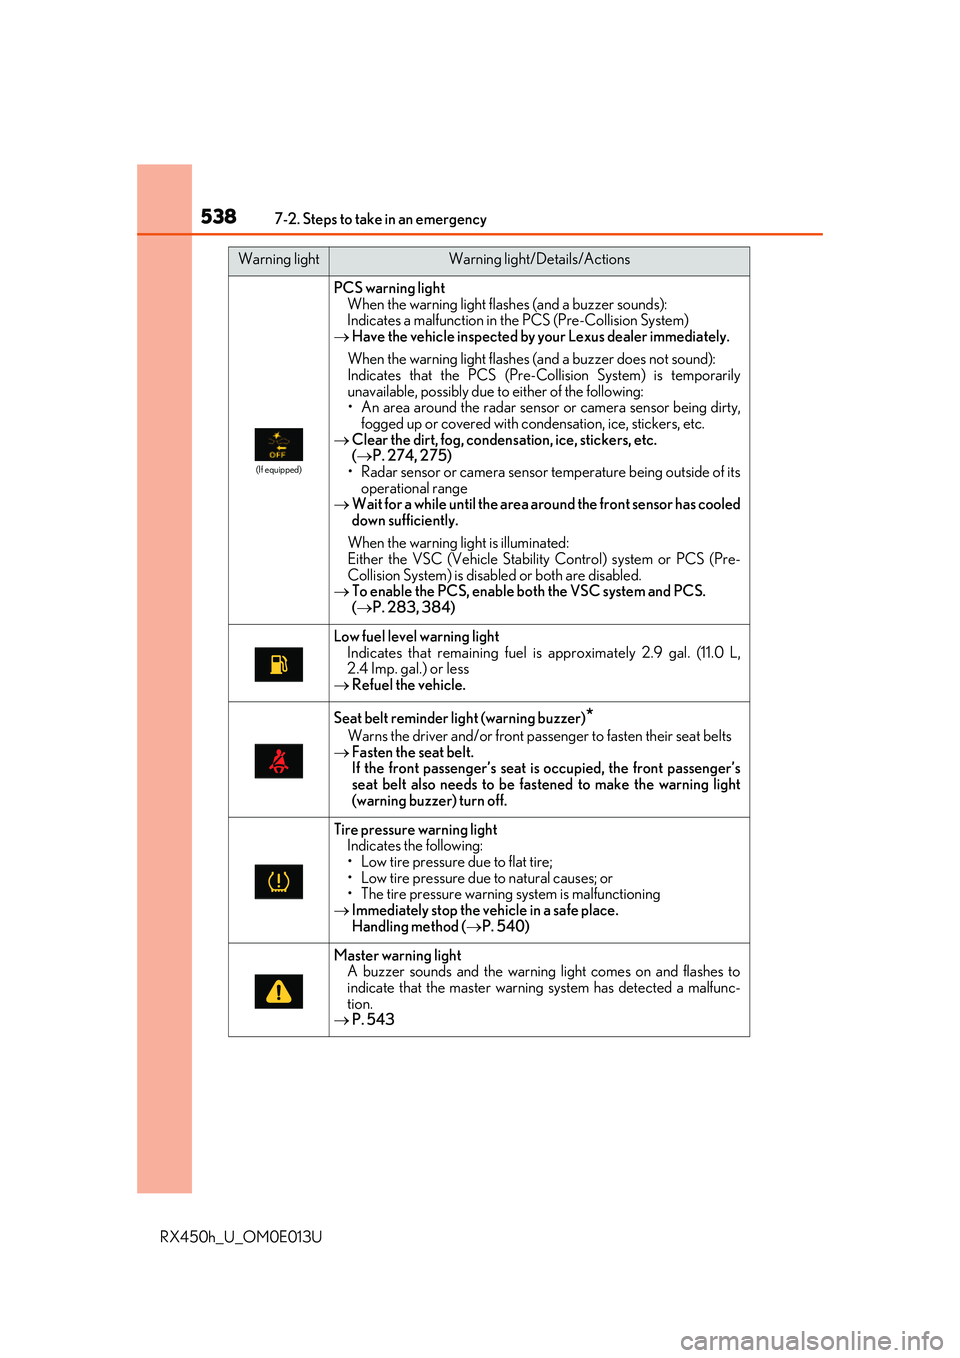
PCS warning lightWhen the warning light flashes (and a buzzer sounds):
Indicates a malfunction in the PCS (Pre-Collision System)
Have the vehicle inspected by your Lexus dealer immediately.
When the warning light flashes (and a buzzer does not sound):
Indicates that the PCS (Pre-Collision System) is temporarily
unavailable, possibly due to either of the following:
• An area around the radar sensor or camera sensor being dirty,
fogged up or covered with condensation, ice, stickers, etc.
Clear the dirt, fog, condensation, ice, stickers, etc.
( P. 274, 275)
• Radar sensor or camera sensor temperature being outside of its
operational range
Wait for a while until the area around the front sensor has cooled
down sufficiently.
When the warning lig ht is illuminated:
Either the VSC (Vehicle Stability Control) system or PCS (Pre-
Collision System) is disabled or both are disabled.
To enable the PCS, enable bo th the VSC system and PCS.
( P. 283, 384)
Low fuel level warning light
Indicates that remaining fuel is approximately 2.9 gal. (11.0 L,
2.4 Imp. gal.) or less
Refuel the vehicle.
Seat belt reminder light (warning buzzer)*
Warns the driver and/or front passenger to fasten their seat belts
Fasten the seat belt.
If the front passenger’s seat is occupied, the front passenger’s
seat belt also needs to be fastened to make the warning light
(warning buzzer) turn off.
Tire pressure warning light
Indicates the following:
• Low tire pressure due to flat tire;
• Low tire pressure due to natural causes; or
• The tire pressure warnin g system is malfunctioning
Immediately stop the vehicle in a safe place.
Handling method ( P. 540)
Master warning light
A buzzer sounds and the warning light comes on and flashes to
indicate that the master warnin g system has detected a malfunc-
tion.
P. 543
Warning lightWarning light/Details/Actions
Page 542 of 660
5427-2. Steps to take in an emergency
RX450h_U_OM0E013U
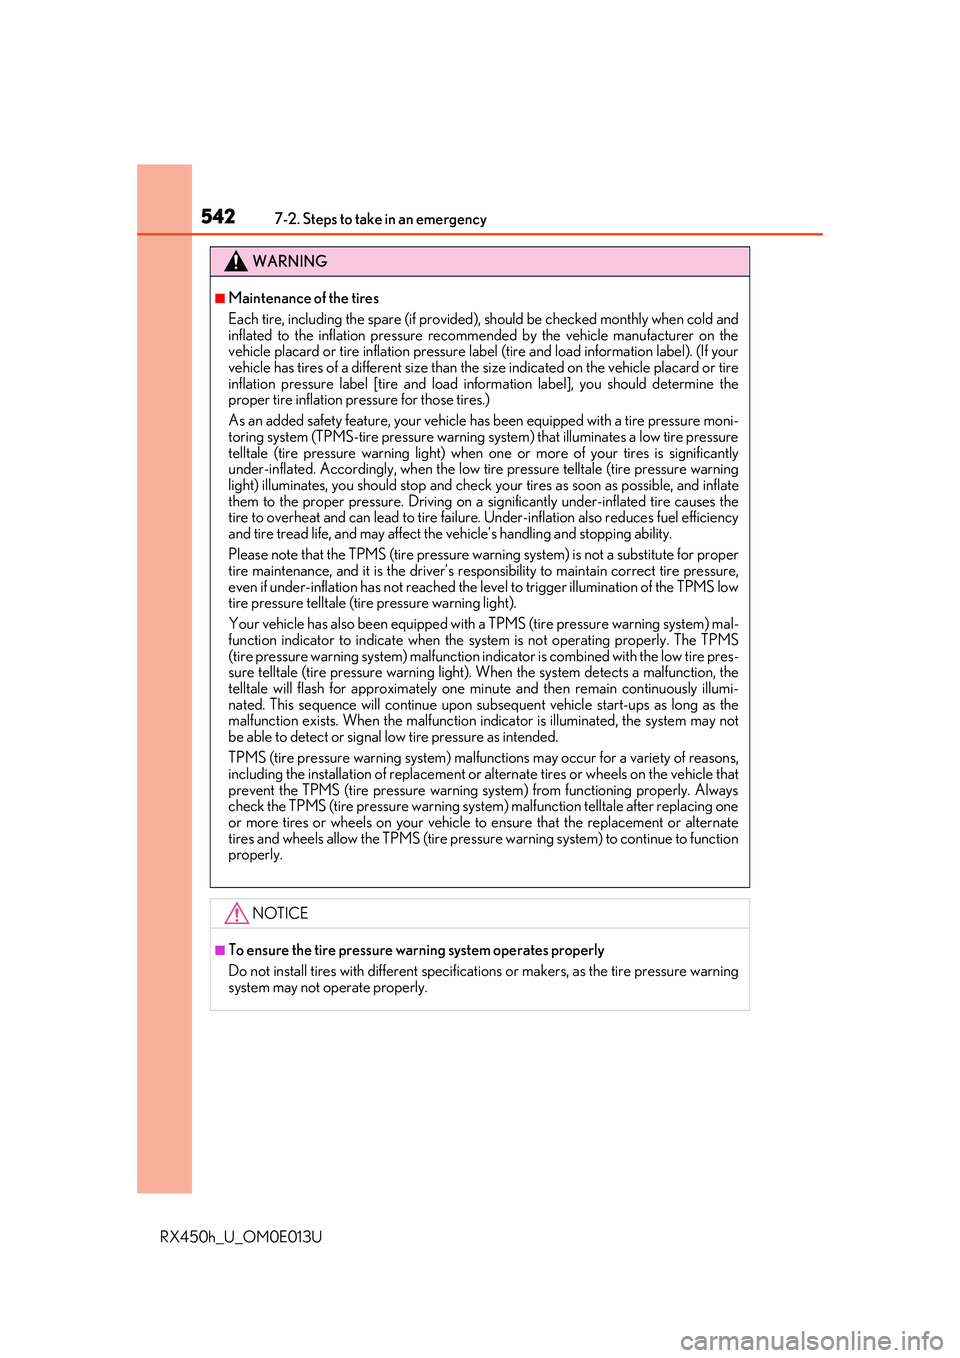
WARNING
■Maintenance of the tires
Each tire, including the spare (if provided), should be checked monthly when cold and
inflated to the inflation pressure recomm ended by the vehicle manufacturer on the
vehicle placard or tire inflation pressure label (tire and load information label). (If your
vehicle has tires of a different size than the size indicated on the vehicle placard or tire
inflation pressure label [tire and load in formation label], you should determine the
proper tire inflation pressure for those tires.)
As an added safety feature, your vehicle has been equipped with a tire pressure moni-
toring system (TPMS-tire pressure warning system) that illuminates a low tire pressure
telltale (tire pressure warning light) when on e or more of your tires is significantly
under-inflated. Accordingly, when the low ti re pressure telltale (tire pressure warning
light) illuminates, you should st op and check your tires as soon as possible, and inflate
them to the proper pressure. Driving on a significantly under-inflat ed tire causes the
tire to overheat and can lead to tire failure. Under-inflation also reduces fuel efficiency
and tire tread life, and may affect the vehicle’s handling and stopping ability.
Please note that the TPMS (tire pressure wa rning system) is not a substitute for proper
tire maintenance, and it is the driver’s responsibility to maintain correct tire pressure,
even if under-inflation has not reached the le vel to trigger illumination of the TPMS low
tire pressure telltale (tir e pressure warning light).
Your vehicle has also been equipped with a TPMS (tire pressure warning system) mal-
function indicator to indicate when the system is not operating properly. The TPMS
(tire pressure warning system) malfunction indi cator is combined with the low tire pres-
sure telltale (tire pressure warning light). When the system detects a malfunction, the
telltale will flash for approximately one mi nute and then remain continuously illumi-
nated. This sequence will cont inue upon subsequent vehicle start-ups as long as the
malfunction exists. When the malfunction indicator is illuminated, the system may not
be able to detect or signal low tire pressure as intended.
TPMS (tire pressure warning system) malfunctions may occur for a variety of reasons,
including the installation of replacement or alternate tires or wheels on the vehicle that
prevent the TPMS (tire pressure warning system) from functioning properly. Always
check the TPMS (tire pressure warning system) malfunction telltale after replacing one
or more tires or wheels on your vehicle to ensure that the replacement or alternate
tires and wheels allow the TPMS (tire pressure warning system) to continue to function
properly.
NOTICE
■To ensure the tire pressure warning system operates properly
Do not install tires with different specifications or makers, as the tire pressure warning
system may not operate properly.
Page 601 of 660
6018-1. Specifications
8
Vehicle specifications
RX450h_U_OM0E013U
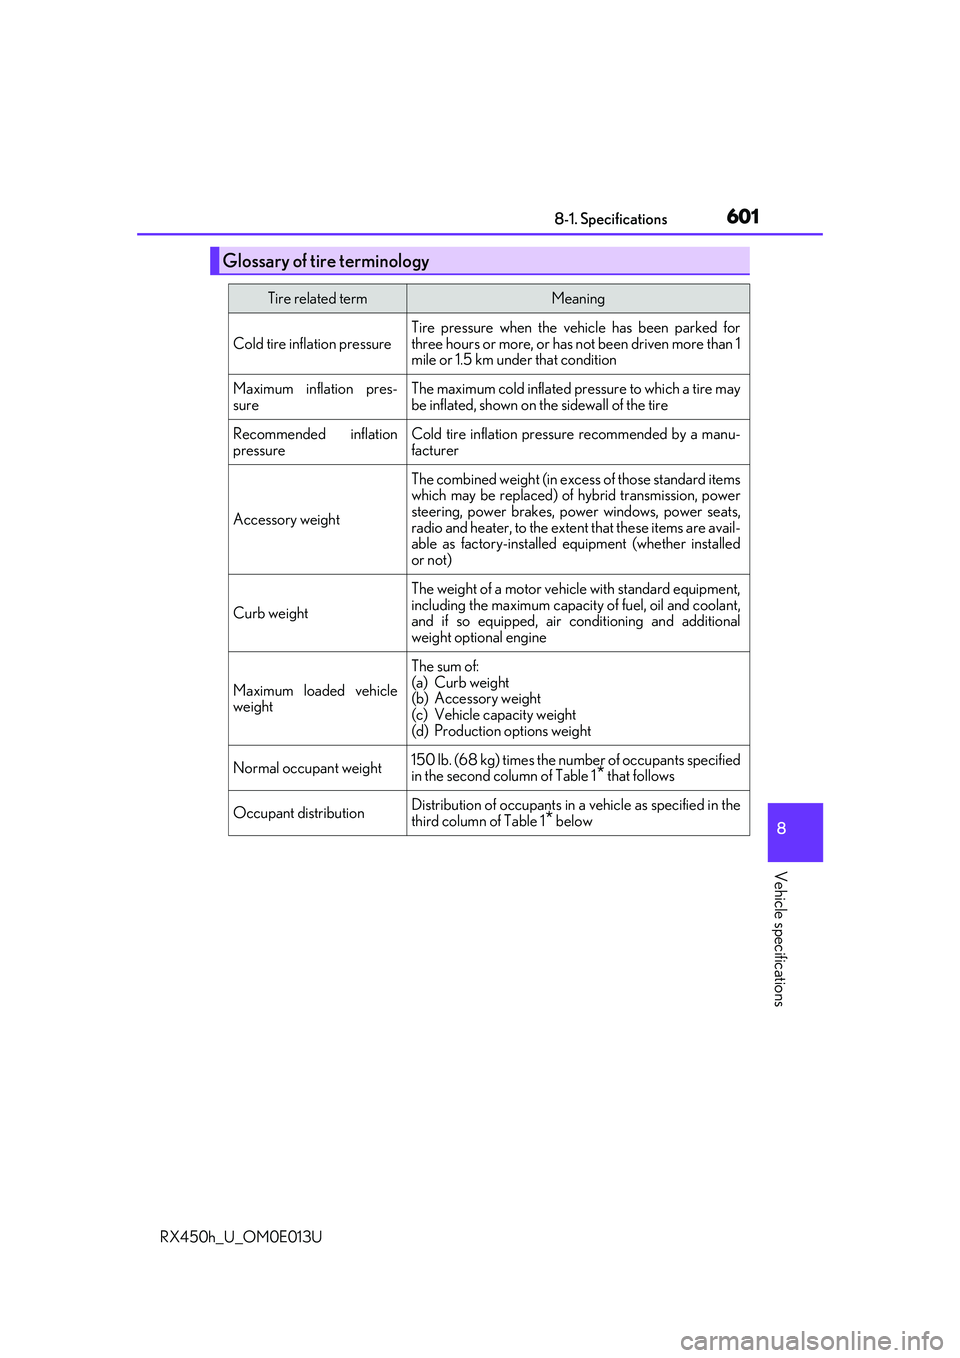
Glossary of tire terminology
Tire related termMeaning
Cold tire inflation pressure
Tire pressure when the vehicle has been parked for
three hours or more, or has not been driven more than 1
mile or 1.5 km un der that condition
Maximum inflation pres-
sureThe maximum cold inflated pr essure to which a tire may
be inflated, shown on the sidewall of the tire
Recommended inflation
pressureCold tire inflation pressure recommended by a manu-
facturer
Accessory weight
The combined weight (in exce ss of those standard items
which may be replaced) of hybrid transmission, power
steering, power brakes, power windows, power seats,
radio and heater, to the extent that these items are avail-
able as factory-installed eq uipment (whether installed
or not)
Curb weight
The weight of a motor vehicle with standard equipment,
including the maximum capacity of fuel, oil and coolant,
and if so equipped, air co nditioning and additional
weight optional engine
Maximum loaded vehicle
weight
The sum of:
(a) Curb weight
(b) Accessory weight
(c) Vehicle capacity weight
(d) Production options weight
Normal occupant weight150 lb. (68 kg) times the numb er of occupants specified
in the second column of Table 1* that follows
Occupant distributionDistribution of occupants in a vehicle as specified in the
third column of Table 1
* below