bulb LEXUS RX450h 2018 Owners Manual
[x] Cancel search | Manufacturer: LEXUS, Model Year: 2018, Model line: RX450h, Model: LEXUS RX450h 2018Pages: 792, PDF Size: 12.5 MB
Page 6 of 792

TABLE OF CONTENTS
6
RX450h_RX450hL _U_OM48F85U7-1. Maintenance and care
Cleaning and protecting
the vehicle exterior ................580
Cleaning and protecting
the vehicle interior.................. 584
7-2. Maintenance
Maintenance
requirements ............................ 587
General mainte nance..............589
Emission inspection and
maintenance (I/M)
programs.................................... 592
7-3. Do-it-yourself
maintenance
Do-it-yourself service
precautions................................ 593
Hood ............................................... 595
Positioning a floor jack ............ 596
Engine compartment ............... 597
12-volt battery ............................. 605
Tires .................................................... 611
Tire inflation pressure .............. 620
Wheels ........................................... 623
Air conditioning filter ............... 625
Windshield wiper inserts ........ 628
Electronic key battery.............. 630
Checking and replacing
fuses.............................................. 632
Headlight aim .............................. 635
Light bulbs .................................... 637 8-1. Essential information
Emergency flashers .................. 652
If your vehicle has
to be stopped in
an emergency .......................... 653
8-2. Steps to take in
an emergency
If your vehicle needs to be
towed ........................................... 654
If you think something is
wrong........................................... 659
If a warning light turns
on or a warning buzzer
sounds ......................................... 660
If a warning message is
displayed .................................... 667
If you have a flat tire .................. 673
If the hybrid system will
not start ....................................... 690
If the electronic key does
not operate properly ............. 692
If the 12-volt battery is
discharged................................. 695
If your vehicle overheats......... 702
If the vehicle becomes stuck .........7067
Maintenance and care 8
When trouble arises
Page 17 of 792
17Pictorial index
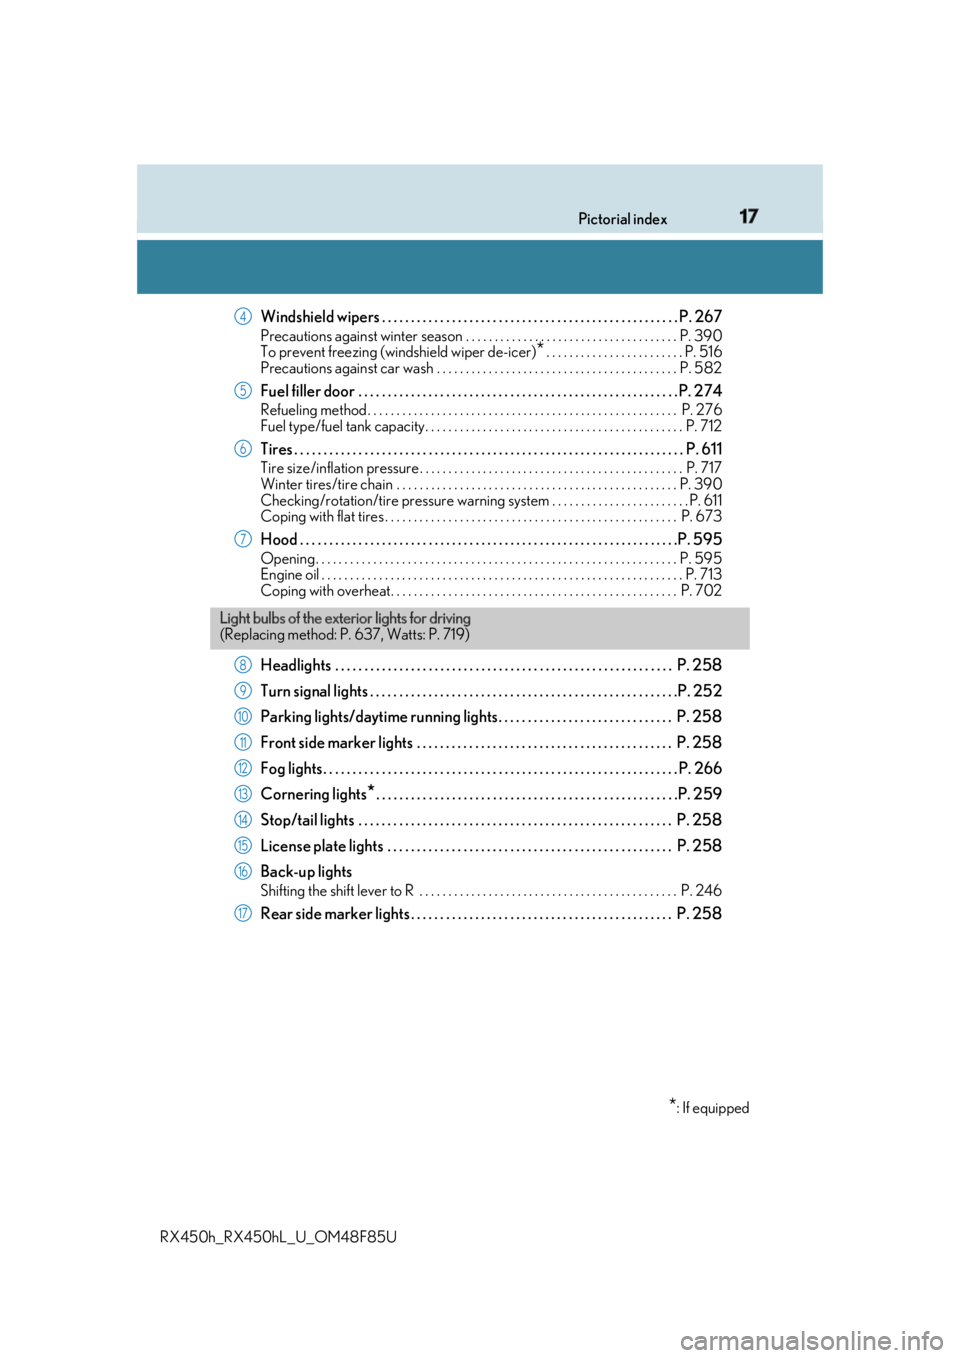
RX450h_RX450hL _U_OM48F85UWindshield wipers . . . . . . . . . . . . . . . . . . . . . . . . . . . . . . . . . . . . . . . . . . . . . . . . . . . P. 267 Precautions against winter season . . . . . . . . . . . . . . . . . . . . . . . . . . . . . . . . . . . . . P. 390
To prevent freezing (windshield wiper de-icer)
* . . . . . . . . . . . . . . . . . . . . . . . . P. 516
Precautions against car wash . . . . . . . . . . . . . . . . . . . . . . . . . . . . . . . . . . . . . . . . . . P. 582
Fuel filler door . . . . . . . . . . . . . . . . . . . . . . . . . . . . . . . . . . . . . . . . . . . . . . . . . . . . . . . P . 274Refueling method . . . . . . . . . . . . . . . . . . . . . . . . . . . . . . . . . . . . . . . . . . . . . . . . . . . . . . P. 276
Fuel type/fuel tank capacity . . . . . . . . . . . . . . . . . . . . . . . . . . . . . . . . . . . . . . . . . . . . . P. 712
Tires . . . . . . . . . . . . . . . . . . . . . . . . . . . . . . . . . . . . . . . . . . . . . . . . . . . . . . . . . . . . . . . . . . . P. 611Tire size/inflation pressure . . . . . . . . . . . . . . . . . . . . . . . . . . . . . . . . . . . . . . . . . . . . . . P. 717
Winter tires/tire chain . . . . . . . . . . . . . . . . . . . . . . . . . . . . . . . . . . . . . . . . . . . . . . . . . P. 39 0
Checking/rotation/tire pressure warning system . . . . . . . . . . . . . . . . . . . . . . . . P. 611
Coping with flat tires . . . . . . . . . . . . . . . . . . . . . . . . . . . . . . . . . . . . . . . . . . . . . . . . . . . P. 673
Hood . . . . . . . . . . . . . . . . . . . . . . . . . . . . . . . . . . . . . . . . . . . . . . . . . . . . . . . . . . . . . . . . .P. 595Opening. . . . . . . . . . . . . . . . . . . . . . . . . . . . . . . . . . . . . . . . . . . . . . . . . . . . . . . . . . . . . . . P. 595
Engine oil . . . . . . . . . . . . . . . . . . . . . . . . . . . . . . . . . . . . . . . . . . . . . . . . . . . . . . . . . . . . . . . P. 713
Coping with overheat. . . . . . . . . . . . . . . . . . . . . . . . . . . . . . . . . . . . . . . . . . . . . . . . . . P. 702
Headlights . . . . . . . . . . . . . . . . . . . . . . . . . . . . . . . . . . . . . . . . . . . . . . . . . . . . . . . . . . P. 258
Turn signal lights . . . . . . . . . . . . . . . . . . . . . . . . . . . . . . . . . . . . . . . . . . . . . . . . . . . . .P. 2 52
Parking lights/daytime running lights. . . . . . . . . . . . . . . . . . . . . . . . . . . . . . P. 258
Front side marker lights . . . . . . . . . . . . . . . . . . . . . . . . . . . . . . . . . . . . . . . . . . . . P. 258
Fog lights. . . . . . . . . . . . . . . . . . . . . . . . . . . . . . . . . . . . . . . . . . . . . . . . . . . . . . . . . . . . . P. 266
Cornering lights
* . . . . . . . . . . . . . . . . . . . . . . . . . . . . . . . . . . . . . . . . . . . . . . . . . . . .P. 259
Stop/tail lights . . . . . . . . . . . . . . . . . . . . . . . . . . . . . . . . . . . . . . . . . . . . . . . . . . . . . . P. 258
License plate lights . . . . . . . . . . . . . . . . . . . . . . . . . . . . . . . . . . . . . . . . . . . . . . . . . P. 258
Back-up lights Shifting the shift lever to R . . . . . . . . . . . . . . . . . . . . . . . . . . . . . . . . . . . . . . . . . . . . . P. 246
Rear side marker lights . . . . . . . . . . . . . . . . . . . . . . . . . . . . . . . . . . . . . . . . . . . . . P. 258 4
5
6
7
Light bulbs of the exte rior lights for driving
(Replacing method: P. 637, Watts: P. 719)
* : If equipped8
9
10
11
12
13
14
15
16
17
Page 252 of 792
252 4-2. Driving procedures
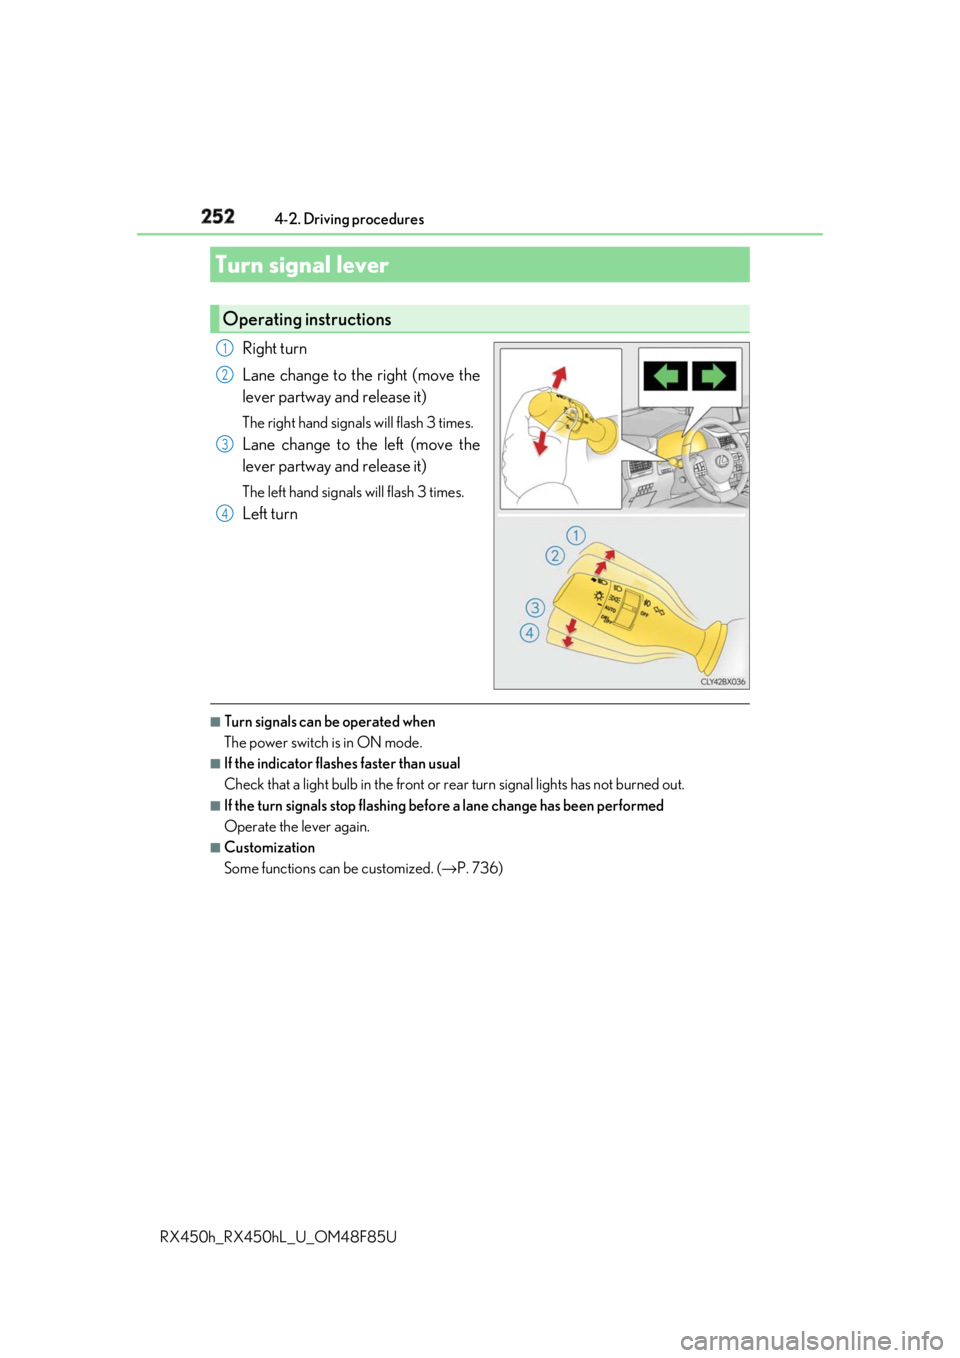
RX450h_RX450hL _U_OM48F85URight turn
Lane change to the right (move the
lever partway and release it) The right hand signals will flash 3 times.
Lane change to the left (move the
lever partway and release it) The left hand signals will flash 3 times.
Left turn
■
Turn signals can be operated when
The power switch is in ON mode. ■
If the indicator flashes faster than usual
Check that a light bulb in the front or rear turn signal lights has not burned out.■
If the turn signals stop flashing befo re a lane change has been performed
Operate the lever again. ■
Customization
Some functions can be customized. ( → P. 736)Turn signal lever Operating instructions 1
2
3
4
Page 579 of 792

579
7Maintenance and care
RX450h_RX450hL _U_OM48F85U7-1. Maintenance and care
Cleaning and protecting
the vehicle exterior................ 580
Cleaning and protecting
the vehicle interior ................. 584
7-2. Maintenance
Maintenance
requirements.............................587
General maintenance ............. 589
Emission inspection and
maintenance (I/M)
programs ....................................592 7-3. Do-it-yourself
maintenance
Do-it-yourself service
precautions................................593
Hood ...............................................595
Positioning a floor jack ............ 596
Engine compartment ............... 597
12-volt battery .............................605
Tires .................................................... 611
Tire inflation pressure............... 620
Wheels ........................................... 623
Air conditioning filter ............... 625
Windshield wiper inserts ........ 628
Electronic key battery ..............630
Checking and replacing
fuses .............................................. 632
Headlight aim .............................. 635
Light bulbs..................................... 637
Page 593 of 792
593
RX450h_RX450hL _U_OM48F85U 7
Maintenance and care 7-3. Do-it-yourself maintenance
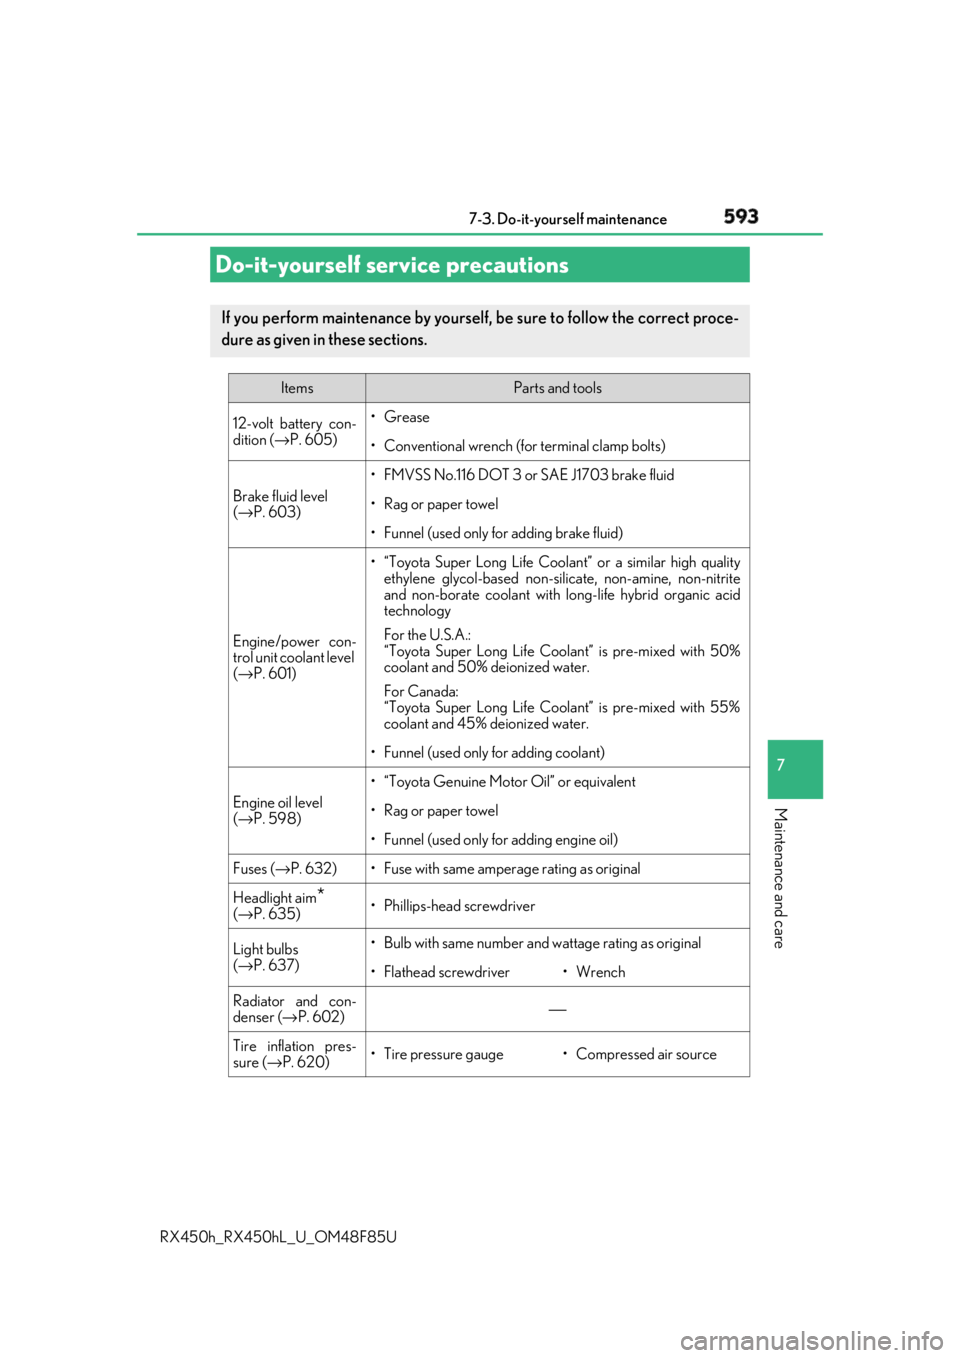
Do-it-yourself service precautions If you perform maintenance by yourself, be sure to follow the correct proce-
dure as given in these sections. Items Parts and tools
12-volt battery con-
dition ( → P. 605) •Grease
• Conventional wrench (for terminal clamp bolts)
Brake fluid level
( → P. 603) • FMVSS No.116 DOT 3 or SAE J1703 brake fluid
• Rag or paper towel
• Funnel (used only for adding brake fluid)
Engine/power con-
trol unit coolant level
( → P. 601) • “Toyota Super Long Life Coolan t” or a similar high quality
ethylene glycol-based non-silicate, non-amine, non-nitrite
and non-borate coolant with long-life hybrid organic acid
technology
For the U.S.A.:
“Toyota Super Long Life Coolant” is pre-mixed with 50%
coolant and 50% deionized water.
For Canada:
“Toyota Super Long Life Cool ant” is pre-mixed with 55%
coolant and 45% deionized water.
• Funnel (used only for adding coolant)
Engine oil level
( → P. 598) • “Toyota Genuine Motor Oil” or equivalent
• Rag or paper towel
• Funnel (used only for adding engine oil)
Fuses ( → P. 632) • Fuse with same amperage rating as original
Headlight aim
*( → P. 635) • Phillips-head screwdriver
Light bulbs
( → P. 637) • Bulb with same number and wattage rating as original
• Flathead screwdriver •Wrench
Radiator and con-
denser ( → P. 602) ⎯
Tire inflation pres-
sure ( → P. 620) • Tire pressure gauge • Compressed air source
Page 634 of 792
634 7-3. Do-it-yourself maintenance
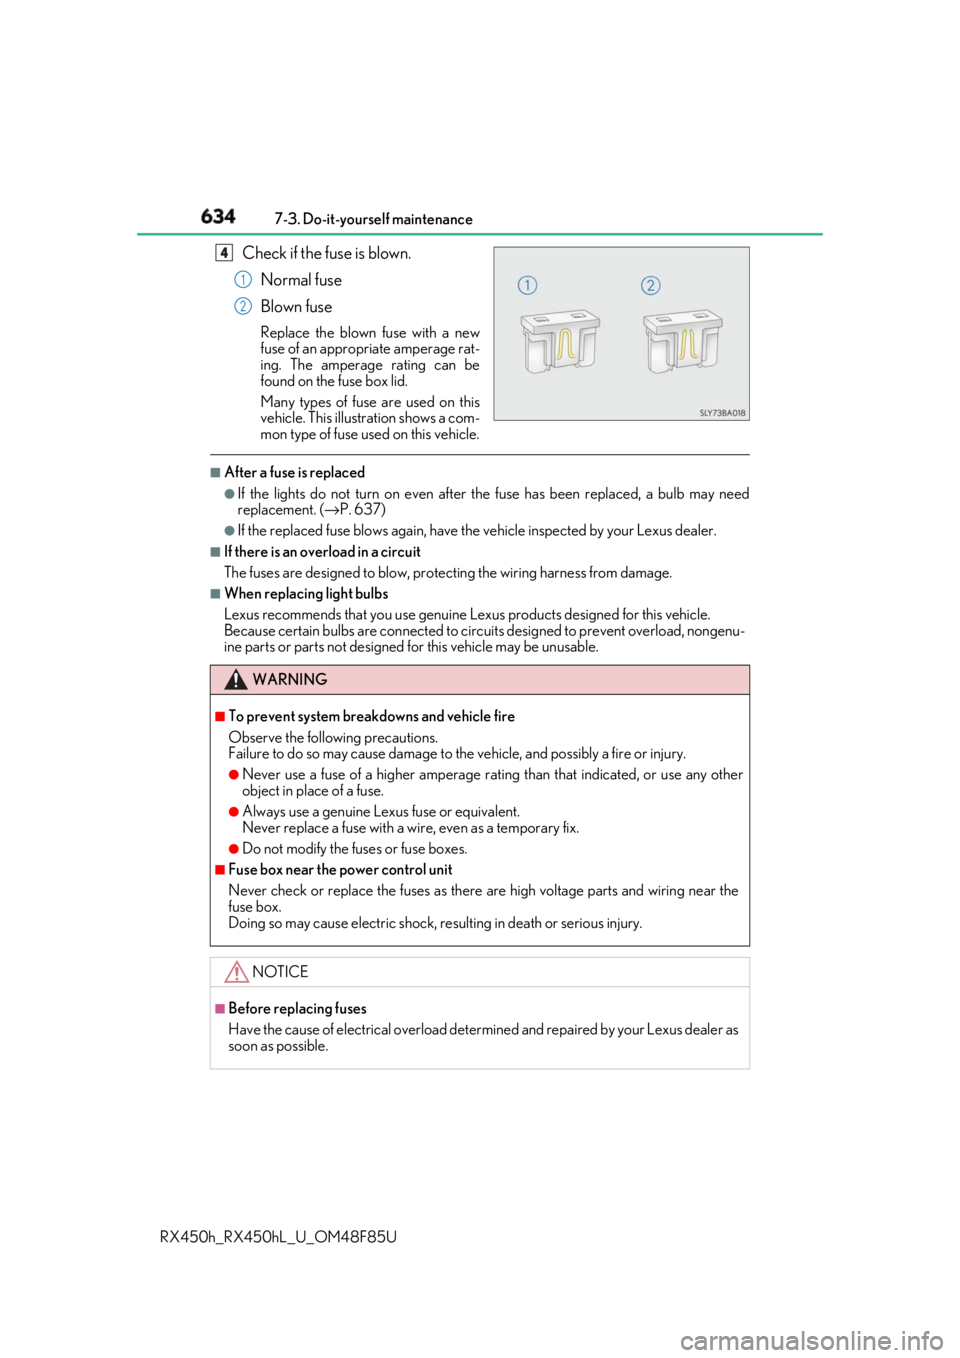
RX450h_RX450hL _U_OM48F85UCheck if the fuse is blown.
Normal fuse
Blown fuse Replace the blown fuse with a new
fuse of an appropriate amperage rat-
ing. The amperage rating can be
found on the fuse box lid.
Many types of fuse are used on this
vehicle. This illustration shows a com-
mon type of fuse used on this vehicle.■
After a fuse is replaced ●
If the lights do not turn on even after the fuse has been replaced, a bulb may need
replacement. ( → P. 637)●
If the replaced fuse blows again, have th e vehicle inspected by your Lexus dealer.■
If there is an overload in a circuit
The fuses are designed to blow, protec ting the wiring ha rness from damage.■
When replacing light bulbs
Lexus recommends that you use genuine Lexus products designed for this vehicle.
Because certain bulbs are conne cted to circuits designed to prevent overload, nongenu-
ine parts or parts not designed for this vehicle may be unusable. 4
1
2
WARNING ■
To prevent system breakdowns and vehicle fire
Observe the following precautions.
Failure to do so may cause damage to th e vehicle, and possibly a fire or injury.●
Never use a fuse of a higher amperage rating than that indicated, or use any other
object in place of a fuse. ●
Always use a genuine Lexus fuse or equivalent.
Never replace a fuse with a wi re, even as a temporary fix.●
Do not modify the fuses or fuse boxes. ■
Fuse box near the power control unit
Never check or replace the fuses as there are high volt age parts and wiring near the
fuse box.
Doing so may cause electric shock, re sulting in death or serious injury.
NOTICE ■
Before replacing fuses
Have the cause of electrical overload determined and repaired by your Lexus dealer as
soon as possible.
Page 637 of 792
6377-3. Do-it-yourself maintenance
7
Maintenance and care
RX450h_RX450hL _U_OM48F85UCheck the wattage of the light bulb to be replaced. ( → P. 637)
→ P. 146Light bulbs You may replace the following bulbs by yo urself. The difficulty level of replace-
ment varies depending on the bulb. If necessary bulb replacement seems diffi-
cult to perform, contact your Lexus dealer.
For more information about replacing ot her light bulbs, contact your Lexus
dealer.
Preparing for light bulb replacement
Canceling the power back door system
Page 638 of 792
638 7-3. Do-it-yourself maintenance
RX450h_RX450hL _U_OM48F85U■
Front
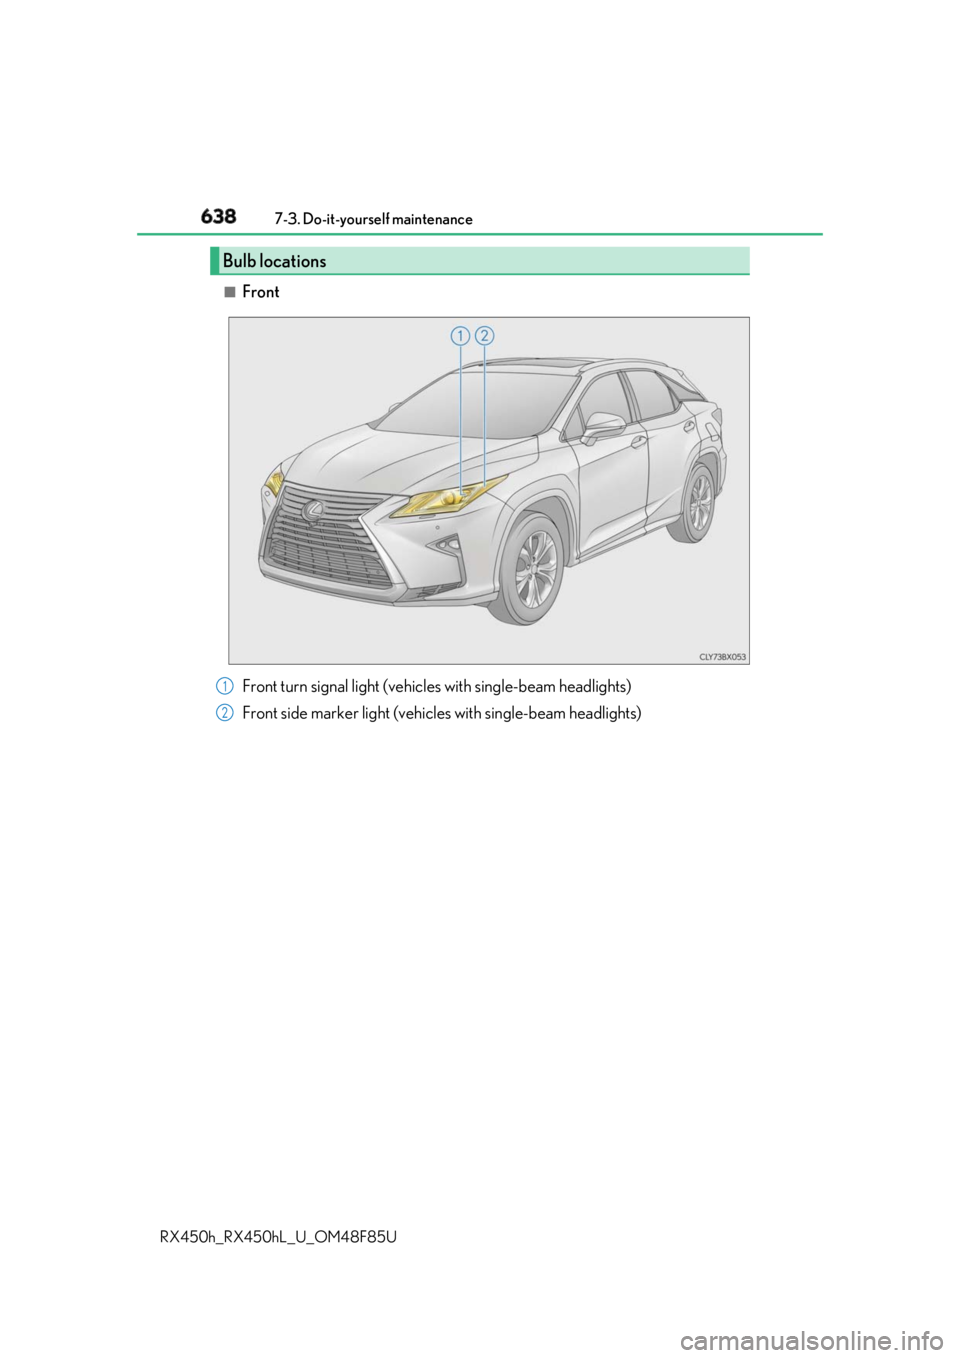
Bulb locations
Front turn signal light (vehic les with single-beam headlights)
Front side marker light (vehic les with single-beam headlights)1
2
Page 640 of 792
640 7-3. Do-it-yourself maintenance
RX450h_RX450hL _U_OM48F85U■
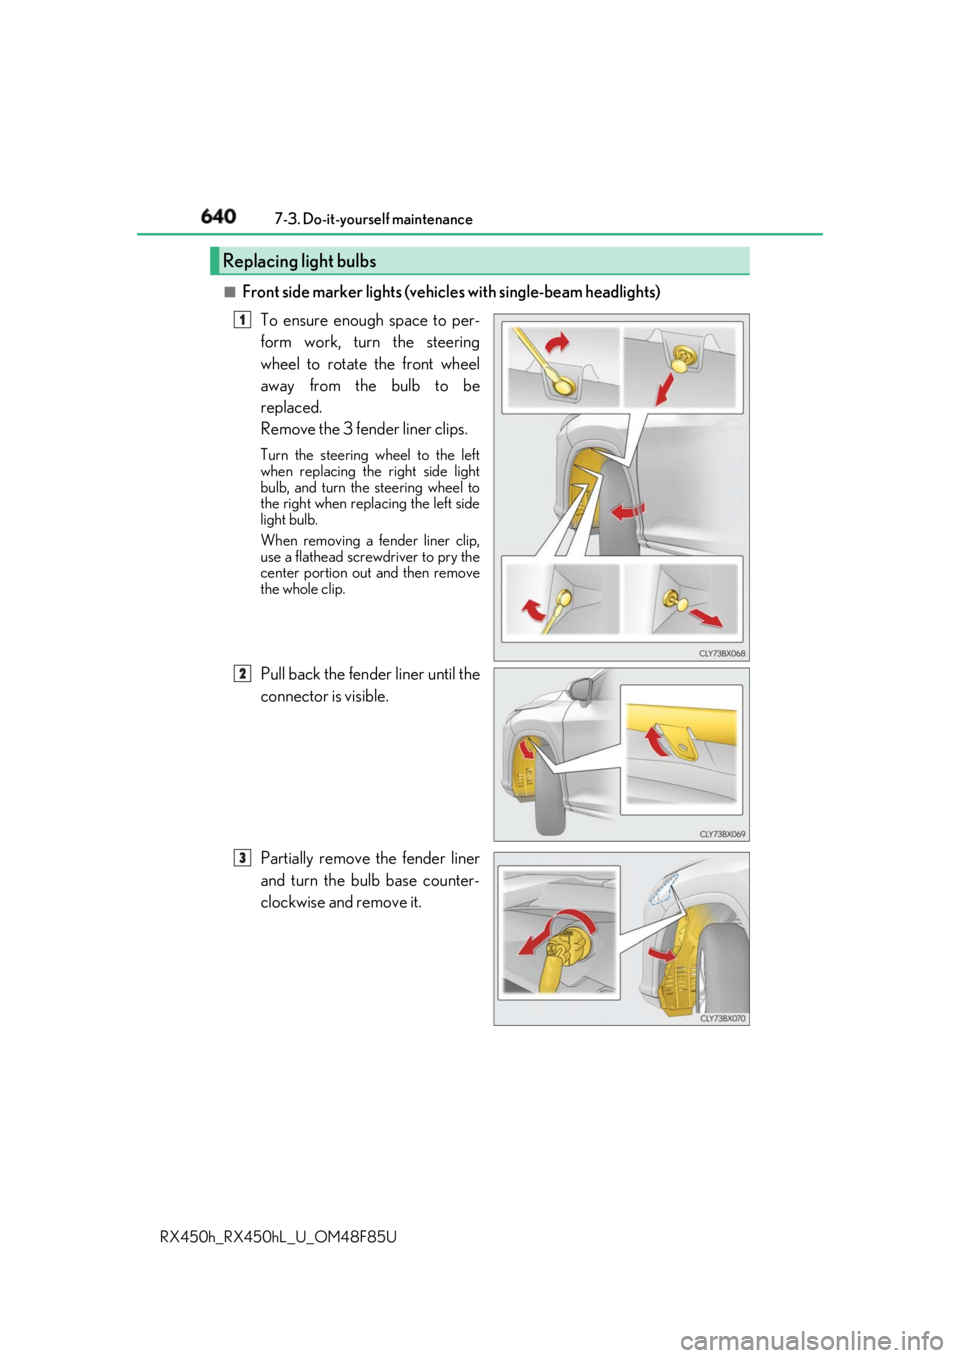
Front side marker lights (vehicle s with single-beam headlights)
To ensure enough space to per-
form work, turn the steering
wheel to rotate the front wheel
away from the bulb to be
replaced.
Remove the 3 fender liner clips. Turn the steering wheel to the left
when replacing the right side light
bulb, and turn the steering wheel to
the right when replacing the left side
light bulb.
When removing a fender liner clip,
use a flathead screwdriver to pry the
center portion out and then remove
the whole clip.
Pull back the fender liner until the
connector is visible.
Partially remove the fender liner
and turn the bulb base counter-
clockwise and remove it.Replacing light bulbs 1
8 2
3
Page 641 of 792
6417-3. Do-it-yourself maintenance
7
Maintenance and care
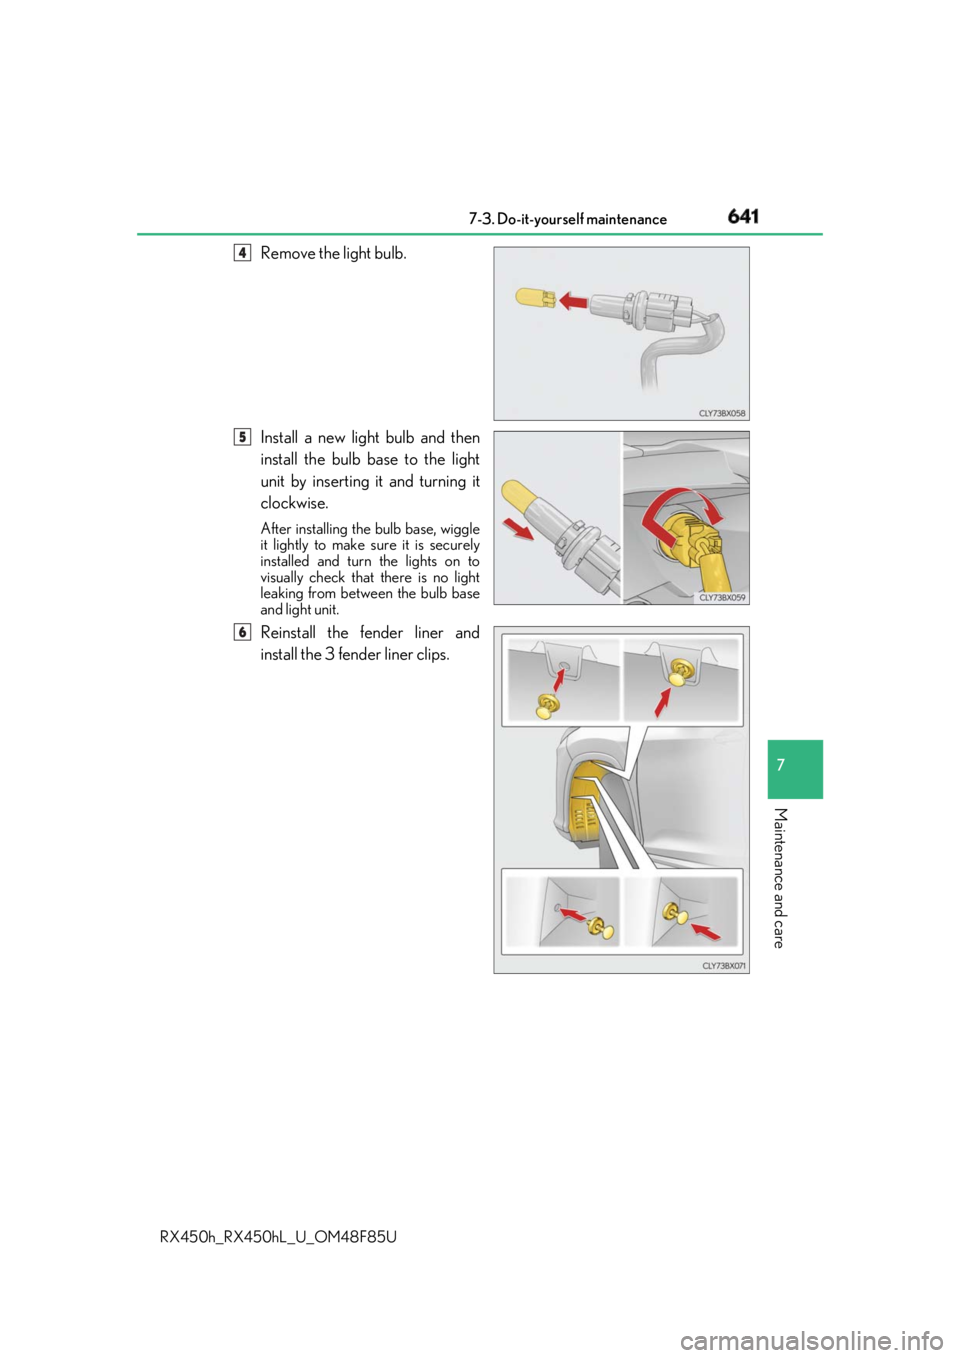
RX450h_RX450hL _U_OM48F85URemove the light bulb.
Install a new light bulb and then
install the bulb base to the light
unit by inserting it and turning it
clockwise. After installing th e bulb base, wiggle
it lightly to make sure it is securely
installed and turn the lights on to
visually check that there is no light
leaking from betw een the bulb base
and light unit.
Reinstall the fender liner and
install the 3 fender liner clips. 4
5
6