audio LEXUS RX450h 2022 Owners Manual
[x] Cancel search | Manufacturer: LEXUS, Model Year: 2022, Model line: RX450h, Model: LEXUS RX450h 2022Pages: 532, PDF Size: 27.62 MB
Page 17 of 532
15Pictorial index
When the warning messages are displayed.......................................................... P.420
Parking brake switch ............................................................................................. P.193
Applying/releasing ........................................................................................................... P.193
Precautions for winter season ......................... ............................................................ P.287
Warning buzzer/messages.......................................................................................... P.420
Turn signal lever ...................................................................................................... P.192
Headlight switch......................................................................................................P.198
Headlights/side marker light s/parking lights/tail lights/license plate lights/daytime
running lights ................................................................................................................. ...... P.198
Fog lights
*1........................................................................................................................... P.20 4
Windshield wiper and washer switch ................................................... P.204, 208
Usage......................................................................................................................... P .204, 208
Adding washer fluid ......................................................................................................... P.3 69
Warning messages .......................................................................................................... P.420
Emergency flasher switch .................................................................................. P.402
Hood lock release lever .......................................................................................P.363
Tilt and telescopic steering control switch ...................................................... P.146
Adjustment ............................................................................................................................P.146
Driving position memory
*1............................................................................................. P.140
Air conditioning system ...................................................................................... P.298
Usage.......................................................................................................................... ...........P.298
Rear window defogger...................................................................................................P.298
Audio system
*2
*1
: If equipped
*2: Refer to “NAVIGATION AND MULT IMEDIA SYSTEM OWNER’S MANUAL”.
E
F
G
H
I
J
K
L
Page 19 of 532
17Pictorial index
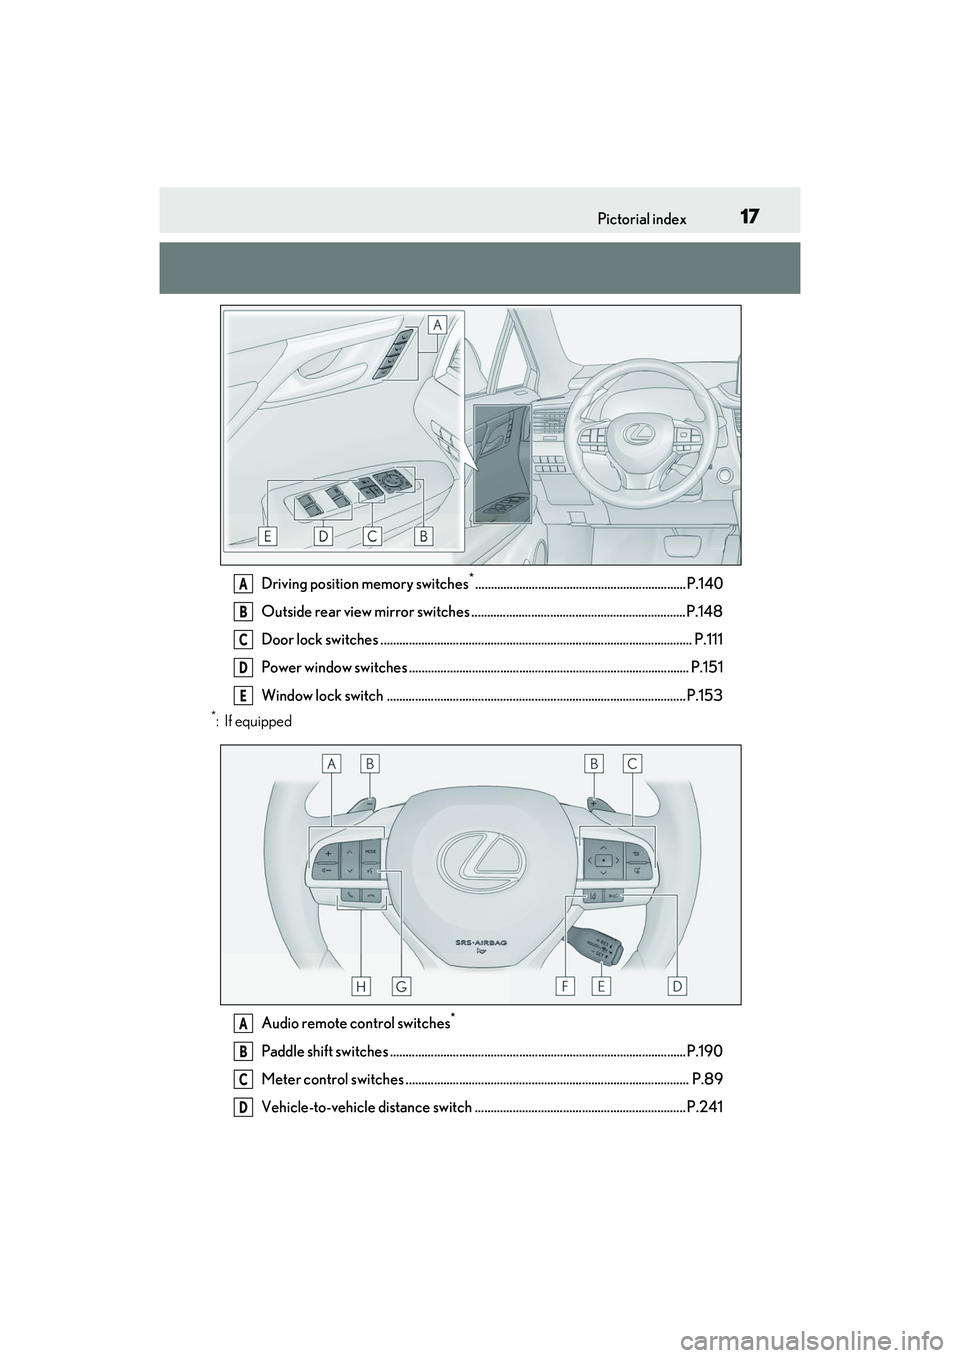
Driving position memory switches*...................................................................P.140
Outside rear view mirror switches ....................................................................P.148
Door lock switches ................................................................................................... P.111
Power window switches ......................................................................................... P.151
Window lock switch ...............................................................................................P.153
*:If equipped
Audio remote control switches
*
Paddle shift switches ......................................... .....................................................P.190
Meter control switches .......................................................................................... P.89
Vehicle-to-vehicle distance switch ................................................................... P.241
A
B
C
D
E
A
B
C
D
Page 91 of 532
892-1. Instrument cluster
2
Vehicle status information and indicators
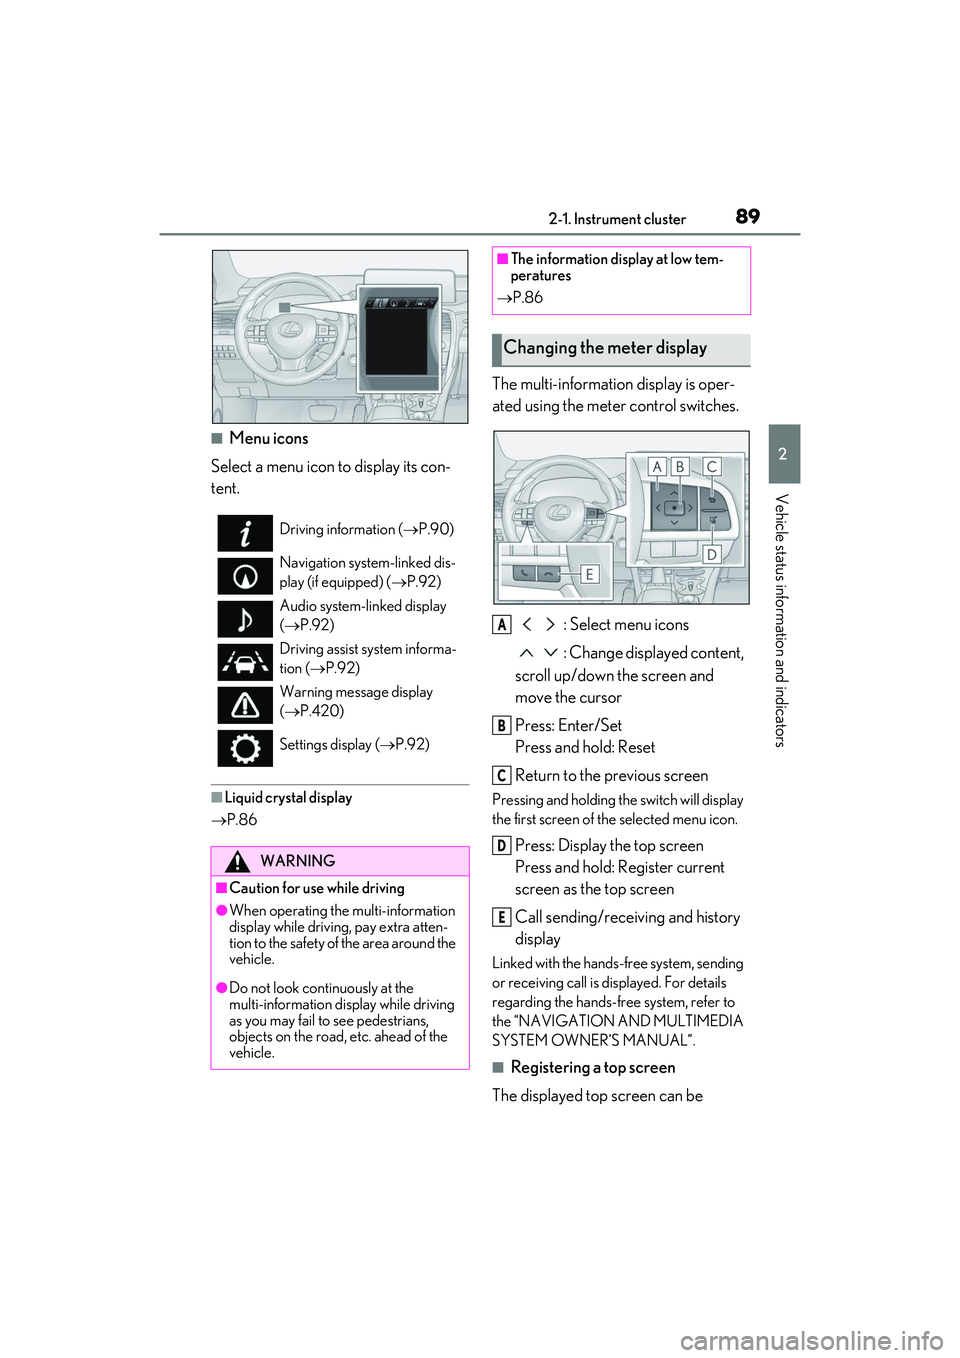
■Menu icons
Select a menu icon to display its con-
tent.
■Liquid crystal display
P.86
The multi-information display is oper-
ated using the meter control switches.
: Select menu icons
: Change displayed content,
scroll up/down the screen and
move the cursor
Press: Enter/Set
Press and hold: Reset
Return to the previous screen
Pressing and holding the switch will display
the first screen of th e selected menu icon.
Press: Display the top screen
Press and hold: Register current
screen as the top screen
Call sending/receiving and history
display
Linked with the hands-free system, sending
or receiving call is di splayed. For details
regarding the hands-free system, refer to
the “NAVIGATION AND MULTIMEDIA
SYSTEM OWNER’S MANUAL”.
■Registering a top screen
The displayed top screen can be
Driving information ( P.90)
Navigation system-linked dis-
play (if equipped) ( P.92)
Audio system-linked display
( P.92)
Driving assist system informa-
tion ( P.92)
Warning message display
( P.420)
Settings display ( P.92)
WARNING
■Caution for use while driving
●When operating the multi-information
display while driving, pay extra atten-
tion to the safety of the area around the
vehicle.
●Do not look continuously at the
multi-information di splay while driving
as you may fail to see pedestrians,
objects on the road, etc. ahead of the
vehicle.
■The information display at low tem-
peratures
P.86
Changing the meter display
A
B
C
D
E
Page 94 of 532
922-1. Instrument cluster
switch is turned to ON mode. It may also
take a few minutes to display the tire infla-
tion pressure after inflation pressure has
been adjusted.
• “---” may be displayed if the tire position information cannot be determined due to
unfavorable radio wave conditions.
• Tire inflation pressu re changes with tem-
perature. The displayed values may also
be different from the values measured
using a tire pressure gauge.
Select to display the following naviga-
tion system-linked information.
Route guidance
Compass display (heading-up dis-
play)
Select to enable selection of an audio
source or track on the meter using the
meter control switches.
Select to display the operational status
of the following systems:
LTA (Lane Tracing Assist) ( P.225)
RSA (Road Sign Assist) (if
equipped) ( P.234)
Dynamic radar cruise control with
full-speed range ( P.236)
■Meter display settings that can be
changed
Clock
Select to switch between 12-hour display
and 24-hour display.
Language
Select to change t he language displayed.
Units
Select to change the units of measure dis-
played.
EV indicator ( P.187)
Select to enable/disab le the EV indicator.
Switch settings
Select to display how to change the top
screen.
Drive information 1/Drive informa-
tion 2/Drive information 3
Select to select up to 2 items ( P.90) that
will be displayed on each Drive information
screen (Drive information 1 screen, Drive
information 2 screen, and Drive informa-
tion 3 screen) respectively.
Pop-up display
Select to enable/dis able the pop-up dis-
play.
• Intersection guidance
• Incoming calls
• Brightness adjustment
Color (except F SPORT models)
Select to set the color of the cursor on the
multi-information display.
Tachometer setting
Select to set the tachometer or Hybrid
System Indicator to always be displayed or
Navigation system-linked dis-
play (if equipped)
Audio system-linked display
Driving assist system information
Settings display
Page 97 of 532
952-1. Instrument cluster
2
Vehicle status information and indicators
*:If equipped
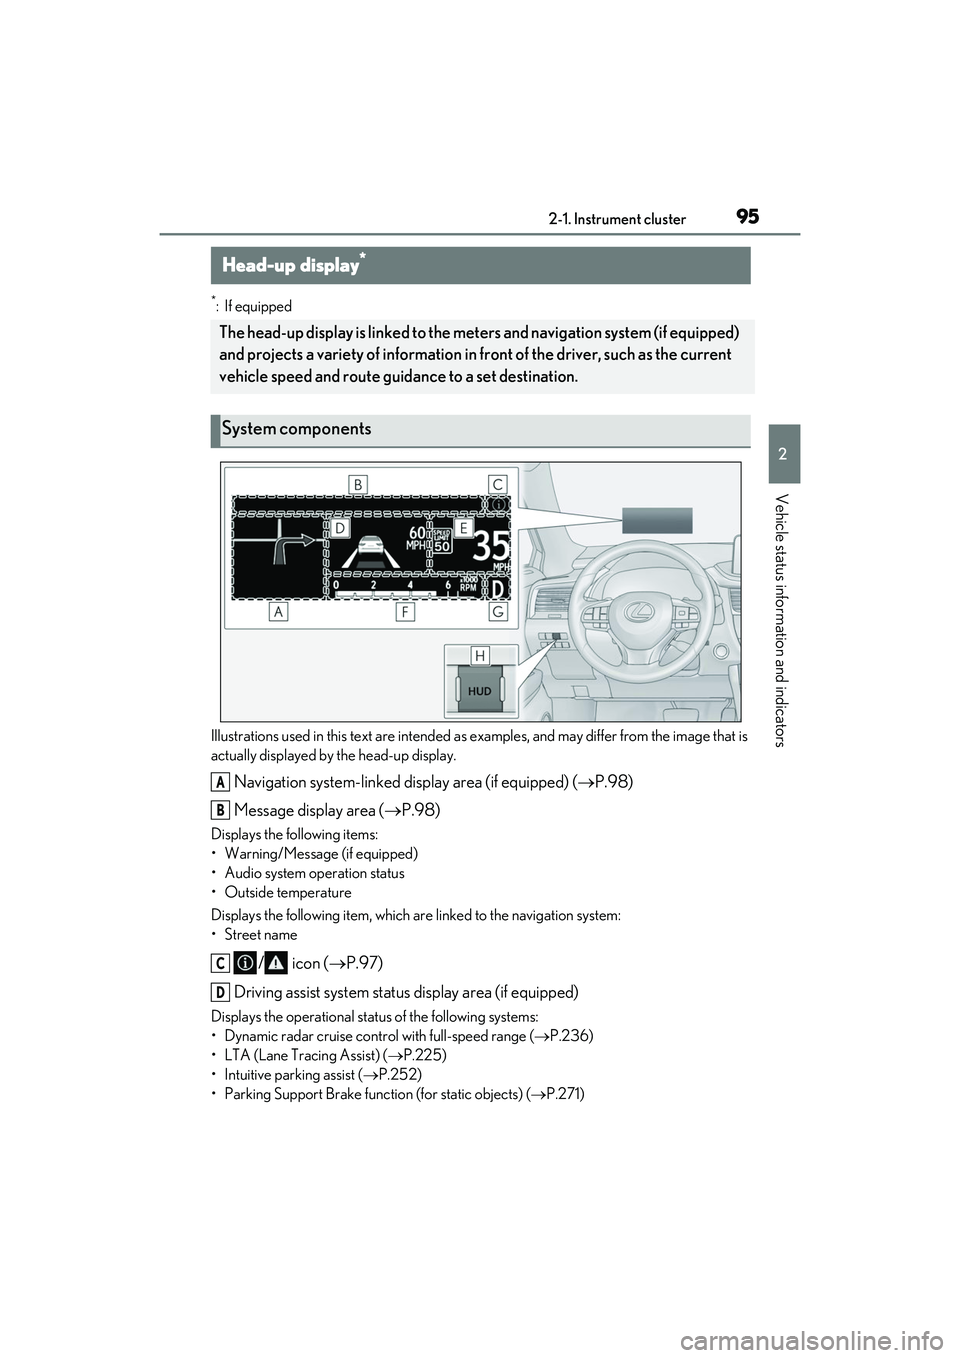
Illustrations used in this text are intended as examples, and may differ from the image that is
actually displayed by the head-up display.
Navigation system-linked display area (if equipped) ( P.98)
Message display area ( P.98)
Displays the following items:
• Warning/Message (if equipped)
• Audio system operation status
• Outside temperature
Displays the following item, which ar e linked to the navigation system:
•Street name
/ icon ( P.97)
Driving assist system status display area (if equipped)
Displays the operational stat us of the following systems:
• Dynamic radar cruise cont rol with full-speed range (P.236)
• LTA (Lane Tracing Assist) ( P.225)
• Intuitive parking assist ( P.252)
• Parking Support Brake functi on (for static objects) (P.271)
Head-up display*
The head-up display is linked to the mete rs and navigation system (if equipped)
and projects a variety of information in front of the driver, such as the current
vehicle speed and route guidance to a set destination.
System components
A
B
C
D
Page 99 of 532
972-1. Instrument cluster
2
Vehicle status information and indicators
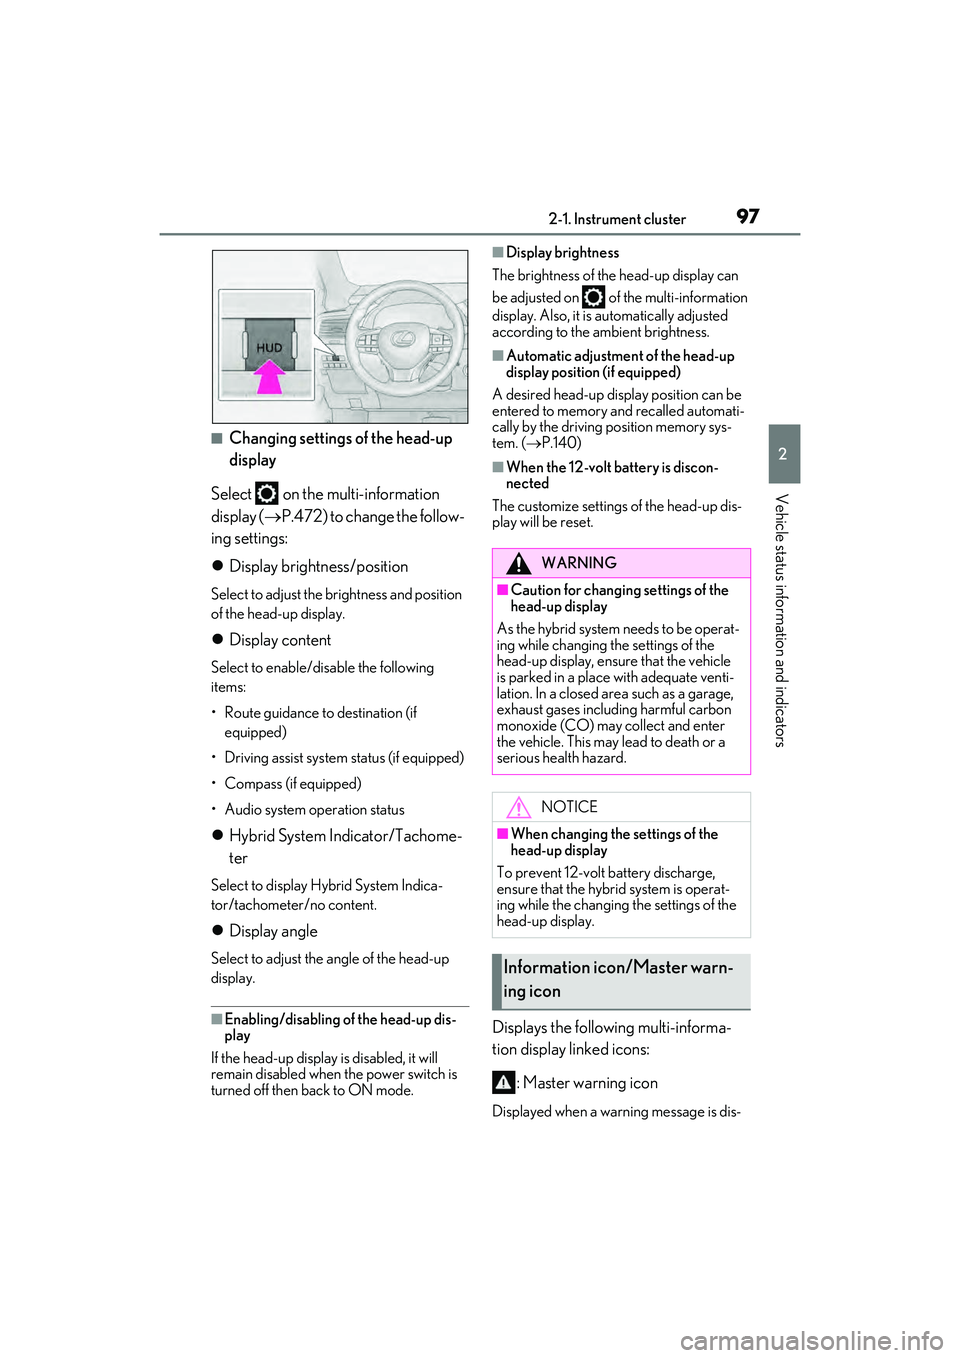
■Changing settings of the head-up
display
Select on the multi-information
display ( P.472) to change the follow-
ing settings:
Display brightness/position
Select to adjust the brightness and position
of the head-up display.
Display content
Select to enable/disable the following
items:
• Route guidance to destination (if
equipped)
• Driving assist system status (if equipped)
• Compass (if equipped)
• Audio system operation status
Hybrid System Indicator/Tachome-
ter
Select to display Hybrid System Indica-
tor/tachometer/no content.
Display angle
Select to adjust the angle of the head-up
display.
■Enabling/disabling of the head-up dis-
play
If the head-up display is disabled, it will
remain disabled when the power switch is
turned off then back to ON mode.
■Display brightness
The brightness of the head-up display can
be adjusted on of the multi-information
display. Also, it is automatically adjusted
according to the ambient brightness.
■Automatic adjustment of the head-up
display position (if equipped)
A desired head-up display position can be
entered to memory and recalled automati-
cally by the driving position memory sys-
tem. ( P.140)
■When the 12-volt battery is discon-
nected
The customize settings of the head-up dis-
play will be reset.
Displays the following multi-informa-
tion display linked icons:
: Master warning icon
Displayed when a warn ing message is dis-
WARNING
■Caution for changing settings of the
head-up display
As the hybrid system needs to be operat-
ing while changing th e settings of the
head-up display, ensure that the vehicle
is parked in a place with adequate venti-
lation. In a closed area such as a garage,
exhaust gases including harmful carbon
monoxide (CO) may collect and enter
the vehicle. This may lead to death or a
serious health hazard.
NOTICE
■When changing the settings of the
head-up display
To prevent 12-volt battery discharge,
ensure that the hybrid system is operat-
ing while the changing the settings of the
head-up display.
Information icon/Master warn-
ing icon
Page 100 of 532
982-1. Instrument cluster
played on the multi-information display.
( P.420)
: Information icon
Displayed when a suggestion/advice
pop-up display is displayed on the
multi-information display. ( P.93)
Displays the following items in the
appropriate situation:
■Warning/Message (if equipped)
Displays the following system warn-
ing/messages:
PCS (Pre-Collision System)
( P.218)
Parking Support Brake function (for
static objects) ( P.271)
Dynamic radar cruise control with
full-speed range ( P.236)
Brake Override System ( P.162)
Drive-Start Control ( P.163)
Details of content displayed on the
head-up display may differ from that dis-
played on the multi-information display. For
details, refer to the explanation of each sys-
tem.
■Audio system operation status
Displayed when the audio system is
operated.
■Outside temperature
Displayed in the following situations:
When the power switch is turned to
ON mode
When the low outside temperature
indicator is flashing Displayed content is the same as that
displayed on the multi-information dis-
play. For details, refer to the explana-
tion of the outside temperature display
on the multi-information display.
(
P.86)
Displays the following items which are
linked to the navigation system:
■Street name
The name of the street that the vehicle
is currently driving on is displayed on
the bottom of the display area.
When the navigation system is per-
forming route guidance, the name of
the next street will be displayed on the
top of the display area.
■Street name display (vehicles with a nav-
igation system)
Only street names which are included in the
map data will be displayed.
Displays the following items which are
linked to the navigation system:
■Route guidance to destination
Displayed when the navigation system
is performing route guidance. When
approaching an intersection, an arrow
will be displayed to indicate the sug-
gested direction of travel.
■Compass
Displays the dire ction of travel.
Message display area
Navigation system-linked dis-
play area (if equipped)
Page 109 of 532

1073-1. Key information
3
Before driving
The electronic keys are equipped with
the following wireless remote control:Locks all the doors (
P.109)
Unlocks all the doors ( P.109)
Opens the windows
*2 and the
moon roof
*1, 2 or panoramic moon
roof
*1, 2 ( P.109)
Opens and closes the power back
door ( P.114)
Sounds the alarm
*1: If equipped
*2: These settings must be customized at
your Lexus dealer.
■Theft deterrent panic mode
When is pressed for longer than
about one second, an alarm will sound
intermittently and the vehicle lights will flash
to deter any person from trying to break
into or damage your vehicle.
To stop the alarm, pr ess any button on the
electronic key.
To take out the mechanical key, push
NOTICE
■To prevent key damage
●Do not drop the keys, subject them to
strong shocks or bend them.
●Do not expose the keys to high tem-
peratures for long periods of time.
●Do not get the keys wet or wash them
in an ultrasonic washer, etc.
●Do not attach meta llic or magnetic
materials to the keys or place the keys
close to such materials.
●Do not disassemb le the keys.
●Do not attach a sticker or anything else
to the surface of the electronic key.
●Do not place the keys near objects that
produce magnetic fields, such as TVs,
audio systems and induction cookers,
or medical electrical equipment, such
as low-frequency therapy equipment.
■Carrying the electronic key on your
person
Carry the electronic key 3.9 in. (10 cm)
or more away from electric appliances
that are turned on. Radio waves emitted
from electric applianc es within 3.9 in. (10
cm) of the electronic key may interfere
with the key, causing the key to not func-
tion properly.
■In case of a smart access system with
push-button start malfunction or
other key-related problems
P.439
■When an electronic key is lost
P.438
Wireless remote control
Using the mechanical key
A
B
C
D
E
Page 129 of 532

1273-2. Opening, closing and locking the doors
3
Before driving
devices
• Another vehicle’s electronic key, another electronic key of your vehicle, or a wire-
less key that em its radio waves
• Personal computers or personal digital assistants (PDAs)
• Digital audio players
• Portable game systems
●If window tint with a metallic content or
metallic objects are attached to the rear
window
●When the electronic key is placed near a
battery charger or electronic devices
●When the vehicle is parked in a pay park-
ing spot where radi o waves are emitted
■Note for the entry function
●Even when the electronic key is within the
effective range (detection areas), the sys-
tem may not operate properly in the fol-
lowing cases:
• The electronic key is too close to the win-
dow or outside door handle, near the
ground, or in a high place when the doors
are locked or unlocked.
• The electronic key is near the ground or in a high place, or too close to the rear
bumper center when the back door is
opened.
• The electronic key is on the instrument panel, luggage compar tment, floor, or in
the door pockets or glove box when the
hybrid system is star ted or power switch
modes are changed.
●Do not leave the electronic key on top of
the instrument panel or near the door
pockets when exiting the vehicle.
Depending on the ra dio wave reception
conditions, it may be detected by the
antenna outside the cabin and the door
will become lockable from the outside,
possibly trapping the electronic key
inside the vehicle.
●As long as the electronic key is within the
effective range, the doors may be locked
or unlocked by anyone.
●Even if the electronic key is not inside the
vehicle, it may be possible to start the
hybrid system if the el ectronic key is near
the window.
●The doors may unlock if a large amount of water splashes on the door handle,
such as in the rain or in a car wash when
the electronic key is
within the effective
range. (The door will automatically be
locked after approximately 60 seconds if
the doors are not opened and closed.)
●If the wireless remote control is used to
lock the doors when the electronic key is
near the vehicle, there is a possibility that
the door may not be unlocked by the
entry function. (Use the wireless remote
control to unlock the doors.)
●Touching the door lock sensor while
wearing gloves may delay or prevent lock
operation. Remove the gloves and touch
the lock sensor again.
●When the lock operation is performed
using the lock sensor, recognition signals
will be shown up to two consecutive
times. After this, no recognition signals
will be given.
●If the door handle becomes wet while the
electronic key is within the effective
range, the door may lock and unlock
repeatedly. In that case, follow the follow-
ing correction procedures to wash the
vehicle:
• Place the electronic key in a location 6 ft. (2 m) or more away from the vehicle.
(Take care to ensure that the key is not
stolen.)
• Set the electronic key to battery-saving
mode to disable the smart access system
with push-button start. ( P.126)
●If the electronic key is inside the vehicle
and a door handle becomes wet during a
car wash, a message may be shown on
the multi-information display and a
buzzer will sound outside the vehicle. To
turn off the alarm, lock all the doors.
●The lock sensor may not work properly if
it comes into contact with ice, snow, mud,
etc. Clean the lock sensor and attempt to
operate it again.
●A sudden approach to the effective
range or door handle may prevent the
doors from being unlocked. In this case,
return the door handle to the original
position and check that the doors unlock
before pulling the door handle again.
●If there is another electronic key in the
Page 187 of 532
1854-2. Driving procedures
4
Driving
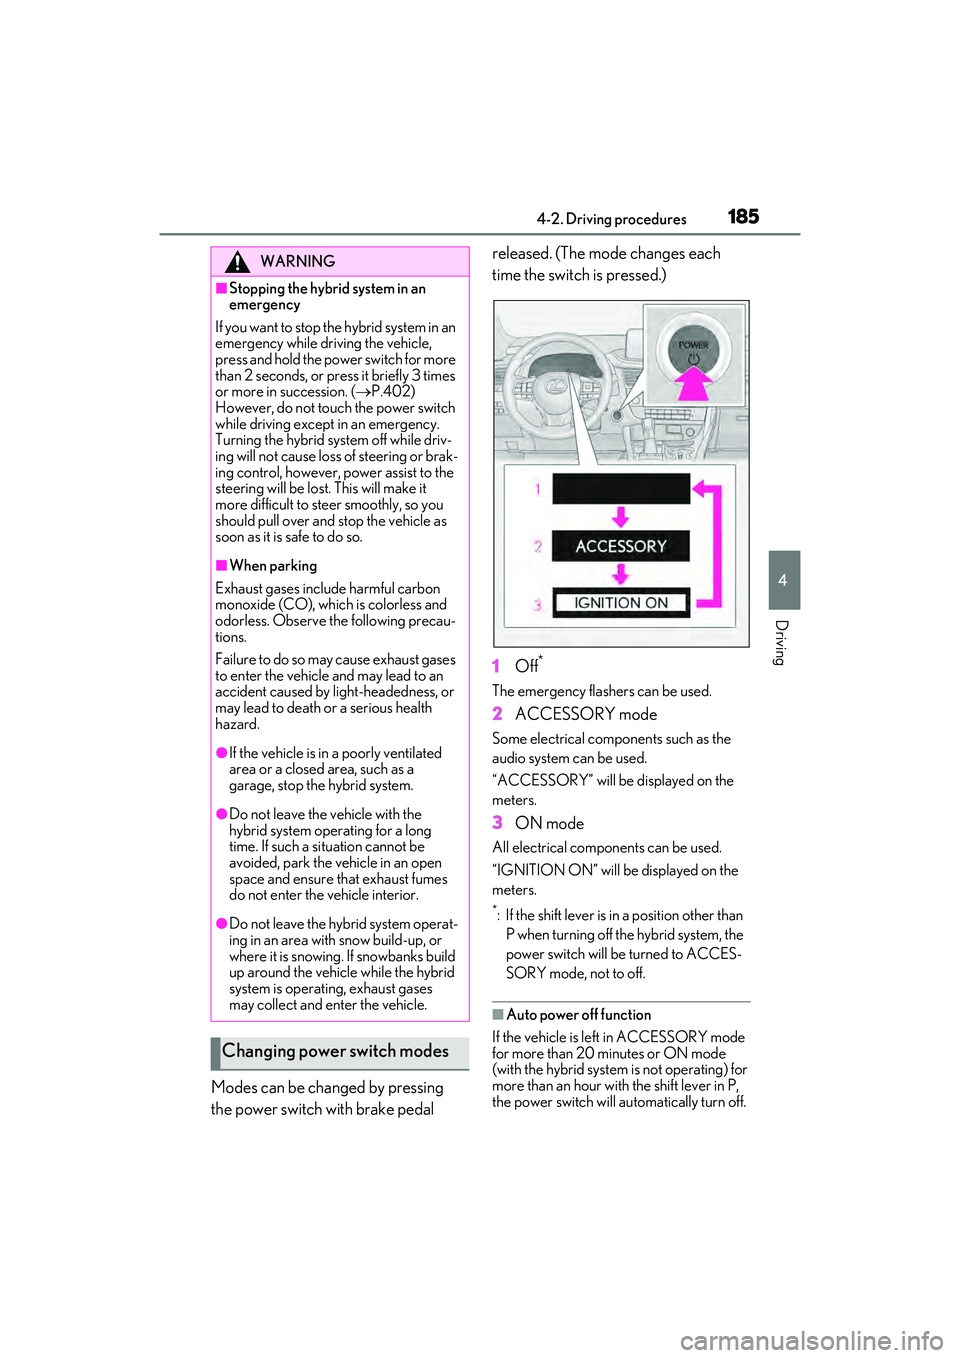
Modes can be changed by pressing
the power switch with brake pedal released. (The mode changes each
time the switch is pressed.)
1
Off
*
The emergency flashers can be used.
2ACCESSORY mode
Some electrical components such as the
audio system can be used.
“ACCESSORY” will be displayed on the
meters.
3ON mode
All electrical components can be used.
“IGNITION ON” will be displayed on the
meters.
*: If the shift lever is in a position other than
P when turning off the hybrid system, the
power switch will be turned to ACCES-
SORY mode, not to off.
■Auto power off function
If the vehicle is left in ACCESSORY mode
for more than 20 minutes or ON mode
(with the hybrid system is not operating) for
more than an hour with the shift lever in P,
the power switch will automatically turn off.
WARNING
■Stopping the hybrid system in an
emergency
If you want to stop the hybrid system in an
emergency while driving the vehicle,
press and hold the power switch for more
than 2 seconds, or press it briefly 3 times
or more in succession. ( P.402)
However, do not touch the power switch
while driving except in an emergency.
Turning the hybrid system off while driv-
ing will not cause loss of steering or brak-
ing control, however, power assist to the
steering will be lost. This will make it
more difficult to st eer smoothly, so you
should pull over and stop the vehicle as
soon as it is safe to do so.
■When parking
Exhaust gases include harmful carbon
monoxide (CO), which is colorless and
odorless. Observe the following precau-
tions.
Failure to do so may cause exhaust gases
to enter the vehicle and may lead to an
accident caused by light-headedness, or
may lead to death or a serious health
hazard.
●If the vehicle is in a poorly ventilated
area or a closed area, such as a
garage, stop the hybrid system.
●Do not leave the vehicle with the
hybrid system operating for a long
time. If such a situation cannot be
avoided, park the vehicle in an open
space and ensure that exhaust fumes
do not enter the vehicle interior.
●Do not leave the hybrid system operat-
ing in an area with snow build-up, or
where it is snowing. If snowbanks build
up around the vehicle while the hybrid
system is operating, exhaust gases
may collect and enter the vehicle.
Changing power switch modes