start stop button LEXUS RX450h 2022 User Guide
[x] Cancel search | Manufacturer: LEXUS, Model Year: 2022, Model line: RX450h, Model: LEXUS RX450h 2022Pages: 532, PDF Size: 27.62 MB
Page 199 of 532

1974-2. Driving procedures
4
Driving
play. The parking brake will then be set
automatically.
■Brake hold function
●If the brake pedal is left released for a
period of about 3 minutes after the sys-
tem has started holding the brake, the
parking brake will be set automatically. In
this case, a warning buzzer sounds and a
message is shown on the multi-informa-
tion display.
●To turn the system off while the system is
holding the brake, firmly depress the
brake pedal and press the button again.
●The brake hold function may not hold the
vehicle when the vehicle is on a steep
incline. In this situation, it may be neces-
sary for the driver to apply the brakes. A
warning buzzer will sound and the
multi-information display will inform the
driver of this situation. If a warning mes-
sage is shown on the multi-information
display, read the message and follow the
instructions.
■When the parking brake is set automati-
cally while the system is holding the
brakes
Perform any of the follo wing operations to
release the parking brake.
●Depress the accelerator pedal. (The
parking brake will not be released auto-
matically if the seat belt is not fastened.)
●Operate the parking brake switch with
the brake pedal depressed.
Make sure that the parking brake indicator
light goes off. ( P.193)
■When an inspection at your Lexus
dealer is necessary
When the brake hold standby indicator
(green) does not illuminate even when the
brake hold switch is pressed with the brake
hold system operating conditions met, the
system may be malfun ctioning. Have the
vehicle inspected at your Lexus dealer.
■If “Brake Hold Fault Depress Brake to
Deactivate Visit Your Dealer” or “Brake
Hold Malfunction Visit Your Dealer” is
displayed on the multi-information dis-
play
The system may be malfunctioning. Have
the vehicle inspected by your Lexus dealer.
■Warning messages and buzzers
Warning messages and buzzers are used to
indicate a system malfunction or to inform
the driver of the need for caution. If a warn-
ing message is shown on the multi-informa-
tion display, read the message and follow
the instructions.
■If the brake hold operated indicator
flashes
P.417
WARNING
■When the vehicle is on a steep incline
When using the brake hold system on a
steep incline exercise caution. The brake
hold function may not hold the vehicle in
such a situation.
■When stopped on a slippery road
The system cannot stop the vehicle when
the gripping ability of the tires has been
exceeded. Do not use the system when
stopped on a slippery road.
NOTICE
■When parking the vehicle
The brake hold system is not designed
for use when parking the vehicle for a
long period of time. Turning the power
switch off while the system is holding the
brake may release the brake, which
would cause the vehicle to move. When
operating the power switch, depress the
brake pedal, shift the shift lever to P and
set the parking brake.
Page 245 of 532

2434-5. Using the driving support systems
4
Driving
pedal
When constant speed control mode is
selected, your vehicle will maintain a
set speed without controlling the vehi-
cle-to-vehicle distance. Select this
mode only when vehicle-to-vehicle dis-
tance control mode does not function
correctly due to a dirty radar, etc.
1 With the cruise control off, press
and hold the “ON/ OFF” button for
1.5 seconds or more.
Immediately after the “ON/OFF” button is
pressed, the dynamic radar cruise control
indicator will come on. Afterwards, it
switches to the cruise control indicator.
Switching to constant speed control mode
is only possible when operating the lever
with the cruise control off.
2 Accelerate or decelerate, with
accelerator pedal operation, to the
desired vehicle speed (at or above
approximately 20 mph [30 km/h])
and push the lever down to set the
speed.
Cruise control “SET” indicator will come
on.
The vehicle speed at the moment the lever
is released becomes the set speed.
Adjusting the sp eed setting: P.240 Canceling and resuming the speed setting:
P.242
■Dynamic radar cruise control with
full-speed range can be set when
●The shift lever is in D.
●The desired set spee
d can be set when
the vehicle speed is approximately 20
mph (30 km/h) or more.
(However, when the vehicle speed is set
while driving at belo w approximately 20
mph [30 km/h], the se t speed will be set
to approximately 20 mph [30 km/h].)
■Accelerating after setting the vehicle
speed
The vehicle can accelerate by operating the
accelerator pedal. After accelerating, the
set speed resumes. Ho wever, during vehi-
cle-to-vehicle distance control mode, the
vehicle speed may decrease below the set
speed in order to main tain the distance to
the preceding vehicle.
■When the vehicle stops while follow-up
cruising
●Pushing the lever up while the vehicle
ahead stops will resu me follow-up cruis-
ing if the vehicle ahead starts off within
approximately 3 seco nds after the lever
is pushed up.
●If the vehicle ahead starts off within 3 sec-
onds after your vehicle stops, follow-up
cruising will be resumed.
■Automatic cancelation of vehi-
cle-to-vehicle dist ance control mode
Vehicle-to-vehicle distance control mode is
automatically canceled in the following situ-
ations.
●VSC is activated.
Selecting constant speed con-
trol mode
Page 347 of 532

3455-6. Using the other interior features
5
Interior features
blink twice, indicating that 2-way
communication is enabled.
If the indicators do not flash, perform 2 and
3 within the first 10 presses of the
HomeLink
® button after programming
has been completed.
2 Press a programmed HomeLink®
button to operate a garage door.
3 Within 1 minute of pressing the
HomeLink
® button, after the
garage door operation has
stopped, press the “Learn” or
“Smart” button on the garage door
opener motor. Within 5 seconds of
the establishment of 2-way com-
munication with the garage door
opener, both garage door opera-
tion indicators in the vehicle will
flash rapidly (green) and the light
on the garage door opener motor
will blink twice, indicating that
2-way communication is enabled.
■Reprogramming a single
HomeLink
® button
When the following procedure is per-
formed, buttons which already have
devices registered to them can be
overwritten:
1 With one hand, press and hold the
desired HomeLink
® button.
2 When the HomeLink
® indicator
starts flashing (orange), continue to
hold the HomeLink
® button and
perform “Programming
HomeLink
®” 1 (it takes 20 seconds
for the HomeLink
® indicator to
start flashing).
■Before programming
●Install a new battery in the transmitter.
●The battery side of the transmitter must
be pointed away from the HomeLink®.
Press the appropriate HomeLink®
button. The HomeLink
® indicator light
should turn on.
The status of the opening and closing
of a garage door is shown by the indi-
cators.
Opening
Closing
This function is only available if the garage
door opener motor used is a compatible
device. (To check de vice compatibility,
refer to www.homelink.com.)
The indicators can operate within
approximately 820 ft. (250 m) of the
Operating HomeLink®
ColorStatus
Orange (flashing)Currently open- ing/closing
GreenOpening/closing has completed
Red (flashing)Feedback signals
cannot be received
A
B
Page 443 of 532

4417-2. Steps to take in an emergency
7
When trouble arises
When the smart access system with
push-button start is deactivated in
customization setting, the power switch will
turn to ACCESSORY mode.
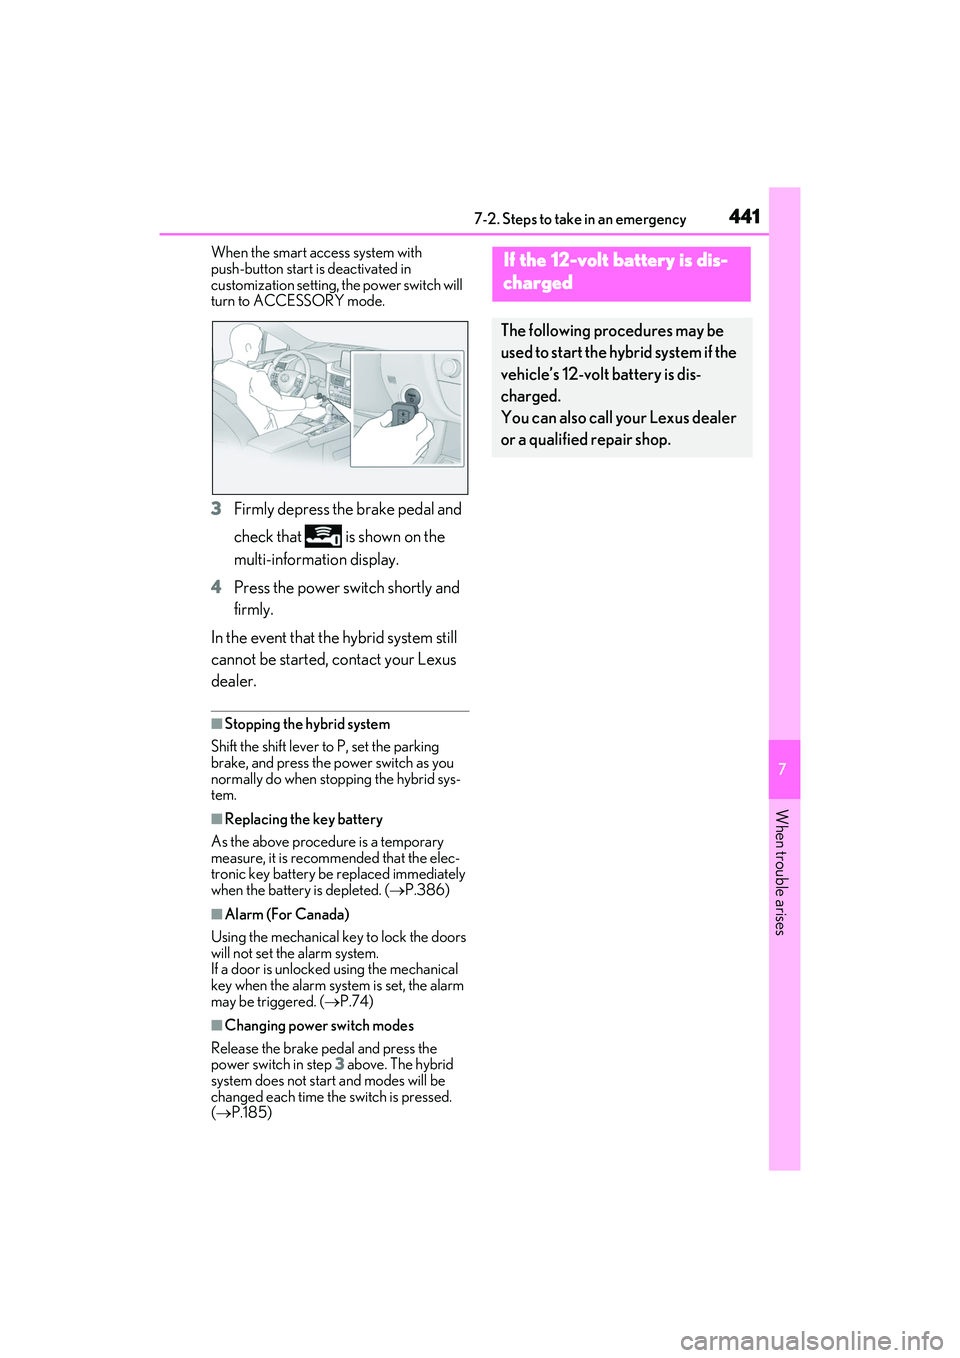
3Firmly depress the brake pedal and
check that is shown on the
multi-information display.
4 Press the power switch shortly and
firmly.
In the event that the hybrid system still
cannot be started, contact your Lexus
dealer.
■Stopping the hybrid system
Shift the shift lever to P, set the parking
brake, and press the power switch as you
normally do when stopping the hybrid sys-
tem.
■Replacing the key battery
As the above procedure is a temporary
measure, it is recommended that the elec-
tronic key battery be replaced immediately
when the battery is depleted. ( P.386)
■Alarm (For Canada)
Using the mechanical key to lock the doors
will not set the alarm system.
If a door is unlocked using the mechanical
key when the alarm system is set, the alarm
may be triggered. ( P.74)
■Changing power switch modes
Release the brake pedal and press the
power switch in step 3 above. The hybrid
system does not start and modes will be
changed each time the switch is pressed.
( P.185)
If the 12-volt battery is dis-
charged
The following procedures may be
used to start the hybrid system if the
vehicle’s 12-volt battery is dis-
charged.
You can also call your Lexus dealer
or a qualified repair shop.
Page 512 of 532

510Alphabetical Index
High voltage components ....................... 69
Hybrid system precautions ..................... 69
If the hybrid system will not start ........ 436
Overheating.................................................448
Power (ignition) switch.............................182
Regenerative braking ................................. 67
Starting the hybrid system.......................182
Hybrid System Indicator......................85, 99
Hybrid transmission..................................... 189 M mode ............................................................. 191
Paddle shift switches .........................190, 191
Hybrid vehicle driving tips ....................... 284
I
I/M test ............................................................ 360
Identification Engine ............................................................. 453
Vehicle ............................................................ 452
If your vehicle has to be stopped in an
emergency .................................................. 402
Ignition switch (power switch) .................182 Auto power off function .......................... 185
Changing the power switch modes . 185
If your vehicle has to be stopped in an
emergency ................................................ 402
Immobilizer system......... ................................73
Indicators ........................................................... 80
Initialization Items to initialize .........................................485
Maintenance ....................................356, 367
Power windows............................................. 151
Tire pressure warning system ............. 378
Inside rear view mirror ................................ 147
Instrument panel light control ................... 87
Interior lights....................................................315 Front interior light ........................................315
Rear interior light .........................................315
Intuitive parking assist.....................250, 252 Function .......................................................... 252
Warning message..................................... 254
J
JackPositioning a floor jack ............................363
Vehicle-equipped jack ...........................425
Jack handle .................................................... 425
Jam protection function Electronic sunshade ...................................157
Moon roof ...................................................... 154
Panoramic moon roof ...............................157
Power back door.......................................... 119
Power windows ............................................. 151
Rear seats ....................................................... 130
K
Keyless entrySmart access system with push-button start ................................................................. 125
Wireless remote control ......................... 107
Keys Battery-saving function.............................126
Electronic key ............................................... 106
If the electronic key does not operate properly .......................................................439
If you lose your keys ................................ 438
Key number plate ....................................... 106
Keyless entry ....................................... 107, 125
Mechanical key ............................................ 106
Power switch................................................. 182
Replacing the battery .............................. 386
Warning buzzer .......................................... 125
Wireless remote control ......................... 107
Knee airbags .................................................... 30
L
Lane Tracing Assist (LTA) Operation ...................................................... 225
Warning messages................................... 233
Language (multi-infor mation display) ... 92
LATCH anchors ............................................. 54