rear view mirror LEXUS RX450h 2022 Owner's Manual
[x] Cancel search | Manufacturer: LEXUS, Model Year: 2022, Model line: RX450h, Model: LEXUS RX450h 2022Pages: 532, PDF Size: 27.62 MB
Page 251 of 532

2494-5. Using the driving support systems
4
Driving
the farther away the vehicle will be detected, causing the outside rear view mirror indi-
cator to illuminate or flash.
■The Blind Spot Monitor is operational
when
The Blind Spot Monitor is operational when
all of the following conditions are met:
●The Blind Spot Monitor is on.
●The shift lever is in a position other than R.
●The vehicle speed is greater than approx-
imately 10 mph (16 km/h).
■The Blind Spot Monitor will detect a
vehicle when
The Blind Spot Monitor will detect a vehicle
present in the detection area in the follow-
ing situations:
●A vehicle in an adj acent lane overtakes
your vehicle.
●You overtake a vehicle in an adjacent lane
slowly.
●Another vehicle enters the detection
area when it changes lanes.
■Conditions under which the system will
not detect a vehicle
The Blind Spot Monitor is not designed to
detect the following types of vehicles and/or
objects:
●Small motorcycles, bicycles, pedestrians,
etc.*
●Vehicles traveling in the opposite direc-
tion
●Guardrails, walls, signs, parked vehicles
and similar stationary objects*
●Following vehicles th at are in the same
lane*
●Vehicles traveling 2 lanes away from your
vehicle*
●Vehicles which are being overtaken rap-
idly by your vehicle*
*
: Depending on the conditions, detection of a vehicle and/or object may occur.
■Conditions under which the system may
not function correctly
●The Blind Spot Monitor may not detect
vehicles correctly in the following situa-
tions:
• When the sensor is misaligned due to a
strong impact to the sensor or its sur-
rounding area
• When mud, snow, ice, a sticker, etc. is
covering the sensor or surrounding area
on the rear bumper
• When driving on a road surface that is
wet with standing water during bad
weather, such as heavy rain, snow, or fog
• When multiple vehicles are approaching
with only a small gap between each vehi-
cle
• When the distance between your vehicle
and a following vehicle is short
• When there is a significant difference in speed between your vehicle and the vehi-
cle that enters the detection area
• When the difference in speed between your vehicle and another vehicle is
changing
• When a vehicle enters a detection area traveling at about the same speed as your
vehicle
• As your vehicle starts from a stop, a vehi- cle remains in the detection area
• When driving up and down consecutive steep inclines, such as hills, dips in the
road, etc.
• When driving on roads with sharp bends, consecutive curves, or uneven surfaces
• When vehicle lanes are wide, or when
driving on the edge of a lane, and the
vehicle in an adjacent lane is far away
from your vehicle
• When an accessory (such as a bicycle carrier) is installed to the rear of the vehi-
cle
• When there is a significant difference in height between your vehicle and the
vehicle that enters the detection area
• Immediately after the Blind Spot Monitor
is turned on
●Instances of the Blind Spot Monitor
unnecessarily detecting a vehicle and/or
object may increase in the following situ-
Page 261 of 532

2594-5. Using the driving support systems
4
Driving
*:If equipped
Meter control switches
Turning the RCTA function on/off.
When the RCTA function is disabled, the
RCTA OFF indicator illuminates.
Outside rear view mirror indicators
When a vehicle approaching from the right
or left at the rear of the vehicle is detected,
both outside rear view mirror indicators
will flash.
Center Display
If a vehicle approaching from the right or
left at the rear of the vehicle is detected,
the RCTA icon ( P.261) for the detected
side will be displayed on the Center Dis-
play. This illustration shows an example of a
vehicle approaching from both sides of the
vehicle.
RCTA buzzer
If a vehicle approaching from the right or
left at the rear of the vehicle is detected, a
buzzer will sound.
RCTA (Rear cross traffic
alert) function
*
The RCTA function uses the BSM
rear side radar sensors installed
behind the rear bumper. This func-
tion is intended to assist the driver
in checking areas that are not easily
visible when backing up.
WARNING
■Cautions regarding the use of the
function
There is a limit to the degree of recogni-
tion accuracy and control performance
that this system can provide, do not
overly rely on this system. The driver is
always responsible for paying attention
to the vehicle’s surro undings and driving
safely. ( P.246)
■To ensure the system can operate
properly
P.246
System components
A
B
C
D
Page 262 of 532

2604-5. Using the driving support systems
Use the meter control switches to
enable/disable the RCTA function.
( P.89)
Vehicles without the Intuitive park-
ing assist
1 Press or to select .
2 Press or to select “RCTA”
and then press .
When the RCTA function is disabled, the
RCTA OFF indicator ( P.78) illuminates
on the multi-information display. (Each
time the power switch is turned off then
changed to ON mode, the RCTA function
will be enabled automatically.)
Vehicles with the Intuitive parking
assist
1 Press or to select .
2 Press or to select “PKSA”
and then press .
3 Press or to select “RCTA”
and then press .
When the RCTA function is disabled, the RCTA OFF indicator (
P.78) illuminates
on the multi-informat ion display. (Each
time the power switch is turned off then
changed to ON mode, the RCTA function
will be enabled automatically.)
■Outside rear view mirror indicator visi-
bility
In strong sunlight, the outside rear view mir-
ror indicator may be difficult to see.
■Hearing the RCTA buzzer
The RCTA buzzer may be difficult to hear
over loud noises, such as if the audio system
volume is high.
■When “Rear Cross Traffic Alert
Unavailable” is shown on the
multi-information display
W a t e r , i c e , s n o w , m u d , etc., may be attached
to the rear bumper around the sensors.
( P.247) Removing the water, ice, snow,
mud, etc., from the attached to the rear
bumper around the se nsors to return the
function to normal.
Additionally, the func tion may not operate
normally when driving in extremely hot or
cold environments.
■Rear side radar sensors
P.247
■Operation of the RCTA function
The RCTA function uses rear side radar sensors to detect vehicles approaching
from the right or left at the rear of the ve hicle and alerts the driver of the presence
of such vehicles by flashing the outside rear view mirror indicators and sounding a
buzzer.
Turning the RCTA function
on/off
NOTICE
■Before using the RCTA function
Do not place objects near the sensors.
RCTA function
Page 300 of 532

2985-3. Using the air conditioning system and defogger
5-3.Using the air conditioning system and defogger
RX450h
Left-hand side temperature control switch
Automatic mode switch
Off switch
Fan speed decreases switch
Fan speed increases switch
DUAL switch
Right-hand side temp erature control switch
Outside/recirculated air mode switch
Air flow mode switch
Rear window defogger and outside rear view mirror defoggers switch
Windshield defogger switch
Front automatic air conditioning system
Air outlets and fan speed are automatically adjusted according to the tem-
perature setting.
Press the “MENU” button on the Remote Touch, then select to display the
air conditioning control screen.
Vehicles with a 12.3-inch di splay: The air conditioning system can be displayed
and operated on the side display.
Air conditioning controls
A
B
C
D
E
F
G
H
I
J
K
Page 301 of 532
2995-3. Using the air conditioning system and defogger
5
Interior features
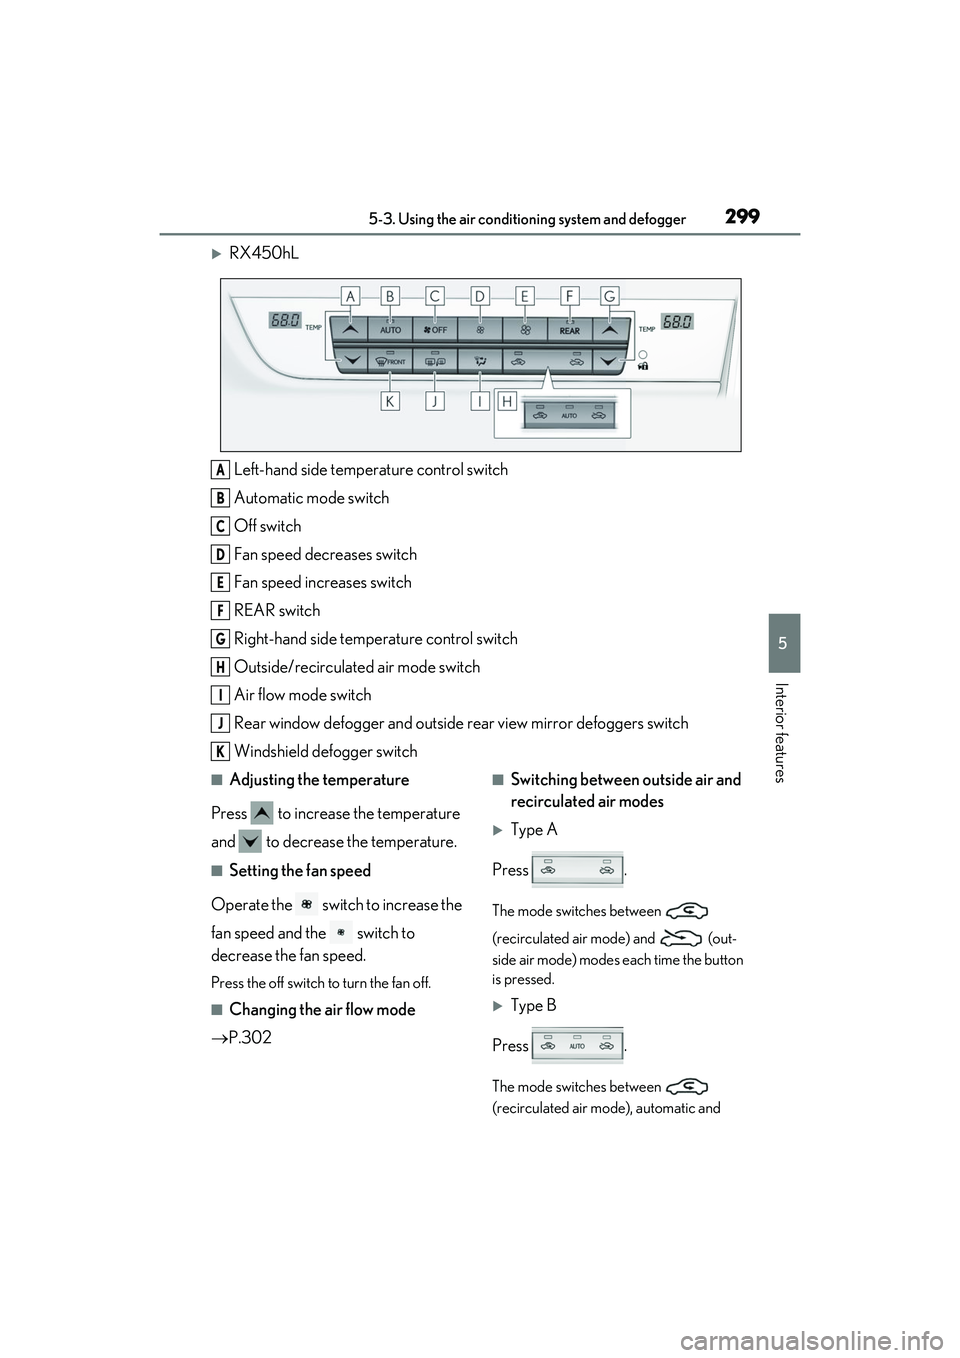
RX450hL
Left-hand side temperature control switch
Automatic mode switch
Off switch
Fan speed decreases switch
Fan speed increases switch
REAR switch
Right-hand side temp erature control switch
Outside/recirculated air mode switch
Air flow mode switch
Rear window defogger and outside rear view mirror defoggers switch
Windshield defogger switch
■Adjusting the temperature
Press to increase the temperature
and to decrease the temperature.
■Setting the fan speed
Operate the switch to increase the
fan speed and the switch to
decrease the fan speed.
Press the off switch to turn the fan off.
■Changing the air flow mode
P.302
■Switching between outside air and
recirculated air modes
Type A
Press .
The mode switches between
(recirculated air mode) and (out-
side air mode) modes each time the button
is pressed.
Type B
Press .
The mode switches between
(recirculated air mode), automatic and
A
B
C
D
E
F
G
H
I
J
K
Page 302 of 532
3005-3. Using the air conditioning system and defogger
(outside air mode) modes each
time the button is pressed.
When the system is switched to automatic
mode, the air conditioni ng system operates
automatically.
■Defogging the windshield
Defoggers are used to defog the wind-
shield and front side windows.
Press the windshield defogger switch.
Set the outside/recirc ulated air mode but-
ton to outside air mode if the recirculated
air mode is used. (It may switch automati-
cally.)
To defog the windshield and the side win-
dows early, turn the air flow and tempera-
ture up.
To return to the previous mode, press the
windshield defogger switch again when the
windshield is defogged.
■Defogging the rear window and
outside rear view mirrors
Defoggers are used to defog the rear
window, and to remove raindrops, dew
and frost from the outside rear view
mirrors.
Press the rear window and outside rear
view mirror defoggers switch.
The defoggers will auto matically turn off
after a period of time.
■Windshield wiper de-icer (if
equipped)
P.305
■When the outside temperature exceeds
75°F (24°C) and the air conditioning
system is on
●In order to reduce the air conditioning
power consumption, the air conditioning
system may switch to recirculated air mode automatically. This may also
reduce fuel consumption.
●Recirculated air mode is selected as a
default mode when the power switch is
turned to ON mode.
●It is possible to switch to outside air mode
at any time by pressing the outside/recir-
culated air mode switch.
■Fogging up of the windows
The windows will easily fog up when the
humidity in the vehicle is high. Selecting
“A/C” on will dehumidify the air from the
outlets and defog the windshield effectively.
●If you turn “A/C” off, the windows may fog
up more easily.
●The windows may fog up if the recircu-
lated air mode is used.
■When driving on dusty roads
Close all windows. If dust thrown up by the
vehicle is still drawn into the vehicle after
closing the windows, it is recommended
that the air intake mode be set to outside air
mode and the fan speed to any setting
except off.
■Outside/recirculated air mode
●Setting to the recirculated air mode tem-
porarily is recommended in preventing
dirty air from entering the vehicle interior
and helping to cool the vehicle when the
outside air temperature is high.
●Outside/recirculated air mode may auto-
matically switch depending on the tem-
perature setting or the inside
temperature.
■Registering air conditioning settings to
electronic keys (vehicles with driving
position memory)
●Unlocking the vehicle using an electronic
key and turning the power switch to ON
mode will recall that key’s registered air
conditioning settings.
●When the power switch is turned off, the
current air conditioning settings will auto-
matically be registered to the electronic
key that was used to unlock the vehicle.
●The system may not operate correctly if
more than one electronic key is in the
vicinity or if the smart access system with
Page 304 of 532
3025-3. Using the air conditioning system and defogger
■Main control screen
Using the touchpad of the Remote
Touch, select the button on the screen.
This system can also be operated by
the touch screen.
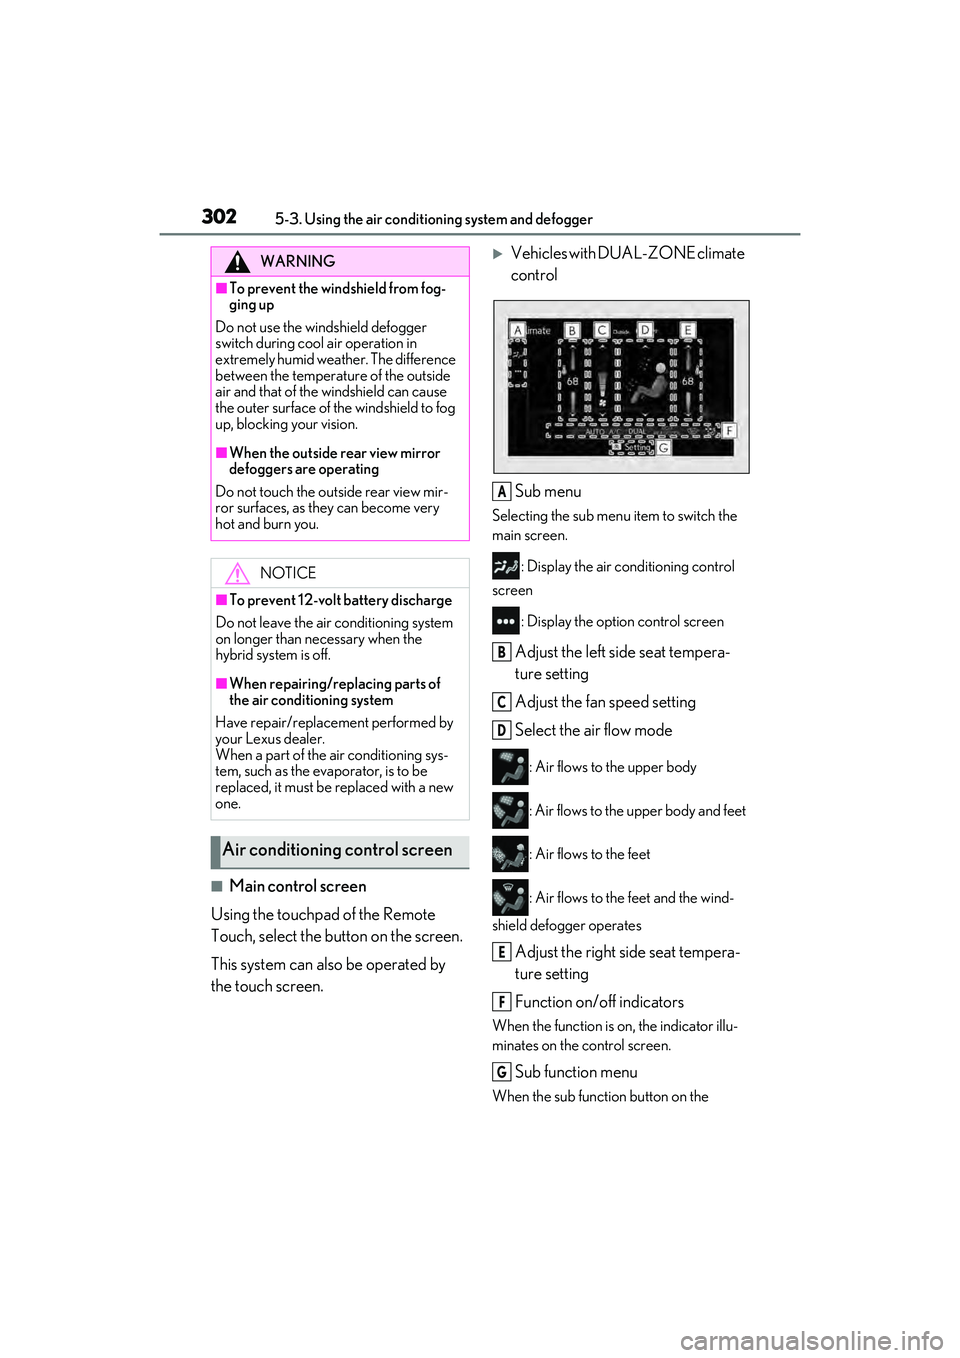
Vehicles with DUAL-ZONE climate
control
Sub menu
Selecting the sub menu item to switch the
main screen.
: Display the air conditioning control
screen
: Display the option control screen
Adjust the left side seat tempera-
ture setting
Adjust the fan speed setting
Select the air flow mode
: Air flows to the upper body
: Air flows to the upper body and feet
: Air flows to the feet
: Air flows to the feet and the wind-
shield defogger operates
Adjust the right side seat tempera-
ture setting
Function on/off indicators
When the function is on, the indicator illu-
minates on the control screen.
Sub function menu
When the sub function button on the
WARNING
■To prevent the windshield from fog-
ging up
Do not use the windshield defogger
switch during cool air operation in
extremely humid weather. The difference
between the temperature of the outside
air and that of the windshield can cause
the outer surface of the windshield to fog
up, blocking your vision.
■When the outside rear view mirror
defoggers are operating
Do not touch the outside rear view mir-
ror surfaces, as they can become very
hot and burn you.
NOTICE
■To prevent 12-vol t battery discharge
Do not leave the air conditioning system
on longer than ne cessary when the
hybrid system is off.
■When repairing/replacing parts of
the air conditioning system
Have repair/replace ment performed by
your Lexus dealer.
When a part of the air conditioning sys-
tem, such as the ev aporator, is to be
replaced, it must be replaced with a new
one.
Air conditioning control screen
A
B
C
D
E
F
G
Page 345 of 532
3435-6. Using the other interior features
5
Interior features
■Programming HomeLink®
Steps 1 through 3 must be performed
within 60 seconds, otherwise the indi-
cator light will stop flashing and pro-
gramming will not be able to be
completed.
1 Press and release the HomeLink
®
button you want to program and
check that the HomeLink
® indica-
tor light flashes (orange).
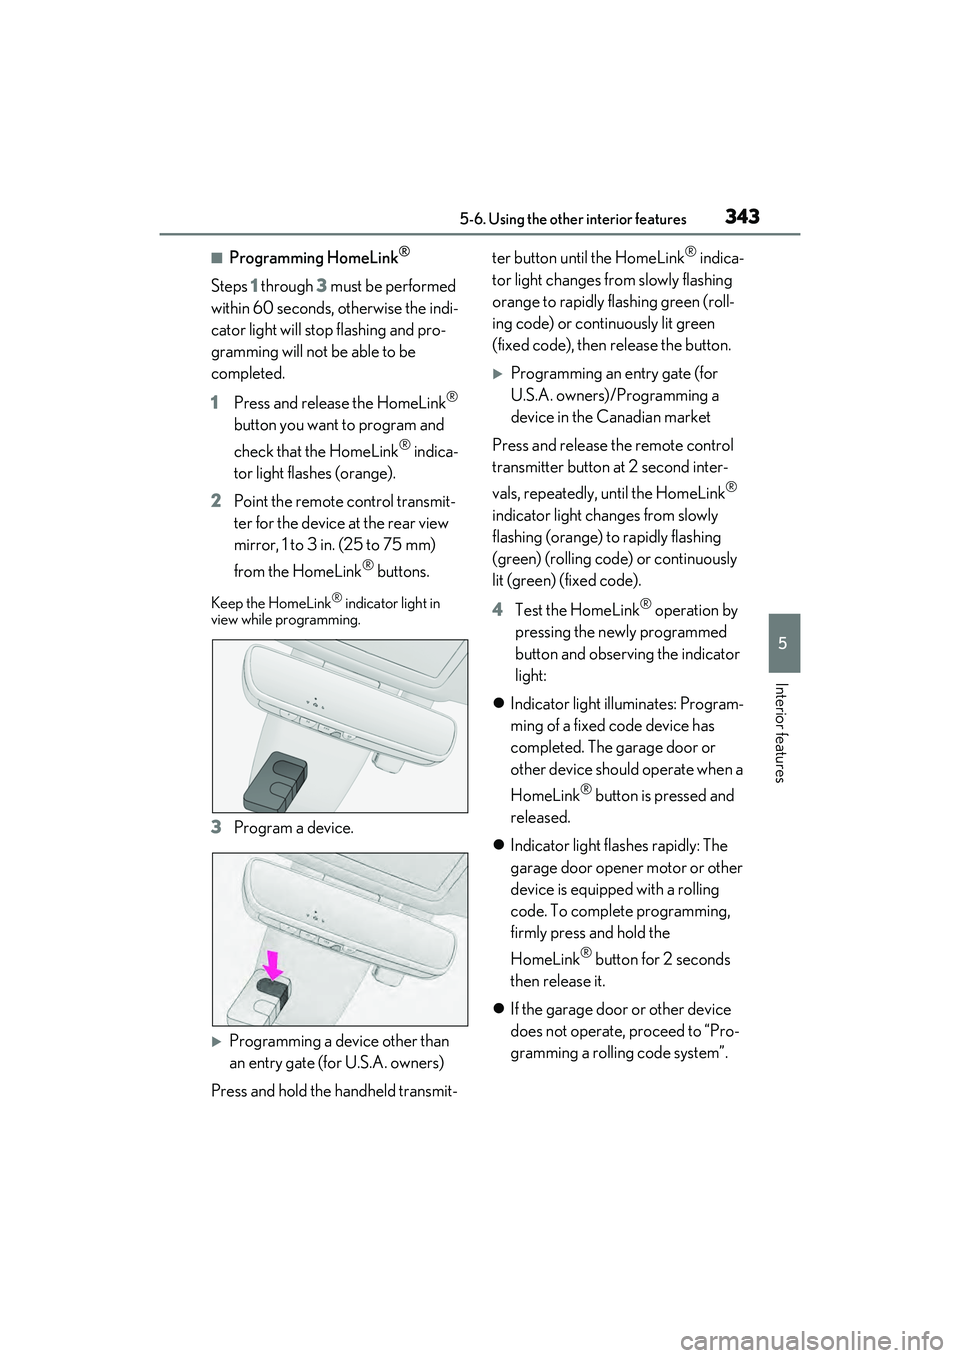
2 Point the remote control transmit-
ter for the device at the rear view
mirror, 1 to 3 in. (25 to 75 mm)
from the HomeLink
® buttons.
Keep the HomeLink® indicator light in
view while programming.
3 Program a device.
Programming a device other than
an entry gate (for U.S.A. owners)
Press and hold the handheld transmit- ter button until the HomeLink
® indica-
tor light changes from slowly flashing
orange to rapidly flashing green (roll-
ing code) or continuously lit green
(fixed code), then release the button.
Programming an entry gate (for
U.S.A. owners)/Programming a
device in the Canadian market
Press and release the remote control
transmitter button at 2 second inter-
vals, repeatedly, until the HomeLink
®
indicator light changes from slowly
flashing (orange) to rapidly flashing
(green) (rolling code) or continuously
lit (green) (fixed code).
4 Test the HomeLink
® operation by
pressing the newly programmed
button and observing the indicator
light:
Indicator light illuminates: Program-
ming of a fixed code device has
completed. The garage door or
other device should operate when a
HomeLink
® button is pressed and
released.
Indicator light flashes rapidly: The
garage door opener motor or other
device is equipped with a rolling
code. To complete programming,
firmly press and hold the
HomeLink
® button for 2 seconds
then release it.
If the garage door or other device
does not operate, proceed to “Pro-
gramming a rolling code system”.
Page 348 of 532
3465-6. Using the other interior features
garage door. However, if there are
obstructions between the garage door
and the vehicle, such as houses and
trees, feedback signals from the
garage door may not be received.
To recall the previous door operation
status, press and release either
HomeLink
® buttons and
or and simulta-
neously. The last recorded status will
be displayed for 3 seconds.
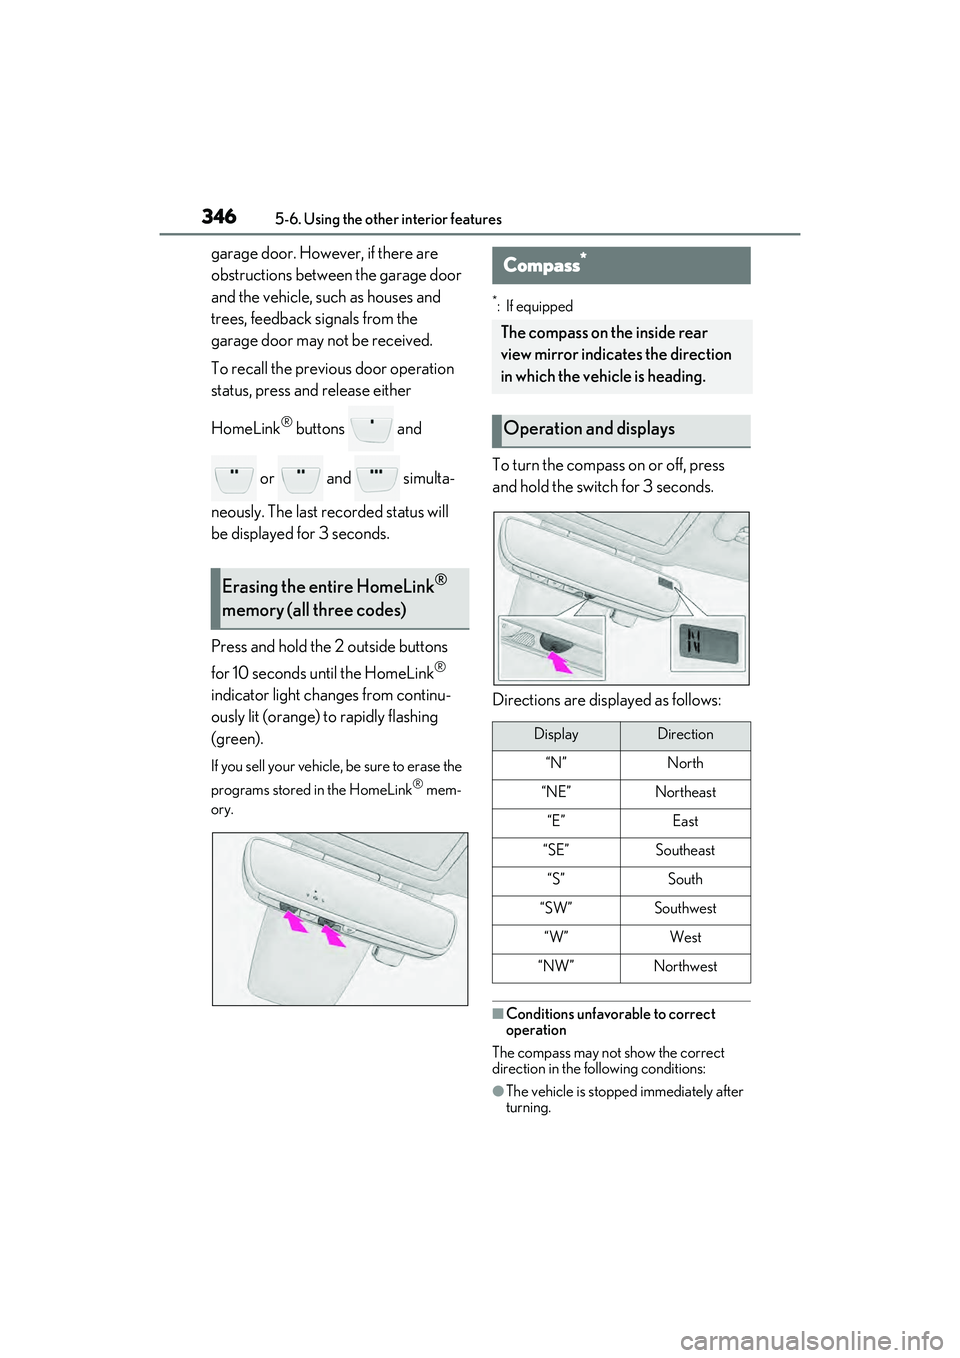
Press and hold the 2 outside buttons
for 10 seconds until the HomeLink
®
indicator light changes from continu-
ously lit (orange) to rapidly flashing
(green).
If you sell your vehicle, be sure to erase the
programs stored in the HomeLink
® mem-
ory.
*: If equipped
To turn the compass on or off, press
and hold the switch for 3 seconds.
Directions are displayed as follows:
■Conditions unfavorable to correct
operation
The compass may not show the correct
direction in the fo llowing conditions:
●The vehicle is stopped immediately after
turning.
Erasing the entire HomeLink®
memory (all three codes)
Compass*
The compass on the inside rear
view mirror indicates the direction
in which the vehicle is heading.
Operation and displays
DisplayDirection
“N”North
“NE”Northeast
“E”East
“SE”Southeast
“S”South
“SW”Southwest
“W”West
“NW”Northwest
Page 349 of 532
3475-6. Using the other interior features
5
Interior features
●The vehicle is on an inclined surface.
●The vehicle is in a place where the earth’s
magnetic field is subject to interference
by artificial magnetic fields (under-
ground car park/parking lot, under a
steel tower, between buildings, roof car
park/parking lot, near an intersection,
near a large vehicle, etc.).
●The vehicle has become magnetized.
(There is a magnet or metal object near
the inside rear view mirror.)
●The battery has been disconnected.
●A door is open.
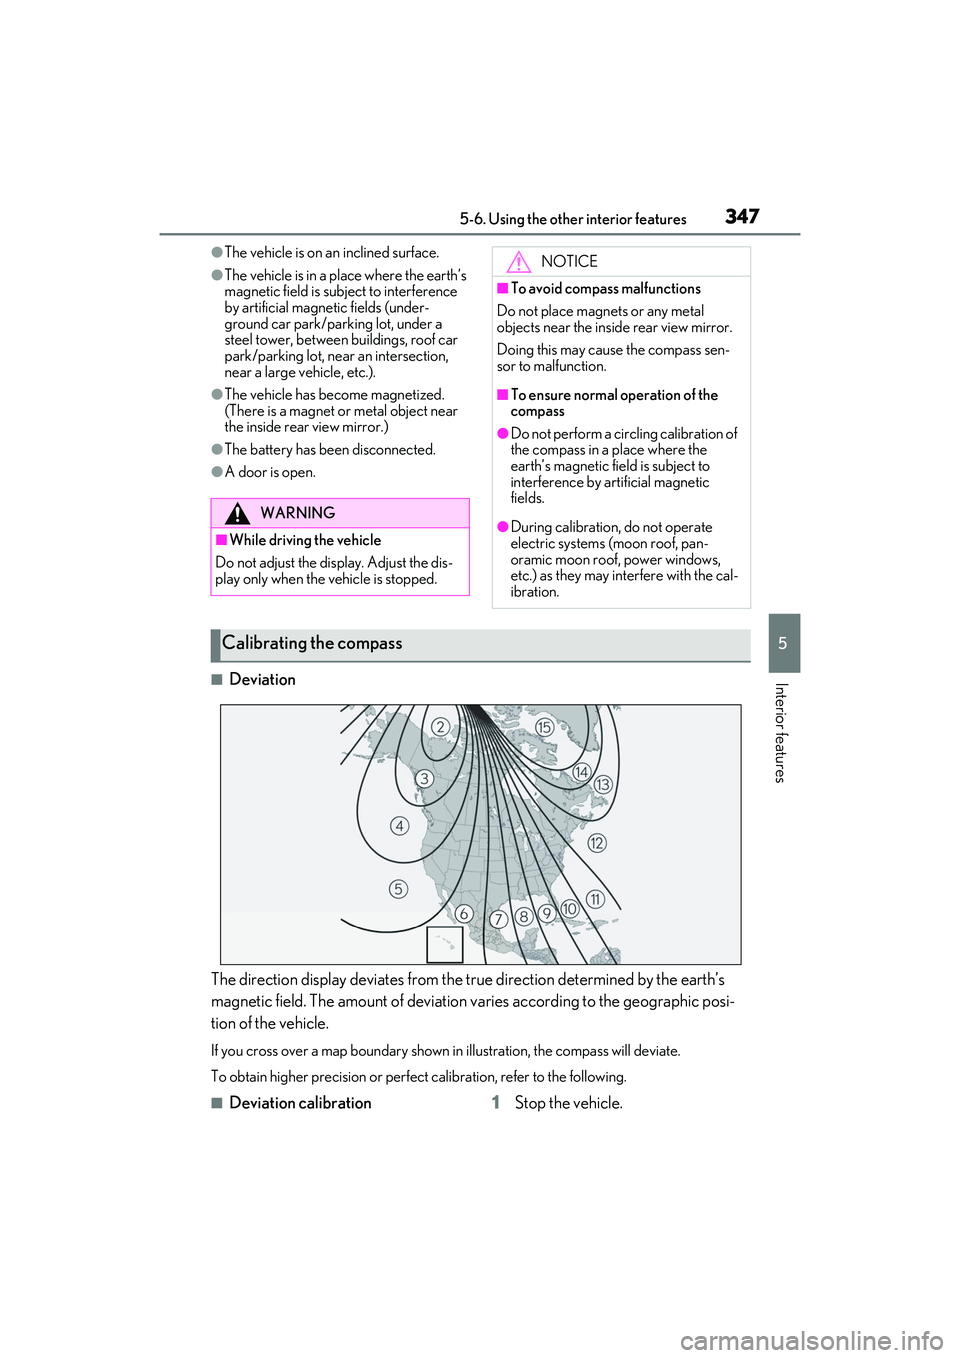
■Deviation
The direction display deviates from the tr ue direction determined by the earth’s
magnetic field. The amount of deviation varies according to the geographic posi-
tion of the vehicle.
If you cross over a map boundary shown in illustration, the compass will deviate.
To obtain higher precision or perfec t calibration, refer to the following.
■Deviation calibration 1Stop the vehicle.
WARNING
■While driving the vehicle
Do not adjust the display. Adjust the dis-
play only when the vehicle is stopped.
NOTICE
■To avoid compass malfunctions
Do not place magnets or any metal
objects near the inside rear view mirror.
Doing this may cause the compass sen-
sor to malfunction.
■To ensure normal operation of the
compass
●Do not perform a circling calibration of
the compass in a place where the
earth’s magnetic field is subject to
interference by artificial magnetic
fields.
●During calibration, do not operate
electric systems (moon roof, pan-
oramic moon roof, power windows,
etc.) as they may interfere with the cal-
ibration.
Calibrating the compass