power steering LEXUS RX450h 2022 Owners Manual
[x] Cancel search | Manufacturer: LEXUS, Model Year: 2022, Model line: RX450h, Model: LEXUS RX450h 2022Pages: 532, PDF Size: 27.62 MB
Page 4 of 532
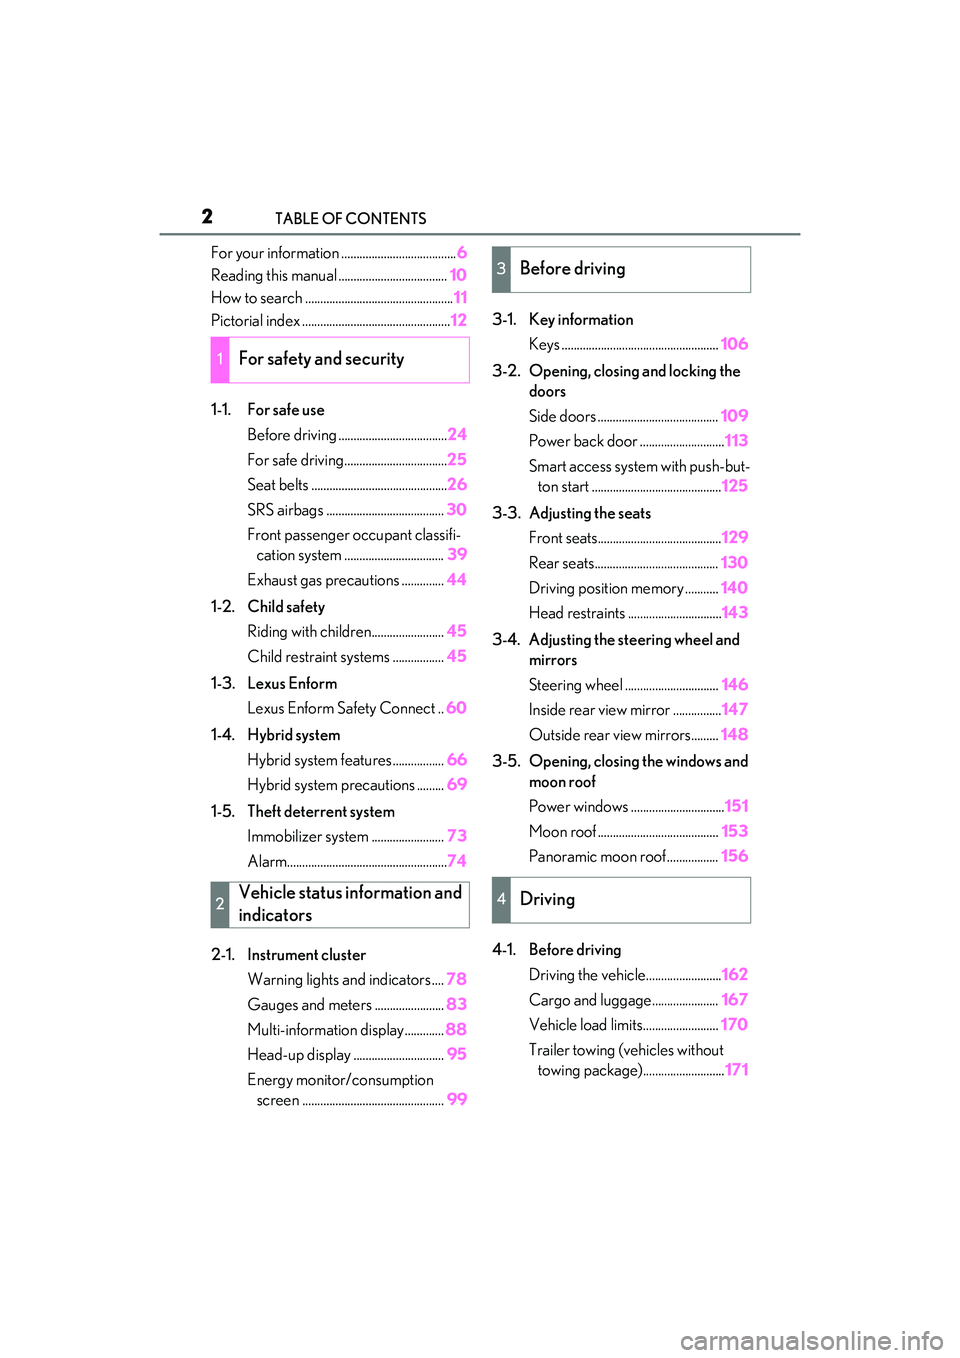
2TABLE OF CONTENTS
For your information ......................................6
Reading this manual .................................... 10
How to search ................................................. 11
Pictorial index ................................................. 12
1-1. For safe use Before driving .................................... 24
For safe driving.................................. 25
Seat belts ............................................. 26
SRS airbags ....................................... 30
Front passenger occupant classifi- cation system ................................. 39
Exhaust gas precautions .............. 44
1-2. Child safety Riding with children........................ 45
Child restraint systems ................. 45
1-3. Lexus Enform Lexus Enform Safety Connect .. 60
1-4. Hybrid system Hybrid system features ................. 66
Hybrid system precautions ......... 69
1-5. Theft deterrent system Immobilizer sy stem ........................ 73
Alarm..................................................... 74
2-1. Instrument cluster Warning lights and indicators .... 78
Gauges and meters ....................... 83
Multi-information display............. 88
Head-up display .............................. 95
Energy monitor/consumption screen ............................................... 993-1. Key information
Keys .................................................... 106
3-2. Opening, closing and locking the doors
Side doors ........................................ 109
Power back door ............................ 113
Smart access system with push-but- ton start ........................................... 125
3-3. Adjusting the seats Front seats......................................... 129
Rear seats......................................... 130
Driving position memory ........... 140
Head restraints ............................... 143
3-4. Adjusting the steering wheel and mirrors
Steering wheel ............................... 146
Inside rear view mirror ................ 147
Outside rear view mirrors......... 148
3-5. Opening, closing the windows and moon roof
Power windows ............................... 151
Moon roof ........................................ 153
Panoramic moon roof ................. 156
4-1. Before driving Driving the vehicle......................... 162
Cargo and luggage...................... 167
Vehicle load limits......................... 170
Trailer towing (vehicles without towing package)........................... 171
1For safety and security
2Vehicle status information and
indicators
3Before driving
4Driving
Page 5 of 532
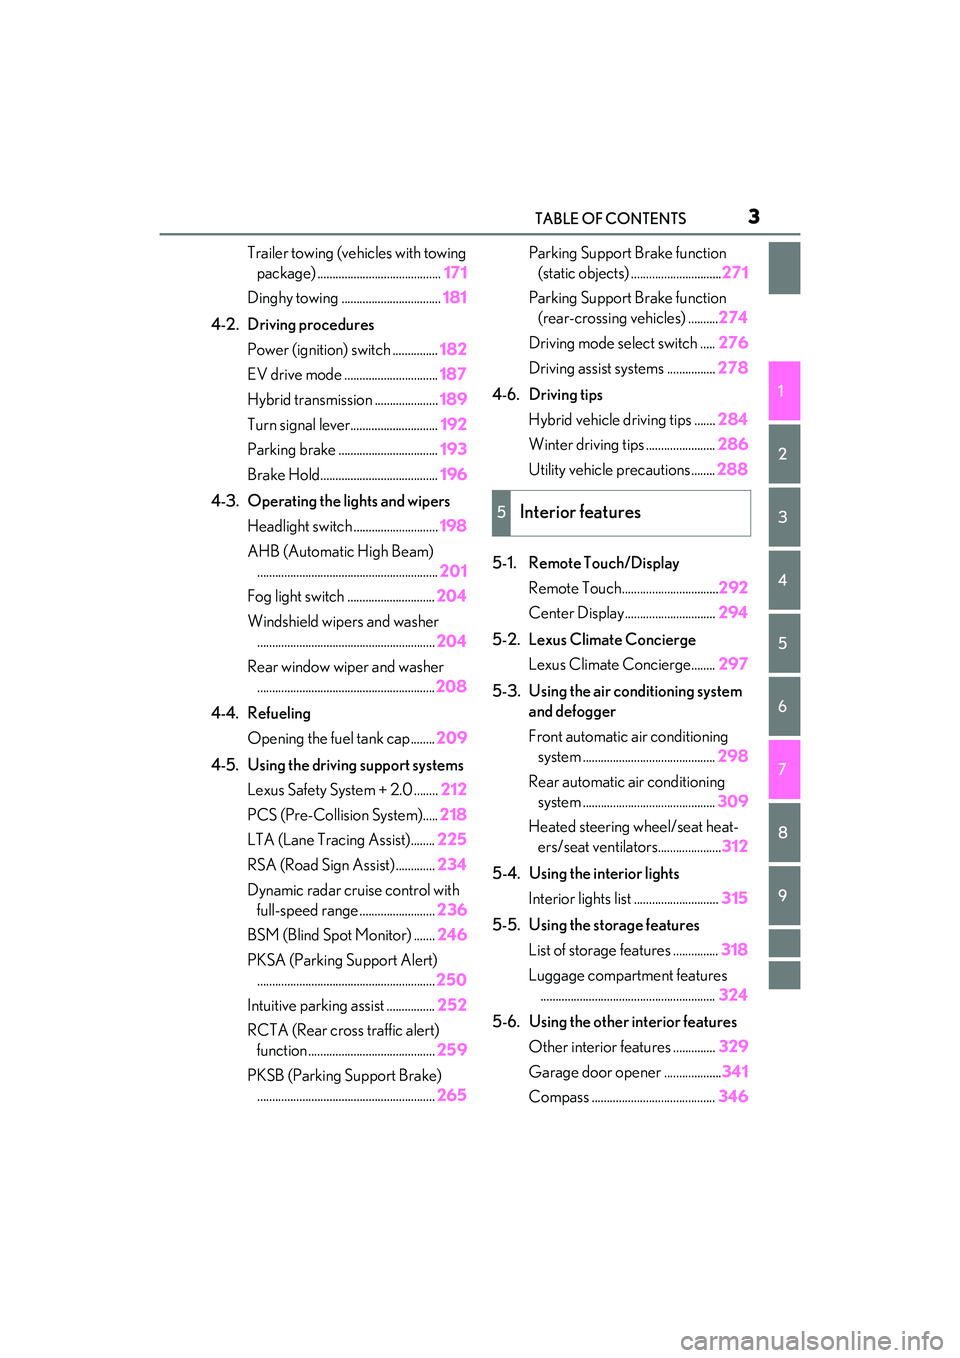
3TABLE OF CONTENTS
1
2
3
4
5
6
7
8
9
Trailer towing (vehicles with towing package) ......................................... 171
Dinghy towing ................................. 181
4-2. Driving procedures Power (ignition) switch ............... 182
EV drive mode ............................... 187
Hybrid transmission ..................... 189
Turn signal lever............................. 192
Parking brake ................................. 193
Brake Hold....................................... 196
4-3. Operating the lights and wipers Headlight switch ............................ 198
AHB (Automatic High Beam) ............................................................ 201
Fog light switch ............................. 204
Windshield wipers and washer ........................................................... 204
Rear window wiper and washer ........................................................... 208
4-4. Refueling Opening the fuel tank cap........ 209
4-5. Using the driving support systems Lexus Safety System + 2.0 ........ 212
PCS (Pre-Collision System)..... 218
LTA (Lane Tracing Assist)........ 225
RSA (Road Sign Assist) ............. 234
Dynamic radar crui se control with
full-speed range ......................... 236
BSM (Blind Spot Monitor) ....... 246
PKSA (Parking Support Alert) ........................................................... 250
Intuitive parking assist ................ 252
RCTA (Rear cross traffic alert) function .......................................... 259
PKSB (Parking Support Brake) ........................................................... 265Parking Support Brake function
(static objects) .............................. 271
Parking Support Brake function (rear-crossing vehicles) .......... 274
Driving mode select switch ..... 276
Driving assist systems ................ 278
4-6. Driving tips Hybrid vehicle driving tips ....... 284
Winter driving tips ....................... 286
Utility vehicle precautions........ 288
5-1. Remote Touch/Display Remote Touch................................ 292
Center Display.............................. 294
5-2. Lexus Climate Concierge Lexus Climate Concierge........ 297
5-3. Using the air conditioning system and defogger
Front automatic air conditioning system ............................................ 298
Rear automatic air conditioning system ............................................ 309
Heated steering wheel/seat heat- ers/seat ventilators..................... 312
5-4. Using the interior lights Interior lights list ............................ 315
5-5. Using the storage features List of storage features ............... 318
Luggage compartment features .......................................................... 324
5-6. Using the other interior features Other interior features .............. 329
Garage door opener ................... 341
Compass ......................................... 346
5Interior features
Page 18 of 532

16Pictorial index
■Switches
Automatic High Beam switch..............................................................................P.201
Power back door switch......................................................................................... P.115
HUD (Head-up display) switch
*1.......................................................................... P.96
Fuel filler door opener switch..............................................................................P.210
Instrument panel light control switches .............................................................P.87
“ODO TRIP” switch .................................................................................................P.87
Camera switch
*1, 2
Heated steering wheel switch*1..........................................................................P.312
*1: If equipped
*2: Refer to “NAVIGATION AND MULT IMEDIA SYSTEM OWNER’S MANUAL”.
A
B
C
D
E
F
G
H
Page 81 of 532
792-1. Instrument cluster
2
Vehicle status information and indicators
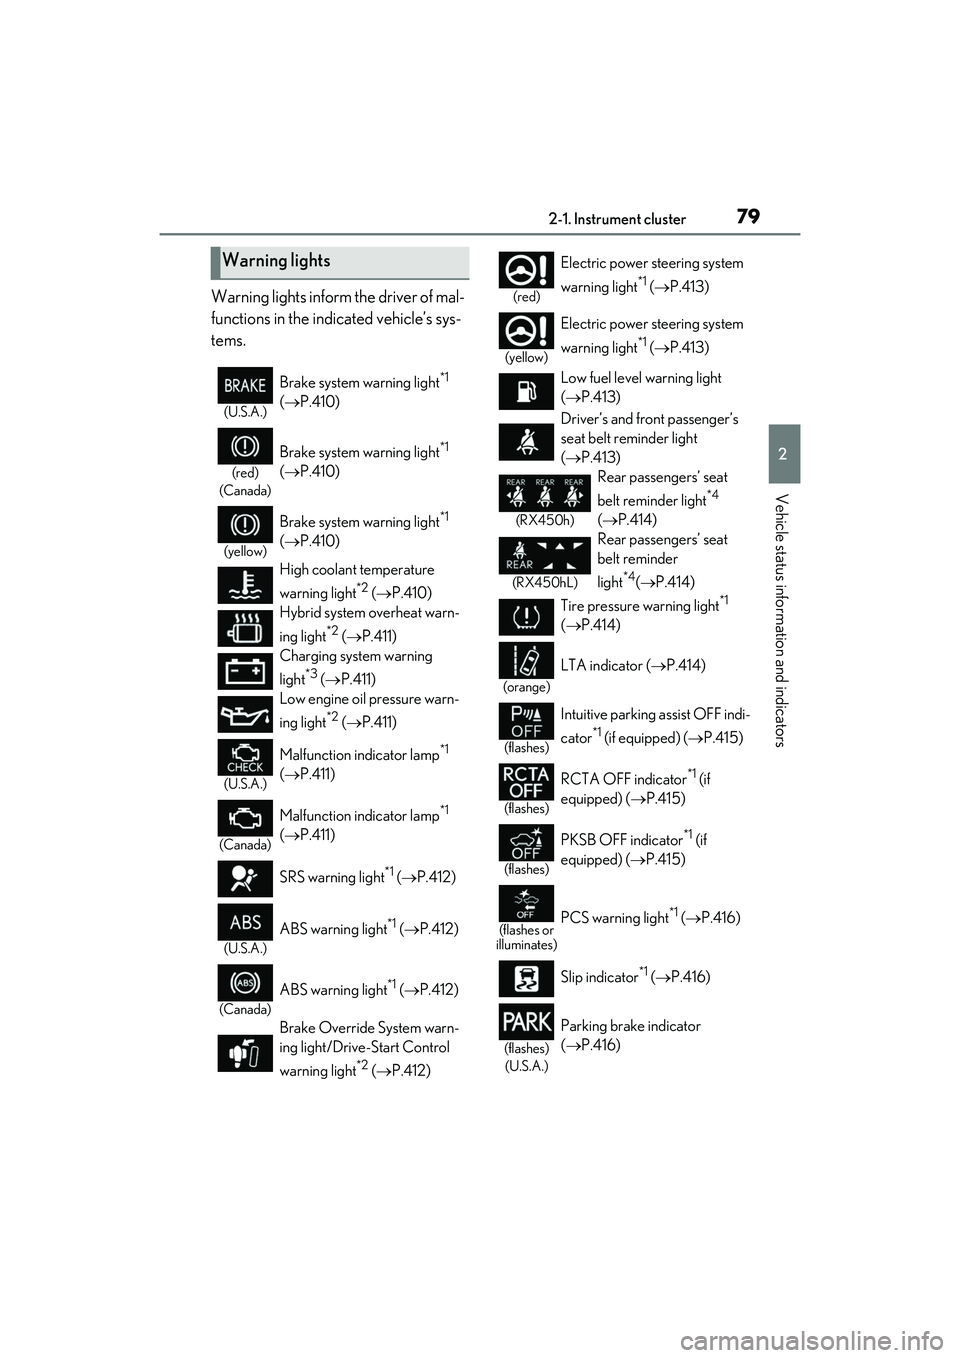
Warning lights inform the driver of mal-
functions in the indicated vehicle’s sys-
tems.
Warning lights
(U.S.A.)
Brake system warning light*1
( P.410)
(red)
(Canada)
Brake system warning light*1
( P.410)
(yellow)
Brake system warning light*1
( P.410)
High coolant temperature
warning light
*2 ( P.410)
Hybrid system overheat warn-
ing light
*2 ( P.411)
Charging system warning
light
*3 ( P.411)
Low engine oil pressure warn-
ing light
*2 ( P.411)
(U.S.A.)
Malfunction indicator lamp*1
( P.411)
(Canada)
Malfunction indicator lamp*1
( P.411)
SRS warning light
*1 ( P.412)
(U.S.A.)
ABS warning light*1 ( P.412)
(Canada)
ABS warning light*1 ( P.412)
Brake Override System warn-
ing light/Drive-Start Control
warning light
*2 ( P.412)
(red)
Electric power steering system
warning light
*1 (P.413)
(yellow)
Electric power steering system
warning light
*1 (P.413)
Low fuel level warning light
( P.413)
Driver’s and front passenger’s
seat belt reminder light
( P.413)
(RX450h)
Rear passengers’ seat
belt reminder light
*4
( P.414)
(RX450hL)
Rear passengers’ seat
belt reminder
light
*4(P.414)
Tire pressure warning light
*1
( P.414)
(orange)
LTA indicator ( P.414)
(flashes)
Intuitive parking assist OFF indi-
cator
*1 (if equipped) (P.415)
(flashes)
RCTA OFF indicator*1 (if
equipped) ( P.415)
(flashes)
PKSB OFF indicator*1 (if
equipped) ( P.415)
(flashes or
illuminates)PCS warning light*1 ( P.416)
Slip indicator
*1 ( P.416)
(flashes)
(U.S.A.)
Parking brake indicator
( P.416)
Page 93 of 532
912-1. Instrument cluster
2
Vehicle status information and indicators
*4: This distance is computed based on your average fuel consumption. As a
result, the actual distance that can be
driven may differ from that displayed.
■Energy monitor
P.99
■AWD Control
Displays the driving force applied to
each wheel using segments.
The greater the number of segments
displayed, the greater the driving force
applied.
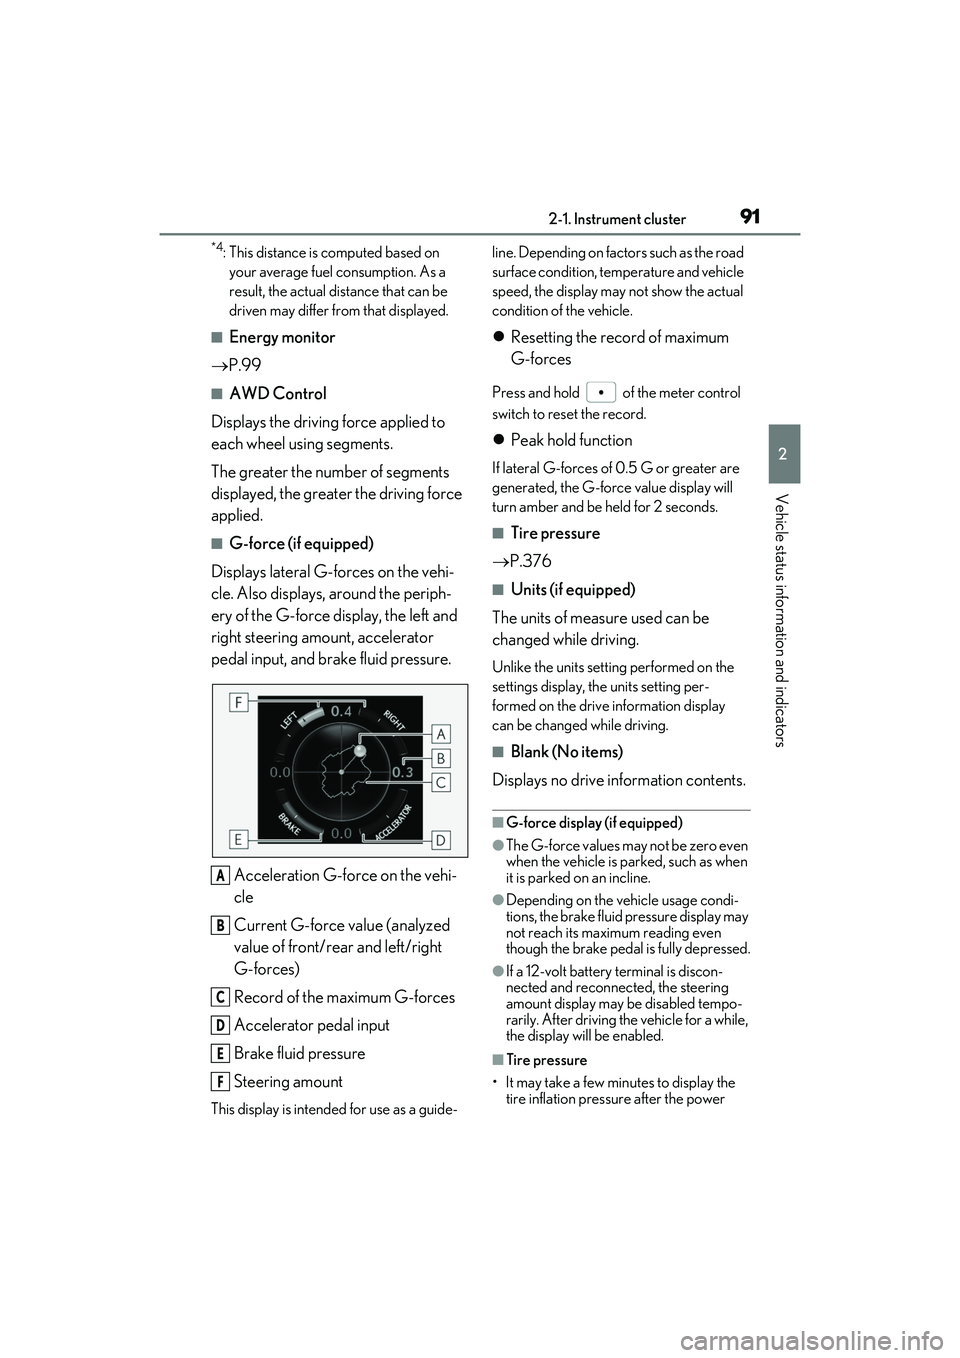
■G-force (if equipped)
Displays lateral G-forces on the vehi-
cle. Also displays, around the periph-
ery of the G-force display, the left and
right steering amount, accelerator
pedal input, and brake fluid pressure.
Acceleration G-force on the vehi-
cle
Current G-force value (analyzed
value of front/rear and left/right
G-forces)
Record of the maximum G-forces
Accelerator pedal input
Brake fluid pressure
Steering amount
This display is intended for use as a guide- line. Depending on fact
ors such as the road
surface condition, temperature and vehicle
speed, the display may not show the actual
condition of the vehicle.
Resetting the record of maximum
G-forces
Press and hold of the meter control
switch to reset the record.
Peak hold function
If lateral G-forces of 0.5 G or greater are
generated, the G-forc e value display will
turn amber and be held for 2 seconds.
■Tire pressure
P.376
■Units (if equipped)
The units of measure used can be
changed while driving.
Unlike the units setting performed on the
settings display, th e units setting per-
formed on the drive information display
can be changed while driving.
■Blank (No items)
Displays no drive information contents.
■G-force display (if equipped)
●The G-force values may not be zero even
when the vehicle is parked, such as when
it is parked on an incline.
●Depending on the vehicle usage condi-
tions, the brake fluid pressure display may
not reach its maximum reading even
though the brake pedal is fully depressed.
●If a 12-volt battery terminal is discon-
nected and reconnect ed, the steering
amount display may be disabled tempo-
rarily. After driving th e vehicle for a while,
the display will be enabled.
■Tire pressure
• It may take a few minutes to display the tire inflation pressu re after the power
A
B
C
D
E
F
Page 107 of 532
105
3
3
Before driving
Before driving
.3-1. Key informationKeys ................................................. 106
3-2. Opening, closing and locking the doors
Side doors ..................................... 109
Power back door......................... 113
Smart access system with push-button start ..................... 125
3-3. Adjusting the seats Front seats ..................................... 129
Rear seats ...................................... 130
Driving position memory ........ 140
Head restraints............................ 143
3-4. Adjusting the steering wheel and mirrors
Steering wheel............................. 146
Inside rear view mirror............. 147
Outside rear view mirrors ...... 148
3-5. Opening, closing the windows and moon roof
Power windows............................ 151
Moon roof ..................................... 153
Panoramic moon roof .............. 156
Page 131 of 532
1293-3. Adjusting the seats
3
Before driving
3-3.Adjusting the seats
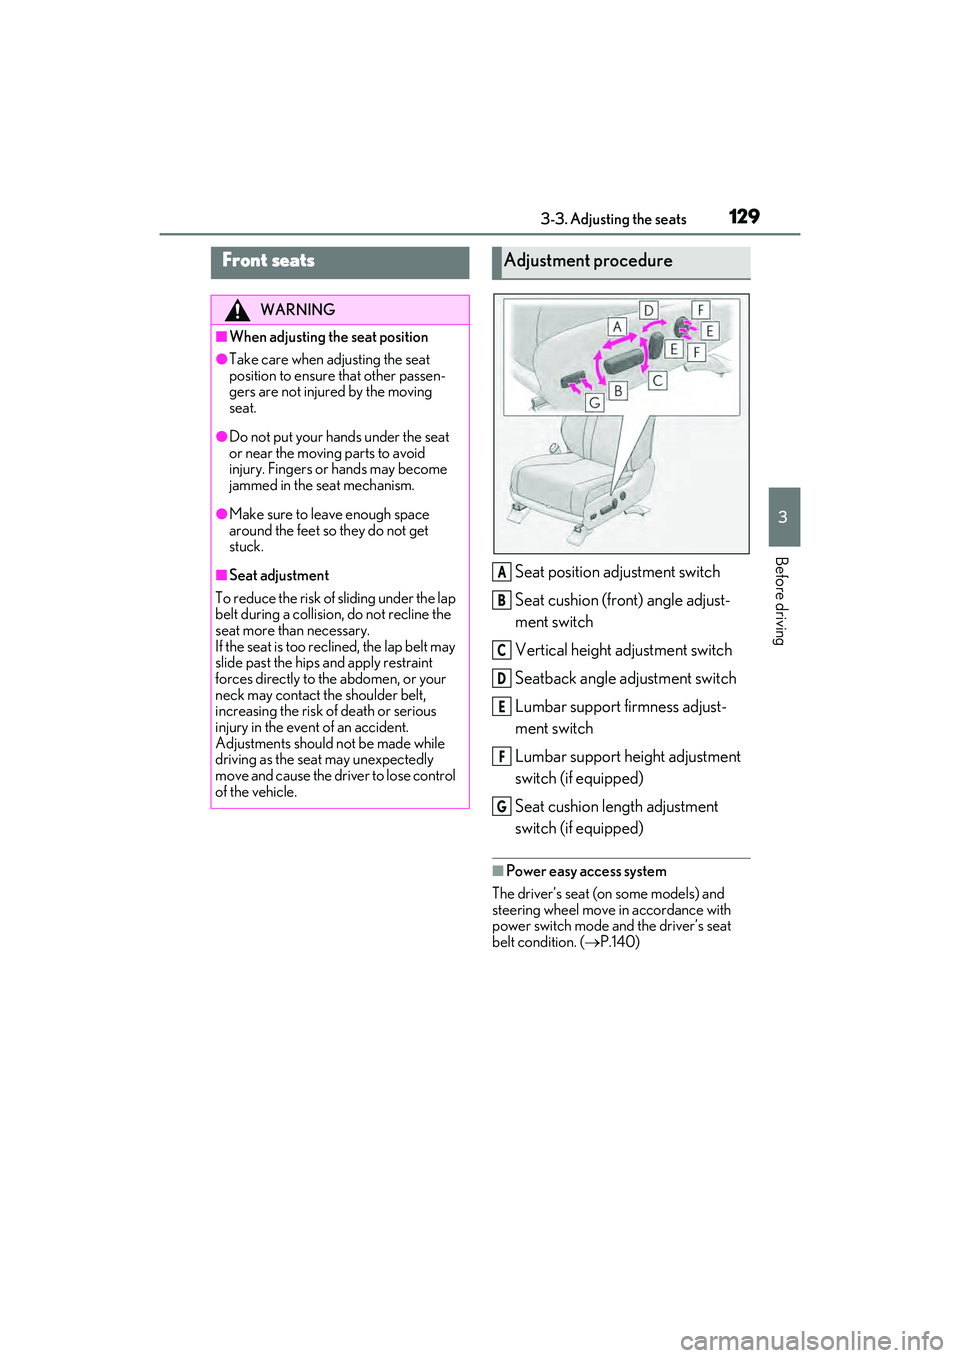
Seat position adjustment switch
Seat cushion (front) angle adjust-
ment switch
Vertical height adjustment switch
Seatback angle adjustment switch
Lumbar support firmness adjust-
ment switch
Lumbar support height adjustment
switch (if equipped)
Seat cushion length adjustment
switch (if equipped)
■Power easy access system
The driver’s seat (on some models) and
steering wheel move in accordance with
power switch mode and the driver’s seat
belt condition. ( P.140)
Front seats
WARNING
■When adjusting the seat position
●Take care when adjusting the seat
position to ensure that other passen-
gers are not injured by the moving
seat.
●Do not put your hands under the seat
or near the moving parts to avoid
injury. Fingers or hands may become
jammed in the se at mechanism.
●Make sure to leave enough space
around the feet so they do not get
stuck.
■Seat adjustment
To reduce the risk of sliding under the lap
belt during a collision, do not recline the
seat more than necessary.
If the seat is too reclined, the lap belt may
slide past the hips and apply restraint
forces directly to the abdomen, or your
neck may contact the shoulder belt,
increasing the risk of death or serious
injury in the event of an accident.
Adjustments should not be made while
driving as the seat may unexpectedly
move and cause the driver to lose control
of the vehicle.
Adjustment procedure
A
B
C
D
E
F
G
Page 142 of 532
1403-3. Adjusting the seats
*:If equipped
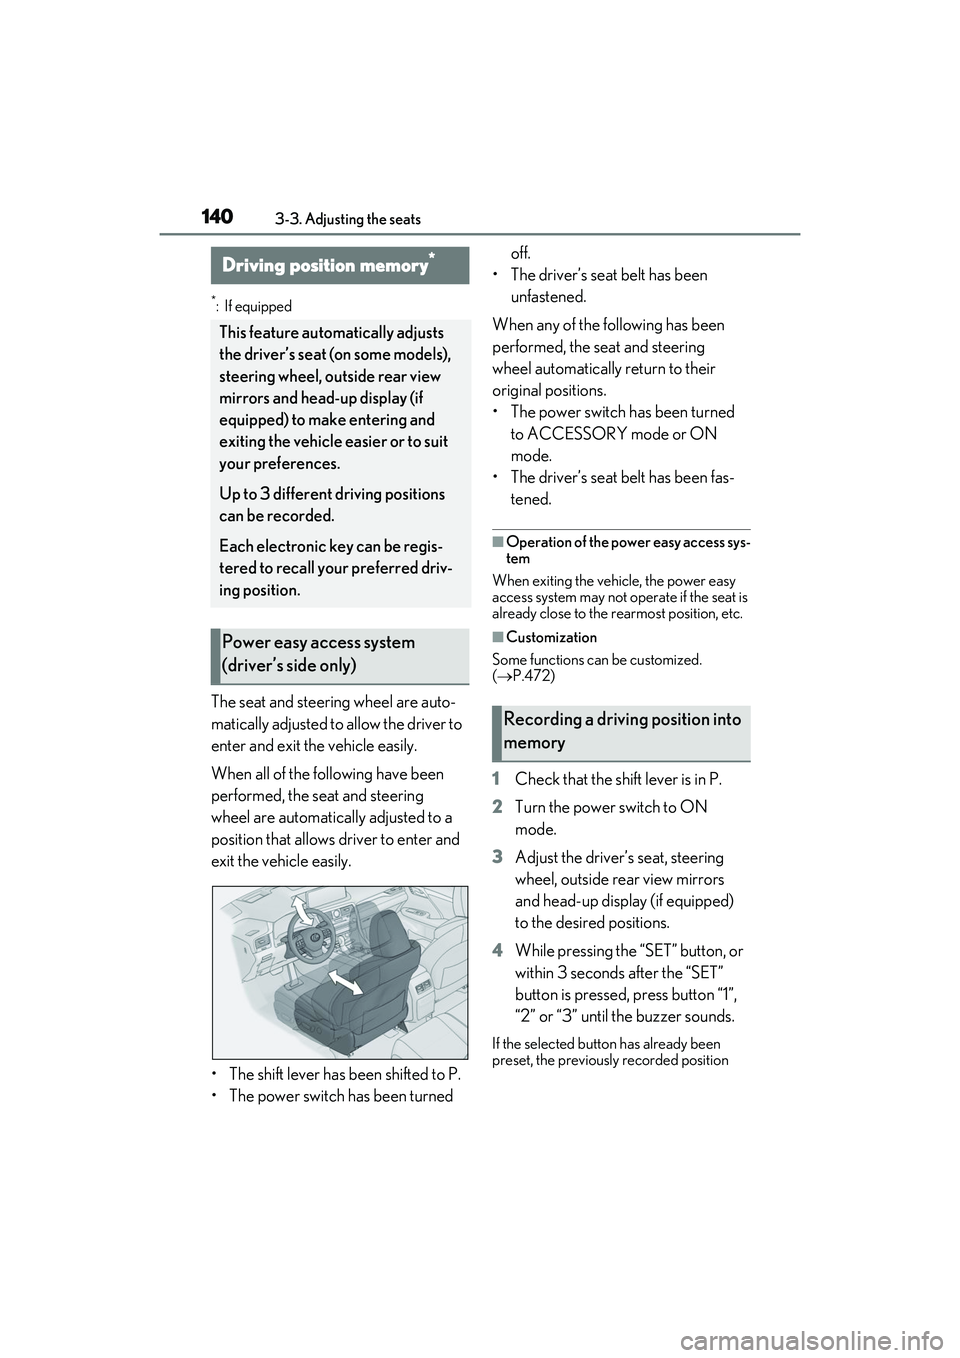
The seat and steering wheel are auto-
matically adjusted to allow the driver to
enter and exit the vehicle easily.
When all of the following have been
performed, the seat and steering
wheel are automatically adjusted to a
position that allows driver to enter and
exit the vehicle easily.
• The shift lever has been shifted to P.
• The power switch has been turned off.
• The driver’s seat belt has been unfastened.
When any of the following has been
performed, the seat and steering
wheel automatically return to their
original positions.
• The power switch has been turned to ACCESSORY mode or ON
mode.
• The driver’s seat belt has been fas- tened.
■Operation of the power easy access sys-
tem
When exiting the vehicle, the power easy
access system may not op erate if the seat is
already close to the rearmost position, etc.
■Customization
Some functions can be customized.
( P.472)
1 Check that the shift lever is in P.
2 Turn the power switch to ON
mode.
3 Adjust the driver’s seat, steering
wheel, outside rear view mirrors
and head-up display (if equipped)
to the desired positions.
4 While pressing the “SET” button, or
within 3 seconds after the “SET”
button is pressed, press button “1”,
“2” or “3” until the buzzer sounds.
If the selected button has already been
preset, the previously recorded position
Driving position memory*
This feature automatically adjusts
the driver’s seat (on some models),
steering wheel, outside rear view
mirrors and head-up display (if
equipped) to make entering and
exiting the vehicle easier or to suit
your preferences.
Up to 3 different driving positions
can be recorded.
Each electronic key can be regis-
tered to recall your preferred driv-
ing position.
Power easy access system
(driver’s side only)
Recording a driving position into
memory
Page 143 of 532
1413-3. Adjusting the seats
3
Before driving
will be overwritten.
■Seat positions that can be memorized
( P.129)
The adjusted positions other than the posi-
tion adjusted by lumbar support switch can
be recorded.
■In order to correctly use the driving
position memory function
If a seat position is already in the furthest
possible position and the seat is operated in
the same direction, the recorded position
may be slightly different when it is recalled.
1 Check that the shift lever is in P.
2 Turn the power switch to ON
mode. 3
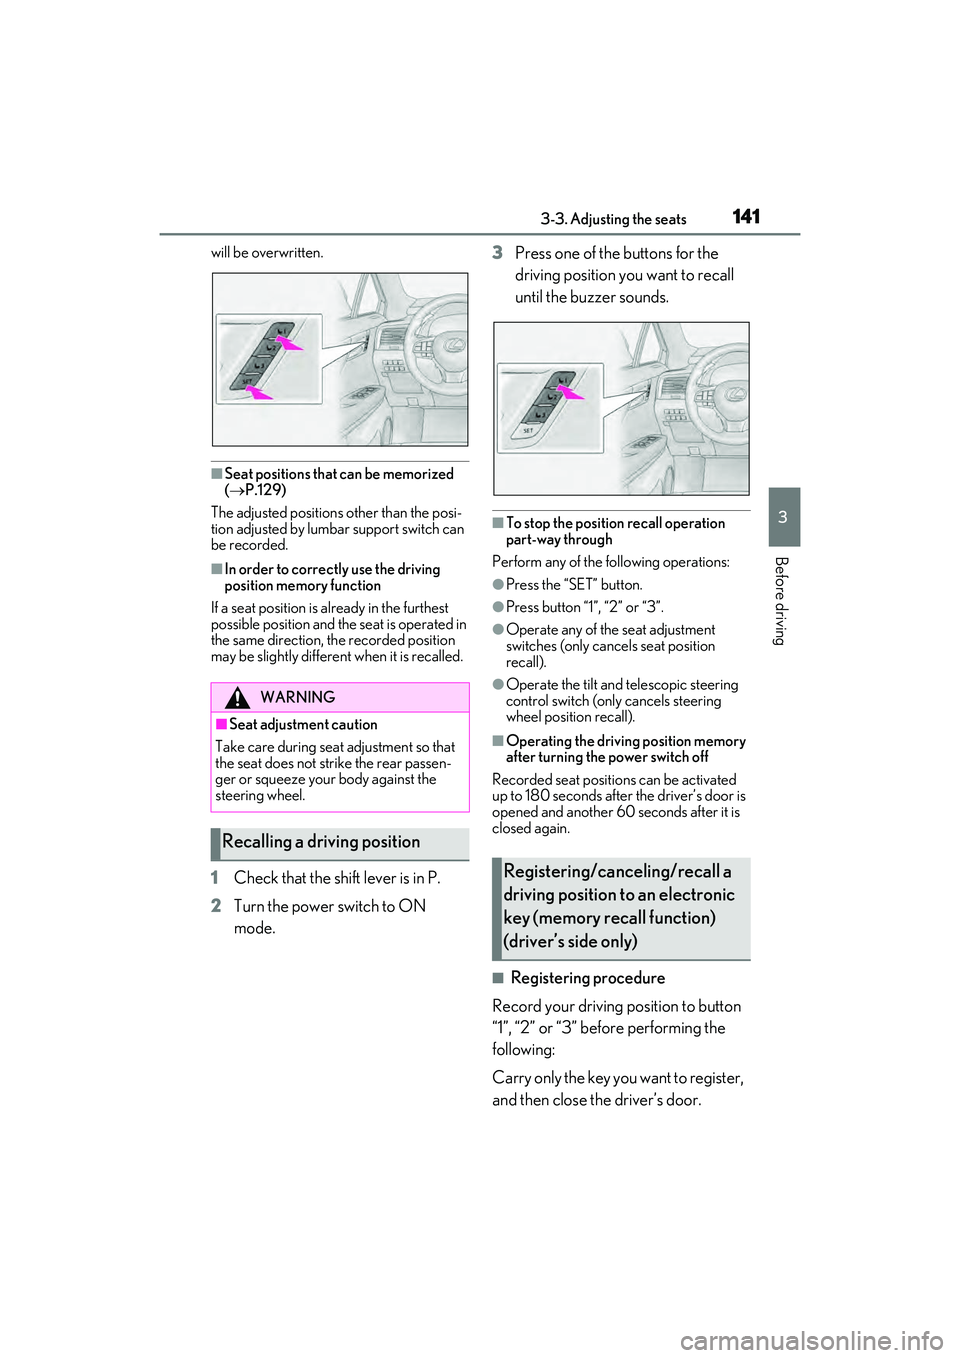
Press one of the buttons for the
driving position you want to recall
until the buzzer sounds.
■To stop the position recall operation
part-way through
Perform any of the following operations:
●Press the “SET” button.
●Press button “1”, “2” or “3”.
●Operate any of the seat adjustment
switches (only cancels seat position
recall).
●Operate the tilt and telescopic steering
control switch (onl y cancels steering
wheel position recall).
■Operating the driving position memory
after turning the power switch off
Recorded seat positions can be activated
up to 180 seconds after the driver’s door is
opened and another 60 seconds after it is
closed again.
■Registering procedure
Record your driving position to button
“1”, “2” or “3” before performing the
following:
Carry only the key yo u want to register,
and then close the driver’s door.
WARNING
■Seat adjustment caution
Take care during seat adjustment so that
the seat does not strike the rear passen-
ger or squeeze your body against the
steering wheel.
Recalling a driving position
Registering/canceling/recall a
driving position to an electronic
key (memory recall function)
(driver’s side only)
Page 144 of 532

1423-3. Adjusting the seats
If 2 or more keys are in the vehicle, the
driving position cannot be recorded
properly.
1Check that the shift lever is in P.
2 Turn the power switch to ON
mode.
3 Recall the driving position that you
want to record.
4 While pressing the recalled button,
press and hold the door lock switch
(either lock or unlock) until the
buzzer sounds.
If the button could not be registered, the
buzzer sounds continuously for approxi-
mately 3 seconds.
■Cancelation procedure
Carry only the key you want to cancel
and then close the driver’s door.
If 2 or more keys are in the vehicle, the
driving position cannot be canceled
properly.
1 Turn the power switch to ON
mode.
2 While pressing the “SET” button,
press and hold the door lock switch
(either lock or unlock) until the
buzzer sounds twice.
If it button could not be canceled, the
buzzer sounds continuously for approxi-
mately 3 seconds.
■Recall procedure
1 Make sure that the doors are
locked before recalling the driving
position. Carry the electronic key
that has been registered to the driv-
ing position, and then unlock and
open the driver’s door using the
smart access system with push-but-
ton start or wireless remote control.
The driving position will move to the
recorded position (not including the steer-
ing wheel and head-up display [if
equipped]). However, the seat will move to
a position slightly behind the recorded
position in order to make entering the vehi-
cle easier.
If the driving position is in a position that
has already been reco rded, the seat and
outside rear view mirrors will not move.
2 Turn the power switch to ACCES-
SORY mode or ON mode, or fas-
ten a seat belt.
The seat, steering wheel and head-up dis-
play (if equipped) will move to the
recorded position.
■Recalling the driving position using the
memory recall function
●Different driving positions can be regis-
tered for each electronic key. Therefore,
the driving position that is recalled may
be different depending on the key being
carried.
●If a door other than the driver’s door is
unlocked with the smart access system
with push-button start, the driving posi-
tion cannot be recalled. In this case, press
the driving position button which has
been set.
■Customization
Some functions can be customized.
( P.472)