steering wheel adjustment LEXUS UX200 2019 Owners Manual
[x] Cancel search | Manufacturer: LEXUS, Model Year: 2019, Model line: UX200, Model: LEXUS UX200 2019Pages: 452, PDF Size: 10.06 MB
Page 25 of 452
251-1. For safe use
1
For safety and security
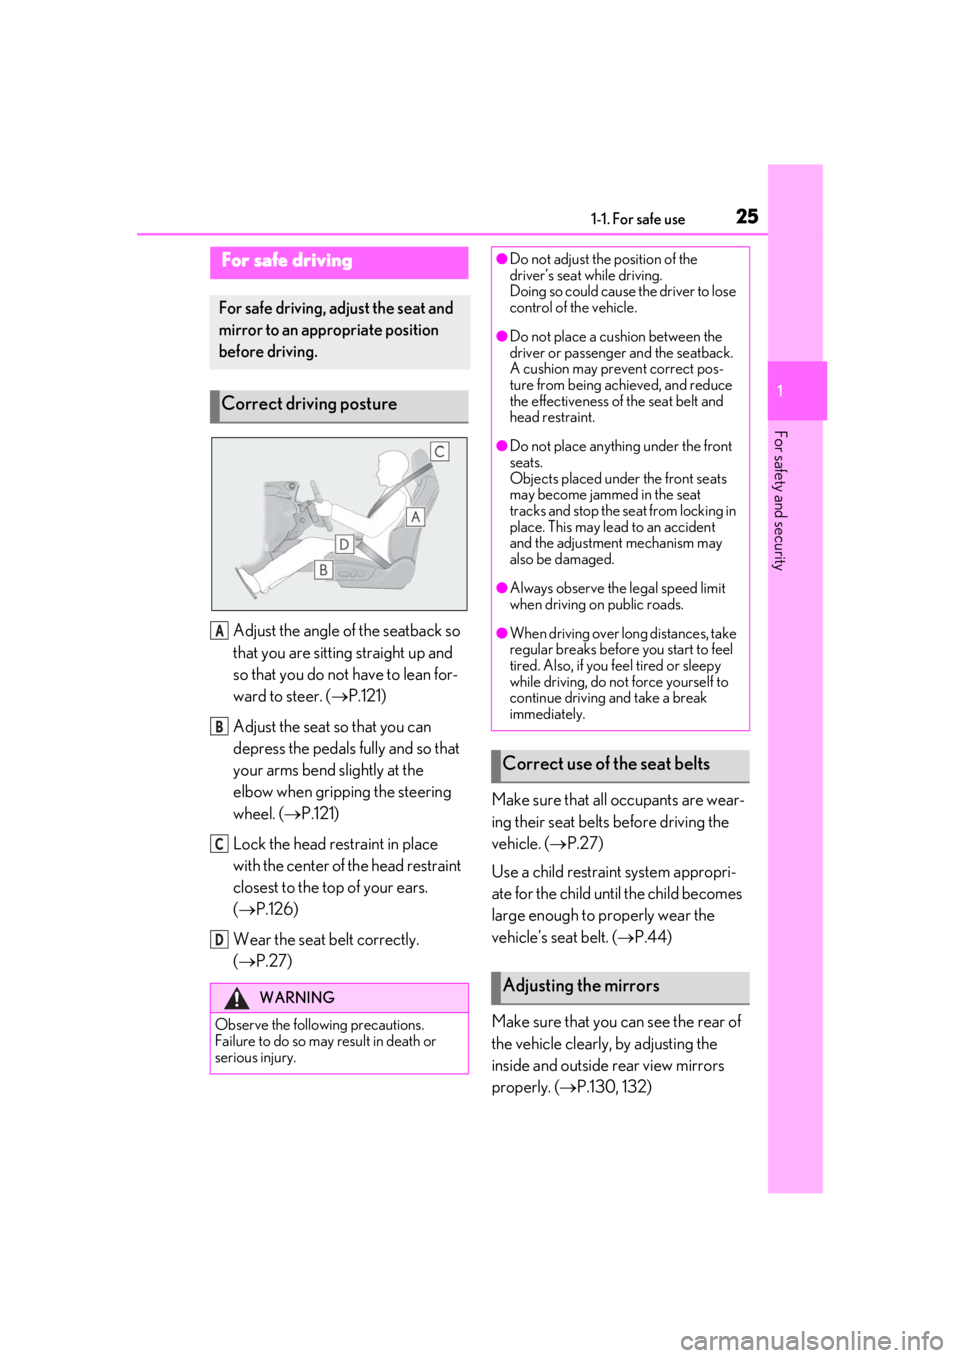
Adjust the angle of the seatback so
that you are sitting straight up and
so that you do not have to lean for-
ward to steer. (P.121)
Adjust the seat so that you can
depress the pedals fully and so that
your arms bend slightly at the
elbow when gripping the steering
wheel. ( P.121)
Lock the head restraint in place
with the center of the head restraint
closest to the top of your ears.
( P.126)
Wear the seat belt correctly.
( P.27) Make sure that all occupants are wear-
ing their seat belts before driving the
vehicle. (
P.27)
Use a child restraint system appropri-
ate for the child until the child becomes
large enough to properly wear the
vehicle’s seat belt. ( P.44)
Make sure that you can see the rear of
the vehicle clearly, by adjusting the
inside and outside rear view mirrors
properly. ( P.130, 132)
For safe driving
For safe driving, adjust the seat and
mirror to an appropriate position
before driving.
Correct driving posture
WARNING
Observe the following precautions.
Failure to do so may result in death or
serious injury.
A
B
C
D
●Do not adjust the position of the
driver’s seat while driving.
Doing so could cause the driver to lose
control of the vehicle.
●Do not place a cushion between the
driver or passenger and the seatback.
A cushion may prevent correct pos-
ture from being achieved, and reduce
the effectiveness of the seat belt and
head restraint.
●Do not place anything under the front
seats.
Objects placed under the front seats
may become jammed in the seat
tracks and stop the seat from locking in
place. This may lead to an accident
and the adjustment mechanism may
also be damaged.
●Always observe the legal speed limit
when driving on public roads.
●When driving over long distances, take
regular breaks before you start to feel
tired. Also, if you feel tired or sleepy
while driving, do not force yourself to
continue driving and take a break
immediately.
Correct use of the seat belts
Adjusting the mirrors
Page 121 of 452
1213-3. Adjusting the seats
3
Before driving
3-3.Adjusting the seats
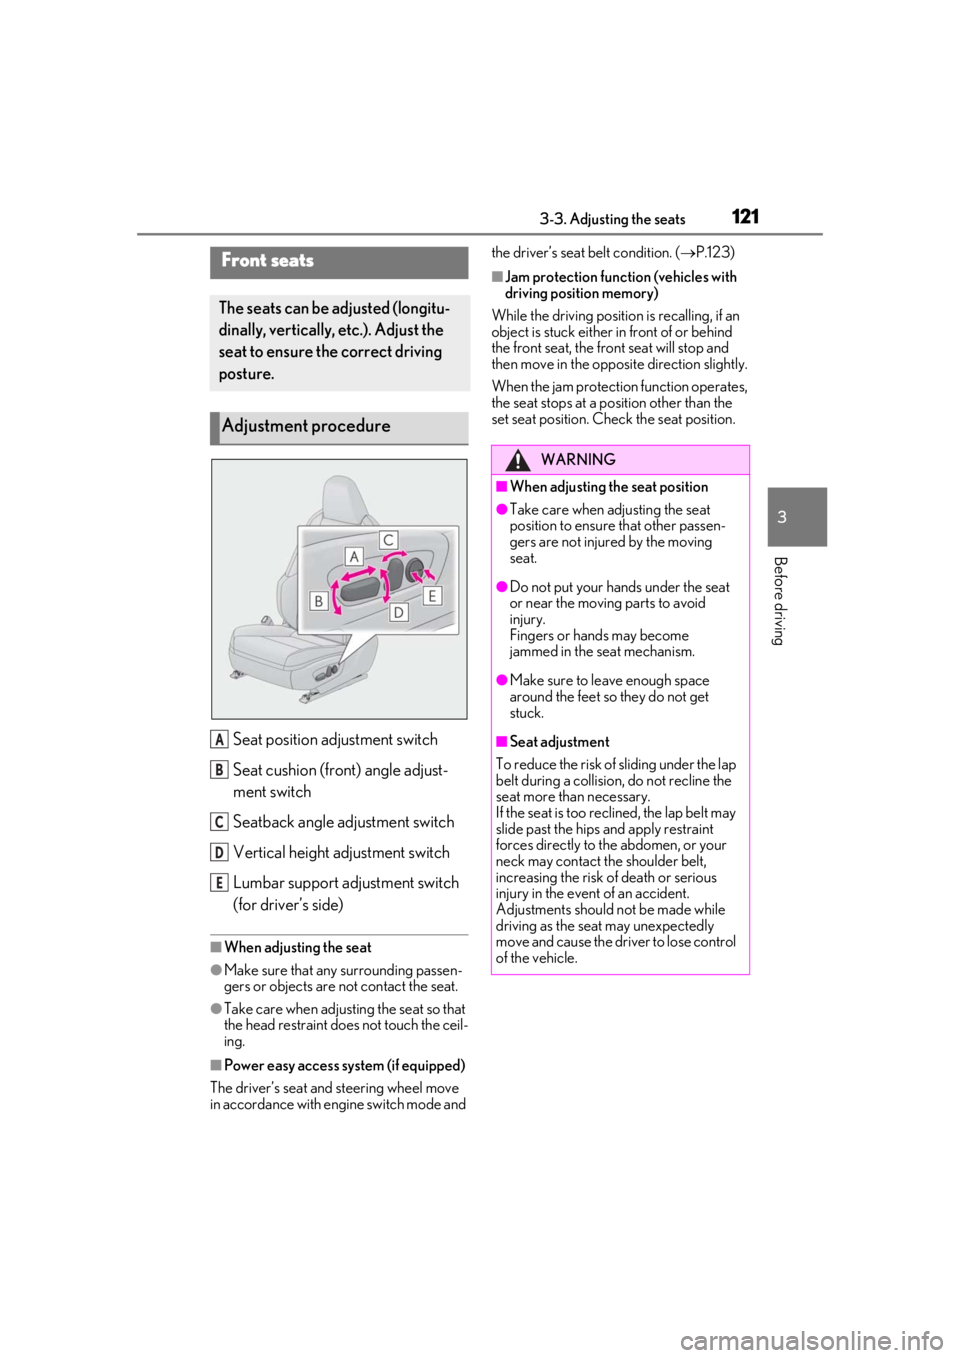
Seat position adjustment switch
Seat cushion (front) angle adjust-
ment switch
Seatback angle adjustment switch
Vertical height adjustment switch
Lumbar support adjustment switch
(for driver’s side)
■When adjusting the seat
●Make sure that any surrounding passen-
gers or objects are not contact the seat.
●Take care when adjusting the seat so that
the head restraint does not touch the ceil-
ing.
■Power easy access system (if equipped)
The driver’s seat and steering wheel move
in accordance with engine switch mode and the driver’s seat belt condition. (
P.123)
■Jam protection function (vehicles with
driving position memory)
While the driving position is recalling, if an
object is stuck either in front of or behind
the front seat, the front seat will stop and
then move in the opposite direction slightly.
When the jam protection function operates,
the seat stops at a po sition other than the
set seat position. Chec k the seat position.Front seats
The seats can be adjusted (longitu-
dinally, vertically, etc.). Adjust the
seat to ensure the correct driving
posture.
Adjustment procedure
A
B
C
D
E
WARNING
■When adjusting the seat position
●Take care when adjusting the seat
position to ensure that other passen-
gers are not injured by the moving
seat.
●Do not put your hands under the seat
or near the moving parts to avoid
injury.
Fingers or hands may become
jammed in the seat mechanism.
●Make sure to leave enough space
around the feet so they do not get
stuck.
■Seat adjustment
To reduce the risk of sliding under the lap
belt during a collision, do not recline the
seat more than necessary.
If the seat is too rec lined, the lap belt may
slide past the hips and apply restraint
forces directly to the abdomen, or your
neck may contact the shoulder belt,
increasing the risk of death or serious
injury in the event of an accident.
Adjustments should not be made while
driving as the seat may unexpectedly
move and cause the driver to lose control
of the vehicle.
Page 124 of 452
1243-3. Adjusting the seats
unfastened.
When any of the following has been
performed, the driver’s seat and steer-
ing wheel automatically return to their
original positions.
The engine switch has been turned
to ACC or ON.
The driver’s seat belt has been fas-
tened.
■Operation of the power easy access sys-
tem
When exiting the vehicle, the power easy
access system may not operate if the seat is
already close to the rearmost position, etc.
■Customization
The seat movement amou nt settings of the
power easy access sy stem can be custom-
ized. (Customizable features: P.413)
1Check that the shift lever is in P.
2
Turn the engine switch to ON.
3
Adjust the driver’s seat, steering
wheel, outside rear view mirrors
and head-up display (if equipped)
to the desired positions.
4
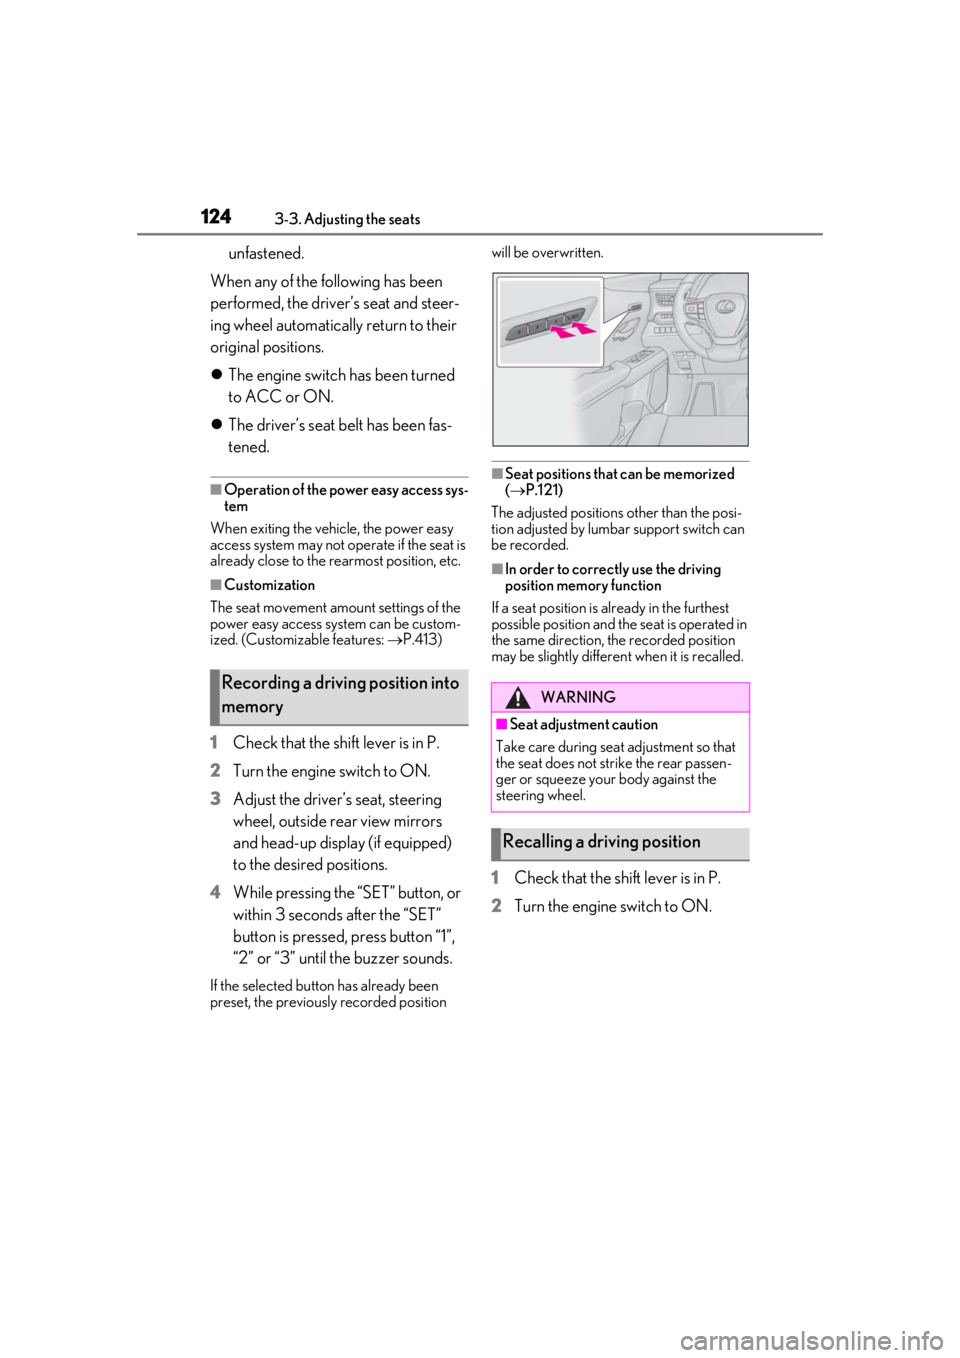
While pressing the “SET” button, or
within 3 seconds after the “SET”
button is pressed, press button “1”,
“2” or “3” until the buzzer sounds.
If the selected button has already been
preset, the previously recorded position will be overwritten.
■Seat positions that can be memorized
(
P.121)
The adjusted positions other than the posi-
tion adjusted by lumbar support switch can
be recorded.
■In order to correctly use the driving
position memory function
If a seat position is already in the furthest
possible position and the seat is operated in
the same direction, the recorded position
may be slightly differen t when it is recalled.
1Check that the shift lever is in P.
2
Turn the engine switch to ON.
Recording a driving position into
memoryWARNING
■Seat adjustme nt caution
Take care during seat adjustment so that
the seat does not strike the rear passen-
ger or squeeze your body against the
steering wheel.
Recalling a driving position
Page 125 of 452
1253-3. Adjusting the seats
3
Before driving
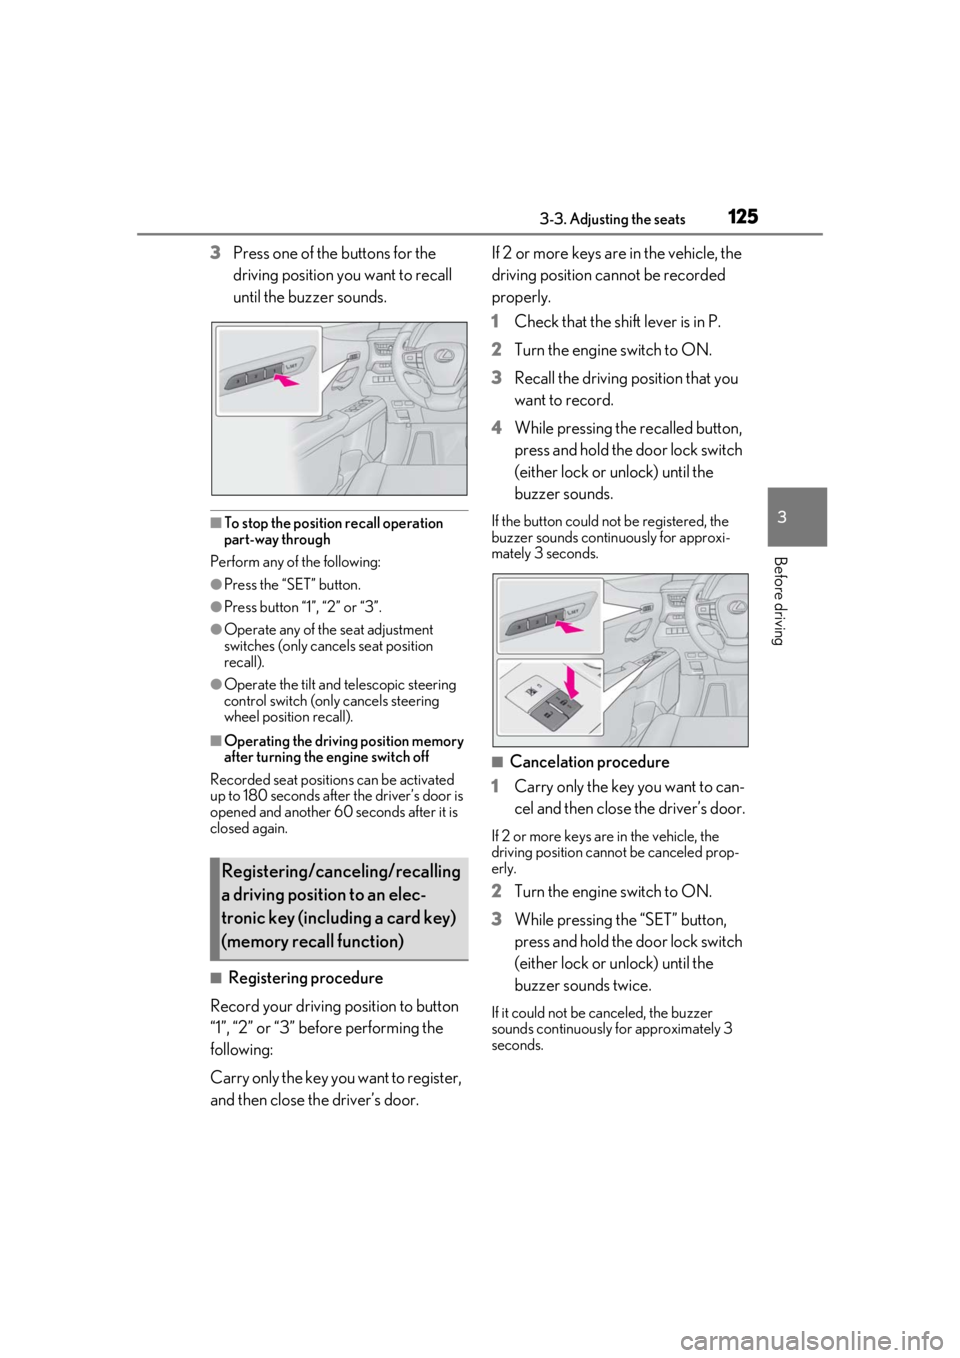
3Press one of the buttons for the
driving position you want to recall
until the buzzer sounds.
■To stop the position recall operation
part-way through
Perform any of the following:
●Press the “SET” button.
●Press button “1”, “2” or “3”.
●Operate any of the seat adjustment
switches (only cancels seat position
recall).
●Operate the tilt and telescopic steering
control switch (only cancels steering
wheel position recall).
■Operating the driving position memory
after turning the engine switch off
Recorded seat positions can be activated
up to 180 seconds after the driver’s door is
opened and another 60 seconds after it is
closed again.
■Registering procedure
Record your driving position to button
“1”, “2” or “3” before performing the
following:
Carry only the key you want to register,
and then close the driver’s door. If 2 or more keys are in the vehicle, the
driving position cannot be recorded
properly.
1
Check that the shift lever is in P.
2 Turn the engine switch to ON.
3 Recall the driving position that you
want to record.
4 While pressing the recalled button,
press and hold the door lock switch
(either lock or unlock) until the
buzzer sounds.
If the button could not be registered, the
buzzer sounds continuously for approxi-
mately 3 seconds.
■Cancelation procedure
1 Carry only the key you want to can-
cel and then close the driver’s door.
If 2 or more keys are in the vehicle, the
driving position cannot be canceled prop-
erly.
2Turn the engine switch to ON.
3 While pressing the “SET” button,
press and hold the door lock switch
(either lock or unlock) until the
buzzer sounds twice.
If it could not be canceled, the buzzer
sounds continuously for approximately 3
seconds.
Registering/canceling/recalling
a driving position to an elec-
tronic key (including a card key)
(memory recall function)
Page 126 of 452
1263-3. Adjusting the seats
■Recall procedure
1
Make sure that the doors are
locked before recalling the driving
position.Carry the electronic key
that has been registered to the driv-
ing position, and then unlock and
open the driver’s door using the
smart access system with push-but-
ton start or wireless remote control.
The driving position will move to the
recorded position (not including the steer-
ing wheel and head-up display [if
equipped]). However, the seat will move to
a position slightly behind the recorded
position in order to make entering the vehi-
cle easier.
If the driving position is in a position that
has already been recorded, the seat and
outside rear view mirrors will not move.
2Turn the engine switch to ACC or
ON, or fasten a seat belt.
The seat, steering wheel and head-up dis-
play (if equipped) will move to the
recorded position.
■Recalling the driving position using the
memory recall function
●Different driving positions can be regis-
tered for each electronic key. Therefore,
the driving position that is recalled may
be different depending on the key being
carried.
●If a door other than the driver’s door is
unlocked with the smart access system
with push-button start, the driving posi-
tion cannot be recalled. In this case, press
the driving position button which has
been set.
■Customization
The unlock door settings of the memory
recall function can be customized. (Cus-
tomizable features: P.413)
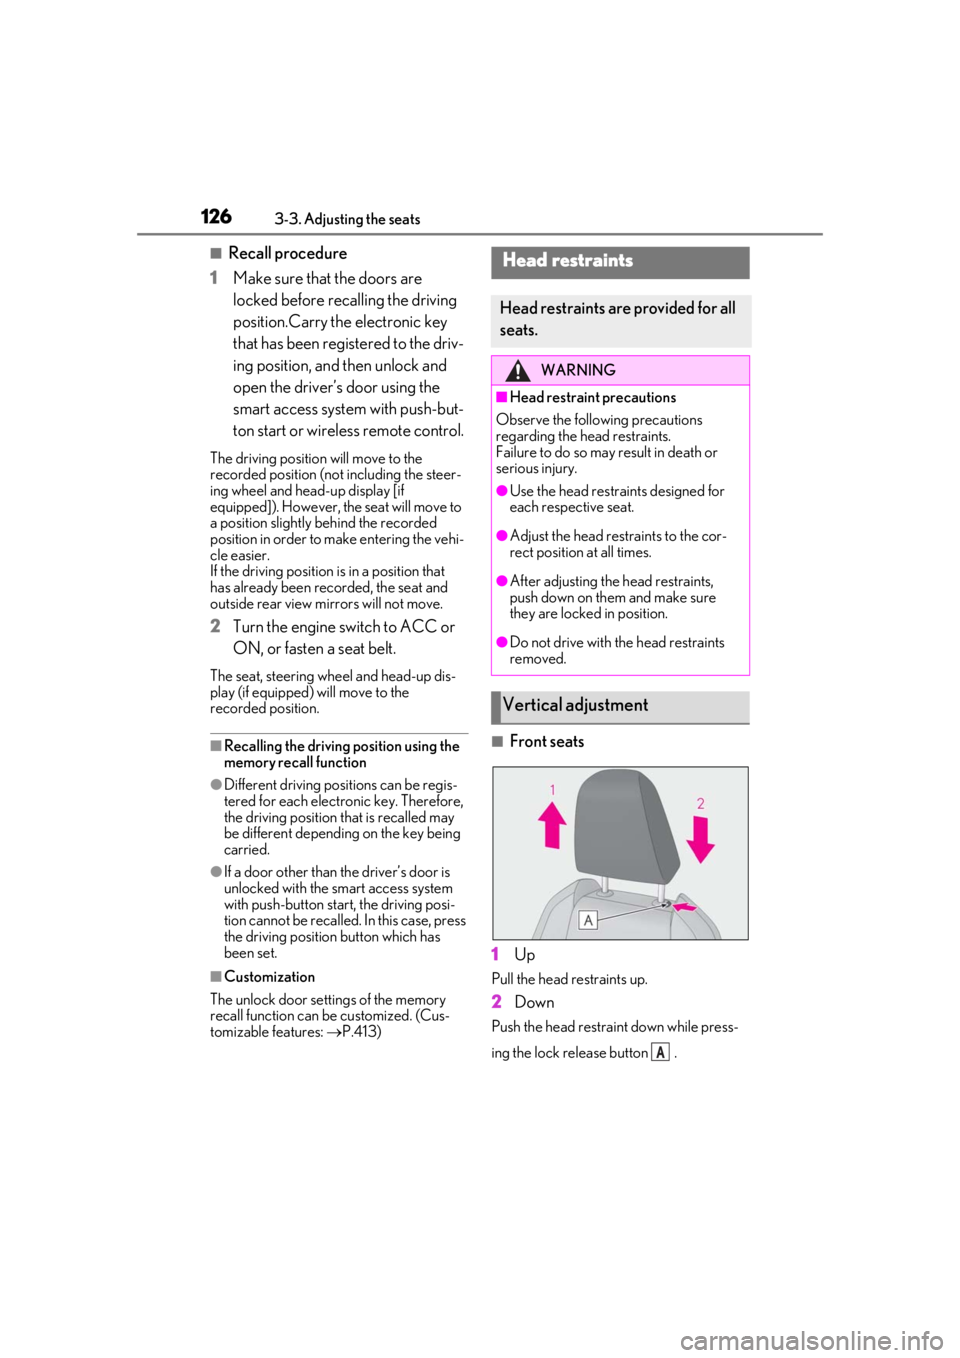
■Front seats
1
Up
Pull the head restraints up.
2Down
Push the head restraint down while press-
ing the lock release button .
Head restraints
Head restraints are provided for all
seats.
WARNING
■Head restraint precautions
Observe the following precautions
regarding the he ad restraints.
Failure to do so may result in death or
serious injury.
●Use the head restraints designed for
each respective seat.
●Adjust the head restraints to the cor-
rect position at all times.
●After adjusting the head restraints,
push down on them and make sure
they are locked in position.
●Do not drive with the head restraints
removed.
Vertical adjustment
A
Page 129 of 452
1293-4. Adjusting the steering wheel and mirrors
3
Before driving
3-4.Adjusting the steering wheel and mirrors
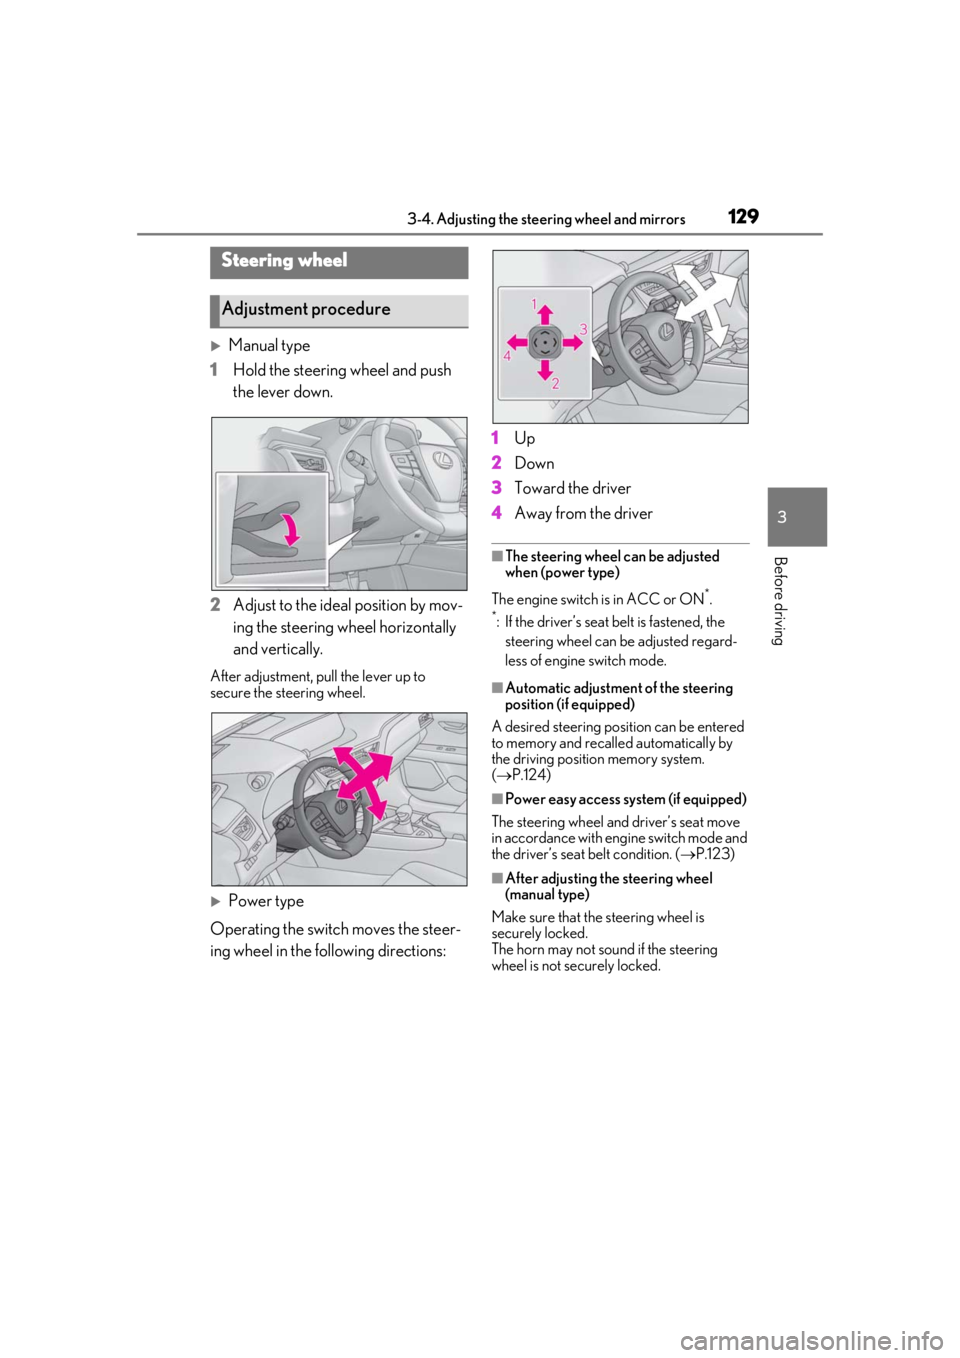
Manual type
1 Hold the steering wheel and push
the lever down.
2 Adjust to the ideal position by mov-
ing the steering wheel horizontally
and vertically.
After adjustment, pull the lever up to
secure the steering wheel.
Power type
Operating the switch moves the steer-
ing wheel in the following directions: 1
Up
2 Down
3 Toward the driver
4 Away from the driver
■The steering wheel can be adjusted
when (power type)
The engine switch is in ACC or ON
*.
*: If the driver’s seat belt is fastened, the
steering wheel can be adjusted regard-
less of engine switch mode.
■Automatic adjustment of the steering
position (if equipped)
A desired steering posi tion can be entered
to memory and recalled automatically by
the driving position memory system.
( P.124)
■Power easy access system (if equipped)
The steering wheel and driver’s seat move
in accordance with engine switch mode and
the driver’s seat belt condition. ( P.123)
■After adjusting the steering wheel
(manual type)
Make sure that the steering wheel is
securely locked.
The horn may not sound if the steering
wheel is not securely locked.
Steering wheel
Adjustment procedure
Page 132 of 452
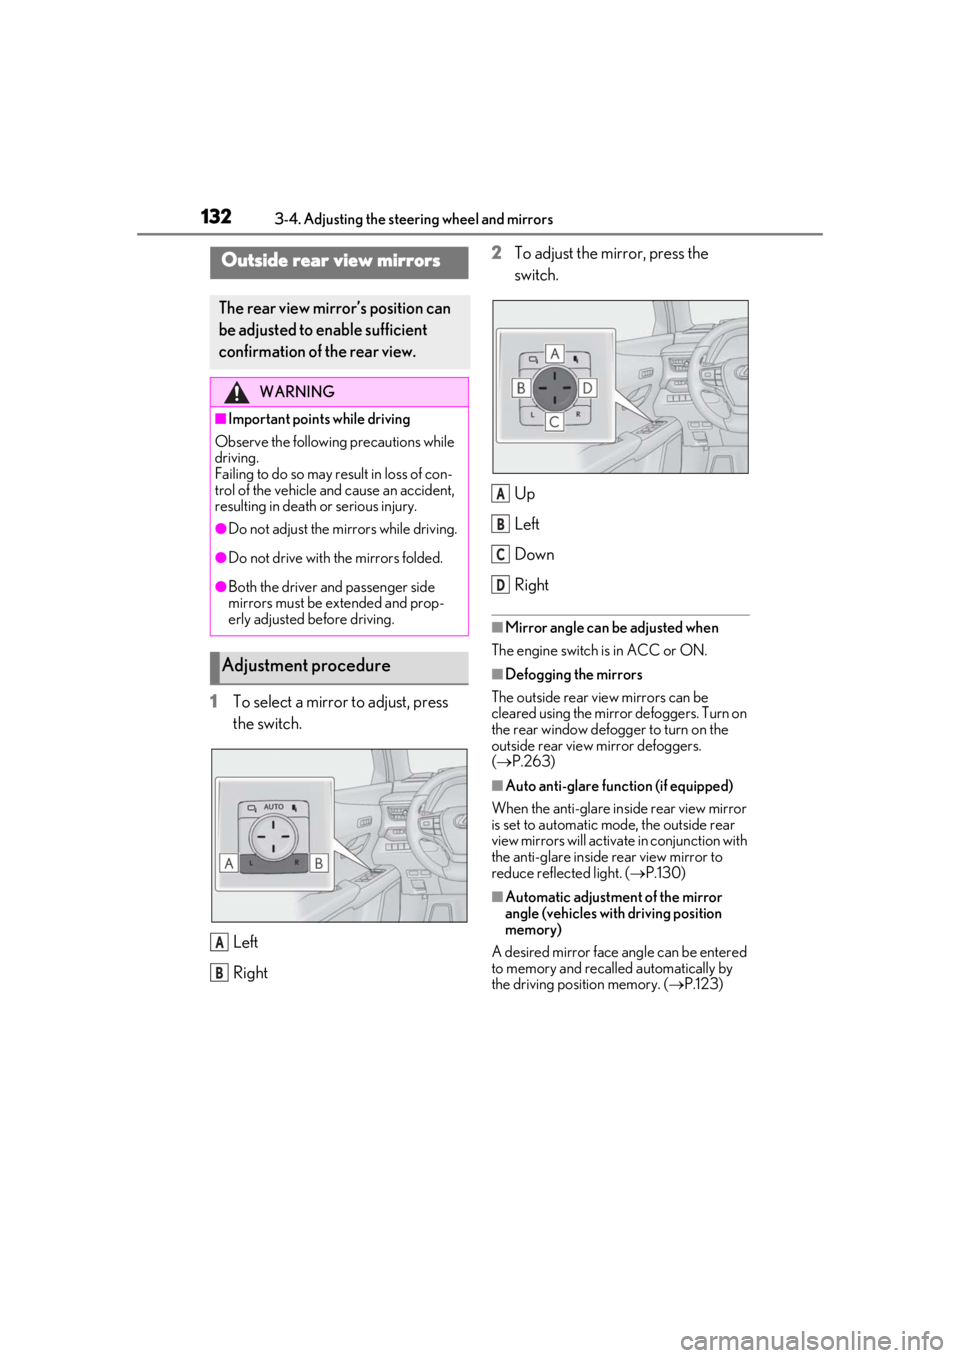
1323-4. Adjusting the steering wheel and mirrors
1To select a mirror to adjust, press
the switch.
Left
Right2
To adjust the mirror, press the
switch.
Up
Left
Down
Right
■Mirror angle can be adjusted when
The engine switch is in ACC or ON.
■Defogging the mirrors
The outside rear view mirrors can be
cleared using the mirror defoggers. Turn on
the rear window defogger to turn on the
outside rear view mirror defoggers.
( P.263)
■Auto anti-glare function (if equipped)
When the anti-glare inside rear view mirror
is set to automatic mode, the outside rear
view mirrors will activate in conjunction with
the anti-glare inside rear view mirror to
reduce reflec ted light. (P.130)
■Automatic adjustment of the mirror
angle (vehicles with driving position
memory)
A desired mirror face angle can be entered
to memory and recalled automatically by
the driving position memory. ( P.123)
Outside rear view mirrors
The rear view mirror’s position can
be adjusted to enable sufficient
confirmation of the rear view.
WARNING
■Important points while driving
Observe the following precautions while
driving.
Failing to do so may result in loss of con-
trol of the vehicle and cause an accident,
resulting in death or serious injury.
●Do not adjust the mirrors while driving.
●Do not drive with the mirrors folded.
●Both the driver and passenger side
mirrors must be extended and prop-
erly adjusted before driving.
Adjustment procedure
A
B
A
B
C
D
Page 134 of 452

1343-4. Adjusting the steering wheel and mirrors
The memorized downward tilt position of
the mirror is linked to the normal position
(angle adjusted with the shift lever in other
than R). Therefore, if the normal position is
changed after adjustment, the tilt position
will also change.
When the normal position is changed,
readjust the angle in reversing.
Page 365 of 452
3657-2. Steps to take in an emergency
7
When trouble arises
If the tire pressure warning light blinks for
approximately 1 minute then stays on
There may be a malfunction in the tire pres-
sure warning system. Have the vehicle
inspected by your Lexus dealer immedi-
ately.
If the tire pressure warning light comes
on
1
After the temperature of the tires has
lowered sufficiently, check the inflation
pressure of each tire and adjust them to
the specified level.
2
If the warning light does not turn off
even after several minutes have
elapsed, check that the inflation pres-
sure of each tire is at the specified level
and perform initialization. ( P.333)
■The tire pressure warning light may
come on due to natural causes
The tire pressure warning light may come
on due to natural causes such as natural air
leaks and tire inflation pressure changes
caused by temperature. In this case, adjust-
ing the tire inflation pressure will turn off the
warning light (after a few minutes).
■When a tire is replaced with a spare tire
The compact spare tire is not equipped with
a tire pressure warning valve and transmit-
ter. If a tire goes flat, the tire pressure warn-
ing light will not turn off even though the flat
tire has been replaced with the spare tire.
Replace the spare tire with the repaired tire
and adjust the tire inflation pressure. The
tire pressure warning lig ht will go off after a
few minutes.
■Conditions that the tire pressure warn-
ing system may not function properly
P.331
WARNING
■If both the ABS and the brake system
warning lights remain on
Stop your vehicle in a safe place immedi-
ately and contact your Lexus dealer.
The vehicle will become extremely
unstable during braking, and the ABS
system may fail, which could cause an
accident resulting in death or serious
injury.
■When the electric power steering
system warning light comes on
When the light comes on yellow, the
assist to the power st eering is restricted.
When the light comes on red, the assist
to the power steering is lost and handling
operations of the steering wheel become
extremely heavy.
When steering wheel operations are
heavier than usual, grip the steering
wheel firmly and operate it using more
force than usual.
■If the tire pressure warning light
comes on (vehicles without run-flat
tires)
Be sure to observe the following precau-
tions.
Failure to do so could cause a loss of
vehicle control and result in death or
serious injury.
●Stop your vehicle in a safe place as
soon as possible. Check and adjust the
tire inflation pre ssure immediately.
●If the tire pressure warning light comes
on even after tire inflation pressure
adjustment, it is prob able that you have
a flat tire. Check the tire s. If a tire is flat,
change it with the spare tire and have
the flat tire repaired by the nearest
Lexus dealer.
WARNING
●Avoid abrupt maneuvering and brak-
ing.
If the vehicle tires deteriorate, you
could lose control of the steering
wheel or the brakes.
Page 366 of 452
3667-2. Steps to take in an emergency
■If the tire pressure warning light
comes on (vehicles with run-flat tires)
Be sure to observe the following precau-
tions.
Failure to do so could cause a loss of
vehicle control and result in death or
serious injury.
●Decelerate to the lowest appropriate
speed as soon as possible. Do not
drive over 50 mph (80 km/h).
●Check and adjust the tire inflation
pressure immediately.
●If the tire pressure warning light comes
on even after tire inflation pressure
adjustment, it is probable that you have
a flat tire. Have the flat tire replaced by
the nearest Lexus dealer.
●Avoid abrupt maneuvering and brak-
ing.
If the vehicle tires deteriorate, you
could lose control of the steering
wheel or the brakes.
■If a blowout or sudden air leakage
should occur
The tire pressure warning system may
not activate immediately.
■Maintenance of the tires
Each tire, including the spare (if pro-
vided), should be checked monthly when
cold and inflated to the inflation pressure
recommended by the vehicle manufac-
turer on the vehicle placard or tire infla-
tion pressure label (tire and load
information label). (I f your vehicle has
tires of a different size than the size indi-
cated on the vehicle placard or tire infla-
tion pressure label [tire and load
information label], yo u should determine
the proper tire infl ation pressure for
those tires.)
As an added safety fe ature, your vehicle
has been equipped with a tire pressure
monitoring system (TPMS-tire pressure
warning system) that illuminates a low
tire pressure telltale (tire pressure warn-
ing light) when one or more of your tires
is significantly under-inflated. Accord-
ingly, when the low ti re pressure telltale
(tire pressure warning light) illuminates,
you should stop and check your tires as
soon as possible, and inflate them to the
proper pressure. Driving on a signifi-
cantly under-inflated tire causes the tire
to overheat and can lead to tire failure.
Under-inflation also reduces fuel effi-
ciency and tire tread life, and may affect
the vehicle’s handling and stopping abil-
ity.
Please note that the TPMS (tire pressure
warning system) is not a substitute for
proper tire maintenance, and it is the
driver’s responsibility to maintain correct
tire pressure, even if under-inflation has
not reached the level to trigger illumina-
tion of the TPMS low tire pressure telltale
(tire pressure warning light).
Your vehicle has also been equipped with
a TPMS (tire pressure warning system)
malfunction indicator to indicate when
the system is not operating properly. The
TPMS (tire pressure warning system)
malfunction indicator is combined with
the low tire pressure telltale (tire pres-
sure warning light) . When the system
detects a malfunction, the telltale will
flash for approximately one minute and
then remain continuously illuminated.
This sequence will continue upon subse-
quent vehicle start-ups as long as the
malfunction exists. When the malfunction
indicator is illuminated, the system may
not be able to detect or signal low tire
pressure as intended.